So, your organization has built in defenses against phishing threats. Congratulations! But tell me, what will you do when you face real attacks in the future? Is your organization willing to share this information with others? Will your company collect and store data about attacks to prevent future attempts? Will you analyze exploit code found in phishing emails used to distribute a malicious dropper and ultimately ransomware? When a security incident occurs, three useful things should happen. First, the organization must automate the response by using software that either actively blocks the attack or runs a script to stop the incident in progress. Second, the company can collect information about each attack to reduce its detection and response time in the future.
Ultimately, an organization can share some of this information with others, which allows for a mutual reduction in detection and response time. While some threat intelligence collection channels are useless or not entirely legal, many are legitimate and useful. But it would be naive to rely solely on a third party that has provided you with the data you need to protect the environment your organization has created and is responsible for. While getting input from experts who have insight into trends and actors is a smart move, it shouldn’t be the only one. In this section, we’ll look at the process of collecting threat intelligence related to phishing emails using a free data sharing platform: AT&T Alien Labs OTX, sometimes called AlienVault OTX. We’ll also reuse many of the OSINT techniques you learned about earlier in this book, this time for the opposite purpose of checking whether a URL or email address is malicious.
Using Alien Labs OTX
Some threat intelligence providers charge the organization to use the data, while others charge the organization to generate the data. But one vendor that is completely free and allows anyone to contribute is AT&T Cybersecurity. Formerly known as AlienVault, this company operates the Alien Labs Open Threat Exchange (OTX) platform, which allows you to subscribe to cybersecurity channels and publish your own information.
Admittedly, the main strength of this platform (free) is also its main weakness, but the positive is that you don’t have to consume any information just because it’s on the platform; You have to choose which channels you are interested in and subscribe to them for free.
If an organization uses Unified Security Monitoring (USM) or Open Source SEIM (OSSIM), it can load signed data directly into USM by synchronizing SEIM with the OTX API. If an organization does not use USM, it can directly connect OTX to Suricata, Bro and Trusted Automated Exchange of Indicator Information (TAXII) frameworks; otherwise, it can use Java, Python, or Go APIs.
As soon as the organization has indicators in the desired format, it can immediately start searching for them in its communications using the method chosen for itself – custom scripts, YARA, STIX, TAXII or something similar. This will allow the organization to identify and respond to known threats.
Analysis of phishing mailings in OTX
What about threats that only your organization has monitored? How can it better detect future attempts and perhaps save other organizations from the same headaches later? Here’s a simple answer: create threat intelligence.
Many organizations don’t do this for the simple reason that they don’t know where to start. Since this is a separate chapter in the book on social engineering and OSINT, I’ll spare you the philosophical justifications for creating threat intelligence. Instead, let’s do an exercise.
First, you’ll need some data to analyze. This can be an email, a website or a file. To cover all three aspects, suppose an organization receives an email directing users to a website that prompts them to enter credentials, and then downloads and attempts to execute the file when the user submits the credentials. You can use the file named invoice.eml in the GitHub repository at https://cti.seosint.xyz/.
Creating momentum
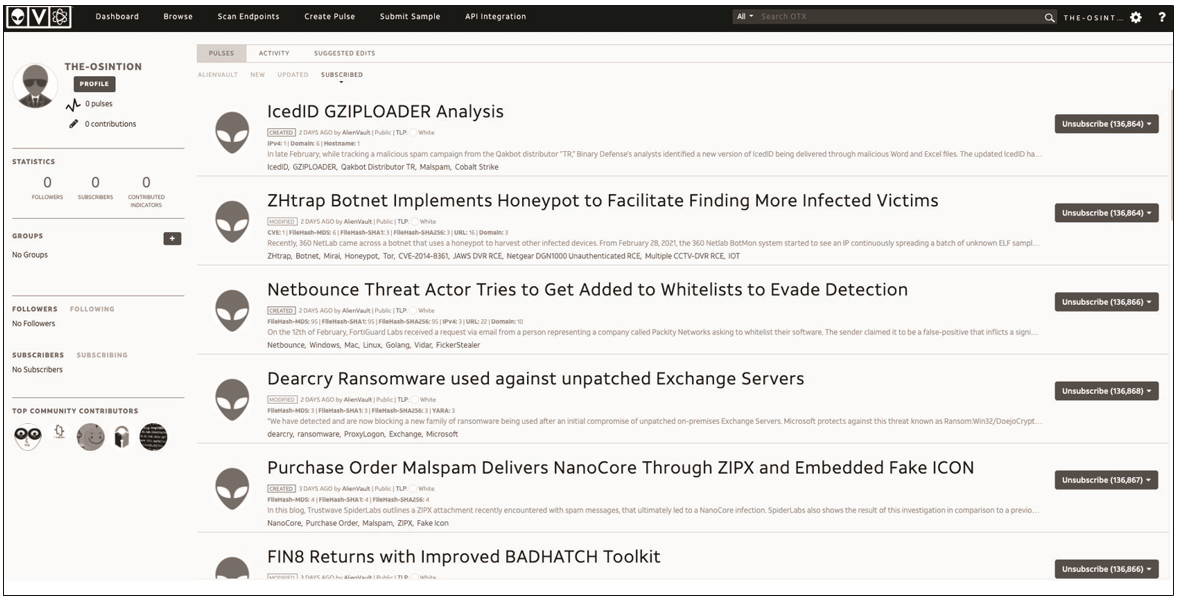
In OTX, a pulse is a set of indicators of compromise for a specific attack. Log in to OTX and select Create Pulse from the OTX dashboard where you will be presented each time you log in (see Figure 12.1).
Fig. 12.1. OTX control panel
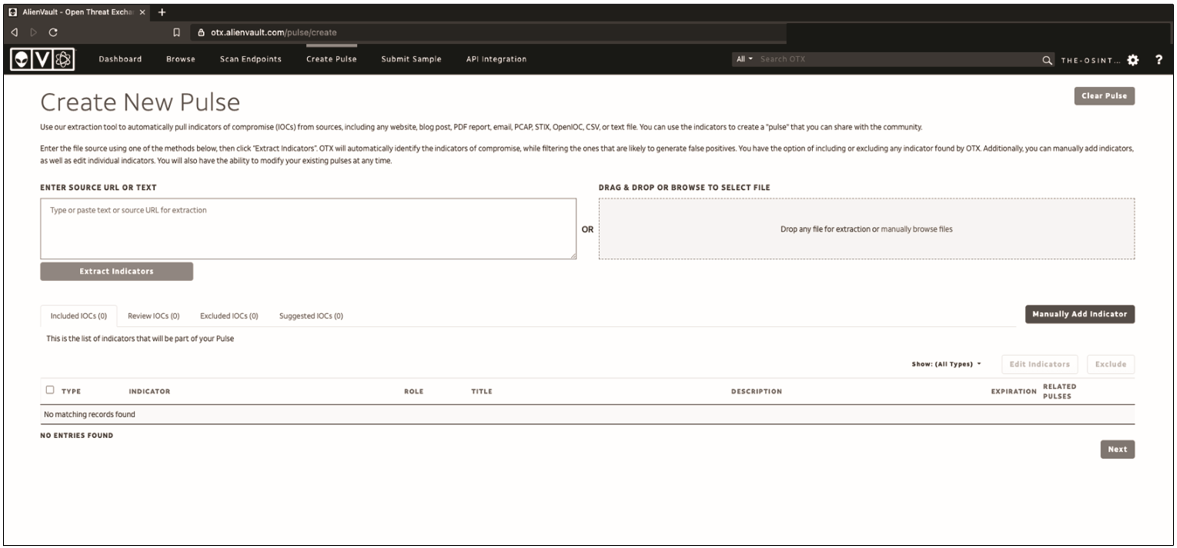
You will be offered several options for creating a pulse (Fig. 12.2). You can import text or a website, or you can manually enter the indicators.
Fig. 12.2. Creating a pulse in OTX
Let’s start by copying and pasting the entire email source.
Email source analysis
I like to use Thunderbird to view the source of an email. It is a free and open source mail client supported by Mozilla. Once Thunderbird is installed and running, you can import any saved emails into OTX in .eml format and start analyzing.
First, open your Thunderbird email. Then, in the upper right corner, select More View Source, as shown in Fig. 12.3.
Fig. 12.3. View email source in Thunderbird
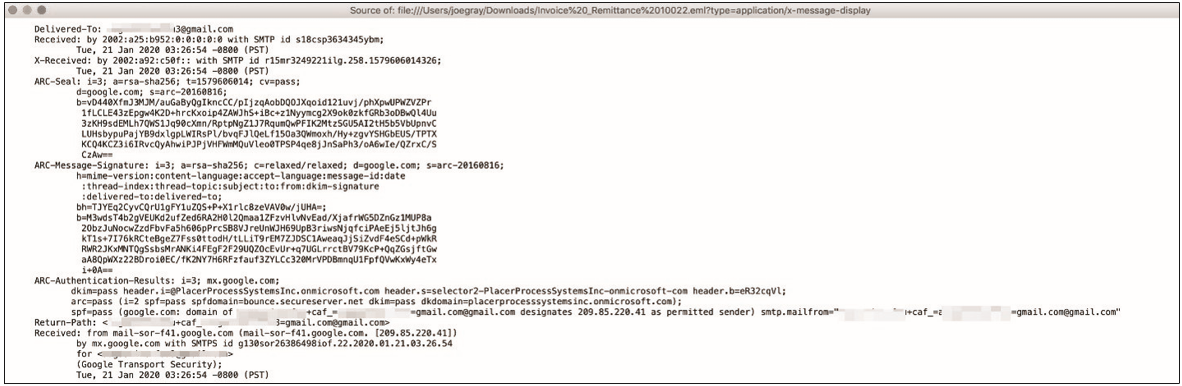
Once the email is open as a source, you should see something like the snippet in Fig. 12.4. This is the basic set of data that is transmitted when sending an email, including all checks performed, as well as the sender and recipients of the email. You can view any email you’ve downloaded this way, sometimes even in the email client itself. For example, in Gmail, click the three dots in the upper-right corner of an email, then select Show Original.
Fig. 12.4. The source of the phishing email
Why is it important to view the source of an email? This allows you to see where the email actually came from, rather than relying on a potentially spoofed sender address. You’ll see both the real and fake email addresses, as well as the sender’s IP address.
When copying and pasting this email on impulse, be careful not to include the IP address of your mail server or any other addresses belonging to reputable email providers. If you add them and start searching, you will get a huge number of false positives, which, if set up incorrectly, will cause complacency.
Introduction of indicators
Now that you have the information from the source, you’re ready to import some metrics. Indicators are data points associated with activity that you capture in a pulse. In the table Table 12.1 shows indicators that accept OTX.
Indicators used in OTX
IPv4 – The IPv4 address of the source, mail, server or site hosting the phishing or malware.
IPv6 – The IPv6 address of the source, mail, server or site hosting the phishing or malware.
Domain – The domain “on” which is “located” the mail, the sender’s server, or the phishing site.
Hostname – The name, host, or subdomain of the source, mail server, or site on which phishing or malicious programs are hosted.
Email – E-mail address of the sender.
URL – A uniform pointer to the resource (URL) of the site where the phishing or malicious program is hosted.
Filehash – A one-way, cryptographic, representation of a malicious file contained in a phishing email. It can be done in a variety of formats, including the following:
MD5: 128-bit, cryptographic representation of the file using the Message Digest 5 algorithm;
SHA-1: 160-bit, cryptographic representation of a file using a secure hashing algorithm;
SHA-256: A 256-bit, cryptographic representation of a file using a 265-bit secure hashing algorithm.
PEHASH – Portable Executable Hash (peHash) is a fuzzy hashing method, which instead of hashing the whole file performs byte limits of the file and hashing them.
IMPASH – Hash import; similar to peHash, but tracks DLLs and other files imported by code.
CIDR -Address, classless, cross-domain, routing, range, network, IP addresses that have “domain expressed” as a “base” IP address, capabilities. The format usually used is xxx.xxx.xxx.xxx/yy, where xxx. xxx.xxx.xxx is the base IPv4 address, and yy is a number from 1 to 32, indicating the number of possible subnets and hosts. Typically, you’ll see numbers between 24 and 32 in this range.
Filepath – A unique location on the workstation where malicious files are detected.
MUTEX – A mutual exclusion object (mutual exclusion object, MUTEX) is an object in a program designed to use a resource somewhere, something, a few times at the same time, for example, access to a file.
CVE – Common “Vulnerabili-ties” and “Exposures, CVE” – “responsibly” disclosed vulnerabilities. Enabling “CVE”, “pulse” allows “others” to search for “CVE” when “subscribing” to channels. This is especially useful when a phishing email is trying to perform an exploit based on an existing vulnerability.
YARA is an acronym that can be read either as Yet Another Recursive Acronym or Yet Another Regular Expression Analyzer. It is a tool for matching patterns in files and iterating in an environment using SEIM or a special YARA tool that supports Windows, MacOS, and Linux.
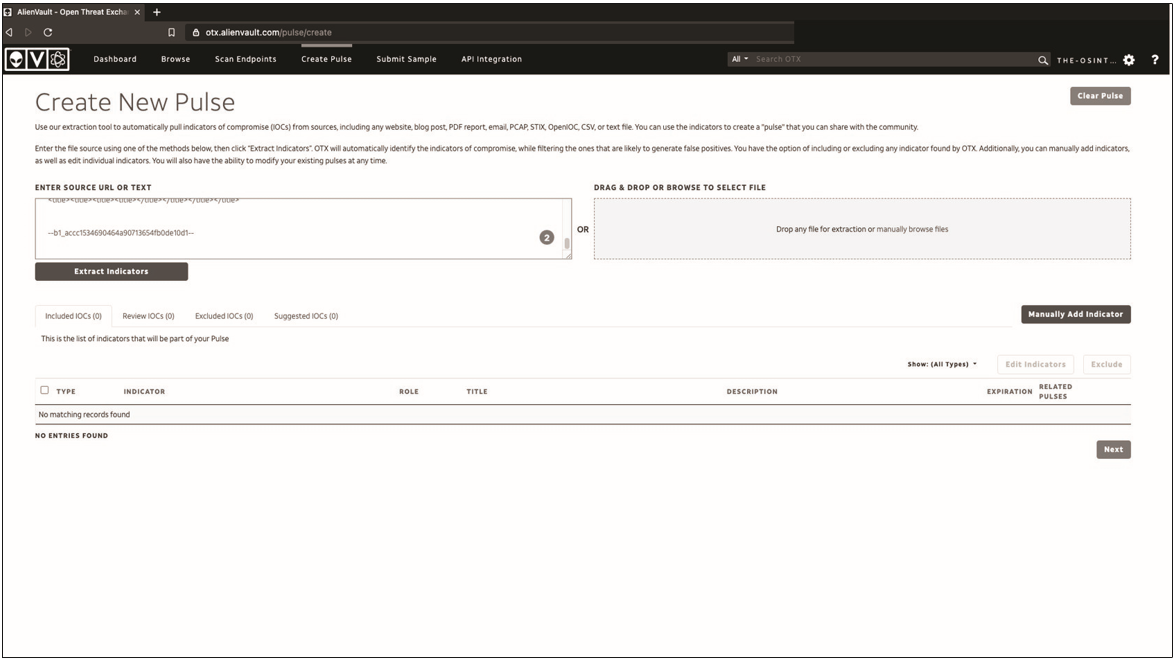
Copy the entire email source and paste it into the left field of the image, then select Extract Indicators (Figure 12.5). The system will do the parsing automatically, but you’ll need to review the metrics and see if they work.
Fig. 12.5. Extraction of indicators in OTX
As can be seen in fig. 12.6, The parser extracted three metrics from the email you pasted.
Fig. 12.6. Pulled indicators
It is necessary to make sure that these indicators refer to the impulse. Since you know from checking the email source that the specified email belongs to the sender, you do not need to check it again. But you should check domains and IP addresses. To do this, we will conduct a small OSINT.
The following needs to be determined: Who owns each domain and IP address? Do the domain and IP address serve a legitimate purpose? Does the domain owner have any control over the data transmitted through its services? Do IP addresses belong to email service providers? Or do we own the domain or IP address?
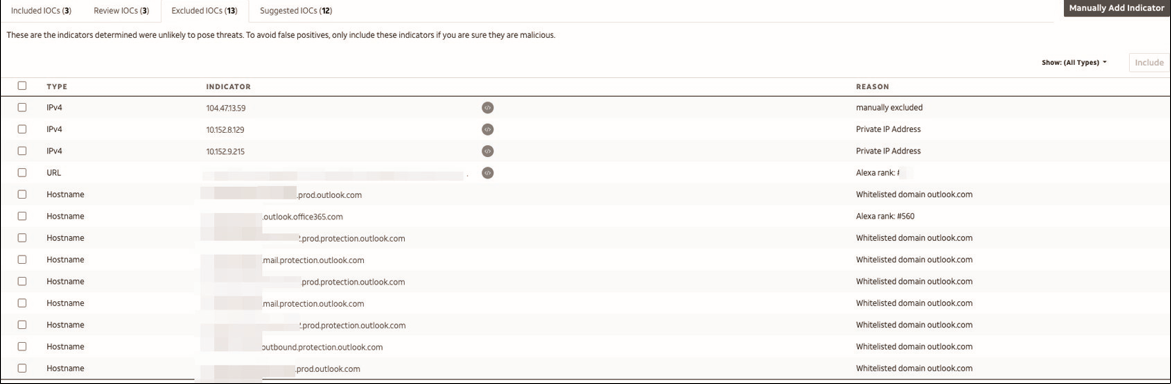
Possible indicators in fig. 12.7 are not valuable elements of threat information, so if OTX does not contain them, they will have to be excluded. You’ll do this later in the process, so you don’t have to analyze them twice.
Fig. 12.7. Excluded indicators
Now go to the list of Ecluded IOCs. Repeat the procedure used for the enabled indicators for each item in the disabled list. We can casually say that some of them do not belong to the signs of threats.
From the list shown here, you need to remove the following:
Three apparent Microsoft addresses (by5pr19mb3713.namprd19.prod.outlook.com, by5pr19mb3970.namprd19.prod.outlook.com and nam12-mw2-obe. outbound.protection.outlook.com);
Two obvious Google addresses (mail-sor-f41.google.com and mx.google.com);
A series of GoDaddy addresses (p3plibsmtp01-08.prod.phx3.secureserver.net, p3plsmtp21-01-26.prod. phx3.secureserver.net and p3plsmtp21-01.prod.phx3.secureserver.net) and 10.186.134.206, which is a class A, that is, a private internal IP address without routing support.
Testing for a potentially harmful domain in a burp
OTX claims that docsend.com is a whitelisted domain but allows users to upload files. This means that it is wise to go further and check exactly what the sender is trying to slip into their victims. In the world of digital forensics and malware, launching potentially dangerous software is called detonation. Detonation can be dangerous if you are using an unprotected system, as it can be infected. I recommend using a dedicated computer isolated from the corporate network, or at least a dedicated virtual machine for this.
In addition to a virtual machine, I recommend installing anti-malware (if possible), enabling a firewall at the host and network level, using a VPN, and (if you’re comfortable with it) using the Tor browser (or Brave, which offers similar functionality). You can find very nasty things in the letters and it’s easy to find yourself on the other side of the law trying to do a legal security investigation.
Open your virtual machine on a separate system and network segment, not on the main network, with a firewall and security appliance running between the system and the rest of your home lab and network. Depending on the level of analysis you intend to perform, you can use a Linux or Windows virtual machine. If you want to get an idea of how an attack should work, you can take a vulnerable Windows system.
Install Burp Suite on your host. Burp is a web proxy that allows you to intercept and modify data transmitted between you and a website. You can see the requests made from your system to the website and the responses received. There is also the ability to track any pop-ups and many unintentional actions, such as redirects to malicious sites. To install Burp, download the free community version from https://portswigger.net/burp/communitydownload/. The installation package will contain a script named burpsuite_community_linux_ v<#>_#_##.sh.
Enter the latest version of the script in the commands shown here:
Once the proxy is installed, you can use the GUI to open burp by clicking on the burp icon or by typing burp in the operating system menu. Burp will prompt you to create a project. Click Next and you will be prompted to accept the default burp settings or download a configuration file. The default settings are sufficient for now.
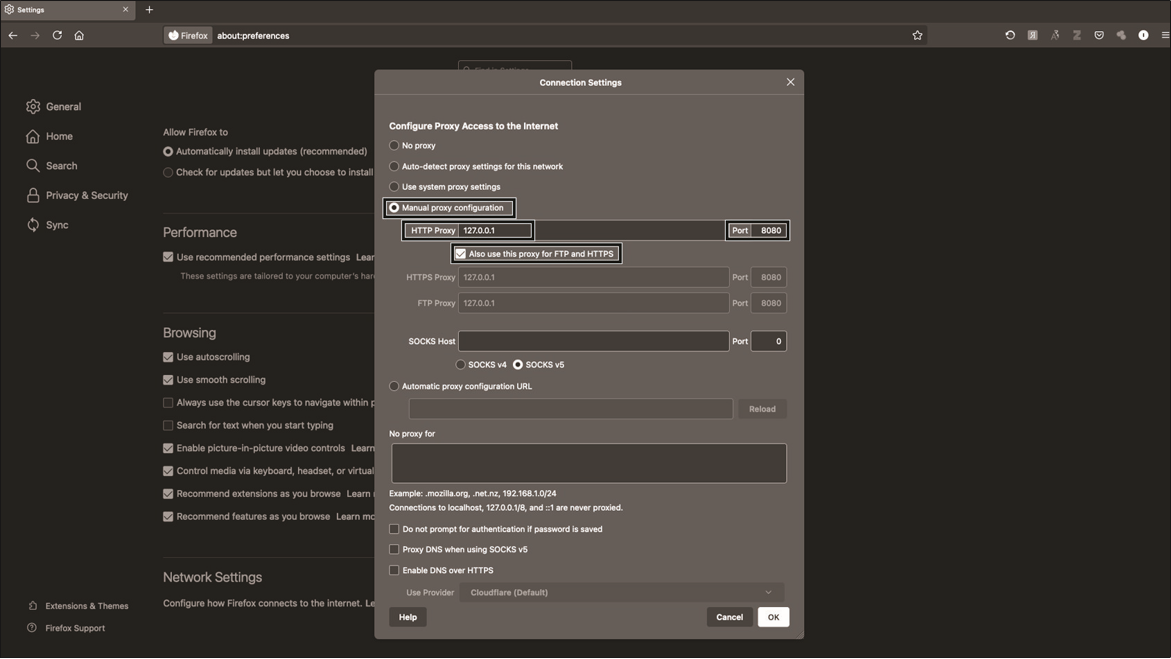
Then route the browser traffic through the burp. To do this, open Firefox and click on the menu icon, then scroll down. Click on Network Settings. You will be prompted to enter information about the proxy server, as shown in Fig. 12.8. Select Manual proxy configuration, and then enter the IP address 127.0.0.1 as the HTTP proxy and 8080 as the port. Select the option to use this proxy for all protocols.
Now that you have burp installed and Firefox configured to route your traffic through the proxy, open Burp and make sure it is configured to intercept traffic. To do this, select the Proxy tab, then Intercept. Finally, make sure interception is enabled.
Fig. 12.8. Setting up a network proxy in Firefox
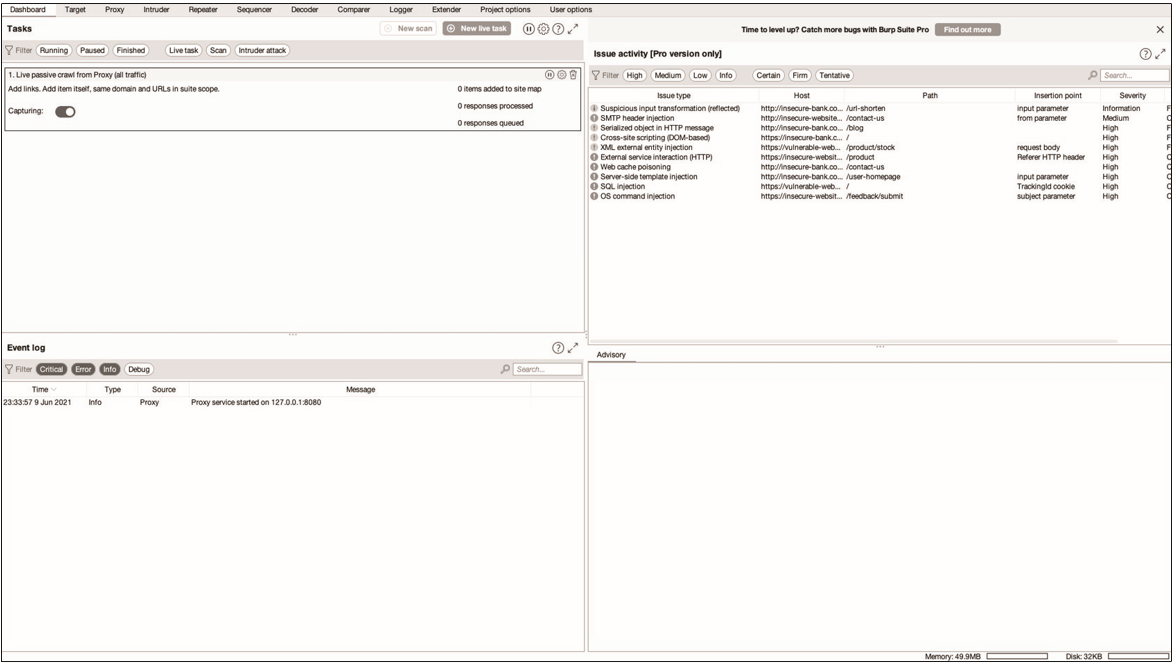
Once you’ve verified that the burp is configured correctly, you can use it to intercept browser traffic (Figure 12.9). As long as interception is enabled, you will need to decide whether to forward or reset the web request each time. This means you can drop malicious (or legitimate) traffic instead of sending it to the browser.
Fig. 12.9. Traffic junction with burp
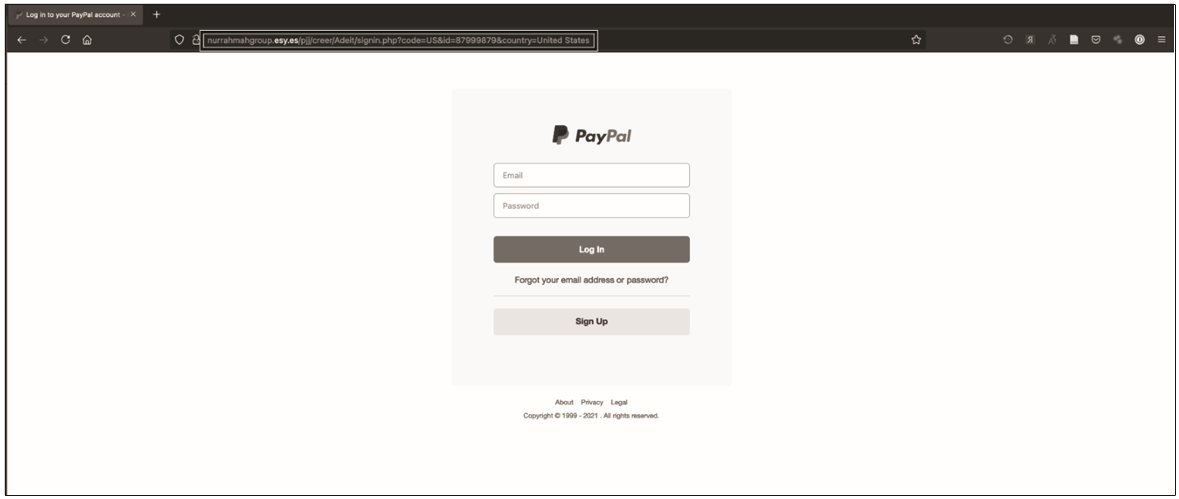
Now let’s visit the website found in the email. When you click on the burp link, the website loads. This site appears to be PayPal, but in Figure 12.10 you can easily see that it is a scam: notice that the URL does not contain the word PayPal and the top-level domain is .es. Also, code=US&id=8799879&country=United States at the end of the line says that some kind of tracking system is being used.
Fig. 12.10. An example of a phishing landing page
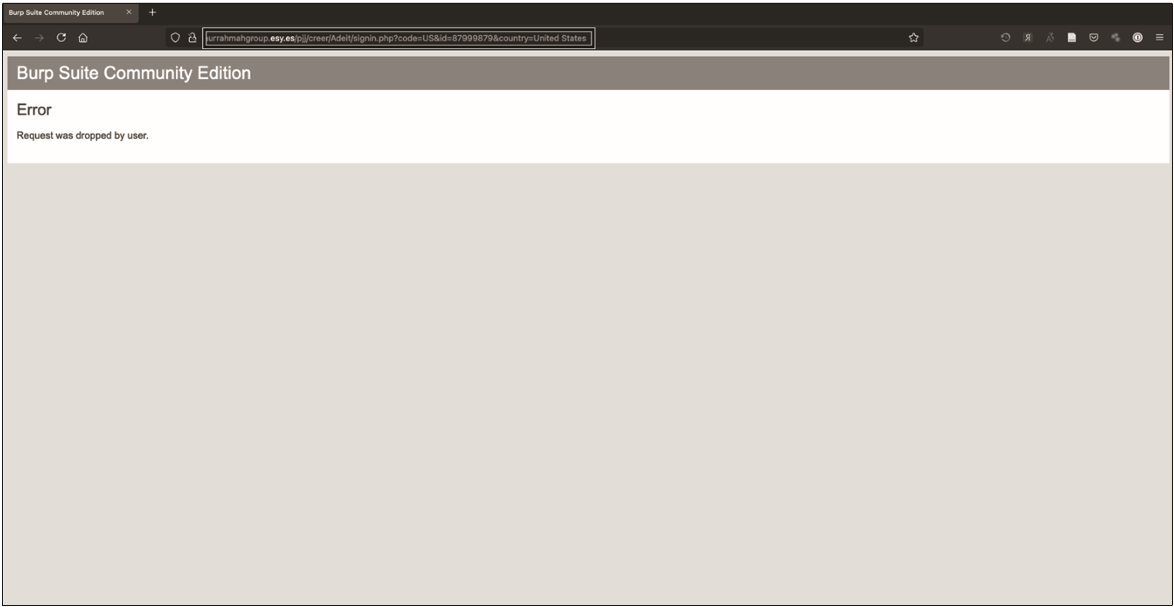
The complete absence of PayPal in the URL is probably the biggest red flag. If you try to open this link on an isolated system (the isolated system or virtual machine discussed earlier in this section), the host must be unknown. And as you can see in fig. 12.11, Burp shows us that entering information and following a link is a dead end, probably indicating a failed attempt to collect credentials.
Fig. 12.11. Non-working phishing forwarding
The fact that the site does nothing may indicate that PayPal or another provider has taken action, perhaps using the DMCA. Although this may indicate that the attacker simply lacked skills. However, it’s important not to ignore the threat that credential harvesting poses. As has been pointed out many times, people still regularly use the same password across multiple platforms, both personal and business accounts. Many sites do not use or support multi-factor authentication, which exacerbates this threat.
Even though the link doesn’t work, you still have to add it to the OTX pulse. Before moving on, add the four IP addresses we’ve determined to be irrelevant to the list of excluded indicators by checking the boxes next to them and clicking Exclude.
Analysis of downloaded files
There were no downloadable files in this phishing campaign. But what if they are? Let us briefly dwell on their analysis. The first step is to get the cryptographic hashes of these files – having them allows you to compare known versions of the files with other versions to see if anything has changed. When potentially malicious software is detected, you receive a cryptographic hash of the file to speed up its search. You then compare the hashes of the files on your system with the hashes of known malware and get a warning if there are any matches. In some cases, malware can modify the boot file, so the hash won’t stay the same. This is so-called polymorphic malware, and that discussion is for a whole other book.
You can hash a file using various tools. Some of them are already installed on Linux.
Sometimes it’s worth getting multiple types of hashes because some systems will verify files using only one hashing algorithm.
To create an MD5 hash of a file, type the following command:
md5sum file name
To create a SHA-1 hash of a file, enter the command:
sha1sumfile name
To create a SHA-256 hash of a file, enter:
sha256sum file name
For SHA-512 file hash, enter:
sha512sum file name
Then add each hash to OTX. If you choose to describe this incident and publish a report, you can import the pulse from the URL and credit the URL. In the following sections, we will further analyze the domain esy.es.
Conducting OSINT for threat analysis
OTX is not the only resource you can use to analyze malicious links or emails. In this section, we will look at several other resources. You can learn about some of these tools and techniques in the OSINT chapters of this book. Here you will use these resources to find out if a site is malicious.
Search the VirusTotal database
Веб-сайт https://www.virustotal.com/,owned by Chronicle Security, allows researchers and threat analysts to scan files for malware using more than 60 antivirus platforms without having to purchase each one. It also allows you to check the status of any URLs.
VirusTotal also has an API for analysis using custom scripts. The GUI search service accepts the following types of data for analysis: actual file downloaded, URL, IP address, domain, or file hash.
Detection of malicious sites in the WHOIS database
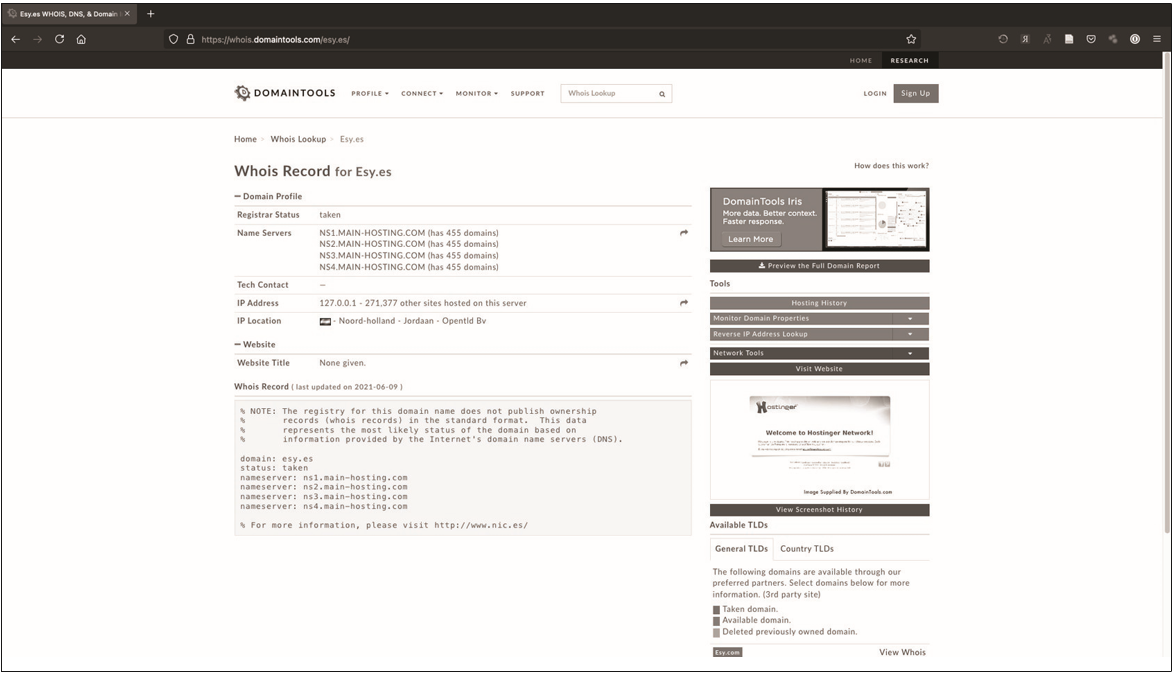
You have already run the WHOIS command while collecting OSINT data. But if you’re using the WHOIS database for malware analysis, you’ll need more information. It is noteworthy that in addition to the usual WHOIS information, you can see the country in which the domain is registered and its autonomous system number (ASN). The ASN will help later when you use PhishTank to analyze the systems from which the phishing email originated. In fig. 12.12 shows the WHOIS record for the seemingly innocuous domain esy.es.
Fig. 12.12. WHOIS record for the esy.es domain
You can see that the domain is registered in the Netherlands region called Jordan last updated on June 9, 2021 and that they are using name servers hosted at main-hosting.com. In turn, doing a WHOIS lookup for main-hosting.com shows that it is hosted on godaddy.com, while a reputable hosting firm will most likely host it on their own server. You should also be careful with newly registered domains. Young domains require special skepticism and analysis, as many of them are harmful. An 8-day-old domain and a 43-day-old nameserver are not necessarily malicious, but require further investigation. In this case, you must include both domains and any associated IP addresses in your OTX boost.
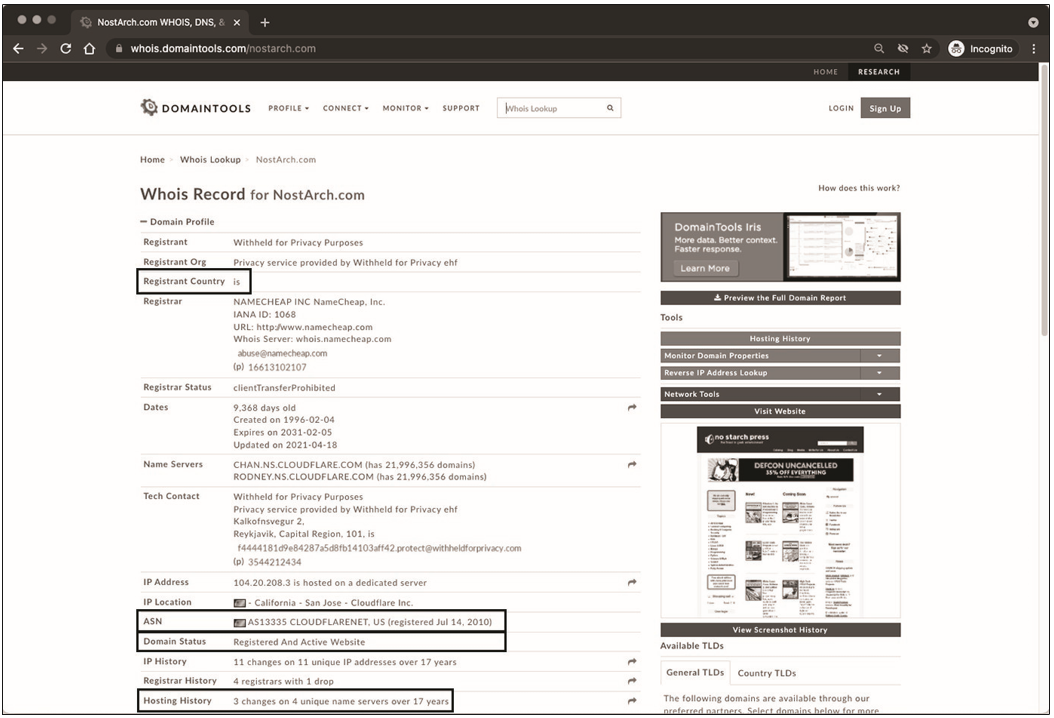
What will appear in the WHOIS record of a trusted site? 12.13 shows the WHOIS result for nostarch.com.
Fig. 12.13. NoStarch WHOIS record
First, note that the country of registration is Iceland. Organizations typically use services such as WhoisGuard or domain privacy to hide their location, and this is not an immediate cause for concern or further analysis. If you look at the date, you will see that this domain was created in 1996 and includes a registered and active website.
Second, the ASN is listed as Cloudflare. Using the reputable Cloudflare service means that the site is most likely not malicious, as content delivery networks like Cloudflare usually remove any suspicious content. We can also see that this domain has undergone three changes on four nameservers in 17 years. This is normal and usually indicates a normal change of service provider. Technology has changed a lot since 1996, so it’s perfectly normal to change service providers and records from time to time to accommodate new technologies.
Phishing detection with PhishTank
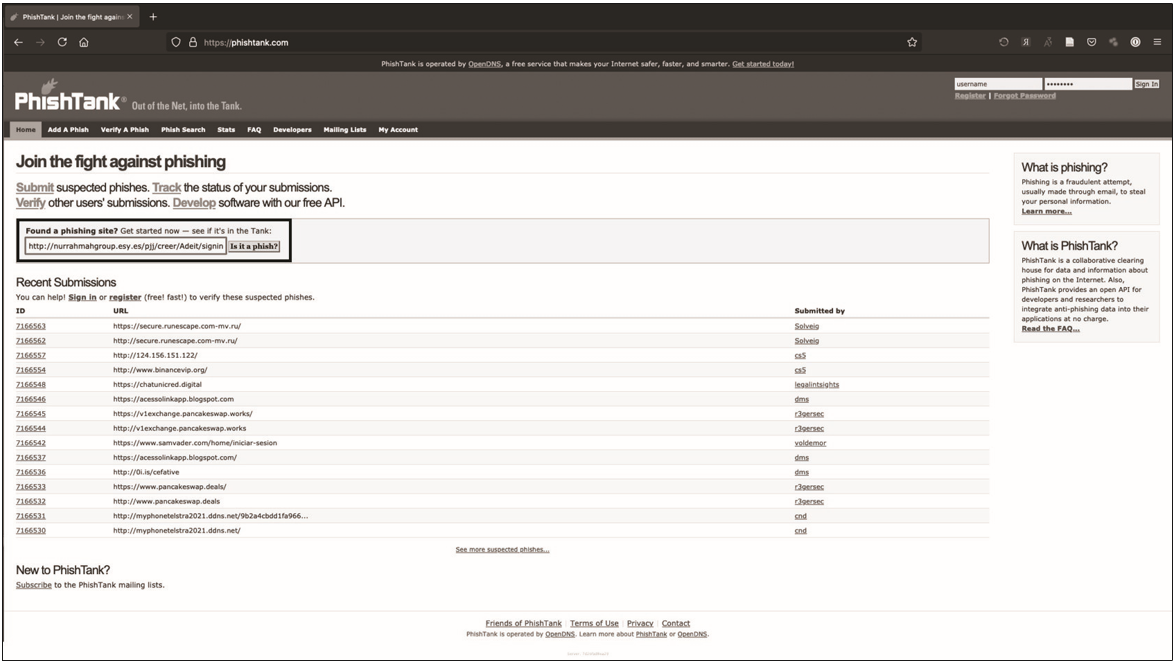
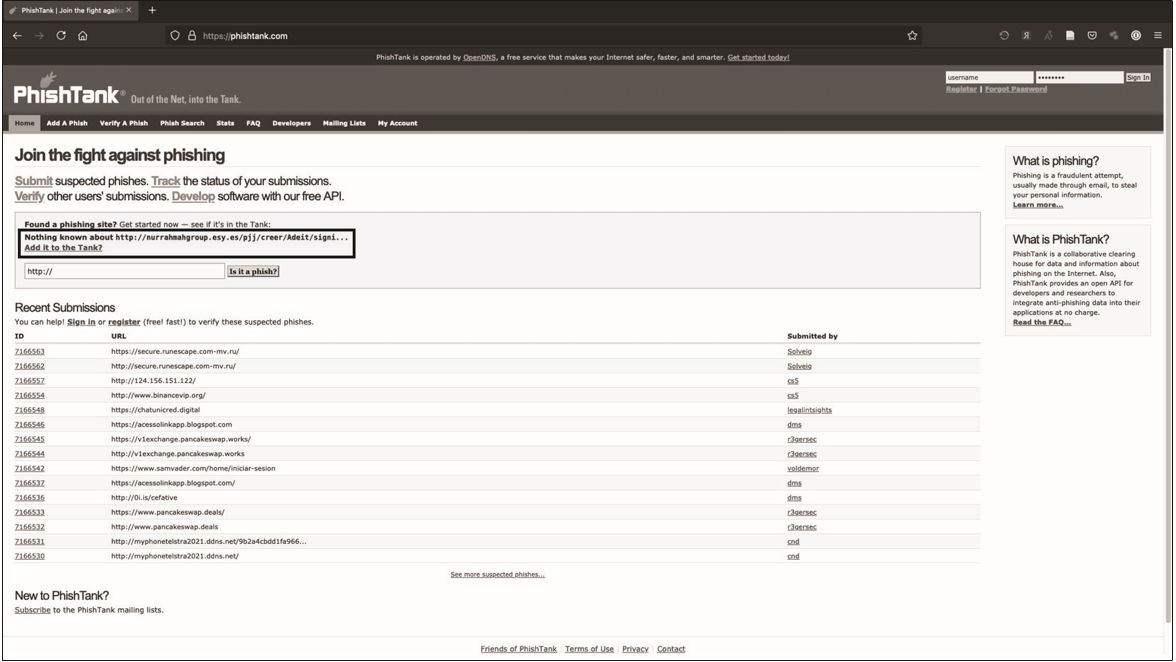
PhishTank (https://phishtank.com/) – is a free phishing screening platform powered by OpenDNS. It allows you to search by domain, URL, or ASN. In my experience, the ASN search is the most effective. But since you don’t have an ASN for the potentially malicious nurrahmahgroup.esy.es domain, you need to search by domain and URL. Figure 12.14 shows the result of this search.
Fig. 12.14. PhishTank search result for nurrahmahgroup.esy.es
As can be seen from fig. 12.15, the search yields nothing. This doesn’t mean the URL you’re checking isn’t phishing, just that no one has reported it.
Fig. 12.15 Phishing detected on PhishTank.com
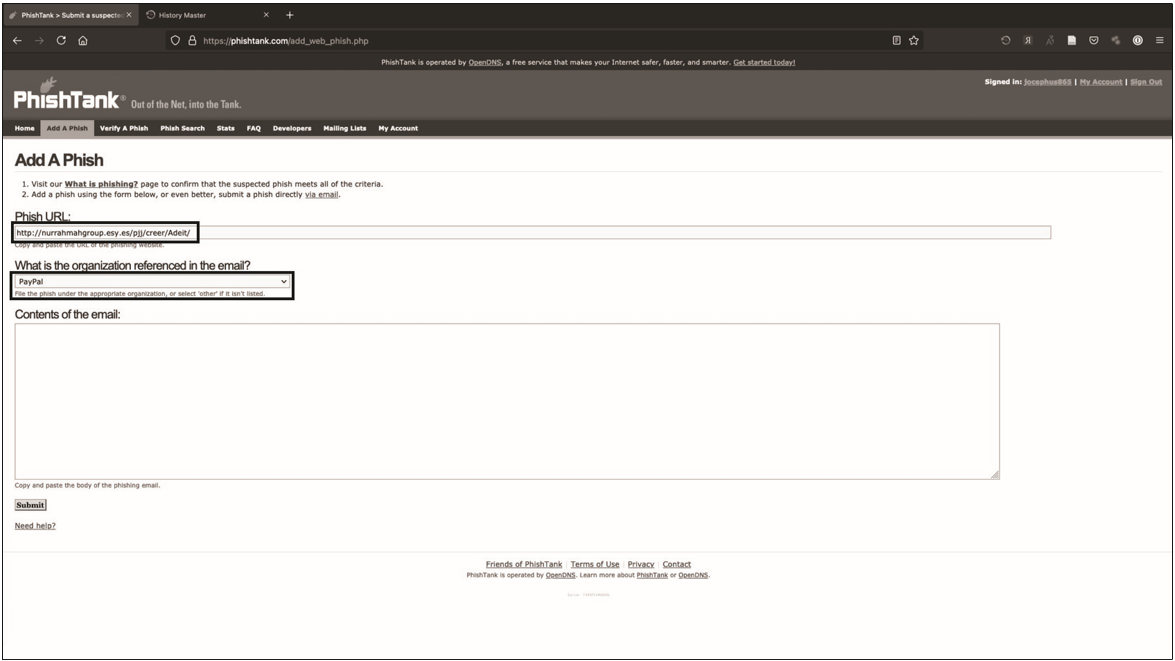
Since the site is down, I’ll let you know. To run the report, click Add it to tank? (Add to disk?) under the message that nothing is known about the site. Then enter the URL of the phishing site. In this case, you will need to paste the body of the email into the three reports in the tank (if you will be sending them) to link all three domains in use. You also select Microsoft as the organization that the email refers to, since they claim the sender belongs to Office 365. When you’re done, click the Send button.
In fig. 12.16 shows an example of entering phishing-related information into PhishTank for inclusion in the database.
Fig. 12.16. Submitting phishing samples to PhishTank
View ThreatCrowd
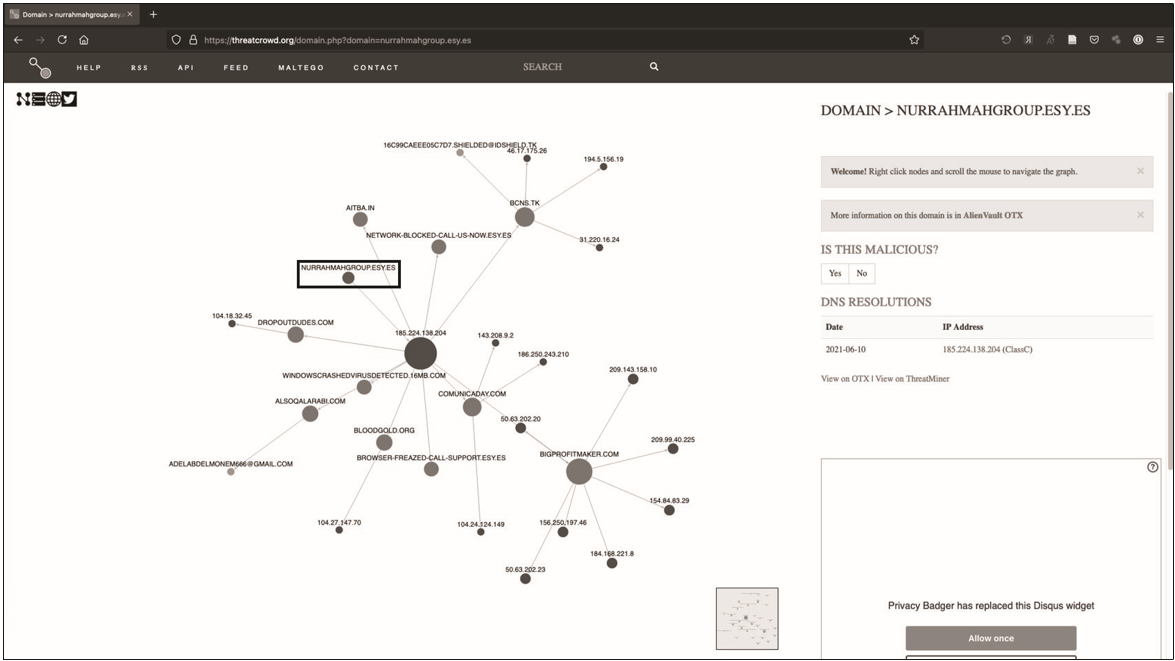
ThreatCrowd(https://www.threatcrowd.org/) – part of AT&T Cyber Security, provides visualization of the legitimacy of domains, IP addresses and other indicators such as hashes. As with OTX and other platforms, you can access it yourself or through the links in ThreatMiner (discussed in the next section). 12.17 shows a visualization of the domain nurrahmahgroup.esy.es.
In this visualization, you can see how different systems, hashes, domains, and other functions interact with the system of interest. This can be very useful when building a cyber threat detection program or when studying a potential adversary in depth. Graphic output also serves as a source of excellent illustrations when writing reports.
Fig. 12.17. ThreatCrowd visualization for nurrahmahgroup.esy.es
Об’єднання інформації в ThreatMiner
ThreatMiner (https://www.threatminer.org/) pulls information from multiple other threat intelligence sources to get a unified view of what other platforms are saying. ThreatMiner allows you to quickly gain insight into the likelihood of malicious intent. Like everything else, it’s not a perfect tool, but it’s one of the best, especially since it’s free.
You can search for indicators or APT Notes on the ThreatMiner website. APT Notes is a repository of public articles and blogs, sorted by year, related to malicious campaigns, actions, or software associated with advanced persistent threat groups or toolkits.
Since you already have some indicators, let’s look for them first. Like OTX, ThreatMiner can handle different types of indicators, some of which are different from OTX. The list of indicators includes domains, IP addresses, hashes (MD5, SHA-1, and SHA-256), email addresses, APT notes, SSL/TLS certificates, user agents, antivirus names, filenames, URIs, registry keys, and m’ yutex
Here’s one of the unique features of ThreatMiner: it opens a panel on the left side of the screen that displays similar Google search results. There you can see the WHOIS data for the presented indicator, if necessary.
At the bottom of the screen will be links to other resources such as RiskIQ, PassiveTotal, VirusTotal, DomainTools, ThreatCrowd, OTX, SecurityTrails and Robtex.
Figure 12.18 shows the search results for nurrahmahgroup.esy.es.
Fig. 12.18. ThreatMiner search results for nurrahmahgroup.esy.es domain
Under the relevant resources, you will notice that there are no APT notes for the domain. There is also no information about associated passive DNS, subdomains, associated URLs, or malware samples. Given that the phishing email you analyzed is old and the domain was recently registered, this is an expected result. In the case of a more mature indicator or a domain that has not been removed, you can see more information here.
You might ask: If ThreatMiner searches all the sites mentioned above, why did I wait until the end of the chapter to show you its capabilities? So that you better understand how to perform the analysis yourself. When I analyze threats lurking in phishing emails, I often start with two open windows: OTX and ThreatMiner. To use information that ThreatMiner identifies as related, simply click on the link.
We used materials from the book “Social Engineering and Ethical Hacking in Practice”, which was written by Joe Gray.
Social engineering is the term that is becoming more and more relevant to today's digital society. This SEO-text focuses on the fact that social engineering is the same as the main methods of research, and that it is possible to defend against threats.
Ethical considerations in social engineering play an important role in ensuring responsible and effective use of manipulation techniques. Compliance with ethical principles, such as the prohibition of illegal use and the responsible handling of confidential information, is necessary to protect privacy, trust and prevent harm.
(Українська) Ми обговоримо різні способи виміру результатів атаки. Вони включають розгляд різних показників, здатних зробити ваші дані зрозумілими для ваших клієнтів.
To provide the best experiences, we use technologies like cookies to store and/or access device information. Consenting to these technologies will allow us to process data such as browsing behavior or unique IDs on this site. Not consenting or withdrawing consent, may adversely affect certain features and functions.
Functional
Always active
The technical storage or access is strictly necessary for the legitimate purpose of enabling the use of a specific service explicitly requested by the subscriber or user, or for the sole purpose of carrying out the transmission of a communication over an electronic communications network.
Preferences
The technical storage or access is necessary for the legitimate purpose of storing preferences that are not requested by the subscriber or user.
Statistics
The technical storage or access that is used exclusively for statistical purposes.The technical storage or access that is used exclusively for anonymous statistical purposes. Without a subpoena, voluntary compliance on the part of your Internet Service Provider, or additional records from a third party, information stored or retrieved for this purpose alone cannot usually be used to identify you.
Marketing
The technical storage or access is required to create user profiles to send advertising, or to track the user on a website or across several websites for similar marketing purposes.