
CobaltStrike is a powerful framework for penetration testing and data management. Ensures the collection, analysis and use of information to improve the security of information systems.

CobaltStrike is a powerful comprehensive framework for penetration testing and deployment of cyber decoys used to assess security and penetration of information systems. Developed by the Strategic Cyber LLC team, this tool allows for a wide range of active security tests, including data interception, traffic spoofing, vulnerability analysis, and incident response testing. CobaltStrike provides extensive capabilities for developing and deploying cyber decoys that allow you to simulate real attacks and threats. It has powerful functions for generating social engineering attacks, intercepting sessions, exploiting vulnerabilities, building “two-way” communication channels, and many others. In addition, CobaltStrike offers an intuitive user interface that makes it easy to work with the framework even for users with limited experience.

Due to its features and capabilities, CobaltStrike is a popular tool among cybersecurity and pentesting professionals. It allows you to assess the strengths and weaknesses of information systems, helps identify vulnerabilities and respond to potential threats. Due to its flexibility and power, CobaltStrike is an indispensable tool for ensuring the security and protection of information resources in today’s digital world. CobaltStrike offers a wide range of features for deploying cyber decoys, including generating social engineering attacks, exploiting vulnerabilities, and building communication channels to interact with attackers. An intuitive user interface makes the framework easy to use, allowing you to quickly start testing and security analysis. CobaltStrike has found wide use among cyber security and pentesting specialists, thanks to its advanced capabilities and powerful functionality. This tool helps identify potential threats and respond to them quickly and effectively, helping to ensure the security and protection of information resources in today’s digital world.
Cobalt Strike is a platform for enemy simulation and RED TEAM operations. The product is intended for targeted attacks and simulation of post-exploitation actions of attackers. This section describes the attack process supported by the Cobalt Strike feature set. These features are covered in detail later in this tutorial.
Overview

A well thought-out targeted attack starts with reconnaissance. The Cobalt Strike System Profiler is a web application that displays the scope for attacks on a client-side target. The information gained from intelligence will help you understand which options have the greatest chance of success in relation to your goal.
Arming is the combination of a post-operational payload with a document or exploit that will be executed on the target. Cobalt Strike contains options for turning ordinary documents into weaponized artifacts. Cobalt Strike also has the ability to export a post-production payload, called a beacon, into various formats to combine with artifacts not included in this toolkit.
Use the Cobalt Strike phishing tool to deliver a weaponized document to one or more people on the target network. Cobalt Strike Phishing Tool turns saved emails into perfect attack emails.
Monitor your target’s network with Cobalt Strike beacons. This post-exploitation payload uses an asynchronous “low and slow” communication scheme typical of advanced malware. The beacon will connect to the C&C server via DNS, HTTP or HTTPS. Beacon goes through common proxy configurations and connects to multiple hosts to resist blocking.
Experience the attribution and analysis capabilities of your targeted attacks with the Malleable beacon management and control language. Convert a beacon to use network indicators that look like known malware or blend in with existing traffic.
Return to a compromised network, find hosts, and bypass with useful beacon automation and peer-to-peer communication over named pipes and TCP sockets. Cobalt Strike is designed to establish trust relationships and enable lateral traffic using derived credentials, password hashes, access tokens, and Kerberos tickets.
Demonstrate significant business risks with Cobalt Strike’s user exploitation tools. Cobalt Strike workflows make it easy to implement keystroke logging and screenshot logging tools on compromised systems. Use Browser Pivoting to access websites that
which your victim accessed via Internet Explorer. This technique, developed only for Cobalt Strike, works with most sites and allows you to bypass two-factor authentication.
Cobalt Strike’s reporting features redesign the experience for your customer. Provide network administrators with a graph of activity so they can find indicators of attacks on their systems. Cobalt Strike generates high-quality reports that you can present to your clients as stand-alone products or use as a supplement to your written submission.
At each of the above stages, you will need to study the target environment, its defenses, and consider how best to achieve your goals with the means at your disposal. This is evasion. Cobalt Strike isn’t meant to provide evasion out of the box. Instead, the product provides flexibility, both in its potential configurations and offensive options, so that you can adapt it to your conditions and tasks.
HelpSystems LLC distributes Cobalt Strike packages as custom archives for Windows, Linux, and MacOS X.
Cobalt Strike uses a client-server model in which each component can be installed on the same system, but is often deployed separately. The Cobalt Strike GUI is called “Cobalt Strike”, “Cobalt Strike GUI” or the command used to launch the Cobalt Strike client. The Cobalt Strike server is called “C&C server” or the command used to run the C&C server.
The basic installation process of Cobalt Strike includes downloading and unpacking the distribution into the operating system and starting the update process to download the product.
Before you start
Please read this section before installing Cobalt Strike.
System requirements
The following components are required for any system hosting the Cobalt Strike client and/or server components.
Java
Cobalt Strike’s GUI client and command server requires one of the following Java environments:
Oracle Java 1.8
Oracle Java 11
OpenJDK 11. (див. Встановлення OpenJDK)
The Cobalt Strike C&C server is supported on Java-compatible Linux systems and has been tested on the following Debian-based Linux distributions (other versions may work, but have not been tested):
Debian
Ubuntu
Kali Linux
The Cobalt Strike client runs on the following systems:
Windows 7 and newer versions
MacOS X 10.13 or later
Linux GUI systems such as: Debian, Ubuntu and Kali Linux (other versions may work but have not been tested)
Equipment
In addition to a valid operating system, the following minimum requirements must be met:
2 GHz+ processor
2 GB of RAM
500MB+ available disk space
On Amazon EC2, use a Medium high-CPU instance (c1.medium, 1.7 GB).
Linux glibc
Note that some Linux distributions may not have the correct version of glibc. If you encounter this problem, see the glibc Missing from older Linux distributions page on HelpSystems.
Installing OpenJDK
Cobalt Strike has been tested with OpenJDK 11 and its launchers are compatible with a properly installed OpenJDK 11 environment.
Update APT: sudo apt-get update
Install OpenJDK 11 using APT: sudo apt-get install openjdk-11-jdk
Set OpenJDK 11 as default: sudo update-java-alternatives -s java-1.11.0-openjdk-amd64
Remove the current OpenJDK packages.
Download OpenJDK for Linux/x64 at: https://jdk.java.net/archive/.
Extract the OpenJDK executable: tar zxvf openJDK-11.0.1_linux-x64_bin.tar.gz
Move the OpenJDK folder to /usr/local: MV JDK-11.0.1 /USR/local
Add the following to ~/.bashrc: JAVA_HOME=”/usr/local/jdk-11.0.1″ PATH=$PATH:$JAVA_HOME/bin
Updating ~/.bashrc to make the new environment variables take effect: Source ~/.bashrc
Download OpenJDK for macOS/x64 at https://jdk.java.net/archive/.
Open a terminal and navigate to the Downloads/ folder.
Unzip the archive: tar zxvf openJDK-11.0.1_osx-x64_bin.tar.gz
Move the extracted archive to the folder /Library/Java/JavaVirtualMachines/: sudo mv jdk-11.0.1.jdk/ /Library/Java/JavaVirtualMachines/
The java command in MacOS X will use the highest version of Java in /Library/ Java by default.
TIP : If you see a JRELoadError message, it’s because the JavaAppLauncher plugin, which is part of Cobalt Strike, loads a library from the specified path to launch the JVM inside the plugin process. To fix this error, run the following command:
sudo ln -fs /Library/Java/JavaVirtualMachines/jdk-11.0.2.jdk /Library/Internet\ Plug-Ins/JavaAppletPlugin.plugin
Replace jdk-11.0.2.jdk with your Java path. The next release of Cobalt Strike will use a more flexible Java application stub for MacOS X.
Download OpenJDK for Windows/x64 at https://jdk.java.net/archive/.
Unzip the archive to c:\program files\jdk-11.0.1.
Add c:\program files\jdk-11.0.\bin to the PATH environment variable
Your user:
Go to Control Panel -> System -> Advanced System Options -> Environment Variables…
Highlight Path in Custom Variables.
Click the Create button.
Enter: c:\program files\jdk-11.0.1\bin.
Click OK on all dialog boxes.
Follow these instructions to install Cobalt Strike.

Download the Cobalt Strike distribution for a supported operating system. (the download link is sent to your e-mail)
Install the recommended Java environment.
Extract, mount, or unzip the distribution. Depending on your operating system, do one of the following:
Unzip the file cobaltstrike-dist.tgz:
tar zxvf cobaltstrike-dist.tgz
Double-click the cobaltstrike-dist.dmg file to mount it.
Drag the Cobalt Strike folder to the Applications folder.
Disable your antivirus before installing Cobalt Strike.
Use your preferred zip tool to extract the file
Cobalstike.zip to the installation location.
Run the updater to complete the installation. Depending on your operating system, do one of the following:
For Linux:
Enter the following commands:
cd /шлях/до/cobaltstrike'a &&./update
For MacOS X:
Go to the Cobalt Strike folder.
Double-click Update Cobalt Strike.command.
For Windows:
Go to the Cobalt Strike folder.
Double click on the bat.
Make sure you update both the C&C server and the client software with a license key. Cobalt Strike is generally licensed for a single user. C&C does not require a separate license.
A valid authorization file is required to run the licensed version of Cobalt Strike. An authorization file is an encrypted file that contains information about your Cobalt Strike license. This information includes: your license key, the license expiration date, and the identifier associated with your license key.
How to get authorization file?
The built-in updater requests an authorization file from the Cobalt Strike update server on startup. The updater downloads a new authorization file even if your version of Cobalt Strike is up to date. This allows the authorization file to match the license expiration dates in the HelpSystems records
What happens if my license expires?
Cobalt Strike will refuse to start when the authorization file expires. If the authorization file expires while Cobalt Strike is running, it will not affect its operation in any way. Licensed Cobalt Strike checks authorization files only at startup.
When does my authorization file expire?
The authorization file expires when the Cobalt Strike license expires. When renewing your Cobalt Strike license, run the built-in updater to update the authorization file with the latest information.
Go to Help -> System Information to find out when the authorization file has expired. Find the “valid until” option in the Other section. Be aware that C&C client and server information may have different meanings (depending on which license key was used and when the authorization file was last updated).
Cobalt Strike will also alert you if the authorization file expires after 30 days.
How do I add an authorization file to an isolated environment?
The authorization file is cobaltstrike.auth. The updater always places this file with cobaltstrike.jar. To use Cobalt Strike in a closed environment:
Download the Cobalt Strike trial package at https://www.cobaltstrike.com/ download.
Update the Cobalt Strike trial package from a system connected to the Internet.
Copy the contents of the updated cobaltstrike/ folder to your environment. The most important files are jar and cobaltstrike.auth.
Does Cobalt Strike have HelpSystems contact capability?
After the update process, Cobalt Strike does not “call home” to HelpSystems. The authorization file is generated during the update process.
How to use old version of Cobalt Strike with updated authorization file?
Cobalt Strike 3.8 and below does not verify or require authorization.
Cobalt Strike 3.9 and later versions check for the cobaltstrike.auth file located together with the cobaltstrike.jar file. Update Cobalt Strike from another folder and copy the new cobaltstrike.auth file to the folder containing the old version of Cobalt Strike. The authorization file is not tied to a specific product version.
What does user ID mean?
The user ID is a 4-byte number associated with the Cobalt Strike license key. Cobalt Strike 3.9 and later embed this information into stages and stages generated by Cobalt Strike.
How do I find the user ID value in a Cobalt Strike artifact?
The user ID value is the last 4 bytes of the stander payload in Cobalt Strike 3.9 and later.
This screenshot is an HTTP trainee from the trial version. For the trial version, the user ID is 0. The last 4 bytes of this stander (0x0, 0x0 0x0, 0x0 0x0) reflect this.

The user ID value also exists in the payload phase, but is more difficult to recover. Cobalt Strike does not use client ID values in network traffic or other parts of the tool.
How to protect the different red team infrastructure from cross-identification with this ID?
If you have a unique authorization file on each C&C server, then each C&C server and the artifacts coming from it will have different identifiers.
The Cobalt Strike update server generates a new authorization file each time the updater is run. Each authorization file has a unique identifier. Cobalt Strike only distributes the C&C server ID. It does not propagate the user ID from the GUI or non-GUI client authorization file.
When you finish
Congratulations! Cobalt Strike is now installed. For more information and next steps, read the following:
Next steps
Start the C&C server. Launching the Cobalt Strike client
Starting the C&C server
Cobalt Strike consists of a client and a server component. The server, called the C&C server, is the payload manager and host for Cobalt Strike’s social engineering features. The C&C server also stores data collected by Cobalt Strike and manages logging.
The Cobalt Strike C&C server must be running on a supported Linux system. To start the Cobalt Strike C&C server, run the following command to run the script included in the Cobalt Strike for Linux package:

The C&C script uses the following two required and two optional parameters:
IP Address – (required) Enter the externally accessible IP address of the C&C server. Cobalt Strike uses this value as the default host for its functions.
Password – (required) Enter the password that your team members will use to connect the Cobalt Strike client to the C&C server.
Malleable C2 profile – (optional) Specify a valid Malleable C2 profile.
Kill Date – (Optional) Enter a date value in YYYY-MM-DD format.
The C&C server will insert this kill date into each beacon stage it generates. The payload will refuse to run on or after this date, and will terminate if it is running on or after this date.
When the C&C server starts, it publishes the SHA256 hash of the C&C SSL certificate. Distribute this hash to your team members. When your team members connect, their Cobalt Strike client will ask if they know this hash before authenticating to the team server. This serves as an important defense against man-in-the-middle attacks.
Follow the steps below to connect the Cobalt Strike client to the C&C server.
To launch the Cobalt Strike client, use the launcher included in the platform package.
For Linux:
Enter the following commands: ./cobaltstrike
For MacOS X:
Go to the folder Cobalt Strike.
Double click on cobaltstrike.
For Windows:
1. Go to the Cobalt Strike folder. Double click on the exe.
The Connection dialog box appears.

2. Cobalt Strike keeps track of the C&C servers you connect to and remembers information about them. Select one of the C&C profiles on the left side of the Connection dialog to populate the window with information. Use the Alias Names and Host Names and Host Names buttons to toggle the display of the host list. Active connections will be displayed in blue. You can control the initial display of the host list, colored text of active connections, and editing of the list using Cobalt Strike -> Settings-> command servers.
Alias – Enter the host’s alias or use the default value. Alias cannot be empty, start with ‘*’, or use the same value as the active connection.
Host – Enter the address of your C&C server in the Host field. The hostname cannot be empty.
Port – Displays the default port for the C&C server (50050). It rarely changes. Port cannot be empty and must be numeric.
User – The User field is your nickname on the command server. Change it to your nickname or hacker’s fictitious name. Username cannot be empty.
Password – Enter the general password for the C&C server.
3.Click the Connect button to connect to the C&C Cobalt Strike server. If this is your first connection to this C&C server, Cobalt Strike will ask if you recognize the SHA256 hash of this C&C server.
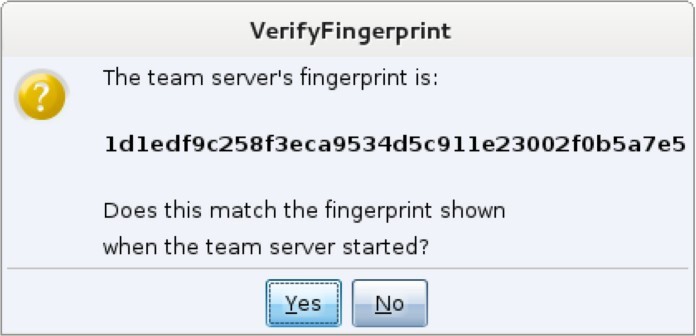
4. If you did, click Yes and the Cobalt Strike client will connect to the server and open the user interface.

Use Cobalt Strike to coordinate distributed red team operations. Install Cobalt Strike on one or more remote hosts. Start the C&C servers and have team members connect to them.

After connecting to the C&C server, your team:
Use the same sessions
Have shared hosts, captured data and downloaded files.
Communicate with a shared event log.
The Cobalt Strike client can connect to multiple C&S servers. Go to Cobalt Strike -> New Connection to initiate a new connection. When connecting to multiple servers, a toggle bar will appear at the bottom of the Cobalt Strike window.

This toggle allows you to switch between active instances of the Cobalt Strike server. Each server has its own button. Right-click on it and select Rename so that the button text reflects the role of the server when you interact with it. The server button will display the active button in bold and color based on the color preference specified in Cobalt Strike -> Preferences -> TeamServers to better show which button is active. This button name also identifies the server in the Cobalt Strike activity report.
When connecting to multiple servers, Cobalt Strike aggregates listeners from all servers to which it is connected. This combination makes it possible to send a phishing email from one server that points to a malicious website hosted on another. At the end of your interaction, CobaltStrike’s reporting feature will query all the servers you’re connected to and combine the data to create a single report.
When the user initiates a client disconnect via the menu, toolbar, or server toggle, a red banner is displayed with a Reconnect and Close button.

Click the Close button to close the window. Click the Reconnect button to reconnect to the C&C server.
If the C&C server is unavailable, a dialog will appear asking if you want to retry (Yes/No). If Yes, the connection will be retried (try again if necessary). If No, the window will close.
When the C&C server initiates an outage or other network interruption, a red banner message appears counting down the time to retry the connection. This will continue until the connection to the C&C server is established or until the user clicks the Close button. At the same time, the user can interact with other parts of the user interface. When the client connects, the red reconnect bar will disappear.
Cobalt Strike can be customized using the Aggressor Script language. The aggressor script allows you to modify and extend the Cobalt Strike client.
History
Aggressor Script is the spiritual successor to Cortana, Armitage’s open source scripting engine. Cortana appeared thanks to a contract under the DARPA Cyber Fast Track program. Cortana allows users to extend Armitage and manage the Metasploit® framework and its features through Armitage’s C&C server. Cobalt Strike 3.0 is a completely redesigned version of Cobalt Strike without using Armitage as a base. This change made it possible to review the Cobalt Strike scripts and create something based on its functionality. The result of this work was the scenario of the aggressor.
Aggressor Script is a scripting language for red team operations and enemy simulation, inspired by scripted IRC clients and bots. Its purpose is twofold. You can create long-lasting bots that simulate virtual team members attacking side-by-side with you. You can also use it to extend and modify the Cobalt Strike client to suit your needs.
Downloading scripts
The aggressor script is built into the Cobalt Strike client. To manage scripts, go to the section
Cobalt Strike -> Script Manager and click Load.
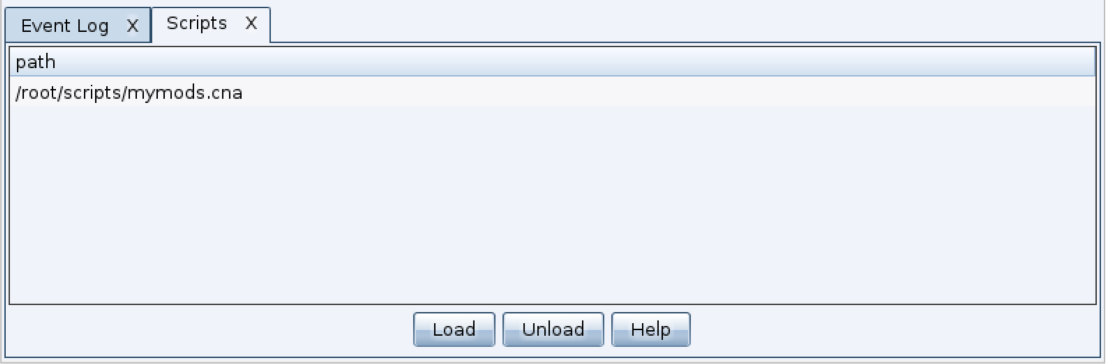
A standard script inside Cobalt Strike defines all pop-up menus and forms the information displayed in Cobalt Strike consoles. With the Aggressor Script engine, you can change these default settings and tailor Cobalt Strike to your liking. You can also use Aggressor Script to add new features to Beacon and automate some tasks.
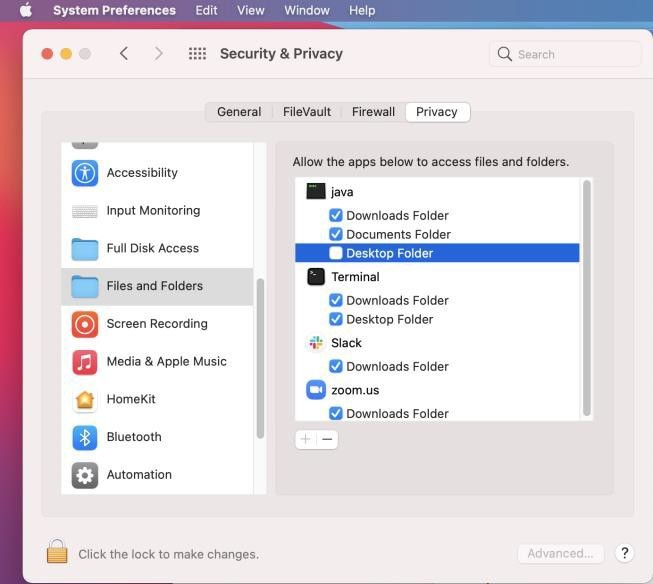
Running the client on MacOS X
The Cobalt Strike client may not initially display the contents of the Documents, Desktop, and Downloads folders in the file browser. (eg when loading scripts, uploading files, generating payloads, etc. etc…) By default, OSX restricts app access to Documents, Desktop, and Download. Programs must be explicitly granted access to these folders.
Since Cobalt Strike is a third-party application, simply giving access to Cobalt Strike will not work. It may be necessary to give the JRE running the Cobalt Strike client access to the file system. You can grant access to specific files and folders, or full disk access.
You may be asked to provide access to:

Or, if access was previously denied, you may need to change access in the OSX System Preferences / Security & Privacy / Privacy dialog :
Review
Cobalt Strike’s user interface is divided into two parts. A visual representation of sessions or goals is displayed at the top of the interface. The bottom of the interface displays tabs for each Cobalt Strike feature or session you’re interacting with. You can click on the area between these two parts and resize them as you like.
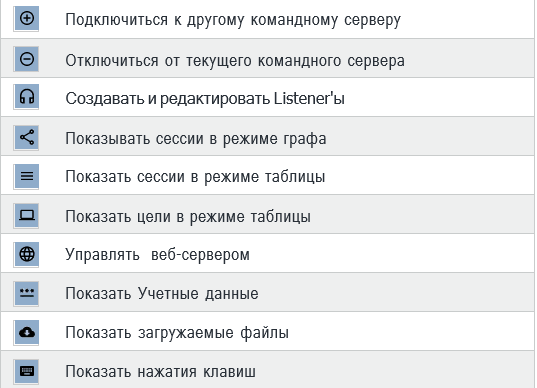
Toolbar
The toolbar at the top of Cobalt Strike provides quick access to common Cobalt Strike functions. Knowing the buttons on the toolbar will significantly speed up your work with Cobalt Strike.
![]()
Visualization of sessions and goals
Cobalt Strike has several visualization tools, each designed to help with different aspects of your work. You can switch between graphic displays using the buttons (Pivot Graph, Session Table, Goal Table) on the toolbar or the Cobalt Strike -> Visualization menu.
Summary schedule
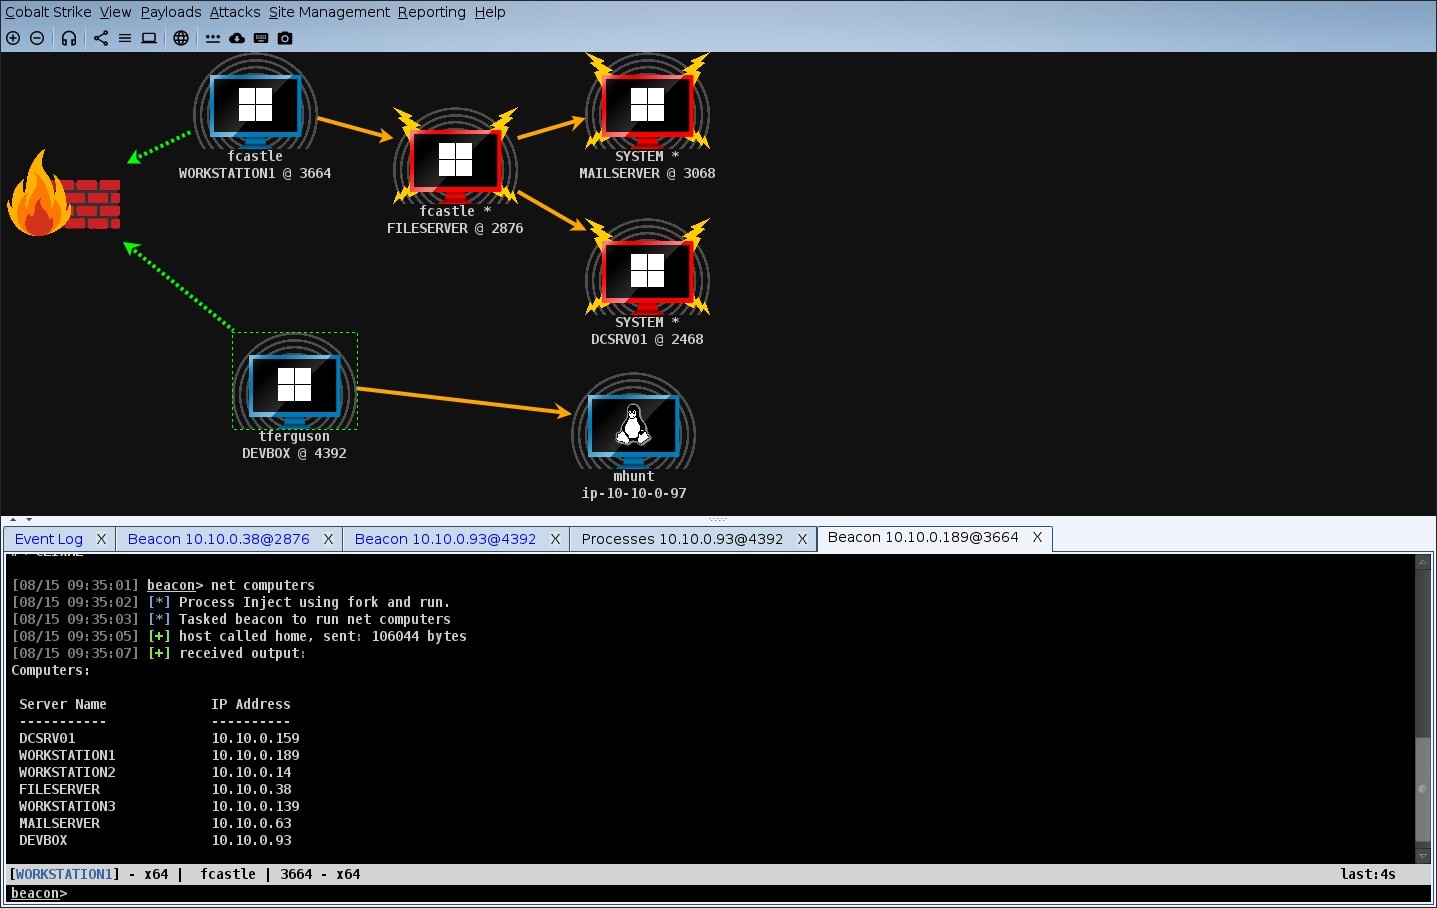
Cobalt Strike has the ability to connect several beacons in a chain. These linked beacons receive their commands and send the results through the parent beacon in the chain. This type of chain is useful for controlling which sessions leave the network and for simulating a legitimate user, which limits the paths of interaction within the network. This chain is one of the most powerful features of Cobalt Strike.
Cobalt Strike workflows make it very easy to build such chains. It is not uncommon for Cobalt Strike operators to build beacon chains four or five levels deep. Without visualization, it is very difficult to track and understand these chains. This is where a summary schedule comes in handy.
The summary graph visually displays your beacon chains. Each beacon session has an icon. As in the session table: the icon for each host indicates its operating system. If the icon is red with lightning bolts, the beacon is running in a process with administrator rights. A darker icon means that the beacon session has been asked to end and has acknowledged it.
The firewall icon indicates the exit point of the beacon. A green dashed line indicates that the beacon is using an HTTP or HTTPS connection to exit the network. The yellow dashed line indicates that DNS is being used to log off the network.
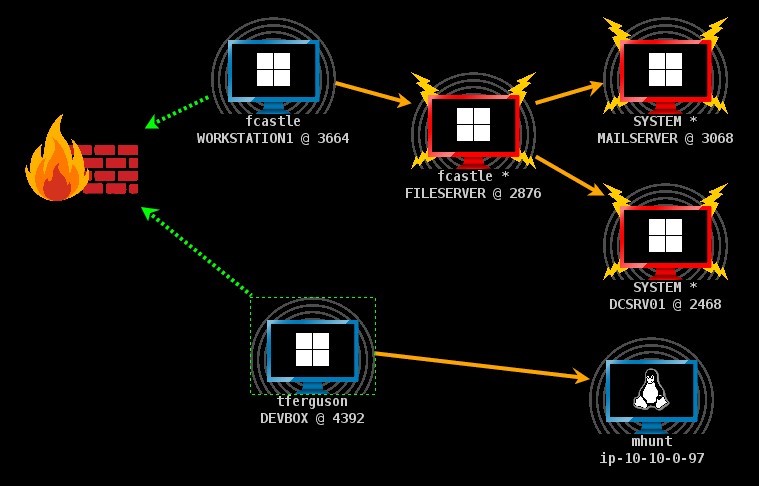
An arrow connecting one beacon session to another represents a connection between two beacons. Beacons use Windows named pipes and TCP sockets to manage beacons over a peer-to-peer connection.
The orange arrow is the named pipe (PIPE). SSH sessions also use the orange arrow. The blue arrow is the TCP socket channel. A red (named pipe) or purple (TCP) arrow indicates that the connection is down.
Click on the beacon to select it. You can select multiple beacons by clicking and dragging the box above the desired hosts. Press Ctrl and Shift to select or deselect an individual beacon.
Right-click on the beacon to open a menu with available post-op options.
Ctrl+Plus — zoom in
Ctrl+minus — will reduce the scale
Ctrl+0 – reset zoom level
Ctrl+A — select all hosts
Escape – remove the selection
Ctrl+C — arrangement of hosts in a circle
Ctrl+S — arrangement of hosts in the form of a stack
Ctrl+H — location of hosts in the hierarchy
Right-click on the summary graph without beacons to adjust the position of this graph. This menu also has an option for disconnected sessions. Select “Hide” to hide unrelated sessions in the summary graph. Select Show to display unrelated sessions again.
The session table shows which beacons are accessing a given instance of Cobalt Strike. Beacon is a Cobalt Strike payload to simulate attackers.
Here you will see the external and internal IP address of each Beacon, its Listener, the time of the last access to the server and other information. Next to each line is an icon indicating the operating system of the compromised target. If the icon is red with lightning bolts, the beacon is running in a process with administrator rights. A darker icon means that the beacon session has been asked to end and it has acknowledged it.

If you’re using a DNS Listener, be aware that Cobalt Strike doesn’t know anything about a host until it contacts it for the first time. If you see a recording of the last call and nothing else, you need to ask this beacon the first question to see more information. Right-click on one or more beacons to see post-op options.
The targets table displays the targets in the Cobalt Strike data model. The target table displays each target’s IP address, its NetBIOS name, and a note assigned by you or a member of your team. The icon to the left of the target indicates its operating system. A red lightning bolt indicates that a beacon session is associated with a target.
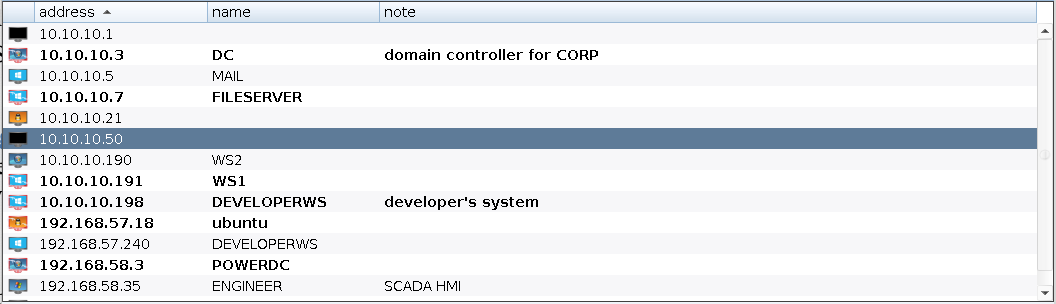
Click on any heading in the table to sort the hosts. Select the row and right-click on it to bring up the options menu for that host. Press Ctrl and Alt to select or deselect individual hosts. The target table is useful for lateral movement and understanding of your target’s network.
Tabs
Cobalt Strike opens every dialog, console and table in a tab. Click the X button to close the tab. Use the keyboard shortcut Ctrl+D to close the active tab. Ctrl+Shift+D will close all tabs except the active one.
Right-click the X to open a tab in a window, take a screenshot of a tab, or close all tabs with the same name.
There are also hotkeys for these functions. Use the keyboard shortcut Ctrl+W to open the active tab in a separate window. Use the keyboard shortcut Ctrl+T to quickly save a screenshot of the active tab.
Ctrl+B will move the current tab to the bottom of the Cobalt Strike window. This is useful for tabs that you need to keep an eye on. Ctrl+E will undo this action and remove the tab at the bottom of the Cobalt Strike window.
Hold Shift and press X to close all tabs with the same name. While holding Shift + control, press X to open the tab in a separate window.
Use the Ctrl+Left and Ctrl+Right keys to quickly switch between tabs. You can drag the tabs to change their order.
Cobalt Strike provides a console to interact with Beacon sessions, squeaks, and chat with teammates.
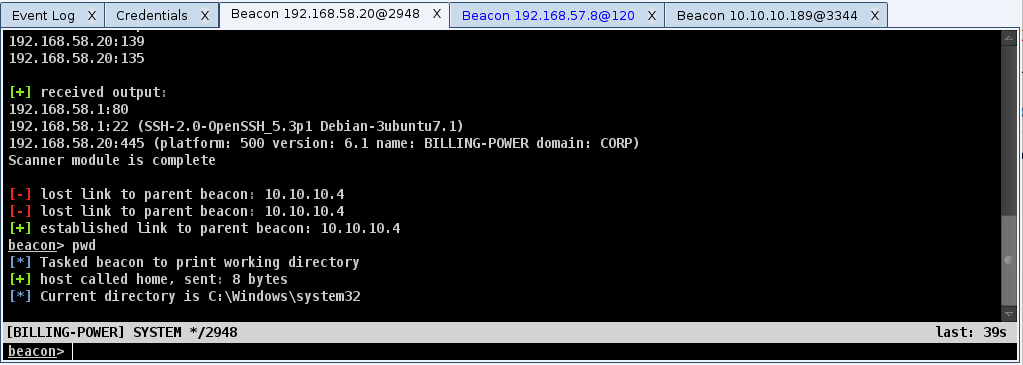
Consoles track command history. Use the up arrow to navigate to previously entered commands. The down arrow allows you to return to the last dialed command. The history command contains a list of previously entered commands. Symbol! Allows you to re-execute previously typed commands.

Use the Tab key to complete commands and options.
Use Ctrl+Plus to increase the console font size, Ctrl+Minus to decrease and Ctrl+0 to reset. This change is local to the current console only. To permanently change the font, go to Cobalt Strike -> Preferences.
Press Ctrl+F to display a panel that allows you to search for text in the console. Use Ctrl+A to select all text in the console buffer.
Cobalt Strike uses tables to display sessions, credentials, goals, and other interaction information.
Most of the tables in Cobalt Strike have the ability to assign color to selected rows. These highlights are visible to other Cobalt Strike customers. Right click and find the Color menu. Press Ctrl+F in the table to display the search bar in the table. This function allows you to filter the current table.
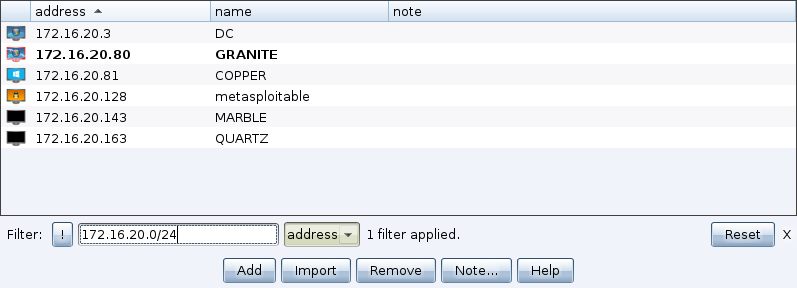
Enter the filter criteria in the text box. The format of the conditions depends on the column to which the filter is applied. Use CIDR notation (eg 192.168.1.0/24) and host ranges (192.168.1-192.169.200) to filter columns that contain addresses. Use numbers or ranges of numbers for columns that contain numbers. Using wildcards(*, ?) to filter out columns that contain rows.
Button! overrides the current criteria. Press Enter to apply the specified conditions to this table. You can combine as many criteria as you like. The Reset button will remove the filters applied to the current table.
There are many default hotkeys available to you when working in the user interface. Some can be used anywhere, others are for different areas of the user interface. If you select Help -> Default KeyboardShortcuts in the menu, the following help window will open:
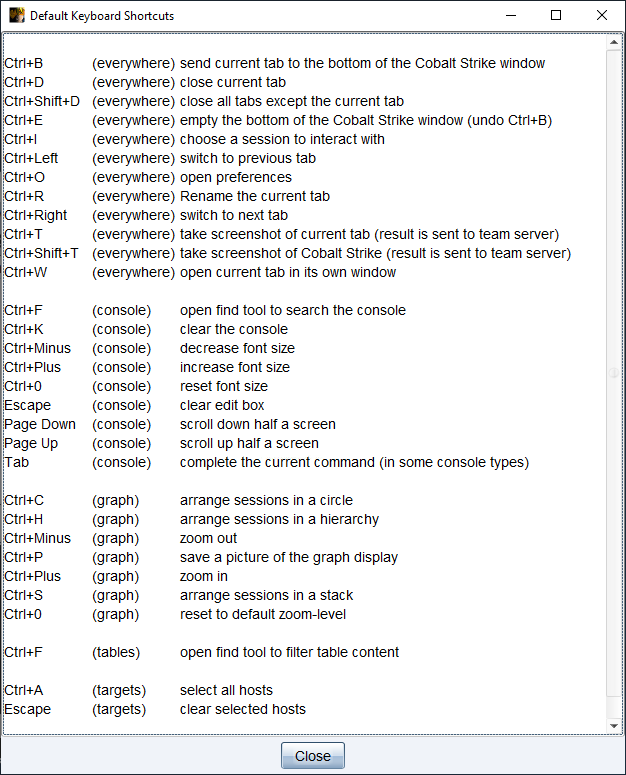
The Aggressor function, can also be used to open this list.
Thanks to various open source guides.