
Scanning Networks: Identifying Assets for Secure Management.

Cyber intelligence gathering is the process of collecting and analyzing information about a target organization or individual that occurs in an online environment. This process may include the collection of open information, such as data from websites, social networks, and other open sources, as well as the collection of closed information that can be found using hacking techniques, such as phishing, vulnerability attacks, traffic interception, and others. . Gathering cyber intelligence is an important part of cyber security because it allows you to identify potential threats and weaknesses in an organization’s infrastructure. This process also helps build a complete picture of the target organization, which can help inform security and strategic decisions. Cyber intelligence collection tools can include special programs that automatically scan websites and detect vulnerabilities, social engineering, server log analysis, and other techniques. Using such tools can help increase the efficiency and accuracy of cyber intelligence collection.

Gathering cyber intelligence is an important step in cybersecurity and can help identify potential threats and improve an organization’s security. One of the most common methods of cyber intelligence gathering is the use of automated website scanners to find vulnerabilities. Other methods include monitoring social networks, forums and chats to gather information about the target group, its habits and other data that can be used for attacks. The process of gathering cyber intelligence is an important step in ensuring cyber security and can help avoid potential cyber attacks. There are specialized tools and programs for cyber intelligence gathering, such as Maltego, Shodan, Nmap, and others. In summary, cyber intelligence gathering is an important step in Internet security and helps reduce the risk of cyber attacks and preserve the privacy and security of information.
The purpose of this tutorial is to teach the basics of the Footprinting methodology used by ethical hackers and pentesters.
Windows 8.1/10.
Basics of networking.
Virtual environment.
Windows Server 2012 or 2016.
ICMP type and code for echo request and echo reply packets.
Learn about the maximum frame size for your network.
Use the ping command to emulate traceroute (the tracert command).
Use the ping command to find the IP address of the target domain.
Ping is a computer network administration utility used to test the reachability of a host on an Internet Protocol (IP) network and to measure the transit time of packets from a source host to a destination host and back. It works by sending Internet Control Message Protocol (ICMP) echo request packets to the target host and listening for an ICMP echo response. The time it takes packets to travel from the source to the destination and back is known as the ping time.
nslookup is a command-line tool used to query the Domain Name System (DNS) for domain name or IP address mapping information. The tool is used to troubleshoot network connectivity or to gather information about a domain’s DNS records. Using nslookup, you can specify a domain name or an IP address, and the tool will return information about the corresponding DNS record, including the IP address associated with the domain name, the name of the mail server associated with the domain, and the I am the official DNS server for the domain.
A diagnostic tool to map the route and measure packet delays over an IP network.
Open Command Prompt or PowerShell in Windows and type:
![]()
Note: The IP address may vary in your environment.
Use the last command and add -fparametr to not fragment the ping packet and -lset the frame size to 1500 bytes.
![]()
Entrance:
![]()
This message above means that the frame is too large to be on the network and needs to be fragmented. The suggestion here is to try different values until the maximum frame size is reached.

Finally, note that the last two response bytes 1473 bytes and 1472 bytes show the maximum frame size on this machine’s network.
Each frame on the network has its own defined TTL. If the TTL reaches 0, the router discards the packet to prevent it from being lost.
![]()

The -i parameter stands for timeout, i.e. the number of seconds to wait between each ping (value between 1-255). TTL Expired means the router dropped the frame, after which the TTL expired (reached 0).
This command traces the network configuration information of the target domain. Open a new command prompt or PowerShell window and type:
![]()
The system converts the URL to its IP address and tries to trace the path to the destination. Here, 19 hops are required for the packet to reach the specified destination. You can use the help mark to show the various options for the commands: tracert /?
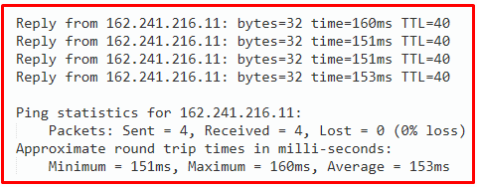
Open a new prompt window or PowerShell and type: ping www.certifiedhacker.com -i 2 -n 1 We set the TTL value, 2 trying to check the packet lifetime and -number of packets to 1
Go to reply from IP address 162.241.216.11 without losing packets. Let it set the TTL value to 3see what happens.
![]()

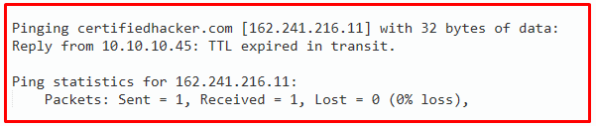
Note that there is a different IP address, the same one that we collect with the traceroute command during the first hops. Repeat this and increase the TTL value until you reach the IP address from (www.certifiedhacker.com) , which we track routed earlier.
![]()
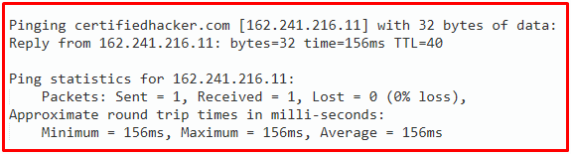
Done! These results mean that when you set the TTL to 19 (in this case), the response comes from the destination host (162.241.216.11). Keep in mind that the output will be similar to the route tracing results. Make a note of all the IP addresses you’re getting a response from.
Used to query the DNS (Domain Name System) to obtain a domain name or IP address mapping and other specific DNS record. Enter PowerShell:
![]()
Note : This command starts the interactive mode, you can enter help to view the list of available commands! To request the IP address of a given domain, you need to set the type to Arecord, and then enter the target domain:


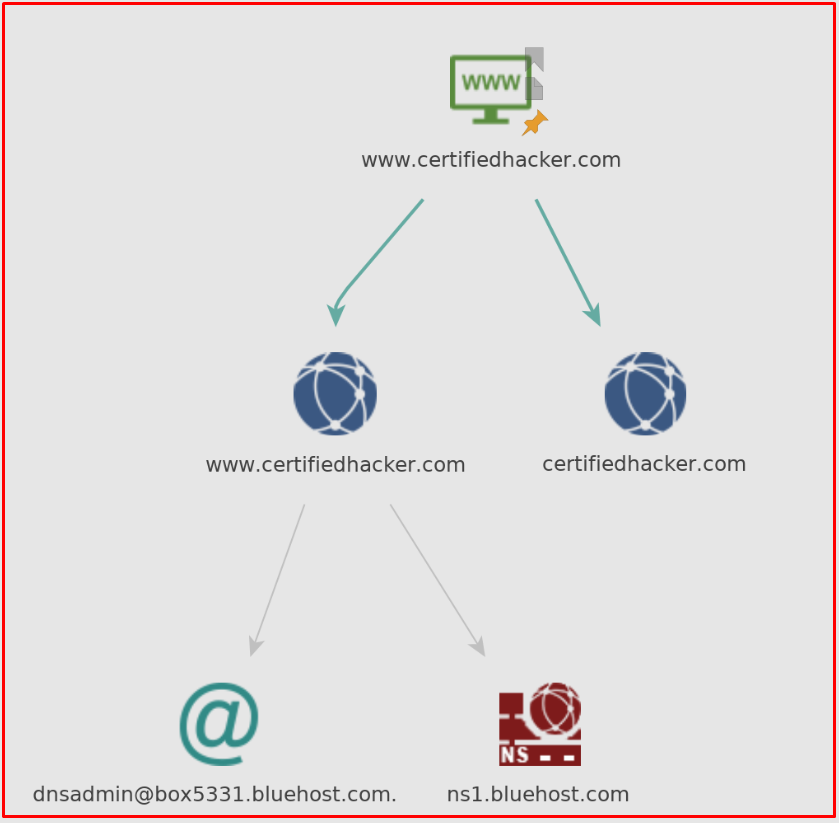
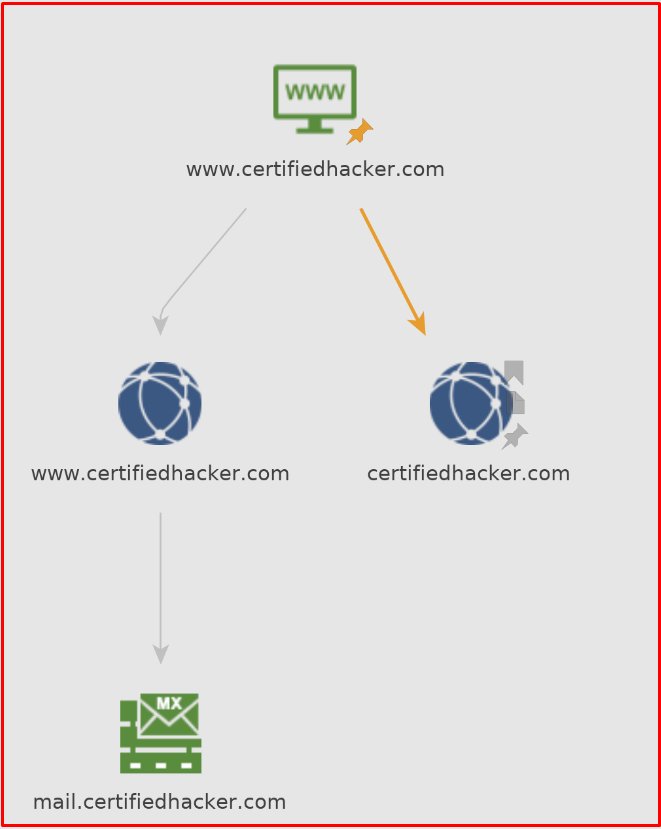
Note: This environment uses Google’s DNS server (8.8.8.8). To set up your own DNS server, just enter server x.x.x.x. The first two lines, dns.google and 8.8.8.8, indicate that the result was directed to this server to resolve the requested domain. Google’s DNS server does not contain the original domain zone files, so it is non-authoritative. Authoritative is the name of the server that contains the original source files of the domain zone. To get the server’s authoritative name, set the type to a CNAME record and query the target:
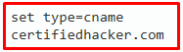
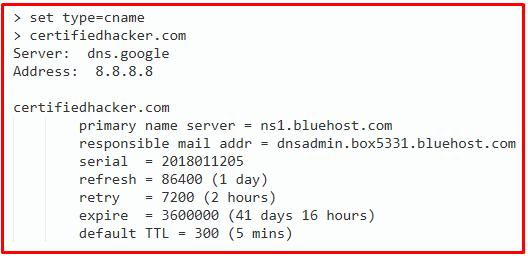
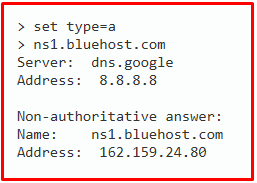
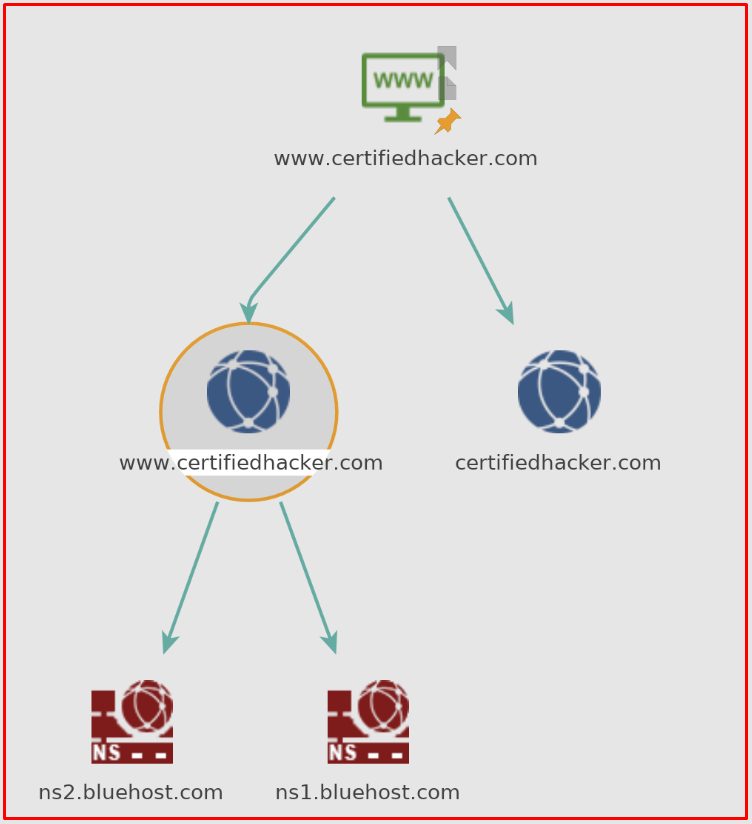
The CNAME search is performed on the official domain name server. With the name of the authoritative server, you can change the IP address. To request an IP address, set the type to value and then enter the name of the primary server that will appear in your lab environment, in my case: ns1.bluehost.com.
![]()
In summary, an authoritative name server maintains the records associated with the respective domain. With an authoritative nameserver (primary nameserver) and an IP address associated with it, an attacker can try to exploit the server by performing attacks such as DDoS, URL redirection, etc. Final analysis: Document all IP addresses. IP addresses of the response request. Information about TTL. DNS server names and other DNS information.
Maltego is an open source software tool used for intelligence and forensics. It allows users to collect and visualize data from a variety of sources, including websites, social media platforms, and public databases, to identify relationships and connections between entities such as people, organizations, and domains. This tool is commonly used by security researchers, intelligence agencies, and law enforcement agencies for investigations, threat analysis, and data analysis.
Kali Linux virtual machine
Determine the IP address. Define the domain and domain name scheme. Define server-side technology. Define Service Oriented Architecture (SOA) information. Define a name server. Define Mail Exchanger. Determine the geographical position. Find email addresses.
There are currently three versions of the Maltego client, namely Maltego CE, Maltego Classic and Maltego XL. This tutorial will focus on Maltego Community Edition (CE). Kali Linux comes with Maltego installed. Start Maltego from the application tray. If you are new to Maltego, just select the Maltego CE (Free) version and create a free account on (https://www.paterva.com/community/community.php).
1. Click the (+) icon located in the upper left corner of the GUI (in the toolbar) to create a new graph window (as a blank document).
2. Go to the left pane and expand the Infrastructure node under Entity Palette.
3. Drag the Website object to the New Graph(1) section.
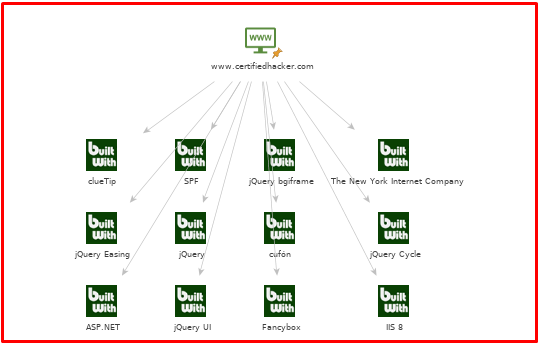
4. Rename the domain name on (www.certifiedhacker.com)

5. Right-click the object, select “All Transformations” and click “To Server Technologies [BuiltWith]”.
6. Create a new chart or delete/save previous results.
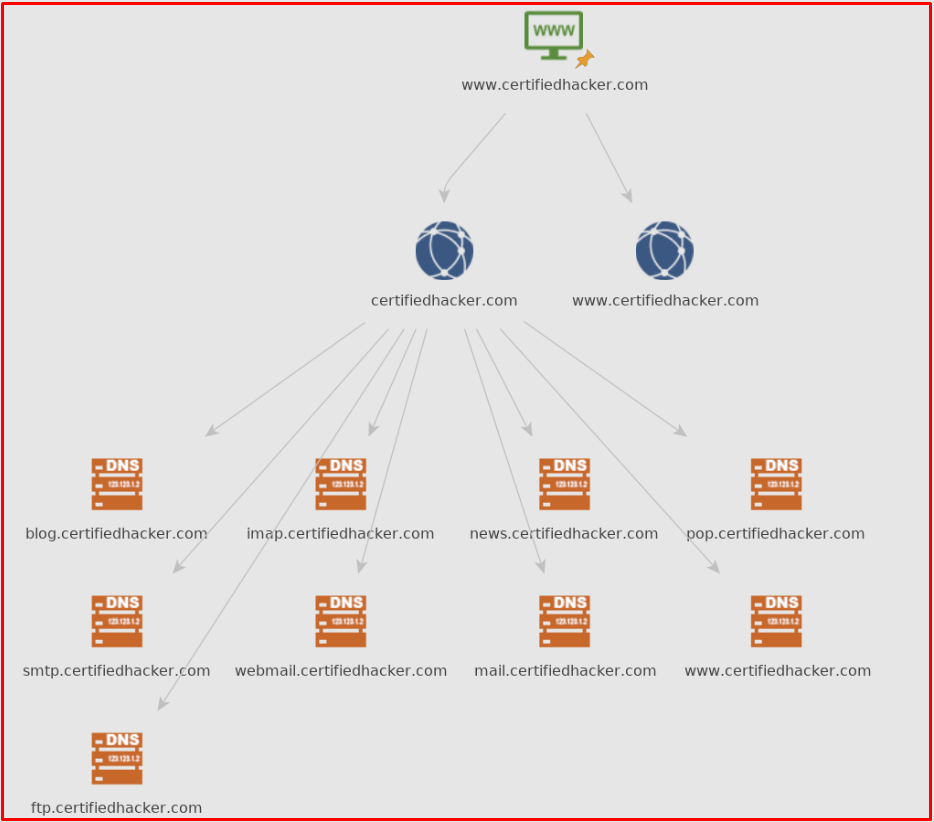
7. Right-click the Domain entity and select All Transforms -> To Domains [DNS].
8. Create a new chart or delete/save previous results.
9. Right-click the domain entity and select All Transformations -> To DNS Name – SOA (Start of Authority).
10. Create a new chart or delete/save previous results.
11. Right-click the domain entity and select All Resolves -> To DNS Name – MX (Mail Server).
12. Create a new chart or delete/save previous results.
13. Right-click the domain entity and select All Resolves -> To DNS Name – NS (Name Server).
14. Right-click the IP object and select All Transforms -> To Location [city, country].
15. Right-click the website entity and select All transformations -> To entities from whois [IBM Watson].

Recon-ng is an open source intelligence framework used in the field of computer security. It is a modular platform that can be used to collect information about a target system or network, including IP addresses, subdomains, open ports, and other information that can be used for penetration testing or vulnerability assessments. The framework allows users to perform intelligence operations by defining and running custom modules, making it a powerful tool for security professionals and researchers. Recon-ng has a similar look and feel to the Metasploit Framework, shortening the learning curve for using the framework.
Kali Linux virtual machine
Collect personal information.Collect hosts associated with a domain.How to perform network reconstruction.Create a report with the collected information.
Open a terminal and type recon-ng. Type help to see all the commands that allow you to add/delete records to the database, make queries, and more.
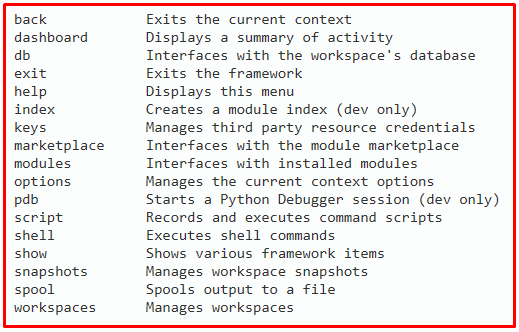
Note: When loading recon-ng for the first time, note the message below. Run from an empty framework (no preinstalled modules).
![]()
Create a new workspace: workspaces create CEH Add a domain to perform network reconstruction: db insert domains, certifiedhacker.com.

Recon-ng works with independent modules, database interaction, built-in convenience features, interactive help, and command completion. Recon-ng provides a powerful environment in which to conduct open source web reconnaissance quickly and thoroughly. You will use the Marketplace to add new modules.
To see all type of repo in the market: search by trading floor Working with modules and workspaces is very easy as shown below:
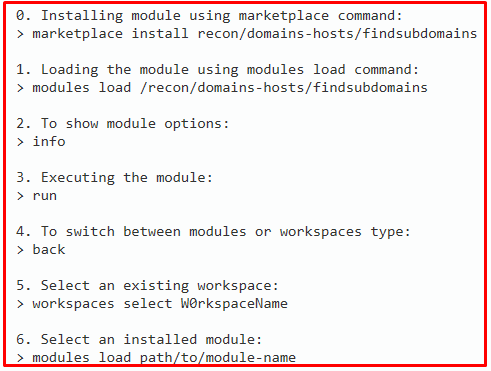
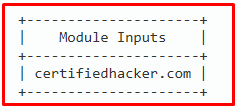
You can find other modules to collect some subdomains, we will use hackertarget in this tutorial. Let’s install and download it: marketplace install hackertarget modules download hackertarget. Enter information to view the SOURCE currently set to default as shown below: info.

Now set SOURCE to: SOURCE option set certifiedhacker.com. You can single input command to see the whole:
Run the module: run Note. If your answer works fine but is confused with a bunch of queries and values, just type show hosts to populate a better result. show hosts (this command will show a clean summary of detected resources).
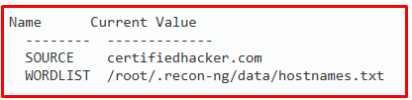
You can use other modules to get more hosts, such as brute_hosts . Exit the current module: back.
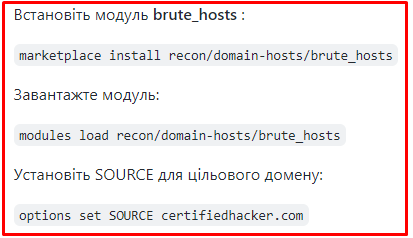
By typing the info you see in this particular module, you can create your own wordlist for hostnames. I recommend using the standard one, which is pretty good.
Run the module: run
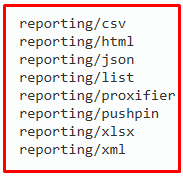
Now that you have collected a few hosts, you will prepare a report with all the information. Install the reporting module to report in html format.
![]()
Note. You can install any of these modules below to export to different formats.
Download the module:
![]()
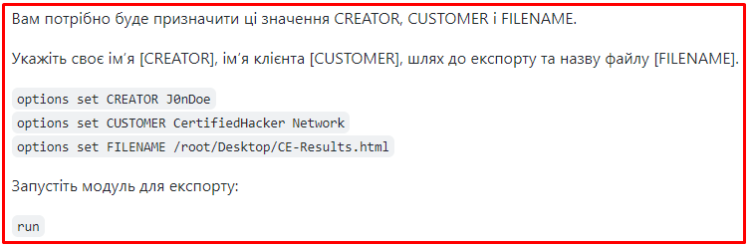
To configure reporting information, type info to see the value.
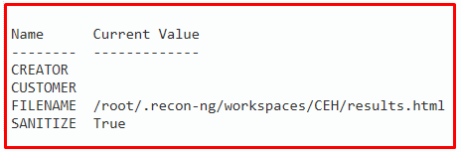
The generated report is saved on the desktop. There isn’t much to this report, but when you run multiple modules and add geolocation reports, they can get very complex. Recon-ng tracks everything perfectly.
Objectives: Get contacts of personnel working in the organization. Search for user profiles on various websites. An important note. The location and button modules mentioned in this tutorial require a valid API key to use and have some GDPR data collection implications. Some require payment of money, which will be discussed below. I suggest saving all your API keys to a file while you’re working to use them later. Setting up an API key for your recon-ng is very easy, just follow the document below and manage your keys in Recon-ng using the command: (https://github.com/Raikia/Recon-NG-API-Key-Creation/blob/master/README-v4.8.3.md)
The collection of personal information involves the discovery of contact details such as email, address, etc., on the target organization’s website. Recon-ng contains various modules for viewing and searching for contact information about a specific company. Some Recon-ng modules for detecting personal information: recon/domain-contacts. recon/company-contacts. recon/domain-contacts/namechk.
Download Kali Linux and open a terminal. Type recon-ng to run the program. Add a new workspace called recon: workspaces create recon
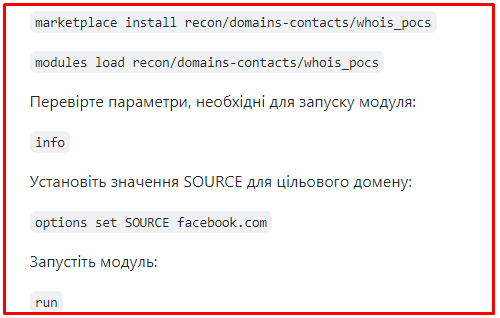
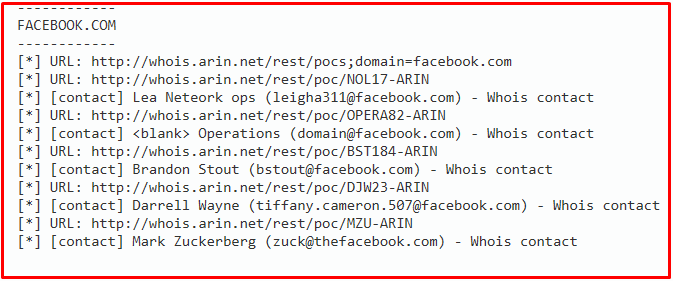
Set the domain and perform a fingerprint on it to get the contact available in the domain. The module chosen to perform this technique uses the ARIN Whois RWS to collect POC data from whois queries for a given domain. Install and download the module:
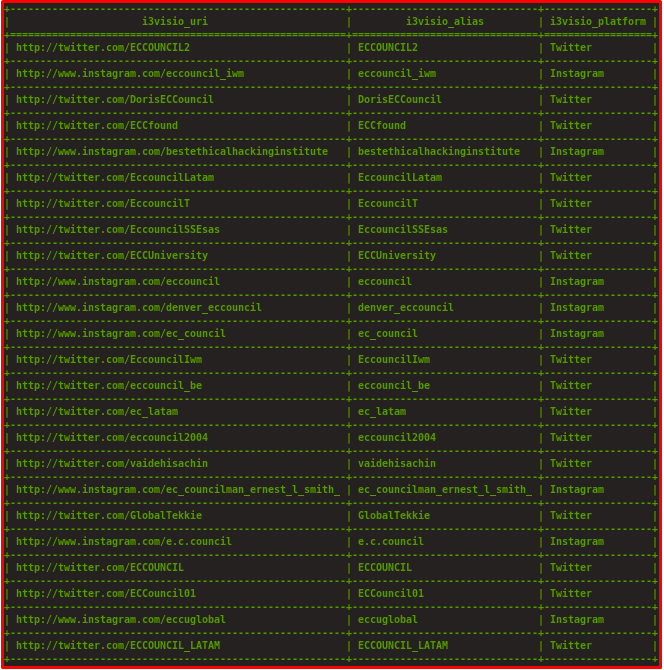
The module recon/profiles-profiles/namechk checks for the existence of the given contact’s username, but unfortunately namechk charges a fee to use its API. We can search for user profiles on various websites using recon/profiles-profiles/profiler .
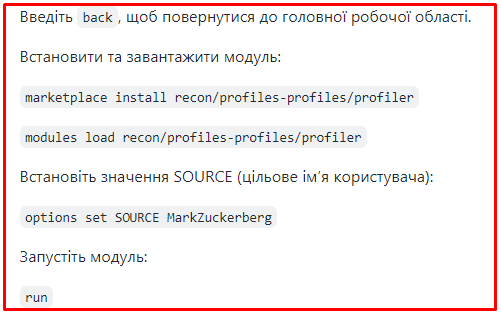
The recon/profiles-profiles/profiler module looks for this username and returns the URL of the profile on various websites (found with a matching username).
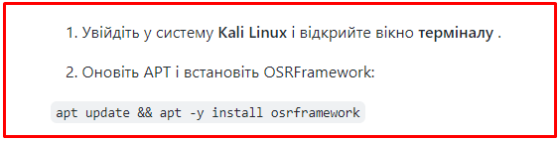
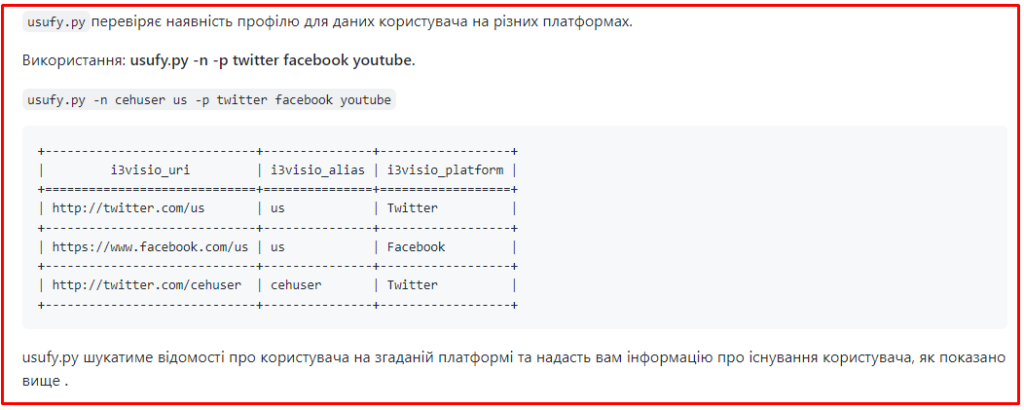
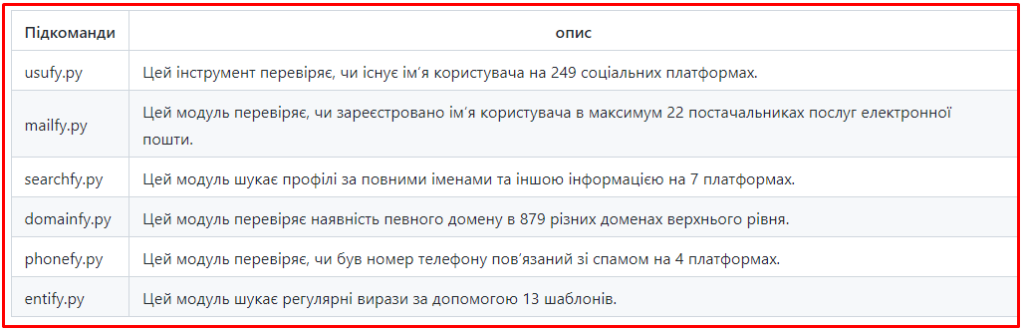
OSRFramework is a set of libraries for performing Open Source Intelligence tasks. They contain links to a bunch of different programs related to username validation, DNS lookups, leak research, deep web searches, regular expression extraction, and more.
Kali Linux virtual machine.
Demonstrate how to identify a target’s usernames on various social media platforms.

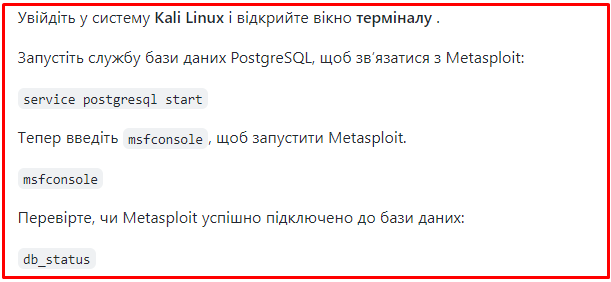
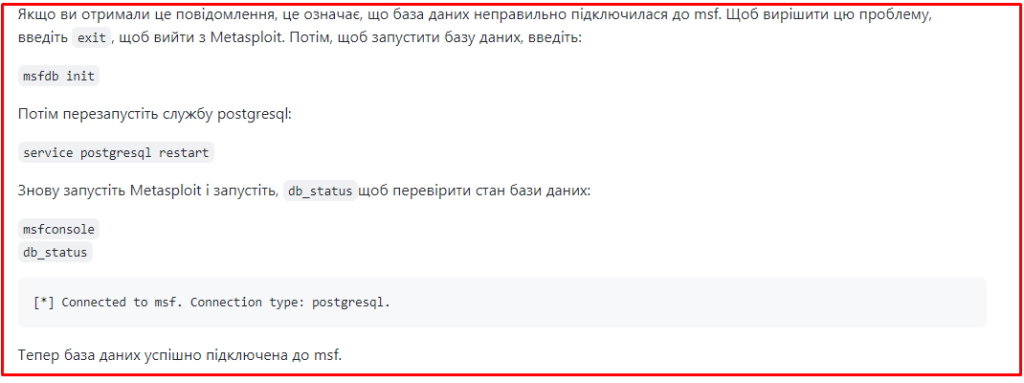
The Metasploit Framework is an open source platform for developing, testing, and executing exploits for detecting security vulnerabilities. It is a comprehensive set of penetration testing and vulnerability assessment tools that allows security researchers and ethical hackers to simulate real-world attacks and assess the security posture of a target system. The framework contains a large database of exploits, payloads and auxiliary modules, as well as a convenient scripting interface for configuring and automating tests. The Metasploit Framework is widely used in the information security industry and is considered the standard tool for conducting security assessments.
Kali Linux virtual machine.
Get accurate network information. How to identify vulnerabilities and disclosures.
![]()
You need to load a couple of virtual machines in your lab. In my case, I shot: Ubuntu Metasploitable. Windows 7 SP1. Windows Server 2012 R2.

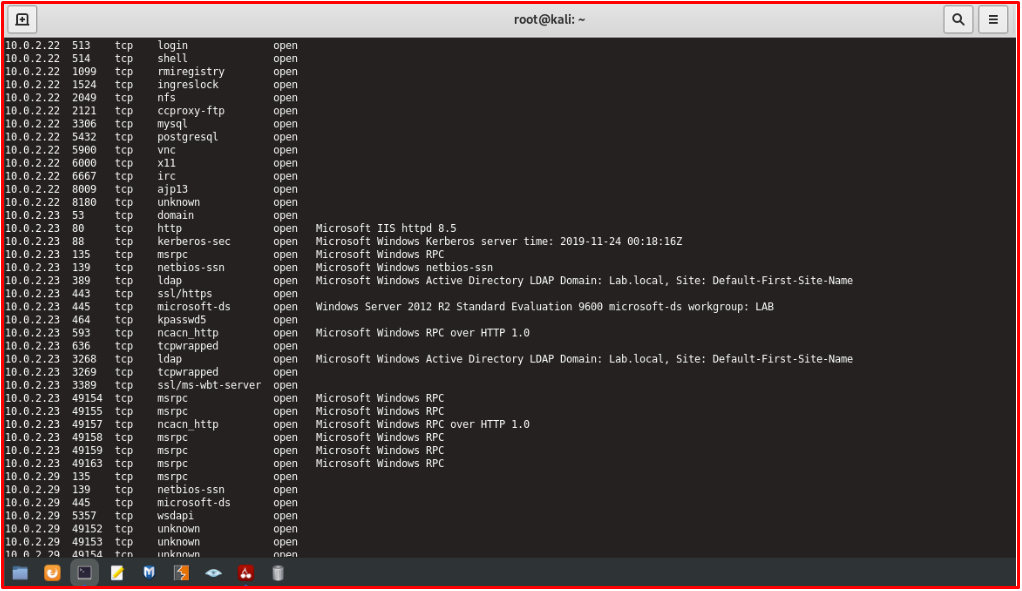
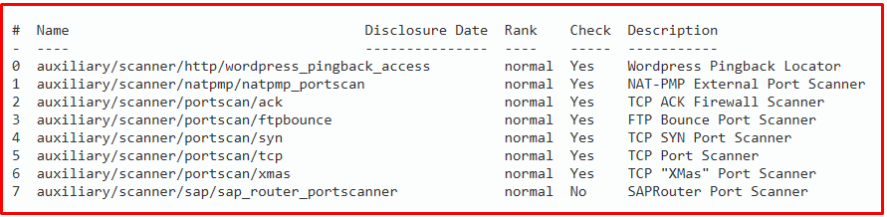
Searching for portscan modules : search portscan
Select scanner/portscan/syn : use scanner/portscan/syn Now we need to see the module options: show options
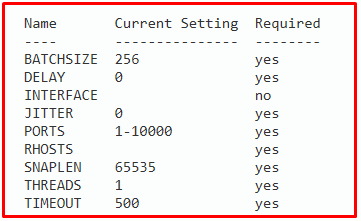
Set RHOSTS target and THREADS to 100, set RHOSTS 10.0.2.23,set THREADS 100. Type run to run the module.

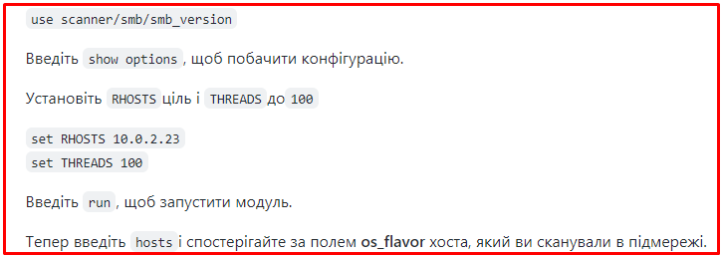
This module will list all open TCP services using a raw SYN scan. Next scan, let’s find out the SMB version.
Download the scanner/smb/smb_version module:
TheHarvester is a tool used to gather open source intelligence (OSINT) about a target, including email addresses, subdomains, and IP addresses. TheHarvester may collect information from various sources such as search engines, Whois databases and various websites. Information collected by TheHarvester may be used for reconnaissance and intelligence gathering as part of a penetration testing or ethical hacking process.
Kali Linux virtual machine.
Extract email, subdomain names, virtual hosts (…) from websites. Demonstrate how to identify search engine vulnerabilities and disclosures with Harvester.

In the help command, you can see the meaning of these options, for example -d means domain and -l limits the number of search results, and -b is the search engine/source. theHarvester may return too much information to view, you can write the output to an HTML file:

The file will be exported to your home folder in Kali Machine. Note. If you’re having trouble exporting an HTML file, be aware that there is a huge amount of information being collected, you may want to reduce the number of search engines/sources instead of using them all at once.
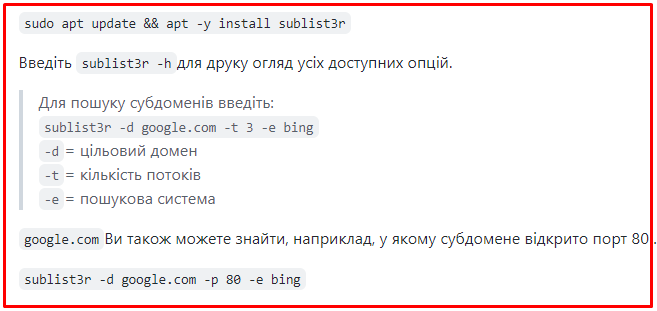
Sublist3r is a Python tool designed to enumerate website subdomains using OSINT. (https://github.com/aboul3la/Sublist3r)
Log into your Kali machine and open a terminal Enter this command to update the current Kali packages and install sublist3r:
Web Data Extractor is a tool used for web scraping and data extraction from websites. It allows the user to retrieve data such as emails, phone numbers, addresses and other information from websites and saves the data in a structured format such as CSV or Excel. The tool can be useful for lead generation, market research and other purposes where you need to collect and analyze data from websites.
HTTrack – is a free open source website copyr or offline browser that allows users to download a website from the internet to their local storage. It allows users to save all website content, including HTML pages, images, and other files, for offline viewing. HTTrack is mainly used for website archiving, data backup and offline browsing, but it can also be used to collect information about websites and servers for security purposes.
Tracing Emails – is the process of tracing the origin or source of an email, usually with the purpose of identifying the identity or location of the sender. This can be done using various methods, such as analyzing email headers, looking for patterns in IP addresses, or using email tracking tools. Email tracking is often used for purposes such as verifying the authenticity of emails, investigating cybercrimes, or simply locating an old friend or associate. It is important to note that email tracking may raise privacy concerns and should only be done with proper authorization and in accordance with applicable laws and regulations.
Path Analyzer Pro – is a network analysis and monitoring software. It provides deep insight into network performance and helps identify and resolve network issues. It can be used to analyze network traffic, measure network performance, identify network bottlenecks, monitor network availability, and detect security threats. With a graphical representation of network topology, it allows users to easily view and understand data flow and identify problem areas in the network.
FOCA– (Organizational Fingerprints with Collected Archives) is a tool used to analyze metadata and collect information in a target organization’s domain. It helps gather information from public sources such as websites, search engines and document metadata to create a complete profile of the target organization. FOCA is used for reconnaissance during penetration testing as well as for information security assessment. Information gathered through FOCA can be used to identify potential vulnerabilities, understand a target organization’s network and systems, and support subsequent attacks