This article compiles a large list of Wi-Fi cards that support monitor mode and wireless injection.

Kali Linux is a Linux distribution that specializes in cybersecurity. It is an open source product that provides a lot of customization for penetration testing that helps companies understand their vulnerabilities. Those interested in cybersecurity often benefit from using this specific Linux distribution. The Kali Linux system was developed as an information security testing tool. The toolkit was selected based on the possibility of being the first to identify weak points in the IT infrastructure and to take measures to eliminate the identified “holes”. Kali is distributed freely, without purchasing licenses. Supports almost all known file systems, drive types, interfaces. So there are no problems with compatibility even in the future, regardless of the hardware part of the computer or server. This article presents a complete guide to creating and further configuring Kali Linux on a portable medium (memory card, flash drive, external drive).

For brevity, the instructions will say “on a flash drive”, although any of the listed media is meant. You can create a flash drive with Kali Linux 2021 Live USB directly in Windows. In fact, this tutorial is suitable for both Windows and Linux, as we will need one cross-platform utility to burn Kali Linux Live to USB. We will do other actions for setting up permanent storage from Kali Linux itself. After installation, the user receives a ready-made package of tools, albeit with a specific bias. This version of Linux cannot completely replace a traditional workstation. In the instructions, we will create a persistent partition, that is, permanent storage, where files and settings will be stored between reboots. If desired, this section can be encrypted.
Create a LIVE system on a flash drive with Kali Linux (Windows or Linux)
Create persistence for your LIVE system
Create an encrypted persistent Kali Linux repository
Creating a bootable flash drive with a LIVE system is one of the fastest ways to launch Kali Linux. This method has several advantages:
Portability – you can boot from a recorded flash drive on any computer
Fast deployment (as installation with unpacking of each package is not required) on a USB flash drive
You can set up persistent storage – a little extra effort and your LIVE Kali Linux system will be able to save files and new system settings
It is impossible to harm the main system – when creating a bootable flash drive, the hard drives of the computer and the bootloader of the main system are not touched
If you want a system with one or more permanent storages, then you need to start with a bootable flash drive with a LIVE system – this is the starting point for all subsequent actions. Therefore, in any case, we will need an ISO image of the system from the official website: https://www.kali.org/get-kali/#kali-live
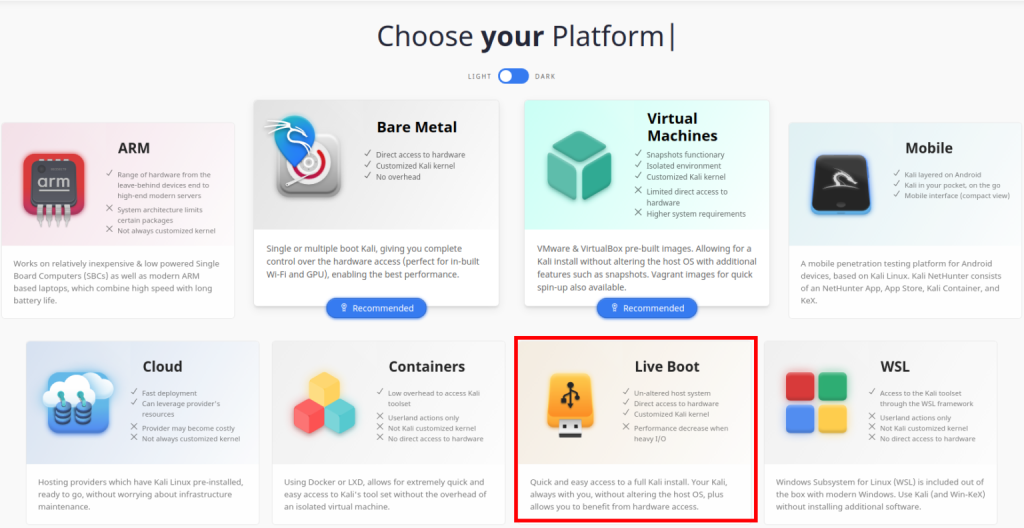
You can choose between the latest release and the Weekly Image, which is a weekly image (with newer versions of packages but released without testing) – choose either one. You can download the image via a direct link or via torrent.
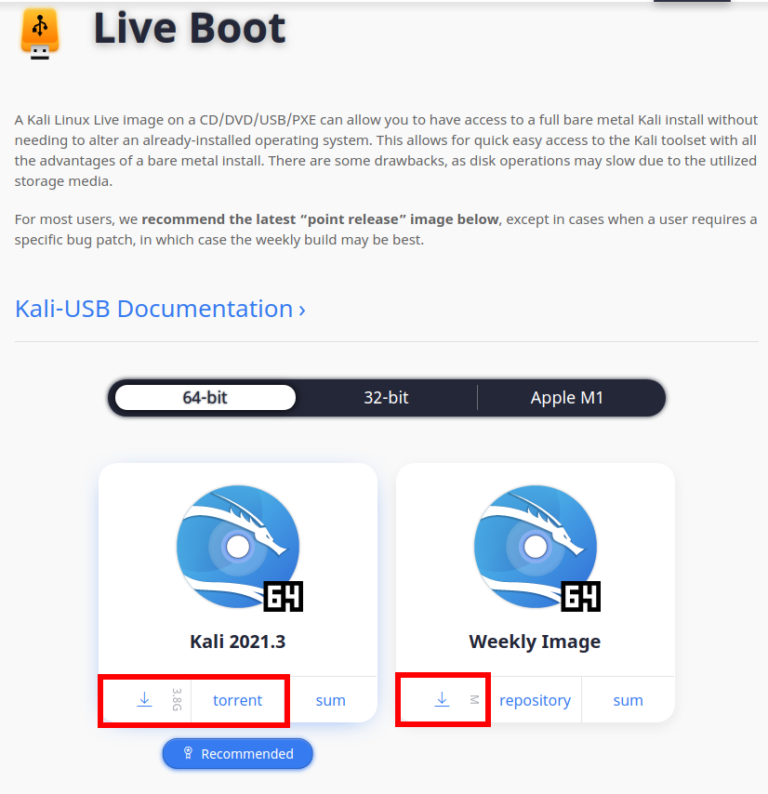
You will also need a flash drive. The faster the read/write speed of the flash drive, the more comfortable it will be. If you need a LIVE Kali Linux system and do not need permanent storage, a flash drive of any size larger than the size of the ISO image is sufficient, ie. it is 4 or more gigabytes. If you plan to create one or more permanent storages, a flash drive with a volume of 16 gigabytes or more is recommended.
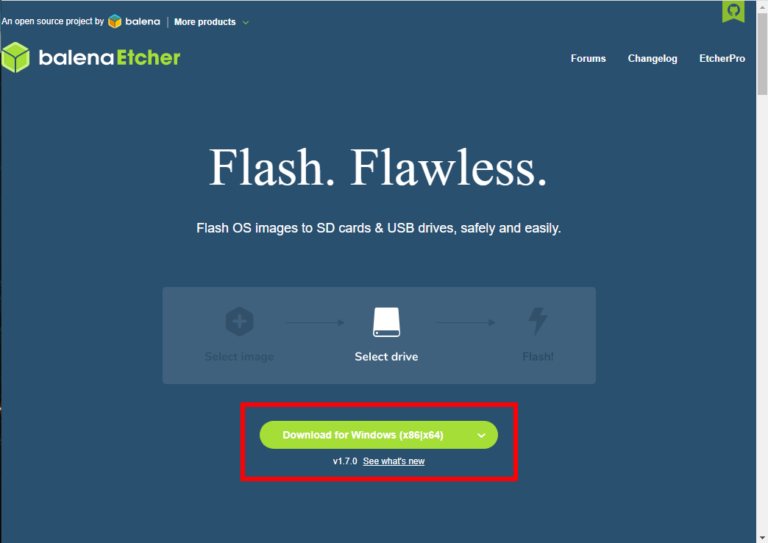
Нам потрібна програма для запису ISO на флешку USB. Для цих цілей ідеально підійде кросплатформова Etcher. Тобто неважливо, ви зараз на Windows або Linux, ви можете використовувати Etcher для запису образу диска на флешку.
Go to the program website Etcher: https://www.balena.io/etcher/ and download it:
Plug in your USB flash drive, launch Etcher, select the downloaded Kali Linux LIVE ISO image, click the Flash button! and wait for completion.

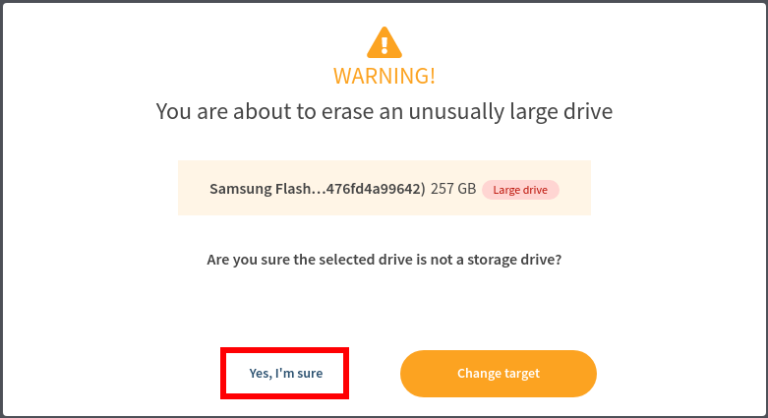
I have a flash drive with a large volume (256 GB), so the program shows me a warning: “You are about to erase an unusually large drive. Are you sure the selected drive is not a storage drive?”. The warning says: You are about to erase an extremely large disk. Are you sure the selected drive is not a drive? If everything is correct (and in my case everything is as I want), then click “Yes, I’m sure”. (Screenshot 1)
1. If you have already started your computer from a bootable flash drive, repeat these steps for Kali Linux Live. For example, on my computer, when turning on, you need to press the ESC button many times (in some systems it is Delete or F12, F2, etc.), and then it is enough to select the flash drive.
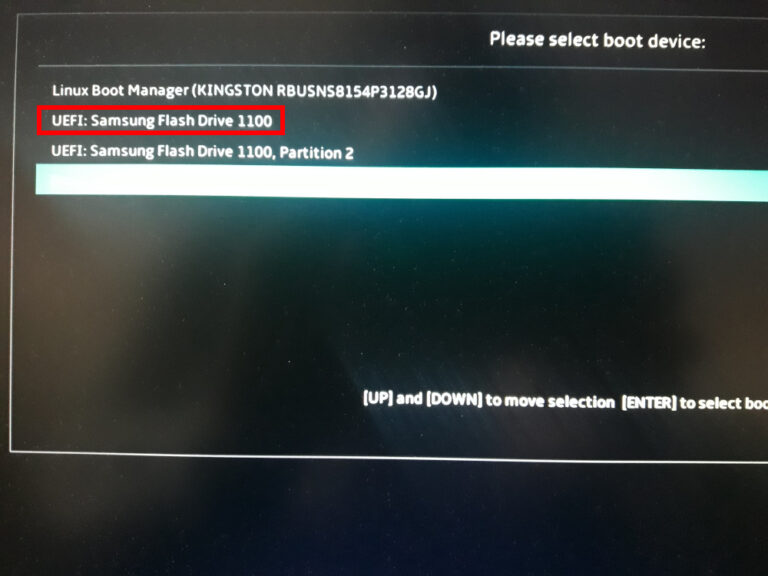
2. If that didn’t work for you, try booting your computer with the SHIFT key. Select the “Use device” section, there you will see the flash drive and select it (Screenshot 2). You will be taken to the UEFI settings, which resemble an advanced BIOS. The specific appearance and structure of the menu varies depending on the motherboard manufacturer.

3. If that didn’t work for you either, you may have Security Boot and Fast Boot enabled. These options must be disabled in the UEFI menu (new version of BIOS). To get to it, turn on the computer with the SHIFT key. Go to the “Troubleshooting” section (Screenshot 3). Go to Advanced Options and select Embedded UEFI Options. Click the “Reload” button.

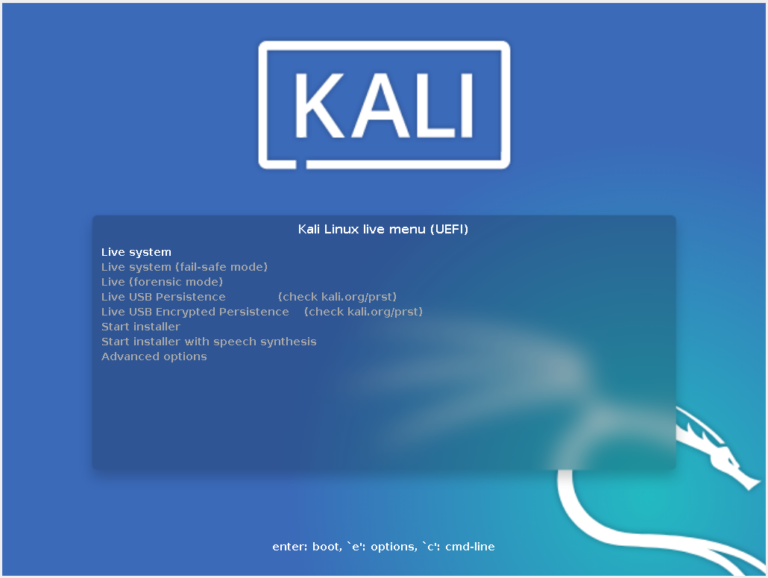
4. You need to find and disable the “Security Boot” and “Fast Boot” settings. If for some reason the SHIFT key did not work for you, see the instructions “Three ways to access the Windows boot options menu”. In the Kali Linux 2021 Live boot menu, select the Live system option (Screenshot 4). Login to the system will be performed without a password. If the system asks for a password at some point, for example to unlock the screen, enter “kali”.
Already at this stage, you can start getting to know Kali Linux.
save files
run tools
update existing programs
install new tools
All changes will be saved in the virtual file system and will be lost when the computer is restarted. So that the installed packages and saved files do not disappear after a reboot, you need to configure the persistence section – permanent storage. For example, I use a 256 GB flash drive, and the Kali Linux Live image takes up 4 GB, so I can allocate up to 252 GB for permanent storage. ATTENTION: This is a very responsible step, because if you make a mistake, you can delete data from a disk that you did not intend to wash.
Open a terminal and run the command:
![]()
You will see a list of drives and their partitions.
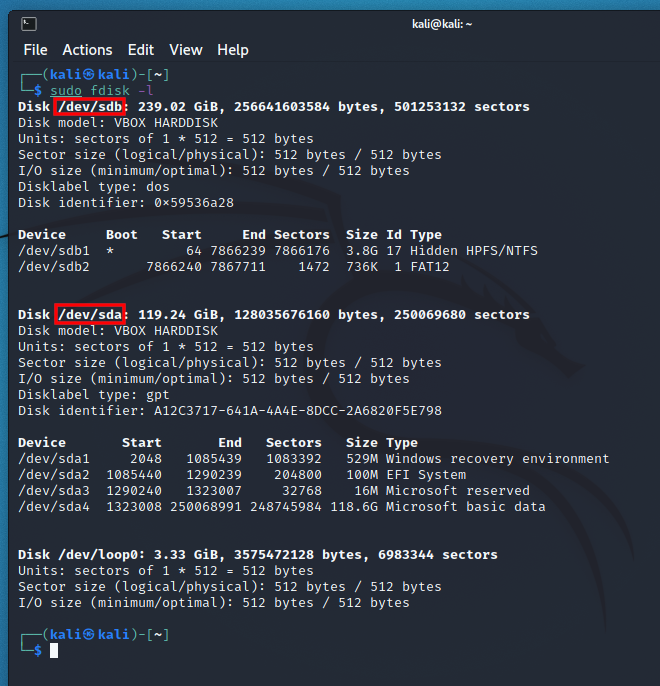
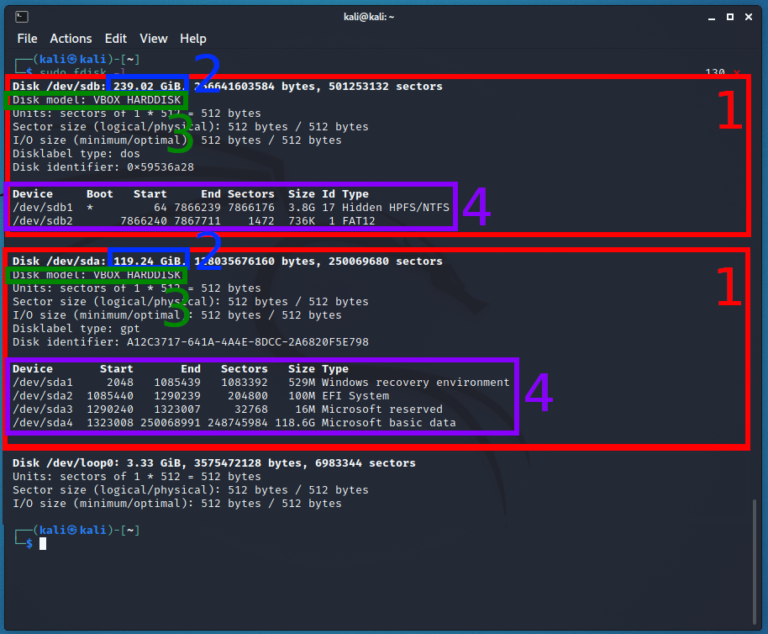
A flash drive with a Kali Linux Live image should have two partitions:

As you can see, the drive is called /dev/sdb and the ISO image is written to the /dev/sdb1 partition.
To verify the disk name, run the following command:
![]()
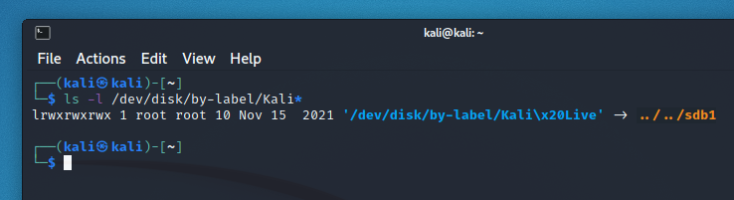
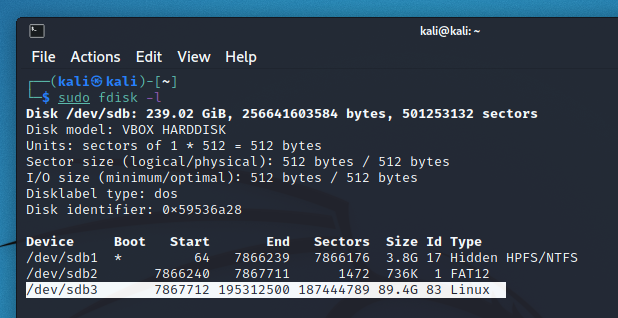
How can you make sure that the Live system is installed on the sdb1 partition, so we really need the /dev/sdb disk. ATTENTION: if you are not sure about the name of the disk, take a screenshot or a photo of all disks (the output of the “sudo fdisk -l” command) and show it here in the comments – we will try to figure it out together.
So, on a flash drive with Kali Linux, I need to find out where the free space begins, for this, use the command of the form:
![]()
For example, in my case the drive is called /dev/sdb, then the command is:
![]()
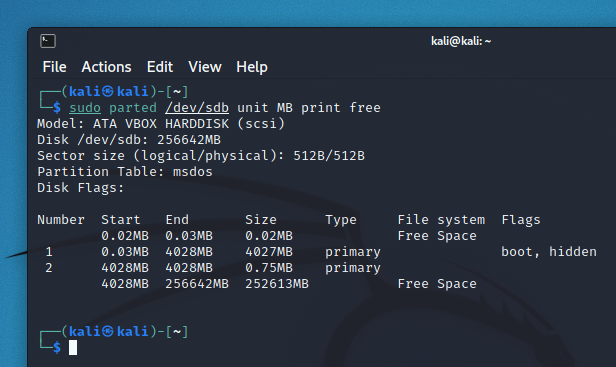
Pay attention to the line:
![]()
4028MB is the beginning of free space. I have a total of 252613M (ie 252 Gigabytes) of free space on the flash drive available to me.
The command to create a new logical partition looks like this:

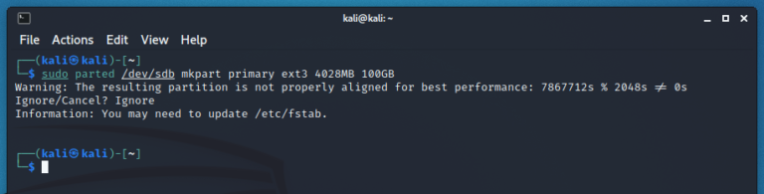
With the following command, I create a new logical partition on the flash drive (for me it is the /dev/sdb disk), the partition will start with 4028MB and end with 100GB:
![]()
primary – partition type
/dev/sdb – path to my flash drive
sudo parted – calling the parted program with superuser privileges
mkpart – internal parted command, which means creating a partition
ext3 – partition filesystem 4028MB – start of new partition 100GB – end of new partition ie. the new partition will have a volume of 100GB minus 4028MB, i.e. approximately 96 gigabytes. Instead of GB, you can specify MB (size in megabytes). ATTENTION: here you specify NOT the size of the partition, but the number of megabytes (or gigabytes) that need to be moved from the beginning of the flash drive to the end of the partition.
The command displays the following warning:

The essence of the message is that the discs are written in blocks, and the selected settings do not fully correspond to the blocks – this is normal for media on which the ISO image is recorded. Therefore, enter “Ignore”. The command will create the partition very quickly and output the following information, which you can ignore:
![]()
You can see the new section using the command:
![]()
I have it displayed as:

NOTE: If you want your permanent storage to be encrypted, you don’t need to complete the following commands from this fourth section, you can skip right now to the fifth step “5. Persistent storage with encryption.” The following command will create an ext3 file system on the specified partition and label it “persistence”.
![]()
In my case the partition is named /dev/sdb3 then the following command:
![]()
Now we need to save on the newly created partition a small file necessary for the normal functioning of the permanent storage. With the following commands, we will create a mount point in the current system, mount the flash drive (so that changes can be made to it), write the configuration file to enable permanent storage, and unmount the flash drive:
sudo mkdir -p /mnt/my_usb && sudo mount /dev/sdc3 /mnt/my_usb && sudo bash -c "echo '/ union' > /mnt/my_usb/persistence.conf" && sudo umount /dev/sdc3
Note that you need to replace /dev/sdb3 with your partition name and number twice in these commands.
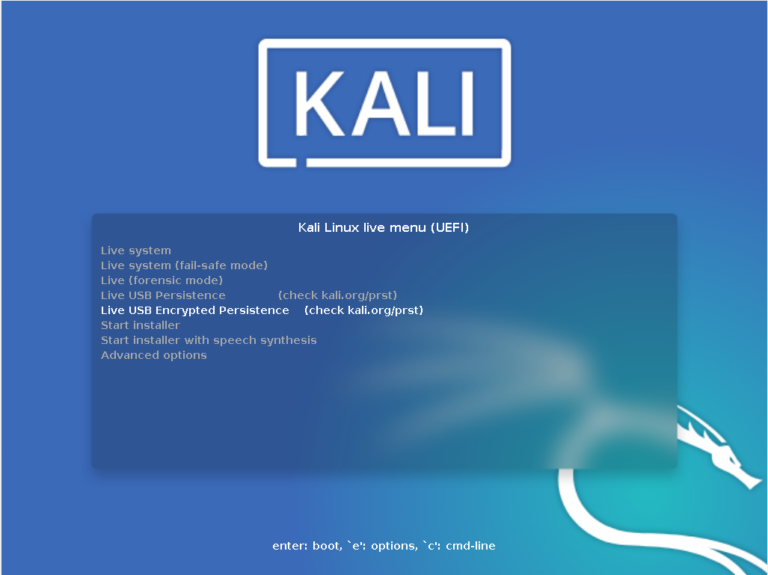
5. Now you can restart the computer and download from the flash drive. At the beginning of the download, select “Live USB Persistence” (Screenshot 5). Now the system will remember the changes made. For example, you can save files or install new programs and they won’t disappear after a reboot. To have the system use persistent storage, select Live USB Persistence every time you boot. Otherwise, the normal Live system will be loaded.

The created additional partition can be encrypted. As a result, all data stored on it will be securely protected. Every time Kali Linux boots, it will ask for a password to decrypt the partition. Data will be automatically encrypted when writing to an encrypted partition and automatically decrypted when reading from the partition. You need to start by creating a permanent repository, as described a little above. We’ll assume you’ve already created a persistent repository, so let’s continue. If you’ve just created a persistent store and haven’t rebooted yet, proceed to encrypt it. If you have already rebooted, then when you turn on the computer, you need to select Live system (and NOT Live USB Persistence) in the boot menu so that the partition we are going to encrypt is not used by the system. NOTE: Remember that in all the following commands it is very important that you replace /dev/sdb3 with the drive name, otherwise you risk deleting data from the wrong drive. When encrypting a partition, all data contained on it will be destroyed and cannot be recovered.
To start encryption, enter the command:

The utility shows us a warning:

Its essence is that all data from the selected section will be irreversibly overwritten. If you are sure, you need to enter the word YES (all capital letters). Next, come up with a password that will open access to the encrypted partition. If you forget your password, there will be no way to recover the information. Although it will not go anywhere, it will be impossible to use it.

You may encounter an error:
The command failed with error code 16: Unable to format device /dev/sdb3 in use.
This means that the system has automatically mounted the partition and you need to manually unmount it, this can be done with the command:

The utility can also display the following message:

It says that this section contains “OpenPGP private key” data. Still, go ahead, type “y” to do so.
Now open the encrypted partition to continue configuring it:
![]()
The phrase Enter passphrase for /dev/sdb3 prompts us to enter a passphrase to open the drive.
Let’s create an ext3 file system and give it the label “persistence”:
![]()
Let’s create a mount point, mount our new encrypted partition and make an entry in the persistence.conf file, then unmount the partition
Close the encrypted channel to our persistence section:

At some point the download will stop and you will need to enter the password. After entering the password, the system will continue downloading.

To change the language of the operating system, run the following command:
![]()
After rebooting, the system will offer to change the folder names to localized ones:

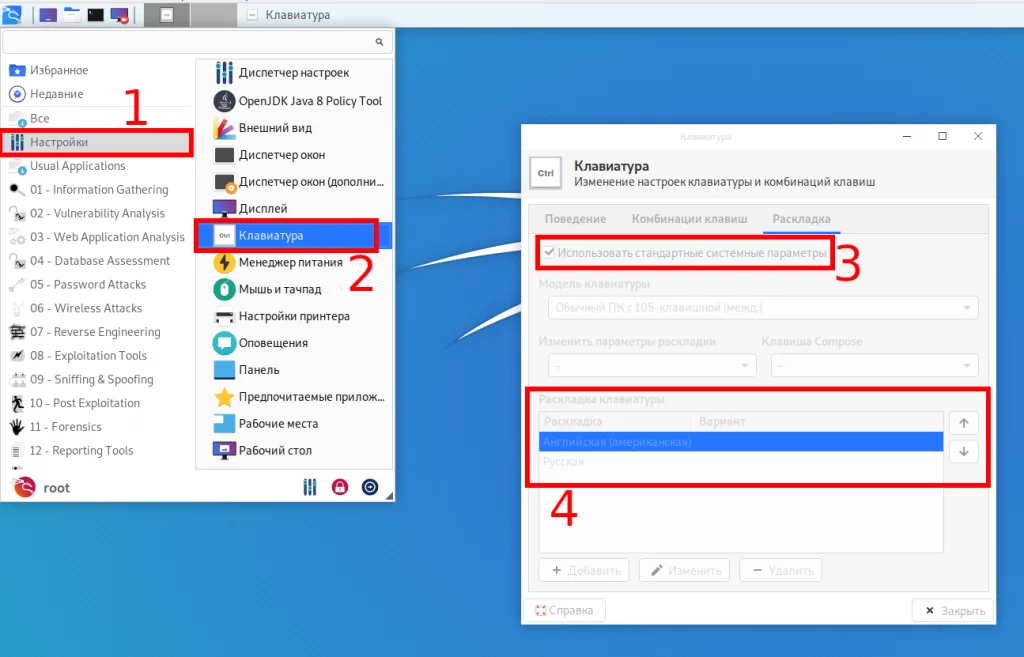
Go to Settings → Keyboard → Layout
To perform the settings, uncheck “Use default system settings”, as a result, you can add new keyboard layouts, choose the default keyboard layout, change the key combination for changing the keyboard (In the English version, it is “Settings” → » → “Use system defaults ».). To change and set other keyboard shortcuts, see the adjacent Keyboard Shortcuts tab.