
05.05.2023
6 min
4748

In this article, I will tell you how to get portable Windows on an external USB drive. This disc is not tied to a computer and should be bootable on any other laptop or desktop PC. The main thing is that it is not a completely old machine (the EFI support is required – this is the firmware, which now (the last 7+ years) replaces the BIOS). Overall, it should work for the most part. USB drive installation tested for Windows 10 and Windows 11. If you are thinking about choosing a USB flash drive or an external USB drive, I recommend the drive itself. In my opinion, the speed of the flash drive is not enough, although I did not check – there is simply no flash drive of sufficient volume. An HDD disk will do, although an SSD would be better. USB 2.0 will do, although USB 3.0 is also better. In this manual, I use the HDD from an old laptop placed in a SATA-USB 2.0 adapter. The system loads more slowly than with an SSD inside the computer, but the speed of the disk is almost not affected in further work – everything is quite comfortable, approximately like on a regular computer with an HDD.
If you try to install Windows on a USB, the system will tell you that it cannot be done on a USB drive. At the same time, there are no obstacles to booting an already installed system from a USB drive. Therefore, we will use one interesting loophole. In VirtualBox, you can connect a USB flash drive or a USB disk so that it will be like a regular SATA disk for the virtual computer. In this state we will install Windows 10/Windows 11. And then it will be possible to boot from this USB drive as from a regular drive on a real (physical) computer. So, we will do the installation in VirtualBox and this gives another advantage: we will not be able to harm the host system (your real computer). That is, we will not mix up the disks during installation and will not spoil them in any other way. By the way, if you use a regular SATA disk through a USB adapter, this disk can be removed from the USB adapter and connected to the desktop computer as a regular system disk. That is, we install it in a virtual machine – we use it everywhere.
We need to find out the system number of the USB drive on which we will install. Connect the USB flash drive or disk to the computer. Then press Win+r and run diskmgmt.msc. Find your flash drive and remember the disk number. For example, on my screenshot 1 flash drive has number 2. Close VirtualBox windows if they are open.

Next, we need to open the command prompt as an administrator. To do this, press Win+x and select Windows PowerShell (Admin). Now navigate to the folder where VirtualBox is installed. If this program is installed in the default directory,
command to switch:
cd $Env:programfilesOracleVirtualBox
If you chose a different location for VirtualBox, edit the previous command accordingly. Now, at the command line, paste the following command, replacing # with the drive number that we looked at a little above, and then press Enter:
.VBoxManage internalcommands createrawvmdk -filename C:usb.vmdk -rawdisk \.PhysicalDrive#
For example, this is the second drive in my OS, then the command looks like this:
.VBoxManage internalcommands createrawvmdk -filename C:usb.vmdk -rawdisk \.PhysicalDrive2
If everything was successful, the inscription should appear:
RAW host disk access VMDK file C:usb.vmdk created successfully.

Note that you can replace C:usb.vmdk with any file location of your choice. This command creates a virtual machine disk (VMDK) file that points to the physical disk you selected. When you load a VMDK file as a disk in VirtualBox, VirtualBox will actually have access to the physical disk. Now open VirtualBox from the administrator – this is mandatory, otherwise it will not work properly. To do this, click the Start button, type VirtualBox and select “Run as administrator”. VirtualBox can only access raw disk devices with administrator rights. Now in VirtualBox, create a new virtual machine by selecting the appropriate operating system, and when you get to the hard drive selection, instead of creating a new one, you can use an existing virtual hard drive. Open the C:usb.vmdk file (or another one if you saved it elsewhere or under a different name).
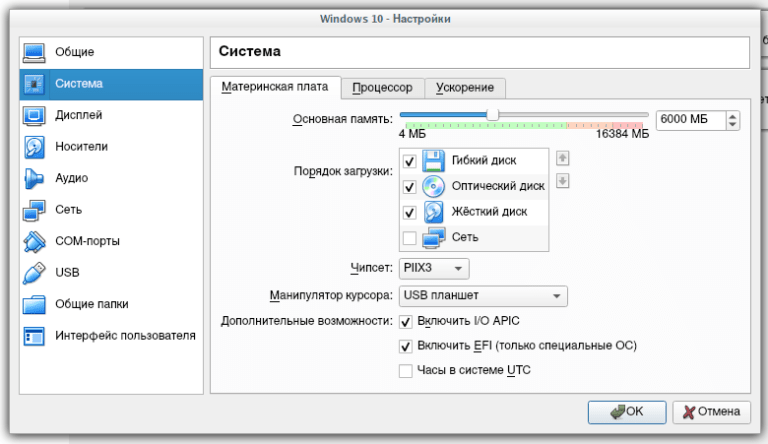
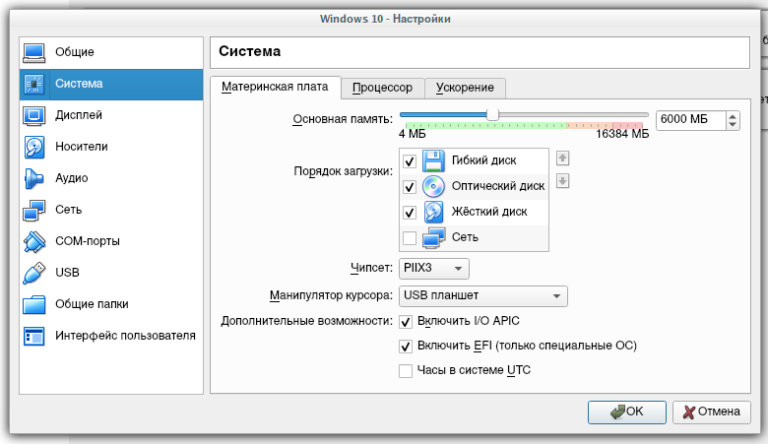
After creating the virtual machine, if you are going to install Windows 10/Windows 11, open its settings, go to System tab → Motherboard and check Enable EFI (custom OS only). Start your virtual machine, mount the Windows 10/Windows 11 ISO image and a normal installation first. Now I’ll show you how to do this in Linux, and then we’ll get back to installing and running a Windows USB stick on a real computer. If you don’t have Linux, just skip the next section.
To understand the principle, read the previous section on Windows. To work without root rights in Linux, you need to add the user (yourself) to the “disk” group:
sudo usermod -a -G disk $USER
Then restart the computer. If you haven’t added yourself to the “disk” group, then you’ll need to run VirtualBox as root or with sudo, otherwise you’ll get the error:
VD: error VERR_ACCESS_DENIED opening image file ‘/home/mial/VirtualBox VMs/usb.vmdk’ (VERR_ACCESS_DENIED).
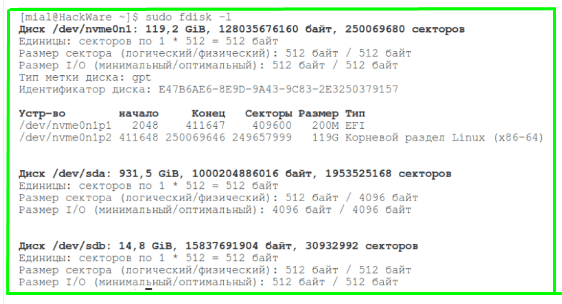
On Linux, to find out the name of the USB drive running the command:
sudo fdisk -l
In my case, the disk name is /dev/sdb.
To create a virtual disk file that points to a real disk, run a command like this:
VBoxManage internalcommands createrawvmdk -filename ‘~/VirtualBox VMs/usb.vmdk’ -rawdisk /dev/sdX
Where instead of X, enter the letter of the corresponding drive. Example for my conditions:
sudo VBoxManage internalcommands createrawvmdk -filename ‘~/VirtualBox VMs/usb.vmdk’ -rawdisk /dev/sdb
In this command, you can change ‘~/VirtualBox VMs/usb.vmdk’ to another location of your choice. Everything else is to create a virtual machine and select an existing virtual disk as the hard disk – exactly as in Windows.
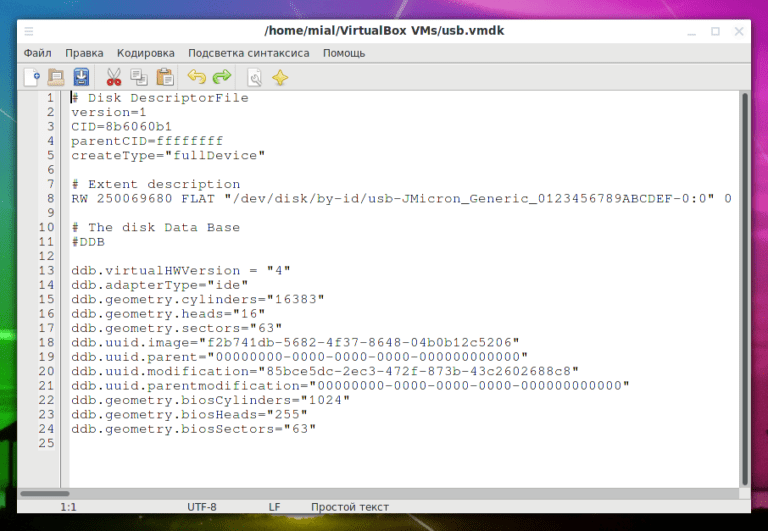
The usb.vmdk file is just a text file that can be moved anywhere and even edited. Instead of a name like /dev/sdX, you can use a constant name based on by-id, for example:
VBoxManage internalcommands createrawvmdk -filename flash.vmdk -rawdisk ‘/dev/disk/by-id/usb-Samsung_Flash_Drive_0325121050019952-0:0’
This will avoid disk unavailability errors when changing its name.
I found an external USB drive and will install on it (and not on the flash drive that is in the screenshots). When starting the virtual machine, you can mount the Windows ISO image. First you will see a message in English that says “Press any button to boot from CD/DVD” – press any button to boot from the installation disc. The usual installation process follows. When you get to the installation type selection, click Custom.
The next step is to mark the disk. You may have a blank drive or, like mine, it may already have something installed on it. For example, I have a test system there that I don’t need. Then I delete all partitions. You can mark the disk in a special way if you wish. If you want to leave the entire disk for the Windows operating system, just click the next button, and the system will create the necessary 4 or 5 partitions during installation. Next, again as with the most usual installation – look for copying files and perform the initial setup. As with the installation on a regular computer, the system reboots several times – no action is required from you. Installation is complete.
Check in the EFI (BIOS) settings that Security Boot and Fast Boot are disabled. You can then select a USB drive as the first source. Or at the very beginning of loading, you can press the ESC key (on your motherboard model, there may be a second key, for example, Delete or one of the functional ones, for example, F12, F9, etc.). Wait for the download options to appear. As I said, I have a disk connected via a SATA-USB adapter, the system sees it as a Mass Storage Device). Windows booted as if from a normal disk.
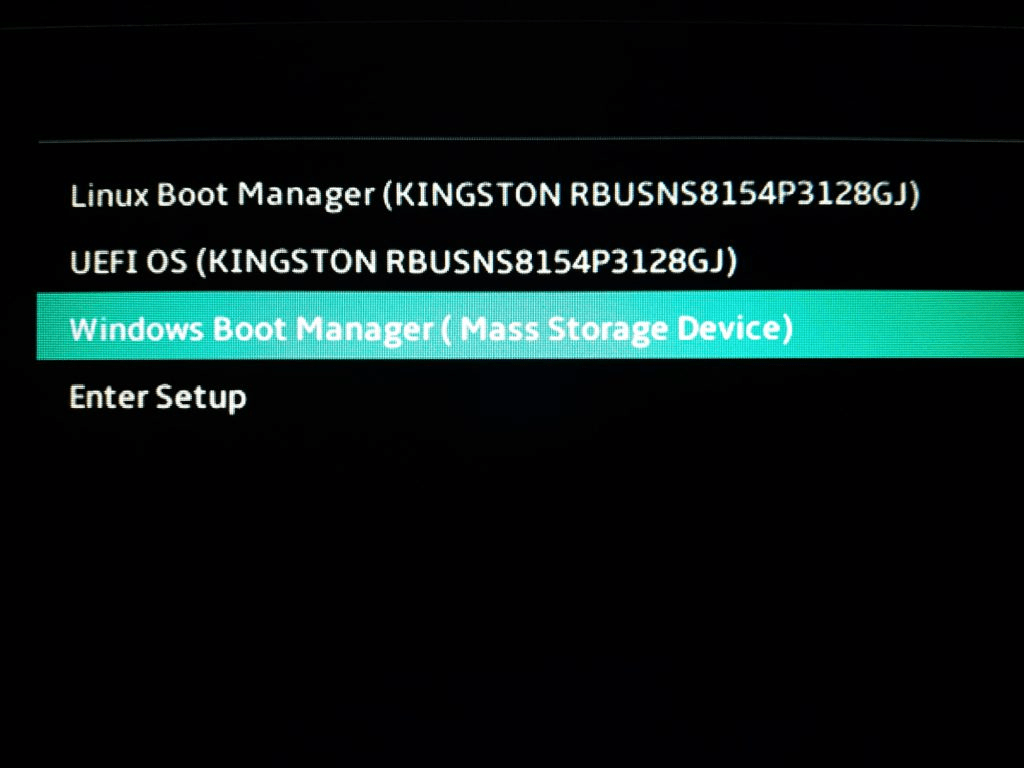
The system sees only its own disk on which it is installed. This is an external USB drive of approximately 750 Gigabytes. The system does not see other drives of the laptop, as they have ext4 and ext2 file systems. The first download may take longer than usual, the inscription “Preparing devices” may appear on the screen – the system has seen new devices and is configured to work with them. For full operation, install the necessary drivers – just like on a regular Windows computer.
There are no artificial USB boot restrictions on Windows (although there are installation restrictions). Therefore, if the system does not boot, it is most likely related to the features of your BIOS or its settings. For example, your computer may not have EFI support, or Security Boot and Fast Boot may be enabled. Also try using other USB sockets. Absolutely avoid USB hubs!
We have prepared our portable Windows USB drive for loading on a physical computer, laptop. But nothing prevents us from loading it in VirtualBox as well. If you have already taken the steps to connect the USB to VirtualBox as a normal drive and created a virtual machine with the appropriate settings, just insert the installation disk and your system will boot from the USB!
There may be a situation where the computer has crashed, but you need files or an embedded operating system with its disk, then you can put the disk in a SATA-USB adapter and boot into VirtualBox. At the same time, intervention in the host system is minimal: no need to disassemble the computer to connect the drive, no need to change BIOS/EFI settings, no need to even reboot it. Just plug in your drive via USB and boot into VirtualBox.
Note that the USB device must be the first hard drive in your VirtualBox virtual machine, otherwise it will not boot. If you’re connecting a new USB drive to an existing machine, try changing the media order in that machine’s settings, or select the appropriate drive to start booting from.