
07.07.2023
12 min
2415

Linux is an open operating system that provides a wide range of opportunities for hackers. It is based on UNIX and is known for its stability, reliability and security. Linux has a rich set of tools that allow hackers to perform a variety of tasks, including packet capture, network security analysis, password recovery, and more. One of the main advantages of Linux for hackers is its flexibility and customization. You can customize your operating system yourself, choose the user interface, applications and development environment you need. This allows you to focus on the needs of hackers and create an optimal working environment. In addition, Linux has a powerful command shell called “Bash”.

This allows hackers to use scripts to automate routine tasks and increase productivity. Bash also supports a wide range of utilities and programs that make it easier to work with networks, file systems, processes, and other operating system components. Learning the basics of Linux for hackers is a step forward in the world of cybersecurity. You’ll be able to use a variety of tools like Metasploit, Wireshark, Nmap, and more to perform penetration testing, vulnerability analysis, and custom scripting. Linux Basics for Hackers provides clear and easy-to-understand information on installing, configuring, and using Linux in cybersecurity. You will learn about Linux commands, file system, network settings and security aspects. In addition, we provide practical examples and tips for solving real problems that hackers face in their work. Get the skills you need to understand and use Linux for cybersecurity. “Linux Basics for Hackers” is your step to confidence in the world of hacking based on the open source Linux operating system. Start your cybersecurity journey today!
Before we begin our journey into the wonderful world of Linux basics for hackers, I want to introduce a few terms that should clarify some of the concepts discussed later in this chapter.
Binary files – this term applies to executable files, similar to executables in a window. The binaries are located in the /usr/bin or usr/sbin directory and include utilities such as ps, cat, ls, and cd (we’ll touch on all four of them in this chapter), as well as programs such as the aircrackng wireless hacking tool and intrusion detection system (IDS) Snort.
Case sensitivity unlike Windows, Linux is case sensitive. This means that Desktop is different from desktop, which is different from DeskTop. Each of these will represent a different file or directory name. Many people who come from a Windows background may find this annoying. If you’re getting a “file or directory not found” error message and you’re sure the file or directory exists, you may need to check your case.
Directory this is the same as a folder in Windows. A directory provides a way to organize files, usually in a hierarchical manner.
Home Each user has their own /home directory, and this is usually where the files you create are typically stored.
Kali Kali Linux is a Linux distribution specially designed for penetration testing. It comes with hundreds of pre-installed tools, saving you hours of downloading and installing them yourself. As of this writing, I will be using the latest version of Kali: Kali 2018.2, first released in April 2018.
Root like almost every operating system, Linux has an administrator or superuser account for use by a trusted person who can do almost everything on the system. This will include things like reconfiguring the system, adding users, and changing passwords. In Linux, this account is called root. As a hacker or pentester, you often use the root account to give yourself control over the system. In fact, many hacking tools require you to use the root account.
Script this is a series of commands executed in an interpreter environment that converts each line into source code. Many hacking tools are just scripts. Scripts can be run using the bash interpreter or any other scripting language interpreter such as Python, Perl, or Ruby. Python is currently the most popular interpreter among hackers.
Shell This is an environment and interpreter for running commands in Linux. The most widely used shell is bash, which stands for Bourne shell, but other popular shells include the C shell and the Z shell. I will use the bash shell exclusively throughout this book.
Terminal This is the command line interface (CLI).
With those basics out of the way, we’ll try to methodically build the basic Linux skills you’ll need to become a hacker or penetration tester. In this first chapter, I’ll walk you through getting started with Kali Linux.
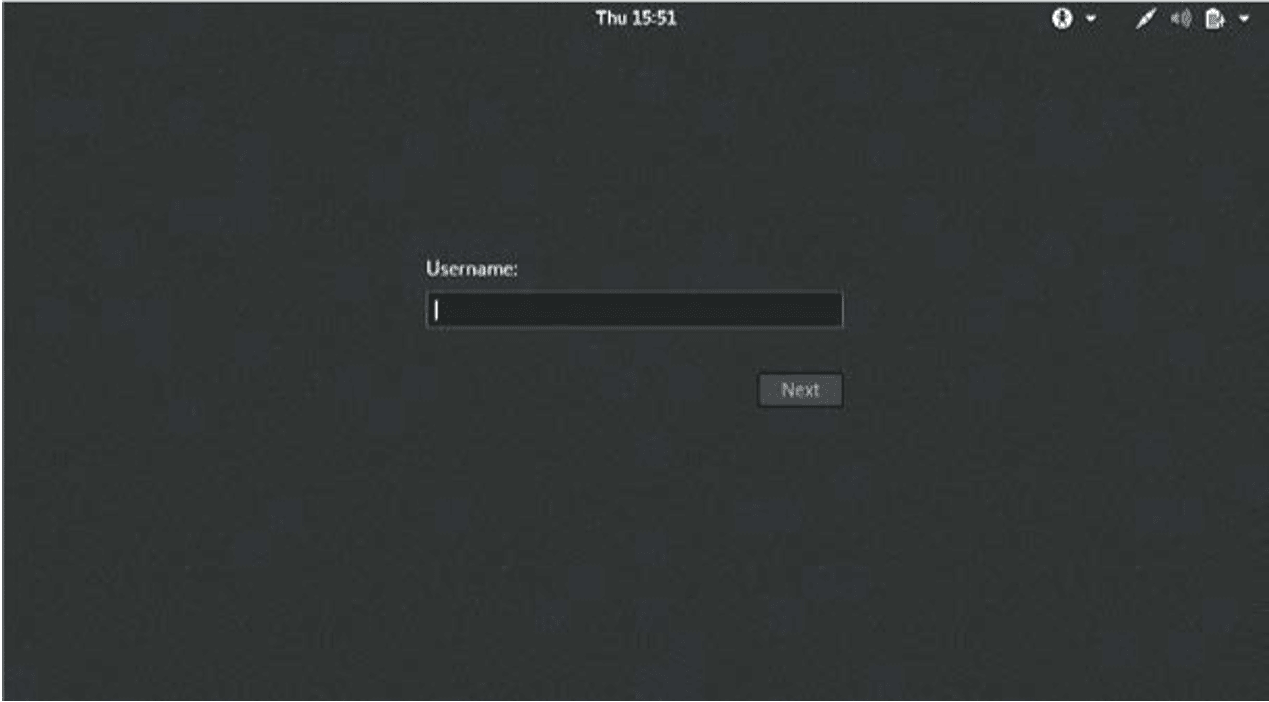
After launching Kali, you will be greeted with the login screen as shown in Fig. Log in using the root account username root and the default password toor.
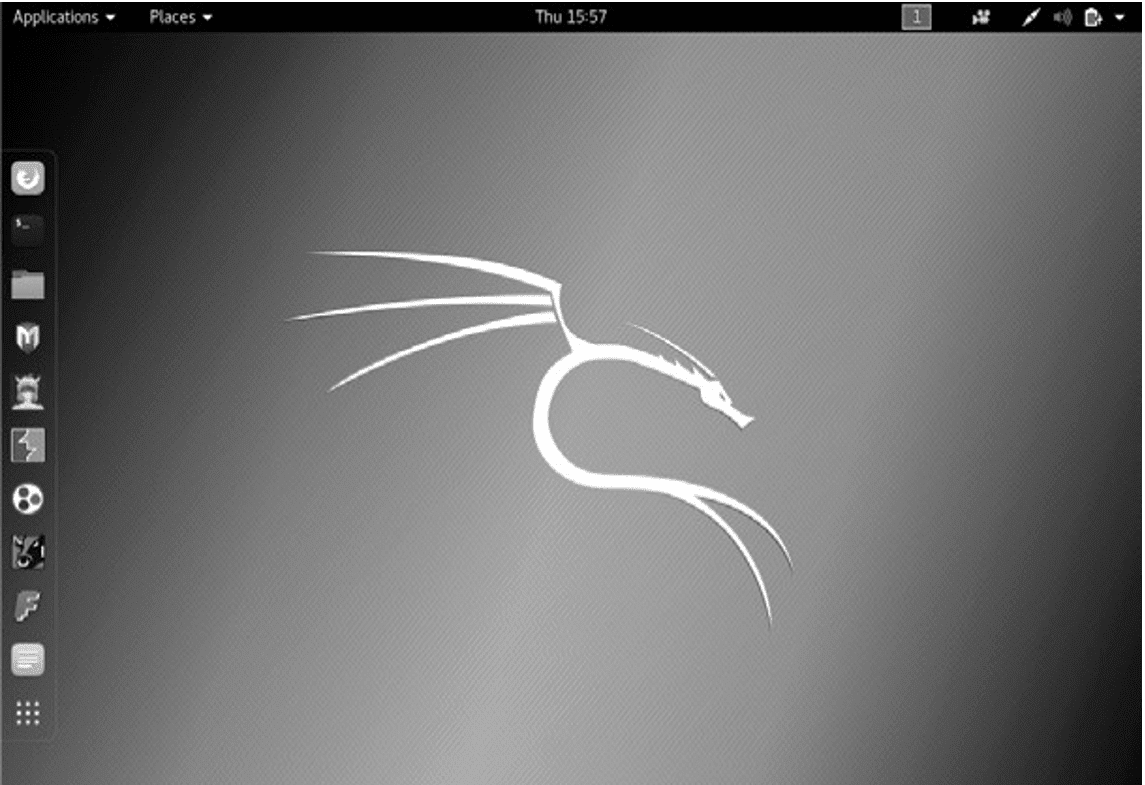
You should now have access to the Kali desktop. We’ll take a quick look at two main aspects of the desktop: the terminal interface and the file structure.
The first step in using Kali is to open a terminal, which is the command line interface that we will use in this book. In Kali Linux, you’ll find a terminal icon at the bottom of your desktop. Double-click this icon to open a terminal or press CTRLALTT. Your new terminal should look like the picture.
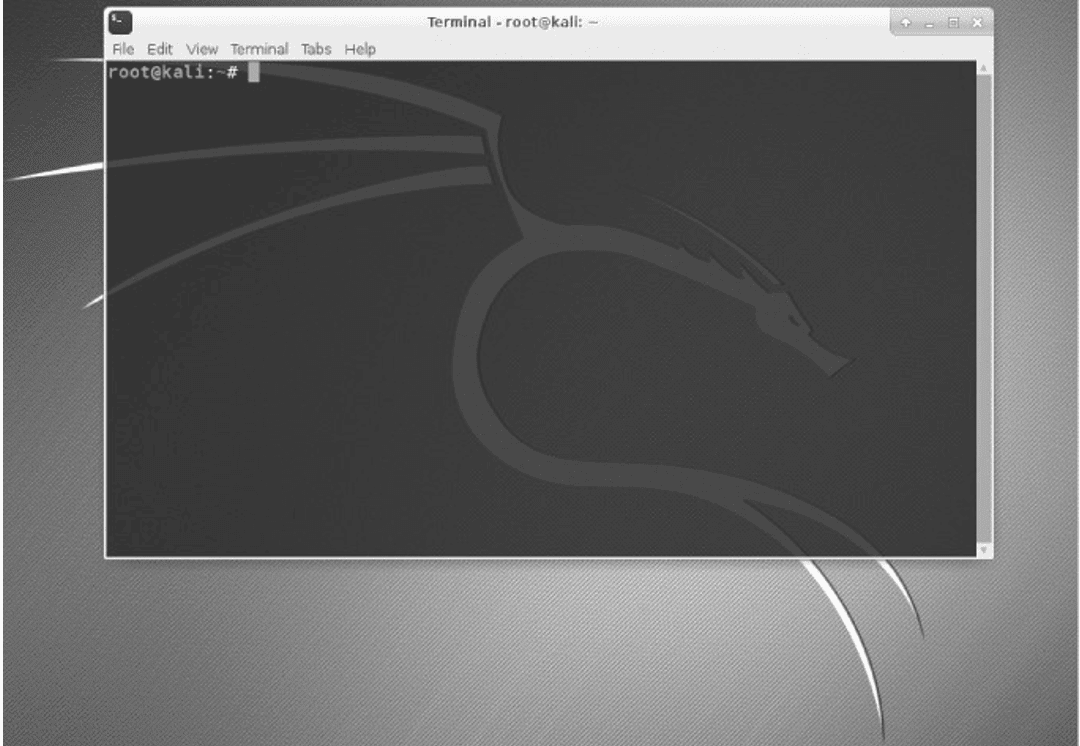
This terminal opens a command-line environment known as a shell that allows you to run commands on the underlying operating systems and write scripts. Although Linux has many different shell environments, the most popular is the bash shell, which is also the default shell in Kali and many other Linux distributions. To change the password, you can use the passwd command.
The structure of the Linux file system is slightly different from that of Windows. Linux does not have a physical drive (such as the C: drive) underlying the file system, but instead uses a logical file system. At the very top of the file system structure is /, which is often referred to as the root of the file system, as if it were an upside-down tree. Note that this is different from the root user. These terms may seem confusing at first, but they will become easier to distinguish once you get used to Linux.
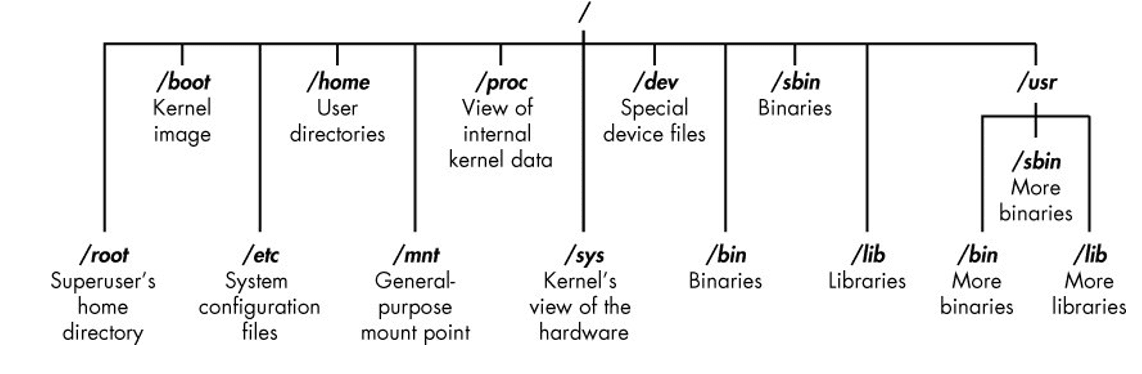
The root (/) of the file system is at the top of the tree, and below are the most important subdirectories to be aware of:
/root Home directory of the all-powerful root user
/etc Typically contains Linux configuration files—files that control when and how programs run
/home The user’s home directory
/mnt Where other file systems are attached or mounted to the file system
/media Where CDs and USB devices are usually mounted or mounted to the file system
/bin Where program binaries are located (equivalent to executable files in Microsoft Windows)
/lib Where to find libraries (shared programs similar to Windows DLLs)
We will spend more time on these key catalogs in this book. Understanding these first-level directories is important for navigating the file system from the command line.
It’s also important to know before you start that you shouldn’t be logged in as root when doing routine tasks, because anyone who hacks your system (yes, hackers hacked you sometimes), if you’re logged in as root, immediately get root privileges to “own” your system. Log in as a normal user, starting by browsing the web, running tools like Wireshark, and more.
First, let’s go over some basic commands to get you up and running in Linux.
Unlike when you’re working in a graphical user interface (GUI) environment like Windows or macOS, the Linux command line doesn’t always make it obvious which directory you’re currently in. To navigate to a new directory, you usually need to know where you are now. The current working directory command, pwd, returns your location in the directory structure.
Type pwd in your terminal to see where you are:
Kali >PWD
/root
In this case, Linux returned /root, telling me that I was in the root user directory. And since you’re logged in as root when you start Linux, you must also be in the root user directory, which is one level below the top of the filesystem structure (/). If you are in a different directory, pwd will return that directory name.
In Linux, the only “all-powerful” superuser or system administrator is called root, and he has all the system privileges needed to add users, change passwords, change privileges, and more. Obviously, you don’t want anyone else to be able to make such changes; You need someone you can trust and who has the proper knowledge of the operating system. As a hacker, you generally need to have all of these privileges to run the programs and commands you want (many hacking tools won’t work if you don’t have root), so you’ll want to log in as root.
If you forget whether you’re logged in as root or another user, you can use the whoami command to see what user you’re logged in as:
kali >whoami
root
If I logged in as a different user, such as my personal account, whoami would return my username as shown here:
kali >whoami
OTW
Navigating the file system from the terminal is an essential Linux skill. To do anything, you need to be able to navigate to find programs, files, and directories located in other directories. In a GUI-based system, you can visually see directories, but when you use a command-line interface, the structure is entirely text-based, and navigating the file system means using some commands.
Changing directories using a CD
To change directories from the terminal, use the command change directory, cd. For example, here’s how to change the /etc directory used to store configuration files:
kali >cd /etc root@kali:/etc#
The prompt will change to root@kali:/etc, indicating that we are in the /etc directory. We can confirm this by typing pwd:
root@kali:/etc# pwd /Etc
To move up one level in the file structure (to the root of the file structure, or /), we use cd followed by colons (..), as shown here:
root@kali:/etc# cd ..
root@kali:/# pwd
/ root@kali:/ #
This will move us up one level from /etc to the root of / , but you can go up as many levels as you need. Just use the same number of pairs of colons as the number of levels you need to move:
You would use .. to go up one level.
You would use .. .. to move up two levels.
You would use .. .. .. to move up three levels and so on.
So, for example, to move up two levels, type cd followed by two sets of colons with a space between them:
Kali >cd .. ..
You can also go to the root level in the file structure from anywhere by typing cd / where / represents the root of the file system.
Listing the contents of a directory with ls
To see the contents of a directory (files and subdirectories), we can use the ls (list) command. This is very similar to the dir command in Windows.
Калі >LS
bin initrd.img media run var boot initrd.img.old mnt sbin vmlinuz dev lib opt srv vmlinuz.old etc lib64 proc tmp home lost+found root usr
This command lists both the files and directories contained in a directory. You can also use this command in any specific directory, not just the one you’re currently in, by specifying the directory name after the command; For example, ls /etc shows what is in the /etc directory.
To get more information about files and directories, such as their permissions, owner, size, and last modified time, you can add the -l switch after ls (l stands for long). This is often called a long enumeration.
Let’s try it here:
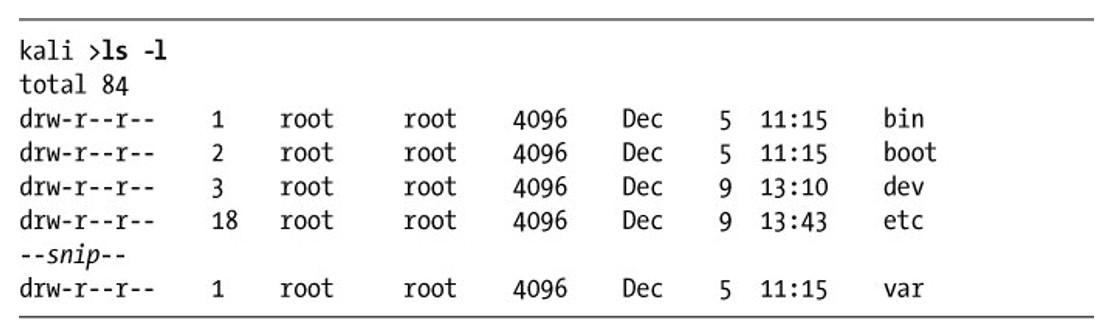
As you can see, ls -l gives us much more information, such as whether the object is a file or a directory, the number of references, the owner, the group, its size, when it was created or modified, and its name.
I usually add the -l switch whenever I do a Linux listing, but to each their own. Some files in Linux are hidden and will not be detected by a simple ls or ls -l command.
To show hidden files, add a lowercase switch, for example: Kali >ls -la If you don’t see the file you expect to see, it’s worth trying ls with a.
Almost every command, program, or utility has a dedicated help file in Linux that provides instructions on how to use it. For example, if I need help using the best wireless hacking tool, aircrackng, I could just type aircrack-ng followed by –help:
kali >aircrack-ng –help
Note the double dash here. The Linux convention is to use a double dash (–) before word options such as help and a single dash (-) before single letter options such as -h.
When you type this command, you should see a brief description of the tool and instructions for using it. In some cases you can use either -h or -? to go to the help file. For example, if I needed help using the best hacking port scanning tool, nmap, I would type the following:
kali >nmap -h
Unfortunately, while many programs support all three options (–help, -h, and -?), there’s no guarantee that the program you’re using will. So if one option doesn’t work, try another.
In addition to the help switch, most commands and applications have a help (man) page with additional information such as a description and synopsis of the command or program. You can view a man page by simply typing man in front of a command, utility, or program.
For example, to see the man page for aircrackng, type the following:
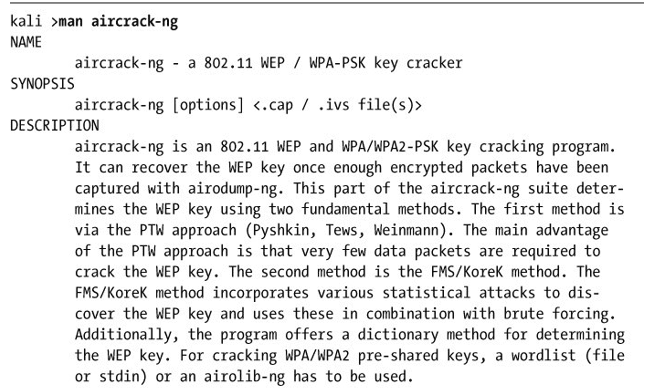
This brings up the aircrackng guide, giving you more detailed information than the help screen. You can scroll through this file manually using the ENTER key, or you can flip and zoom out using the PG DN and PG UP keys respectively. To exit, just type q (for quit) and you will be returned to the command line.
Until you’re new to Linux, it can be frustrating to navigate, but knowing a few basic commands and techniques will make the command line much more comfortable. The following commands will help you find things from the terminal.
Probably the easiest command to use is locate. After a keyword that represents exactly what you want to find, this command will go through your entire file system and find every occurrence of that word.
For example, to find aircrackng, type the following:
kali >знайти aircrack-ng
/usr/bin/aircrackng
/usr/share/applications/kaliaircrackng.desktop
/usr/share/desktopdirectories/05101aircrackng.directory
/var/lib/dpkg/info/aircrackng.mg5sums
However, the locate command is not perfect. Sometimes the search results can be overwhelming, giving you too much information. In addition, the search function uses a database that is usually updated only once a day, so if a file was created a few minutes or a few hours ago, it may not appear in this list until the next day. It’s worth knowing the drawbacks of these basic commands so you can better decide when to use each one.
If you are looking for a binary file, you can use the whereis command to find it. This command returns not only the location of the binary file, but also its source and master page, if available.
Here is an example:
kali >whereisaircrack-ng aircarckng: /usr/bin/aircarckng /usr/share/man/man1/aircarckng.1.gz
In this case, only the aircrackng binaries and the help page are returned, not every occurrence of the word aircrackng. Much more efficient and brighter, don’t you think?
The which command is even more specific: it only returns the location of binaries in the Linux PATH variable. We’ll take a closer look at the PATH variable in Chapter 7, but for now it’s enough to know that the PATH contains the directories in which the operating system looks for the commands you run at the command line. For example, when I type aircrack-ng at the command line, the operating system looks at the PATH variable to see which directories it should look for aircrackng:
kali >whichaircrack-ng /usr/bin/aircrackng
Here, which was able to find one binary file in the directories listed in the PATH variable. At a minimum, these directories usually include /usr/bin, but may include /usr/sbin and possibly a few others.
The find command is the most powerful and flexible of the search utilities. It is able to start a search in any specified directory and search for a number of different parameters, including of course the file name, as well as the date created or modified, owner, group, permissions and size.
Here is the basic syntax for find:
Searching for a directory parameter expression
So if I wanted to look for a file named apache2 (an open source web server) starting in the root directory, I would type:
kali >find /➊ -type f➋ -name apache2➌ First, I declare the directory in which to start the search, in this case / ➊. Then I specify what type of file to search for, in this case f for a regular file ➋. Finally, I give the name of the file I’m looking for, in this case apache2 ➌.
My search results are shown here:
kali >find / -type f -name  apache2 /usr/lib/apache2/mpmitk/apache2
/usr/lib/apache2/mpmevent/apache2
/usr/lib/apache2/mpmworker/apache2
/usr/lib/apache2/mpmprefork/apache2
/etc/cron.daily/apache2
/etc/logrotate.d/apache2
/etc/init.d/apache2
/etc/default/apache2
The find command started at the top of the filesystem (/), went through each directory looking for apache2 in the filename, and then listed all instances found.
As you can imagine, a search that searches every directory can be slow. One way to speed it up is to search only in the directory where you expect to find the files you want. In this case we’re looking for a configuration file so we can start looking in the /etc directory and Linux will only look in its subdirectories.
Let’s try:
kali >знайти /etc -type f -name apache2
/etc/init.d/apache2
/etc/logrotate.d/apache2
/etc/cron.daily/apache2
This much faster search found only instances of apache2 in the /etc directory and its subdirectories. It’s also important to note that unlike some other search commands, find only returns exact name matches. If the apache2 file has an extension such as apache2.conf, the search will not match. We can fix this limitation by using wildcards, which allow us to match multiple characters. Generalization symbols come in several different forms: * . , ? and [].
Let’s look at the /etc directory for all the files that start with apache2 and have any extension. To do this, we could write a search command using the following wildcard:
kali >find /etc -type f --name apache2.*
/etc/apache2/apache2.conf
When we run this command, we find that there is one file in the /etc directory that matches the pattern apache2.*. When we use a dot followed by the * wildcard, the terminal looks for any extension after the apache2 filename. This can be a very useful method for finding files whose extension is unknown.
When I run this command, I find two files that start with apache2 in the /etc directory, including the apache2.conf file.
Very often, when using the command line, you will need to search for a specific keyword. To do this, you can use the grep command as a filter to search for keywords.
The grep command is often used when output is passed from one command to another.Linux and Windows allow us to take the output of one command and send it as input to another command. This is called pipelines and we use | for this (the | key is usually above the ENTER key on the keyboard).
The ps command is used to display information about processes running on a machine. For this example, let’s say I want to see all the processes running on my Linux system. In this case, I can use the ps (processes) command followed by the aux switches to specify what process information to display, for example: kali >ps aux.
This gives me a list of all the processes running on this system, but what if I just want to find one process to see if it’s running?
I can do this by passing the output from ps to grep and searching for a keyword. For example, to find out if the apache2 service is running, I would type the following.
kali >ps aux | grep apache2 root 4851 0.2 0.7 37548 7668 ? Ss 10:14 0:00 /usr/sbin/apache2 k start root 4906 0.0 0.4 37572 4228 ? S 10:14 0:00 /usr/sbin/apache2 k start root 4910 0.0 0.4 37572 4228 ? Ss 10:14 0:00 /usr/sbin/apache2 k почати snip
This command tells Linux to display all my services and then send that output to grep, which will look at the output for the apache2 keyword and then display only the relevant output, saving me a lot of time and my eyesight.
After finding files and directories, you need to perform actions with them. In this section, we will look at how to create files and directories, copy files, rename files, delete files and directories.
There are many ways to create files in Linux, but for now we’ll look at just two simple methods. First, cat, which is short for concatenate, which means to join parts together (not a reference to your favorite pet cat). The cat command is usually used to display the contents of a file, but it can also be used to create small files. For larger files, it’s best to enter the code in a text editor such as vim, emacs, leafpad, gedit, or kate, and then save it as a file.
Concatenation with cat
Команда  cat, за якою слідує ім'я файлу, відображатиме вміст цього файлу, але щоб створити файл, ми слідуємо команді cat з перенаправленням, позначеним символом >,  та ім'ям файлу, який ми хочемо створити. Ось приклад:

kali >cat>hackingskills
If you don’t use the redirect symbol, Linux will spit back the contents of your file.
To add or add more content to a file, you can use the cat command with a double redirect (>>) followed by whatever you want to add to the end of the file. Here is an example:
kali >cathackingskills
Everyone Should Learn Hacking Linux goes into interactive mode again, waiting for content to be added to the file.
Linux goes into interactive mode again, waiting for content to be added to the file. When we type Everyoneshouldlearnhacking and press CTRLD, we are returned to the prompt. Now, when the contents of this file are displayed using cat, we can see that Everyoneshouldlearnhacking has been added to the file, as shown here:
kali >cathackingskills
Hacking is the most valuable skill set of the 21st century! Everyone should learn hacking. If I want to overwrite the file with new information, I can simply use the cat command again with one redirect, like this:
kali >cat>hackingskills
Anyone doing IT security without hacking skills is in the dark poop > cats hacking skills. Anyone dealing with IT security without hacking skills is in the dark
As you can see here, Linux goes into interactive mode and I type new text and then exit back to the prompt. When I use cat again to see the contents of the file, I see that my previous words have been overwritten by the latest text.
The second command for creating a file is touch. This command was originally designed so that the user could simply tap on a file to change some of its details, such as the date it was created or modified. However, if the file does not already exist, this command creates it by default.
Let’s create a new file with a tap:
kali >touchnewfile
Now when I then use ls -l to see the long directory listing, I see that a new file has been created with the name newfile. Note that its size is 0 because the new file has no content.
The command to create a directory in Linux is mkdir, short for make directory.
To create a directory named newdirectory, type the following command:
kali >mkdir newdirectory
To navigate to this newly created directory, simply type this:
kali >cd newdirectory
To copy files, use the cp command. This creates a duplicate file in the new location and leaves the old one in place. Here we’ll create an oldfile in the root directory with a tap and copy it to /root/newdirectory, renaming it in the process and leaving the original oldfile in place:
kali >toucholdfile
kali >cpoldfile /root/newdirectory/newfile
Renaming the file is optional and is done by simply adding the name you want to give it to the end of the directory path. If you don’t rename the file when copying, the original file name will be kept by default.
When we then change to the new directory, we see that there is an exact copy of oldfile called newfile:
kali >cdnewdirectory
kali >ls
newfile oldfile
Unfortunately, Linux does not have a command dedicated exclusively to renaming a file, as Windows and some other operating systems do, but it does have the mv (move) command.
The mv command can be used to move a file or directory to a new location or simply to give an existing file a new name. To rename newfile to newfile2, enter the following:
kali >mv newfile newfile2 kali >ls oldfile newfile2
Now when you list (ls) that directory you see newfile2 but not newfile because it has been renamed. The same can be done with directories.
To delete a file, you can simply use the rm command, like this:
kali >rm newfile2
If you now do a long list in the directory, you can confirm that the file has been deleted.
The command to remove a directory is similar to the rm command to remove files, but with the addition of dir (for a directory), for example:
kali >rmdir newdirectory
rmdir:failed remove ‘newdirectory’: directory is not empty
It is important to note that rmdir will not remove a directory that is not empty, but will give you a warning that “the directory is not empty”, as you can see in this example. Before deleting it, you must first delete the entire contents of the directory. This prevents you from accidentally deleting objects that you did not intend to delete.
If you want to remove a directory and its contents in one go, you can use the -r switch after rm, for example:
kali >rm -r newdirectory
However, a word of caution: be careful using the -r option with rm, at least initially, because it’s very easy to delete valuable files and directories by mistake. For example, using rm -r in your home directory will delete all files and directories—probably not what you intended.
GO PLAY NOW!
Now that you have some basic file system navigation skills, you can play around with your Linux system a bit before progressing. The best way to get used to using the terminal is to try out your new skills right now. In the following chapters, we will explore our hacking site further and deeper.
We used materials from the book “LINUX BASICS FOR HACKERS” written by William Pollock