
13.05.2023
1 min
1882

Vulnerability scanning is one of the foundations of information security. In this article, I will show you how to install and use OpenVAS/GVM on Kali Linux to scan and find vulnerabilities. It is capable of running a constantly updated and expanded system of Network Vulnerability Tests (NVTs). After the release of OpenVAS version 9.0, the framework was renamed Greenbone Vulnerability Management (GVM) and released as Greenbone Source Edition (GSE). Starting with GVM 10, the term OpenVAS is used only for the scanner component. When the OpenVAS project was created, it consisted only of a vulnerability scanning engine. Soon after, Greenbone Networks received funding to provide professional support in the field of vulnerability scanning. Greenbone took over development, added several software components, and turned OpenVAS into a multi-faceted vulnerability management solution that still preserves the values of open and free software.
After a few years, it became apparent that using OpenVAS as a trademark for an open source project and funding almost all of the project’s development was not appreciated from the outside. Therefore, after the release of the OpenVAS 9 platform, it was renamed Greenbone Vulnerability Management (GVM) and released as Greenbone Source Edition (GSE). Starting with GVM 10, the term OpenVAS is used only for the scanner component, as it was at the beginning of the project. If you are looking for an effective and free way to identify potential security issues in your network or system, OpenVAS may be the perfect solution. Read our article to learn more about this open source vulnerability scanner.
During the installation and launch process, I encountered quite a few errors, which, however, I managed to solve. Assuming that these errors are common to everyone (and not just my particular installation), I described these errors right through the installation process, resulting in a cluttered guide. If you do not encounter the described errors during the installation process, please write about it in the comments – if the errors do not appear for everyone, then I will put them at the very end of the article, thanks to which the instructions will become clearer in general.
Since the authors renamed openvas to gvm (more precisely, divided it into different packages), now the main package is gvm, installing it as a dependency will also get all other necessary packages.
Installation is done as follows:

Let’s start by configuring the Open Vulnerability Assessment Scanner (OpenVAS), i.e. the open vulnerability assessment scanner for Greenbone Vulnerability Management (GVM). It is used in Greenbone Security Manager and is a full-featured scanning module that performs constantly updated and expanded Network Vulnerability Tests (NVTs), i.e. tests of network vulnerabilities. The scanner needs a running Redis server to temporarily store the collected information on the scanned hosts. Setting up the Redis server is done as follows (these commands need to be executed once):

Starting the Redis server (to be done after restarting the computer):

Or, if you prefer, add it to autoload:

The Greenbone Vulnerability Management (gvmd) service acts as an OSP client to connect and manage scanners. openvas does not act as an OSP service – you will need the OSPD-OpenVAS module for that. The actual user interfaces (eg GSA or GVM-Tools) will only interact with gvmd and/or ospd-openvas, but not with the scanner. You can run openvas to load plugins into Redis using the following command:

Note: Although you can run openvas as a non-elevated user, it is recommended that you run openvas as root because a number of Network Vulnerability Tests (NVTs) require root privileges to perform certain operations such as packet spoofing. If you run Openvas on behalf of a user without permission to perform these operations, the scan results will most likely be incomplete.
Since openvas will be started from the ospd-openvas process using sudo, the following configuration is required in the sudoers file:

Add this line to allow the user running ospd-openvas to run openvas as root:
![]()
You can find out the username with the command:

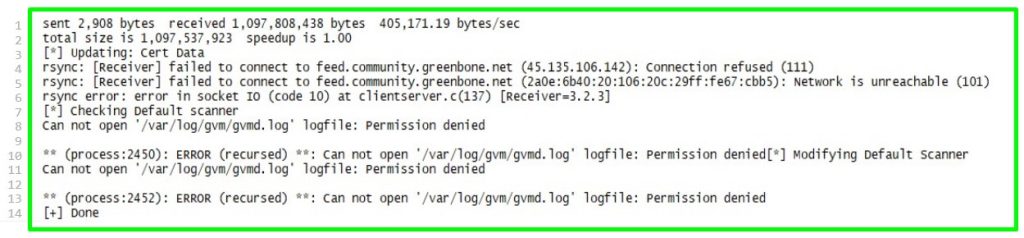
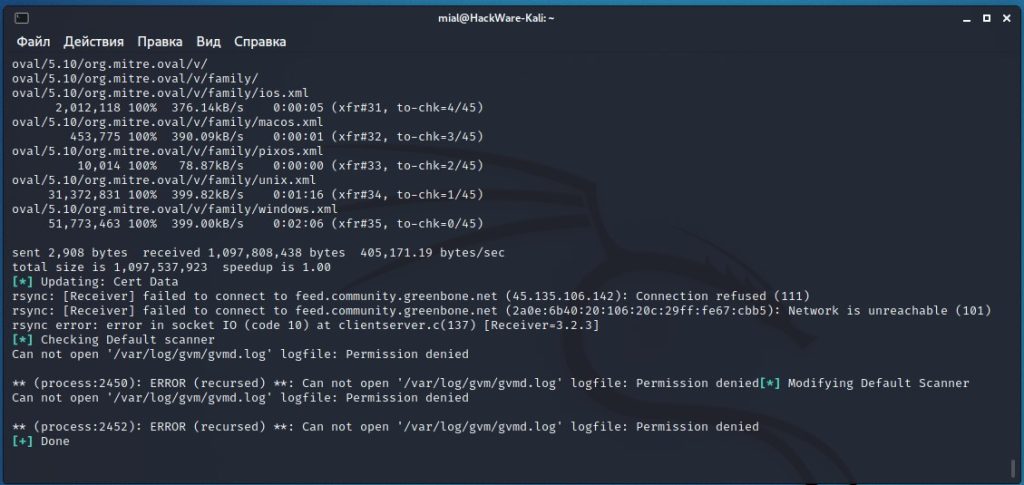
If something does not work, then you can view the log with the command:
![]()
Greenbone Vulnerability Manager is a central management service between security scanners and user clients. It manages the storage of any vulnerability configuration and scan results. Access to data, management commands, and workflows is provided through the XML-based Greenbone Management Protocol (GMP). Scanners such as OpenVAS are managed via the Open Scanner Protocol (OSP). Deployment script (instead of openvas-setup):

This script only needs to be run once. The script ended with an error:
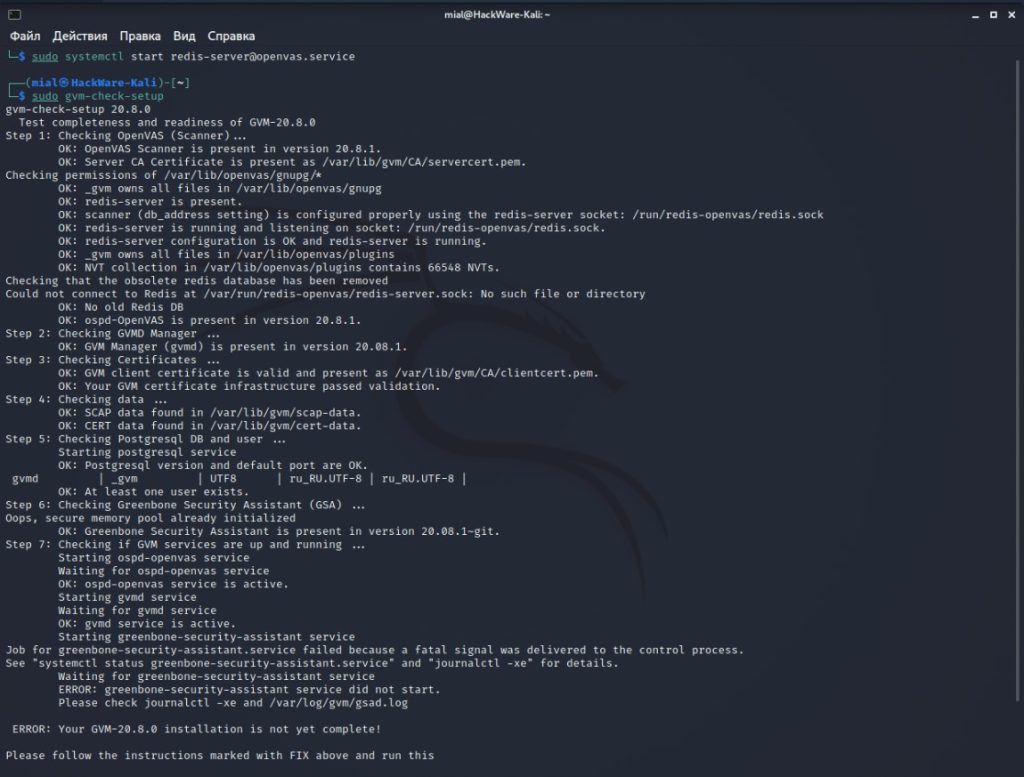
Check started:

also showed an error in the fourth step:
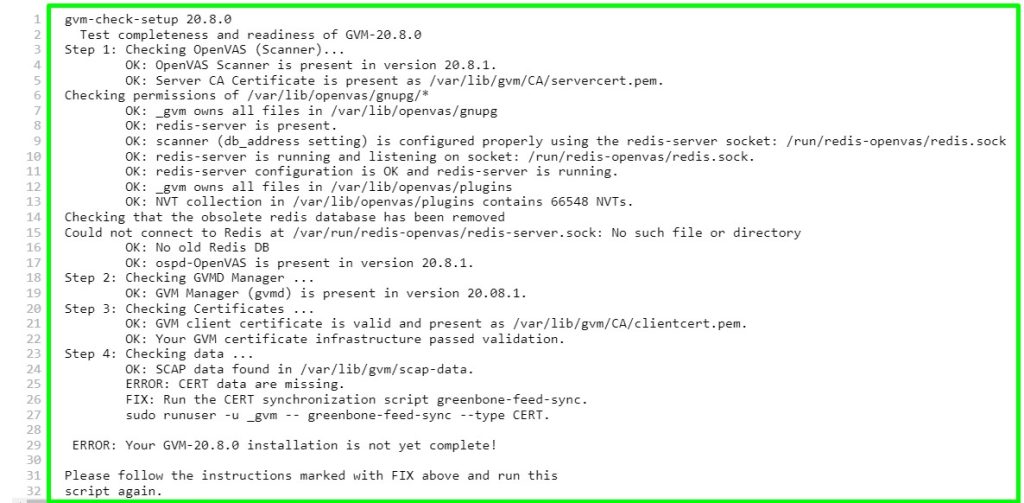
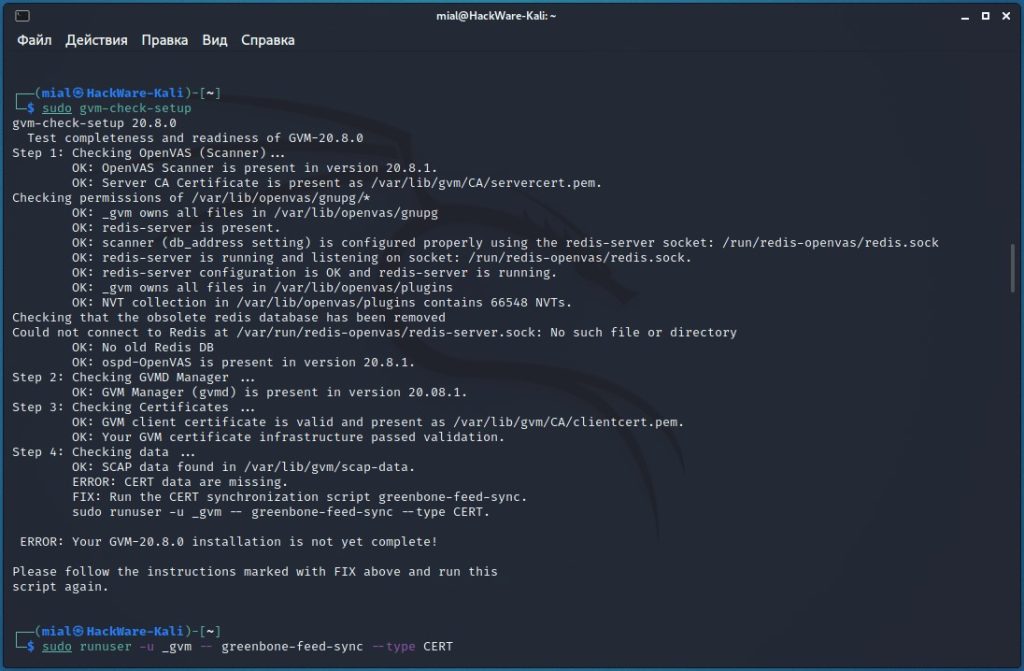
To correct the error “ERROR: CERT data are missing. FIX: Run the CERT synchronization script greenbone-feed-sync.” run the following command:

Running the check again showed an error in step five:

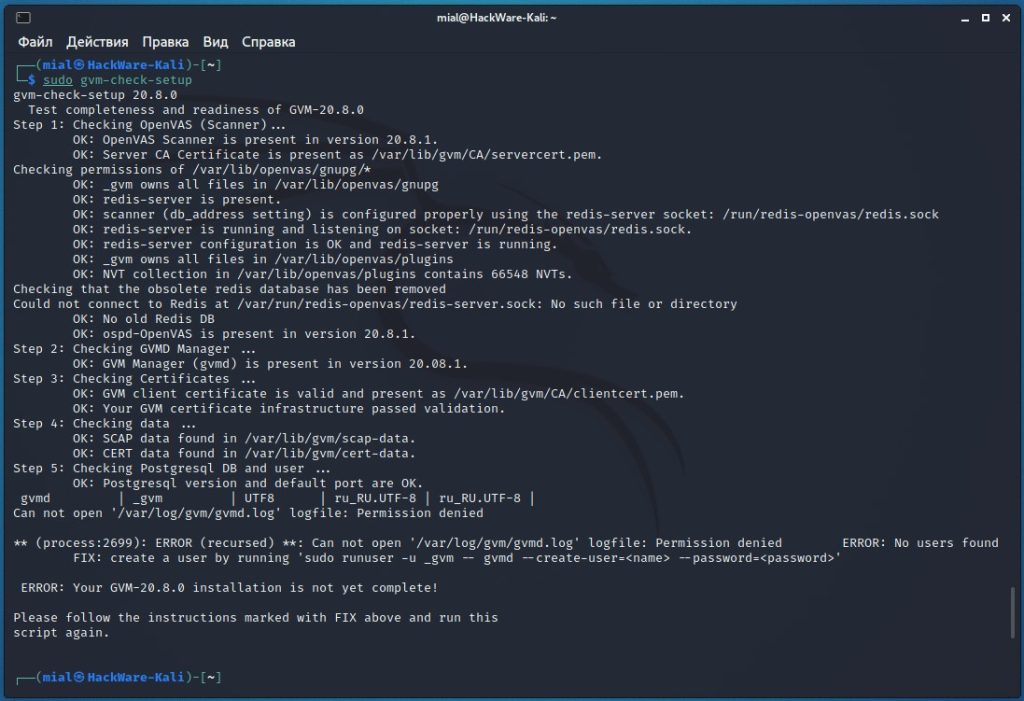
There are several errors at once, but the key one is “ERROR: No users found. You need to create at least one user to log in.”
To fix it, run a command like this:
![]()
For example, to create a user with the name mial and password 2:

The previous command failed:

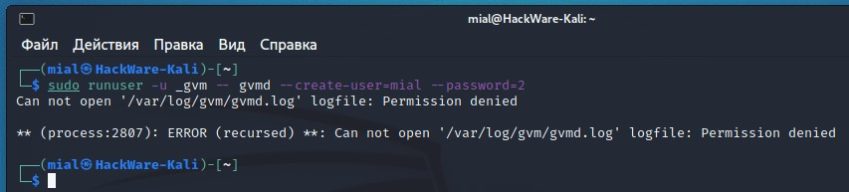
The essence of the error is that the command does not have enough rights to write to the /var/log/gvm/gvmd.log file, even though the previous command was run with sudo.
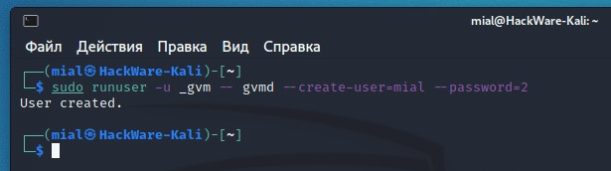
To fix the error, run the following command:

Then run the new user creation again.
And another error in the seventh step:
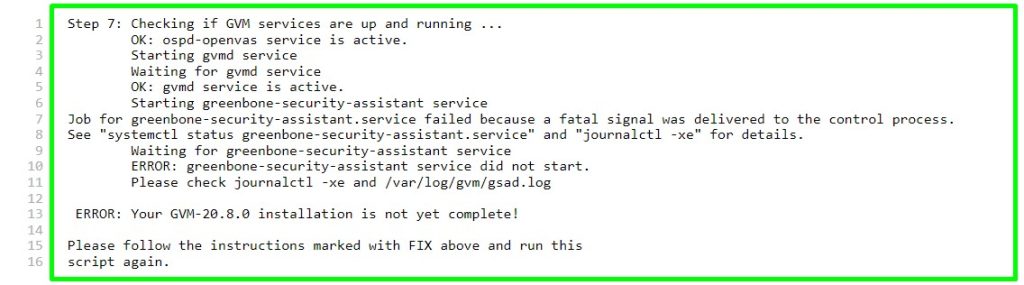
I don’t know how to solve it completely, but I know how to get around it. Let’s move on to starting the necessary services. Do not forget that before starting the service, you need to start the Redis server, that is, before running the command:

Starting the service:
![]()
And we get the following:

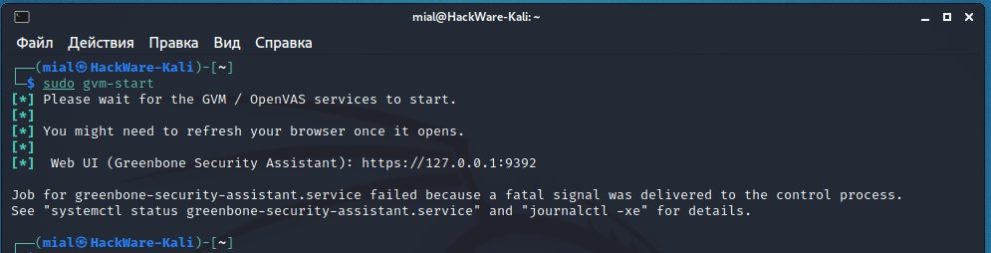
The gist of the messages is that everything started normally, except for greenbone-security-assistant, i.e. gsa, i.e. Web UI (Greenbone Security Assistant), i.e. the web interface. You can view the contents of the log:

Conclusion:

Failed to start the https daemon. gsad has a –http-only option that runs only HTTP without HTTPS. Let’s use it:
![]()
Another message that something is wrong will be displayed again:

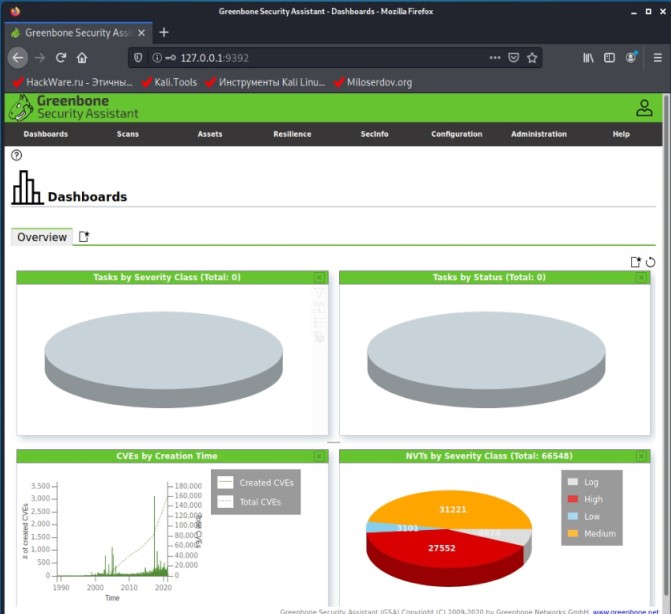
However, the web interface is now available at http://127.0.0.1:9392 (but not available at https://127.0.0.1:9392!).

Log in to it using the credentials you came up with when you created the new user.
Stop service:

Other:

In the future, to update signatures, sometimes run the command:
![]()
If something does not work, then you can view the log with the command: