
30.04.2023
3 min
2023

Wireshark is a free and open source network traffic analyzer that allows you to monitor, capture and analyze data packets transmitted over a computer network. It provides the ability to drill down into network protocols, identify network problems, analyze security vulnerabilities, and troubleshoot network problems. Wireshark supports a variety of network interfaces and protocols, and allows users to get a complete picture of how data is transmitted and interacted in the network environment. It is a powerful tool for network administrators, system analysts, ethical hackers, and other professionals who work with networks and need detailed analysis of network traffic.

Wireshark also provides the ability to view and decrypt encrypted network traffic, including SSL/TLS, SSH, and other encryption protocols. This allows analyzing the contents of packets transmitted over secure communication channels. In addition, Wireshark supports packet filtering, allowing users to quickly find and analyze the data they need. This tool can also be used to debug network problems, troubleshoot network setup, and explore protocols and network aspects of software. Overall, Wireshark is a powerful network traffic analysis tool that helps you understand, monitor, and improve network systems. In this guide, we’ll look at the basic functionality of Wireshark, relate it to the OSI model, learn how to analyze network traffic, and secure your presence on the global Internet.
First we need to download and install Wireshark. Since the program is released under the GNU GPL v2 license (which means that it can be distributed freely), it is not difficult to find any version of the program in the public domain. In the tutorial, we will use functions from an older version of the program (1.12.3). This is because the SSL protocol used in Chapter 6 is directly integrated into this version. Installing an older version makes it easier to get started with the program, so we choose it. You can find the installer on the official website .
Further installation of the program is simple – click “Next” – “Next” – “Next”.
After successful installation, a Wireshark shortcut will appear on your desktop. We can start considering the functionality!

One of the main capabilities of the program is the capture of network traffic. Therefore, first you need to learn how to capture the traffic of your network.
Let’s launch the program! We are immediately greeted by the start menu, where you can see available for capture computer interfaces, manuals from the developers of the program and many other interesting things.
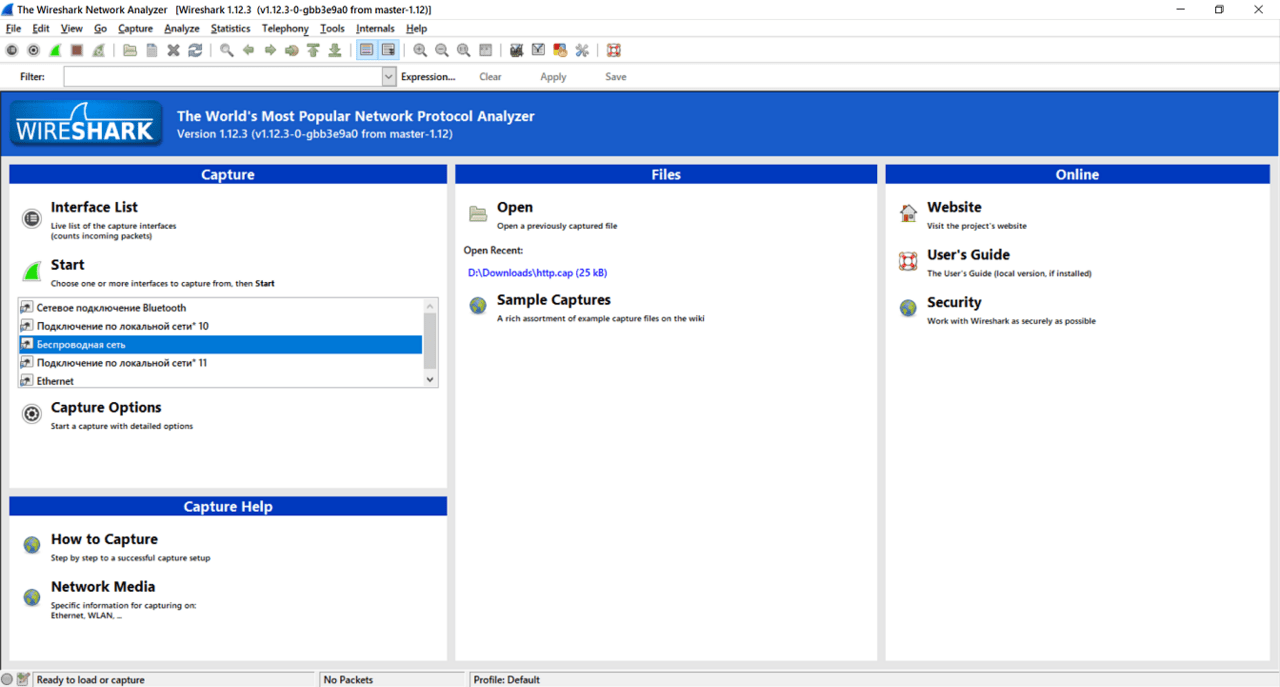
From all this, we need to pay attention to this area of the program.
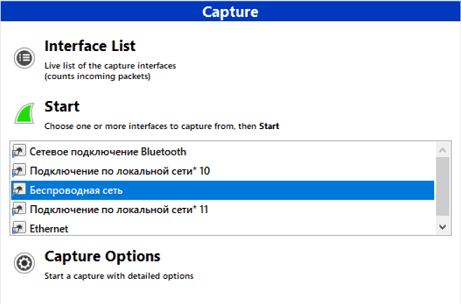
Here you need to select the interface through which you are connected to the Internet.
A network interface is software that interacts with the network driver and the IP layer. It provides the IP layer with access to all available network adapters, the traffic of which we will intercept. Most often, in the Wireshark program, you can find a wireless (Wi-Fi) and cable (Ethernet) network interface.
The guide uses Wi-Fi, so we capture “Wireless Network” and then click “Start“.
If you have selected the correct interface, you will be able to see the following.
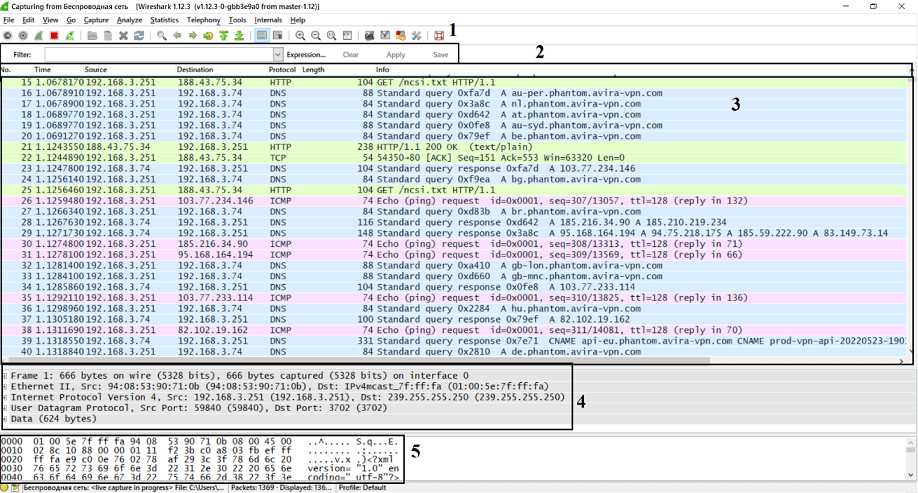
The filter panel allows you to find the necessary information. It is described in more detail in the fifth chapter of the manual.
A title panel that divides the information from point 3 into number, time since the start of traffic capture, source and destination, as well as protocol, packet size, and a little information about the network packet.
The package panel is updated in real time. Here, package information is divided into columns defined in the title bar.
Layers panel describing the OSI model layers of the selected network packet.
Metadata panel representing data in hexadecimal and symbols.
Congratulations! You have successfully captured your network traffic. Now you can see the data packets passing through the network, as well as some information about them: sender and receiver addresses, protocols and packet contents. Now you can start analyzing network traffic.
Before starting traffic analysis, it is necessary to have a basic knowledge of the protocols of the OSI network model. It is enough to read the article in Wikipedia.
Many programs use the HTTP protocol to transfer information, which allows you to receive various resources from the Internet and back. Let’s consider one of the packets transmitted using the HTTP protocol.
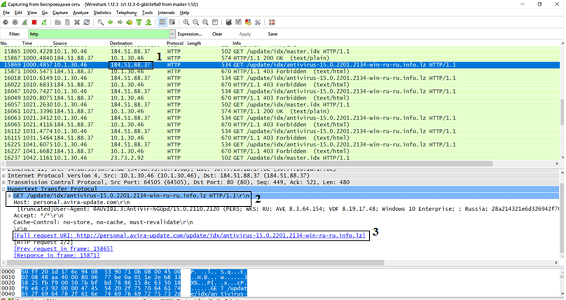
To anchor the material, try to analyze any HTTP packet on your computer and try to explain what it was sent for.
While doing your homework, you might have a problem finding the package you need. Wireshark has a solution for solving it – filtering! In the special Filter field, you can enter the necessary commands or use the prompts.
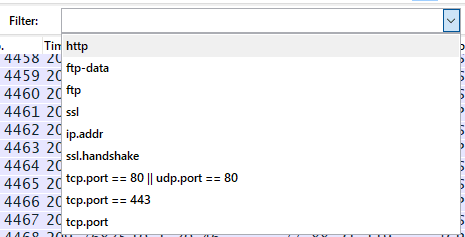
Filtering by IP addresses, port numbers and protocols is most often used. Let’s see how it happens.
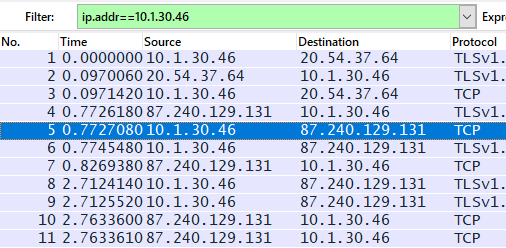
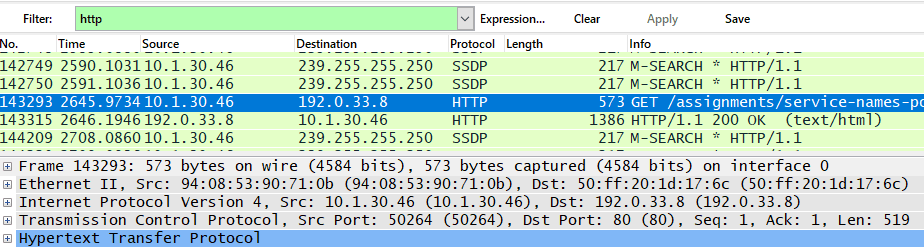
Filtering by IP address allows us to view all packets coming from anyone or those going to anyone. For example, let’s select all packets coming from the IP address 10.1.30.46 using the input in the filter “ip.src == xxxx”.
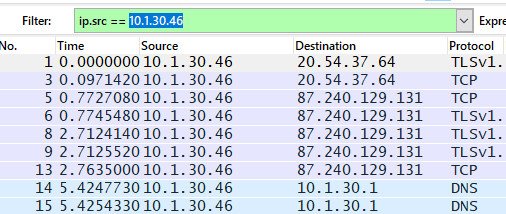
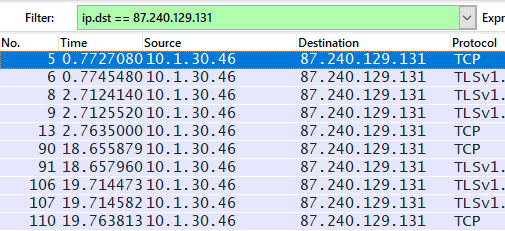
It is also possible to filter network traffic by the IP address of the recipient of the packets using the command «ip.dst == xxxx».
Alternatively, packets can be seen regardless of traffic direction using ip.addr == xxxx.
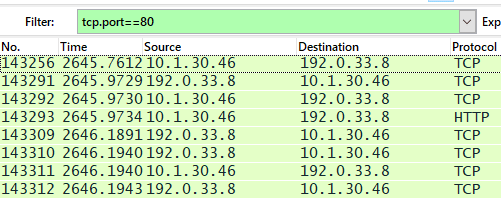
To filter by port number, use .port = x after the protocol name. For example, to view TCP port 80, which is used for unencrypted HTTP traffic, use the command “tpc.port == 80”.
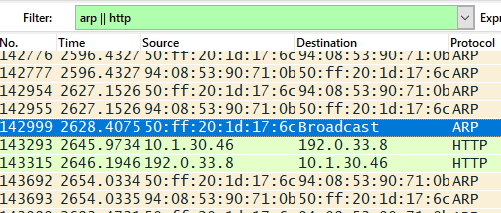
And finally, to filter traffic by protocol packets, you just need to enter the name of the protocol.
Please note that filters can be combined using logical operators AND “and/&&” OR “or/||” and NOT “not/!”
To practice finding the necessary information, try to look at the number of packets of a particular protocol and think about why there are so many.
Having dealt with the basic functionality of Wireshark, we can proceed to a more complex and useful one.
Data transmission over the global Internet is dangerous, especially if it is not secured. Modern browsers use the SSL/TLS protocol, which encrypts information and allows it to be transmitted securely.
Sometimes the user or system administrator needs to check the traffic for suspicious activity or the correct operation of the program. Because of this, there is a need to decrypt the intercepted protected traffic.
First, let’s understand how the SSL/TLS protocol works. Before exchanging encrypted data, a connection establishment process, also called a handshake, is used.
At the handshake stage, the client and server undergo authentication (authenticity check), exchange information about their capabilities, and only then begin to negotiate a common session key.
There are many algorithms for negotiation over an unprotected communication channel. The selection comes from a list of algorithms supported by the client at the initial handshake stage.
The most common session key exchange algorithm is RSA. Consider the infographic that describes the mechanism of the algorithm.
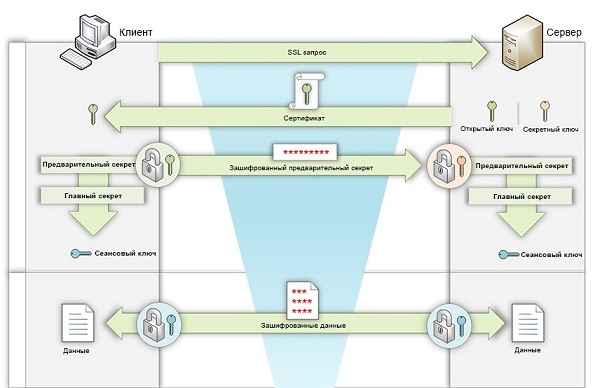
During the handshake, the client generates a random number called a secret coin and sends it encrypted with the server’s public key. Both parties then convert the pre-secret into a master secret and generate a session key that is used to exchange additional information.
Now try to get the protected information in Wireshark. Perform the preparatory steps, namely, check the session key matching algorithm and configure the browser. First, we find the handshake using a filter by typing “ssl.handshake” and check the message from the server.
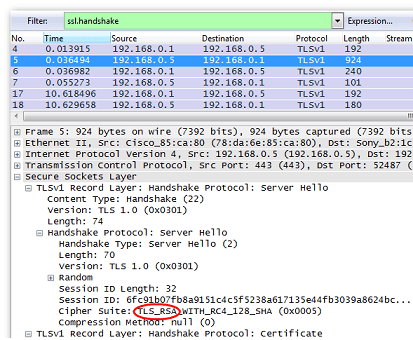
In the field “Cipher Suite” we can enter “TLS_RSA”. This means that we can start further actions.
Setting up a browser in the Windows operating system is quite simple. Open the properties of the computer, then “Additional system parameters” and select “Environment variables…”.
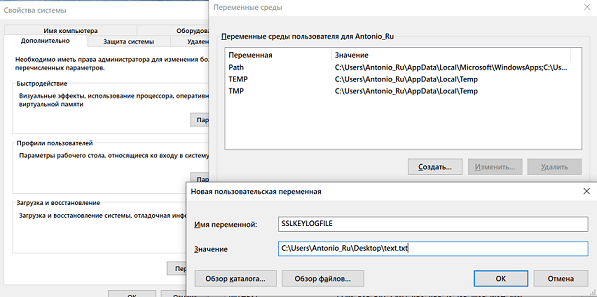
We add a new user variable “SSKEYLOGFILE” and specify the path to the file where we go to save it.
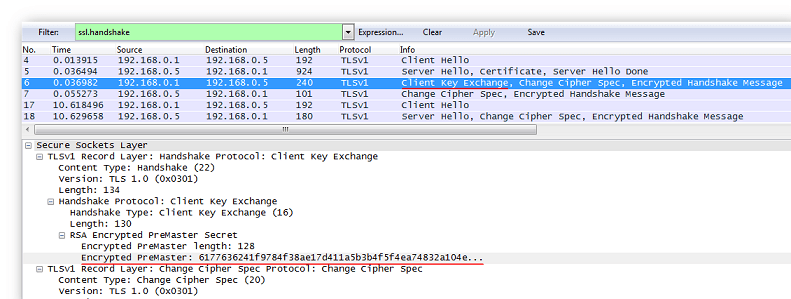
Consider the client’s response message: it contains the encrypted value of the previous secret of the current session.
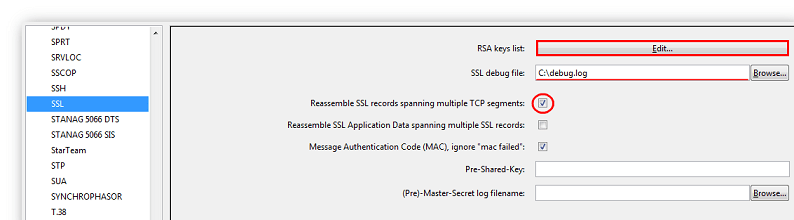
Next, we proceed to the settings of the Wireshark program. Use the key combination “Ctrl + Shift + P” to open the “Preferences” menu, then open the “Protocols” branch and select “SSL”.
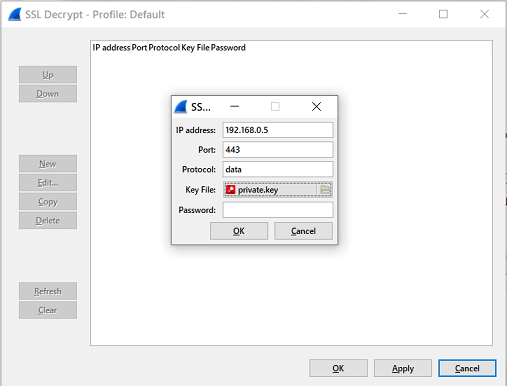
Now you can confirm the settings and start viewing the decrypted traffic. Don’t forget to use the filter!
Try to connect to the server of any site yourself and see what packages your computer is exchanging with it.
Capturing protected traffic opens up many opportunities. One is to intercept HTTPS requests from users connected to the network. Let’s see how it will be done and what results we will get.
To begin with, we repeat the actions of the previous point, but specify the address of the requested page as the IP address of the SSL server. The HTTP transfer protocol is commonly used to transfer passwords. We talked about the methods used in this section in Chapter 4. To use the HTTP traffic filtering method, you can use the command “http.request.method == “methodname””. Since we want to intercept the data sent by the client to the server, we will look at POST requests. For this we will apply the filter “http.request.method ==”POST””.
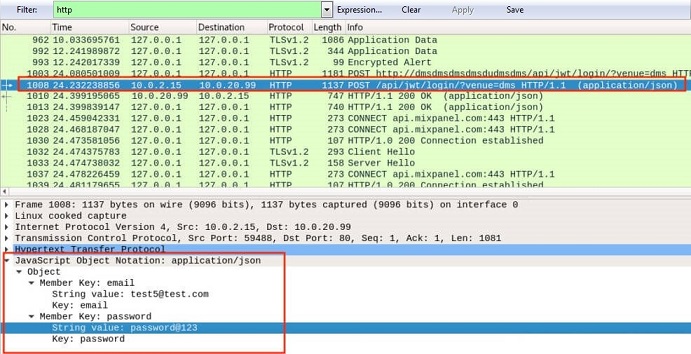
After performing these simple steps, we received important data of another user. Therefore, it should be remembered that public networks are dangerous and threaten even protected traffic.
Try to capture the secure traffic of the email server and log in using your login and password. Look for the POST request and see what’s there.
Most likely, important data will be encrypted. In this way, the postal service protects your data, but the risk of hacking still remains.
Having considered all the functionality of the Wireshark program, we can correlate it with the OSI network model. But to begin with, we should remember what this model is.
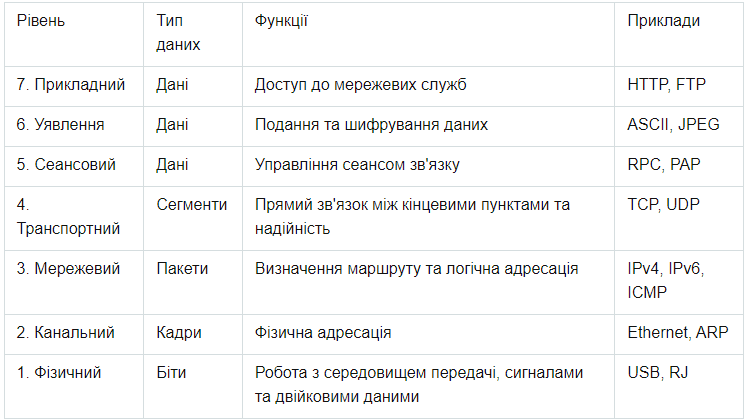
OSI is a set of network protocols from which different network devices communicate with each other. The model defines seven levels of system interaction. Consider the table of levels of the OSI model.
Now let’s correlate these levels with Wireshark. Let’s consider the most common protocols during traffic analysis, namely HTTP, TCP and ICMP.
The HTTP protocol in Wireshark has 4 layers according to the OSI model, namely Application (Hypertext Transfer Protocol), Transport (TCP), Network (IPv4) and Channel (Ethernet II).
The TCP protocol has 3 layers according to the OSI model, which include transport (TCP), network (IPv4) and channel (Ethernet II).

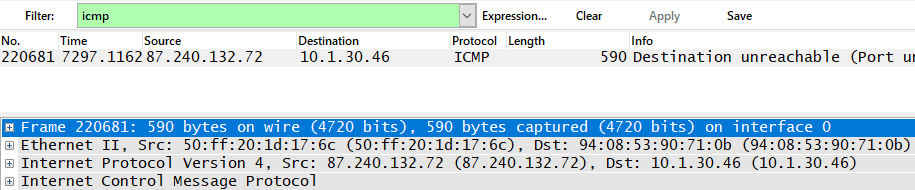
The ICMP protocol generally has only 2 layers according to the OSI model: network (IPv4) and channel (Ethernet II).
In general, Wireshark defines only 5 layers of the OSI model: application, transport, network, channel, and physical. Depending on the protocol, you can see different levels.
After reading this guide, we learned how to analyze traffic and find hidden information, as well as block protected information. For future information security professionals, these are very important skills that will surely come in handy in the future and are the basis for further career development.