
Looking for a complete guide to Bash Bunny in Ukrainian? In this extensive guide, you will find everything from basic device setup to developing complex payloads for HID attacks, network spoofing, geofencing, and data exfiltration. All ATTACKMODE, CUCUMBER, DuckyScript, BLE triggers, Bash extensions, working with MicroSD, installing additional tools, and more are covered. The guide is suitable for both beginners and experienced security professionals. This manual will turn your Bash Bunny into a versatile tool for Red Team operations, USB security testing, and social engineering.

Bash Bunny is a specialized USB computer from Hak5 designed for BadUSB attacks. The device is capable of simulating multiple types of USB peripherals at the same time, such as a keyboard, network adapter, flash drive, and serial port. This opens up opportunities for fully automated attacks on target systems without the need for manual intervention. Bash Bunny runs on a Debian-like Linux system, which allows you to extend its functionality with bash scripts, additional utilities, and complex logic of execution conditions.
With built-in storage and MicroSD support, the device is convenient for both temporary one-time attacks and long-term operations with logging and saving information. Designed for security professionals, this tool demonstrates the weaknesses inherent in computers trusting connected USB devices, and helps to identify vulnerabilities in corporate and personal security systems.
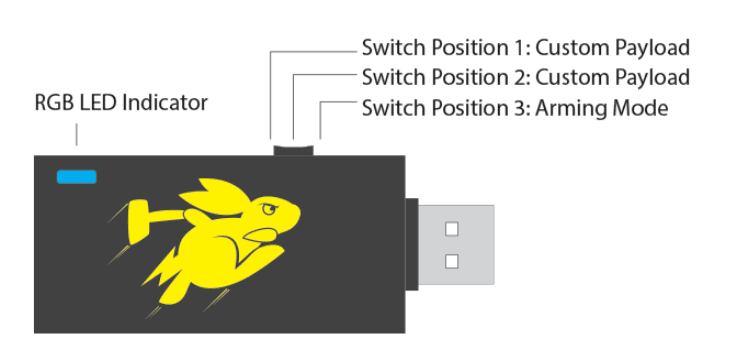
Bash Bunny has a physical three-position switch that determines the behavior of the device after connecting to a computer. Position 3 (closest to USB) activates “Arming Mode” – an arming mode that allows you to access the device’s file system via Mass Storage, as well as connect to Bash Bunny as a serial port. In this mode, it is convenient to download payloads, install tools, or view attack logs. Positions 1 and 2 correspond to user-defined attack scenarios. When loaded in these positions, Bash Bunny automatically executes the payload.txt script located in the corresponding /payloads/switch1 or /payloads/switch2 directory. This allows you to prepare different scenarios in advance – for example, the first for an attack on Windows, and the second for attacks on Linux.
The Bash Bunny file system is divided into several logical directories, each of which performs a separate function:
/payloads/switch1 and /payloads/switch2 — payloads corresponding to the switch positions.
/payloads/library — a complete library of official payloads, synchronized with GitHub.
/payloads/library/extensions — additional bash functions that extend DuckyScript capabilities.
/loot — a folder where the results of attacks are stored: merged files, logs, password hashes.
/languages — keyboard layout files for HID injections (e.g. us.json, fr.json).
/tools — a directory from which Bash Bunny automatically installs .deb packages or utilities when booting into Arming Mode.
/docs — additional documentation and examples.
This structure allows you to maintain order by separating scripts, results, and supporting resources, which is critical for safe and efficient operation of the device.
The second version of Bash Bunny has added support for MicroSD cards, which significantly expands the functionality of the device. If a MicroSD is inserted in switch position 1 or 2 when the device is started, the /root/udisk directory is automatically linked to the root of the card. Thus, all files that are usually stored in the internal storage are moved to the card.
This is especially useful for long-term attacks that require saving large amounts of data – for example, logging NTLM hashes or network traffic. It is important that in Arming Mode, payloads are always launched from internal memory – even if the card is present. In addition, if ATTACKMODE STORAGE is enabled, the MicroSD (and not the internal memory) will be presented to the target system as a USB drive, which allows you to configure staging or hidden data exfiltration.
The information provided by the built-in RGB LED on the Bash Bunny is one of the key ways to understand what state the device is currently in. This LED can glow one of several colors, as well as blink in different patterns, each of which indicates a specific stage of execution, error state, or readiness. For example, a slow green blink indicates that the device is booting, while a blue blink indicates that the device is in Arming mode. If the LED blinks red, this indicates an error or a flashing process.
Firmware versions above 1.1 also use a red-blue alternating light — a “police” mode — to visually confirm that a firmware update is in progress. In addition to the basic colors, the LED can also adopt other patterns: single, double, triple blinks, as well as inverted patterns (for example, a short off in the middle of a long on).
Typical colors and patterns:
🔵 Blue (blinking) – Arming Mode is active.
🟢 Green (blinking) – the device is booting.
🔴 Red (blinking) – error or flashing.
🔵🔴 Red-blue alternating – firmware update (version >1.1).
🟣 Magenta (steady light) – installing tools from /tools.

Bash Bunny supports a flexible system for extending functionality by installing additional tools. This is especially important for launching payloads that require third-party utilities or libraries.
All you need to do is prepare .deb packages or directories with ready-made tools and copy them to the /tools folder on the device’s USB drive during Arming Mode. The next time you connect, Bash Bunny will perform the installation itself using dpkg, and move the remaining files to /tools in the root file system. The whole process is accompanied visually: the LED glows in a constant magenta color, signaling an active installation.
Key steps when installing utilities:
Copy .deb files or folders to /tools in Arming Mode
Connect Bash Bunny: installation will happen automatically
LED → magenta = installation in progress
The finished tools will appear in /tools system level
This example payload demonstrates how Bash Bunny uses logic to check for the presence of the necessary tools before executing the main attack. The rdp_checker script looks for the impacket directory in the internal /tools directory. If it is not present, Bash Bunny automatically terminates and signals an error by flashing red (LED FAIL). This way, the payload is not launched until all dependencies are satisfied. This avoids situations where the attack is partially executed or fails without any results.
Typical payload logic structure:
REQUIRETOOL impacket — check for package availability
If OK → continue script
If not → red LED and stop
Gives clear feedback, no need for a terminal
To ensure correct operation of HID injections in environments with different localizations, Bash Bunny allows you to specify the keyboard language layout. The default is US (DUCKY_LANG us), but to work with systems in France, Germany, Ukraine or Japan, you need the appropriate JSON files. To do this, you need to place a file with a name like fr.json, ua.json, de.json in the /languages folder. They are automatically activated when booting into Arming Mode.
JSON file with layout in /languages
Command DUCKY_LANG ua — activates Ukrainian
All QUACK commands after this follow the new layout
Compatible with Rubber Ducky-like HID attacks

Bash Bunny Mark II has significant innovations that allow you to perform complex attacks without direct user intervention. One of these is the mass data exfiltration mode, which allows you to automatically detect the type of storage device and, depending on its presence or absence, choose the right point to save the attack results – either to the internal memory of the device or to a MicroSD card.
If there is a MicroSD card in positions 1 or 2 during boot, the internal directory /root/udisk will automatically point to the root of the card, which makes exfiltration more flexible. If there is no card, Bash Bunny works with the built-in SSD. This allows you to adapt the device’s behavior to the needs of a specific task, without having to change the configuration manually each time.
Particularly impressive is the introduction of Bluetooth Low Energy. It is used for:
Geofencing — launching the payload only when a specific Bluetooth device is present (e.g., “MBAudio”);
Remotely launching the next stage of the attack after a BLE signal is sent;
Environment assessment — Bash Bunny can capture all advertised BLE identifiers nearby and use them in the payload logic.
Thus, the new Mark II features significantly increase stealth, control over the attack point, and security for the pentester performing an injection in an area with unknown risks.
When using memory cards in Bash Bunny, it is important to follow the formatting rules. Depending on the OS with which the device will interact, the card must have the correct file system. For example, Windows systems work better with FAT32, ExFAT, or NTFS; macOS with APFS or FAT32; and Linux with EXT or FAT32.
Bash Bunny itself only supports EXT and FAT32, so even if the target system supports something else — for example, NTFS — Bash Bunny will not be able to work with it directly. Therefore, before starting testing, you need to make sure that the card is formatted in the correct format. Otherwise, saving logs, loading tools, or executing payloads may result in errors.
Basic steps for preparing a MicroSD card:
Use only one partition;
Choose a compatible file system: FAT32 or EXT;
Check if the device is correctly recognized via /root/udisk;
Avoid mounting the card on Bash Bunny and the host at the same time to avoid access conflicts.
These basic steps help avoid read/write errors and ensure stable operation of payloads.
DuckyScript is a key Bash Bunny language that allows for keystroke-based attacks. Any script that contains the QUACK command, or its abbreviated form Q, can pass commands to the victim system as if they were entered by a real user. The simplest example is to open PowerShell on Windows and run a pre-prepared script:
1 GET SWITCH_POSITION
2 LED ATTACK
3 ATTACKMODE HID STORAGE
4 RUN WIN powershell ".((gwmi win32_volume -f 'label=''BashBunny''').Name+'payloads\\$SWITCH_
5 LED FINISH
The power of DuckyScript lies in the combination with BASH: scripts can contain logic, conditions, delays, result checking, etc. This opens up a wide range of scenarios, from simple text input to complex multi-stage attacks where HID is combined with log storage, network attacks, or loading additional tools.
Basic DuckyScript commands:
QUACK STRING <text> — prints text;
QUACK ALT F4 — simulates hotkeys;
QUACK DELAY 1000 — pauses execution;
LED STAGE1 — changes colors to display status.
DuckyScript creates the illusion of “human” input, which is difficult to track by security systems and often allows you to bypass even protected computers without unlocking the screen.

Bash Bunny, being a universal device, allows you to emulate network interfaces to expose the victim’s computers to an isolated network controlled by Bash Bunny itself. Using RNDIS or ECM modes, the device can impersonate an Ethernet adapter through which the computer automatically tries to connect to the Internet. Thanks to this, Bash Bunny gets priority as the “fastest network” and begins to intercept the victim’s traffic without arousing suspicion. This allows you to carry out MITM attacks, DNS spoofing, credential theft, and other malicious actions.
Commonly used commands:
ATTACKMODE RNDIS_ETHERNET — for Windows
ATTACKMODE ECM_ETHERNET — for macOS/Linux
GET TARGET_IP — to get the victim’s IP
GET TARGET_HOSTNAME — to save a log with the identifier
QuickCreds is one of the fastest and most effective methods implemented through Bash Bunny to steal NTLM hashes. The method is based on using network mode and running the Responder utility, which listens to traffic on the network connected to Bash Bunny. After connecting to the victim computer, the device automatically captures usernames, password hashes, and other authentication data on the local network.
Typical algorithm of actions:
Set ATTACKMODE RNDIS_ETHERNET
Get hostname and IP
Run Responder.py with appropriate parameters
Wait for NTLM hashes to appear in loot directory
This method works even on locked machines, allowing access to credentials in a passive mode, without active user interaction.
Bash Bunny supports a large number of pre-configured file exfiltration payloads, from simple copying to complex multi-stage scripts using cloud services or QR codes. All of them focus on quickly obtaining, compressing and transmitting sensitive information without arousing suspicion. The scripts can operate via flash memory, network or even fiber optic channels.
Here are 5 of the most effective:
USB EXFILTRATOR – copies user documents to loot
SMB EXFILTRATOR – uses SMB for fast exfiltration via robocopy
OPTICAL EXFILTRATOR – encodes data into camera-readable QR codes
DROPBOX EXFILTRATOR – uploads documents to Dropbox via staged PowerShell
TCP EXTRACTOR – transfers zip file with data via netcat
These payloads cover a wide range of situations, from phishing campaigns to internal physical security tests.

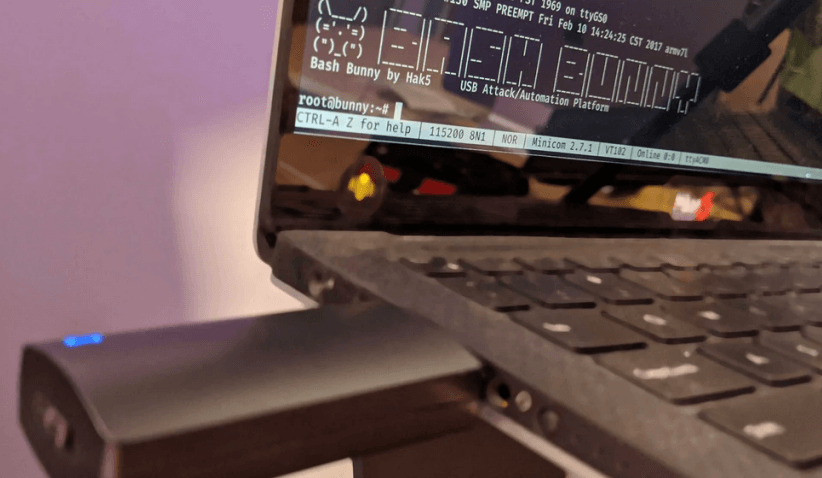
Bash Bunny Mark II provides direct access to the system via the built-in serial port, allowing users to interact with the device at the kernel level of the operating system. This is especially useful for developers and security professionals who need deep control over the device. The serial console provides access to the root shell without the need for additional adapters or special software.
To connect to the serial console on Windows systems, you can use the PuTTY program:
Open Device Manager and find the COM port associated with Bash Bunny.
Launch PuTTY, select the connection type “Serial”, enter the COM port number and set the baud rate to 115200.
Click “Open” to establish the connection.
On Linux or macOS systems, you can use the screen utility:
Specify the device name, for example /dev/ttyUSB0 or /dev/ttyACM0.
Run the command: sudo screen /dev/ttyUSB0 115200.
To exit, press Ctrl+A, then Ctrl+\.
This access allows you to perform diagnostics, configuration, and payload development directly on the device.
One of the innovative features of Bash Bunny Mark II is the ability to launch payloads using remote triggers via Bluetooth Low Energy (BLE). This allows you to activate certain actions on the device only when a specific BLE device is nearby, which increases security and control over the execution of scripts.
To implement this feature, the WAIT_FOR_PRESENT command is used, which pauses the execution of the payload until the specified BLE device is detected. For example, you can configure Bash Bunny to activate a HID attack only when a smartphone with a specific name is detected.
This is especially useful in social engineering scenarios, where it is necessary to ensure the exact moment of activation of the attack, for example, when the target turns away or leaves the workplace.
Geofencing in Bash Bunny Mark II allows you to restrict payload execution to specific physical locations, defined by the presence or absence of specific BLE devices. This provides an additional layer of security by preventing accidental or unwanted attacks from being launched outside of the defined area.
To implement geofencing, the following commands are used:
WAIT_FOR_PRESENT <device name> – waits for the specified BLE device to appear before continuing execution.
WAIT_FOR_NOT_PRESENT <device name> – pauses execution until the specified device is nearby.
These commands allow you to fine-tune the conditions under which payloads are launched, ensuring they are executed only in the desired environment.
For some scenarios, such as firmware updates, installing third-party utilities, or remote management, Bash Bunny requires access to the Internet. Since the device does not have its own wireless interface, the connection is made via the victim or pentester computer by sharing the connection. Bash Bunny simulates a network adapter (via RNDIS for Windows or ECM for Linux/macOS), obtains an internal IP address, and uses NAT or a proxy to access the network. The configuration depends on the operating system.
Windows: Open “Network and Sharing Center”, find Bash Bunny’s connection (e.g. Ethernet 2), right-click → Properties → Sharing → Turn on Internet Sharing. Bash Bunny usually gets IP 172.16.64.64.
Linux: You can use iptables or NetworkManager. Example: create a bridge, configure a DHCP server (dnsmasq), enable NAT via iptables.
macOS: Enable “Internet Sharing” in “System Preferences → Sharing”. Share your Wi-Fi or Ethernet with Bash Bunny via USB Ethernet.
This setting allows Bash Bunny to fetch packages, update itself, install tools from repositories, or push data to remote servers
Hak5 actively supports Bash Bunny by releasing new firmware and payload library versions. The most convenient way is to automatically update via Bash Bunny Updater. This is a cross-platform utility that automatically downloads new firmware, keyboard languages, payload libraries and installs them via Arming Mode. The process takes 5–10 minutes. After the update is complete, the device is completely rebooted.
Brief procedure:
Connect Bash Bunny to Arming Mode (switch to position 3).
Run Bash Bunny Updater (Windows, Linux, macOS).
Wait for the message about successful completion.
Check /version.txt for the updated version.
After the update, all payloads, libraries, and system components will be up to date. For safe testing, it is recommended to make a backup before updating.
If Bash Bunny Updater is not available or there are connection problems, you can perform the update manually. To do this, download the .tar.gz archive from the official Hak5 website without unpacking it. In Arming Mode, Bash Bunny reads the presence of this file in the root of the drive and starts the update procedure.
Download the latest firmware from hak5.org/downloads
Copy .tar.gz to the root of your mass storage
Safely remove Bash Bunny
Reconnect the device in the same position (Arming)
The LED will start blinking red-blue (upgrade in progress)
When complete, the LED will be green or blue
This is an alternative, reliable way to update in case of unstable network environment.
Payloads are bash or hybrid scripts that automate the attack actions of the device. They contain Bash, DuckyScript commands, extensions and variables. They are placed in the directories /payloads/switch1/ or /payloads/switch2/, depending on the selected switch position. The main file is named payload.txt, but can include additional files such as library, extensions, resources, which are included at runtime.
Typical structure of a simple payload:
LED SETUP
ATTACKMODE HID STORAGE
QUACK STRING whoami
LED FINISH
This payload enables HID + STORAGE, injects whoami, and exits with a blink. Payloads can be conditional, loop, wait for events (WAIT_FOR), perform network actions, or respond to target status.
DuckyScript™ is a compact, specialized HID injection language that allows you to simulate keystrokes as if they were being typed by a real user. Bash Bunny supports an extended version of DuckyScript (v1.0–v2.0), with support for conditionals, variables, language, and templates.
Key commands:
QUACK STRING <text> — print text
QUACK DELAY 1000 — pause in milliseconds
QUACK CTRL ALT DELETE — key combination
DUCKY_LANG ua — set Ukrainian language HID
LED SETUP — color indicator
When combined with Bash, DuckyScript becomes a flexible automation tool, especially effective against locked or protected systems.
Bash Bunny supports custom extensions that plug into payload.txt to provide additional logic. They are stored in the /payloads/library/extensions/ directory and are automatically plugged in when the script is run. For example, GET allows you to read the target’s system information, REQUIRETOOL checks for the presence of a required tool, and DUCKY_LANG switches the keyboard layout.
Examples:
GET TARGET_IP — get the victim’s IP
RUN /tools/my-script.sh — run the utility
REQUIRETOOL impacket — check the imported toolkit
These extensions greatly simplify payloads, increase code reusability, and reduce the risk of bugs.
ATTACKMODE determines which USB devices Bash Bunny emulates at startup. Each mode activates the appropriate drivers and settings that are perceived by the OS as new peripherals. These can be keyboard (HID), network (RNDIS, ECM), storage (STORAGE), or a combination of these.
Popular examples:
ATTACKMODE HID — keyboard
ATTACKMODE STORAGE — flash drive
ATTACKMODE RNDIS_ETHERNET — Windows network adapter
ATTACKMODE ECM_ETHERNET — adapter for Linux/macOS
ATTACKMODE HID STORAGE — combo for HID injection + file transfer
It is also possible to set custom USB identifiers:
VID 0x1FC9
PID 0xA4A1
MAN "Hak5"
PROD "PayloadDevice"
SN "BB2025"
This allows you to bypass USB filtering or simulate legitimate devices in a corporate environment.
The Bash Bunny LED is a key means of communicating with the user. Its behavior indicates boot status, errors, script progress, or completion. The LED supports colors (RGB), blinking patterns, and frequency changes.
Typical values:
LED SETUP — magenta (tool setup)
LED ATTACK — yellow (attack in progress)
LED FINISH — green (successful completion)
LED FAIL — red (error, failures)
LED SPECIAL PATTERN — alternating, flashing, etc.
Complex patterns can be created, such as flashing 3x blue + 1x red to indicate a specific stage. The LED serves as a visual interface when the console is not available.
Bash Bunny, starting with firmware version 1.3, has implemented a special system for managing the power consumption and performance of the microcontroller. For this, the CUCUMBER command is used, which allows you to choose one of three processor operating modes. This feature is of strategic importance when performing long-term or sensitive attacks that require either battery saving or maximum computing power. For example, for stealthy passive attacks that run for hours, reducing the number of active cores can prevent overheating and device detection.
CUCUMBER modes:
ENABLE — one core, “ondemand” mode (energy saving)
DISABLE — four cores, “ondemand” (balanced performance)
PLAID — four cores, “performance” (maximum speed)
The ATTACKMODE command allows Bash Bunny to emulate various USB devices. The greatest flexibility is achieved by combining multiple modes in a single script. This allows you to create attacks that change on the fly depending on the behavior of the target. For example, Bash Bunny can initially emulate a storage device, and after detecting a network interface, activate Ethernet mode. This approach provides a more flexible, unpredictable, and dynamic penetration of target systems. This makes scripts more effective even in complex environments with multiple layers of protection.
Examples of valid combinations:
ATTACKMODE HID STORAGE
ATTACKMODE HID ECM_ETHERNET
ATTACKMODE STORAGE RNDIS_ETHERNET
The RGB LED on the Bash Bunny is not only a decorative element, but also a functional indicator of the current state of the device. Changing color, blinking or a combination of modes allows the user to understand exactly what is happening with the device. This is especially important in the field, when the device is not connected to a terminal and has no feedback to the user. In standard practice, LEDs are used to identify such states as: loading, attack, completion, error, and even for visual separation of multi-stage scenarios.
Typical patterns:
LED SETUP,LED ATTACK,LED FAIL,LED FINISH
Color + mode: LED R FAST, LED G SOLID, LED M 300LED M 300
QUACK is the primary command for inputting keystrokes. It traces its origins to the USB Rubber Ducky and has become the de facto standard for keyboard simulation scripts. Using it allows you to execute any scenario, from opening PowerShell to running complex sequences of actions.
Keyboard injection becomes especially effective when combined with conditional logic or previous stages of target analysis. Additionally, Alt codes are supported, which expands the possibilities of entering characters that are not available on the physical keyboard.
Examples:
QUACK STRING Hello World
QUACK ALTCODE 236— infinity symbol (∞)
To increase the trust in Bash Bunny on the victim’s side, a spoofing method is used – replacing the identification data of the USB device. Bash Bunny allows you to specify its Vendor ID (VID), Product ID (PID), Manufacturer (MAN), Product (PROD) and Serial Number (SN) values to appear as a regular device from a known manufacturer. This is especially useful in environments with USB filtering or policies that only allow certain types of devices. For example, you can disguise yourself as a “Kingston USB Drive” or a “Logitech Keyboard”.
Example syntax:
ATTACKMODE HID STORAGE VID_0XF000 PID_0X1234 MAN_LOGITECH PROD_KEYBOARD SN_1337
Working with the Bash Bunny File System (udisk)
The Bash Bunny mass storage (udisk) plays a critical role in the scenarios: it is where logs are written, payload files, tools, data logging, and more are stored. Since the memory is shared with the victim system, it is important to manage the mount correctly: incorrect or simultaneous mounts on the host and Bash Bunny can lead to file corruption or unpredictable behavior. That is why the udisk mount command exists for explicit mounting inside Bash Bunny, allowing you to precisely control access and avoid conflicts.
udisk mount, udisk unmount, udisk remount, udisk reformat
All Bash Bunny payloads automatically synchronize the file system upon completion, but in certain scenarios (e.g., cyclic logging), judicious use of sync is critical. If a write to udisk is performed in the middle of an infinite loop or the payload is aborted abnormally, without synchronization, this data will not be physically written. Therefore, payloads should terminate with a sync call, which guarantees that the files will be saved. In combination with the FINISH LED, this allows you to safely eject Bash Bunny after the script is complete.
Depending on the nature of the load, Bash Bunny can change the computing mode “on the fly”. This allows, for example, to use full power during the attack phase (CUCUMBER PLAID), and then switch to a power-saving mode (CUCUMBER ENABLE) for long waits or logging. It is also important to note that switching between modes is dynamic – without restarting Bash Bunny, which allows you to write multi-stage and adaptive scripts even during execution. This approach is ideal for long-term attacks with a controlled thermal profile.
The completion of the script should be clearly defined. It is recommended to use LED messages (LED FINISH), sync, as well as final messages or create special marker files. This allows the Bash Bunny operator to verify that the script has been fully executed.
Moreover, such final signals can act as triggers for the next stage of the attack (for example, running a second script after removing the Bash Bunny). In complex attacks where sequence is important, these markers are critical.
Typical actions at the end of the scenario:
sync
LED FINISH
echo COMPLETE > /root/udisk/loot/marker.txt
Conclusion
Bash Bunny is not just a USB attack tool, but a full-fledged automation platform that connects the worlds of operating systems, hardware exploitation and social engineering scenarios. Its strength lies in its adaptability: thanks to support for multiple ATTACKMODEs, an extensible file system, flexible HID-injectable DuckyScript, RGB lighting, BLE triggers and dynamic CPU mode switching, it provides full control over the stages of penetration, data collection and exfiltration.
All this makes Bash Bunny an indispensable tool in the hands of a professional pentester, especially in conditions of limited physical access, strict network segmentation or thorough USB filtering. The correct use of each module – from ATTACKMODE HID STORAGE to CUCUMBER PLAID – allows you to implement attacks that were previously possible only with the participation of several devices and manual work.
Modern defense requires a deep understanding of such tools not only for defense, but also for studying its weaknesses. It is Bash Bunny that allows you to simulate scenarios that can bypass security policies built on the assumption of the “security” of USB devices.