
27.08.2024
2 min
1385

Want to learn how to turn your ESP32 into a powerful Wi-Fi Jammer? This article provides a complete guide: from the basics of radio interference theory to the practical application of the ESP32 penetration tool. You will learn what PMKID, Handshake, and DOS attacks are, and how these tools help in testing the security of Wi-Fi networks.

Important: This material is provided strictly for educational purposes only. The authors and the editorial team do not encourage, endorse, or take any responsibility for the illegal use of the instructions or tools described. Performing Wi-Fi jamming, capturing PMKID or handshake data without explicit permission from the network owner violates applicable laws in most jurisdictions. All security testing must be conducted only on networks you own or have explicit authorization to audit.
Jammer – a device whose purpose is to block a radio signal. If we consider that such technologies as: BlueTooth, Wifi, GPS – operate in the radio frequency range, then the result is that it is with the help of such devices that it is possible to interfere with the normal operation of devices that use the corresponding technologies.
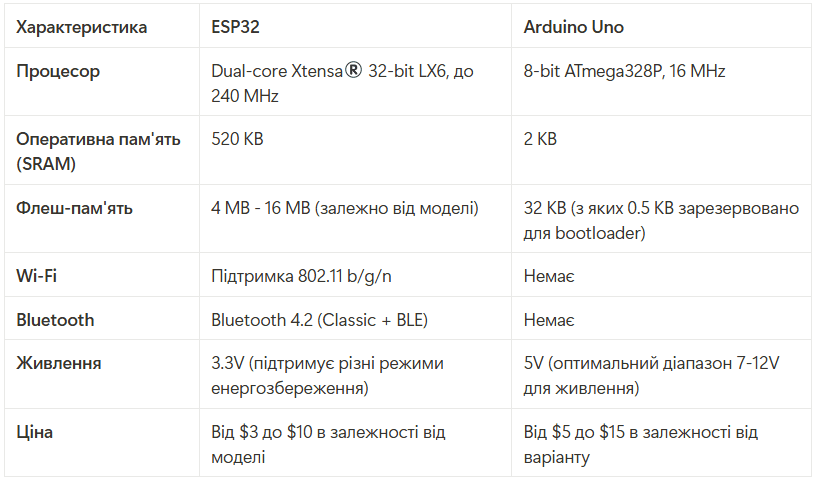
And what about ESP32, the development platform, which accordingly has a powerful 32-bit dual-core processor “on board” operating at a frequency of 240 MHz with flash memory from 4 to 16 MB, which is truly impressive. If we compare the parameters of the aforementioned microcontroller (hereinafter referred to as the MK) with the fairly popular Arduino Uno board, we can conclude that the Arduino loses out in everything.
Comparative characteristics of ESP32 and Arduino Uno:
An interesting point is that the logic level is 3.3V, as opposed to 5V in the Arduino Uno. This is because the ESP32 processor operates at much higher frequencies, which can cause certain physical phenomena that prevent normal operation at a logic level of 5V.
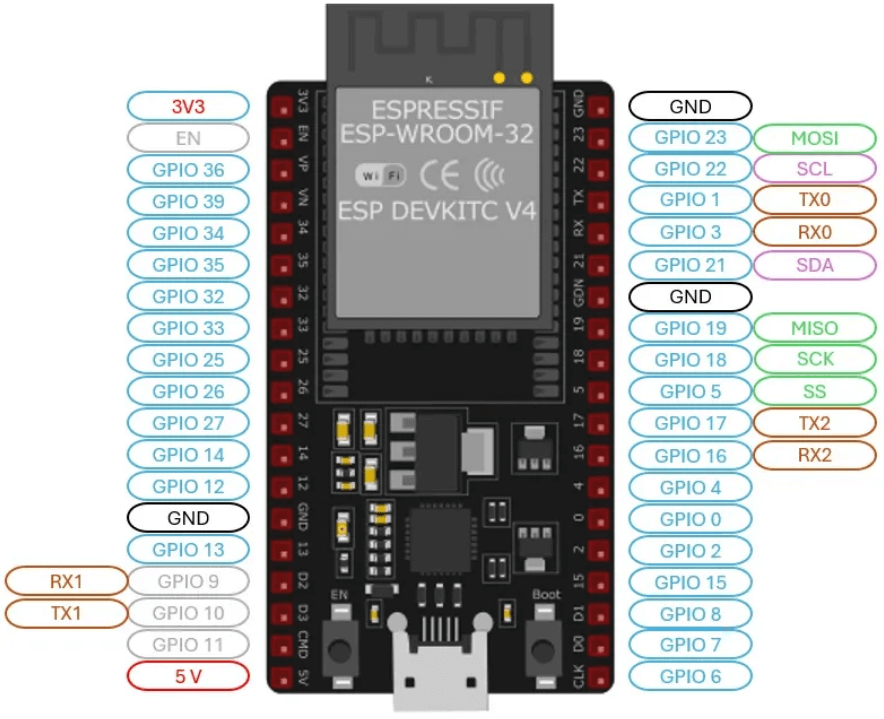
From above we can see a dark rectangle on which a certain broken track is visible – this is the built-in PCB antenna.
To enhance the signal, it is recommended to install an Omni-Directional Antenna or a Directional Antenna, but first you should check if the specific platform supports its use, after connecting it, the ESP will use it as the main antenna.
As a software, we use a ready-made solution in the form of ESP32 penetration tool (https://github.com/risinek/esp32-wifi-penetration-tool).
Installation Python (https://www.python.org/downloads/) + pip (https://docs.python.org/uk/3.13/installing/index.html) + most likely, for correct operation you will need to install the driver for the CH340 chip (https://arduinokit.com.ua/ua/a462945-ustanovka-drajvera-ch340.html?srsltid=AfmBOoqfTKAER8a5IyI2Bn9li9WyLJVkVmN8-tLbLIqt0y9u0iwJmnid)
Clone your software repo (https://github.com/risinek/esp32-wifi-penetration-tool).
Перегляньте порт, до якого підключений МК (Windows: Device Maneger → COM, SERIAL PORTS, LINUX:
ls /dev/ttyUSB* /dev/ttyS* /dev/ttyACM* 2>/dev/null
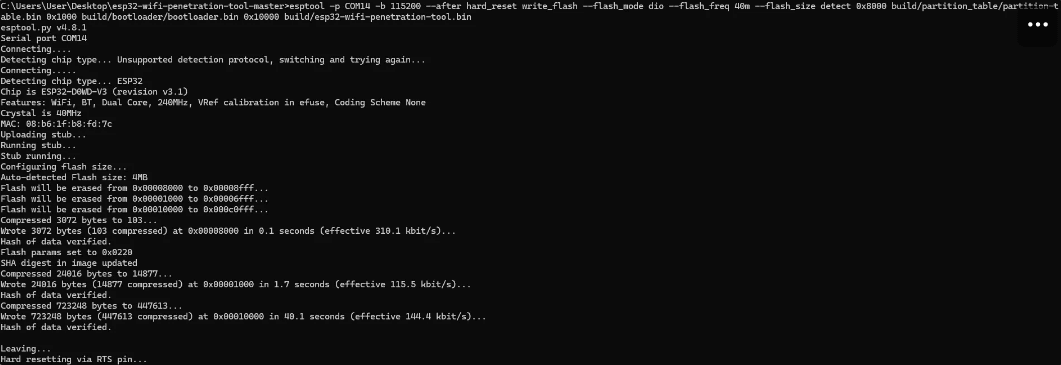
Go to the cloned folder and run the following script:
esptool -p {ВАШ ПОРТ ТУТ}-b 115200 --after hard_reset write_flash --flash_mode dio --flash_freq 40m --flash_size detect 0x8000 build/partition_table/partition-table.bin 0x1000 build/bootloader/bootloader.bin 0x10000 build/esp32-wifi-penetration-tool.bin
Where in the port (-p) parameter you need to specify your port.
Next, we connect to WIFI ManagementAP:mgmtadmin and go to the address 192.168.4.1 and access the web client.
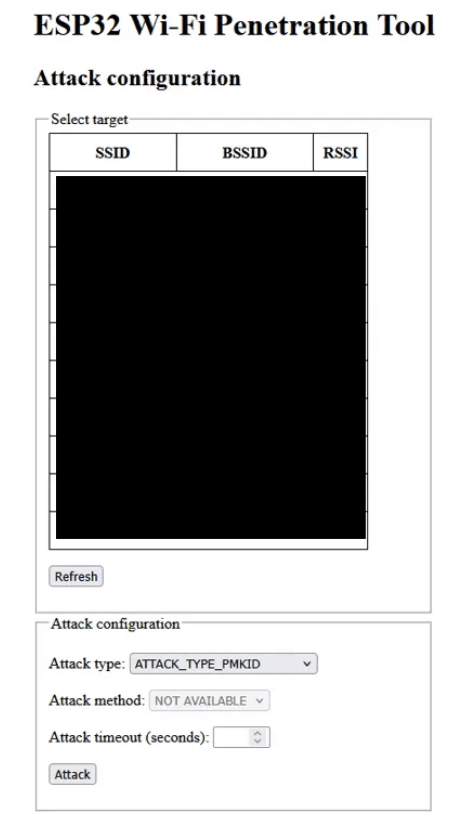
SSID – network name
BSSID – router mac
RSSI – signal strength in dBm.
Attack settings:
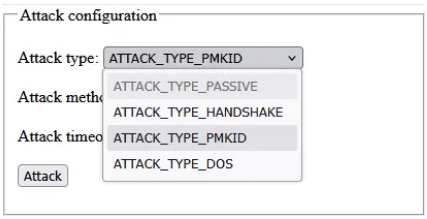
PMKID. Explanation: PMKID is the Master Key Identifier (PMK) used in the Wi-Fi authentication process. The client enters the PSK password to connect to the network → a PMK is generated from it → a 4-way handshake is performed, and it is during this process that the PMKID can be intercepted and the payload accessed by brute force. (e.g. hashcat – https://hashcat.net/hashcat/).
HANDSHAKE. Explanation: Handshake is the authentication process between a client (such as a laptop or phone) and a Wi-Fi access point in the WPA/WPA2 protocol. This exchange validates the entered password, creates a session key, and ensures a secure connection. Capturing the handshake file allows an attacker to perform offline brute force attacks, such as using hashcat or aircrack-ng, to attempt to crack the network password.
**DOS**Denial of Service) is a type of attack whose purpose is to disrupt the availability of a service or resource, making it inaccessible to legitimate users. The attack is aimed at overloading the system or destroying its ability to process requests.
Next, you need to select the type of attack and click “Attack”.
Changing network settings is done by changing the config along the path esp32-wifi-penetration-tool-master/components/wifi_controller/Kconfig, after which you need to compile the project again using idf.py (https://docs.espressif.com/projects/esp-idf/en/stable/esp32/api-guides/tools/idf-py.html)
Congratulations! Now you know a little more about WIFI and ESP32. In fact, the above attacks are not the classic result of the work of a jammer in physical terms, but the impact is appropriate. Let us recall that such actions are illegal, as they violate the law:
“Article 361 of the Criminal Code of Ukraine — “Unauthorized actions with information systems, computer networks or their parts”” Your task will be to test this utility yourself.