
13.01.2025
21 min
1137

This article describes the use of the Kerberos authentication protocol and its PKINIT extension, which uses public-key cryptography to improve security. We explain in detail how this method helps protect against attacks based on weak passwords in environments such as Active Directory.

Disclaimer: We are aware that some photos or articles may contain Russian language captions. But isn’t it great to use their own language against them?
The article discusses the principle of operation of one of the extensions to the Kerberos protocol – PKINIT. After a theoretical introduction, the attack techniques associated with this extension will be analyzed in detail, namely: Shadow Credentials and UnPAC the hash.
Briefly about the essence of these techniques: the first allows an attacker to ensure a stable presence in the domain, even in the event of password changes, while the second – to obtain the NT hash of the account password, provided that there is permission to change the msDS-KeyCredentialLink attribute for the corresponding account.
PKINIT (Public Key Cryptography for Initial Authentication in Kerberos) is an extension to the Kerberos protocol that allows the use of public key cryptography at the initial authentication stage.
Why was this extension needed? What are its main advantages?
To give a correct answer, you need a solid knowledge of cryptography, since such questions are quite difficult to explain in simple words. To put it simply, those familiar with the topic will find the answer superficial, and beginners may not understand it. However, this material does not claim to be a rigorous scientific work, so I will try to give an introductory explanation that will help to better understand the essence of the question.
When assessing the security of an organization’s information resources, one of the classic risks remains the use of passwords vulnerable to dictionary or brute force attacks. The Kerberos protocol itself does not provide effective protection against such attacks (this was mentioned in more detail earlier in the context of password spraying). Of course, you can implement a strict password policy in Active Directory, as well as monitor event logs to detect and block attacks. But how to fix this problem at a deeper level?
Let’s start with the basics. What is a password? In GOST R 58833-2020 “Information protection. Identification and authentication. General Provisions” provides the following definition:
A password is confidential information for authentication, usually in the form of a string of characters.
The key word in this definition is “usually”. After all, a password can be not only a string of characters, but also a hardware token, a fingerprint, a retinal image, a voice, etc.
It is also worth noting the difference between two-factor and two-step authentication, which can be read in more detail in separate materials.
Passwords in the form of a string of characters have a number of vulnerabilities, including:
the possibility of using dictionary passwords;
the need to remember passwords;
the risk of users accidentally disclosing passwords during phishing attacks, in correspondence or in publicly accessible files;
in case of server compromise, an attacker can obtain users’ passwords and use them for replay attacks.
PKINIT is designed to eliminate these shortcomings, as it allows the use of public-key cryptography. Thanks to this extension, authentication by certificates is supported, and two-factor authentication becomes possible, which makes it impossible to use dictionary attacks.
Next, let’s look at what a “public key” is in the context of cryptography.
First, you need to understand the difference between symmetric and asymmetric encryption.
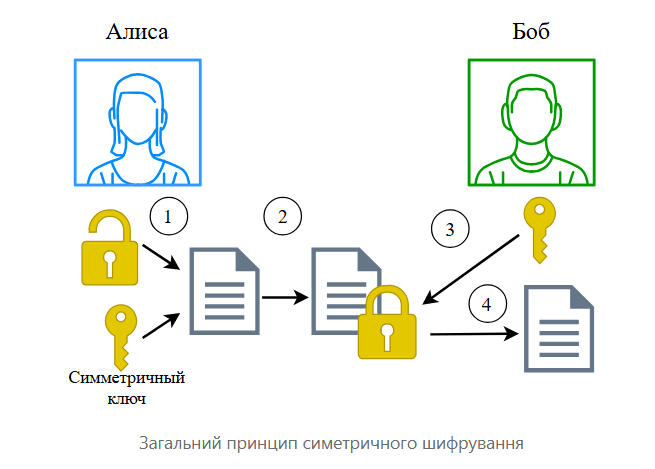
Symmetric encryption involves using the same key for both encryption and decryption of data. This means that both the client and the server must have the same secret.
Asymmetric encryption is based on a pair of interconnected keys: public and private. The private key is kept secret, and the public key can be publicly available. Data encrypted with one of the keys can only be decrypted with the help of the other.
For a better understanding, let’s give a household example:
In symmetric encryption, information is transmitted in a box locked with a regular lock. Both the sender and the recipient have the key to this lock. To encrypt a message, the sender places it in a box and locks it with his key. The recipient, having the same key, opens the lock and receives the message.
In asymmetric encryption, the sender uses a lock that can only be opened with the recipient’s special key. Accordingly, each participant keeps his key secret, and even if someone intercepts the box with the message, he will not be able to open it without the private key.
With asymmetric encryption, the message is transmitted in a box closed with an unusual lock. The peculiarity of the lock is that nothing is needed to close it, the lock just needs to be clicked, and to open it, a key is already needed. The recipient creates many copies of the lock and distributes them to everyone, and keeps the key secret. Anyone who wants to send a message puts it in the box and closes it with a snap lock that only the recipient can open.

Symmetric encryption is fast, but its weakness is key management, in particular the problem of transmitting a shared secret key over open communication channels. This is critical for establishing secure connections, such as on the Internet.
Asymmetric public-key cryptography solves this problem, although it is slower.
To better understand this, let’s give a hypothetical but realistic example. Imagine a network where each user has their own server with a fully-fledged email and a blog containing contact information.
Розглянемо можливий процес обміну повідомленнями у вказаній мережі:
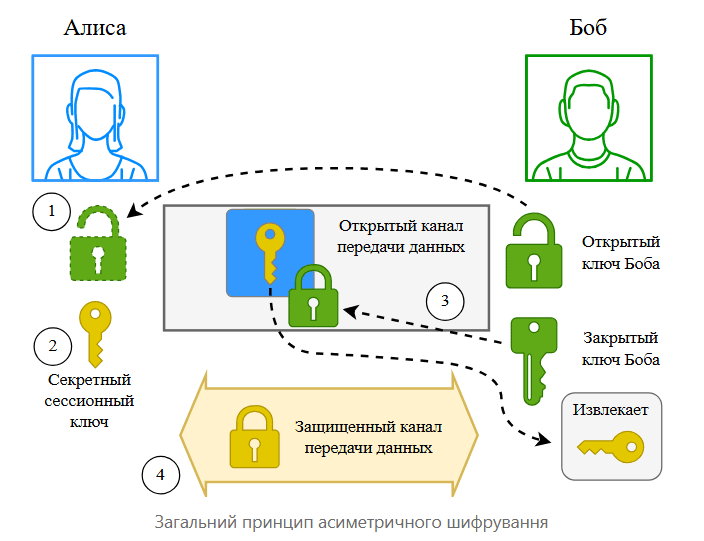
User Alice finds user Bob’s website and finds Bob’s public key in the contact information section
Alice generates a secret session key, encrypts it using Bob’s public key, and sends the encrypted message to Bob.
Bob, upon receiving the message, decrypts it using his private key and obtains the session key
Bob sends Alice a message encrypted using the received session key. Further communication is encrypted using the established session key.
It is important to note that this example is susceptible to a man-in-the-middle attack. The attacker can force his server to the sender instead of Bob’s server, for example, using ARP spoofing. The fake server can contain a copy of Bob’s site, but with a different public key value, the private key of which is in the attacker’s possession. As a result, the sender will send the attacker a message encrypted with the fake public key.
The question arises, how can Alice verify that Bob’s public key really belongs to Bob?
Public-key cryptography also works in the opposite direction: data encrypted with a private key can be decrypted with the corresponding public key.
What is the point of this approach? Suppose we have Bob’s real public key, and Bob wants to make a public message on his behalf. In this case:
Bob creates the message text and encrypts it with his private key.
Bob posts the encrypted message on his website.
Anyone can decrypt the message with Bob’s public key and read it.
If decryption is successful, it confirms that the message was created by the owner of the private key, Bob. Thus, the information can be “signed” with a digital signature.
In other words, a digital signature allows you to verify the authenticity of the source of the message and ensure that the information has not been altered during transmission. This provides authentication and data integrity control.
However, encrypting the entire message is a resource-intensive process, so usually only the hash of the message, obtained using a cryptographic hash function, is encrypted. This encrypted hash, called a signature, is added to the original message. Anyone who wants to verify the authenticity calculates the hash of the message themselves and compares it with the decrypted signature.
However, the problem of public key authentication remains unresolved. One solution is to introduce public key certification using a trusted third party – a certificate authority. In this case, before publishing their public key, the user must contact a certificate authority to obtain a certificate.
A public key certificate can contain many fields, for example:
Username
User Public Key
Certificate Expiration
Certificate Authority Name
But the most important field is the digital signature, which is a hash of all the certificate fields, encrypted with the private key of the certification authority.
Let’s consider an example of the message exchange procedure in the presence of a certification authority:
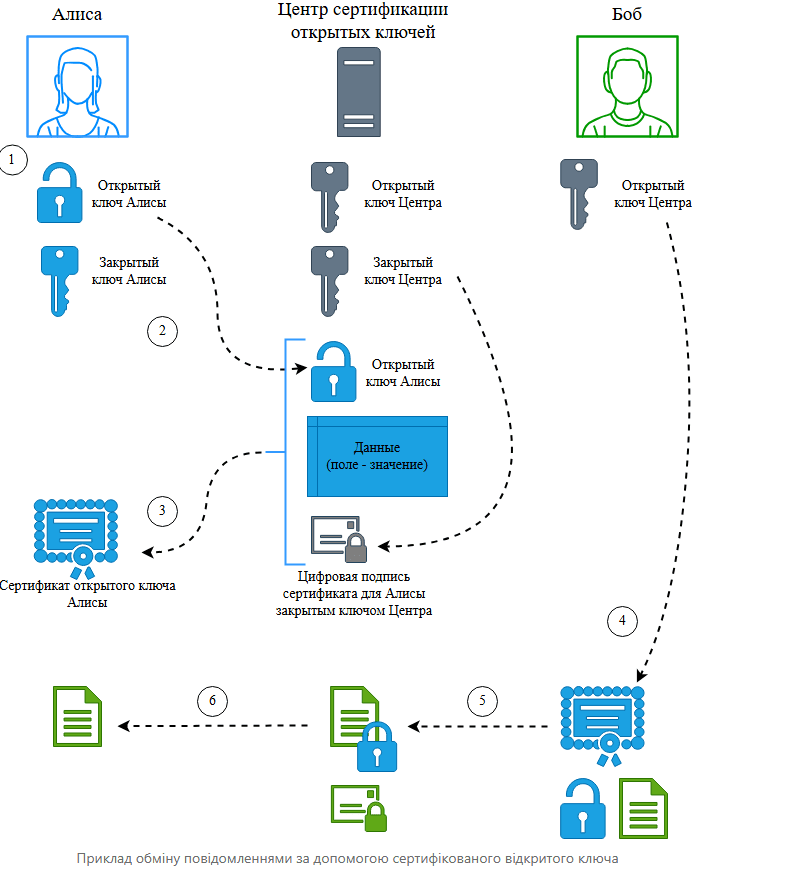
Alice generates a public/private key pair.
Alice authenticates herself to the certificate authority and sends her data, including her public key, to the certificate authority.
The certificate authority verifies the received data and signs it using its private key. The result is a public key certificate, which is sent to Alice.
Steps 1-3 are considered standard for all network users. It can be assumed that during registration each user receives a certificate for his public key and the public key of the Certification Authority. Thus Bob also has a certificate for his public key and the public key of the Certification Authority.
Wanting to send a message, Bob receives a public key and a corresponding certificate from Alice’s website. Using the public key of the certification authority, Bob verifies the authenticity of the received certificate. Bob trusts the Certification Authority, and a successful verification of the digital signature of the certificate means that the Certification Authority, in turn, has verified that the public key belongs to Alice. Therefore, Bob can be sure that the public key retrieved from the website really belongs to Alice.
Bob encrypts the message using Alice’s public key and signs it using his private key. The data is transmitted to Alice.
Having received the message, Alice decrypts it using her private key. In addition, thanks to the electronic signature, Alice can verify that the message was sent by Bob. Thus, mutual authentication of users is ensured.
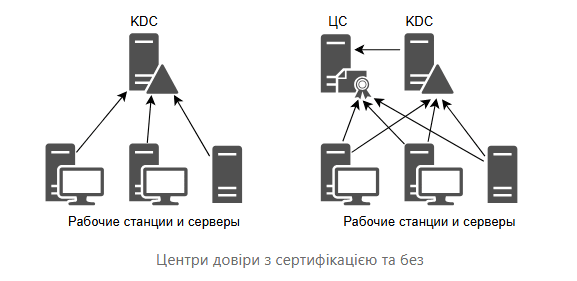
It is interesting to note that in the considered scheme, the Certification Authority is needed only when registering a user.
The given example illustrates the general idea that by introducing an additional trusted entity, the problem of public key management can be solved.
It is important to note that with the introduction of the certification procedure, another trust authority appears in the domain.
PKINIT allows you to implement public-key cryptography at the pre-authentication stage of the Kerberos protocol. The pre-authentication stage was already discussed in detail in the previous part. Let us briefly recall: in a “normal” scenario, for client and server authentication, both parties must have a common symmetric key.
Now, let’s consider, in a first approximation, the exchange of messages using PKINIT:

The client sends the authentication server the current timestamp signed with its private key, as well as a certificate intended to verify the authenticity of the transmitted public key.
The authentication server verifies, using the public key of the certification authority, the authenticity of the received certificate of the client’s public key.
Using the verified public key of the client, the authentication server verifies the signature of the timestamp and compares its value with the current one.
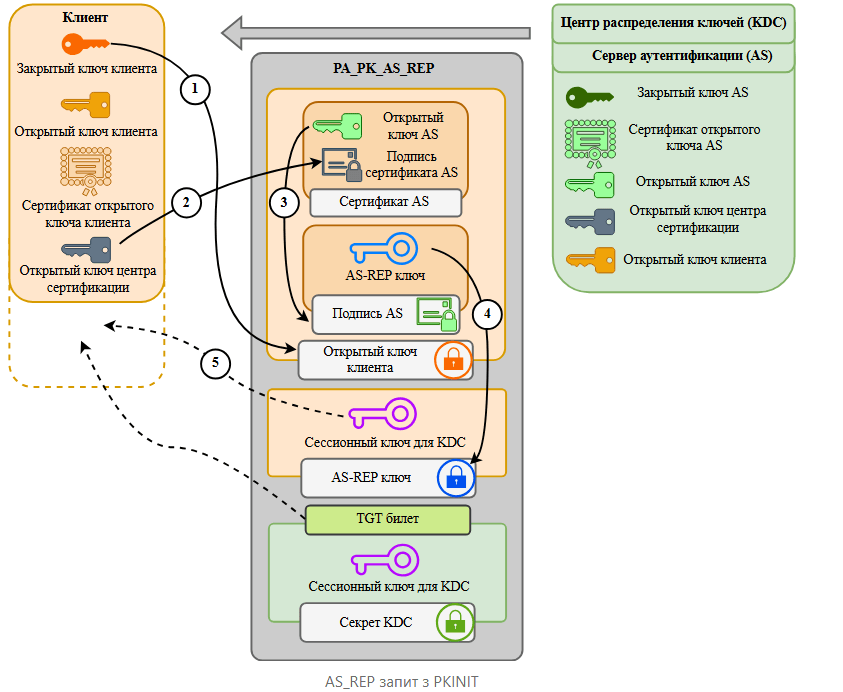
The authentication server sends a response to the Client.
The Client, using its private key, decrypts one part of the received response.
In the decrypted part, the Client checks the public key certificate of the authentication server.
Using the received public key of the authentication server, the Client checks the signature of the AS-REP key.
Using the AS-REP key, the Client decrypts the session key for communication with the domain controller.
The Client receives a TGT and a session key for the KDC.
After receiving the TGT and session key, the further stages of Kerberos authentication are performed according to the standard scheme, as in the classic scenario.
Curious readers may have a question: why use an intermediate symmetric key (see step #3) instead of immediately transmitting the session key? The main reason is that there are different ways to generate a symmetric key, each of which has its own advantages and disadvantages. There is no need to delve into all possible options, so we focused on the most common one for the sake of example. It is also worth noting that the considered scenario is simplified, and in real conditions the transmitted messages contain additional fields, such as random labels and identifiers.
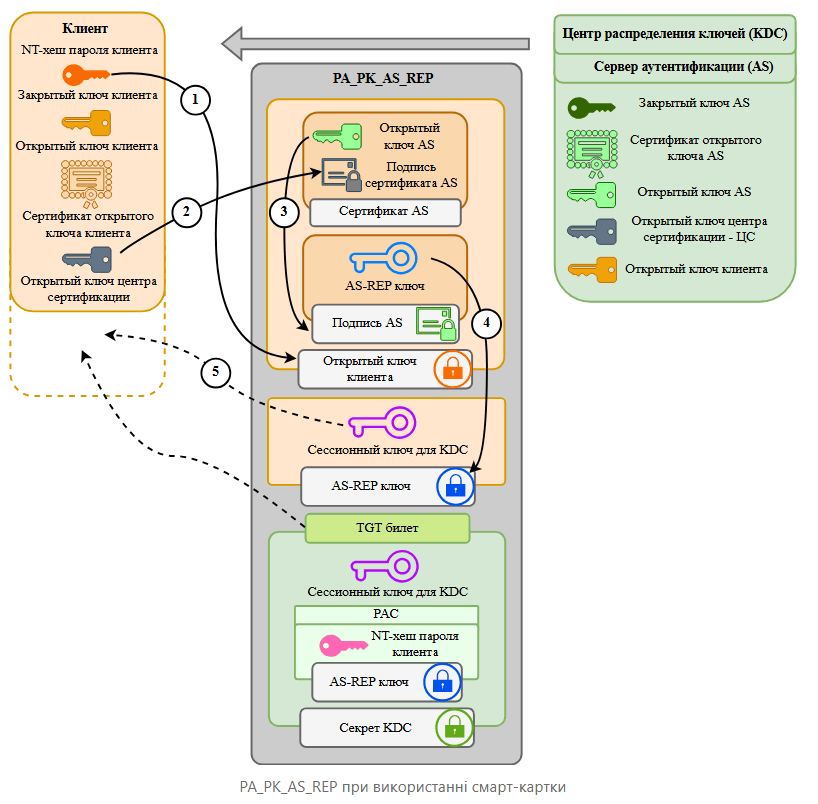
The question remains open as to how users store their private keys. Various specialized devices can be used for this: external (smart cards, tokens, etc.) or internal hardware modules (TPM). Such devices have built-in, tamper-resistant storage and chips that enable cryptographic operations.
The private key can either be imported to the device or generated directly on the device. Activation of the device and operations that require access to the private key usually require additional verification, such as entering a PIN.
This results in two-factor authentication:
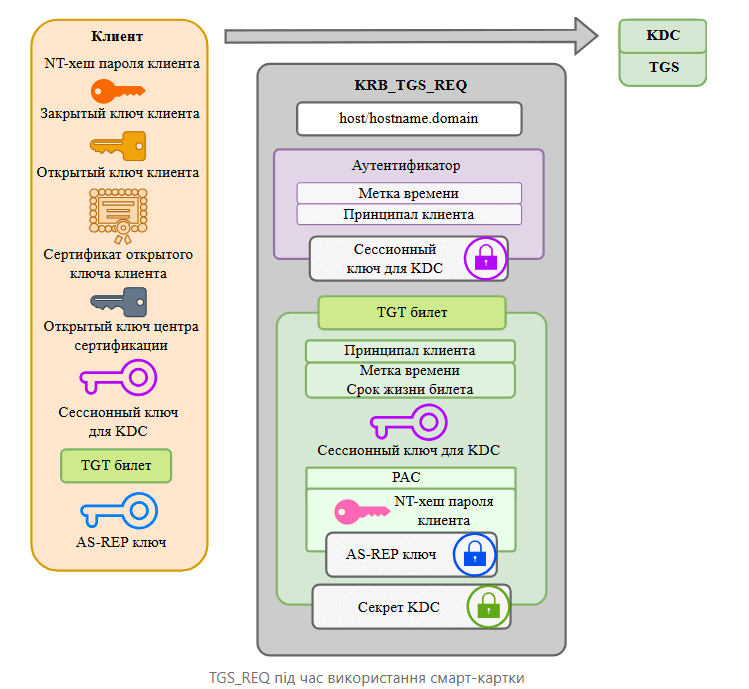
The client then sends a request to the domain controller for a TGS ticket to access the workstation. Note that the service principle is specified as host/hostname.domain.
The domain controller copies the PAC from the TGT, creates a TGS ticket, and sends it to the client. It is important to note that this is an interactive logon scenario, so the “host secret” is assumed to be known to the workstation.
The system will grant the client access, but the key point is that the client’s NT hash will be decrypted using the AS-REP key and stored in the LSA cache. If a service fails to use Kerberos in the future, the system will automatically use the NT hash from the LSA cache for NTLM authentication.
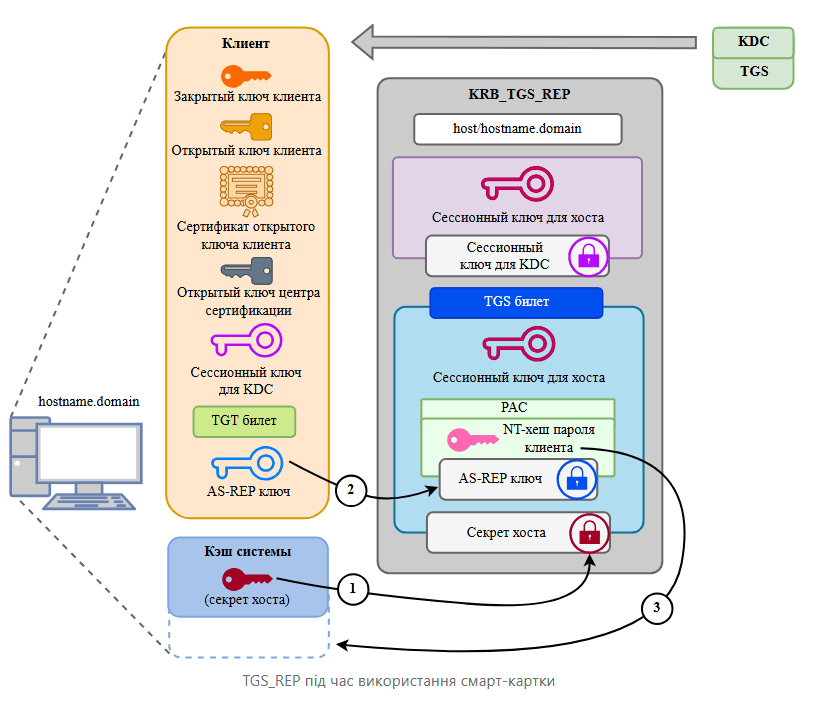
Таким чином використання смарт-карт не виключає застосування протоколу NTLM.
We previously discussed the certificate-based trust model using CAs and smart cards. This was one of the first models implemented in Active Directory, but Microsoft later added a new model called Key Trust, which was introduced with Windows Server 2016 and Windows Hello for Business.
Windows Hello is a technology that provides two-factor authentication using biometric data (fingerprint, face, iris) and is integrated into Windows operating systems. It supports both standalone devices and domain environments.
You can learn more about Windows Hello at the following links:
In Key Trust, instead of certificates, the domain controller uses the msDS-KeyCredentialLink attribute to authenticate the client. This attribute supports multiple values, allowing the same user to log in from different devices, each of which can have its own private key. For example, this is relevant when a user uses two workstations with different TPMs.
Although it may seem that a certificate authority is not needed in this model, this is not entirely true. Certificates are still needed to verify the authenticity of the domain controller’s public key. So, the client authenticates the controller with a certificate, and the controller verifies the client by decrypting its message with the public key from the msDS-KeyCredentialLink attribute.
How can this information help during penetration testing? In addition to the Shadow Credentials and UnPAC the Hash attacks mentioned earlier, there are other techniques, including PassTheCertificate.
PassTheCertificate
Conditions: availability of a key pair and a corresponding user certificate.
Result: gaining access to domain resources with the rights of the user whose keys were stolen.
PassTheCertificate is a basic technique that allows you to authenticate to a domain without entering a password, using keys and a user certificate. Most often, keys are found in PEM or PFX formats:
PEM: .pem – public key and certificate .key – private key
PFX: Includes public and private keys along with the certificate in encrypted form.
After receiving these files, you can authenticate and obtain a TGT for the corresponding account.
Commands to execute the attack in Linux:
There is a set of scripts for working with PKINIT in Linux PKINITtools. To authenticate the certificate, we will use the utility gettgtpkinit.py
Authentication by certificate in PFX format:
gettgtpkinit.py -cert-pfx "PATH_TO_PFX_CERT" -pfx-pass "CERT_PASSWORD" "FQDN_DOMAIN/TARGET_SAMNAME" "TGT_CCACHE_FILE"
Authentication by a certificate in PFX format encoded in Base64:
gettgtpkinit.py -pfx-base64 $(cat "PATH_TO_B64_PFX_CERT") "FQDN_DOMAIN/TARGET_SAMNAME" "TGT_CCACHE_FILE"
Authentication by certificate in PEM format:
gettgtpkinit.py -cert-pem "PATH_TO_PEM_CERT" -key-pem "PATH_TO_PEM_KEY" "FQDN_DOMAIN/TARGET_SAMNAME" "TGT_CCACHE_FILE"
Commands to execute the attack on Windows:
Rubeus supports working with PFX certificates encoded in Base64:
Rubeus.exe asktgt /user:"TARGET_SAMNAME" /certificate:"BASE64_CERTIFICATE" /password:"CERTIFICATE_PASSWORD" /domain:"FQDN_DOMAIN" /dc:"DOMAIN_CONTROLLER" /show
On Windows, you can convert PEM to PFX using openssl:
openssl pkcs12 -in "cert.pem" -keyex -CSP "Microsoft Enhanced Cryptographic Provider v1.0" -export -out "cert.pfx"
During PassTheCertificate, it is logical to use PassTheTicket ( PassTheTicket ), but there are other attacks that will be discussed later.
Requirements: A key pair and a corresponding certificate for the account.
Result: Obtaining the NT hash of the account password.
While obtaining a TGT is useful, an NT hash opens up much more possibilities. To understand the essence of the UnPAC the Hash attack, let’s consider the principle of User-to-User (U2U) authentication in the Kerberos protocol.
U2U authentication was created for situations where users can provide services to each other, for example, via NFS or FTP. Since the user’s workstation is considered unreliable for storing long-term keys, a temporary session “user key for the KDC” is used as the service secret.
The key point is that the KDC does not store these session keys, but extracts them from the TGT. Then the question arises – how does the KDC encrypt the TGS ticket? Answer: The session key is extracted from the TGT and then used to encrypt the TGS ticket, which ensures the security of the process.
To better understand what is happening step by step, let’s analyze the stages of U2U authentication.
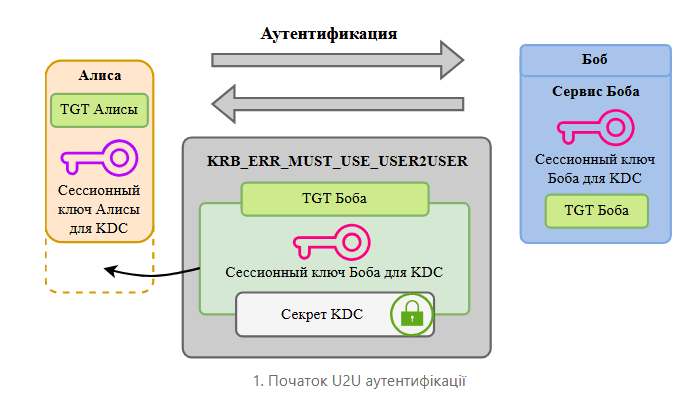
Alice authenticates to a service provided by Bob by presenting a TGS ticket encrypted with Bob’s long-term key (e.g., an NT hash). However, Bob’s service cannot decrypt this ticket because it is running on a regular workstation that does not have access to Bob’s long-term key.
To solve this problem, Bob’s service sends a response requesting the use of the U2U mechanism and appending its TGT. Transmitting the TGT in the clear is considered secure, even if the network traffic is visible to potential attackers, because all the critical information in it is encrypted.
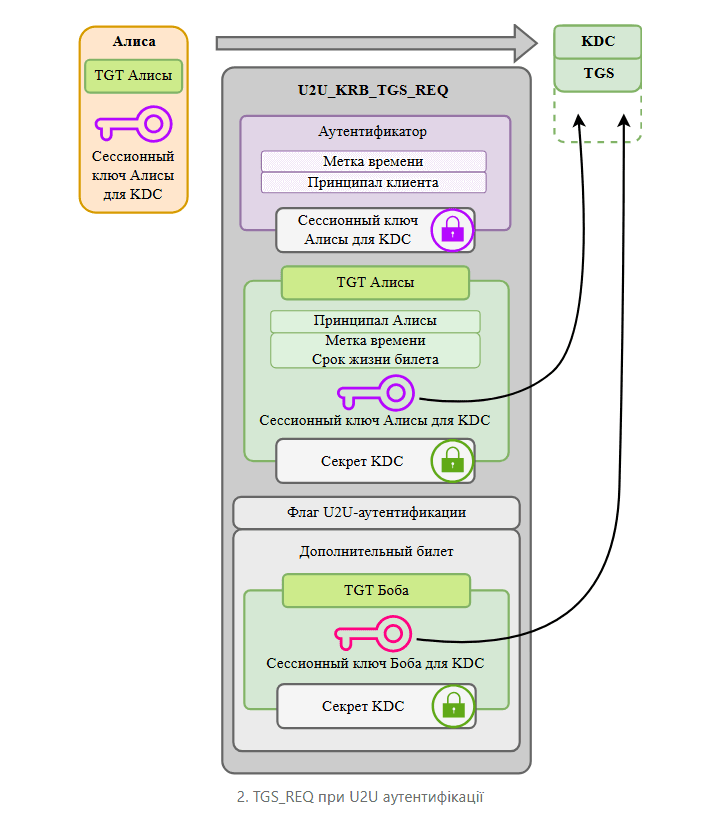
Alice requests a TGS ticket from the domain controller using U2U authentication, as indicated by a special flag. In addition, Alice adds Bob’s TGT as an additional ticket. The domain controller, in turn, extracts Alice’s and Bob’s session keys from the received TGTs.
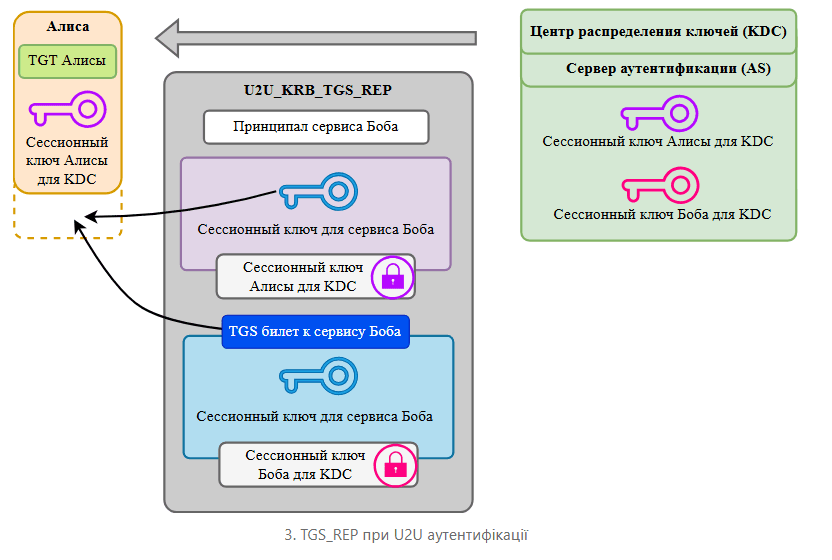
The domain controller sends Alice a TGS ticket encrypted using Bob’s session key extracted in the previous step.
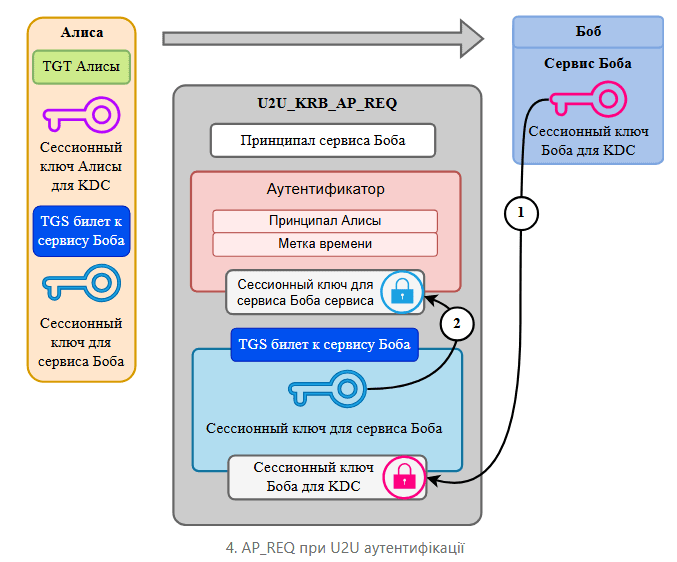
Bob’s Service can now decrypt the received TGS ticket and grant access to Alice.
Using a short-term key as a secret also prevents Kerberosting against ordinary users. As a result, why was it necessary to explain all these complicated mechanisms?
The point is that a user can make a PKINIT + U2U authentication request to themselves and thus obtain their NT hash. To begin with, let’s imagine that Alice has already obtained a TGT using PKINIT, as discussed earlier.
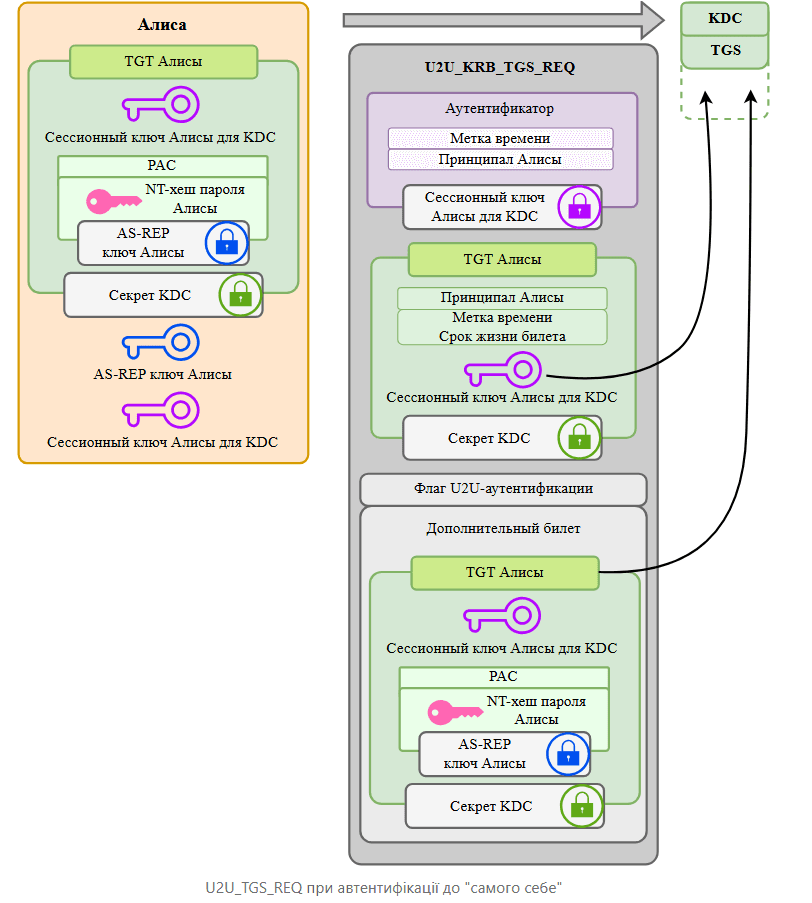
Alice contacts the KDC with a U2U authentication request to her own service and provides her TGT, obtained as a result of PKINIT and containing a PAC with her NT hash, as an additional ticket.
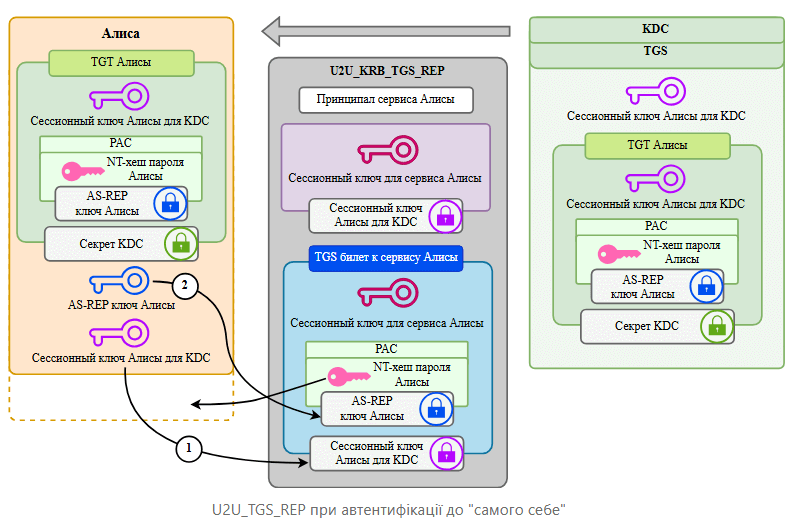
The domain controller sends Alice a TGS ticket encrypted with her session key to the KDC. Alice uses her session key to decrypt the TGS ticket and then obtains her NT hash by decrypting it with the AS-REP key.
Thus, if an attacker has the key pair and the corresponding certificate of an account, he can obtain the NT hash of the account’s password. In practice, the PassTheCert technique, combined with UnPAC the Hash, is widely used to further exploit the results of previous attacks.
Commands to perform the attack in Linux:
First, we request a TGT using PKINIT:
gettgtpkinit.py -cert-pfx "PATH_TO_CERTIFICATE" -pfx-pass "CERTIFICATE_PASSWORD" "FQDN_DOMAIN/TARGET_SAMNAME" "TGT_CCACHE_FILE"
Using the received TGT and AS-REP key (displayed in the console as a result of executing gettgtpkinit), we obtain the NT hash:
export KRB5CCNAME="TGT_CCACHE_FILE"
getnthash.py -key 'AS-REP key' 'FQDN_DOMAIN'/'TARGET_SAMNAME'
Commands to execute the attack on Windows:
Rubeus.exe asktgt /getcredentials /user:"TARGET_SAMNAME" /certificate:"BASE64_CERTIFICATE" /password:"CERTIFICATE_PASSWORD" /domain:"FQDN_DOMAIN" /dc:"DOMAIN_CONTROLLER" /show
This article has examined in detail the basic principles of the PKINIT extension and the operation of certificates in the Active Directory environment. It also analyzed typical attack techniques based on the described mechanisms, and provided practical examples with commands for their implementation.