


15.04.2023
10 min
3939

In the insecure world of the Internet, online privacy is a major concern these days when users are constantly dependent on the Internet. The Internet is so vulnerable to security attacks that it is easy to track your identity, including your physical location and other online activities such as the sites you visit, online passwords, etc. ISPs, government corporations, and hackers can easily track your online activity and access your other personal information without your knowledge. The issue of anonymous use of penetration testing tools is very broad. And even if you think you’ve got everything set up correctly, you may be in for a nasty surprise when some programs ignore system-wide proxy settings.
Such programs include Nmap, Masscan, IVRE, and others, which do not use system functions for connections, but involve their own low-level techniques. In fact, for experts, the art of port scanning does not require much effort. They know dozens of different port scanning techniques and choose the right one (or a combination of several) for a specific task. Inexperienced users try to solve all tasks using the default SYN scan. Since Nmap is free, the only barrier to mastering port scanning techniques is knowledge. This short article shows practical solutions for Tor scanning in Nmap, sqlmap and WPScan. These issues arose and were resolved when setting up suIP.biz, as the programs are used quite often. I think many people will be interested in how to scan and at the same time not give out their IP.
Since we will use Tor for anonymity, we will install the necessary packages that we will need:
In Kali Linux
sudo apt-get install torsocks tor
Add the following lines to the end of the /etc/tor/torrc file:
AutomapHostsOnResolve 1
DNSPort 53530
TransPort 9040
Start and add the Tor service to autorun:
sudo systemctl start tor
sudo systemctl enable tor
In BlackArch / Arch Linux:
sudo pacman -S torsocks tor proxychains-ng –needed
Add the following lines to the end of the /etc/tor/torrc file:
AutomapHostsOnResolve 1
DNSPort 53530
TransPort 9040
Start and add the Tor service to autorun:
sudo systemctl start tor
sudo systemctl enable tor
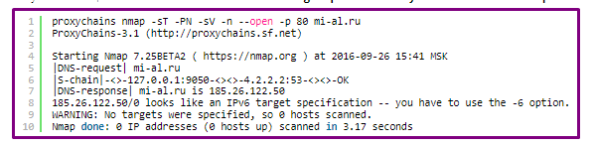
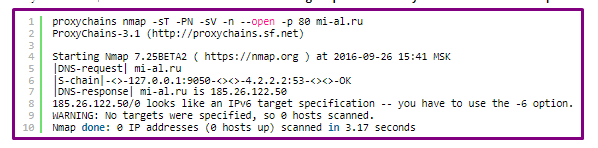
ProxyChains has a bug, if you use ProxyChains with nmap and try to specify a hostname (rather than an IP address) as a target, you will get an error message that looks like an IPv6 target specification — you must use the -6 option.
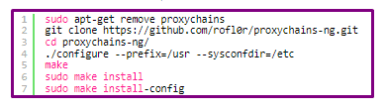
Since proxychains has not been updated since 2006, and this bug has already been fixed in ProxyChains-NG, I suggest installing ProxyChains-NG (only for users of Kali Linux and Debian derivatives, everything is fine in BlackArch/Arch Linux – ProxyChains-NG is installed by default:
Nmap is one program to be careful with if you want to maintain your anonymity. If we want to scan with Nmap through a proxy, we will definitely need the -sT option. Let’s take a look at the help for this option and now learn about the two types of Nmap scans:
This is the TCP scan type used by default when SYN scanning is not available. This happens when the user does not have privileges to use raw packages. Instead of using raw packets, as is the case with most other types of scanning, Nmap “asks” the operating system to establish a connection to the target machine on the specified port through the connect system call. This is the same high-level system call used by browsers, P2P clients, and other applications to establish a connection. This call is part of a programmable interface known as the Berkeley Sockets API. Instead of reading responses in the form of raw packets, Nmap uses this API to obtain information about the status of each connection attempt. If SYN scanning is available, it will definitely be a better choice. Nmap has less control over the high-level connect call compared to raw packets, making it less efficient. The system call terminates connections on open ports, instead of using half-open connections as in the case of SYN scanning.
Thus, it takes more time and packets to receive the same information, and in addition, the target machines will most likely write this connection in their logs. A decent IDS will do the same, although most machines do not have such a protection system. Many services on your Unix system will add a syslog entry as well as an error message when Nmap establishes and closes a connection without sending data. Some services even crash when this happens, although this is not a common situation. An administrator who sees a group of connection attempts from a single system in the logs should know that his machine has undergone this type of scan. So now we run nmap with the -sT option but without sudo ie. the program no longer requires superuser rights.
Options will also be useful:
When using any proxies, there is always a slowdown in speed, an increase in response time, so scanning through the proxy will be noticeably slower. Therefore, I recommend specifying the ports of interest with the -p option or using the option
The final -n option tells Nmap to never do a reverse DNS resolution of the names of each active IP address it discovers. DNS resolution can be slow even with Nmap’s built-in parallel IP address resolver, so this option can reduce scan times.
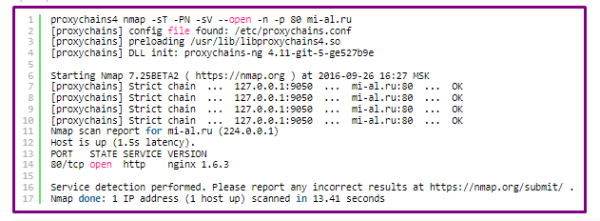
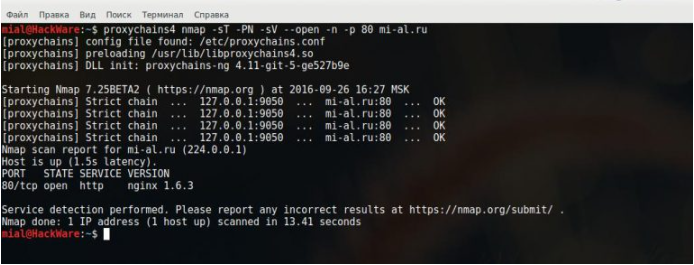
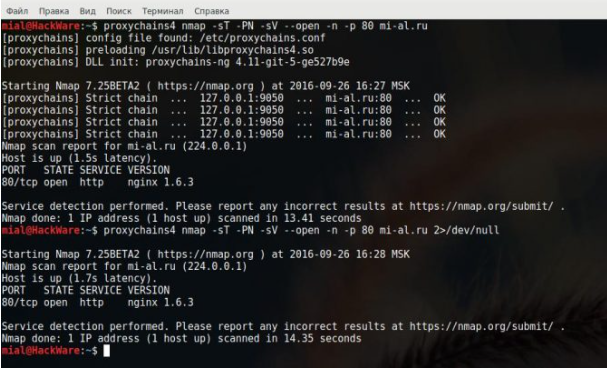
Finally we come to the –proxies option. Intuition suggests using it something like this: –proxies socks4://127.0.0.1:9050. But really, this option SHOULD NOT be used at all. To understand the extent of its inferiority, refer to the official help: Warning: This feature is still under development and has limitations. It is implemented inside the nsock library and, therefore, does not affect ping, port scanning, and scanning phases relative to the OS. Only NSE and Version Scan can benefit from this option – so other features can reveal your real address. SSL is not yet supported, nor is DNS resolution on the proxy side (hostnames are always resolved to Nmap). That is, apart from misleading us that we are behind a proxy, this option cannot do anything. This is exactly why we installed ProxyChains-NG. We need to add proxychains4 before each Nmap command, then scanning will be done through Tor:
proxychains4 nmap -sT -PN -sV –open -n PURPOSE
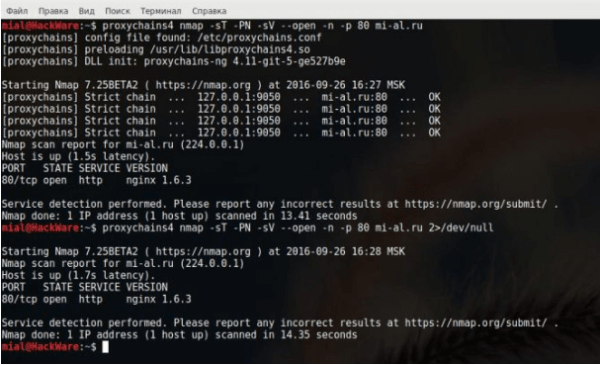
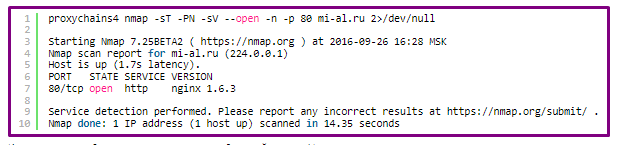
As you can see, a lot of information generated by ProxyChains-NG is displayed. To suppress the output of this information, you can use the following construction:
proxychains4 nmap -sT -PN -sV –open -n PURPOSE 2>/dev/null
Example:
As we can see, we get normal Nmap output:
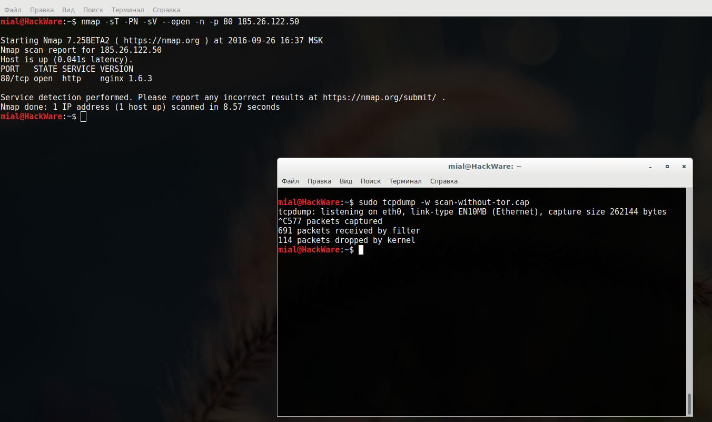
Now let’s move on to the most important thing – testing that Tor is actually being used. In my opinion, the best test would be to set up passive monitoring on the target machine. But now there is no time for that – we will definitely return to this issue later. For now, let’s check that there are no packets sent directly to the target machine.
Open two console windows, in the first enter:
sudo tcpdump -w scan-without-tor.cap
In the second window, start the scan (you can choose your target):
nmap -sT -PN -sV –open -n -p 80 185.26.122.50
When the scan is finished, stop tcpdump in the first window.
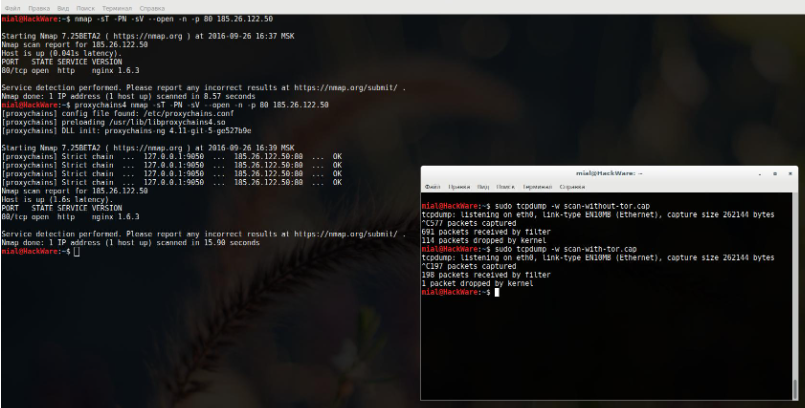
Now again, run in the first window:
sudo tcpdump -w scan-with-tor.cap
And in the second:
proxychains4 nmap -sT -PN -sV –open -n -p 80 185.26.122.50
Stop tcpdump after scanning is finished.
Now we search in the two saved files:
sudo tcpdump -nS -c 10 -r scan-without-tor.cap “host 185.26.122.50”
sudo tcpdump -nS -c 10 -r scan-with-tor.cap “host 185.26.122.50”
As you can see, in the second case our IP address is not disclosed:
If you tried to use proxychains with nmap, for example to determine the OS version:
proxychains4 nmap -sT -PN -sV -v -A -T4 suip.biz 2>/dev/null
And you get an nmap error: netutil.cc:1348: int collect_dnet_interfaces(const intf_entry*, void*): Assertion `rc == 0′ failed. Then you have two options to choose from:
To do this, open the /etc/proxychains.conf file.
Find the line there
proxy_dns
And comment it so that it turns out:
#proxy_dns
Everything is much simpler here. We need to add your scan command –proxy socks5://127.0.0.1:9050. That is, the command looks like this (you can also use all the options you normally use):
sqlmap -u TARGET –proxy socks5://127.0.0.1:9050
Example:
sqlmap -u “https://mi-al.ru/index.php?page=ready&directory=gp&id=3312.htm” –proxy socks5://127.0.0.1:9050
If you look at the web server logs, you can see that the scan is from the address 91.219.236.218, although my real address is differ
Here again it’s pretty simple, add –proxy socks5://127.0.0.1:9050 to your command:
wpscan -u TARGET -e p,vt,u –proxy socks5://127.0.0.1:9050
You can also use the –request-timeout 500 –connect-timeout 120 options, since using Tor causes significant delays.
sudo wpscan -u kali.tools -e p,vt,u –proxy socks5://127.0.0.1:9050
Let’s look again at the web server logs and make sure that the scanning is done from the address 176.126.252.11, although my real address is different
So, we can conclude that the ProxyChains-NG program is universal and you can use different programs together with it. For example, instead of the proposed option with the –proxy options, you could run it like this
proxychains4 sqlmap -u TARGET
proxychains4 wpscan -u TARGET -e p,vt,u
ProxyChains-NG is especially convenient to use with applications that do not have options/functionality to support proxies. It is necessary to test whether you are really hiding your IP. Because, as the Nmap example shows, even with relevant program options, things can go wrong. If we talk not only about anonymity when scanning, but also about anonymity in general, then this is a complex topic, since there are many ways to “pierce”.

