
CobaltStrike is a powerful comprehensive framework for penetration testing and deployment of cyber decoys.

Want to learn how to effectively use Malleable in CobaltStrike to manage and control your cyber attacks? Our guide provides step-by-step guidance and training on using Malleable for successful cybersecurity results. In the CobaltStrike tutorial, we’ll focus on using Malleable, a powerful feature that allows you to customize and change the characteristics of cyberattacks to achieve optimal results. You’ll learn how to configure attack behavior, traffic interception, interactions with target systems, and more using Malleable. Our guide offers concrete examples, explanations and step-by-step instructions on how to use Malleable in CobaltStrike.
You will learn how to create and configure Malleable profiles that meet your needs and allow you to effectively manage and control cyber attacks. With our CobaltStrike guide, you’ll gain the knowledge and skills you need to successfully use Malleable for command and control in cyber security. The guide will help you expand your skills and ensure reliable protection of your information in the digital world. Access the CobaltStrike Guide today and become a Malleable command and control master in cyberspace. In our CobaltStrike guide, we’ll take a detailed look at all aspects of using Malleable for command and control in cyber security. You’ll learn about the various parameters you can modify with Malleable, such as HTTP request headers, session characteristics, and attack behavior. We’ll provide specific examples and explain how to configure these parameters to maximize the effectiveness and success of your cyber attack. The CobaltStrike tutorial focuses on hands-on learning, so you’ll get step-by-step instructions and code samples to help you understand and use Malleable in practice. Regardless of your experience level, our guide will provide you with the necessary knowledge and skills to effectively use Malleable in CobaltStrike.
The beacon’s HTTP LEDs are controlled by the flexible C2 control and monitoring profile. A flexible C2 profile is a simple program that defines how to transform data and store it in a transaction. The same profile that transforms and stores the data implemented in reverse order also retrieves and restores the data from the transaction.
To use your own profile, you need to start the Cobalt Strike C&C server and specify your profile at the same time. ./teamserver [external ip] [password] [/path/to/profile] You can only download one profile per copy of Cobalt Strike.
Viewing the uploaded profile
To view the C2 profile loaded when the C&C server is started, click Help -> Flexible C2 Profile. If you connect multiple C&C servers, the current C&C server profile will be displayed. This dialog box is read-only.
To close the dialog box, use the “x” button in the upper right corner of the dialog box.
Cobalt Strike’s Linux package includes the c2lint program. This program will check your profile syntax for communication, apply several additional checks, and even verify your profile with random data. It is highly recommended that you test your profiles with this tool before loading them into Cobalt Strike.
./c2lint [/шлях/до/профілю]
C2lint returns and logs the following result codes for the specified profile file:
A result of 0 is returned if c2lint completes without errors
A result of 1 is returned if c2lint exits with only warnings
A result of 2 is returned if c2lint only fails
Result 3 is returned if c2lint crashes with both errors and warnings
The last lines of c2lint output show the number of errors and warnings encountered. If no errors are found, no message is displayed. There may be more error messages in the output than the count indicates, because a single error can result in multiple error messages. A similar possibility exists for warnings, but it is not so significant.
Example:
[!] 1 warning detected.
[-] 3 errors were detected.
The best way to create a profile is to modify an existing one. Several example profiles are available on Github: https://github.com/cobalt-strike/Malleable-C2-Profiles.
When you open your profile, you’ll see the following:
# це коментар =)
встановити global_option «значення»;
протокол-транзакція {
встановити local_option «значення»;

клієнт {
# Індивідуальні клієнтські індикатори
}

сервер {
# Налаштовані індикатори сервера
}
}
Comments start with the # sign and go all the way to the end of the line. The set operator is a method of assigning a value to a parameter. Profiles use { curly brackets } to group instructions and information. Statements always end with a semicolon.
To make it all clearer, here is a fragment of the profile:
http-get {
set uri "/foobar"; client {
metadata {
base64;
prepend "user="; header "Cookie";
}
}
This profile fragment defines metrics for an HTTP GET transaction. The first set of the uri operator specifies the URI that the client and server will refer to during this transaction. The set operator is outside the client and server code blocks because it applies to both.
The client block defines metrics for the client performing the HTTP GET. In this case, the client is Beacon Cobalt Strike.
When Beacon Cobalt Strike calls home, it sends metadata about itself to Cobalt Strike. In this profile, we need to define how this metadata will be encoded and sent with our HTTP GET request.
The metadata keyword, followed by a group of instructions, specifies how to transform and embed the metadata in our HTTP GET request. The group of statements that follows the metadata keyword is called a data transformation.
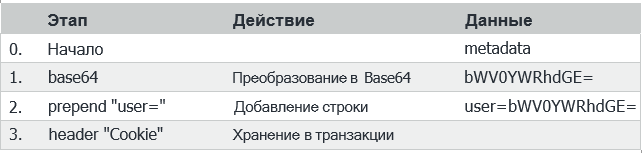
The first statement in our data conversion specifies that we will convert the metadata to base64 encoding [1]. The second prepend statement takes our encoded metadata and appends the string user= [2] to it. Our transformed metadata is now of the form “user=”. base64(metadata). The third instruction specifies that we will store our transformed metadata in a client-side HTTP header called Cookie [3] . This is it.
Both Beacon and its server use profiles. In this case, we looked at the profile from the Beacon client’s point of view. The Beacon server will take the same information and interpret it in reverse order. Let’s say our Cobalt Strike web server receives a GET request to the /foobar URI. Now he wants to extract the metadata from the transaction.
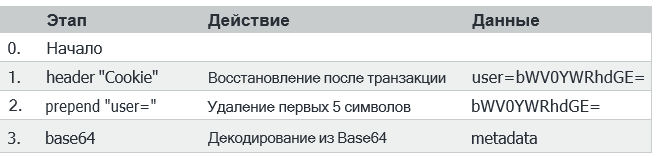
The header will tell our server where to get the transformed metadata [1]. The HTTP server will take care of parsing the headers from the HTTP client for us. Next, we need to deal with the preparatory instruction. To recover the transformed data, we interpret prepend as removing the first characters of X [2], where X is the length of the original string we appended. It remains only to interpret the last instruction – base64. Previously, we used the base64 encoding function to modify the metadata. We now use base64 decode to recover metadata [3].
We’ll get the output metadata after the profiler has finished executing each of these callbacks.
Data transformation language
Data transformation is a sequence of instructions that transform and transfer data. Data conversion instructions are as follows:

A data transformation is a combination of any number of these instructions in any order. For example, you can choose to convert netbios for the data transfer, add some information, and then convert the entire content to base64.
Data conversion always ends with a completion report. You can only use one completion report for a conversion. This instruction tells the beacon and its server where to store the transformed data in the transaction.
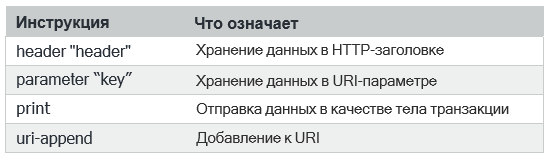
There are four instructions to complete.
The header completion operator stores the transformed data in the HTTP header. The parameter completion operator stores the converted data in the HTTP parameter. This parameter is always sent as part of the URI. The print statement sends the converted data to the transaction body.
The print statement is the standard termination statement for the http-get.server.output, http-post.server.output, and http-stager.server.output blocks. For other blocks, you can use the header, parameter, print, and uri-append completion statement.
If you use a header, parameter, or completion report to add a uri to http-post.client.output, the beacon will split its responses into chunks of an acceptable length to fit into that part of the transaction. These blocks and the data they send are described in the next section.
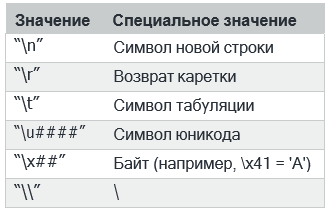
The Beacon profile language allows you to use strings in multiple places. In general, lines are interpreted as usual. However, there are a few special values that can be used in a string:
Headers and parameters
Data conversion is an important part of the indicator setup process. Indicators allow you to configure the data Beacon should send or receive with each transaction. You can also add third-party indicators to each transaction.
In an HTTP GET or POST request, these third-party indicators are supplied as headers or parameters. Use the parameter statement in the client block to add an arbitrary parameter to an HTTP GET or POST transaction.
This code will cause the beacon to add ?bar=blah to the /foobar URI when it makes a request.
http-get {
client {
parameter "bar" "blah";
Use the header directive in the client or server blocks to add a valid HTTP header to the client request or server response. This guidance adds an indicator to reassure network security monitoring teams.
http-get {
server {
header "X-Not-Malware" "I promise!";
The profile interpreter interprets your headers and parameters in order. However, the WinINet library (client) and the Cobalt Strike web server have the final say on where these indicators will appear in a transaction.
Parameters
You can configure the default beacon settings via a profile file. There are two types of parameters: global and local. Global settings change the global beacon settings. Local depends on the specific transaction. Local parameters must be set in the appropriate context. Use the set statement to set the parameter.
set "sleeptime" "1000";
Here are some options:
With the uri parameter, you can specify multiple URIs as a space-separated string. The Cobalt Strike web server will concatenate all of these URIs and assign one of them to each Beacon host when creating the Beacon stage.
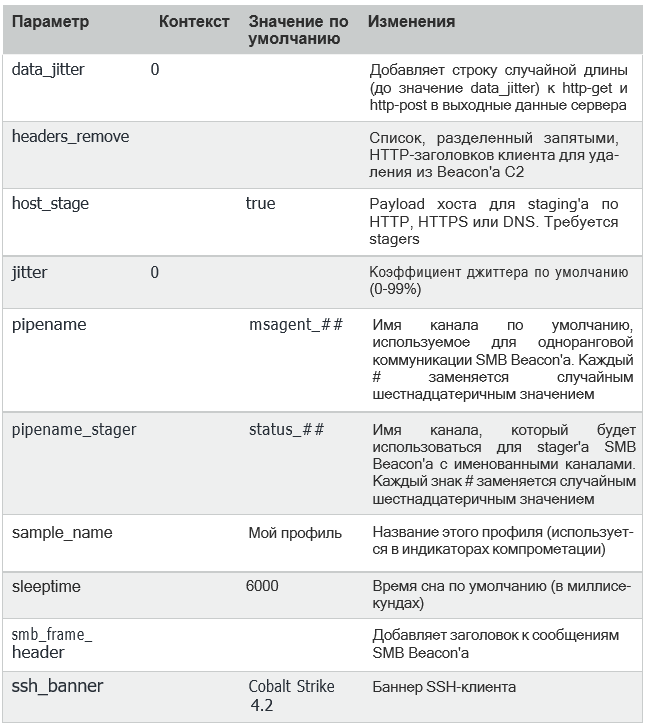
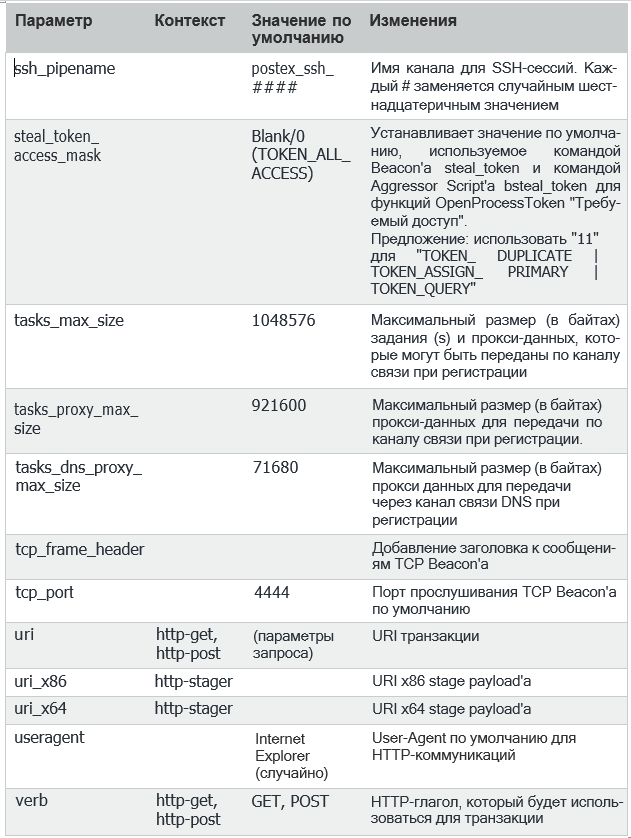
Even if the useragent parameter exists, you can use the header directive to change this parameter. Additional notes on “task_” parameters
The tasks_max_size, tasks_proxy_max_size, and tasks_dns_proxy_max_size parameters work together to create a buffer of data that will be passed to the beacon upon registration. When a beacon registers, it requests a list of jobs and proxy data that is ready to pass on to that beacon and its children. The data buffer is starting to fill up
task(s) and then the proxy data for the parent beacon. This process then continues for each child beacon until no more tasks or proxy data are available, or until tasks_max_size is exceeded by the next task or proxy data.
tasks_max_size controls the maximum size in bytes of the data buffer filled with tasks and proxy data that can be sent to the beacon via DNS, HTTP, HTTPS, and peer-to-peer communication channels. In most cases the default values are fine, but in some cases the custom job exceeds the maximum size and cannot be sent. For example, you use the execute-assembly command with an executable file larger than 1 MB, and the C&C and Beacon console displays the following message:
[C&C console]
Task rejection for 40147050! The job size of 1389584 bytes exceeds the maximum job size of 1048576 bytes.
[Beacon Console]
The job size of 1389584 bytes exceeds the maximum job size of 1048576 bytes.
Increasing the tasks_max_size parameter will allow this custom destination to be sent. However, this will require restarting the C&C server and generating new beacons, as the tasks_max_size parameter is entered in the configuration settings when the beacon is generated and cannot be changed. This parameter also affects how much memory on the heap the beacon allocates for processing tasks.
Practical tips:
Define the largest job size that will be sent to the beacon. This can be done by testing and looking up the message above, or by examining your own objects (executables, dlls, etc.) used in your builds. Once this is determined, add additional free space to the value. Using the information from the example above, set the tasks_max_size to 1572864 (1.5 MB). The space is necessary because a smaller task can follow a larger one to read the response.
Once the tasks_max_size value is defined, update the task_max_size parameter in your profile, start the C&C server, and create the beacon artifacts to deploy to your target systems.
If your infrastructure requires that beacons generated by other C&C servers communicate with each other via peer-to-peer communication channels, this setting should be updated on all C&C servers. Otherwise, the beacon will ignore the request when it exceeds the set size.
If an external C2 Listener is used, you need to update to support a tasks_max_size larger than the default 1MB.
If you’re running a large job, don’t queue it with other jobs, especially if it’s running on a beacon that uses peer-to-peer communication channels (SMB and TCP), as it can be delayed by several registrations depending on the number of jobs already queued queued, and proxy data to send. The reason is that when you add a task, it is X bytes in size, which reduces the total available space for adding more tasks. In addition, proxying data through Beacon also reduces the amount of space available to send a large job. When a task is postponed, the following message is displayed in the C&C and Beacon console:
[C&C console]
Slicing tasks into 123! Unable to add task 787984 bytes because it exceeds the available size of 260486 bytes. 2 tasks are suspended until the next registration.
[Beacon Console]
Unable to add task 787984 bytes because it exceeds the available size of 260486 bytes. 2 tasks are suspended until the next registration.
The parameters tasks_dns_proxy_max_size (DNS channel) and tasks_proxy_max_size (other channels) define the size of proxy data in bytes that will be sent to the beacon. Both parameters must be less than the tasks_max_size parameter. We recommend not changing these settings as the default sizes are fine. These settings work like this: adding proxy data to the data buffer for the parent beacon uses the value of proxy_max_size channels minus the current task length, which can be either positive or negative. If this is a positive value, the proxy data will be appended to this value. If this value is negative, proxy data will be omitted for this registration. For a child beacon, the proxy_max_size is temporarily reduced based on the available data buffer space left after processing the parent and previous child beacons.
A beacon is a turn-based payload. This means that the payload is loaded by the stager and inserted into memory. Your http-get and http-post indicators will not take effect until the beacon is in your object’s memory. The http-stager block in Malleable C2 configures the HTTP staging process.
http-stager {
set uri_x86 "/get32.gif"; set uri_x64 "/get64.gif";
The uri_x86 parameter specifies the URI to download the x86 payload. The uri_x64 parameter specifies the URI
to load the x64 grade payload.
client {
parameter "id" "1234";
header "Cookie" "Какое-то значение";
}
The client keyword, in the context of http-stager, identifies the client side of an HTTP transaction. Use the parameter keyword to add a parameter to the URI. Use the header keyword to add a header to the handler’s HTTP GET request.
server {
header "Content-Type" "image/gif"; output {
prepend "GIF89a";
print;
The server keyword, in the context of http-stager, defines the server side of an HTTP transaction. The header keyword adds a server header to the response. The output keyword, in the context of the http-stager server, is a data transformation to change the stage payload. This transformation can only add rows to the beginning or end of a stage. Use the print finish instruction to close this output block.
To put this all together, you need to know what a Beacon transaction looks like and what data is sent with each request. A transaction starts when the Beacon makes an HTTP GET request to the Cobalt Strike web server. At this time, Beacon should send metadata containing information about the compromised system.
The Cobalt Strike web server responds to the HTTP GET with tasks that the beacon should perform. Initially, these tasks are sent as a single encrypted binary block. You can convert this information using the source key layer in the context of the http-get server.
As jobs progress, Beacon accumulates results. After all tasks have completed, Beacon checks if there is any output to send. If there are none, it goes into sleep mode. If they are, the Beacon initiates an HTTP POST transaction.
An HTTP POST request must contain the session identifier in the URI parameter or header. Cobalt Strike uses this information to associate output with the desired session. The content that is initially published is an encrypted binary block. You can transform this information using the source keyword in the http-post client context.
The Cobalt Strike web server can respond to an HTTP POST with anything. “Mayak” company does not accept and does not use this information. You can specify HTTP POST output using the output block in the http-post server context.
NOTE: Although http-get defaults to GET and http-post defaults to POST, you are not limited to these options. Use the verb option to change these default values. There is a lot of flexibility here.
This table summarizes these keywords and the data they convey:


The http-config block affects all HTTP responses sent by the Cobalt Strike web server.
Here you can specify additional HTTP headers and the order of the HTTP headers.
http-config {
set headers "Date, Server, Content-Length, Keep-Alive, Connection, Content-Type";
header "Server" "Apache";
header "Keep-Alive" "timeout=5, max=100"; header "Connection" "Keep-Alive”;
set trust_x_forwarded_for "true";
set block_useragents "curl*,lynx*,wget*";
}
set headers – this parameter specifies the order in which these HTTP headers are delivered to the HTTP Response. Any headings not included in this list are added at the end.
header – This keyword adds a header value to every Cobalt Strike HTTP response. If a header value is already defined in the response, this value is ignored.
set trust_x_forwarded_for – This setting determines whether Cobalt Strike will use the X-Forwarded-For HTTP header to determine the address of a remote request. Use this option if your CobaltStrike server is behind an HTTP redirector.
block_useragents and allow_useragents – These options configure a list of custom user agents that are blocked or allowed when a 404 response is received. By default, all requests from user agents starting with curl, lynx, or wget are blocked. If both options are specified, block_useragents will take precedence over allow_useragents . The parameter value supports a comma-separated string of values. Values are supported by simple generics:

Self-signed SSL certificates with SSL Beacon
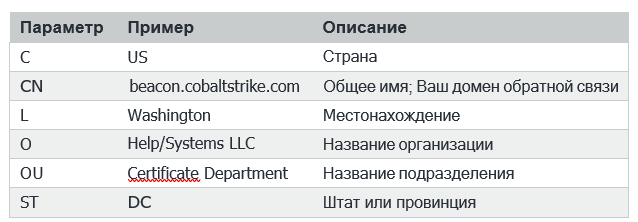
HTTPS Beacon uses HTTP Beacon indicators in its communication. Flexible C2 profiles can also specify settings for the C2 Beacon server’s self-signed SSL certificate. This is useful if you want to recreate an agent with unique indicators in its SSL certificate:
https-certificate {
set CN	"bobsmalware.com"; set O	"Bob’s Malware";
}
Certificate settings managed by the profile:
https-certificate {
set keystore "domain.store"; set password "пароль";
}
You have the option to use a valid SSL certificate with Beacon. Use the Malleable C2 profile to specify the Java keystore file and keystore password. This keystore must contain the private key of your certificate, the root certificate, all intermediate certificates, and the domain certificate provided by your SSL certificate provider. CobaltStrike expects to find a Java keystore file in the same folder as your MalleableC2 profile.
Options for using a valid SSL certificate:

Below are the steps to create a valid SSL certificate for use with Beacon:
Use the keytool program to generate a Java keystore file. This program will ask the question “What is your first and last name?”. Make sure you reply with the FQDN of your beacon server. Also, don’t forget to write down the keystore password. It will be needed later.
$ keytool -genkey -keyalg RSA -keysize 2048 -keystore domain.store
Use keytool to generate a Certificate Signing Request (CSR). This file will be sent to the SSL certificate provider. They will verify that you are who you say you are and you will be issued a certificate. Some suppliers are easier and cheaper to work with than others.
$ keytool -certreq -keyalg RSA -файл домену.csr -магазин ключів domain.store
Import the root and intermediate certificates provided by your SSL provider.
$ keytool -import -trustcacerts -alias FILE -file FILE.crt – keystore domain.store
Finally, you need to install the domain certificate.
$ keytool -import -trustcacerts -alias mykey -file domain.crt – keystore domain.store
This is it. You now have a Java keystore file ready to use with Beacon.
Profile settings
C2 flexible profile files contain one profile by default. You can package options for the current profile by specifying option blocks for http-get, http-post, http-stager, and https-certificate.
A variant block is specified as [block name] “variant name” { … }. Here is a variant of the http-get block named “My Variant”:
http-get "Мой вариант" { client {
parameter "bar" "blah";
An option block creates a copy of the current profile, with the specified option blocks replacing the default blocks in the profile itself. Each unique variant name creates a new profile variant. You can fill the profile with any number of variant names.
The options can be selected when configuring HTTP Listener or HTTPS Beacon. The options allow each HTTP or HTTPS beacon listener bound to the same C& server to have network IOCs that differ from each other.
Developer certificate
Payloads -> Windows Stager Payload and Windows Stageless Payload provide the ability to sign an executable or DLL. To use this option, you must specify a Java keystore file with the developer’s certificate and private key. Cobalt Strike expects to find a Java keystore file in the same folder as your Malleable C2 profile.
code-signer {
set keystore "keystore.jks"; set password "password"; set alias	"server";
}
Below are the developer certificate options.


You have the option to modify the DNS traffic of the beacon/listener with the Malleable C2.
dns-beacon “optional-variant-name” {
# Параметры перенесены в группу 'dns-beacon' в 4.3:
set dns_idle	"1.2.3.4";
set dns_max_txt	"199";
set dns_sleep	"1";
set dns_ttl	"5";
set maxdns	"200";
set dns_stager_prepend	"doc-stg-prepend"; set dns_stager_subhost	"doc-stg-sh.";
# Параметры переопределения подхостов DNS добавлены в 4.3:
set beacon	"doc.bc.";
set get_A	"doc.1a.";
set get_AAAA	"doc.4a.";
set get_TXT	"doc.tx.";
set put_metadata	"doc.md.";
set put_output	"doc.po.";
set ns_response	"zero";
}
The settings are as follows:


You can use “ns_response” when the DNS server responds to target audience queries with “Server Error” errors. The public DNS resolver can initiate queries for DNS records that the DNS server on the Cobalt Strike command server rejects by default.

The flexible C2 gives you a new level of control over your network and host indicators. With this power comes responsibility. A malleable C2 is also an opportunity to make a lot of mistakes. Below are a few things to keep in mind when creating profiles.
Each instance of Cobalt Strike uses one profile at a time. If you change your profile or upload a new one, previously deployed Beacons will not be able to interact with you.
Always keep an eye on the health of your data and what the protocol allows when you convert it. For example, converting the metadata to base64 and storing it in the URI parameter will not work. Why? Some base64 characters (+, =, and /) have special meaning in URIs. The c2lint tool and profiler compiler do not detect these types of problems.
Always check your profiles, even after small changes. If Beacon can’t contact you, there may be a problem with your profile. Please edit it and try again.
Trust the c2lint tool. This tool surpasses the capabilities of the profile compiler. The checks are based on how the technology is implemented. If the validation with c2lint fails, there is a serious problem with your profile.
Thanks to various open source guides.