


11.05.2023
17 min
2224

And so the long-awaited continuation of the topic of advanced use of OpenVPN. In the previous article, we installed the openvpn server and the easy-rsa program needed to generate certificates and keys, generated the keys and certificates themselves, configured the server, enabled the firewall and allowed connection to the port we needed. In this article, we will create a configuration file for the client, configure and test how everything works. It provides an opportunity to get safe and secure access to the Internet from a smartphone or laptop when connected to an untrusted network, such as Wi-Fi in a hotel or cafe. OpenVPN is a full-featured open source VPN solution that uses the TLS protocol and allows for a wide range of configurations.

OpenVPN is open source and freely distributed under the GNU GPL license. OpenVPN can be called one of the most secure protocols. All transmitted data is securely protected using the OpenSSL encryption library and SSLv3/TLSv1 protocols, which ensures high security and anonymity. In the Keenetic Internet Center for OpenVPN connection, such features as TCP and UDP mode, TLS authentication, use of certificates and encryption keys are implemented to increase the security of the VPN connection. OpenVPN must be connected to the Internet with a white IP address, and when using a KeenDNS domain name, it must be configured in “Direct Access” mode, which also requires a public IP address. If any of these conditions are not met, it will be impossible to connect to such a server from the Internet.
As of fall 2021, OpenVPN has been transitioning to the new major branch 2.5.* for almost a year. If you’ve been putting off updating, now the new branch can be considered time-tested. However, if you are migrating from the 2.4 branch, you may need to adjust your configuration files.
1.In the server and client configuration files, replace the line:
![]()
2. To change the TCP protocol (which is not recommended), then replace the row:
![]()
Select server row:
3.Choose a row for the client:
The UDP protocol on the server and on the client is assigned however:
4. When a static IP address is set in the middle of the virtual private network, the record is now broken:
For example:
For the promotion of OpenVPN, wicking the UDP protocol and officially recommending wicking yoga. Tim is no less, the TCP protocol also works wonderfully with OpenVPN and you can tweak it if you need it. Theoretically, the TCP protocol can be larger than “overhead charges”, so that some of the data that is transmitted will not carry any cost, but is necessary only for normal TCP operation, which ensures the savings and integrity of the transmitted packets. In my opinion, it is necessary to add a TCP winkle support through those that with other OpenVPN Internet providers on the UDP protocol could not connect through a pardon (the pardon will be looked at further), but miraculously worked on the TCP protocol. To set up the OpenVPN robot with the TCP protocol, you need to know the following points:
1. Protocol may be specified explicitly.
For custom configuration files, change row:
Select server row:
Client row:

To clarify: the UDP protocol on the server and on the client is shown the same way:
2. The TCP protocol can be specified in the configuration files of both the server and the client.
3. Don’t tag the explicit-exit-notify option.
Do not tweak the server configuration file (just delete the whole row):
Otherwise, you will stick with a pardon:
4. The port may be free.
However, it is worthwhile to work with OpenVPN both for UDP and for TCP: the selected port is to blame, but it’s still worth the pardon “TCP / UDP: Address already in use (errno = 98)”, for example:
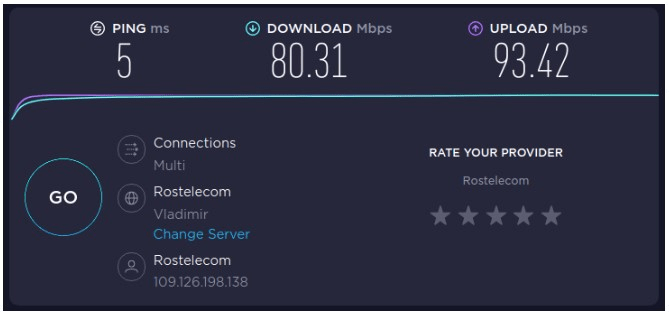
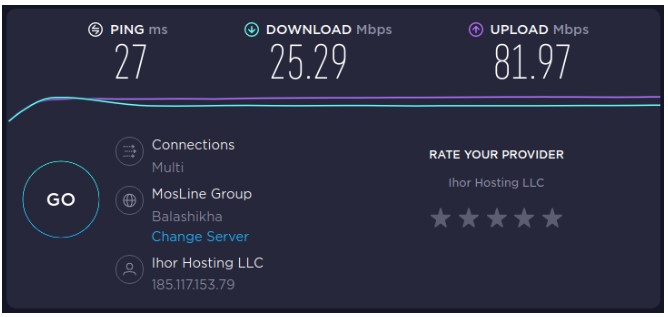
The speed of my Internet connection without the OpenVPN wiki:
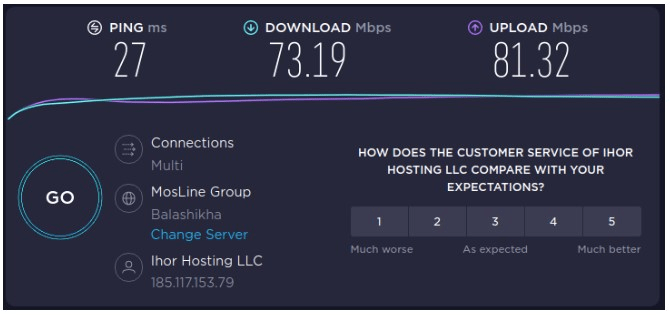
The speed of my Internet connection is based on the UDP protocol:
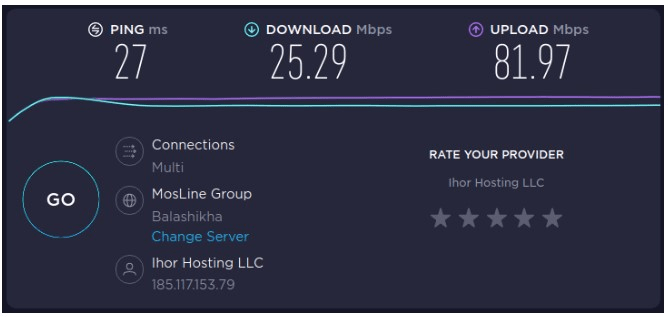
The speed of my Internet connection is based on the OpenVPN version over the TCP protocol.
As you can tell, the loss of speed when switching from UDP to TCP is significant. The difference in bandwidth between OpenVPN and OpenVPN over UDP protocol is negligible – in fact, in both cases, the bandwidth practically depends on the maximum bandwidth of my network.
You can single-handedly beat a bunch of OpenVPN processes on one server, with which the stench works on different ports and presses on a virtual private network, so that they don’t overlap one by one. The robot of dekіlkoh instances of OpenVPN is delivered from the box, but it will be necessary for additional installation.
1. OpenVPN services are to blame for various corruptions
All OpenVPN services are responsible for victorizing the appropriate port. Keep in mind that the same port numbers for UDP and TCP are different ports, so you can try to match the same port number with two OpenVPN examples for understanding that one of them is a UDP port and the other is a TCP port.
If two OpenVPN services win the same port, then the first instance of OpenVPN that starts up can be done without pardon, and the other instance will not start through the pardon “TCP/UDP: use (errno=98)”, for example:
For the third service, you can specify the next range of IP address and so on:
2. Range address of the virtual private network
For promotion, the server configuration file specifies the range of the IP address for the virtual private network, for example:
Additional instances of the OpenVPN service may vary in other ranges. For example, for another service, you can specify an offensive range:
3. Traffic routing for all virtual private networks
The section “Enable routing traffic on the OpenVPN server” shows how to disable NAT for traffic on virtual private networks so that they can connect to the Internet. In the application of the ordered section, it is shown that the routing is configured for traffic from the subdivision 10.8.1.0/24. The oscillators for additional instances of the OpenVPN service have other networks (for example, 10.8.1.0/24), then in order for the clients of these virtual networks to be able to access the Internet, it is necessary to set up routing for the skin of these networks.
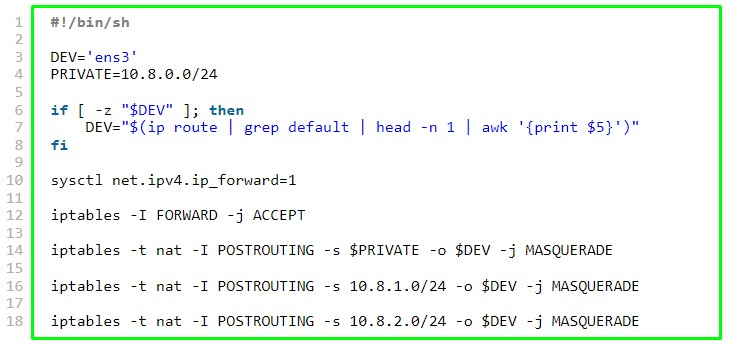
An example of a way out of the file /root/bin/vpn_route.sh:
File /root/bin/vpn_route.sh + NAT for subdivision 10.8.1.0/24, 10.8.2.0/24 and 10.8.3.0/24:
To reverse NAT, type the command:
4. Set up local static addresses
If you hacked the “How to generate static IP for OpenVPN clients” and added entries like “ifconfig-push 10.8.0.10 255.255.255.0” to the “/etc/openvpn/ccd/client1” file, then you need to hack other names for the other client that offensive OpenVPN tether, stink shards vikoristovuyet іnshі ranges IP-address of the virtual private tranche.
5. Starting and adding the second and subsequent OpenVPN services to startup
Please note that from systemctl you can type a command like:
Where <configuration> – s the actual configuration file that is located in the/etc/openvpn/server/, but without the .conf extension. 0 For example, another configuration file for another instance of the OpenVPN service is placed in the /etc/openvpn/server/server-tcp.conf, file, then the program to start the service is available:
Checking the service status with the server-tcp.conf configuration file:
Reviewing the pardons of the OpenVPN service from the server-tcp.conf configuration file:
Adding a service to autostart:
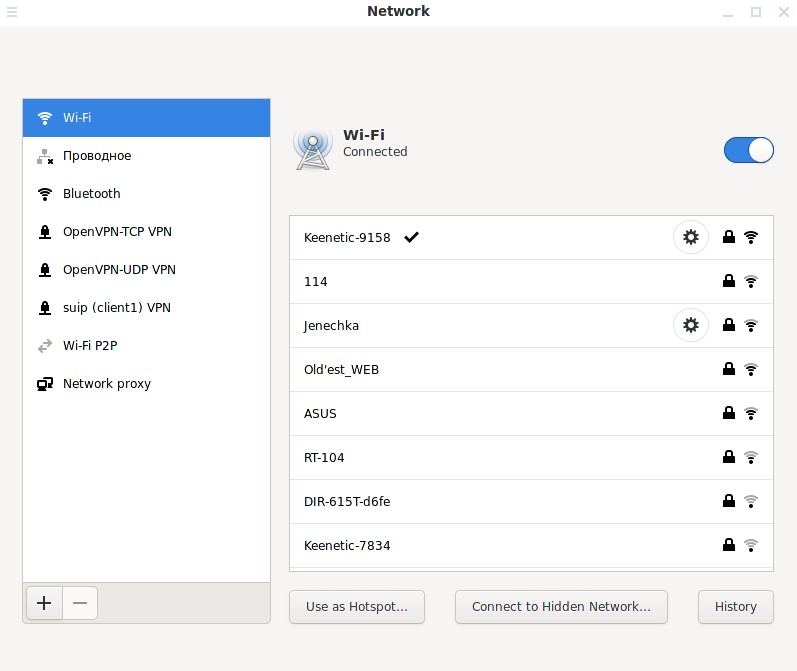
On the Windows view, for which the OpenVPN retailers have created that client with a graphical interface, for Linux, the view distributors have only a client with a command line interface. But a miracle alternative for the official client is NetworkManager. Most of the NetworkManager distributions have already been installed and added to the auto-acquisition, the shards of the service are responsible for all the services, the drones and the drones. For older Debian, the package is called network-manager, for older Arch Linux, the package is called networkmanager.
For NetworkManager there are plugins, there are some in the repositories of Linux distributions. If this note focuses on OpenVPN, then we can see the plug-in for the OpenVPN robot, which Debian calls network-manager-openvpn-gnome (don’t be surprised by the name, Xfce uses the same plug-in), and in Arch Linux it’s networkmanager-openvpn. Install this plugin, as there is no other way. If you use NetworkManager and the networkmanager-openvpn plugin for most of the OpenVPN control functions, then the operation of OpenVPN is generally similar in other distributions. The middle part of the working table imposes its own features. Although the features are not critical, it is possible to see the work with OpenVPN in the popular Linux desktop environments.
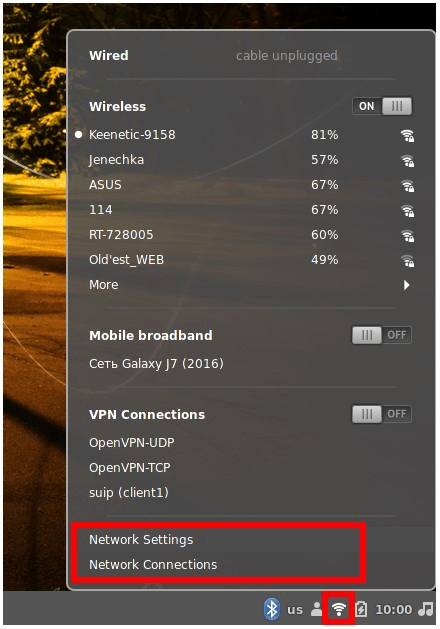
The middle of the Cinnamon desktop is typical of Linux Mint.
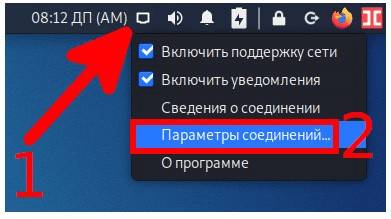
When you click on the network connection icon (its appearance depends on whether you are using a wired or wireless connection), two options will be available to manage networks:
In general, these settings allow you to do the same things: add, edit, and remove network connections.
Network Settings contains a list of available Wi-Fi networks, settings, proxies, and wired connections.
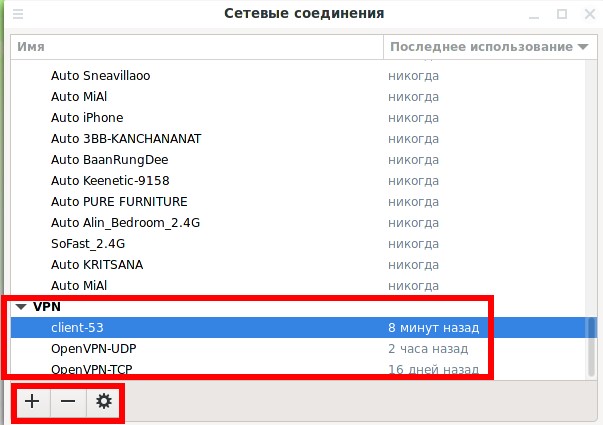
Network Connections does not show the Wi-Fi networks available for connection, but it stores the settings of the networks that the computer has ever connected to.
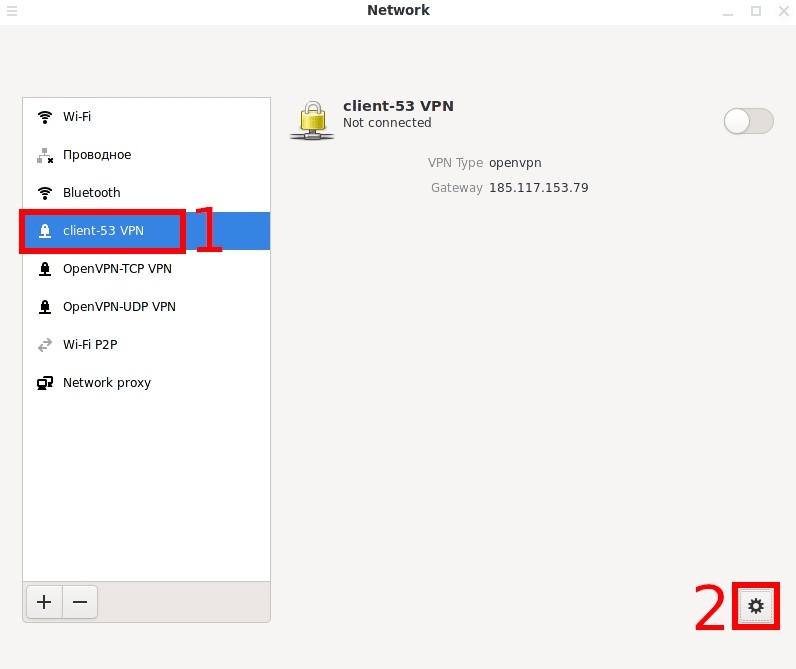
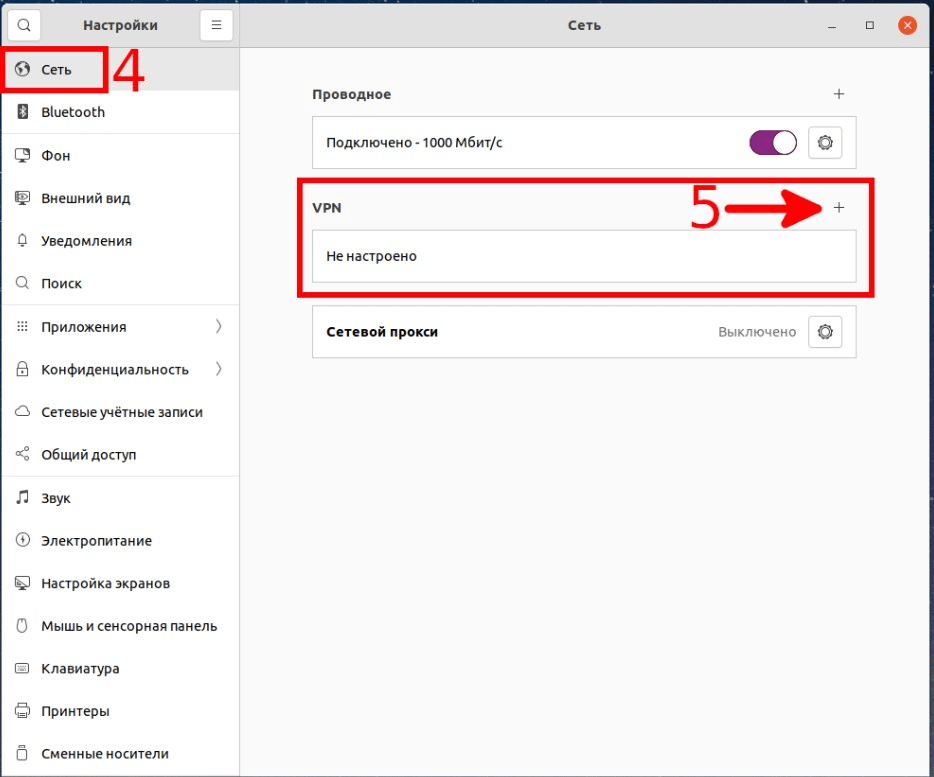
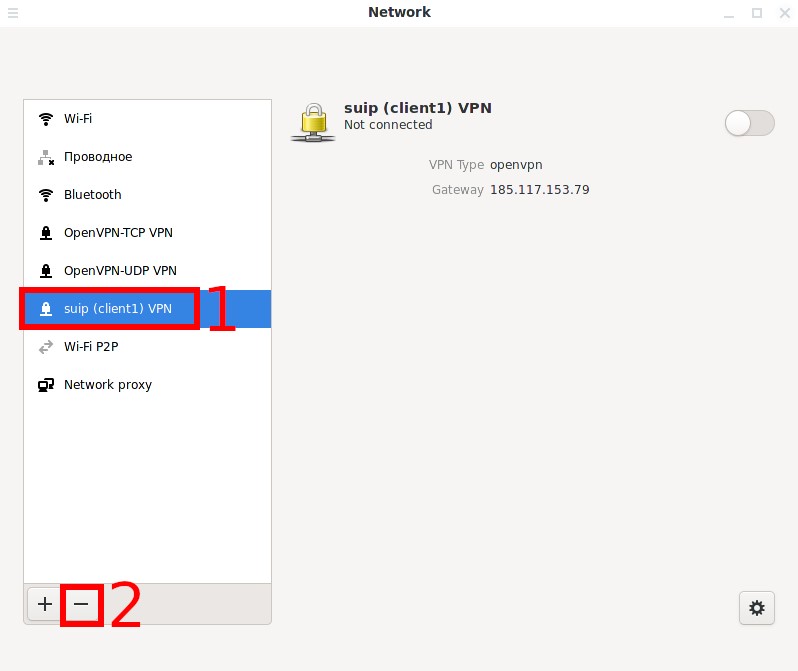
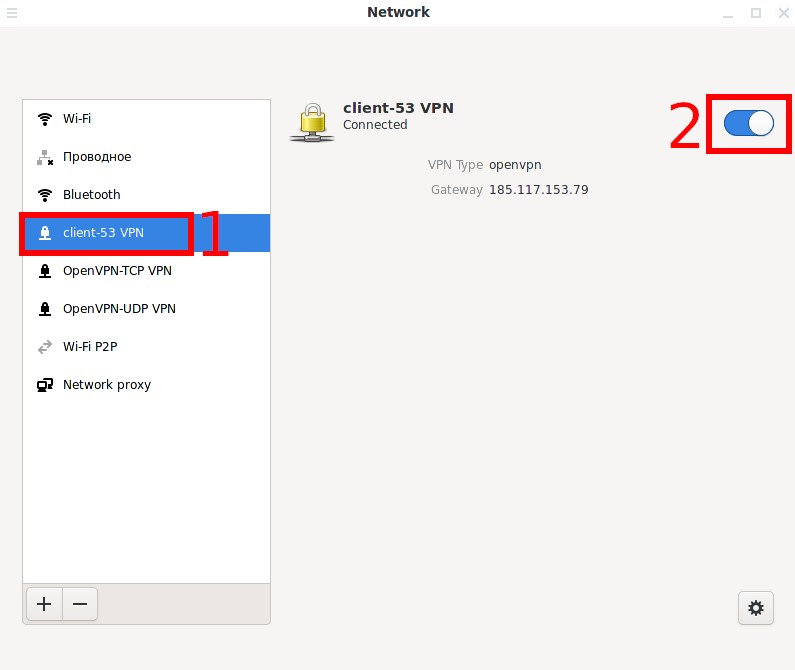
Manage OpenVPN connections in Network Settings
To remove the OpenVPN connection, press the minus sign(–).
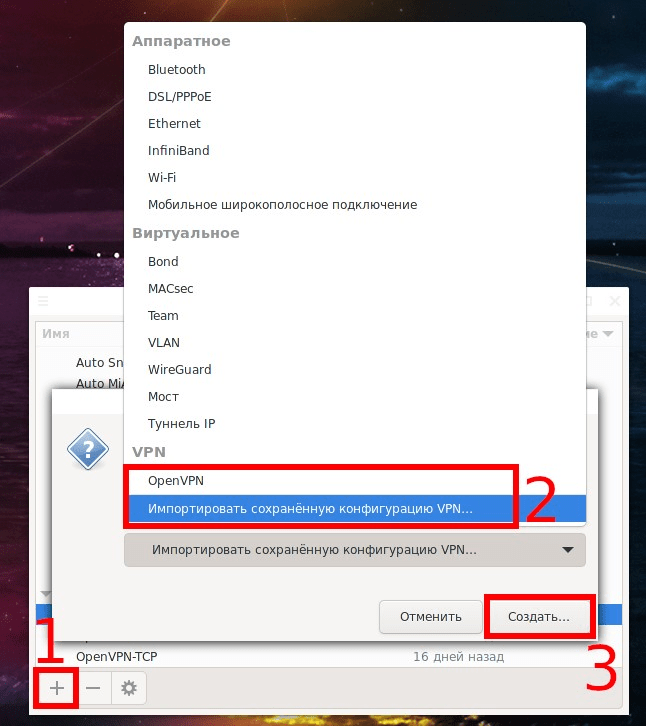
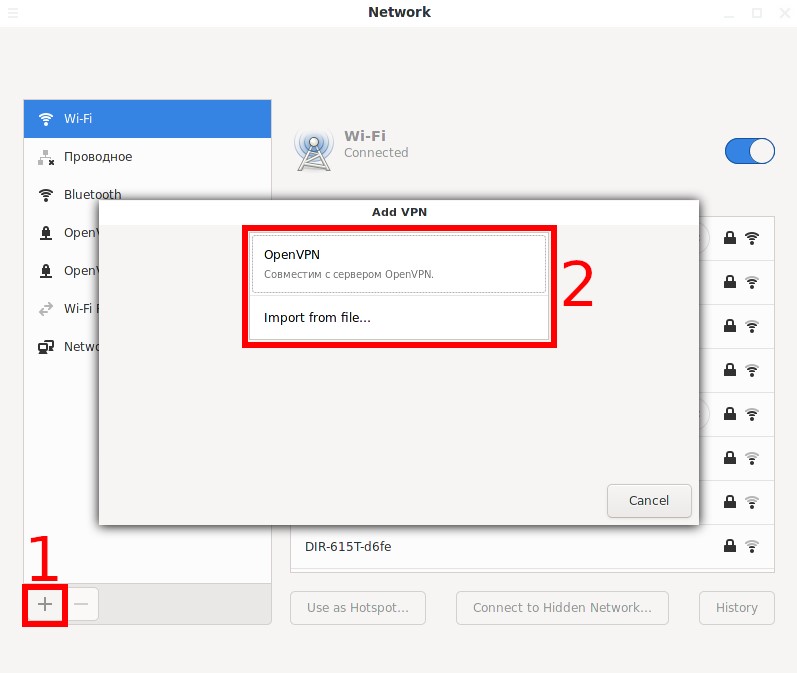
To add an OpenVPN connection, click the plus sign(+).
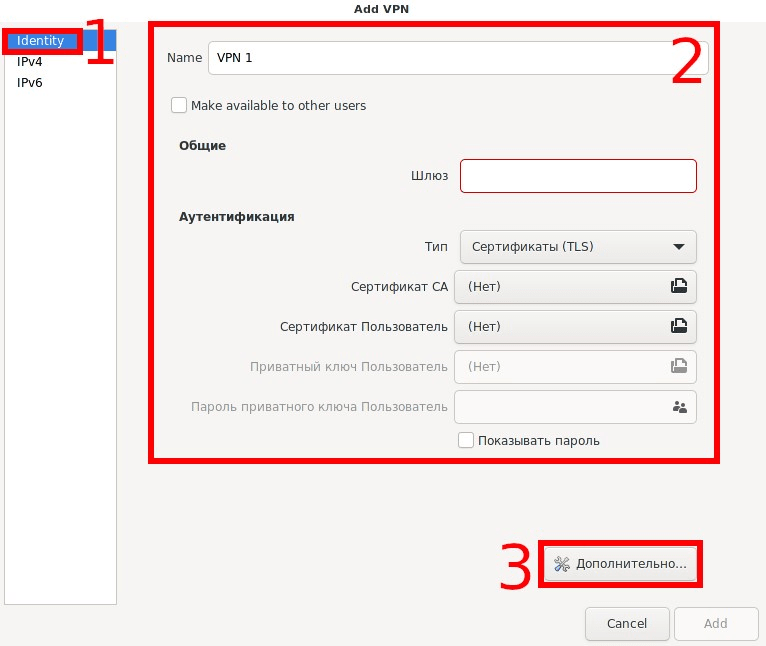
You will be offered 2 options:
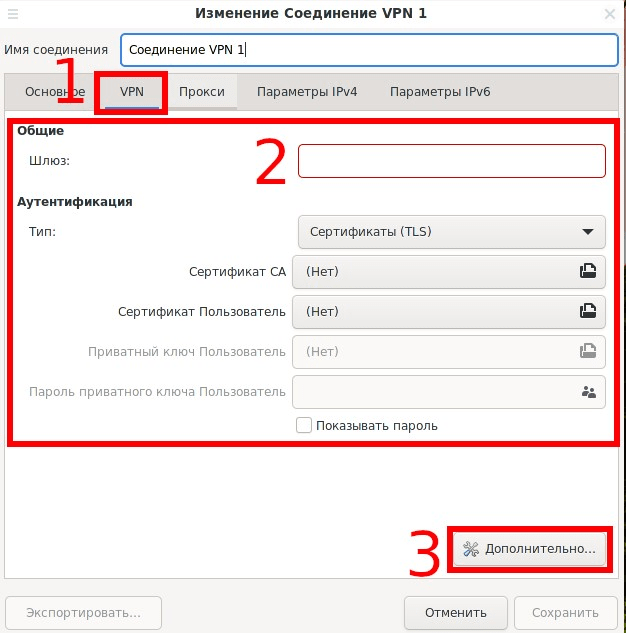
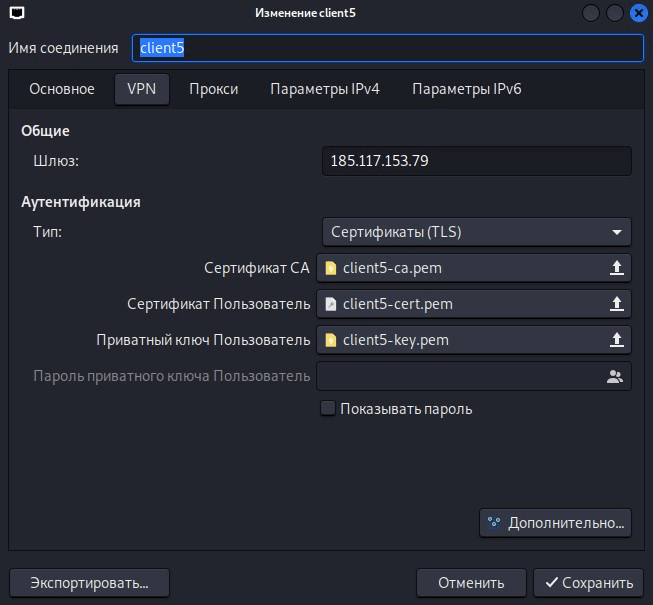
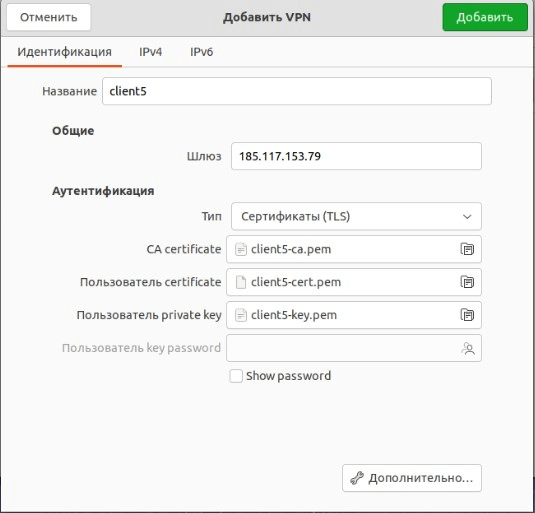
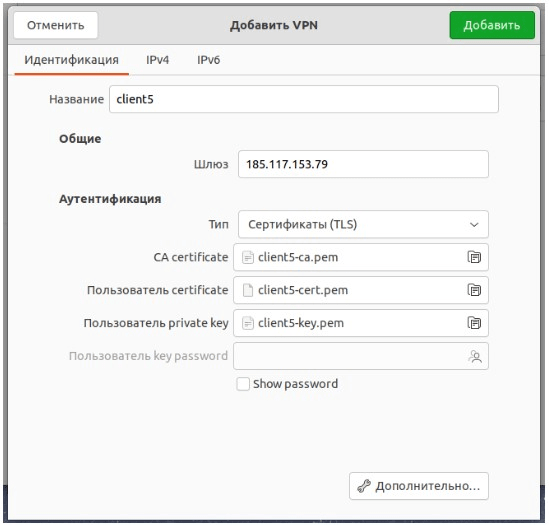
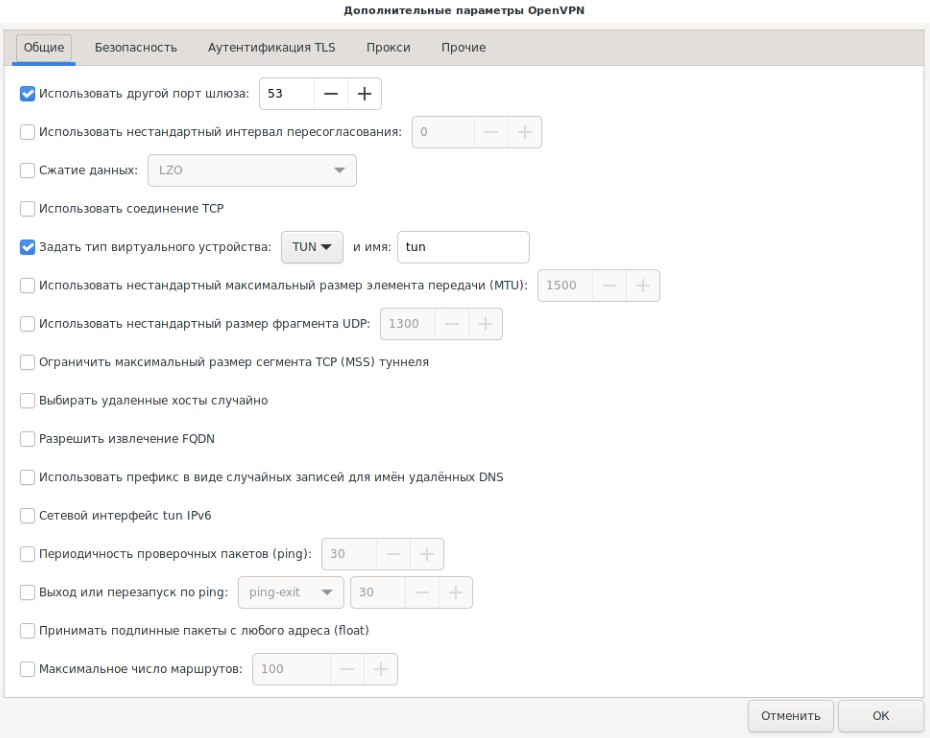
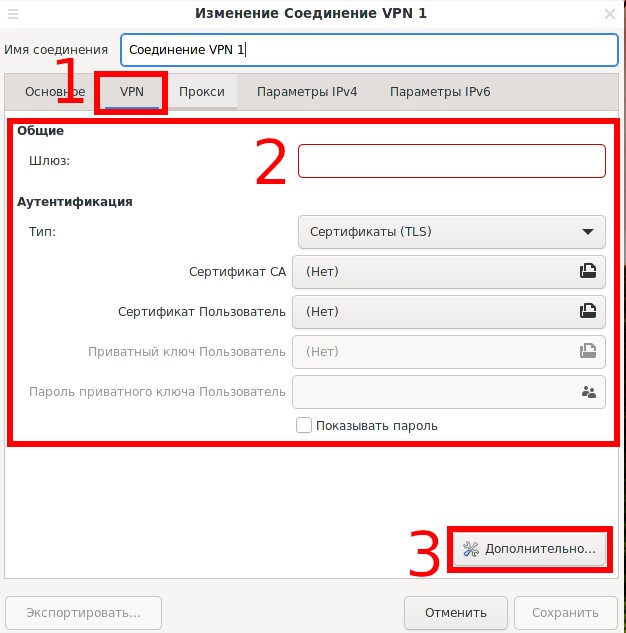
With manual configuration, you do not need to change the IPv4 and IPv6 tabs. Part of the settings is located on the Identity tab, to access other settings, click the “More” button:
To edit an OpenVPN connection, select it and click the gear icon.
Part of the settings is located on the Identity tab.
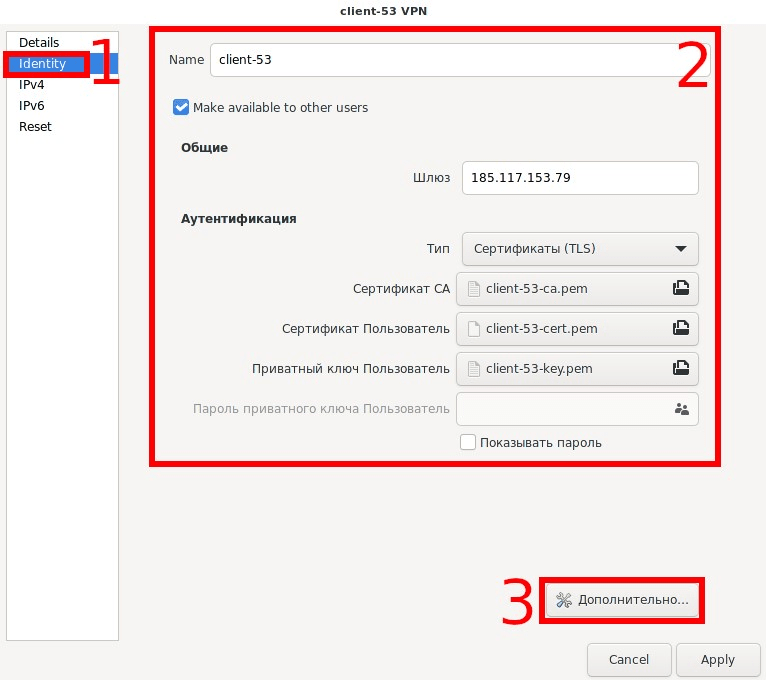
To access other options, click the “Advanced” button.
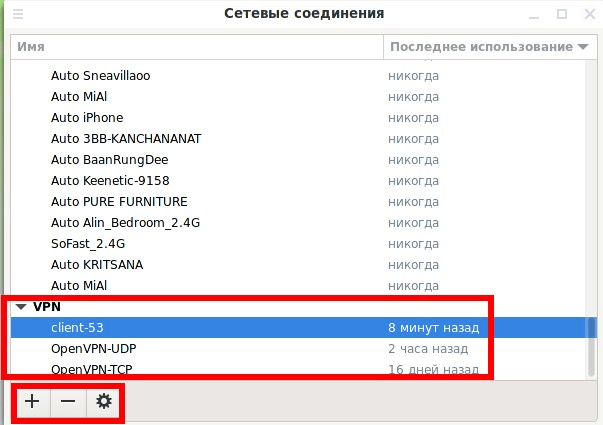
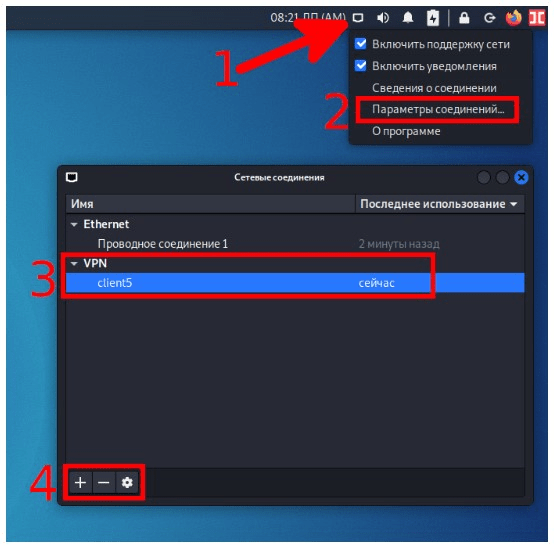
Manage OpenVPN connections in Network Connections
1. To remove an OpenVPN connection, press the minus sign (-).
2. To add an OpenVPN connection, click the plus sign (+).
.
In the drop down list you will have many options available, 2 of them are related to OpenVPN:
OpenVPN —you need to enter the settings manually and specify the certificate files.
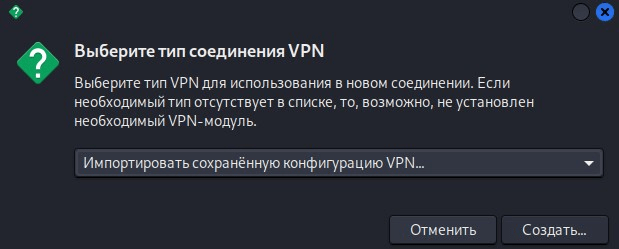
Import a saved VPN configuration
With manual configuration, you do not need to modify the Main, Proxy, IPv4 Settings, and IPv6 Settings tabs. Some of the settings are located in the VPN tab, click the “Advanced” button to access other options.
To edit an OpenVPN connection, select it and click the gear icon.
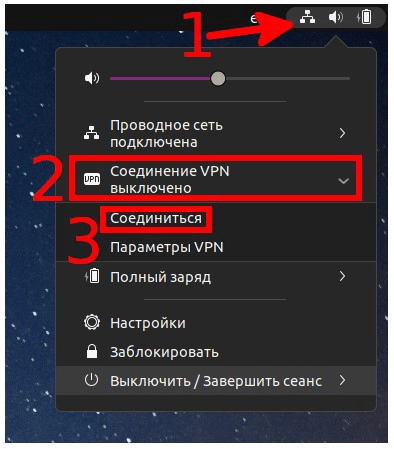
Connecting to an OpenVPN server
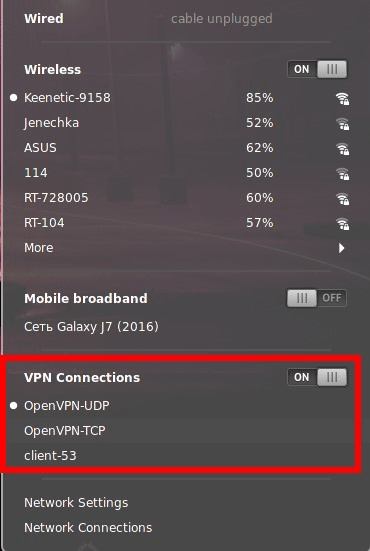
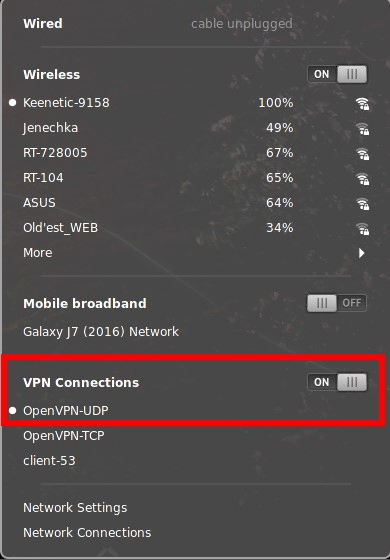
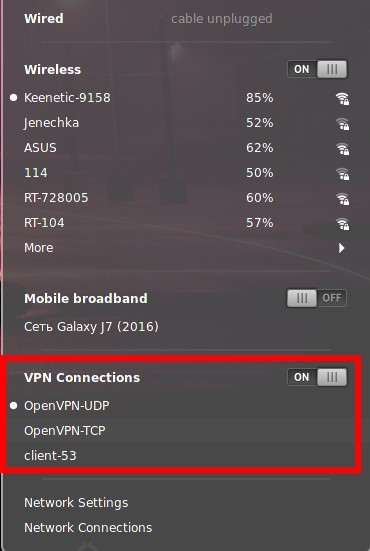
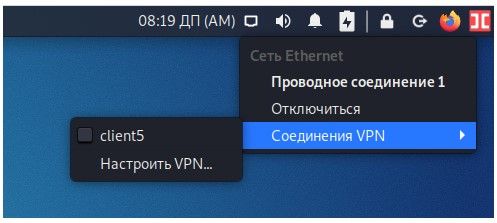
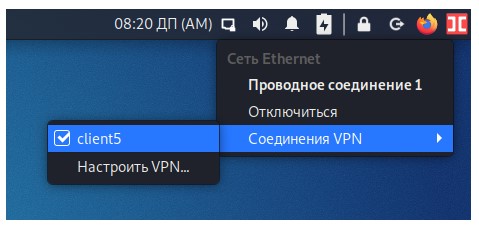
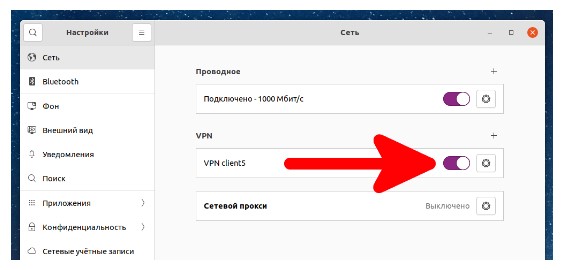
You can add multiple OpenVPN connections and enable any of them depending on your needs. You can enable them as in the main NetworkManager panel – click on the selected connection:
You can also enable the VPN connection in Network Settings, for this, select the desired VPN connection and press the switch:
Popular distributions with Xfce are Kali Linux and Xubuntu. Xfce only has Network Connections. There are two ways to add a new OpenVPN connection:
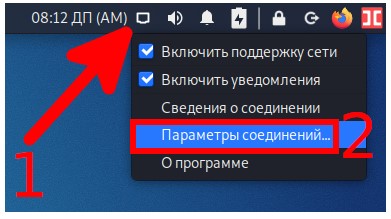
1) Right-click on the network connection icon and select “Connection options“:
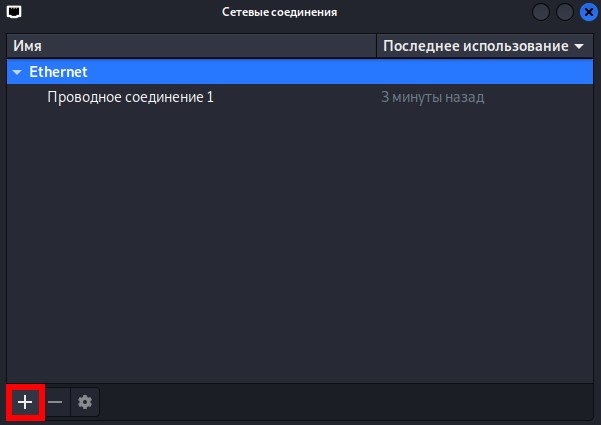
In the already familiar Network Connections, click the plus (+) sign.
2)Alternatively, left-click the network connection icon and select VPN Connection → Add VPN Connection.
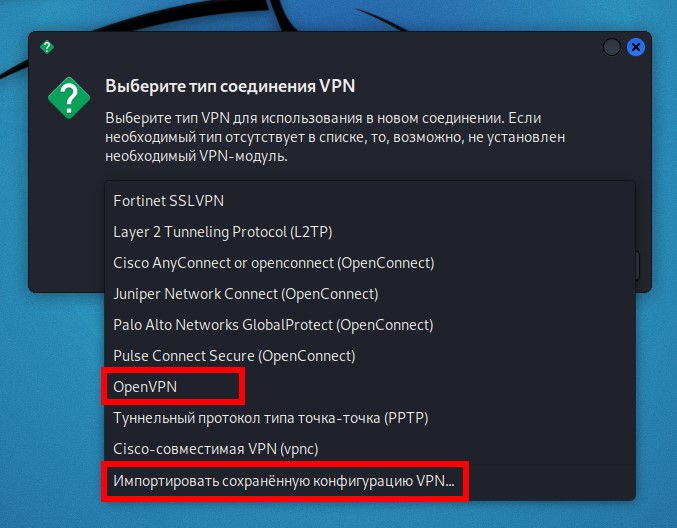
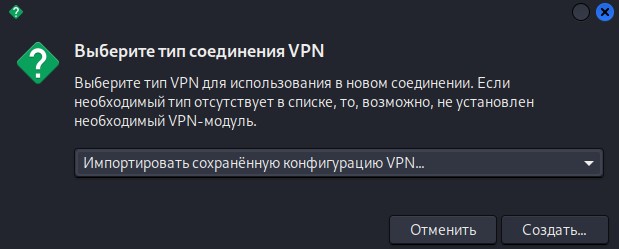
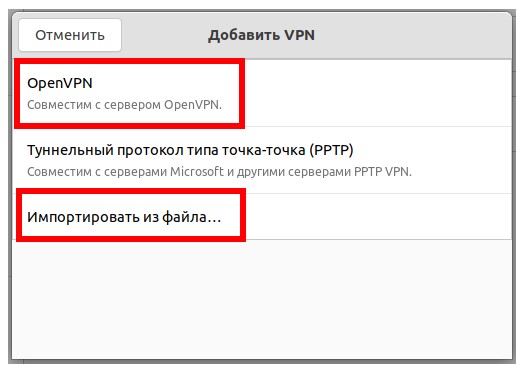
Select the type of VPN connection.
To import a VPN connection from a file, select Import Saved VPN Configuration.
Click the “Create” button and specify the settings file.
With manual configuration, you do not need to modify the Main, Proxy, IPv4 Settings, and IPv6 Settings tabs. Some of the settings are located in the VPN tab, click the “Advanced” button to access other options.
To connect to OpenVPN, left-click on the network connection icon and select “VPN Connection” and select the desired connection.
If the connection is successful, a checkmark will appear opposite the name of the VPN connection.
To add, modify, and remove VPN connections, go to Network Connections, right-click the network connection icon, and select Connection Options.
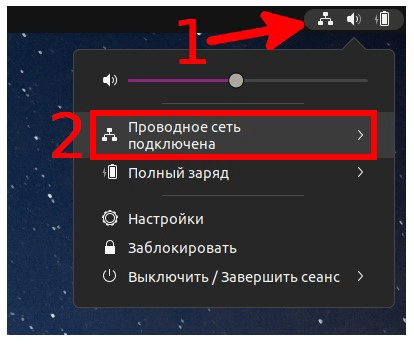
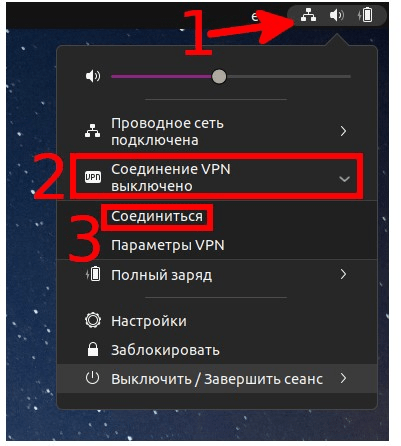
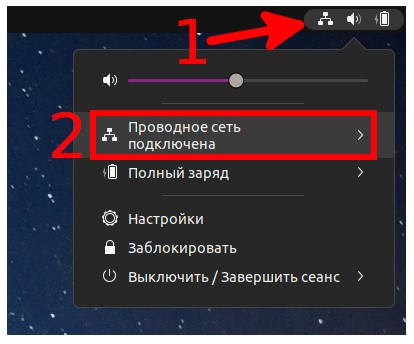
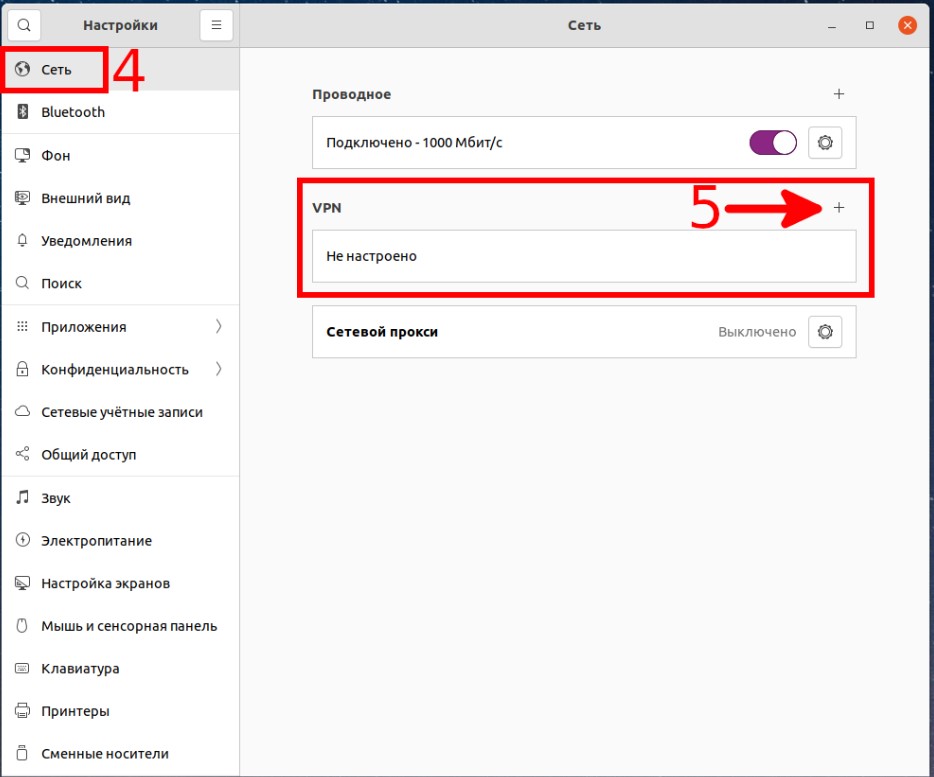
A popular example of a Linux distribution that uses GNOME 3 is Ubuntu. To add an OpenVPN connection, click on the network connection icon:
1.Expand the connection section.
2. Select “Connection options“:
3.Once in the OS settings, on the “Chain” tab you can add a new VPN connection or manage existing ones To add a new one, click the plus sign (+).
4. With manual configuration, you do not need to change «IPv4» and «IPv6 tabs». Part of the settings is located on the “Identification” tab, to access other settings, click the “More” button:
You can enter the data manually or import the OpenVPN connection settings from an .ovpn file. Or you can enable OpenVPN connection by clicking the network connections button, then selecting the desired VPN connection.
With manual configuration, you do not need to change the IPv4 and IPv6 tabs. Part of the settings is located on the “Identification” tab, to access other settings, click the “More” button:
You can enable OpenVPN connection by clicking the network connections button, then selecting the desired VPN connection.
You can also go to Network Settings and enable your chosen OpenVPN connection there.
To edit a VPN connection, click the network connection button, then expand the VPN list and select VPN Settings.
Select the connection you want to change and click the gear.
To remove an OpenVPN connection, go to its settings as shown just above and click the “Remove VPN” button.
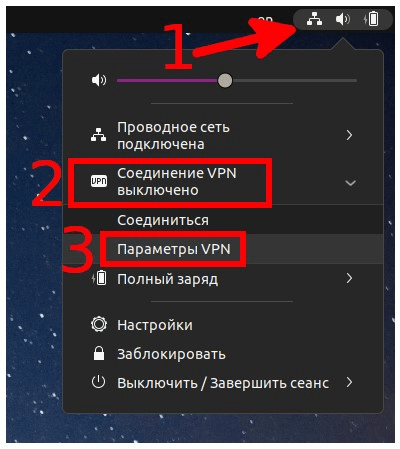
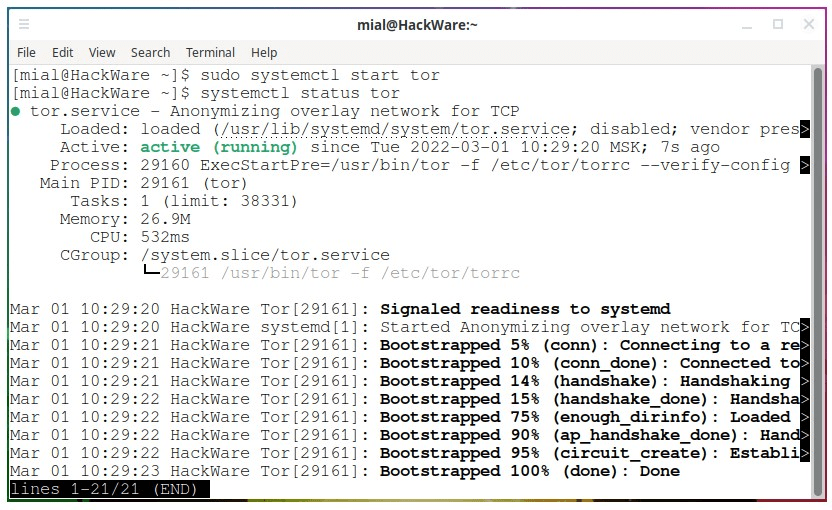
Connecting to Tor via a VPN in practice is usually used not so much to increase anonymity (although such a use occurs), but to bypass the Tor network. In some countries, the Tor network is blocked at the state level, so it is necessary to use bridges – intermediate nodes of the Tor network – to connect the Tor browser or the Tor service. Instead of bridges, you can connect to the Tor network through a VPN. In fact, connecting Tor via VPN is even easier than using bridges.
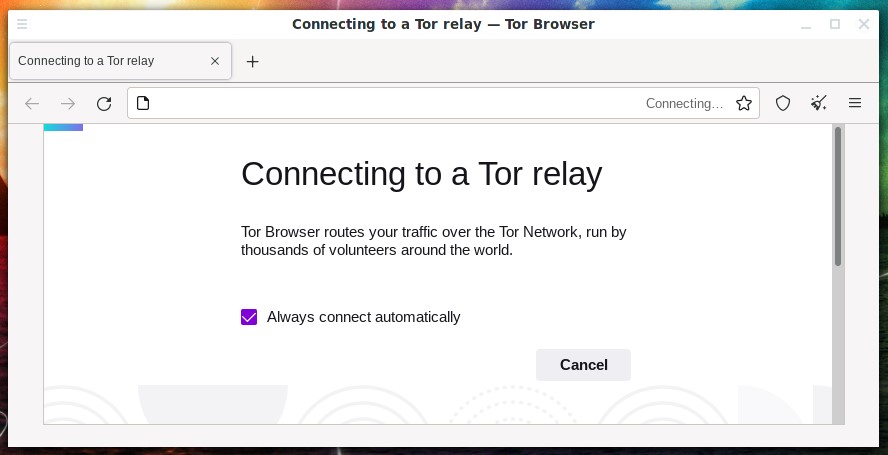
Please note that due to the specifics of the blocking implementation (for example, blocking is performed only at the level of the last mile providers), even a VPN of a country where the Tor network is blocked can be used to bypass the blocking of the connection to the Tor network. Signs that an ISP is blocking access to the Tor network are Tor connections stopping in the early stages. For example, Tor Browser freezes at the inscription:
Another error option:
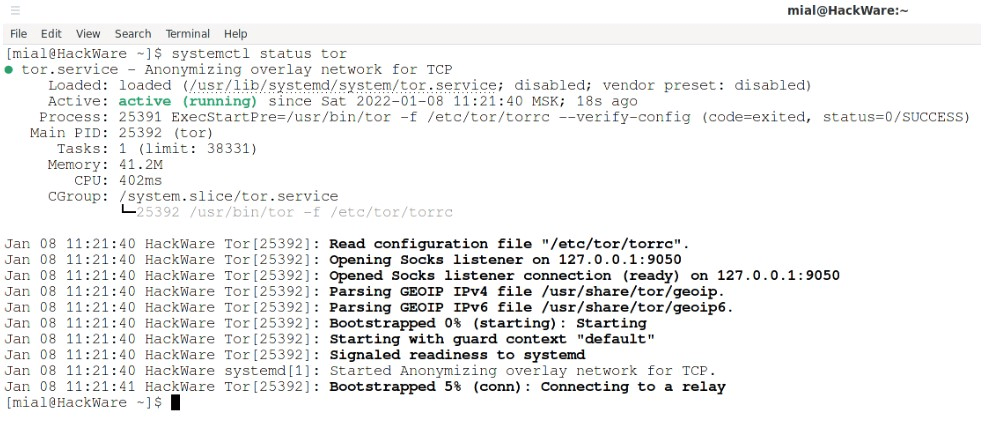
When trying to use the Tor service by running it with the command
Status check
It will show that the initial download has stopped at 5%, that is, at the stage of connecting to the repeater:
To connect to the Tor network via VPN, start by connecting to a VPN server, for example using OpenVPN. Immediately after that, you can use Tor as usual – no additional configuration is required. The Tor browser successfully connects to the Tor network and opens sites.
tor successfully establishes a connection to the Tor network.
Task:
Branch subnets are connected via OpenVPN. All clients connect to the server and routes to the Internet are registered through the OpenVPN server. Everything works, but there is a problem. If the OpenVPN server remains without the Internet for some reason, then the other branches also remain without the Internet, because the traffic does not go through its gateway, but through the OpenVPN server. Is there a way to write a script to:
1. In the absence of a connection to the OpenVPN server, the routes were restored and worked through its own gateway.
2. Every 2-3 minutes, the client tried to connect to the OpenVPN server.
3. When the connection is restored, the routes are registered again through the OpenVPN server.
Theoretically, it is quite possible to write a script in Bash (for Linux) or PowerShell (for Windows) that would ping the OpenVPN server and if the server is online would make a connection to it or if the connection is already present, then it would do nothing. And if the OpenVPN server is offline, then disconnect from it or do nothing if the server is already disconnected. In Linux, such a script can be added to autostart and then run regularly using Systemd or Cron timers. In Windows, it can also be solved using the Task Manager (Windows Task Scheduler).
But IMHO, this is a fundamentally wrong approach. It is necessary to strive to ensure that the OpenVPN server is always online. Because it is needed for something in the work of the users, if they connect to it? And if so, when you disconnect from OpenVPN, there will be failures in connecting to local resources.
Nevertheless, here are examples of scripts.
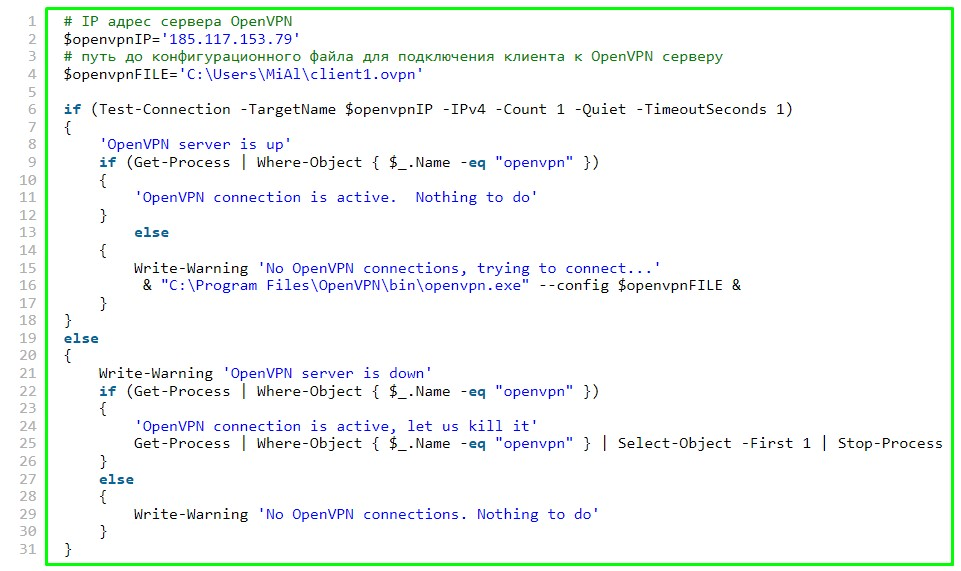
For Windows, the script is written in PowerShell, create a file vpn.ps1 and copy into it (replace the IP address of the OpenVPN server and the path to the configuration file with your own):
Check like this:

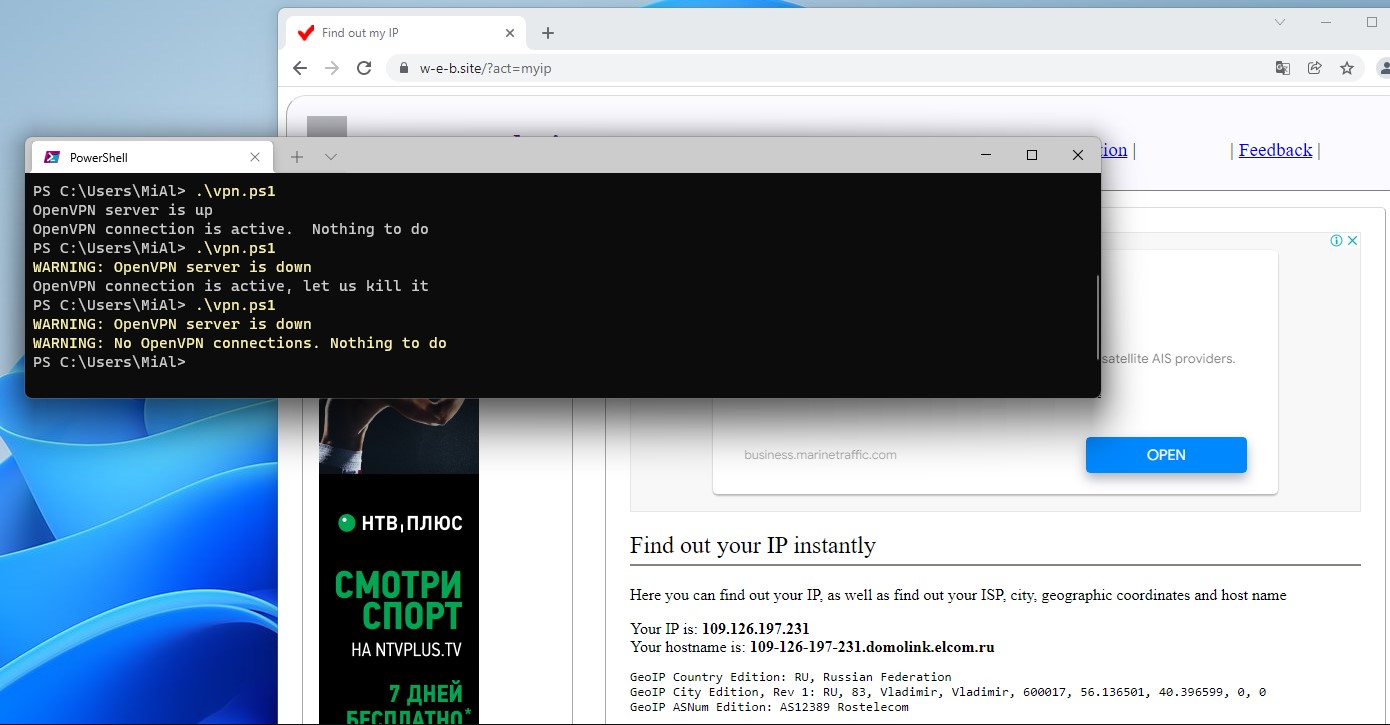
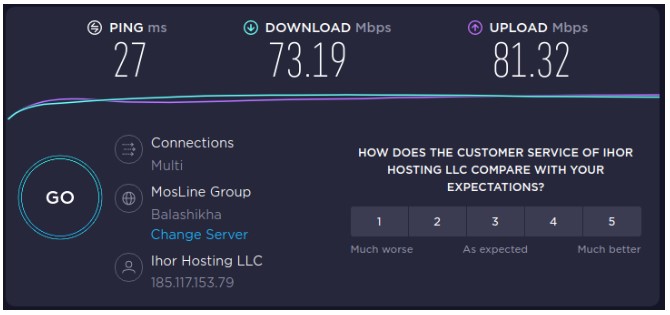
1.The OpenVPN server is online, so the script connects to it and does nothing during subsequent checks. Checking the client’s IP shows that access to the Internet is indeed done via OpenVPN:
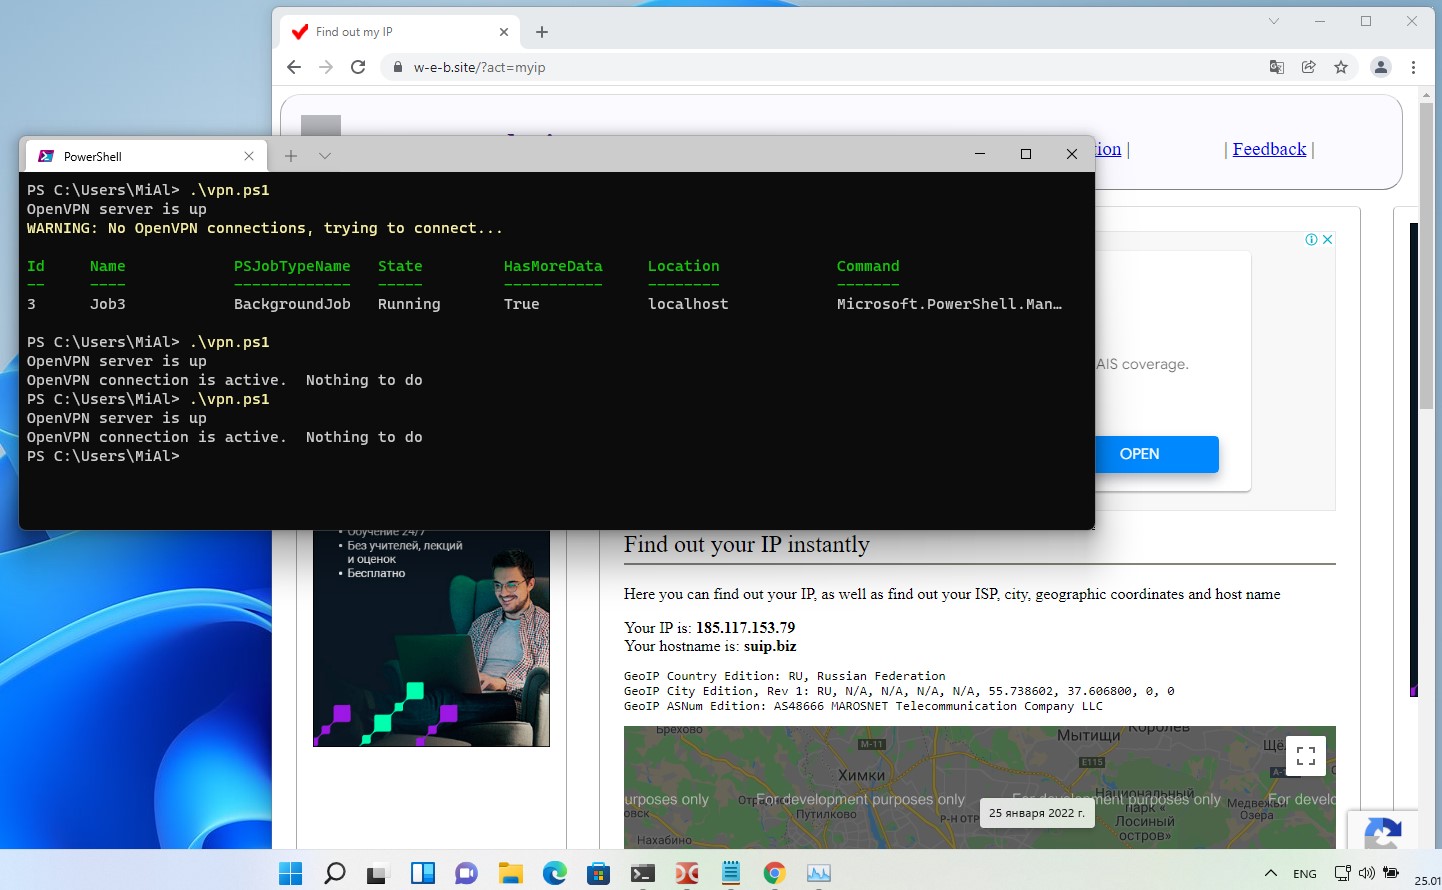
2.OpenVPN is offline, so the script disconnects from it. On subsequent checks, the script does nothing until the OpenVPN server is available. When OpenVPN is back online, it connects to it.
Use Windows Task Manager to run your script like this:
![]()
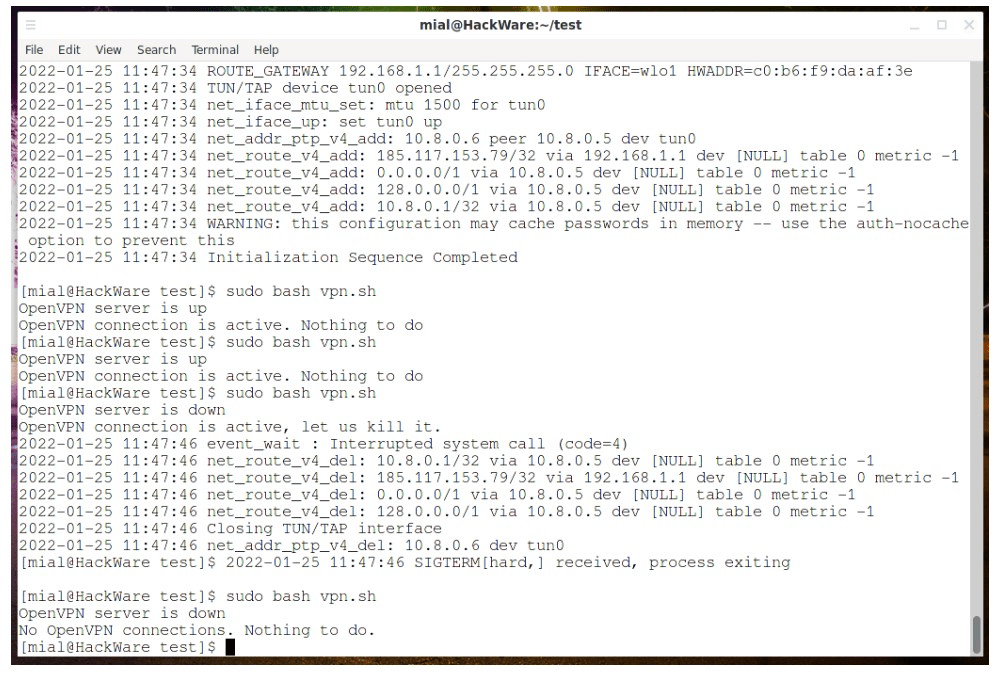
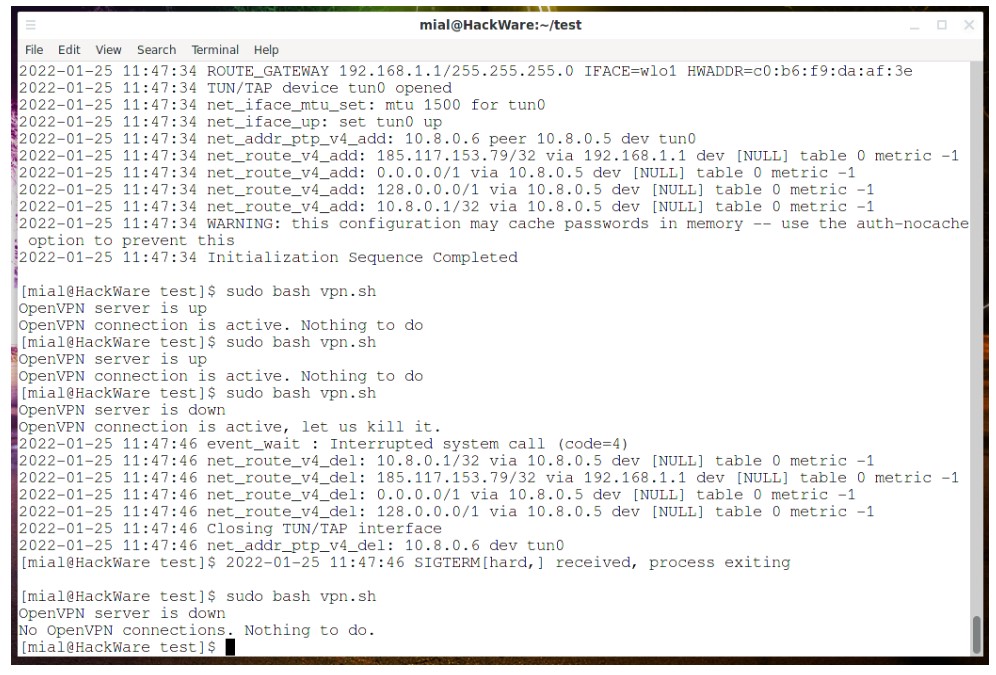
An example script for Linux – create a vpn.sh file and copy into it:
Run like this:
The OpenVPN server is online, so the script connects to it and does nothing during subsequent checks. Checking the client’s IP shows that access to the Internet is via OpenVPN. OpenVPN is offline, so the script disconnects from it. On subsequent checks, the script does nothing until the OpenVPN server is available. When OpenVPN is back online, it connects to it.
To run regularly, use .timer systemd or cron. And that’s all for today, thank you all for your attention.
