
28.03.2023
7 min
1798

After reading the definition of a script in Wikipedia, I was completely confused. Here it is – a virtual world detached from reality. In fact, it seems to me that everything is much simpler. A script is a program or an independent part of a program (subprogram) capable of performing certain actions in a given sequence. Consider an example: Task: Masha, take the money and go to the store for bread. Purpose: Bread. Object: Masha. Action scenario: take the money and go to the store (this will be our script). The following comes out: Masha [script] for bread. We change the goal: Masha [script] at the computer. We change the goal and the object: Petya [script] for candy. Well, now it’s clear what a script is? Spammers create their spam scripts with the goal of doing something without your knowledge, such as sending some of your personal data, redirecting you to another site, or in the case of phishing, to trick you into personal or sensitive data. In short, a spam script is a set of instructions that are executed in the background (without the user’s knowledge). In modern life and on the Internet, you can often find the word bot, especially when it concerns spam.

A bot (spam bot) is a script program that is created to perform a certain function in the case of spam. Spam provides scripts that combine features available in Python. These are expected to be invoked from the command line (after your virtual environment is activated). All scripts will report all their options with a short explanation if simply run with – -help . Almost all scripts accept images in the form of one TIFF file for each state. If your 3D data is in the form of a series of slices, save them as a single 3D TIFF file. The most common script programming languages: JavaScript; Python; PHP; Ruby; PERL; GROOVY; BASH; POWERSHELL.
Let’s take a look at what spam is. So, spam is the mass sending of correspondence of an advertising or other nature to persons who did not wish to receive it.
⦁ Messengers (Telegram, Viber, Whatsapp…)
⦁ Replacement of Internet traffic
⦁ SMS message
⦁Phone calls
⦁ Advertising
⦁ Phishing
⦁ Religious mailings
⦁ Mass Disruption of System (DDoS)
⦁ Mass mailing on behalf of another person (with a virus)
Persons who are engaged in creating and sending one or another type of spam are called “spammers”.
SMTP is a protocol for working with e-mail. Since it is not possible to send an email directly to the recipient, it is sent first to the mail server, and then the server sends it to the recipient, there are 3 main types of POP (Post Office Protocol); IMAP (Internet Message Access Protocol). SMTP (Simple Mail Transfer Protocol)
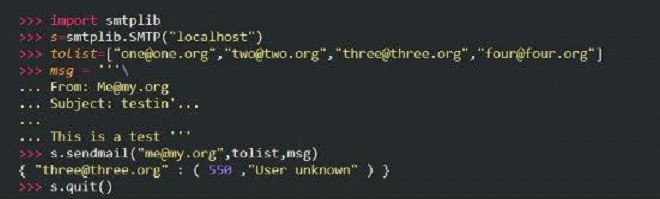
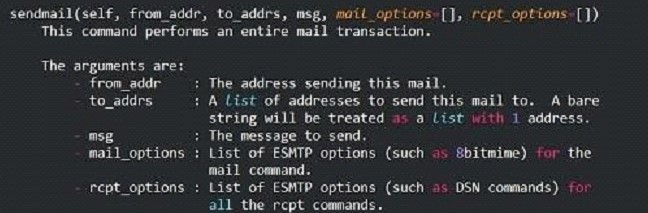
First of all, you need to create an smtplib object, which can be seen as a portal that gives access to the connection and various tools for working with it from the smtplib module. In this case, the function returning the required object takes two parameters or arguments. The first argument contains the domain name, i.e. the email address starting with “smtp”, as shown below. The second argument is the port number to connect to on the email server. It almost always takes the value 587 according to the TLS encryption standard. Services using port 465 are very rare.

It turns out that the smtpObj variable is an object of type SMTP. This can be verified by entering the name of the variable in the console and confirming the input. The address of its memory location and its type will appear on the screen (assuming you entered the previous command correctly). The smtpObj variable can be named anything as long as it is a valid variable name in Python.
The next thing to do to establish a connection is to “tell” the SMTP object that the message should be encrypted. To do this, enter the following line in the console and press Enter:
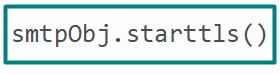
Here’s what we did: we told Gmail that we wanted our connection to be encrypted using TLS (Transport Layer Security), which is the standard for Internet communications today. TLS itself is not a cryptographic algorithm, rather it communicates that encryption must be used or the connection must not be established.

An important point is that if you skip this step and immediately proceed to authorization, error messages will appear on the screen. All because Gmail applies encryption using the HTTPS protocol, that is, the same HTTP “wrapped” in an additional TLS protocol.
At this stage, the e-mail password, so to speak, flies into the unknown, which is quite dangerous. This isn’t a problem on your local computer, but if you’re really automating email with a Python script, you should be careful and think twice before publishing the script code somewhere or uploading a file with it to third-party resources.

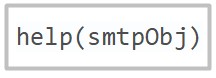
The advantage of using environments with a command interpreter is that even in the absence of any information – for example, descriptions of sending letters – you can ask the interpreter about it.

Note that the above example is missing the authorization command. This is because the program was connecting to the user’s computer, not the remote email server. For our case, we will write the following:

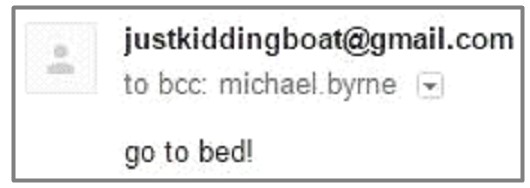 If the message was received, then everything works as it should.
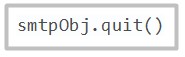
To complete the connection, it is enough to use the following command:
Of course, sending messages is only a small part of what you can do with email with Python.

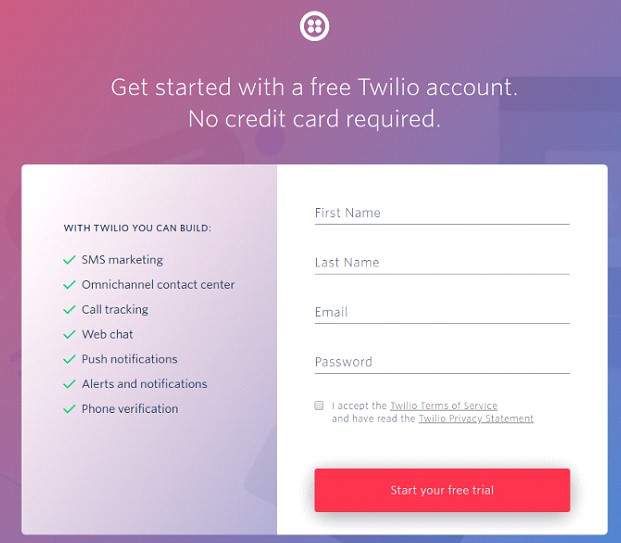
1) Create a free profile on Twilio and confirm your email address and phone number. In addition to the free period, your Twilio profile includes the Twilio Sandbox for WhatsApp test environment, in which you cannot use your number: you need a one-time permission to receive messages on WhatsApp. All problems are solved with receiving a number – after WhatsApp allows Twilio to use your number. Then you need to fill out the form and wait a little. All Twilio customers can create and test sending and receiving WhatsApp messages using the WhatsApp Sandbox test environment.
2) Now you need to connect your phone to the WhatsApp Sandbox test environment and you can start receiving messages. Let’s go to the beta version of WhatsApp in the learning section of the console

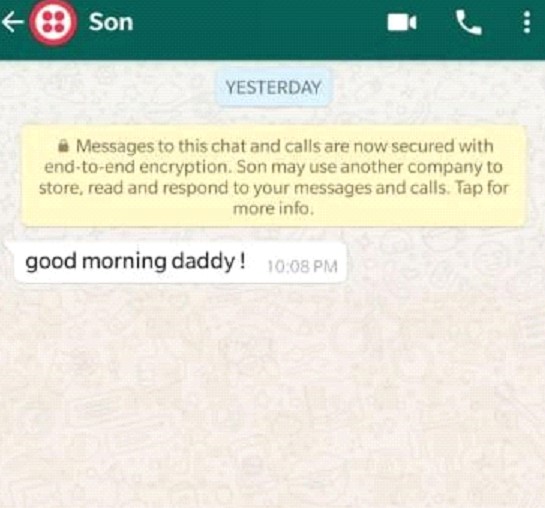
3) Let’s save our WhatsApp number in contacts. You can give it any name. I saved it as a Twilio Sandbox, then sent a message from the father’s phone, as you can see above. This can only be done once. Now let’s go to the Twilio Console, set up an SSID profile there and get an authentication token – so Twilio will be able to identify us when executing the code.

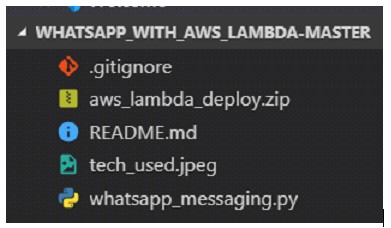
1) Download repository GitHub and unzip it. (Inside is a file with our code and a deployment package.)
whatsapp_messaging.py
aws_lambda_deploy.zip
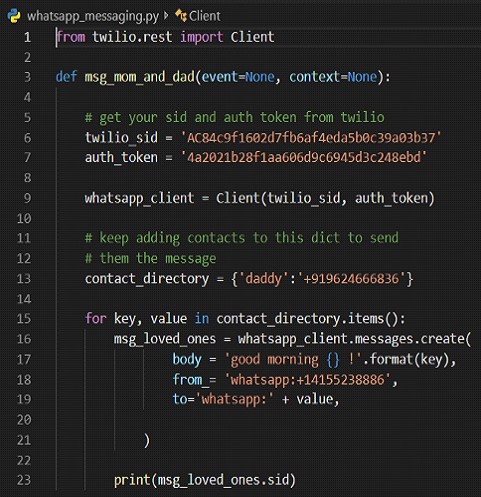
Line 1: Imports the Twilio package and uses its REST client to call the Twilio API.
Line 3: Here we create a msg_mom_and_dad function that will be sent to the AWS cloud to be executed every day at a certain time.
Lines 6–7: Substitute the sid and auth_token values of our profile, which were discussed in step 1.
Line 9: A Twilio client object is created with our credentials.
Line 13: Creates a Python dictionary with name key and phone number value. This dictionary can be updated if you want to send a message to someone else.
Line 15: a for loop that runs for all key and value pairs (we only have one now). We enter our message in the body. For example, I have a simple “good morning” followed by a key value. This code outputted “good morning, dad!”. Then we write the from number that we received for Twilio WhatsApp and the to number from which the confirmation was previously sent for the WhatsApp test environment.
Line 23: A line to check the status of the message using the SID. But we won’t need it.
⦁ twilio_sid
⦁ auth_token
⦁ contact_directory
⦁ from_
⦁ body
After the changes, we save everything. Next, extract aws_lambda_deploy.zip and replace whatsapp_messaging.py inside with the one we just created. Then we pack again. All we had to do was change the code, substituting our identification and contact details. And now we have the deployment package ready.
So, the code is ready to run and send messages via WhatsApp. Want to know what other files are in our deployment package? This is the Twilio package and the rest of its dependencies. They will still be useful because we will be using the lambda function in the Python environment, and there is no Twilio package. The logical question is why not just pip install twilio to install? Because we don’t have a server here.
AWS Lambda is a server-side data processing facility where a piece of code is executed based on various AWS events and triggers according to user requests. Therefore, engaging a server (EC2 server instance in AWS) running 24/7 for our small task would be a waste of computing resources and finances. After all, here our lambda function will be executed every day for a short period of time at the moment of activation of this trigger. By itself, the lambda service is inexpensive and provides a million requests per month for free.

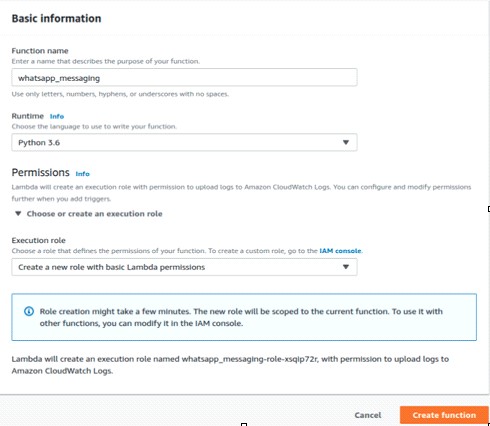
We are not going to connect to other services in AWS, so we will stop at the standard permission option. Click on create function and enter your personal account.


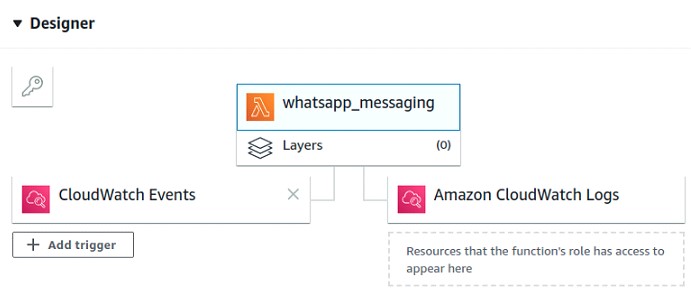
Execute our whatsapp_messaging Python file and the msg_mom_and_dad function inside that file every time the lambda function is called. Change the handler value as shown above. At the code entry point, select upload a .zip file, download the deployment package we created in step 2, and save. Our code is ready to run. Now you can check if the feature sends a message to the specified WhatsApp number. Click on test and check. Our final step is to set the code to activate at a specific time each day. To do this, click add trigger -> CloudWatch Events in this window.
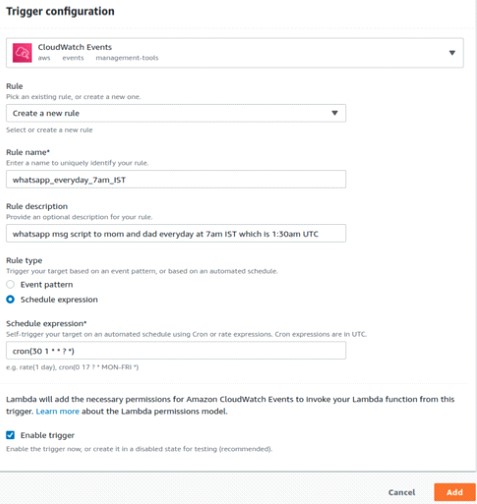
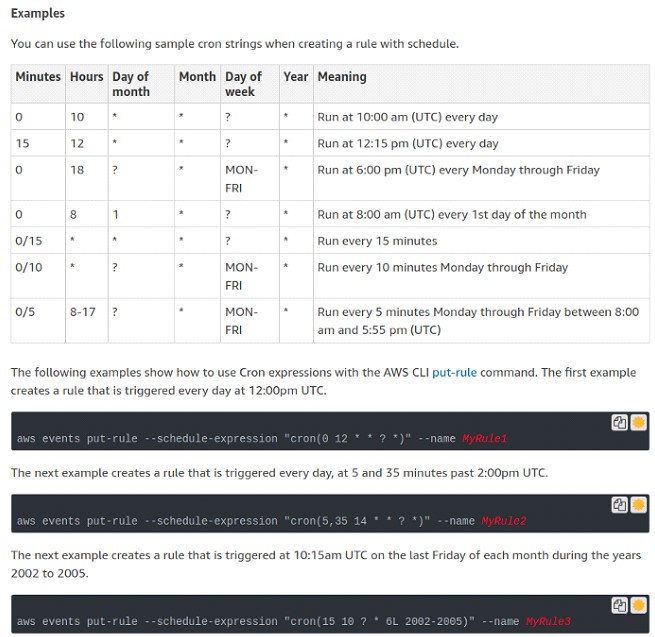
If desired, you can give it any name and description. Set the schedule expression as the rule type. We specified the time using cron(). 30 1 means 1:30 AM, time in UTC format. The next two, * *, are used to indicate the day and month. The next two, ? *, — to indicate the day of the week and year. We set * and ? to indicate each day, month and year. For your own cron parameters, you can use the table below as an example. If you want to learn in detail, the cron guide will help you at aws_cron_docs.
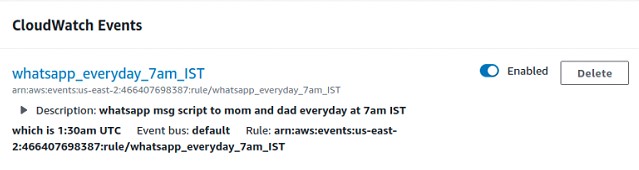
Scrolling down we can see the CloudWatch event fired to call our function.
That’s all! You can change the name of the Twilio Sandbox test environment to your own and even respond to responses from the Twilio dashboard. Thus, we considered 2 fairly simple examples of how you can send messages using scripts, including spam. I also want to note that scammers collect e-mail addresses and phone numbers from all available sources. Among others, thematic forums, guest books, social networks, and other resources are especially popular, where such information is poorly protected or is completely in the owner’s profile in public access. Some databases are hacked by hackers and sold on the Darknet.
In addition, the collection of personal information can be carried out by a software method. There are special search bots – harvesters. They go through thousands of resources in an hour and carefully put all the received data into the database. It is also worth taking into account the usual selection. There are billions of mailboxes registered all over the world, which means that these addresses can be generated with the help of a specially written program. The same is true for phones. Viruses also help unscrupulous businessmen. Malicious code, as a rule, is worms, it can send itself through the address database. The information collected in this way is very valuable for spammers, because it contains only working data used by their master.
⦁ When you are on a website where you need to enter your personal data for authorization, make sure that you are using the HTTPS protocol and that your connection is secure, if this is not the case, there is a fairly high risk of traffic substitution and/or the link address may be changed and when you click on it, you can run a script in the background that will send your personal data to the attacker.
⦁ Don’t use your primary email address wherever possible. Create an alternate mailbox and leave it when asked at a store, hotel, etc.
⦁ Suspicious email attachments and links from unidentified/unknown senders. Quite often we can receive a letter with an incomprehensible attachment or link, in no case should we open them.
⦁ You should also not open a link in messages on social networks from strangers.