17.04.2025
12 min
1330

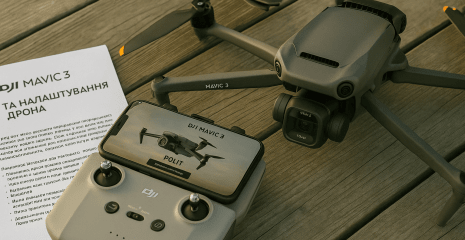
The Ukrainian manual for the DJI Mavic 3 is a convenient guide for those who want to quickly and safely master the drone. The first part covers basic settings, installing the DJI Fly App and DJI Assistant 2, as well as initial actions after purchase. You will learn how to use the manual, where to find video tutorials, how to connect devices and launch the drone. Flight modes, status indicators, return to home and sensor operation are explained. This introduction is especially useful for beginners who are first introduced to DJI equipment.
The DJI Mavic 3 is equipped with an infrared sensor system, as well as forward, backward, upward, sideways and downward vision systems, allowing it to hover and fly both indoors and outdoors, and automatically return to home, avoiding obstacles in all directions. The maximum flight speed is 47 mph (75.6 km/h), and the maximum flight time is 46 minutes.
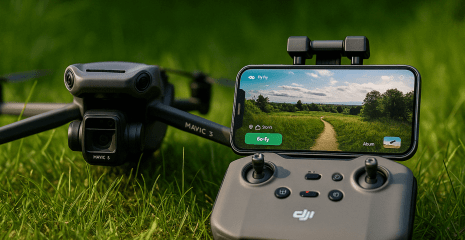
The DJI Mavic 3 Cine comes with a DJI RC Pro remote controller, which has a built-in 5.5-inch 1000 cd/m2 high-brightness module with a resolution of 1920×1080 pixels. Users can connect to the Internet via Wi-Fi, and the Android operating system includes Bluetooth and GNSS. The DJI RC Pro comes with a wide variety of aircraft controls and a stabilized gimbal, as well as customizable buttons, and has a maximum operating time of 3 hours. The DJI Mavic 3 comes with an RC-N1 remote controller that displays video from the aircraft in DJI Fly to your mobile device. The aircraft and camera are easy to control with onboard buttons, and the remote controller has a battery life of 6 hours.
Gimbal and Camera: The DJI Mavic 3 uses a 4/3-inch Hasselblad L2D-20c CMOS sensor capable of shooting 20MP stills and 5.1K 50fps/DCI 4K 120fps video in Apple ProRes 422 HQ* and H.264/H.265. The camera has an adjustable aperture from f/2.8 to f/11, a dynamic range of 12.8 stops, and supports 10-bit D-Log video. The telephoto camera allows you to shoot with 28x zoom in Explore mode.
Video Transmission: With four built-in antennas and DJI’s O3+ long-range video transmission technology, the DJI Mavic 3 provides a maximum transmission range of up to 15 km and video quality of up to 1080p 60fps from the drone to the DJI Fly app. The remote control operates at 2.4 and 5.8 GHz frequencies and is able to automatically select the best transmission channel.
Intelligent Flight Modes: The user can focus on controlling the aircraft, while the Advanced Pilot Assistance System 5.0 (APAS 5.0) helps the device avoid obstacles in all directions.
Only the DJI Mavic 3 Cine comes with a built-in 1TB solid-state drive that supports Apple ProRes 422 HQ video recording and storage. Otherwise, the features and functions described in this user manual apply to both the DJI Mavic 3 and DJI Mavic 3 Cine.
The maximum flight time was tested in still air conditions at a constant flight speed of 32.4 km/h. The maximum flight speed was tested at sea level without wind. Please note that in the European Union (EU), the maximum flight speed is limited to 68.4 km/h. These values are for reference only.
The remote controller achieves its maximum signal strength (FCC) in an open area without electromagnetic interference at an altitude of approximately 120 m. The maximum transmission range refers to the maximum distance the drone can still send and receive transmissions. It does not refer to the maximum distance the drone can fly in a single flight. The maximum operating time was tested under laboratory conditions and without charging the mobile device. This value is for reference only.
5.8 GHz is not supported in some regions. Please comply with local laws and regulations.
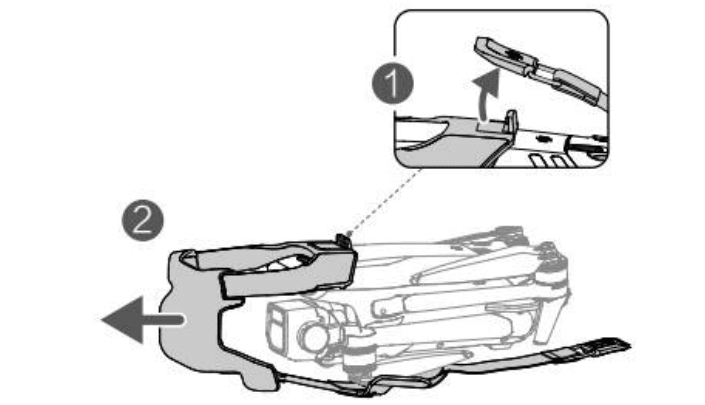
Before packing, the DJI Mavic 3 is folded. Follow the steps below to unfold the drone and remote controller.
1. Remove the storage cover.
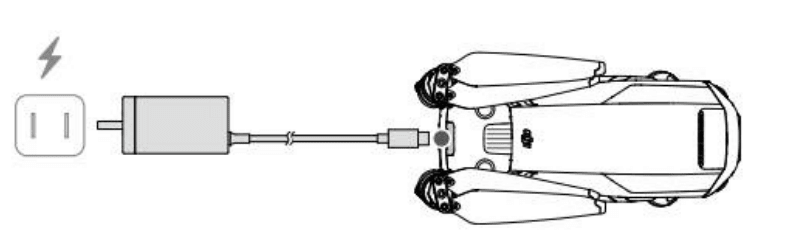
2. All Intelligent Flight Batteries are in sleep mode before shipping for safety reasons. To charge and activate the battery, use the included charger to charge and activate it for the first time. It takes approximately 1 hour and 36 minutes to fully charge the Intelligent Flight Battery.
3. Unfold the front blades, then the rear blades, and then the propeller blades
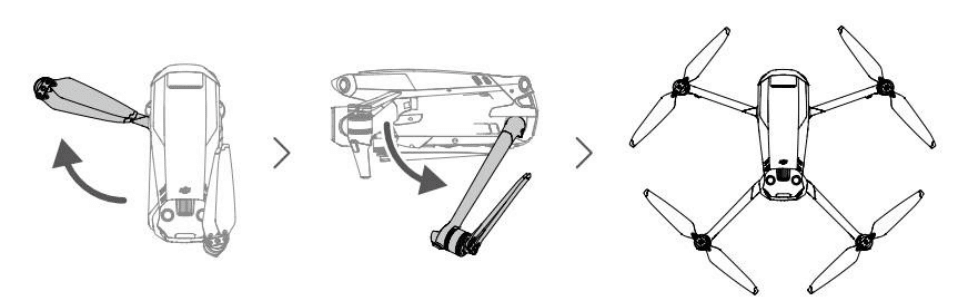
Be sure to unfold the front blades before unfolding the rear blades.
Before turning on the aircraft, make sure the storage cover is removed and all brackets are unfolded. Otherwise, it may affect the drone’s self-diagnosis.
Attach the storage cover when the drone is not in use.
Follow the steps below to prepare the DJI RC Pro Remote Controller for use with the DJI Mavic 3 Cine.
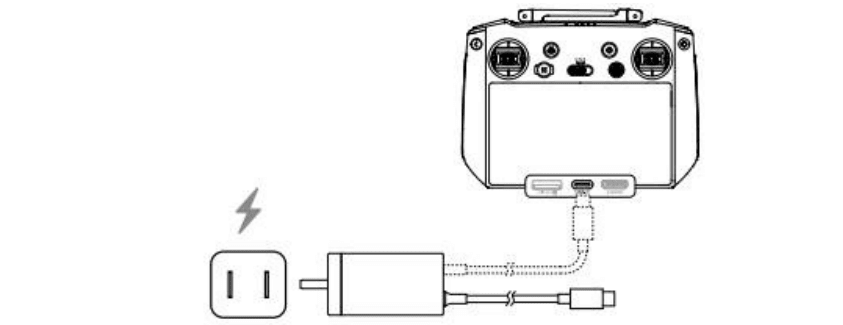
1. Charge the remote controller via the USB-C port using the included charger to activate the battery.
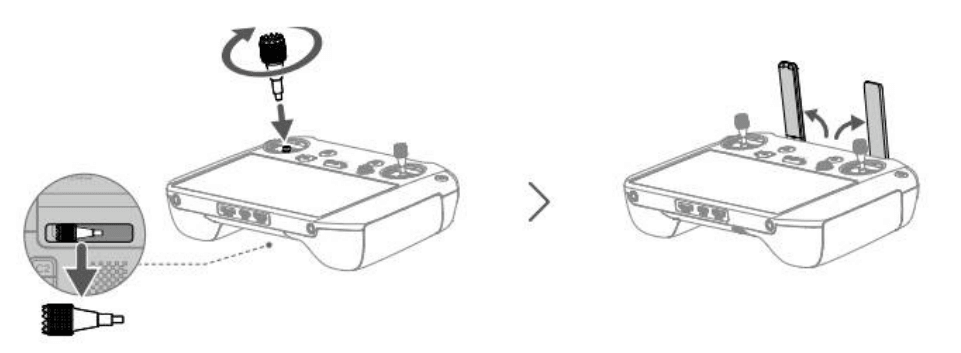
2. Remove the control sticks from the storage slots on the remote control and screw them into place.
3. Extend the antennas.
4. Before first use, the remote control must be activated, which requires an internet connection. Press and then press and hold the power button to turn on the remote control. Follow the on-screen prompts to activate the remote control.
Follow these steps to prepare the DJI RC-N1 Remote Controller for DJI Mavic 3.
1. Remove the control sticks from the storage slots on the remote controller and screw them into place.
2. Pull out the mobile device holder. Select the appropriate remote controller cable depending on the type of mobile device. A Lightning cable, a Micro USB cable, and a USB-C cable are included. Connect the end of the cable with the phone icon to your mobile device. Make sure your mobile device is secured.
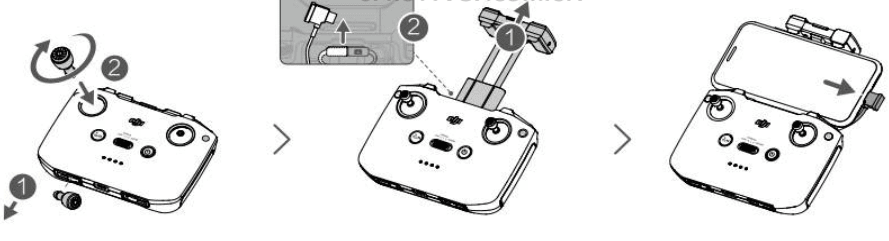
If you are prompted to connect via USB while using your Android mobile device, select the Charge Only option. Otherwise, the connection may not be successful.
The DJI Mavic 3 requires activation before first use. After turning on the aircraft and remote controller, follow the on-screen prompts to activate the DJI Mavic 3 using DJI Fly. An internet connection is required for activation.
It is recommended to pair the drone and remote controller to ensure the best after-sales service. Follow the on-screen prompts after activation to pair the drone and remote controller.
DJI Fly will prompt you when a new firmware is available. It is recommended to update the firmware whenever prompted to ensure the best user experience.

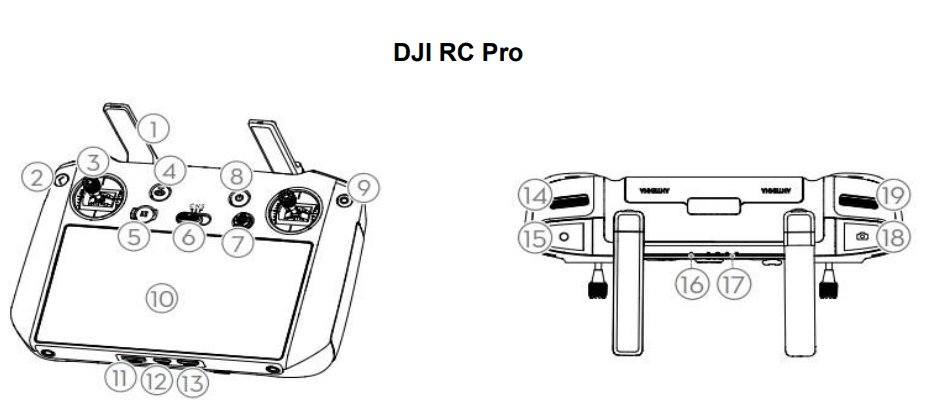
Antennas. Relay wireless drone control signals and video.
Back button. Press once to return to the previous screen. Press twice to return to the home screen.
Control sticks. Use the control sticks to control the aircraft’s movements. Set the flight control mode in DJI Fly. The control sticks are detachable, making them easy to store.
Return to Home (RTH) button. Press and hold to initiate RTH. Press again to cancel RTH.
Flight pause button. Press once to make the aircraft brake and hover in place (only if GNSS or Vision systems are available).
Flight mode switch. Switches between Cine, Normal, and Sport modes.
5D button. View the functions of the 5D button in DJI Fly by entering the Camera View menu, Settings, and then Controls.
Power button. Press once to check the current battery level. Press, then press and hold to turn on or Turn off the remote controller. When the remote controller is on, press once to turn on or off to turn the touch screen on or off.
Confirmation button. Press once to confirm your selection. The button has no function when using DJI Fly.
Touch screen. Touch the screen to operate the remote controller. Please note that the touch screen is not waterproof. Handle it with care.
microSD card slot. Use to insert a microSD card.
USB-C port. For charging.
Mini HDMI port. For video output.
Gimbal dial. Controls the camera tilt.
Record button. Press once to start or stop recording.
Status indicator. Shows the status of the remote controller.
Battery level indicators. Displays the current battery level of the remote controller.
Focus/Shutter Button. Press the button halfway to activate autofocus, and press it fully to take a photo.
Camera Control Dial. For controlling the zoom.
Ventilation Hole. For heat dissipation. Do not block the ventilation hole during use.
Control Stick Storage Slot. For storing the control sticks.
Customizable Button C1. Toggles between gimbal re-centering and gimbal downward pointing. This function can be configured in DJI Fly.
Speaker. Outputs sound.
Customizable Button C2. Press once to turn the auxiliary lower light on or off. This function can be configured in DJI Fly.
Air Intake. For heat dissipation. DO NOT cover the air intake during use.
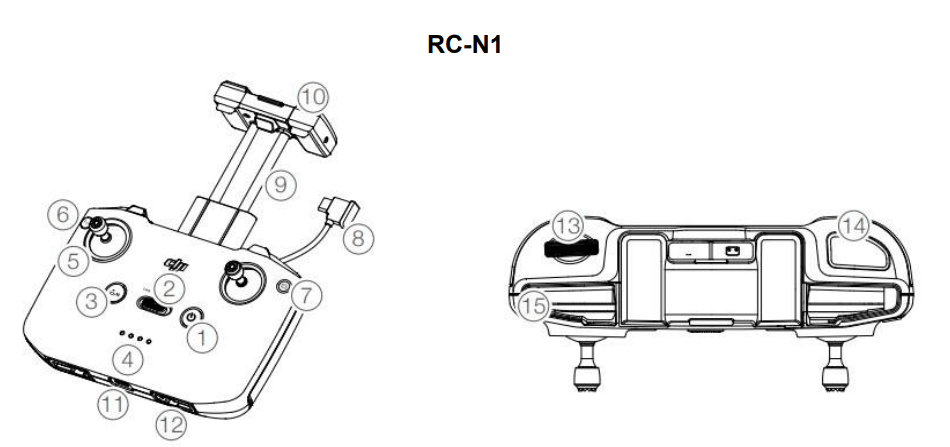
Power button. Press once to check the current battery level. Press once, then press and hold again to turn the remote controller on or off.
Flight mode switch. Switch between Sport, Normal, and Cinema modes.
Flight pause/Return to Home (RTH) button. Press once to make the aircraft brake and hover in place (only if GNSS or Vision systems are available). Press and hold the button to initiate RTH. Press again to cancel RTH.
Battery level indicators. Shows the current battery level of the remote controller.
Control sticks. Use the control sticks to control the aircraft’s movements. Set the flight control mode in DJI Fly. The control sticks are detachable for easy storage.
Customizable button. Press once to turn the auxiliary bottom light on or off. Double-click to center the gimbal or tilt it down (default setting). The button can be customized in DJI Fly
Photo/Video Switch. Click once to switch between photo and video mode.
Remote Controller Cable. Connect to your mobile device for video communication using the remote controller cable. Select the cable according to your mobile device.
Mobile Device Holder. Used to securely attach your mobile device to the remote controller.
Antennas. Relay wireless aircraft control signals and video signals.
USB-C Port. For charging and connecting the remote controller to a computer.
Control Stick Storage Slot. For storing the control sticks.
Gimbal Control Dial. Controls the camera tilt. Press and hold the customizable button to use the control dial to adjust the zoom in Exploration Mode.
Shutter/Record Button. Press once to take a photo, start, or stop recording.
Mobile device slot. Used to attach a mobile device.
The DJI Mavic 3 includes a flight controller, video transmission system, vision systems, infrared sensor system, powertrain, and intelligent flight battery.
The DJI Mavic 3 has three flight modes, as well as a fourth flight mode that the aircraft switches to in certain scenarios. Flight modes can be switched using the Flight Mode switch on the remote controller.
Normal mode: The UAV uses GNSS and forward, backward, side, side, top, and bottom vision systems, as well as an infrared sensor system to determine the location and stabilize the drone. When the GNSS signal is strong, the aircraft uses GNSS to determine its location and stabilize. When the GNSS signal is weak but the lighting and other environmental conditions are sufficient, the drone uses vision systems to determine its location and stabilize. When the forward, backward, side, top, and bottom vision systems are enabled and the lighting and other environmental conditions are sufficient, the maximum flight altitude angle is 30° and the maximum flight speed is 15 m/s.
Sports mode: In sports mode, the drone uses GNSS for positioning, and the drone’s responses are optimized for maneuverability and speed, making it more sensitive to the movements of the control joints. Note that obstacle detection is disabled and the maximum flight speed is 21 m/s (19 m/s when flying in the EU).
Cinema Mode: Cinema mode is based on Normal mode, but the flight speed is limited, making it more stable when filming. In ATTI mode, the aircraft can be more easily affected by the environment. Environmental factors such as wind can cause horizontal drift, which can be dangerous, especially when flying in confined spaces.
The DJI Mavic 3 has front LEDs and aircraft status indicators.
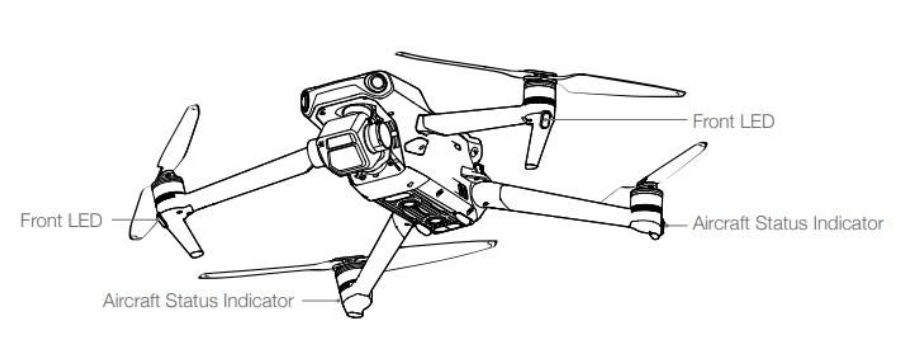
When the aircraft is powered on but the engines are not running, the front LEDs glow red, indicating the aircraft’s orientation.
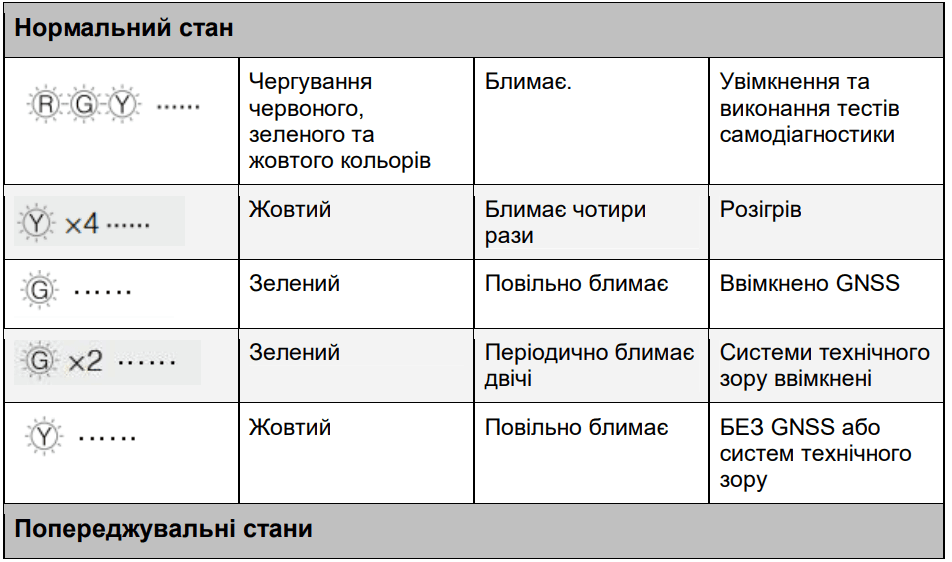
When the aircraft is powered on but the engines are not running, the aircraft status indicators display the status of the flight control system. For more information about the aircraft status indicators, refer to the table below.

After the engine starts, the front LEDs flash red and green alternately, and the drone status indicators flash green.
For better shots, the front LEDs will automatically turn off during shooting if DJI Fly is set to auto-off front LEDs. Lighting requirements vary by region. Please follow local laws and regulations.
Функція Return to Home (RTH) повертає дрон до останньої зафіксованої домашньої точки, якщо система позиціонування функціонує нормально. Існує три типи RTH: Smart RTH, Low Battery RTH і Failsafe RTH. Дрон автоматично повертається до домашньої точки і приземляється, коли запускається режим Smart RTH, дрон переходить в режим Low Battery RTH або коли під час польоту втрачається сигнал відеозв’язку.
За замовчуванням початкова точка – це перше місце, де літальний апарат отримав сильний або помірно сильний сигнал GNSS, де піктограма позначена білим кольором. Домашню точку можна оновити перед зльотом, якщо літальний апарат отримує сильний або помірно сильний сигнал GNSS. Якщо сигнал GNSS слабкий, то домашню точку неможливо оновити.
The Smart RTH function allows the drone to return to the takeoff point when there is a stable GNSS signal. Activation is via the DJI Fly app or the RTH button on the remote control. You can exit the mode in the same way.
Advanced RTH is activated under favorable lighting and environmental conditions. The drone independently plots the optimal route, avoiding obstacles and GEO zones, focusing on technical vision.
During RTH:
If the drone is closer than 5 m, it lands immediately.
If further, it plots a route and returns with a forward orientation.
When approaching the point, the drone flies at an angle of 19° to save energy.
Additionally:
Advanced RTH ignores the set RTH altitude and adjusts the flight parameters itself.
If the environment is not suitable, regular straight-line RTH is activated.
During RTH, the user can change the speed, but not the altitude, direction, or orientation.
If the speed is too high, the aircraft will not be able to avoid obstacles and will stop flying.
Straight-line RTH mode is activated when lighting or the environment prevents the visual positioning systems from working. In this case, the aircraft returns to the starting point along a simple route without avoiding obstacles.
The procedure looks like this:
The starting point is fixed.
Direct RTH is activated.
The aircraft hovers and begins to turn.
— If it is further than 50 m — it levels off, rises to the specified RTH altitude and flies at the current or target altitude.
— If it is 5–50 m away — it flies to a point at the current altitude, or rises to 2 m if it was flying lower.
— If it is closer than 5 m — it lands immediately.
Upon arrival, the drone lands and turns off its engines.
Additionally:
The drone will exit RTH by pulling down on the throttle or pitch stick.
If the maximum altitude is reached during the climb, the drone will stop and continue at that altitude.
During this mode, you can adjust the altitude and speed, but not the direction or orientation.
If the speed is too high, the drone will lose its ability to detect obstacles.
Failsafe RTH is activated automatically if the drone loses contact with the remote controller for more than six seconds, provided that the return point has been recorded and the compass is working normally. The DJI Fly app must be set to “Return to Home” in advance, otherwise the function will not be activated.
In the event of signal loss, if the vision systems are active and the lighting is sufficient, the DJI Fly screen will display the route that the drone formed before the signal loss. It will return along this path, taking into account obstacles. Even if the connection with the remote controller is restored, the aircraft will remain in RTH mode. If the vision systems are unavailable, the drone will return to the start point along the basic direct route.
In this case, the drone will first hover, after which it will either land immediately (if closer than 5 m to the take-off point), or adjust its position and fly back. If the distance exceeds 50 m, it will fly 50 m back along the original route and then perform a direct RTH.
It is important to remember that the RTH function may not work in the absence of GNSS signal, strong wind, or in obstacle conditions. In such situations, the drone may enter manual mode (ATTI) or hover before landing. It is necessary to set the correct return altitude in advance, especially in urban or forested conditions, to avoid collision with obstacles. In case of risk, it is advisable to switch to manual control.
The low battery function is activated when the battery is insufficient for a safe return. In this case, the drone must immediately return or land. The device independently judges whether the battery is sufficient for a return based on the distance, speed, and conditions. A warning appears in the DJI Fly app, after which the drone enters RTH mode. The user can cancel it, but then the risk of an accident increases. If the power is only enough for landing, the drone will begin an automatic descent – it cannot be canceled, but you can control the direction and speed. In a critical case, the drone will land on its own or fall if there is no charge left at all.
DJI Mavic 3 automatically turns on landing protection during intelligent RTH. If the surface is suitable for landing, the drone will land smoothly on its own. If the area is dangerous, the copter will hover and wait for confirmation from the pilot. In the event that the system does not work, DJI Fly will offer to manually complete the landing using the throttle or automatic slider.
Precision landing allows the drone to navigate to the terrain at the takeoff point and land there. It is activated automatically provided that the takeoff point has not changed, the device has gained at least 7 meters of altitude after launch, the terrain has clear contours, and the lighting is moderate. If the drone cannot identify the location during landing, a message will appear in the app. The user can accelerate the descent or change the direction, but after releasing the controls, the drone will begin a vertical descent again.
The drone’s safety systems include omnidirectional sensing: infrared sensors, cameras that look in all directions — forward, backward, up, down and to the sides. This allows the device to hover accurately even indoors or in areas without a GNSS signal. Additionally, the built-in illuminator improves the visibility of the sensors in the dark, which is especially useful during night flights or in low-light conditions.
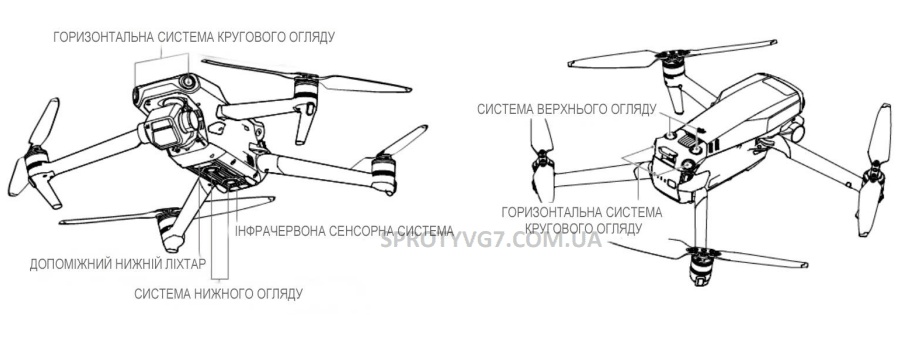
Front vision system. Accurate measurement range: 0.5-20 m; Viewing angle: 90° (horizontal), 103° (vertical)
Rear vision system. Accurate measurement range: 0.5-16 m; Viewing angle: 90° (horizontal), 103° (vertical)
Side vision system. Accurate measurement range: 0.5-25 m; FOV: 90° (horizontal), 85° (vertical)
All-round vision system. Accurate measurement range: 0.2-10 m; Viewing angle: 100° (front and back), 90° (left and right)
All-round vision system. Accurate measurement range: 0.3-18 m; Viewing angle: 130° (front and back), 160° (left and right). The all-round vision system works best when the drone is at an altitude of 0.5 to 30 m.
The DJI Mavic 3 uses a system of external sensors to navigate in space when GNSS is not available. If the surface has a clear texture and sufficient lighting, the all-round vision system is activated. The forward, backward, upward and side sensors automatically operate in Normal or Cine modes if the obstacle avoidance settings are set to Brake or Bypass. Thanks to these sensors, the drone can brake in front of obstacles and maintain stable flight, but their effectiveness depends on environmental conditions.
The systems work best at an altitude of 0.5 to 30 m, provided that there is a clear pattern on the ground and stable lighting. If the lighting is poor, the lower light is automatically turned on. However, it may affect the operation of the vision system cameras. If the drone is flying over snow, water or a homogeneous surface, the vision system may not work correctly – in such conditions, you need to be extremely careful.
There are a number of situations in which the vision system may malfunction:
flying over plain or shiny surfaces;
over water, transparent or moving objects;
in areas with variable or excessively bright/dark light;
in areas with repetitive patterns or thin obstacles (e.g. branches).
Before flying, it is important to make sure that the sensors are not clogged, clean, or damaged. If prompted to calibrate in DJI Fly, perform the calibration automatically. Do not fly the drone in fog, rain, or dusty environments. If the sensors are dirty, wipe them with a soft cloth without using alcohol. In case of damage, it is best to contact DJI support.
APAS 5.0 (Advanced Pilot Assistance Systems) is an advanced pilot assistance system available in Normal and Cine modes. It allows the drone to autonomously navigate around obstacles by responding to the movements of the control sticks. This feature makes flying safer and video smoother. The pilot can continue to control the drone in any direction, even when the aircraft is flying around obstacles: he chooses a trajectory – up, down, left or right – depending on the situation.
The drone can be stopped at any time by pressing the “Pause Flight” button or by touching the screen in DJI Fly. After that, the aircraft will freeze for three seconds and wait for further commands. APAS is enabled in the “Safety” section of the system settings, where you need to select the “Bypass” mode.
For APAS to work correctly, it is necessary that the technical vision or GNSS systems are active, and that the route does not pass over water, snow, transparent or small objects. Lighting conditions also affect the system: too bright or dark environments can disrupt the system. It is not recommended to use APAS near restricted areas or GEO zones, where the function may lose stability. In such cases, it is worth closely monitoring the status in the DJI Fly app.
Flight recorder. Flight data, including flight telemetry, aircraft status information, and other parameters, is automatically saved to the aircraft’s internal data recorder. The data can be accessed using DJI Assistant 2 (consumer drone series)
Propellers. There are two types of low-noise quick-release propellers for the DJI Mavic 3, which are designed to rotate in different directions. Labels are used to indicate which propellers should be attached to which motors. Make sure that the propeller and motor are selected according to the instructions.
Attaching propellers. Attach marked propellers to marked motors, and unmarked propellers to unmarked motors. Press each propeller against the motor and turn until it is secure.

Press the propellers against the motors and turn them in the unlocking direction.
Propeller blades are sharp. Handle with care.
Use only official DJI propellers. DO NOT mix propeller types.
Purchase propellers separately if necessary.
Before each flight, make sure the propellers are securely installed.
Before each flight, make sure all propellers are in good condition. DO NOT use old, cracked, or broken propellers.
Stay away from rotating propellers and motors to avoid injury.
Do not pinch or bend propellers during transport or storage.
Make sure the motors are securely attached and rotate smoothly. Land the aircraft immediately if a motor is stuck and cannot rotate freely.
DO NOT attempt to modify the motors.
After flying, do not touch or allow hands or body contact with the motors, as they may be hot.
DO NOT block the ventilation holes on the motors or the drone body.
Make sure that the propellers make a normal sound when turned on.
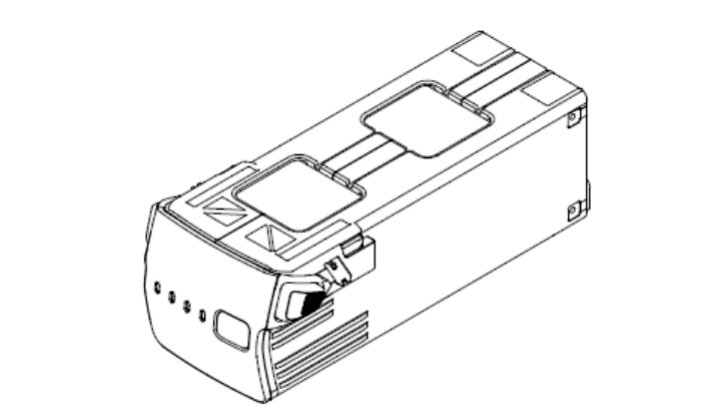
The DJI Mavic 3 Intelligent Flight Battery is a 15.4V, 5000mAh battery with intelligent charging and discharging function.
Key features of the DJI Mavic 3 battery:
Battery Level Indicator: LED lights show the current battery charge.
Automatic Discharge: – down to 96% after 3 days of non-use; – down to 60% after 9 days of non-activity. The case may heat up slightly during the process, which is normal.
Balanced Charging: The battery automatically equalizes the voltage between the cells.
Overcharge Protection: Charging stops when the battery is fully charged.
Temperature Safety: Charging is only possible at temperatures between 5°C and 40°C.
Overcurrent Protection: Charging stops when excessive current is detected.
Overdischarge Protection: Activates automatically when the battery is idle.
Short Circuit Protection: Power turns off when a short circuit is detected.
Damaged Cell Monitoring: The DJI Fly app reports cell damage.
Deep sleep mode:– turns off after 20 minutes of inactivity;– at <5%, enters deep sleep after 6 hours.
Data transmission: The battery sends voltage, current, and capacity data to the drone.
Before use, be sure to read the safety instructions and the marking on the battery. All responsibility for operation lies with the user.
Checking the battery level.
Press the power button once to check the battery level.
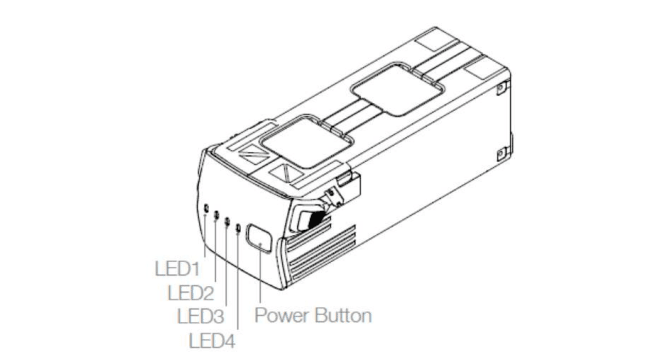
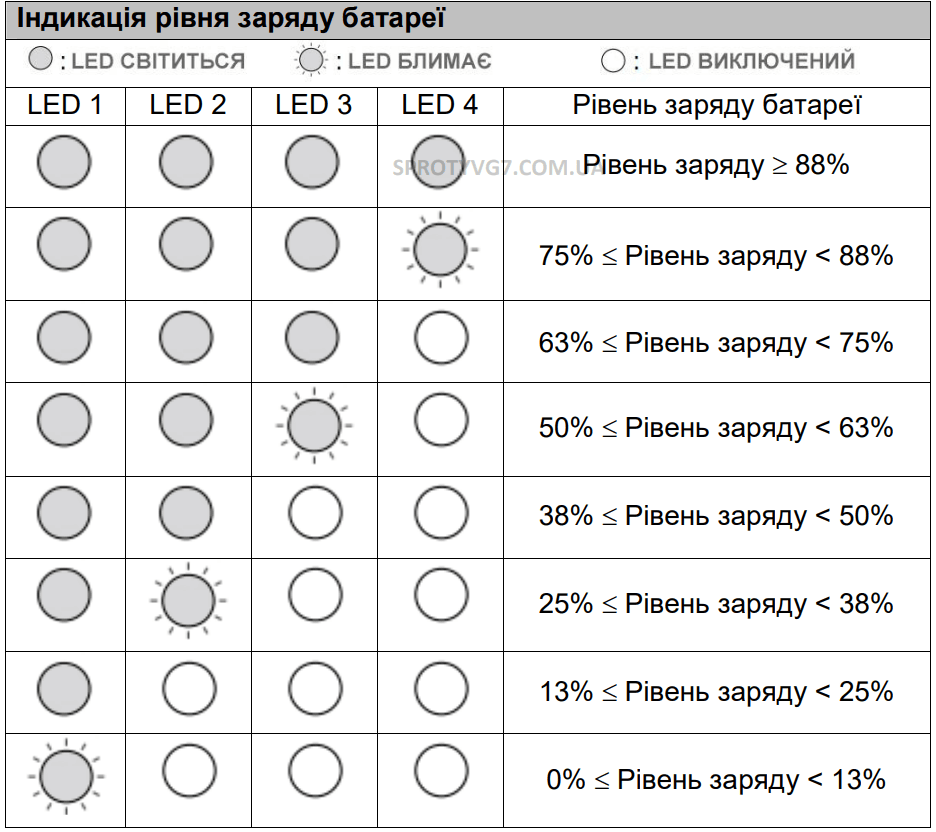
To turn the power on or off, press the power button once, then press and hold it again for about two seconds. Once activated, the battery charge indicators will show the battery charge level.
DJI Mavic 3 batteries have reduced capacity at low temperatures of -10°C to +5°C. It is recommended to allow the batteries to warm up in place or while flying in hover mode before flying. Batteries should not be used at temperatures below -10°C. At the first low-temperature warning in cold weather, the flight should be terminated immediately. The optimal battery temperature is above 20°C. In cold conditions, the drone has less wind resistance, especially at high altitudes.
Before each flight, fully charge the Intelligent Flight Battery using the Mavic 3’s proprietary charging base or the DJI 65W charger. This will ensure stable battery operation in the air and increase flight safety.
The Mavic 3’s proprietary charging module, when combined with the DJI 65W charger, can charge up to three batteries in turn, from the most charged to the least charged. A full charge cycle for one battery takes about 1 hour and 36 minutes.
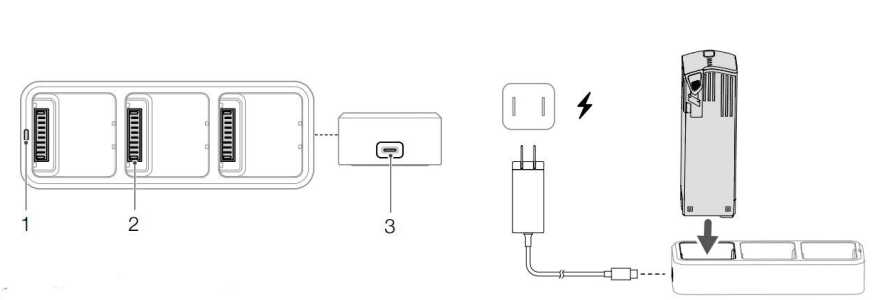
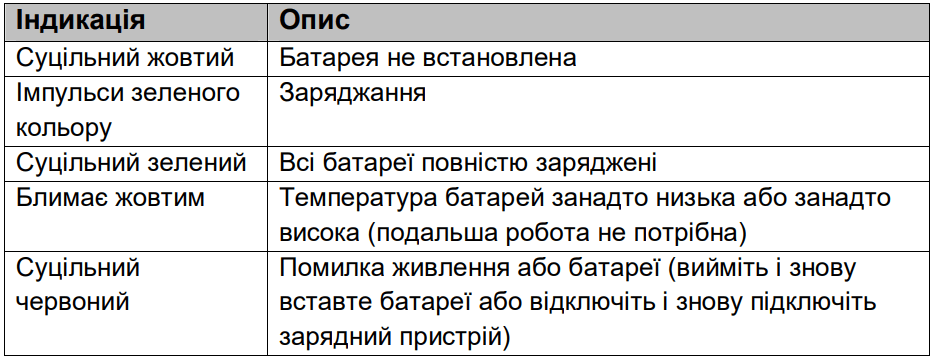
LED status indicator
Battery port
Power port
Insert the Intelligent Flight Battery into the battery slot. Connect the charging hub to a power outlet (100-240V, 50-60Hz) using the DJI 65W Portable Charger.
The Intelligent Flight Battery with the highest charge level will be charged first, and then the other batteries will be charged sequentially according to their charge levels. Refer to the “LED Status Indicator Descriptions” section for more information on the LED status indicator flashing patterns. After charging is complete, you can disconnect the Intelligent Flight Battery from the charging module.
For safe and efficient charging of DJI Mavic 3 batteries, it is recommended to use the DJI 65W Portable Charger or the DJI Mavic 3 Car Charger Adapter in combination with the official Mavic 3 Charging Hub.
The charging hub is only compatible with the BWX260-5000-15.4 battery model. Do not use it with other battery types as this may cause damage. When charging, the hub should be placed on a flat, dry and stable surface, away from flammable objects. Do not touch the metal contacts of the device as this is dangerous. If the contacts are dirty, wipe them with a soft, dry cloth free of liquids and chemicals.
Connect the charger to an AC power source (100-240V, 50/60Hz).
Use the charging cable to connect the drone or battery to the device (the battery itself must be turned off).
While charging, the LED indicators will show the current charge level.
When all the indicators are off, the battery is fully charged. Then unplug the charger.
Following these rules will ensure battery durability and stable operation of the drone in all conditions.
Do not charge the battery immediately after flying. The battery may be overheated. Allow it to cool to room temperature before connecting it to the charger.
Charging Temperature Range: Charging will stop automatically if the battery temperature exceeds 5°C–40°C. The ideal charging temperature is 22°C–28°C for best performance and safety.
Maintaining Battery Life: Even if you do not use the drone regularly, fully charge the battery at least once every three months to avoid battery degradation.
Third-Party Chargers: Using unofficial chargers may cause damage. DJI is not responsible for any consequences associated with the use of uncertified equipment.
Preparing for Transportation: For safe transportation, discharge the battery to 30% or below. This can be done by simply flying outdoors to an appropriate charge level.
Following these recommendations will ensure stable battery operation, long service life, and safety during operation.
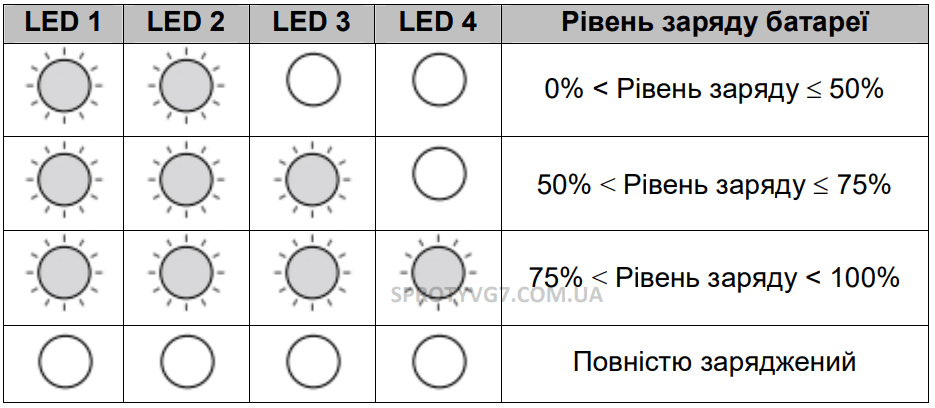
The table below shows the battery charge level during charging:
The battery LED indicator can display battery protection prompts that are triggered when abnormal charging conditions occur.
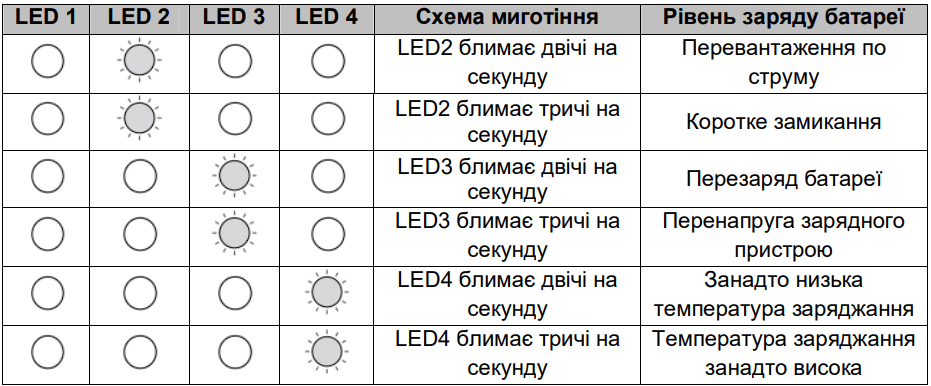
If the battery protection mechanisms are triggered, you must disconnect the battery from the charger and reconnect it to continue charging. If the charging temperature is abnormal, wait until the charging temperature returns to normal, and the battery will automatically resume charging without having to disconnect and reconnect the charger.
Insert the Intelligent Flight Battery into the battery compartment of the aircraft. Make sure it is securely fastened and the battery latches have clicked.
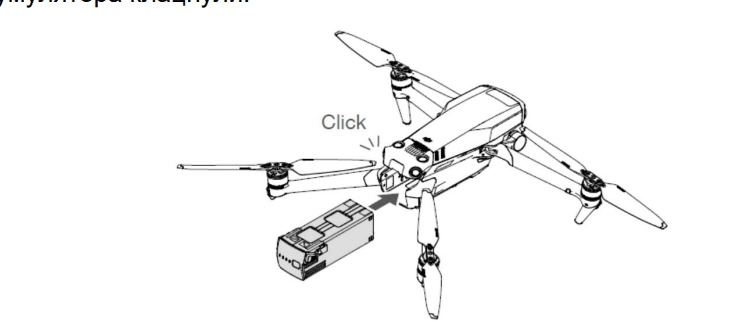
Press the textured part of the latches on the sides of the Intelligent Flight Battery to remove it from the compartment.
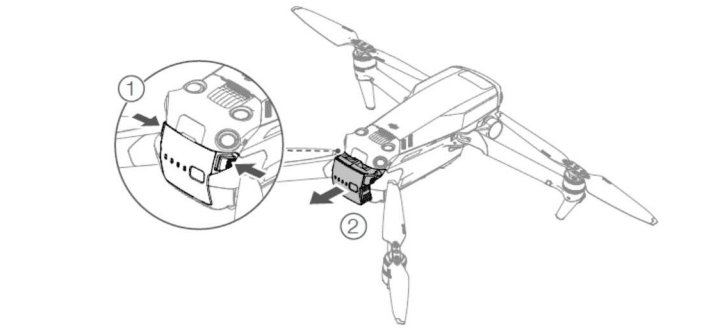
DO NOT disconnect the battery while the drone is powered on. Make sure the battery is securely attached.
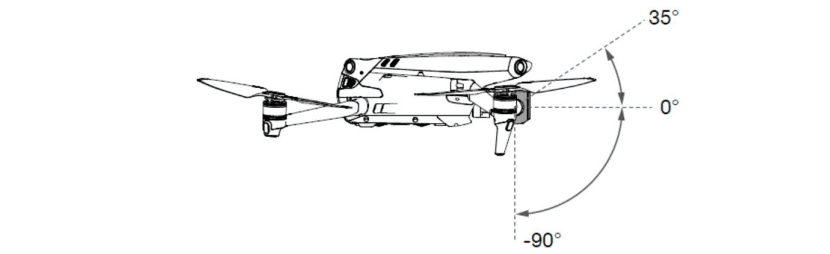
Stabilizer Profile
The DJI Mavic 3’s 3-axis gimbal stabilizer stabilizes the camera, allowing you to capture clear and stable images and videos. The tilt adjustment range is from -90° to +35°.
DJI Mavic 3 allows you to adjust the camera tilt using a slider on the remote controller or directly from the screen in the DJI Fly app. There are two stabilization modes available in the camera menu: Follow mode, which keeps the gimbal in a fixed orientation, and FPV mode, which synchronizes with the drone’s movements to create a first-person flight effect. To avoid damage, do not press the gimbal, do not take off from uneven surfaces, and do not apply excessive pressure after launch. Vibration or a brief hang during launch is normal, as is the automatic locking of the axes when the power is turned off.
The Hasselblad L2D-20c’s main camera features a 4/3-inch CMOS sensor, capable of shooting 20MP photos and videos in 5.1K up to 50fps, DCI 4K up to 120fps in Apple ProRes 422 HQ, H.264 or H.265, and supports 10-bit D-Log. It features an adjustable aperture of f/2.8–f/11 and a focus range of 1m to infinity. The secondary camera features a 1/2-inch CMOS, 12MP, f/4.4, shooting from 3m and 28x zoom in Exploration mode. To maintain quality, do not block the ventilation holes and use special lens cleaners.
DJI Mavic 3 has 8 GB of built-in memory and supports microSD cards of the UHS-I/UHS-II SDXC standard. High-quality video requires cards with high write speeds. The Cine version is equipped with a 1 TB SSD and data transfer of up to 10 Gbps via DJI Lightspeed. Do not remove the memory card while it is turned on – this can damage files. Before shooting, check the settings, take test shots and make sure that the drone is properly powered off – otherwise, data may be lost or corrupted. DJI is not responsible for unsuccessful or unreadable shooting.
We have completed the first part of the Ukrainian instructions for the DJI Mavic 3, which covers basic but critically important topics: from the first launch of applications to understanding flight modes, the operation of sensors, battery and cameras. This section is a foundation for a confident start, which is a must-have for any beginner or Mavic 3 owner looking to gain a deeper understanding of their equipment.
The continuation of the guide will be presented in the second and third parts, where:
In the second part, we will focus on the remote controller (DJI RC Pro and RC-N1), how to set it up, connect it, and also review the main functions of the DJI Fly app – its interface, camera view and home screen.
In the third part, we will analyze all aspects of flight: environmental requirements, zone restrictions, pre-launch checks, automatic takeoff and landing functions, as well as pause and return functions. We will conclude the instruction with useful additions – technical specifications, updates and user information.
Stay tuned for updates — the most interesting things are ahead.