16.04.2025
28 min
1257

The remote controller is the primary interface between the operator and the aircraft. It is through it that most control commands, settings, and camera interactions are performed. This section describes the functions of the remote controller and provides instructions for controlling the aircraft and camera. It also provides important information about using the DJI Fly mobile app, which is used to configure flight parameters, pair devices, and control shooting.
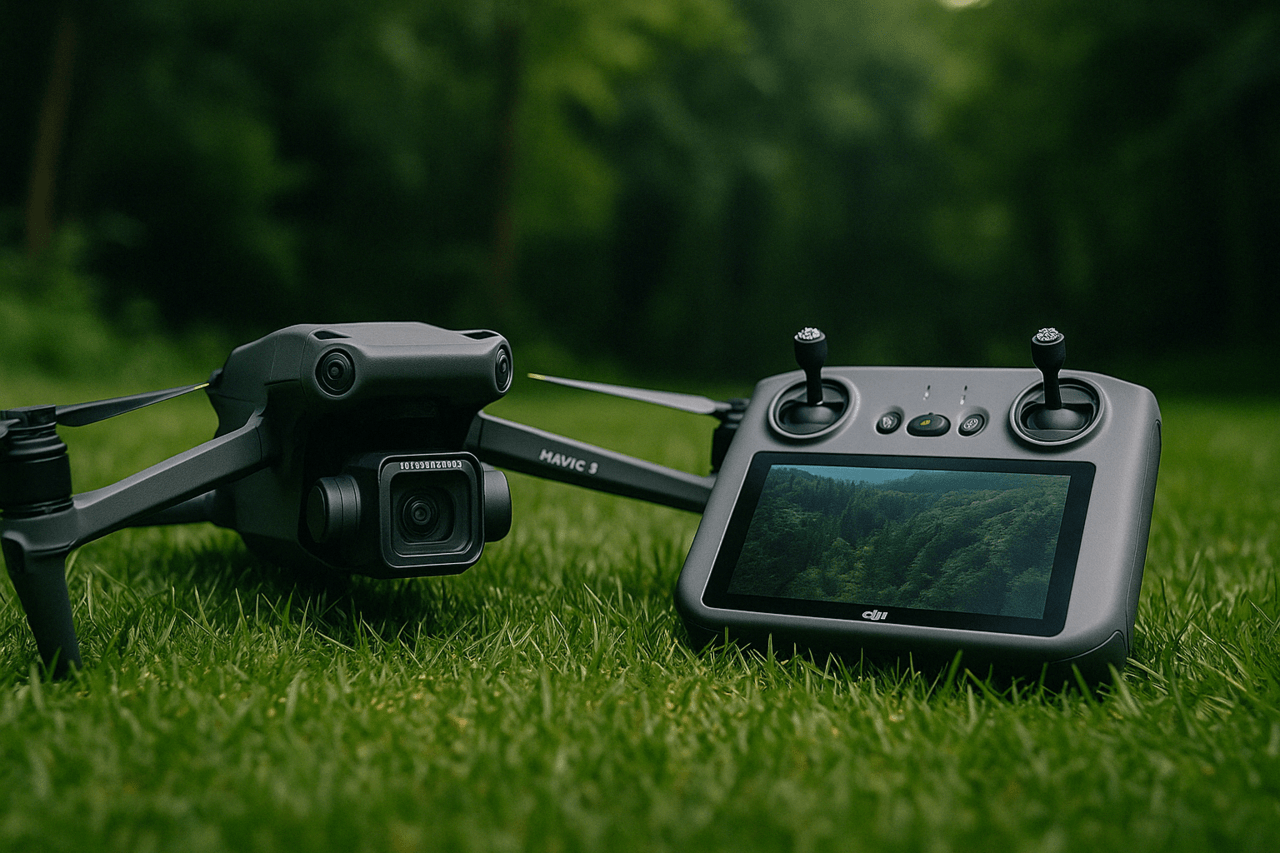
The DJI RC Pro remote control supports the latest generation OcuSync image transmission technology – O3+. It operates at frequencies of 2.4 and 5.8 GHz, automatically selects the best channel and is able to transmit HD video in real time from the drone camera at a distance of up to 15 km.
The device has a 5.5-inch screen with a brightness of 1000 cd/m² and a resolution of 1920×1080. The remote control is equipped with a wide set of buttons for controlling the drone and the gimbal, with the possibility of individual configuration. It provides Internet connection via Wi-Fi, Bluetooth and GNSS support (GPS+GLONASS+Galileo), as well as the use of Android 10 with all the necessary functions.
Thanks to the built-in speaker, H.264 and H.265 video formats are supported in 4K/120 frames/s, and there is also a video output via Mini HDMI. The built-in memory is 32 GB, with support for microSD cards. The 5000 mAh (36 Wh) battery provides up to 3 hours of battery life.
Power on/off. Press the power button once to check the current battery level. Press, then press and hold again to turn the remote control on or off.
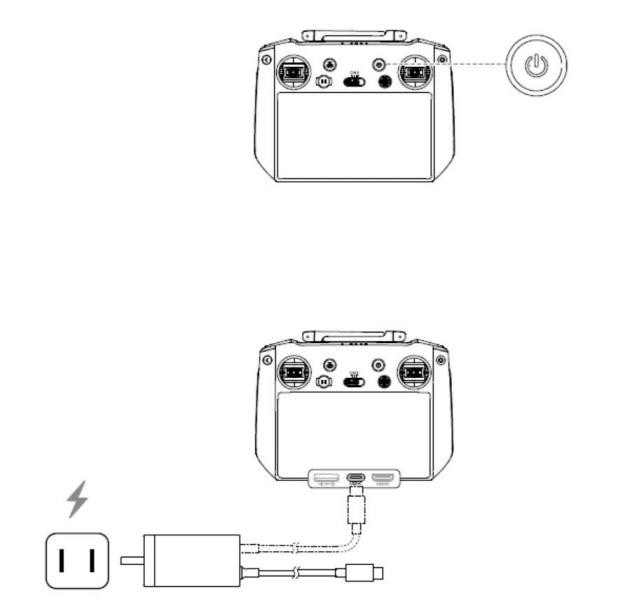
Charging the Battery
Connect the charger to the USB-C port on the remote control using the USB-C cable.
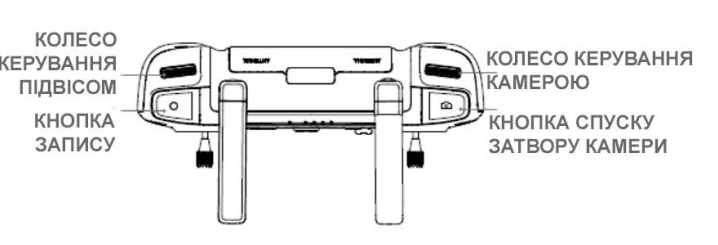
Controlling the Gimbal and Camera
Focus/Shutter Button: Press halfway to autofocus and press fully to take a photo. Record Button: Press once to start or stop recording. Camera Control Wheel: Use to adjust the zoom. Gimbal Control Wheel: Use to adjust the tilt of the camera gimbal.
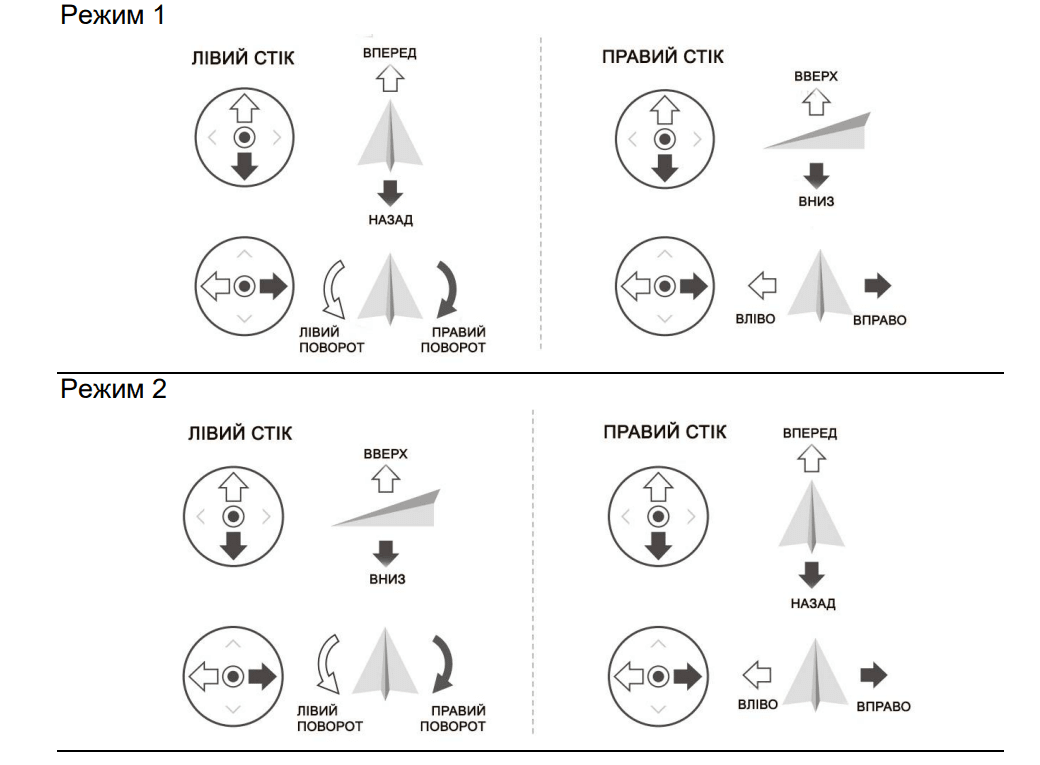
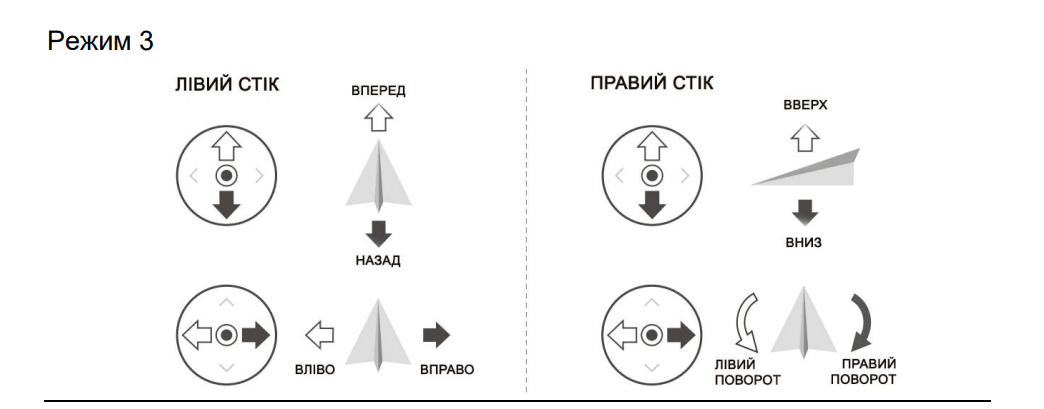
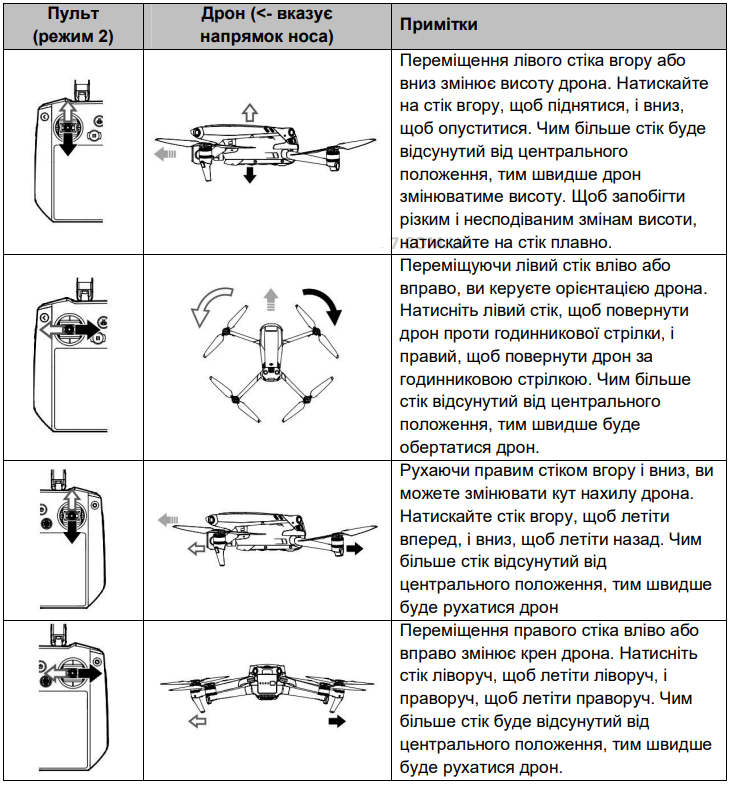
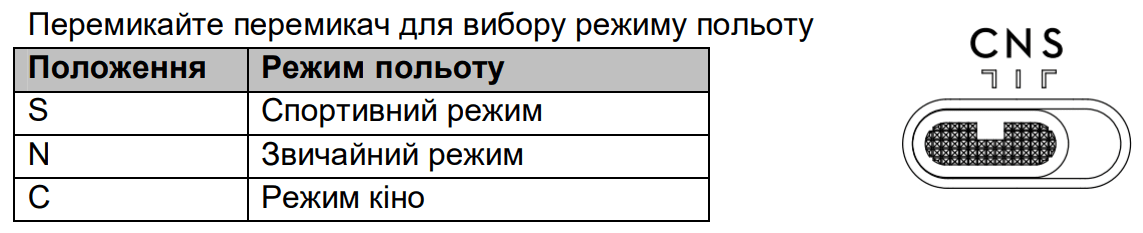
There are three pre-programmed modes (Mode 1, Mode 2, and Mode 3), as well as custom modes that can be configured in DJI Fly. Mode 2 is used by default.
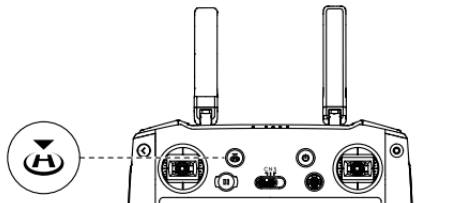
Press and hold the RTH button until the remote controller beeps to begin moving to the right. Press the button again to cancel RTH and regain control of the aircraft. For more information about RTH, refer to the “Return to Home” section.
Includes C1, C2, and 5D buttons. Go to System Settings in DJI Fly and select Controls to customize the button function.
Back + Gimbal Control Dial: Brightness Adjustment;
Back + Camera Control Dial: Volume Adjustment;
Back + Record Button: Screen Recording;
Back + Shutter Button: Screenshot;
Back + 5D Button: Up – Home, Down – Quick Settings, Left – Recents.
Status indicator light
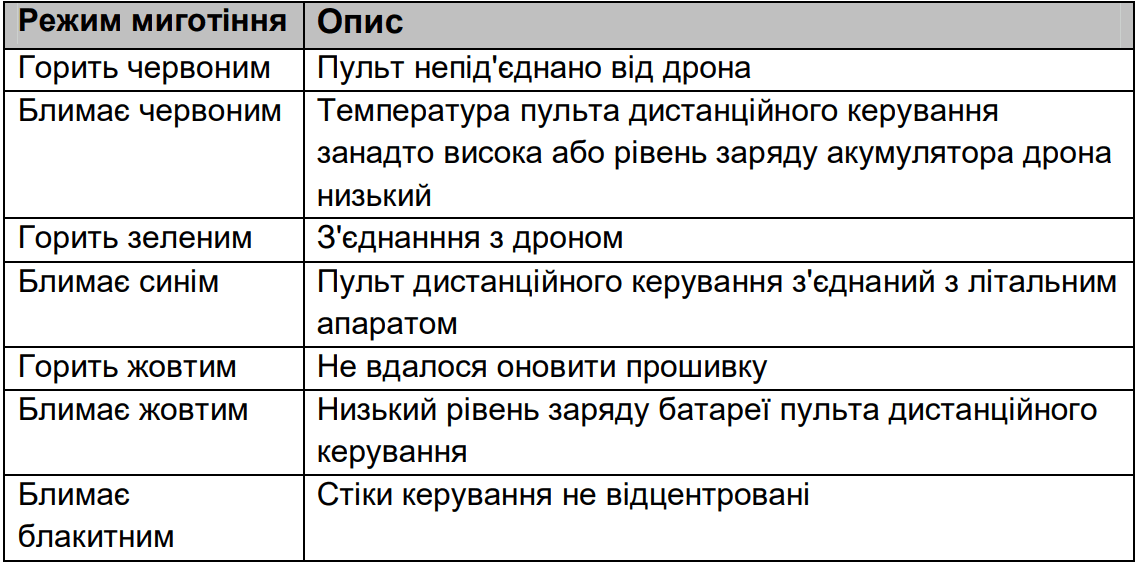
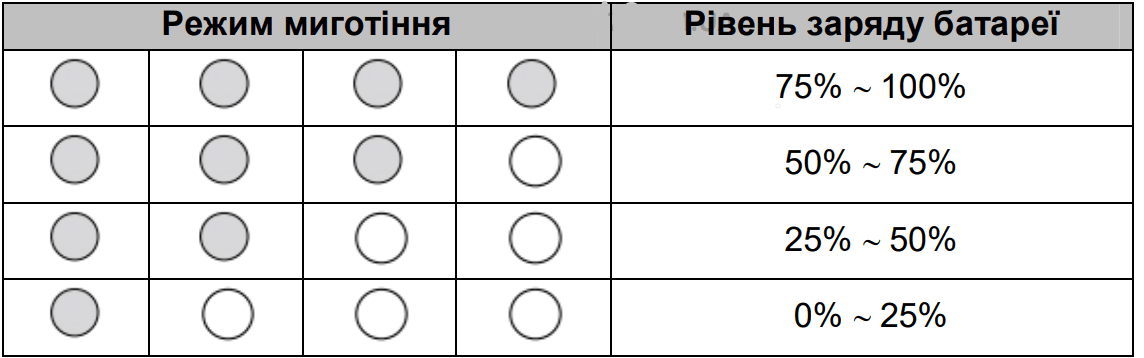
Blinking Pattern –> Battery Level
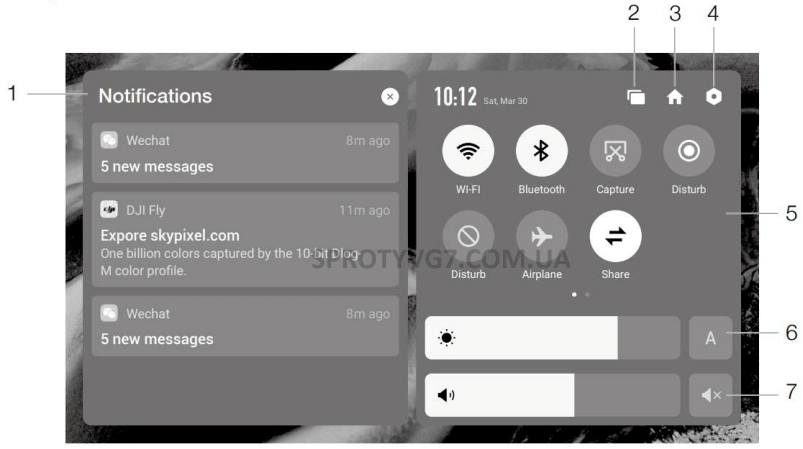
Remote Controller Warning. The remote controller vibrates or beeps when an error or warning occurs. Pay attention when prompts appear on the touchscreen or in DJI Fly. Swipe down from the top and select Do Not Disturb or Mute to turn off some notifications.
Optimal Transmission Area. The signal between the aircraft and remote controller is most reliable when the antennas are positioned relative to the aircraft as shown below.

It is not recommended to use other wireless devices that operate on the same frequency as the remote controller, otherwise interference may occur with the remote controller.
If the signal strength becomes weak during flight, a warning message will appear in the DJI Fly app. In this case, adjust the antenna positions to ensure optimal communication with the aircraft.
Before using the drone, it must be paired with a remote controller. To pair a new remote controller, follow one of the following methods:
Turn on the drone and the remote controller.
Press and hold the C1, C2 and Record buttons simultaneously until the indicator light starts flashing blue and the remote controller starts beeping.
On the drone, press and hold the power button for more than 4 seconds. After one beep, the device will enter pairing mode. When the connection is established, a double beep will sound and the battery level indicators on the remote controller will turn on continuously.
Turn on the drone and the remote controller.
Open the DJI Fly app.
In camera view, open the menu, select Control, then Pair to Aircraft.
On the drone, press and hold the power button for more than 4 seconds. A single beep will indicate that the device is ready to pair. Once the connection is successful, a double beep will sound and the charge indicators on the remote controller will turn solid.
Home
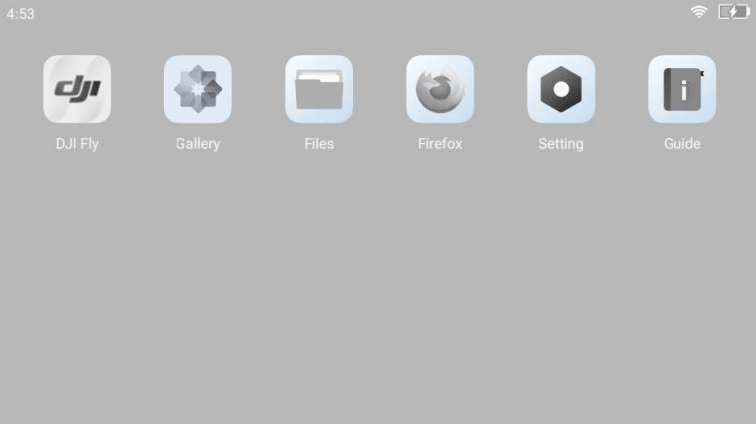
The top of the touchscreen displays the time, Wi-Fi signal, and remote controller battery level. Some apps are already installed by default, such as DJI Fly, Gallery, Files, Firefox, Settings, and Guide. Settings include network, display, voice, and Bluetooth configurations. Users can quickly learn about features in the Guide section.
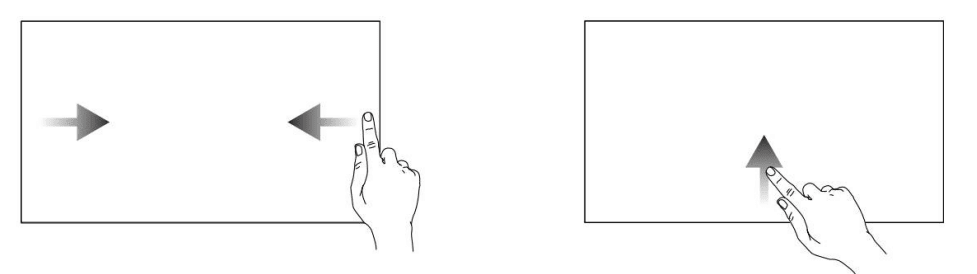
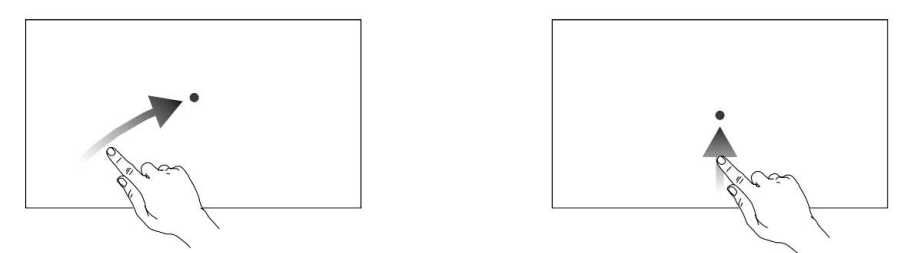
The touchscreen is intuitive to use and allows for quick access to both basic system functions and advanced settings. With easy access to quick settings and gesture controls, users can easily adapt the device to their needs in any situation.
Launch DJI Fly and go to the home screen.
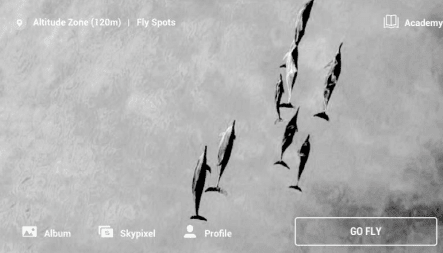
Flight Locations View and share locations suitable for flying and filming. Get information about geofences and view other users’ aerial photos.
Academy Tap the icon in the upper right corner to access educational materials: tutorials, safety tips, drone operating instructions.
Album View photos and videos saved in DJI Fly or on your phone. Templates — automatically edit your content. Pro — manually edit videos and photos.
SkyPixel An online gallery where you can view other users’ work and share your own.
Profile View your account details, flight history, access to the DJI Forum, online store, Find My Drone, and other settings.
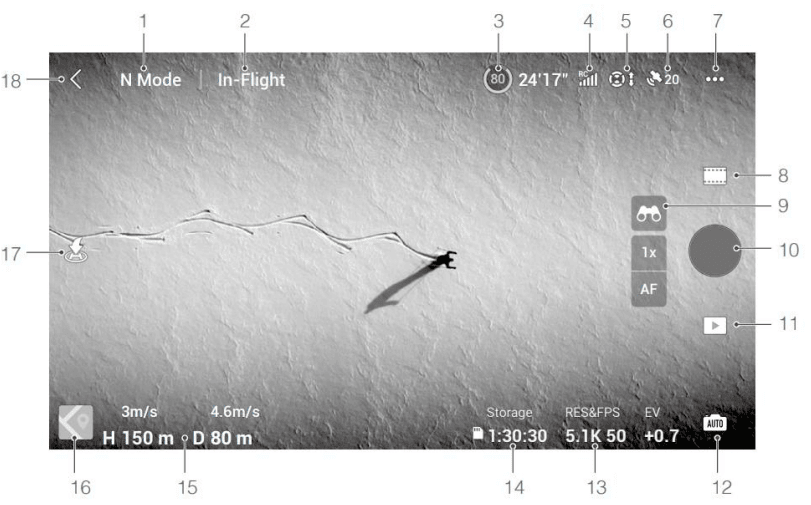
Flight Mode (N Mode) Displays the current active flight mode of the drone.
System Status Bar (In-Flight) Displays the flight status of the drone, as well as alerts and system notifications.
Battery Information. Displays the current battery charge level and estimated remaining flight time. Tapping opens detailed information about the battery status.
Remote Control Signal Strength. Displays the video quality level between the drone and the remote.
External Sensor System Status. The left part of the icon indicates the status of the front, rear and side sensors, the right part indicates the status of the up and down sensors. White color – the system is stable. Red color – the system is unavailable.
GNSS Status. Displays the signal level of satellite navigation (GPS, GLONASS, Galileo). Tapping allows you to view the signal details. You can update your home point when the icon turns white, indicating a strong signal.
System Settings (menu ) Accesses security settings, drone control, transmission settings, and other technical information.
Shooting modes — Video: Normal, Time-lapse. Photo: Single, SmartPhoto, AEB, Timer.
Exploration mode — Shows the zoom ratio. Tap to change the zoom. Press or hold AF/MF to switch between auto and manual focus.
Shutter/Record button — Starts or stops recording video, or takes a photo.
Playback — Opens the photo and video review mode immediately after taking a photo.
Camera mode switch — Auto and Pro modes are available for photo shooting, with separate options.
Shooting options — Shows the active options. Tap to change settings.
Memory Info — Shows the number of available shots or remaining video recording time. Tap to view microSD or SSD capacity.
Flight Telemetry — Shows the distance to the home point, altitude, horizontal and vertical speed of the aircraft.
Map — Shows the orientation, pitch angle, position of the aircraft, remote controller, and home point.
Auto Takeoff/Landing/RTH — Hold to initiate takeoff or landing. Tap RTH to return the aircraft to the Home Point.
Back — Tap to return to the main screen. Hold to bring up the gimbal tilt adjustment panel.
In the security section, you can activate the obstacle avoidance systems for the top, front, rear and side views – they will work only when “Bypass” or “Braking” is selected in the avoidance parameters. If the function is disabled, the drone will not recognize obstacles. Additionally, you can enable the display of the radar map for real-time monitoring.
The maximum flight altitude, distance, return-to-home altitude and take-off point are also set here. If necessary, the user has access to calibrate the sensors, view the status of the IMU, compass and battery. Control of the auxiliary LED and front indicators is available, which are automatically turned off during shooting. Through this section, you can also unlock GEO zones and use the “Find my drone” function.
Among the advanced security settings are options that determine the behavior of the drone in case of loss of signal with the remote control: it can be automatic return, descent or hovering. There is an emergency propeller stop function that can be enabled only in case of emergency, such as a collision or loss of control. In the “Emergency Only” mode, stopping the engines is allowed only in case of danger, while “Anytime” allows it to be done at any time on command. At the same time, stopping the propellers in flight will inevitably cause the drone to fall. If the AirSense system is activated, DJI Fly will notify you of the approach of a manned aircraft, but before doing so, you should definitely read the relevant disclaimer in the application.
The control section provides access to basic settings for the drone, gimbal, remote control, and tutorial. The user can select the gimbal operating mode, adjust tilt angles, perform calibration, or assign functions to the customizable buttons on the remote control. If the drone is not connected, you can initiate a connection through this item.
The camera section provides shooting options according to the selected mode, histogram settings, white balance, backlight warning, grid display, focus peaking levels, and automatic HD photo saving. Materials can be recorded both to the drone’s internal memory and to a microSD card. There is also the option to format media, set cache, and reset camera settings.
The control section provides access to the basic settings of the drone, gimbal, remote control, and a tutorial for beginners. The user can set the gimbal operating mode, adjust its tilt angle, perform calibration, and assign functions to the customizable buttons on the remote control. If necessary, you can change the connection mode here and connect the drone to the remote control manually.
In the “Camera” tab, the user can adjust the shooting settings according to the selected mode — photo or video. Here you can adjust exposure, white balance, histogram, overexposure warning, crop grid, peak focus area and HD image synchronization. You can also manage the cache during recording.
Footage is saved either to the drone’s internal memory or to a microSD card. Both types of media can be formatted directly from the interface. There is an option to set a video cache limit, as well as reset the camera settings to default values if necessary.
To activate focus or spot metering, simply tap the screen. The exact display of focus or metering depends on the selected focus mode, exposure, and spot metering type. After setting the spot metering value, you can lock the exposure by long-pressing the screen. To cancel the lock, tap and hold the screen again.
Before launching DJI Fly, make sure your device is fully charged. The app requires a stable cellular connection – check with your mobile operator for data rates. If you are using your phone as a screen during flight, do not receive calls or send messages to avoid disrupting the connection. Be sure to pay attention to all system messages, safety instructions, and disclaimers. Familiarize yourself with the flight regulations in force in your area – you are solely responsible for complying with them.
Before using automatic or special functions, carefully read all accompanying warnings, especially in the following cases:
before initiating an automatic takeoff or landing;
before changing the maximum permitted altitude;
before switching between different flight modes;
when flying in or near GEO zones;
before using intelligent control modes.
If the app issues a message about the need to land immediately, do so as soon as possible in a safe place. Also, review the in-app warning checklist before each flight. If you have no experience flying a drone, use the built-in training mode to gain basic skills. Don’t forget to cache a map of the area where you plan to fly in advance by connecting to the Internet.
Remember: DJI Fly is a convenient tool to help, but not a replacement for the operator. Use it responsibly and do not rely entirely on automated functions. The app is governed by the DJI Fly Terms of Use and Privacy Policy – you must read them before flying.
The DJI RC Pro remote controller together with the DJI Fly app form a powerful ecosystem for precise, safe and convenient drone control. With an intuitive touch interface, advanced camera capabilities, security settings, and flexible flight controls, the user has full control over all aspects of shooting and navigation. However, for effective use, it is important to follow the instructions, respond to notifications in a timely manner, and pay attention to all warnings. This guarantees a comfortable flight, high-quality shooting, and — most importantly — safety.