16.04.2025
28 min
1257

This section summarizes the key aspects of flight preparation and general settings necessary for full operation with the DJI Mavic 3. It covers the basic conditions in which you can safely launch the drone, as well as important restrictions related to geographical zones. In addition, attention is paid to mandatory pre-flight checks, the sequence of actions during automatic takeoff and landing, starting the engines and testing the stability of the drone in the air. This is the final part of the article, which will help to bring all the knowledge together and prepare to use the drone confidently and competently, taking into account all the technical and practical nuances.

After completing all the preparatory procedures before flying, it is recommended to practice your drone control skills in a safe environment. All flights should be conducted in open areas only. For detailed information on controlling the aircraft, please refer to the sections dedicated to the remote controller and the DJI Fly app.
Do not launch the drone in adverse weather conditions: strong winds (over 12 m/s), precipitation, fog or snowfall.
Only fly in open spaces. Tall buildings and large metal objects can negatively affect the operation of the compass and GNSS. It is recommended to keep the drone at least 5 meters away from such structures.
Avoid flying near obstacles, crowds, trees, water bodies, power lines and other dangerous objects. The minimum recommended height above water is 3 meters.
Try to avoid areas with strong electromagnetic interference – near substations, television towers, antennas, base stations and power lines.
The operation of the drone and the battery depends on the environment. In high altitudes (from 6000 m above sea level), the efficiency is significantly reduced.
In polar latitudes, the drone will not be able to use GNSS. In such conditions, one should rely on the all-round vision system.
If launching from mobile platforms (e.g., a boat or a car), the flight must be performed with extreme caution.
Drone operators are required to comply with the rules set by international and local aviation organizations such as ICAO, FAA, etc. To enhance safety, the system has restrictions enabled by default to help avoid violations and dangerous situations.
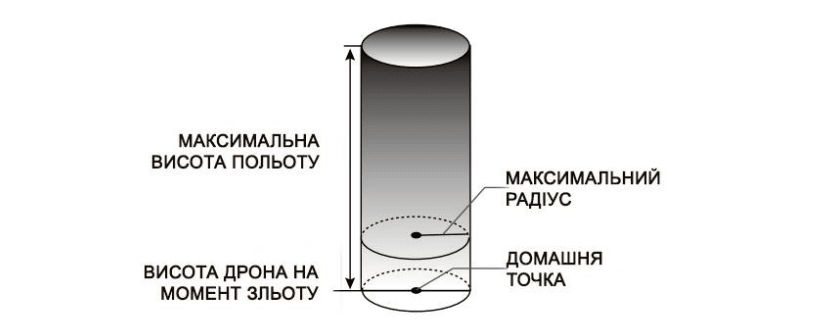
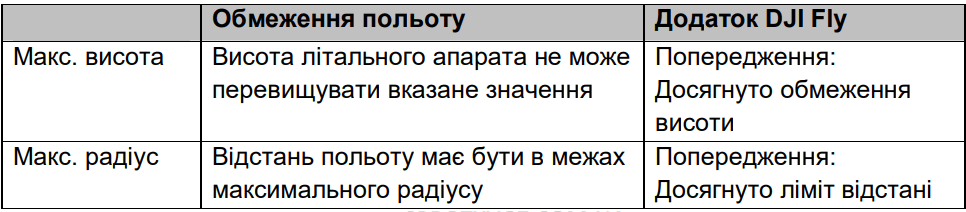
Users can independently set limits for maximum altitude and flight distance. These parameters control the area in which the drone can fly. When GNSS signal is available, altitude, distance and GEO zones are simultaneously in effect. In the event of loss of GNSS, the drone is limited only in altitude.
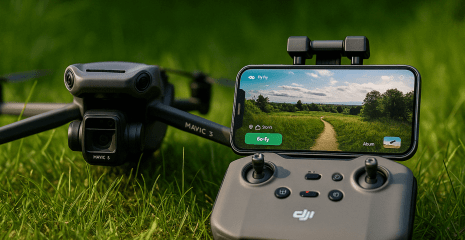
In the DJI Fly app, the user can manually set the maximum flight altitude and distance. Depending on the set parameters, the aircraft will fly within a defined cylindrical area.
When GNSS satellite navigation is available
Only the all-round view system is available
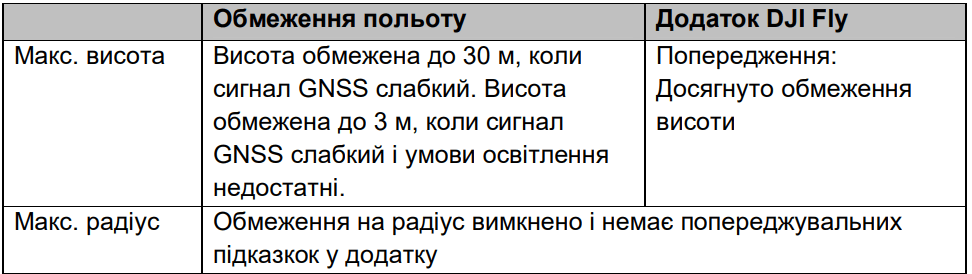
The altitude limit for weak GNSS signal will not be limited if there was a strong GNSS signal when the aircraft was powered on.
If the drone reaches the limit, you can still control it, but you cannot fly further. If the drone goes beyond the maximum radius, it will automatically return to the range when the GNSS signal is strong.
For safety reasons, do not fly near airports, highways, railway stations, railroad lines, city centers, and other dangerous areas. Only fly the drone within direct visibility.
The current list of all GEO zones is available on the official DJI website: www.dji.com/flysafe. These zones are classified by level of restrictions and include, in particular, the territories of airports, airstrips, border areas, as well as critical infrastructure facilities – for example, power plants. When flying near such areas, appropriate warnings will automatically appear in the DJI Fly application.
Before each flight, be sure to perform a complete check using the checklist:
Make sure the remote controller, smartphone, and drone battery are charged.
Check that the battery is inserted correctly and the propellers are locked.
All of the drone’s console elements should be unfolded.
Check that the gimbal and camera are working properly.
Make sure that no foreign objects are interfering with the motors.
Check that DJI Fly has successfully connected to the drone.
Make sure that the camera lens and visual positioning system sensors are clean.
Always use only original or certified DJI components. Unknown or uncertified parts may cause malfunctions and pose a hazard.
For a safe start, use the auto-takeoff function:
Open DJI Fly and enter camera view mode.
Make sure all the check points are completed.
Tap the takeoff button. If all conditions are met, press and hold the button to confirm.
The aircraft will take off and hover at an altitude of approximately 1.2 meters.
To perform an auto landing:
Tap the appropriate button in the app. If the landing location is safe, hold the button to confirm.
If necessary, the auto-landing can be canceled by tapping again.
If the visual positioning system is working properly, the soft landing function is activated.
After landing, the engines automatically stop.
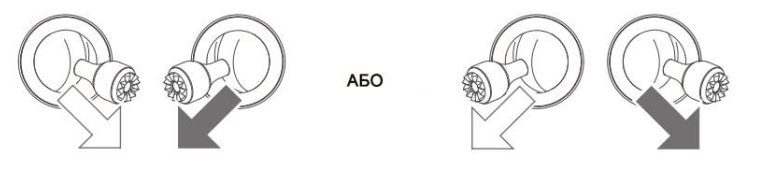
The CSC (Combined Joystick Move) command is used to start the engines. To turn on the engines, move both sticks to the bottom inner or bottom outer corners at the same time. Once the engines start, release the sticks.
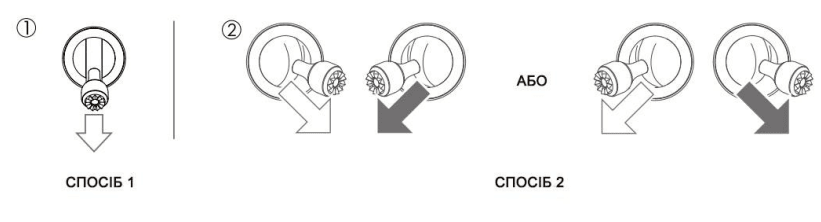
There are two ways to stop the motors.
Method 1: When the drone has landed, press and hold the left stick. The motors will stop after three seconds.
Method 2: When the drone has landed, press the left stick down and execute the same CSC command that was used to start the motors. The motors will stop immediately. Release both sticks once the motors stop.\
Stopping the motors in flight is only allowed in critical situations, as it almost always results in the drone crashing. This procedure is allowed when the drone is behaving uncontrollably — for example, after a collision, with a sudden loss of stability, rapid climb or loss of altitude, or if the motor unexpectedly stops. The same CSC command is used to turn off the motors in flight as during startup. You can change the default settings of this command in DJI Fly.
Before the first launch or after a long period of downtime, it is recommended to perform a short test flight. This will help to ensure that the systems are working properly, check the operation of the remote control, stabilizer, sensors and camera, as well as adapt to the controls. To ensure everything goes safely and predictably, follow this sequence of actions:
Place the drone on a flat, open surface with its status indicator facing you.
Turn on the drone and the remote controller.
Launch the DJI Fly app and switch to camera view.
Wait for the self-test to complete. If there are no system warnings on the screen, you are ready to fly.
Gently move the throttle stick up or use the auto takeoff function.
Use the auto landing function or gently lower the throttle stick to land.
After landing, press and hold the throttle stick down and the motors will shut down after a few seconds.
When you are finished flying, turn off the drone and the remote controller.
Following this instruction allows you to confidently test the drone in real conditions and make sure that all systems are working correctly before serious filming or a long flight.
The section dedicated to the flight and setup of the DJI Mavic 3 is the final, but extremely important stage in preparing for drone operation. It combines all previous knowledge into a holistic system of actions: from analyzing the environment and flight restrictions to detailed instructions for starting the engines and landing safely. Proper preparation, attention to detail and strict adherence to instructions are the key to ensuring that each flight will be not only effective, but also safe.
With the DJI Mavic 3 in your hands, you have not just a high-tech device, but a whole tool for creativity, research and inspiration. All that remains is to put your knowledge into action, lift the drone into the sky and catch your perfect shot.