05.05.2023
6 min
4748

When learning how to hack Wi-Fi, your first step should be choosing the right compatible adapter. Many adapters have replaceable antennas. There are several different types of specialized antennas that you can attach to them to increase the range and performance of the device. Wireless network adapters often come with a small omnidirectional antenna that can be replaced later. This omnidirectional antenna receives the signal approximately equally from any possible direction. It is best used in the office or at home, where there is no way to know exactly where the signal will come from. In conditions where the signal is still not strong enough, you should give up the ability to detect the Wi-Fi network from all possible angles. This will help amplify the signal coming from a certain point. Directional antennas can be used to obtain a huge range and the ability to track even weak signals.
While a directional network adapter can dramatically increase network signal when properly installed, this benefit disappears or may be minimized when there is interference in front of the Wi-Fi source. In an environment with a lot of interference, you will find that the strongest signal that a directional antenna can pick up will not be obtained when pointed directly at the source, but when the device is mounted at a different angle. It is also worth noting that a large omnidirectional antenna does not always receive a strong signal. If the Wi-Fi source is nearby, it can extend the strongest part of the radiation pattern beyond where the target is.
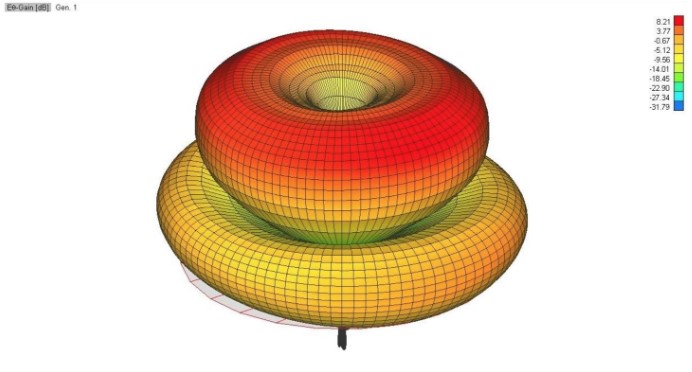
The standard antenna you’re likely to see on your router or network adapter is the Rubber Ducky-style antenna, which looks like a simple plastic stick. It is inexpensive and works well – this is enough for most consumers. Such an antenna will have a flat, circular radiation pattern that is similar in shape to a donut. This diagram is suitable for connecting to a wireless access point on a certain floor, but it is not suitable for connecting to any network outside, on a floor below or above.
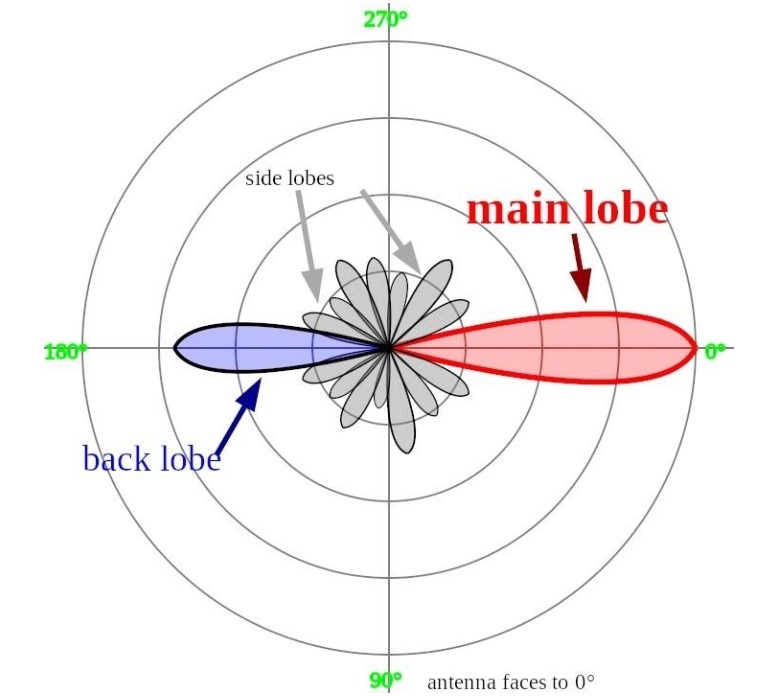
Directional panel antennas have a radiation pattern that looks more like a flashlight than a doughnut. They are much weaker than omnidirectional antennas, which work in all directions, but are very strong when directly in front of or behind the source. The main lobe of this radiation pattern, when it “looks” at the source of the Wi-Fi network, can have a huge range that the usual “Rubber Ducky” antenna could not even dream of. However, if the antenna is moved a couple of centimeters to the side, the signal level will drop quickly. A panel antenna will be an excellent choice for receiving a strong signal from a specific location. You should not buy it if you do not know exactly the direction of the Wi-Fi signal you need.
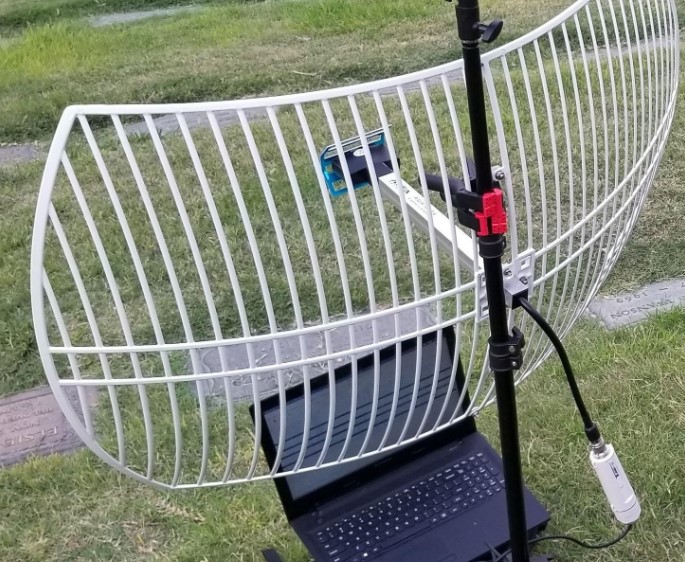
If the radiation pattern of a panel antenna is similar to a flashlight, the radiation pattern of a parabolic antenna is more like a laser beam. This antenna has a huge range of action and is designed to receive a signal from a fixed location remotely. The network source may be kilometers away from the adapter, but you will have a clear line of sight. Although parabolic nets are thick and bulky, they have a huge range that will be provided to a person using almost any kind of Wi-Fi antenna. Due to their high gain and directivity, they can better pick up signals from several kilometers away with the right setup (even compared to network analyzers like Kismet). As with panel antennas, interference or changes in the angle of the antenna can cause rapid signal degradation. It is worth noting that capturing a tracked Wi-Fi device can cause a measurable signal spike.
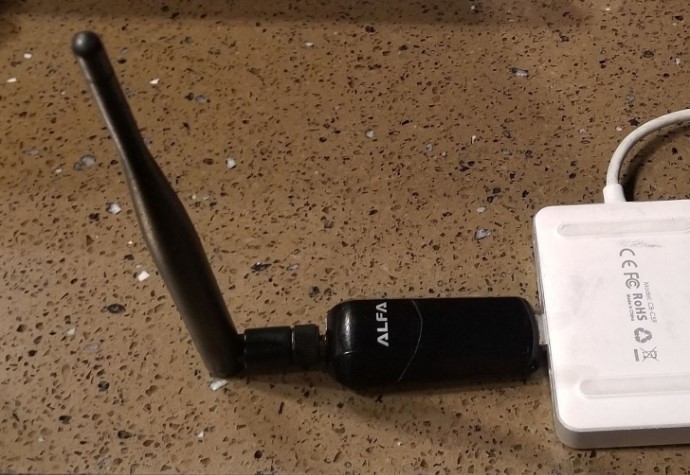
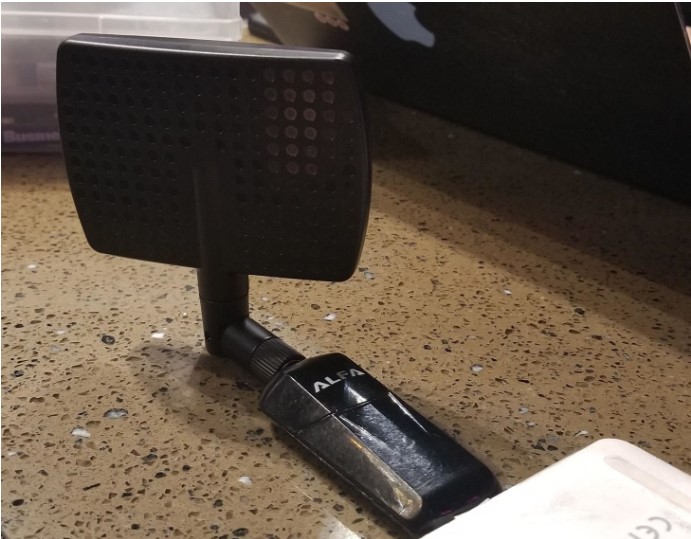
For the following guide to be relevant to you, you will need a Kali-compatible Wi-Fi network adapter such as the Alfa AWUS036NEH. It has a removable Wi-Fi antenna.
When choosing an omnidirectional antenna, look for high-gain options like the Alfa ARS-N19 9 dBi Wireless Antenna. There are many indoor and outdoor panel adapters, but we used the Alfa RP-SMA 7 dBi panel antenna. Parabolic nets are more expensive, but have the largest possible range. If portability and small dimensions are not a priority for you, the SimpleWiFi G2424 parabolic mesh antenna is an excellent choice (one of the best on the market).
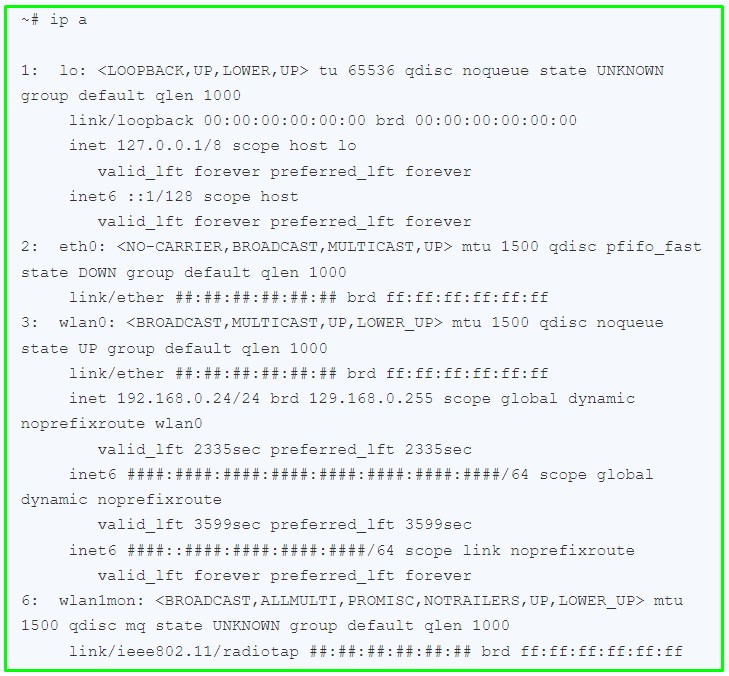
First, you need to connect your Kali-compatible Wi-Fi network adapter. Once that’s done, you can type the ip a command to find it. It will have something like “wlan1” if your internal card is “wlan0”. Then, in a terminal window, run the command “ifconfig” to enable the network adapter and the command “airmon-ng” to put it in monitor mode. Once your card is in monitor mode, you can type the “ifconfig” command again to confirm that it is now called something like “wlan1mon”. Make sure you choose an appropriate name.

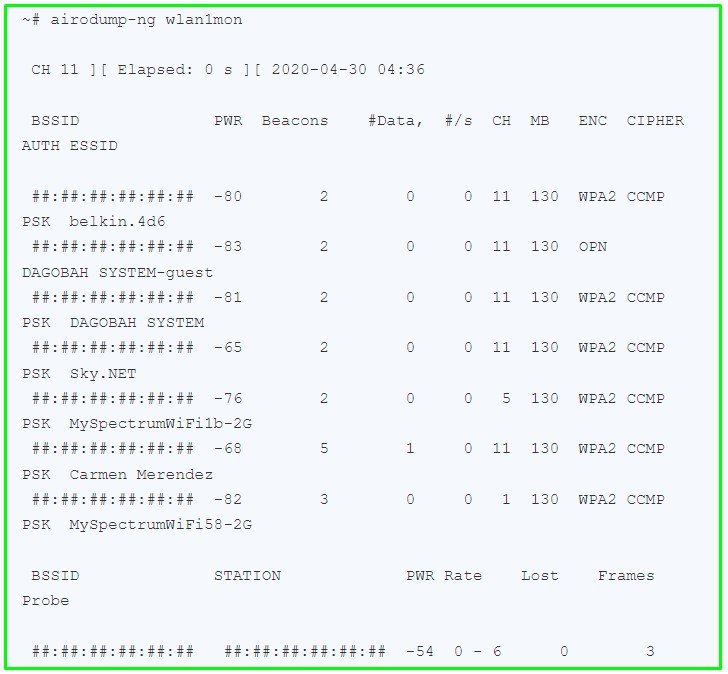
Now that our map is in monitor mode, we will select a network to track (as a control point). It will be necessary to use the signal of this network to test our antennas and see what power it receives at each of them. First, let’s make a list of Wi-Fi networks to target. We will do this by entering the airodump-ng wlan1mon command and watching the adapter scan for all available Wi-Fi channels. After the list fills up a bit, press Control-C to stop the scan.
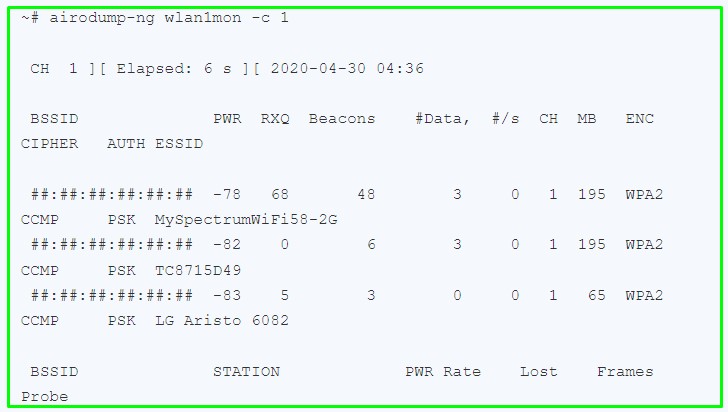
Now you need to find a channel where you can see a network with a strong signal. We enter the “airodump-ng” command again with the “c” flag added to scan only the channel that comes out of the target network. If we want to scan channel number 1, our command will look like this. You need to run it in a terminal window. Now we’ll open Wireshark to start plotting the data.
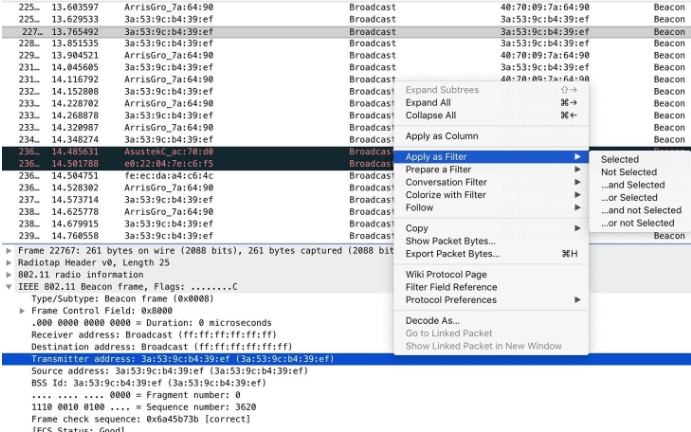
Once Wireshark opens, select your network adapter as the source and click on the shark fin icon to start capturing the target. After the capture starts, you will see many packets from different networks in the area. Find the broadcast packet from the network you want to monitor and click on it.
In the “EEE 802.11 Beacon Frame” section, find the transmitter address and right-click. Select the “Apply as Filter” option from the menu, then click “Selected.” Thus, you can create a filter to display the received data only from this Wi-Fi device. You will now see packets coming only from the monitored device. You should have a filter (similar to the one below) appear in the Wireshark filter panel.
![]()
Wireshark will only display packets with a sender address that matches the address of the device you want to monitor. You can track any other device, but you’ll likely have to target specific data packets because smartphones don’t disclose beacon frames.
And now let’s connect our omnidirectional antenna. The signal level suddenly jumped a lot. It remains so powerful no matter what angle the adapter is at.
This signal is good enough to receive data and is resistant to changes in the position of the adapter. To test this, I specifically moved it around the room. The only position where the signal was weak was when the tip of the antenna was pointed directly at the Wi-Fi network source.

The network signal level dropped after we removed the omnidirectional antenna. We connect a directional panel antenna. We can see that there is a consistently high signal level when it is pointed directly at the network source. The signal is worse when the antenna “looks” to the side. We can use a directional panel antenna to get a stronger signal when pointed at any fixed Wi-Fi target. However, moving targets will result in an unstable and weak network connection.
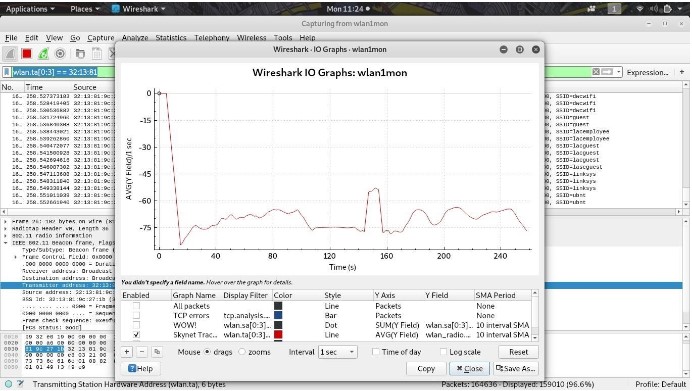
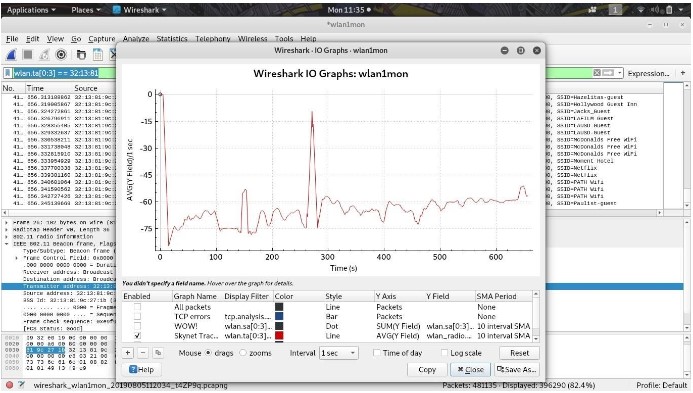
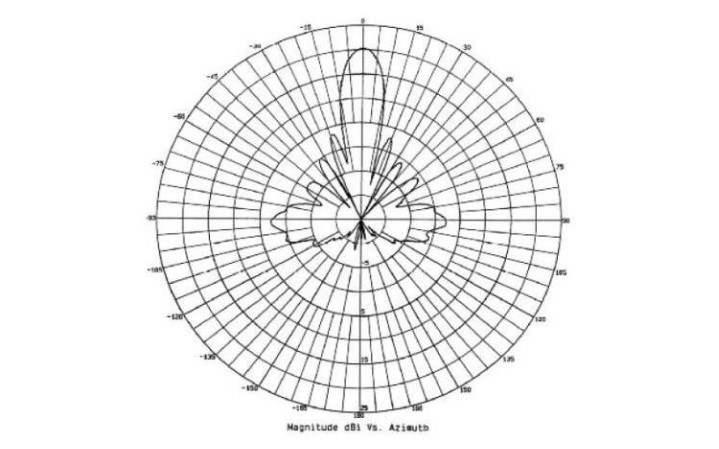
Finally, we connect the parabolic grid. We begin to receive a signal that is many times stronger than received before. When moving the antenna from one place to another, since we cannot tell exactly where the source is, the signal also remains quite good. In the graph below, signals received by omnidirectional and pan antennas are to the left of the burst in the middle, and signals received using a parabolic grid are to the right. As soon as we reset the parabolic antenna, we got an even stronger and more stable signal.
Towards the end of the network capture, we turned up the Wi-Fi device we were monitoring in another room and noticed a spike in signal level. This means that the network can be found even when someone physically moves the device, as long as you have a highly directional antenna.