
05.05.2023
6 min
4748

We will look at building a hardware bookmark that does not require direct access to the systems under attack – Wi-Fi Pineapple. In addition, we will study how this device can be used not only in attacks on Wi-Fi networks, but also as an IP camera for monitoring objects.

A camera lying on the shelves, running on the UPnP (Universal Plug and Play) protocol stack;
Raspberry Pi Zero 2 (W – optional);
passive USB hub;
USB modem;
Power supply.
In this, as in any other project, the choice of an OS for single-payer users is a purely individual matter. I’d recommend looking towards DietPi if you want the most lightweight and uncluttered image possible, and Kali-ARM if you plan to use the out-of-the-box Kali toolkit. The following guide will be built on a Raspberry Pi Zero 2 W with Kali on board.
We download the finished image from https://www.kali.org/get-kali/#kali-arm and, using Rufus or other similar software, download it to a MicroSD card.
We insert the MicroSD into the appropriate socket on the board and hack the monitor, keyboard and power supply. If you are using a Raspberry Pi Zero, you will have to purchase several OTG – {your_socket} – mini-HDMI(X1), {your_socket} – micro-USB(X2), and also several proportional heatsinks, so that the temperature of the processor does not fall outside the permissible limits.
Now Kali should start, if suddenly you get the error Kernel panic – not syncing: VFS: Unable to mount root fs on unknown-block(179,6) , most likely it’s a bad microSD card, I don’t know why, but I myself some time fought this bug by buying a Kingston card from Ozone for 400 wooden forever.
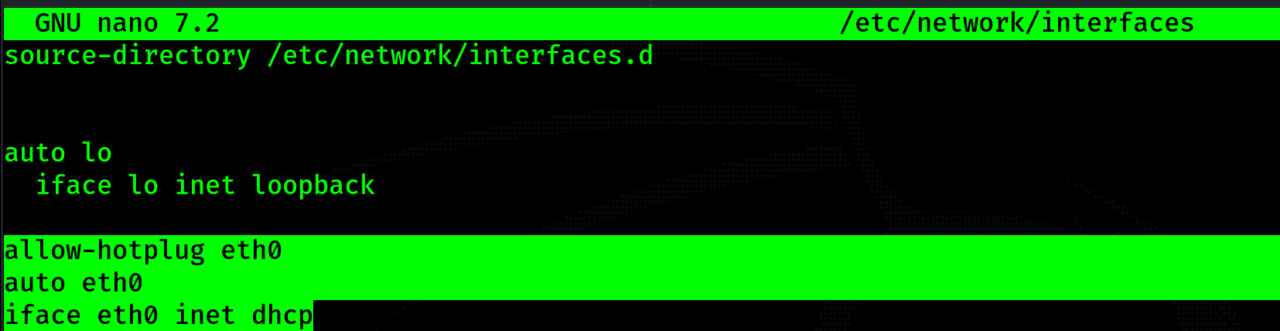
In order for us not to be connected to raspberry by one network and to be able to go to it wherever we are, it is necessary to give raspberry access to the Internet. An ordinary 4G modem copes with this perfectly.
In order not to dance with a tambourine when trying to connect to the modem’s Wi-Fi network at home, let’s make an external network card from the modem. To do this, we need to activate the network interface of the modem at each startup by writing the following lines in /etc/network/interfaces:
Setting up OpenVPN starts with key generation. Generated keys are divided into:VPS:
The root CertificateAuthority (CA) certificate and key used to sign each server and client certificate.
Public and private keys for the server and each client separately.
We install the OpenVPN package:
sudo apt install openvpn
Using Easy-RSA, we create server keys and certificates: make-cadir /etc/openvpn/easy-rsa- Copy the easy-rsa template directory /etc/openvpn/.
Go to the copied directory and execute the following commands: ./easyrsa init-pki- Initialize the structure of directories and files for managing public keys.

./easyrsa build-ca- We create a self-signed certificate authority (CA) that will be used to sign certificates.

./easyrsa gen-dh- Generate a Diffie-Hellman (DH) key exchange parameters file for use in the process of establishing a secure connection.

./easyrsa gen-req ovpn-server nopass- We generate a request to create a certificate for the OpenVPN server, using the name “ovpn-server”, without asking for a password.

./easyrsa sign-req server ovpn-server- We sign a certificate request for an OpenVPN server using a CA using predefined settings.

./easyrsa gen-req pi_zero nopass- Generate a request to create a client certificate with the name “pi_zero” without a password.

./easyrsa sign-req client pi_zero- We sign a certificate request for a client named pi_zero using a CA.

We create a configuration file for the OpenVPN server (/etc/openvpn/server.conf):
port 1194
proto udp
dev tun
ca /etc/openvpn/keys/ca.crt
cert /etc/openvpn/keys/ovpn-server.crt
key /etc/openvpn/keys/ovpn-server.key
dh /etc/openvpn/keys/dh.pem
server 10.8.0.0 255.255.255.0
ifconfig-pool-persist ipp.txt
push "redirect-gateway def1 bypass-dhcp"
push "dhcp-option DNS 8.8.8.8"
keepalive 10 120
cipher AES-256-CBC
comp-lzo
user nobody
group nogroup
persist-key
persist-tun
status openvpn-status.log
verb 3
We start the OpenVPN server:
systemctl start openvpn@server– We launch the demon;
systemctl enable openvpn@server– Enable auto-start of the daemon when the system is up.
We check whether the interface is up via ip a:

We install OpenVPN:
sudo apt install openvpn
With the help of csp, we transfer the keys and certificates to the raspberry:
scp user@your_vps_ip:/path/to/your/files/ca.crt /path/on/your/computer
scp user@your_vps_ip:/path/to/your/files/pi_zero.key /path/on/your/computer
scp user@your_vps_ip:/path/to/your/files/pi_zero.crt /path/on/your/computer
We create a configuration file for the OpenVPN client (client.ovpn):
client
dev tun
proto udp
remote your_vps_ip 1194
resolv-retry infinite
nobind
user nobody
group nogroup
persist-key
persist-tun
ca ca.crt
cert client.crt
key client.key
cipher AES-256-CBC
comp-lzo
verb 3
We try to lift the tunnel with the handles:
sudo openvpn --config client.ovpn
If everything has risen, and we can ping a raspberry from Vpski, we can move on. Now we need to make the tunnel go up when raspberry starts, for this we will create a systemd unit file for the client connection ( /etc/systemd/system/openvpn-client.service ):
[Unit]

Description=OpenVPN to VPS After=network.target

[Service]

Type=simple ExecStart=/usr/sbin/openvpn --config /path/to/client.ovpn

[Install]

WantedBy=multi-user.target
Just in case, to avoid critical errors, we can add two more options to the [Service] section:
The Restart=always option in systemd sets the rule to always restart the service, even in the event of a crash. And the RestartSec=3 option sets the delay time before restarting the service in seconds.
Restart systemd:
systemctl daemon-reload
We start and activate the written daemon:
systemctl start openvpn-client systemctl enable openvpn-client
In order to do port forwarding from one interface to another to another, we can use SSH. For this, we will need one command executed on the VPS:
ssh -f -N -L 0.0.0.0:90:raspberry_ip:90 user@raspberry_ip
We will write about why we open port 90 a little later. We can either do the same with the previous daemon or run this command when we need to, the -f flag will bring up the tunnel in the background.
If you need to implement port forwarding through a daemon, you will need to configure authentication using keys. To do this, we first generate the keys on vpske, and then throw them on the raspberry:
ssh-keygen
ssh-copy-id user@raspberry_ip
Motion is a program that monitors the video signal from one or more cameras, able to detect if a significant part of the image has changed.
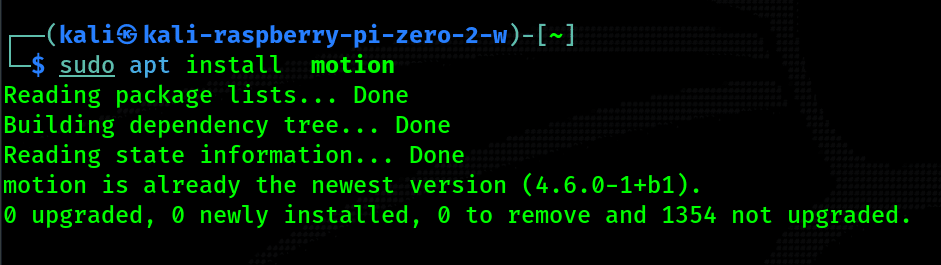
You can download the already assembled .deb package from the link (we are interested in the version for the ARM64 architecture – *_motion_4.6.0-1_arm64.deb) https://github.com/Motion-Project/motion/releases/tag/release-4.6.0
An alternative is to download motion through the apt package manager:
As mentioned, any UpNP camera will work. In order to check the functionality and compatibility of the camera, we can use the v4l2-ctl tool installed through the APT package manager – sudo apt _install_ v4l-utils.
Below are two conclusions, if you get the error “Cannot open device /dev/video0, exiting”, use lsusb to check if the system can see your camera.

The main configuration file motion.conf is located in the /etc/motion directory. Below are all the flags that we will need during the initial configuration of motion, for independent study, go to the documentation( https://motion-project.github.io/motion_config.html ):
daemon on: This option enables daemon mode, meaning motion will run in the background as a service.
stream_port 90: Sets the port on which the video stream will be available.
stream_quality 100: Defines the quality of the video stream (from 1 to 100, where 100 is the maximum quality).
stream_maxrate 20: Limits the maximum video stream rate in frames per second.
stream_localhost off: Allows remote devices to view the video stream.
stream_limit 0: Defines a limit on the number of connections to a video stream.
width 1280, height 720: Determine the width and height of the frame of the video stream (set to the maximum supported by your camera).
framerate 20: Sets the frame rate per second.
locate_motion_mode on, locate_motion_style redbox: Shows the motion area in the video with a red rectangle.
stream_auth_method 1: Selects the authentication method (1 is basic authentication).
stream_authentication user:pass: Sets the username and password to access the video stream.
We try to run motion:
sudo motion -b
If everything started successfully, we can try to go to the stream_port specified in the config file (I have 90) and check how successfully everything started:

To start motion at reboot, add the following line to the crontab:
@reboot motion -b
Now it remains only to close the camera so that the object of observation does not notice anything, I imagine the option that I used to test how fireless it can be hidden:


Ideally, it can be inserted directly above the object of observation, this will help to find out what and when the object of observation entered on the keyboard without unnecessary trouble and other hardware hat.
After using a small passive hub to connect the camera to the modem, we have at least two more USB ports left, where you can plug in an external Wi-Fi adapter with monitor mode:


And for the lucky owners of a Raspberry Pi Zero 2 W with a built-in Wi-Fi adapter, the good news is that its built-in adapter can be flashed and used in monitor mode. The firmware can be found here: https://re4son-kernel.com/
By the way, as one of the observations – the resulting assembly works perfectly not only on the Raspberry Pi Zero, but even if you just rearrange the microSD card in the Raspberry Pi 4B, everything will work just as well.
Of course, you can assemble the device with the help of a small camera designed specifically for working with raspberries, and as a battery take a small lithium-ion battery the size of a raspberry itself, but we had an article on the manufacture of the most artisanal and punk device, which does not look very presentable, but perfectly performs all assigned tasks. You can experiment with the railway by yourself, trying different modules and components!