
02.04.2023
7 min
1727

SSH tunnels are a powerful tool for secure connections between local and remote networks. In this article, we explain how SSH tunneling works, what local (Local Forwarding), remote (Remote Forwarding) and dynamic (SOCKS proxy) tunnels are. Instead of complex terms, we use intuitive diagrams, simple examples and real-world use cases.

SSH is another example of an old technology that is still widely used. It’s possible that learning a few SSH tricks will prove to be more beneficial in the long run than mastering a dozen cloud tools that will become obsolete next quarter.
One of my favorite parts of this technology is SSH tunnels. Using only standard tools and often just one command, you can achieve the following:
Access internal VPC endpoints through a public EC2 instance.
Open a port from the local host of the development VM in the host browser.
Expose any local server from your home/private network to the outside world.
But even though I use SSH tunnels every day, it always takes me a while to figure out the right command. Should it be a local or remote tunnel? What are the flags? Is it local_port:remote_port or vice versa? So I decided to finally figure it out, and the result was a series of labs and a visual cheat sheet.
SSH tunnels are designed to connect hosts over a network, so each lab below involves multiple “machines,” as expected. However, running multiple virtual machines for each lab can be tedious, so I used containers to simulate network hosts. This way, a single Linux server running Docker (or similar) can be used to run all of the labs.
Each example requires a valid key pair without a passphrase on the host, which is then mounted into the containers to simplify access control. If you don’t have one, the labs provide an example of how to generate one.
Important: The SSH daemons in the containers here are for educational purposes only—the containers in this post are intended to represent full-fledged “machines” with SSH clients and servers on them. Keep in mind that it is rarely a good idea to put the SSH constructor inside real containers!
Starting with the one I use most often. Often there might be a service listening on localhost or a private interface of a machine that I can only connect to via SSH via its public IP address. And I absolutely need access to that port from the outside. A few typical examples:
Access your database (MySQL, Postgres, Redis, etc.) using a user-friendly UI tool from your laptop.
Use a browser to access a web application that is only accessible to the private network.
Access the container port from your laptop without publishing it on the public server interface.
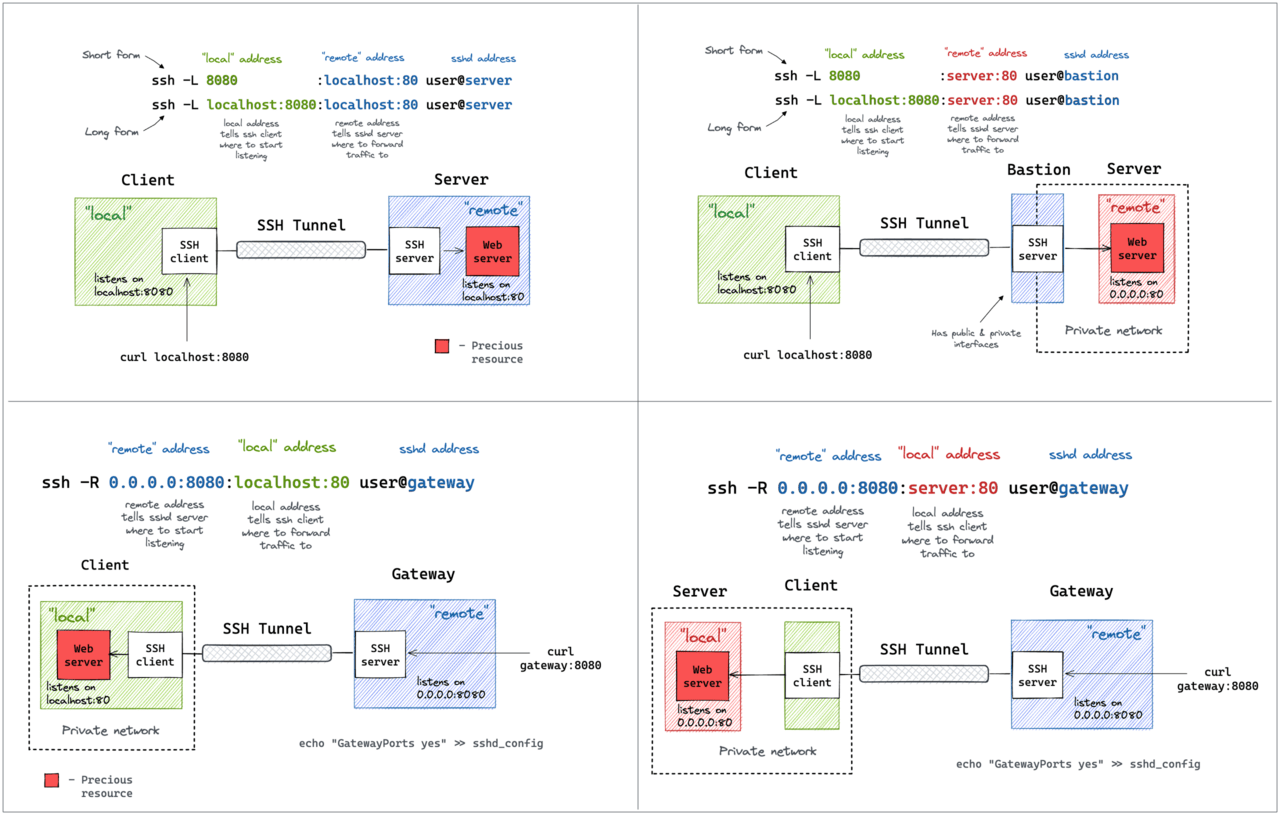
All of the above use cases can be solved with a single ssh command:
ssh -L [local_addr:]local_port:remote_addr:remote_port [user@]sshd_addr
The -L flag indicates that we are starting local port forwarding. In reality, this means:
On your computer, the SSH client will start listening on local_port (probably localhost, but it depends on the circumstances – check the GatewayPorts settings).
Any traffic to this port will be redirected to the remote_private_addr:remote_port computer you are connected to via SSH.
Ось як це виглядає на схемі:
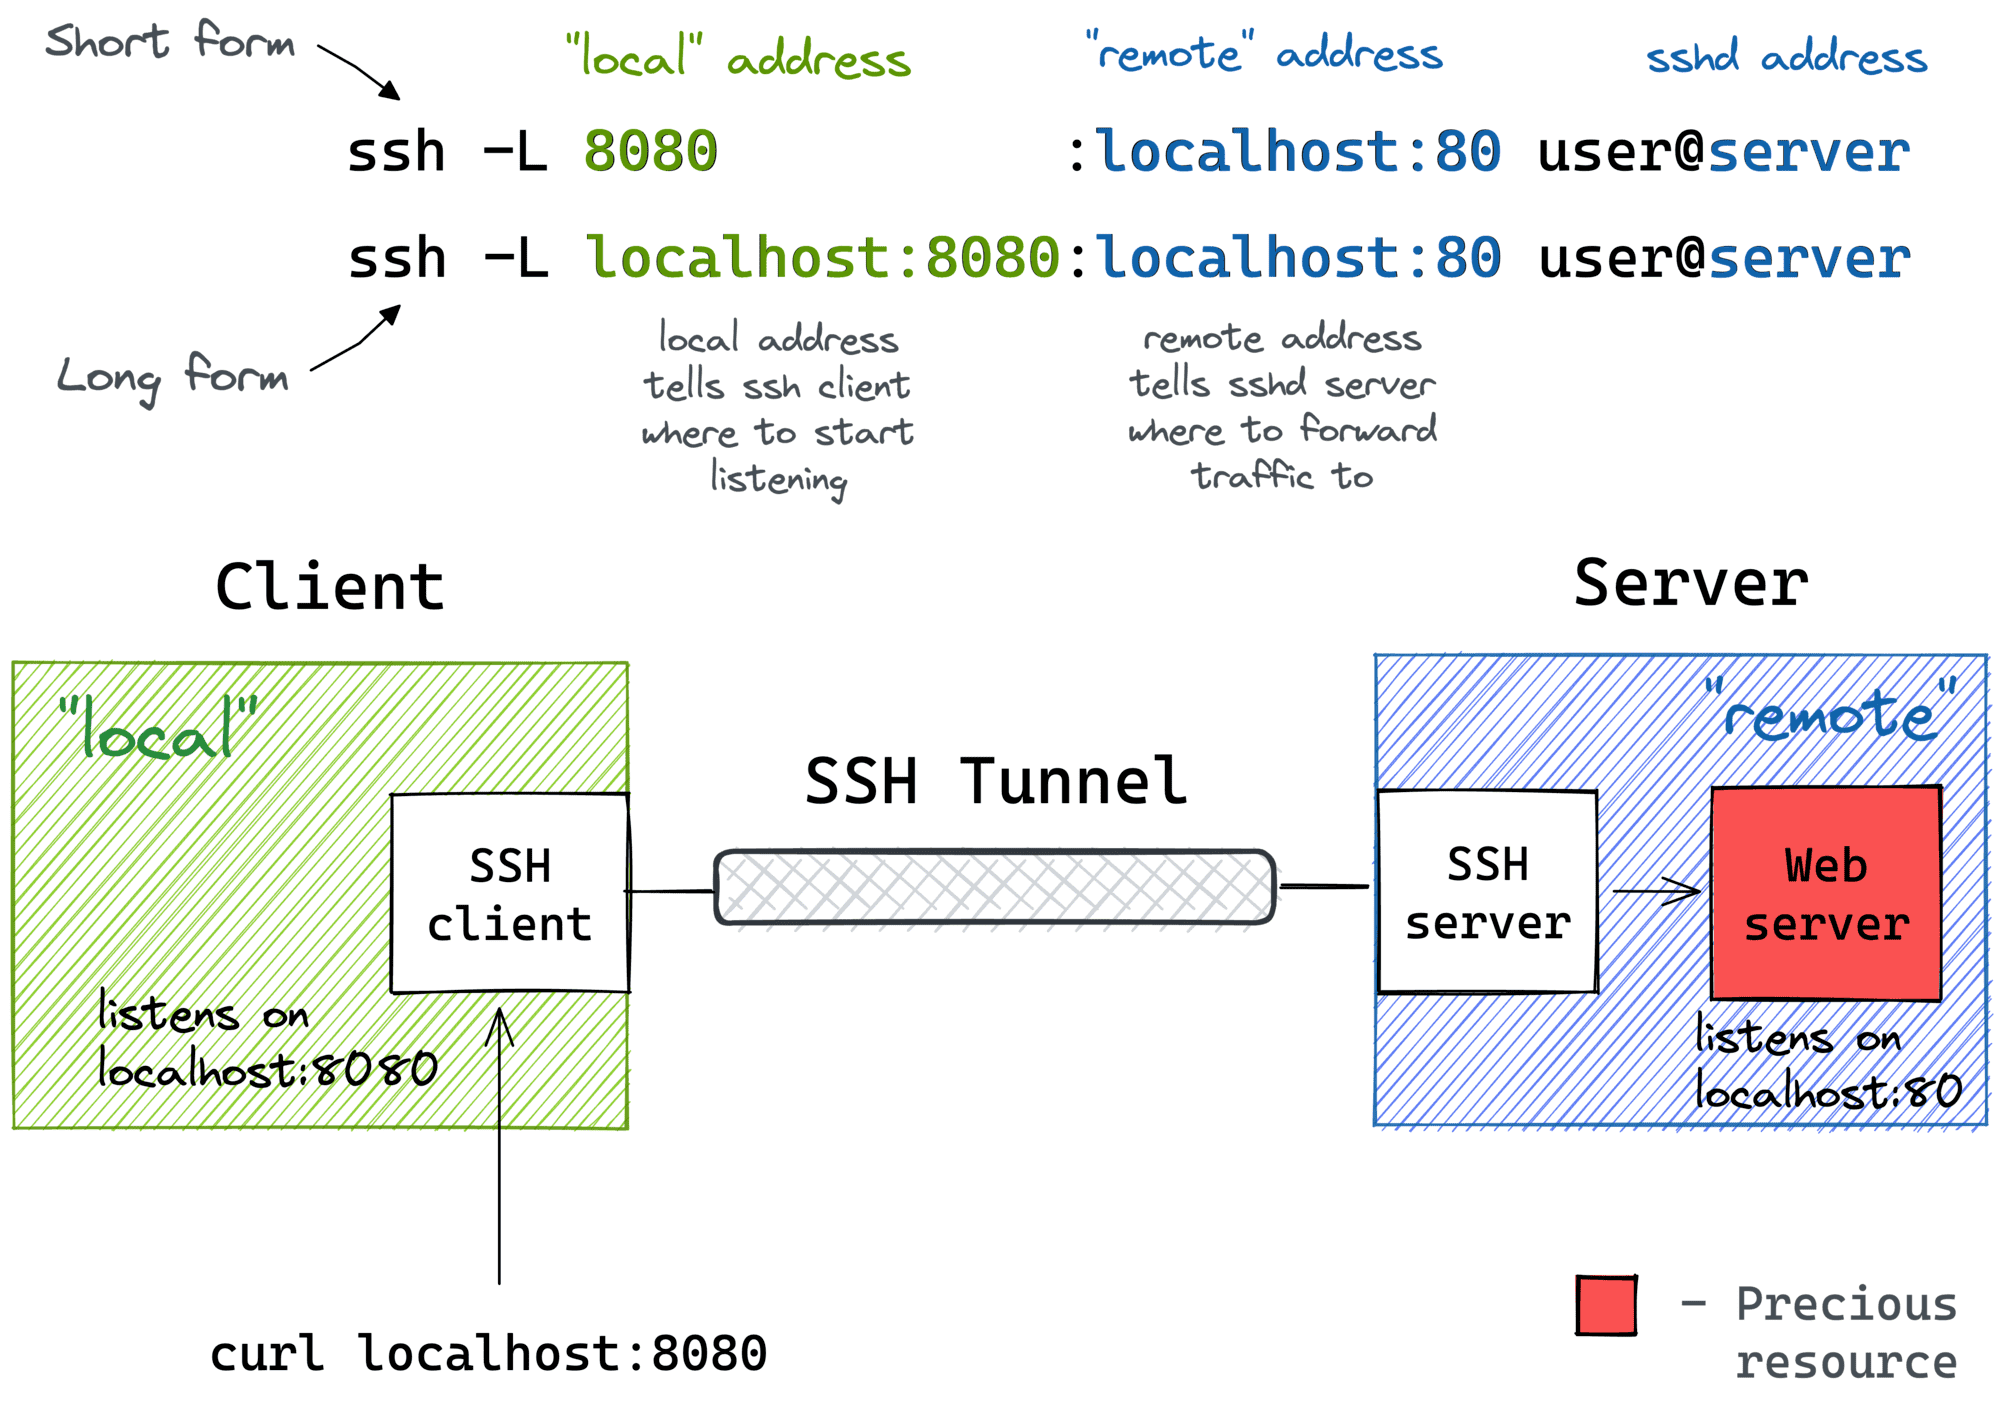
Pro Tip: Use ssh -f -N -L to start a port forwarding session in the background.
The lab recreates the setup from the diagram above. First, we need to prepare a server—a machine with an SSH daemon and a simple web service listening on 127.0.0.1:80:
$ docker buildx build -t server:latest -<<'EOD'
# syntax=docker/dockerfile:1
FROM alpine:3

# Install the dependencies:
RUN apk add --no-cache openssh-server curl python3
RUN mkdir /root/.ssh && chmod 0700 /root/.ssh && ssh-keygen -A

# Prepare the entrypoint that starts the daemons:
COPY --chmod=755 <<'EOF' /entrypoint.sh
#!/bin/sh
set -euo pipefail

for file in /tmp/ssh/*.pub; do
  cat ${file} >> /root/.ssh/authorized_keys
done
chmod 600 /root/.ssh/authorized_keys

# Minimal config for the SSH server:
sed -i '/AllowTcpForwarding/d' /etc/ssh/sshd_config
sed -i '/PermitOpen/d' /etc/ssh/sshd_config
/usr/sbin/sshd -e -D &

python3 -m http.server --bind 127.0.0.1 ${PORT} &

sleep infinity
EOF

# Run it:
CMD ["/entrypoint.sh"]
EOD
Starting the server and recording its IP address:
$ yes no | ssh-keygen -t rsa -N "" -f ~/.ssh/id_iximiuz_lab

$ docker run -d --rm \
   -e PORT=80 \
   -v $HOME/.ssh:/tmp/ssh \
   --name server \
   server:latest

SERVER_IP=$(
  docker inspect \
    -f '{{range.NetworkSettings.Networks}}{{.IPAddress}}{{end}}' \
  server
)
Since the web service is listening on the localhost, it will not be accessible from the outside (i.e., in this particular case, from the host system):
$ curl ${SERVER_IP}
curl: (7) Failed to connect to 172.17.0.2 port 80: Connection refused
But from inside the “server” everything works fine:
$ ssh -i $HOME/.ssh/id_iximiuz_lab -o StrictHostKeyChecking=no \
  root@${SERVER_IP}
7b3e49181769:$# curl localhost
<!DOCTYPE HTML PUBLIC "-//W3C//DTD HTML 4.01//EN" "http://www.w3.org/TR/html4/strict.dtd">
<html>
<head>
...
Here’s the trick: bind the server localhost:80 to the host localhost:8080 using local port forwarding:
ssh -i "$HOME/.ssh/id_iximiuz_lab" \
-o StrictHostKeyChecking=no \
-f -N -L 8080:localhost:80 \
remote_addr
You should now be able to access the web service on the local port of the host system:
$ curl localhost:8080
<!DOCTYPE HTML PUBLIC "-//W3C//DTD HTML 4.01//EN" "http://www.w3.org/TR/html4/strict.dtd">
<html>
<head>
...
A slightly more verbose (but more explicit and flexible) way to achieve the same goal is to use the form local_addr:local_port:remote_addr:remote_port:
$ ssh -i $HOME/.ssh/id_iximiuz_lab -o StrictHostKeyChecking=no \
  -f -N -L localhost:8080:localhost:80 root@${SERVER_IP}
It may not be obvious at first, but the ssh -L command allows you to forward a local port to a remote port on any machine, not just the SSH server itself. Note that `remote_addrand` may or may not have the same value as sshd_addr:
ssh -L [local_addr:]local_port:remote_addr:remote_port [user@]sshd_addr
Not sure how legitimate it is to use the term “bastion host” here, but this is how I imagine this scenario:

I often use the above trick to call endpoints accessible from the bastion host but not from my laptop (e.g. using an EC2 instance with private and public interfaces to connect to an OpenSearch cluster fully deployed in a VPC).
Again, the lab replicates the setup from the diagram above. First, we need to prepare a bastion host—a machine with only the SSH daemon installed:
$ docker buildx build -t bastion:latest -<<'EOD'
# syntax=docker/dockerfile:1
FROM alpine:3

# Install the dependencies:
RUN apk add --no-cache openssh-server
RUN mkdir /root/.ssh && chmod 0700 /root/.ssh && ssh-keygen -A

# Prepare the entrypoint that starts the SSH daemon:
COPY --chmod=755 <<'EOF' /entrypoint.sh
#!/bin/sh
set -euo pipefail

for file in /tmp/ssh/*.pub; do
  cat ${file} >> /root/.ssh/authorized_keys
done
chmod 600 /root/.ssh/authorized_keys

# Minimal config for the SSH server:
sed -i '/AllowTcpForwarding/d' /etc/ssh/sshd_config
sed -i '/PermitOpen/d' /etc/ssh/sshd_config
/usr/sbin/sshd -e -D &

sleep infinity
EOF

# Run it:
CMD ["/entrypoint.sh"]
EOD
Starting the bastion host and recording its IP address:
$ yes no | ssh-keygen -t rsa -N "" -f ~/.ssh/id_iximiuz_lab

$ docker run -d --rm \
    -v $HOME/.ssh:/tmp/ssh \
    --name bastion \
    bastion:latest

BASTION_IP=$(
  docker inspect \
    -f '{{range.NetworkSettings.Networks}}{{.IPAddress}}{{end}}' \
  bastion
)
Now, running the target web service on a separate “machine”:
$ docker run -d --rm \
    --name server \
    python:3-alpine \
    python3 -m http.server 80

SERVER_IP=$(
  docker inspect \
    -f '{{range.NetworkSettings.Networks}}{{.IPAddress}}{{end}}' \
  server
)
Let’s imagine that calling curl ${SERVER_IP} directly from the host is not possible for some reason (for example, there is no route from the host to that IP address). So, we need to start port forwarding:
$ ssh -i $HOME/.ssh/id_iximiuz_lab -o StrictHostKeyChecking=no \
  -f -N -L 8080:${SERVER_IP}:80 root@${BASTION_IP}
Note that the SERVER_IP and BASTION_IP variables have different values in the above command.
Checking it works:
$ curl localhost:8080
<!DOCTYPE HTML PUBLIC "-//W3C//DTD HTML 4.01//EN" "http://www.w3.org/TR/html4/strict.dtd">
<html>
<head>
...
Another popular (but rather counterintuitive) scenario is when you want to temporarily expose a local service to the outside world. Of course, you’ll need a public inbound gateway server for this. But fear not! Any public server with an SSH daemon can be used as such a gateway:
ssh -R [remote_addr:]remote_port:local_addr:local_port [user@]gateway_addr
The above command doesn’t look any more complicated than its ssh -L counterpart. But there is one catch…
By default, the above SSH tunnel will only allow the local host of the gateway to be used as the remote address. In other words, your local port will only be accessible from within the gateway server itself, and you probably don’t really need that. For example, I usually want to use the public gateway address as the remote address to expose my local services to the public internet. To do this, the SSH server needs to be configured with the GatewayPorts yes parameter.
Here’s what you can use remote port forwarding for:
Opening a demo access to a development service from your laptop to the public internet.
Hmm… I can think of some esoteric examples, but I doubt they’re worth sharing here. I’d be interested to hear what other people might use remote port forwarding for!
Here’s what remote port forwarding looks like in a diagram:

Pro Tip: Use ssh -f -N -R to start a port forwarding session in the background.
The lab recreates the setup from the diagram above. First, we need to prepare a “developer machine” – a computer with an SSH client and a local web server:
$ docker buildx build -t devel:latest -<<'EOD'
# syntax=docker/dockerfile:1
FROM alpine:3

# Install dependencies:
RUN apk add --no-cache openssh-client curl python3
RUN mkdir /root/.ssh && chmod 0700 /root/.ssh

# Prepare the entrypoint that starts the web service:
COPY --chmod=755 <<'EOF' /entrypoint.sh
#!/bin/sh
set -euo pipefail

cp /tmp/ssh/* /root/.ssh
chmod 600 /root/.ssh/*

python3 -m http.server --bind 127.0.0.1 ${PORT} &

sleep infinity
EOF

# Run it:
CMD ["/entrypoint.sh"]
EOD
Starting the development machine:
$ yes no | ssh-keygen -t rsa -N "" -f ~/.ssh/id_iximiuz_lab

$ docker run -d --rm \
    -e PORT=80 \
    -v $HOME/.ssh:/tmp/ssh \
    --name devel \
    devel:latest
Preparing the inbound gateway server – a simple SSH server with the GatewayPorts setting: yessshd_config
$ docker buildx build -t gateway:latest -<<'EOD'
# syntax=docker/dockerfile:1
FROM alpine:3

# Install the dependencies:
RUN apk add --no-cache openssh-server
RUN mkdir /root/.ssh && chmod 0700 /root/.ssh && ssh-keygen -A

# Prepare the entrypoint that starts the SSH server:
COPY --chmod=755 <<'EOF' /entrypoint.sh
#!/bin/sh
set -euo pipefail

for file in /tmp/ssh/*.pub; do
  cat ${file} >> /root/.ssh/authorized_keys
done
chmod 600 /root/.ssh/authorized_keys

sed -i '/AllowTcpForwarding/d' /etc/ssh/sshd_config
sed -i '/PermitOpen/d' /etc/ssh/sshd_config
sed -i '/GatewayPorts/d' /etc/ssh/sshd_config
echo 'GatewayPorts yes' >> /etc/ssh/sshd_config

/usr/sbin/sshd -e -D &

sleep infinity
EOF

# Run it:
CMD ["/entrypoint.sh"]
EOD
Starting the gateway server and recording its IP address:
$ docker run -d --rm \
    -v $HOME/.ssh:/tmp/ssh \
    --name gateway \
    gateway:latest

GATEWAY_IP=$(
  docker inspect \
    -f '{{range.NetworkSettings.Networks}}{{.IPAddress}}{{end}}' \
  gateway
)
Now, from inside the developer machine, run remote port forwarding:
$ docker exec -it -e GATEWAY_IP=${GATEWAY_IP} devel sh
/ $# ssh -i $HOME/.ssh/id_iximiuz_lab -o StrictHostKeyChecking=no \
  -f -N -R 0.0.0.0:8080:localhost:80 root@${GATEWAY_IP}
/ $# exit  # or detach with ctrl-p, ctrl-q
And check if the local port of the developer machine has become open on the public interface of the gateway (from the host system):
$ curl ${GATEWAY_IP}:8080
<!DOCTYPE HTML PUBLIC "-//W3C//DTD HTML 4.01//EN" "http://www.w3.org/TR/html4/strict.dtd">
<html>
<head>
...
Similar to local port forwarding, remote port forwarding has its own bastion host mode. But this time, a machine with an SSH client (like your developer laptop) acts as the bastion. Specifically, this allows you to open ports on your home (or private) network that your laptop has access to the outside world via an inbound gateway:
ssh -R [remote_addr:]remote_port:local_addr:local_port [user@]gateway_addr
It looks almost identical to a simple remote SSH tunnel, but the local_addr:local_port pair becomes the address of the device on the home network. Here’s how it can be represented in a diagram:

Since I usually use my laptop as a thin client and the actual development happens on a home server, I rely on this kind of remote port forwarding when I need to provide access to a development service from my home server to the public internet and the only machine with access to the gateway is my thin laptop.
As usual, the lab recreates the setup from the diagram above. First, we need to prepare a “thin development machine”:
$ docker buildx build -t devel:latest -<<'EOD'
# syntax=docker/dockerfile:1
FROM alpine:3

# Install the dependencies:
RUN apk add --no-cache openssh-client
RUN mkdir /root/.ssh && chmod 0700 /root/.ssh

# This time we run nothing (at first):
COPY --chmod=755 <<'EOF' /entrypoint.sh
#!/bin/sh
set -euo pipefail

cp /tmp/ssh/* /root/.ssh
chmod 600 /root/.ssh/*

sleep infinity
EOF

# Run it:
CMD ["/entrypoint.sh"]
EOD
Launching the “development machine”:
$ yes no | ssh-keygen -t rsa -N "" -f ~/.ssh/id_iximiuz_lab

$ docker run -d --rm \
    -v $HOME/.ssh:/tmp/ssh \
    --name devel \
    devel:latest
Starting a private development server using a separate “machine” and recording its IP address:
$ docker run -d --rm \
    --name server \
    python:3-alpine \
    python3 -m http.server 80

SERVER_IP=$(
  docker inspect -f '{{range.NetworkSettings.Networks}}{{.IPAddress}}{{end}}' \
  server
)
Preparing the inbound gateway server:
$ docker buildx build -t gateway:latest -<<'EOD'
# syntax=docker/dockerfile:1
FROM alpine:3

# Install the dependencies:
RUN apk add --no-cache openssh-server
RUN mkdir /root/.ssh && chmod 0700 /root/.ssh && ssh-keygen -A

# Prepare the entrypoint that starts the SSH daemon:
COPY --chmod=755 <<'EOF' /entrypoint.sh
#!/bin/sh
set -euo pipefail

for file in /tmp/ssh/*.pub; do
  cat ${file} >> /root/.ssh/authorized_keys
done
chmod 600 /root/.ssh/authorized_keys

sed -i '/AllowTcpForwarding/d' /etc/ssh/sshd_config
sed -i '/PermitOpen/d' /etc/ssh/sshd_config
sed -i '/GatewayPorts/d' /etc/ssh/sshd_config
echo 'GatewayPorts yes' >> /etc/ssh/sshd_config

/usr/sbin/sshd -e -D &

sleep infinity
EOF

# Run it:
CMD ["/entrypoint.sh"]
EOD
And let’s start this:
$ docker run -d --rm \
    -v $HOME/.ssh:/tmp/ssh \
    --name gateway \
    gateway:latest

GATEWAY_IP=$(
  docker inspect \
    -f '{{range.NetworkSettings.Networks}}{{.IPAddress}}{{end}}' \
  gateway
)
Now, from within the “development machine”, run the SERVER-GATEWAY remote port forwarding:
$ docker exec -it -e GATEWAY_IP=${GATEWAY_IP} -e SERVER_IP=${SERVER_IP} devel sh
/ $# ssh -i $HOME/.ssh/id_iximiuz_lab -o StrictHostKeyChecking=no \
  -f -N -R 0.0.0.0:8080:${SERVER_IP}:80 root@${GATEWAY_IP}
/ $# exit  # or detach with ctrl-p, ctrl-q
Finally, check if the development server is available on the gateway’s public interface (from the host system):
$ curl ${GATEWAY_IP}:8080
<!DOCTYPE HTML>
<html lang="en">
<head>
...
After doing all this lab work and drawing, I noticed that:
The word “local” can refer to either the SSH client machine or an upstream host accessible from that machine.
The word “remote” can refer to either the SSH server (sshd) or the upstream host accessible from it.
Local port forwarding (ssh -L) means that the ssh client itself starts listening on the new port.
Remote port forwarding (ssh -R) means that the ssh server itself starts listening on the additional port.
The mnemonics are “ssh -L local:remote” and “ssh -R remote:local”, and the new port is always opened on the left line.
I hope the above materials have helped you a little to become a master of SSH tunnels.