
In this article, we will tell you what a web server for Windows consists of. But that's all about its installation and configuration.

MySQL is a scalable, fast and reliable database management system that can run on any platform such as Windows, Unix, Linux, etc. and can be installed on a desktop or any server machine . It is an open source database system, the source code can be modified according to our needs. Most commonly used in conjunction with PHP to store website databases. Can also be used as a data store of any program or tool. MySQL has a graphical interface phpMyAdmin – a web application written in PHP. It allows you to work with data, including viewing, modifying, importing and exporting it in a web interface. phpMyAdmin requires a web server (Apache), and of course PHP and MySQL. We wrote this article to help you better understand MySQL. It will help you in using MySQL to work with databases. We will also tell you how to install and configure phpMyAdmin to get a graphical database management interface. Using this knowledge, you can, for example, run a site on a local computer, deploy a site that uses a database from a backup copy.
There are many top sites that use MySQL. It consists of two main components: the server and the client. The MySQL server is the same DBMS that ensures the operation of databases. The server is necessary for the operation of the database. A MySQL client is a utility for connecting to a server. The client is required if you want to connect to the MySQL server from the command line. In a client-server network environment, the MySQL server is available as a separate application. In addition, it is available as a library that can be linked to a separate application.
If you have already worked with Debian derivatives (Linux Mint, Ubuntu), they have two packages:
mysql-server – MySQL server
mysql-client -MySQL client
By default, MySQL is already installed in Kali Linux, but if you have a minimal build, you may need to install the DBMS manually.
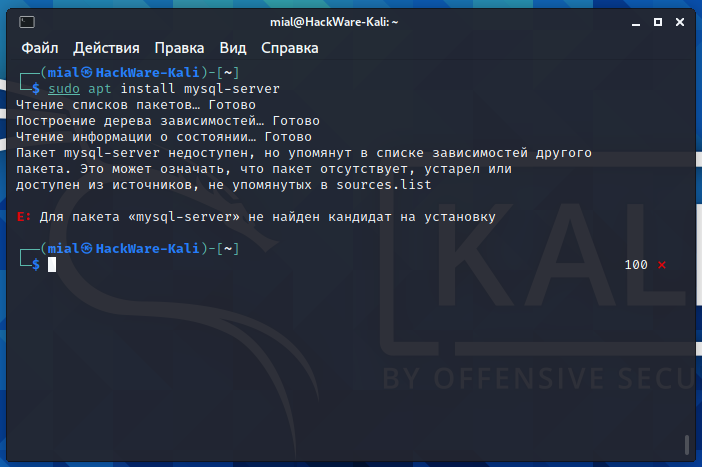
If you try to install the mysql-server package, you will get the following error (Screenshot 1):

The fact is that in Kali Linux (and probably in fresh Debian, as well as in all its derivatives), this package is called differently:
default-mysql-server (executable DBMS files and system database settings)
default-mysql-server-core (only implemented DBMS files)
Therefore, to install MySQL, use the following command:

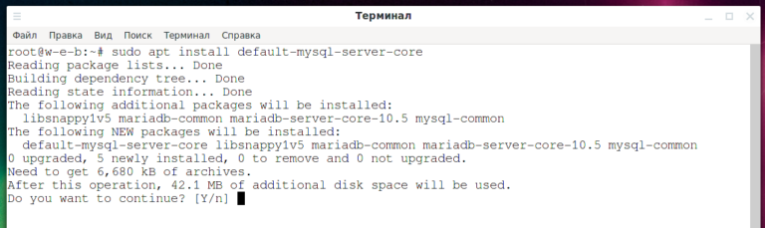
We say MySQL, but MySQL is completely absent from the Kali Linux repositories. Regardless of whether this DBMS was installed on your system or you installed it manually, MariaDB is installed instead (Screenshot 2).
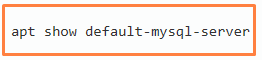
You can see for yourself with the command:
MariaDB is also a database management system. It is an offshoot of MySQL. MariaDB’s mission is to perform all the functions of MySQL, but better. The name of the service, the name of the configuration files have not changed.

/etc/mysql/my.cnf (link to /etc/alternatives/my.cnf)
/etc/mysql/debian.cnf (obsolete file, will be removed in future versions)
/etc/mysql/conf.d/mysql.cnf
/etc/mysql/conf.d/mysqldump.cnf
/etc/mysql/mariadb.conf.d/50-client.cnf
/etc/mysql/mariadb.conf.d/50-mysqld_safe.cnf
/etc/mysql/mariadb.conf.d/60-galera.cnf
/etc/mysql/mariadb.conf.d/50-mysql-clients.cnf
/etc/mysql/mariadb.conf.d/50-server.cnf
Most of the settings are collected in the 50-server.cnf file. By default, the MySQL service listens for incoming connections only on localhost (connections from other computers are not possible).
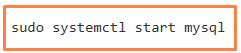
To start the MySQL service, run the command:
To enable MySQL to start automatically every time you turn on your computer, run the command:
![]()
For newly installed MySQL, the root user password is blank. To change it, launch and follow the instructions:

When the MySQL server service is running, to connect to it, you need to use a command like this:

All three options are optional. If the -u option is omitted, the current OS username will be used as the MySQL username. The -p option means that a password login is performed. After this option, you do not need to write a password – it will be asked in the command line prompt. If the -h option is not specified, an attempt will be made to connect to the local server.
Attempting to connect when the mysql -u root user password is not set:
This will throw an error:

The crux of the problem is that unix_socket authentication is used by default, meaning when the OS username matches the MySQL/MariaDB username, no password needs to be entered at all. But another user can’t login as another user, so you need to use sudo to login as root. You can choose one of the options:
1. Always use sudo: mysql -u root.
2. Make changes to the MySQL settings so that ordinary users can connect to the DBMS. 3. Create a new MySQL user. If it will be a user with the same name as your name in the OS, then you can use unix_socket authentication and not enter a password when connecting. Or you can choose password authentication and use any name. To access the MariaDB database as a normal user without using sudo privileges (this will also set the root user password).
Go to the MySQL command prompt
![]()
and run the following SQL commands:

Note that you need to enter a PASSWORD.
Then try logging into the database without sudo
mysql -u root -p
Go to the MySQL command line prompt:
mysql -u root -p
and run the following commands:
![]()
Please note that you need to enter a NEW PASSWORD. Also note that this method changes the password of the root user. If you want to change the password of another MySQL user, then in the preceding SQL query specify the name of that user, for example:

If you work exclusively on localhost and security issues do not concern you, then for convenience you can set an empty password (do not do this if you do not fully understand the possible risks):
![]()
In this case, you can not use the -p option when connecting:
mysql -u root
By default, phpMyAdmin is not installed on Kali Linux. Installation can be done in two ways:
1. Since phpMyAdmin is a PHP web application, you can simply download the archive with the source code (scripts) and unzip it to any folder on the server.
2. In most distributions, there is a phpMyAdmin installation package in the standard repositories. The advantage of this approach is that you do not need to monitor the release of new versions of phpMyAdmin and do updates manually.
I prefer to install phpMyAdmin from the standard repositories (and WordPress, on the other hand, I prefer to install by simply copying the folder with the WordPress files to the web server folder; this gives me control over the upgrade process; if you really need to upgrade, it’s all done in a convenient web interface). You should already have Apache, MySQL, PHP installed. By default, they are already in Kali Linux, but if you have a version with the minimum number of packages, then install them:
![]()
Install phpMyAdmin with the following command:
![]()
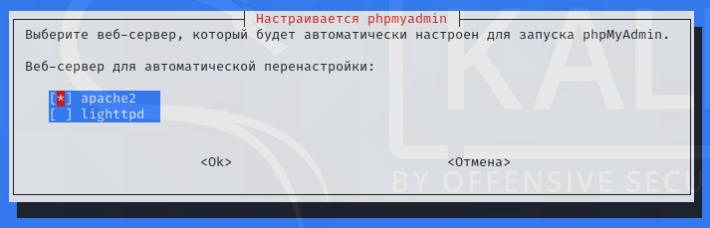
Answer “No” to the configuration request from dbconfig-common (Screenshot 3):

To move between items, press the Tab key and then press the Enter key. Select apache2 (Screenshot 4).
To select items, press the space bar, scroll to Tab, and then press Enter (Screenshot 5). Now, after enabling the web server, phpMyAdmin will be available at https://server_ip_address/phpmyadmin/
Don’t forget to start the services:


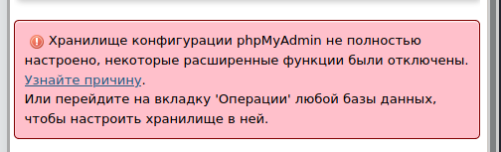
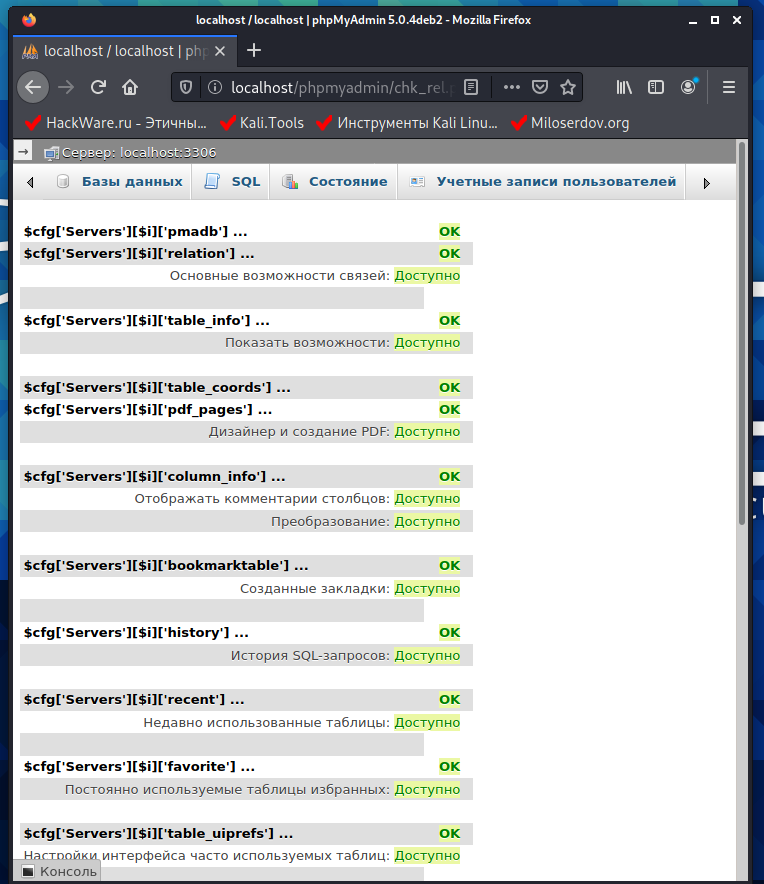
At the bottom of the phpMyAdmin page, you can see a message on a red background:
The phpMyAdmin configuration store is not fully configured, some advanced features have been disabled. Find out why.Or go to the ‘Operations’ tab of any database to configure storage in it.
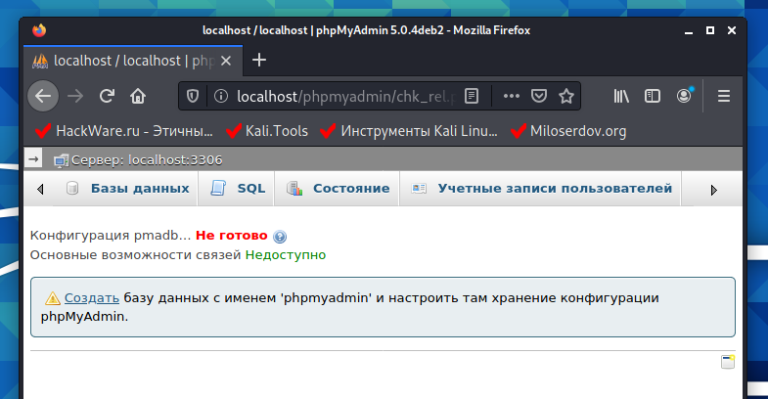
If you only want to enable them, then click “Create Database” (Screenshot 6).
After that, all new functions will be activated (Screenshot 7).
To enable phpMyAdmin for use with the Apache web server, use the command:

Restart the web server for the changes to take effect.
To disable phpMyAdmin, use the command:

Restart the web server for the changes to take effect.
There is an important line in the /etc/phpmyadmin/apache.conf file:

Its essence is that the URL address /phpmyadmin (for example, http://localhost/phpmyadmin) starts responding to the folder /usr/share/phpmyadmin. That is, phpMyAdmin files (scripts) are physically located in /usr/share/phpmyadmin, not the web server directory (for example, /var/www/html/). Many automatic scanners of “hidden” files and folders of web servers and sites necessarily check “phpmyadmin”, “pma” and other similar directories. You can hide your phpMyAdmin well by changing the Alias.
Example:
![]()
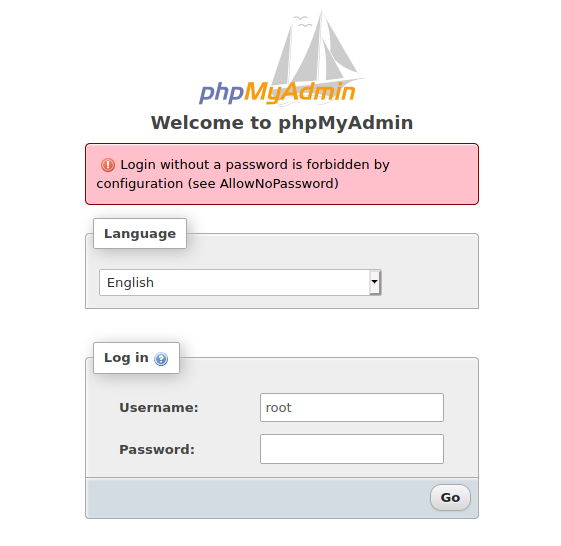
phpMyAdmin will now be available at http://localhost/lkjgler94345 – this is not easy to find. When you try to login to phpMyAdmin with an empty password, you may receive an error (Screenshot 8):
Login without a password is prohibited by configuration (see AllowNoPassword)
The bottom line is that logging in without a password is prohibited by the phpMyAdmin configuration.
1. Set the MySQL password
2. In the phpMyAdmin configuration, allow login without a password.
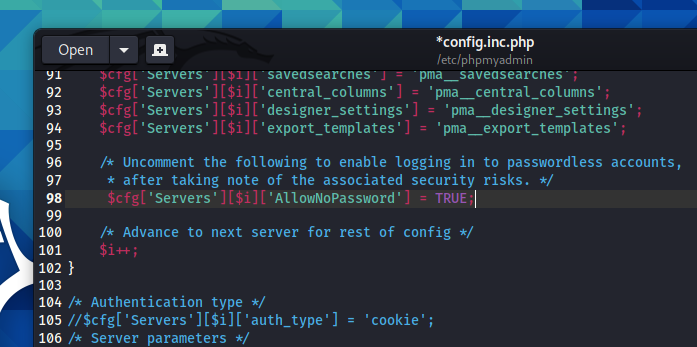
To enable passwordless login to phpMyAdmin, open the /etc/phpmyadmin/config.inc.php file:
![]()
Find the second (there are two) line
![]()
Uncomment it to make it work (Screenshot 9):

Save and close the config.inc.php file.
Working in phpMyAdmin is intuitive, so there should be no difficulties. But by default, PHP has very small limits on the size of the file being processed, so if you import or export a large database, you may encounter the phpMyAdmin “Incorrect format parameter” error, see this article on how to fix it. If you work a lot with phpMyAdmin, you can customize it to your liking, including setting standard settings for import and export.
Please note that phpMyAdmin is a plugin that uses PHP to interact with databases. Therefore, there are speed losses when processing very large databases, and you can also encounter PHP limits set in its configuration file. Import and export of large databases in MySQL can be performed using the tools of MySQL itself – the DBMS comes with auxiliary utilities that allow you to perform various actions. Editing databases, adding new records, deleting records, and more can be done from the command line using SQL queries.