
10.05.2023
9 min
3225

The web server as such is Apache – it is able to process requests from the user and send the requested files to him, such as static HTML pages, images, CSS and JavaScript files. Since this functionality is usually not enough and most users need support for dynamically created pages, PHP is connected to Apache as a web server module for these purposes. One or another database management system (DBMS), usually MySQL or MariaDB, is used to store data. DBMS is not an Apache or PHP module, it is a separate network service to which various programs can connect, it is important for us that PHP can work with MySQL. These three components are typical of what is commonly referred to as a “web server”, although, again, a web server is really just Apache. Quite often, phpMyAdmin is added to these three components. At its core, phpMyAdmin is a set of scripts written in PHP and designed to facilitate working with databases. phpMyAdmin is a web interface for working with databases. In fact, other scripting languages such as Python, Perl, Ruby and others can be added/connected to the web server.
This article will show in detail how to install, configure and run Apache, MySQL, PHP and phpMyAdmin without using third-party assemblies. It’s like a step-by-step guide to setting up a web server in Windows. This approach will allow you to have the latest versions of components and not worry about the security of running programs. Once you understand how Apache modules work and connect, you can add whatever components you need and customize it exactly to your needs.
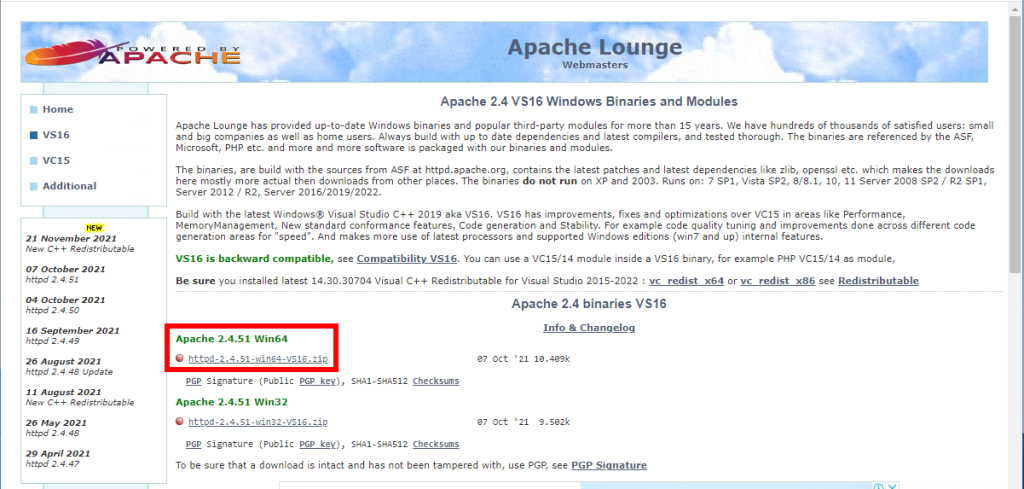
Apache: https://www.apachelounge.com/download/
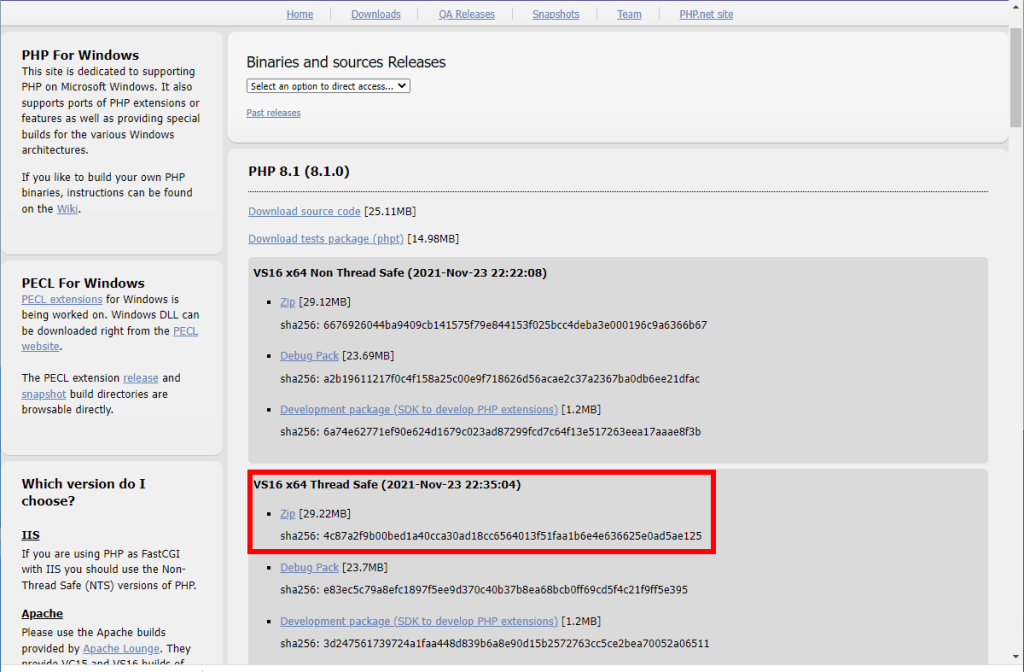
PHP: https://windows.php.net/download/. Choose the Thread Safe version, pay attention to bitness.
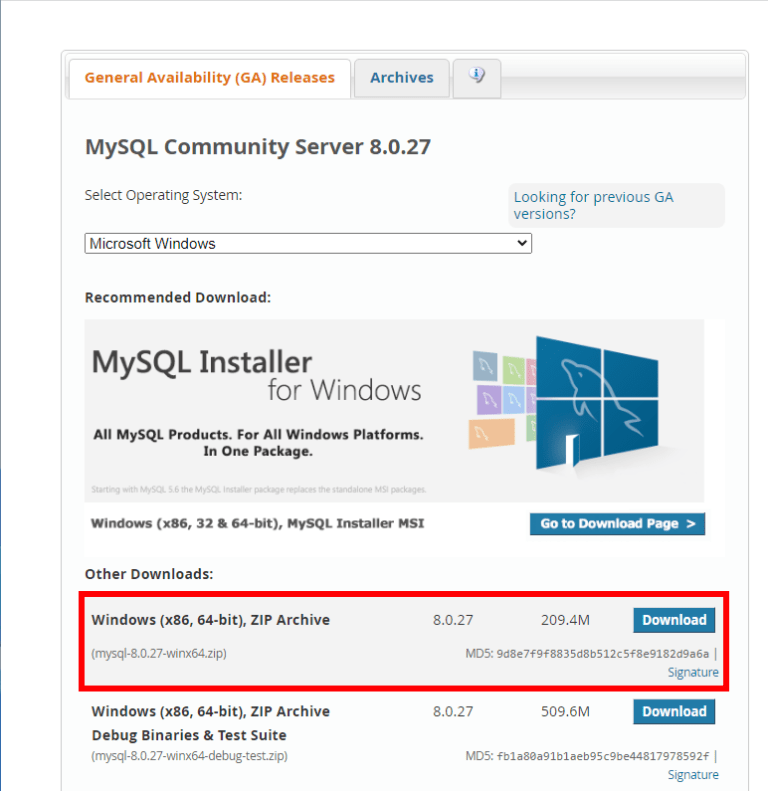
MySQL: https://dev.mysql.com/downloads/mysql/
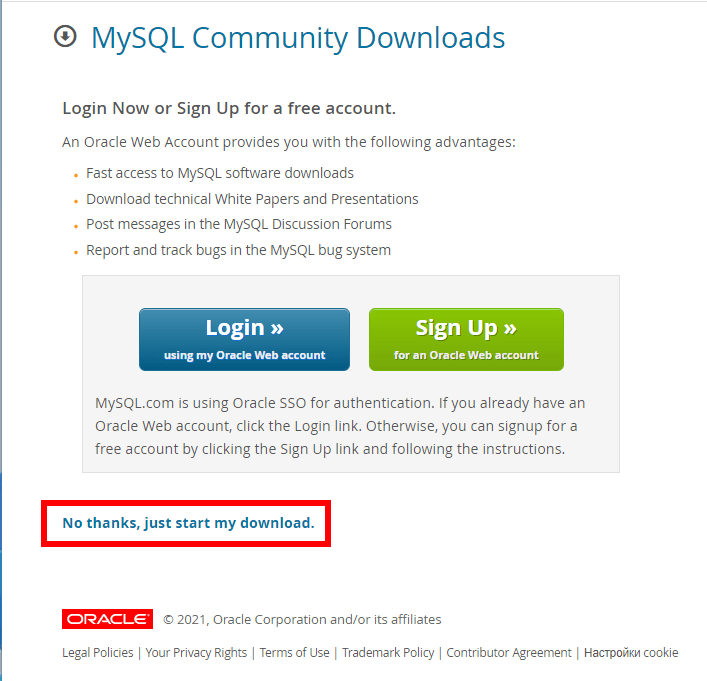
Just click on the “No thanks, just start my download” link.
phpMyAdmin: https://www.phpmyadmin.net/downloads/phpMyAdmin-latest-all-languages.zip
Also needed is the Visual C++ Redistributable for Visual Studio 2015-2022 file, ie. Visual C++ Distributed Component for Visual Studio 2015-2022 (or any later), you can download it from the official Microsoft website using the link (direct link to download 64-bit version; direct link to download 32-bit version). So, I have the following files downloaded:
VC_redist.x64.exe
mysql-8.0.27-winx64.zip
httpd-2.4.51-win64-VS16.zip
php-8.1.0-Win32-vs16-x64.zip
phpMyAdmin-5.1.1-all-languages.zip
Install the VC_redist.x64.exe file. If you use Windows Explorer to create and rename configuration files, remember that it doesn’t show file extensions by default, so you might see my.ini but it’s actually my.ini.txt file. Therefore, the server does not see this file and does not apply parameters from it, which leads to errors. Therefore, when creating files:
or use Double Commander (Free equivalent of Total Commander), this program always shows file extensions, and is generally a very good cross-platform, open-source, two-window file manager.
or enable the display of file extensions in Explorer.
Next, we will create the directory structure of our server. The main idea is to separate files and site files with databases. This is convenient for server maintenance, particularly backups. At the root of the C: drive, create a Server directory. In this directory, create 2 subdirectories: bin (for files) and data. Go to the data directory and create the DB (for databases) and htdocs (for sites) folders there. Navigate to the C:ServerdataDB directory and create an empty data folder there. Map of important folders mentioned in this guide:

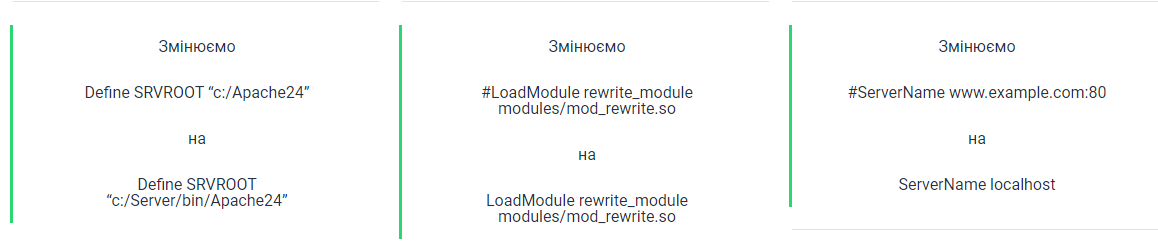
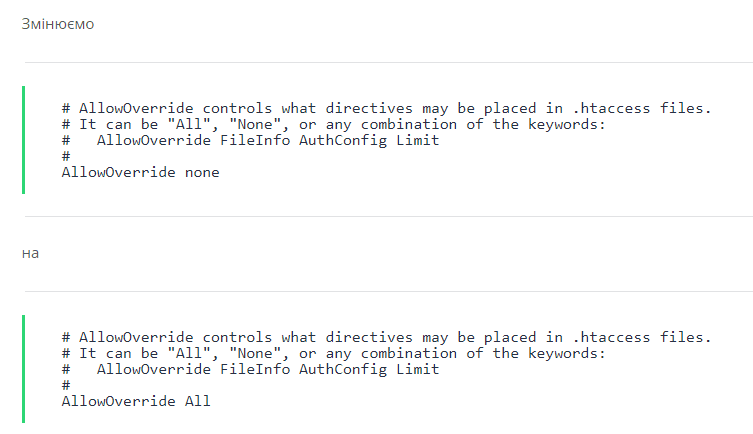
The contents of the downloaded archive (more precisely, only the Apache24 directory), extract to C:Serverbin. Navigate to the c:ServerbinApache24conf directory and open the httpd.conf file with any text editor. In it, we need to replace a number of lines.

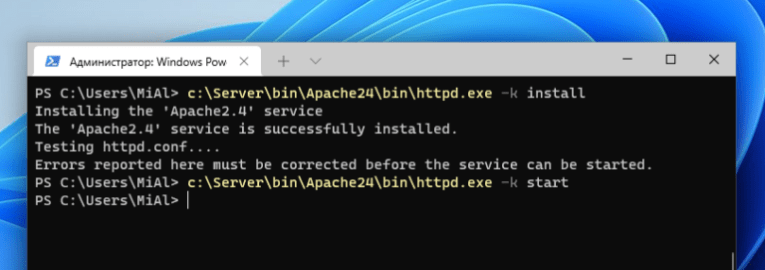
Open the command line (this can be done by simultaneously pressing the Win + x keys). Select Windows Terminal (Admin) there (Screenshot 1) and copy there:
![]()
If there is a request from the firewall about Apache, then click Allow access.

Now type in the command line:

and press Enter (Screenshot 2).
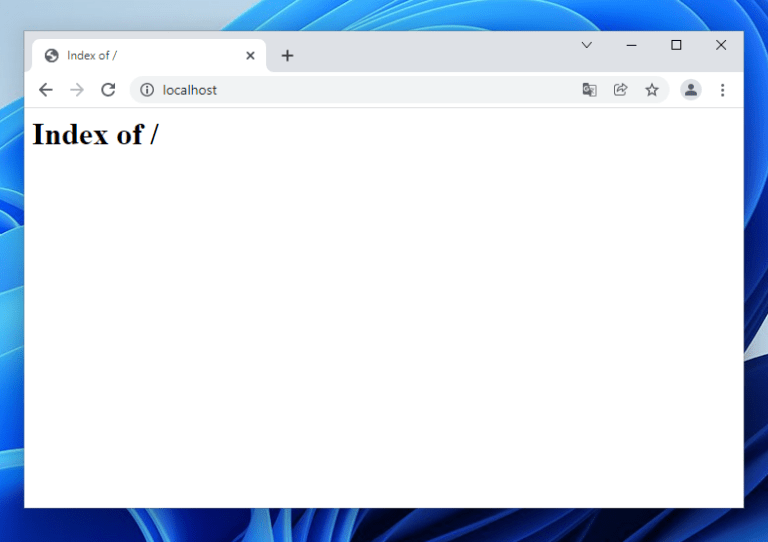
Now type in the browser http://localhost
Apache is running.
There is no file in the c:Serverdatahtdocs directory.
You can play around – add any html files to the directory – a full-fledged web server works.
We unpack the MySQL files (from the mysql-8.0.27-winx64.zip archive) into the bin directory. Rename the folder mysql-8.0.27-winx64 to mysql-8.0 (for brevity). By the way, the unzipped mysql-8.0 folder takes up more than 800 megabytes! Go to this folder and create the my.ini file there. Now open this file with any text editor. Add the following lines there:

The setup is complete, but you still need to perform initialization and installation (Screenshot 4), for this we open the command line as an administrator and sequentially enter there:

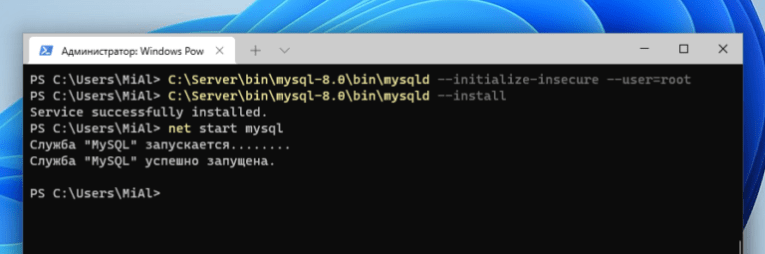
At the end of this process, automatically generated files should appear in the C:ServerdataDBdata directory. The MySQL service will now start every time Windows is turned on.
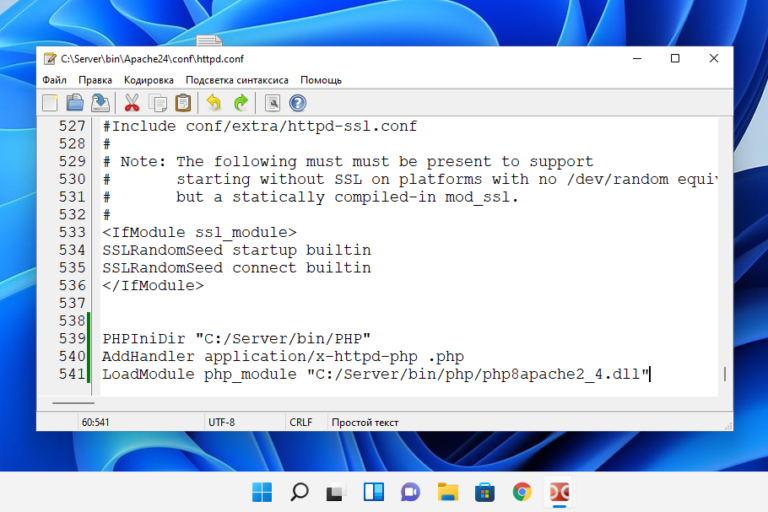
In the c:Serverbin folder, create a PHP directory and copy the contents of the php-8.1.1-Win32-vs16-x64.zip archive. In the c:ServerbinApache24confhttpd.conf file, add lines at the very end (Screenshot 5)
![]()
Then restart Apache

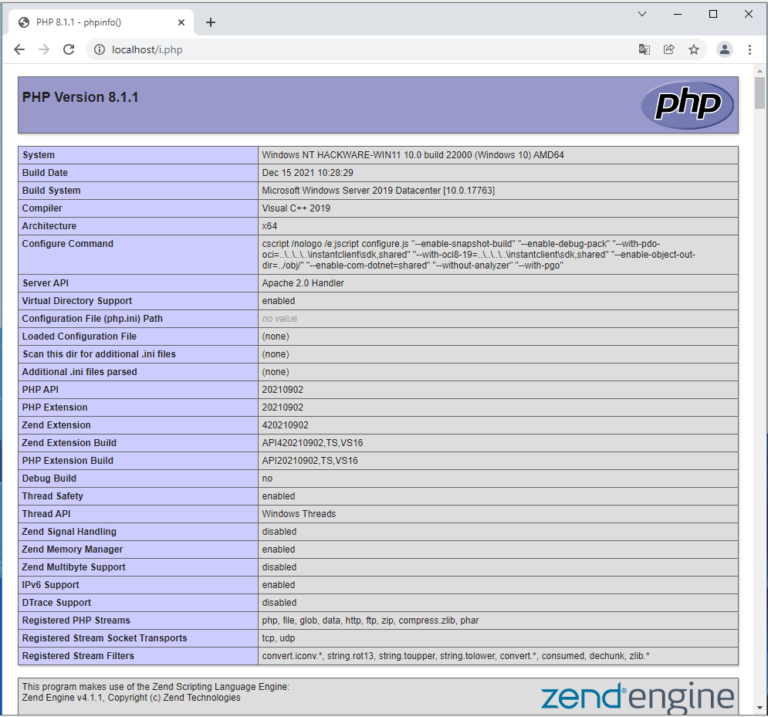
In the c:Serverdatahtdocs directory, create a file called i.php Copy to this file:
![]()
Open the link http://localhost/i.php in your browser. If you see the same as in the picture, then PHP is working (Screenshot 6).
And then we start configuring PHP. It happens in the php.ini file. There is no php.ini in the zip archives intended for manual installation and updates (this is done specifically so that you do not accidentally delete your file with your unique settings). But there are two others called php.ini-development and php.ini-production. Any of them, with manual installation, can be renamed to php.ini and configured further. On the localhost, we will use php.ini-development.

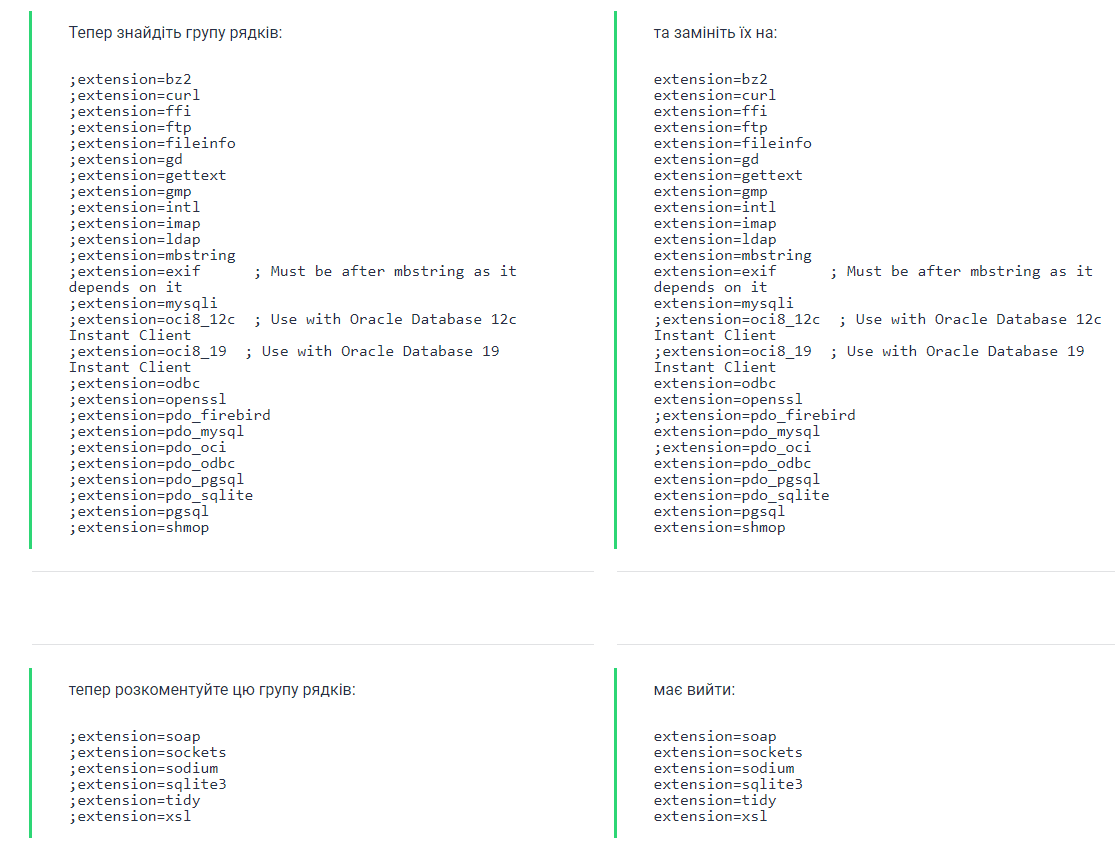
With these actions, we have enabled the extension. They may be needed in different situations for different scripts. Save the file and restart Apache.
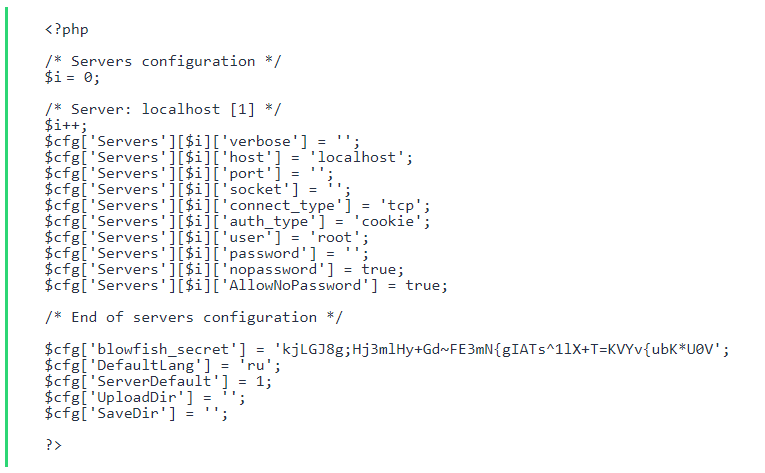
Copy the contents of the phpMyAdmin-5.1.1-all-languages.zip archive to the c:Serverdatahtdocs directory. Rename phpMyAdmin-5.1.1-all-languages to phpmyadmin (for brevity) In the c:Serverdatahtdocsphpmyadmin directory, create a config.inc.php file and copy it there:
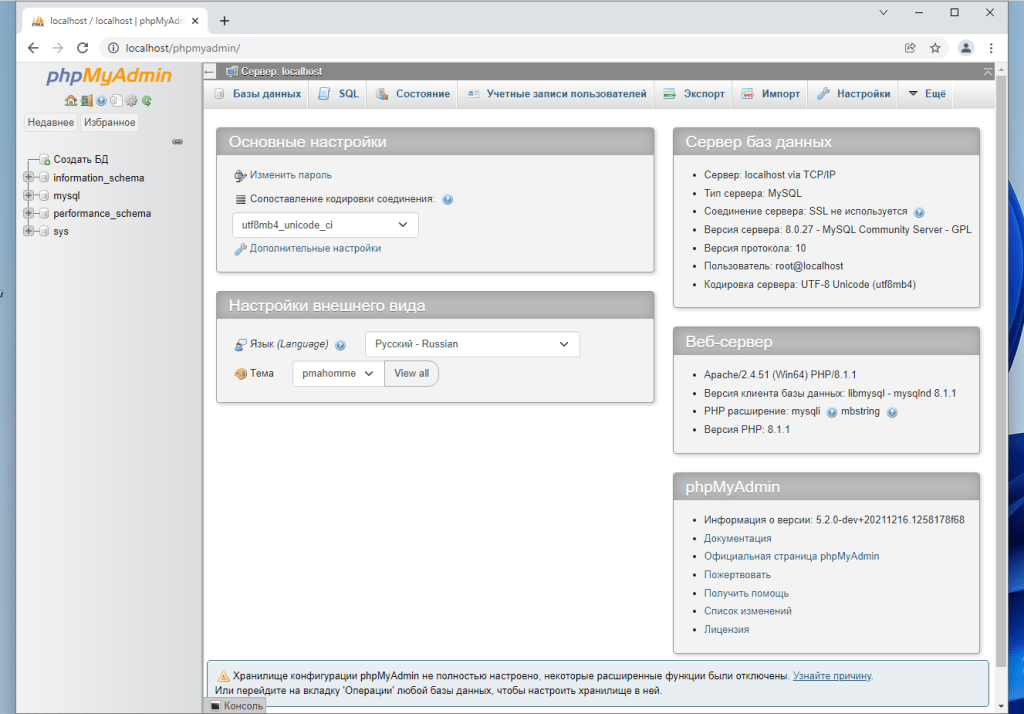
In the browser, type http://localhost/phpmyadmin/ Enter root as the username. Leave the password field empty. If everything is done correctly, everything should look like this (Screenshot 7). And then in the c:Serverdatahtdocs directory, create folders and files, for example: c:Serverdatahtdoctestajax.php – this file, accordingly, will be available at the address http://localhost/test/ajax.php, etc. To create a full backup of all sites and databases, it is enough to copy the directory C:Serverdata. Before updating modules, make a backup of the bin folder – in case of problems, you can easily roll back to previous versions. When reinstalling the server or updating it, you need to configure the configuration files again. If you have copies of these files, the process can be greatly speeded up. It is recommended to back up the following files: c:ServerbinApache24confhttpd.conf c:Serverbinmysql-8.0my.ini c:ServerbinPHPphp.ini c:Serverdatahtdocsphpmyadminconfig.inc.php They store all settings.
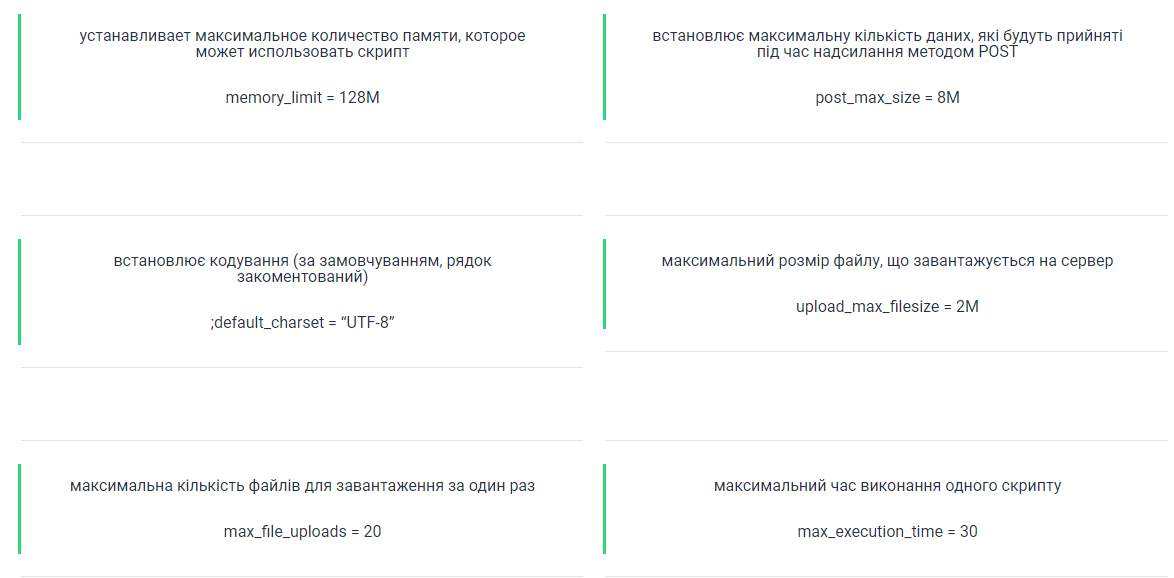
PHP is currently a very powerful, flexible, convenient programming language and tool. On a local computer, it can be used to solve various tasks that are not necessarily related to the generation of Web pages. When solving extraordinary tasks, you can rely on the restrictions set in the settings. These settings are contained in the php.ini file (c:ServerbinPHPphp.ini). Let’s consider some of them:
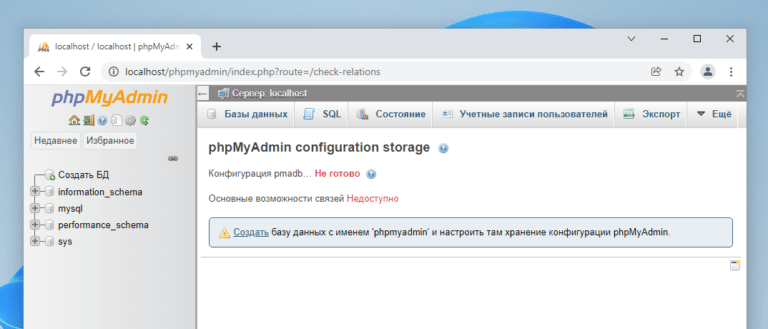
We’ve already set up phpMyAdmin and the basic functionality is enough for most of us. However, the phpMyAdmin start page says: “The phpMyAdmin configuration store is not fully configured, some advanced features have been disabled. Find out the reason. Or go to the ‘Operations’ tab of any database to configure storage in that database.” The new features are:
showing connections between (related) tables;
adding information about tables (starting from version 2.3.0 you can describe in the special table ‘table_info’ which column will be shown in the tooltip when moving the cursor over the related key);
creating a PDF diagram (starting with version 2.3.0, you can create PDF pages in phpMyAdmin that show the relationships between your tables);
display column comments (starting from version 2.3.0 you can make a comment describing each column for each table. And they will be visible in the “print preview”. Starting from version 2.5.0, comments are used on the tables’ own pages and in the mode view, appearing as tooltips above columns (property tables) or embedded in the table header in view mode.They can also be shown in a table dump);
create bookmarks (since version 2.2.0, phpMyAdmin allows users to bookmark queries. This can be useful for frequently used queries);
history of SQL requests (starting from version 2.5.0, you can save your history of all SQL requests that were made through the phpMyAdmin interface);
designer (since version 2.10.0, the Designer tool is available;
it allows you to visually manage the connections between tables);
information about recently used tables;
setting the interface of frequently used tables;
tracing (starting from version 3.3.x, a tracing mechanism is available. It helps you to trace every SQL command that was executed by phpMyAdmin. It supports logging of data operations and logging of commands. Once enabled, you will be able to version tables);
user settings (since version 3.4.x, phpMyAdmin allows users to set most settings and store them in the database);
customizable menus (starting from version 4.1.0 you can create groups of users to whom only assigned menu items will be available. A user can be assigned to a group and will see only menu items available to his group);
hide/show navigation items (starting with version 4.1.0, you can hide/show items in the navigation tree).
Go to the link http://localhost/phpmyadmin/index.php?route=/check-relations and click “Create a database with the name “phpmyadmin” and configure the storage of the phpMyAdmin configuration there” (Screenshot 8).
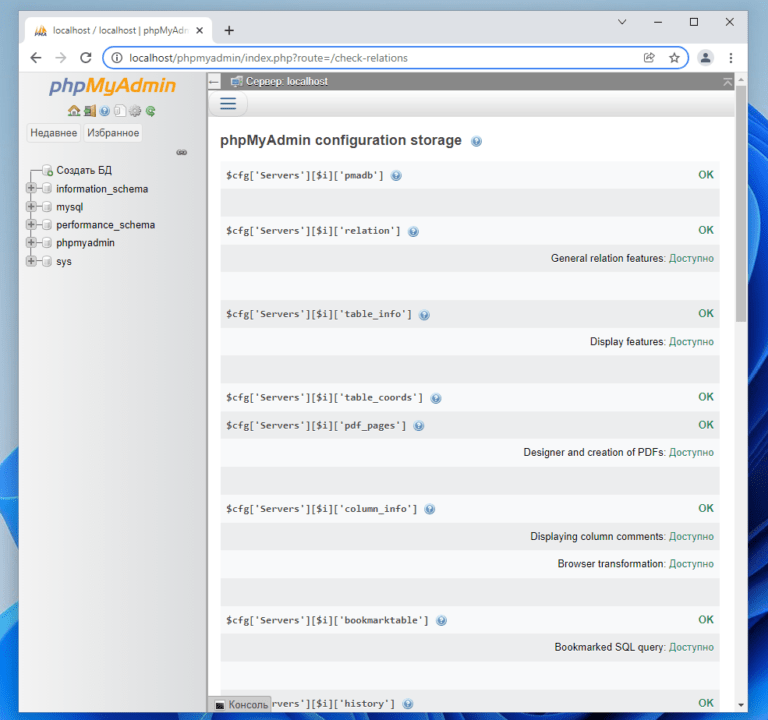
After that, all new functions will be activated (Screenshot 9).
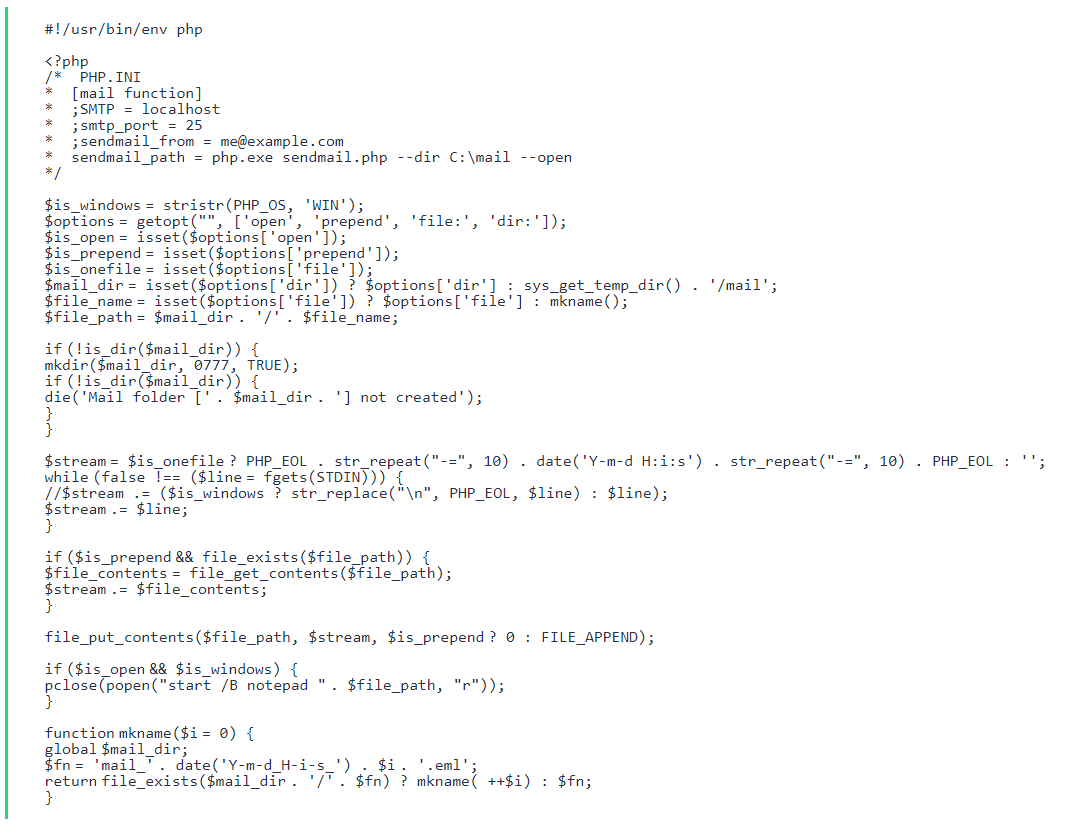
In the C:Serverbin directory, create a new directory called Sendmail. Now, in this directory, create a sendmail.php file with the following content:
Open the PHP configuration file, it is located here C:ServerbinPHPphp.ini. And add one line there:

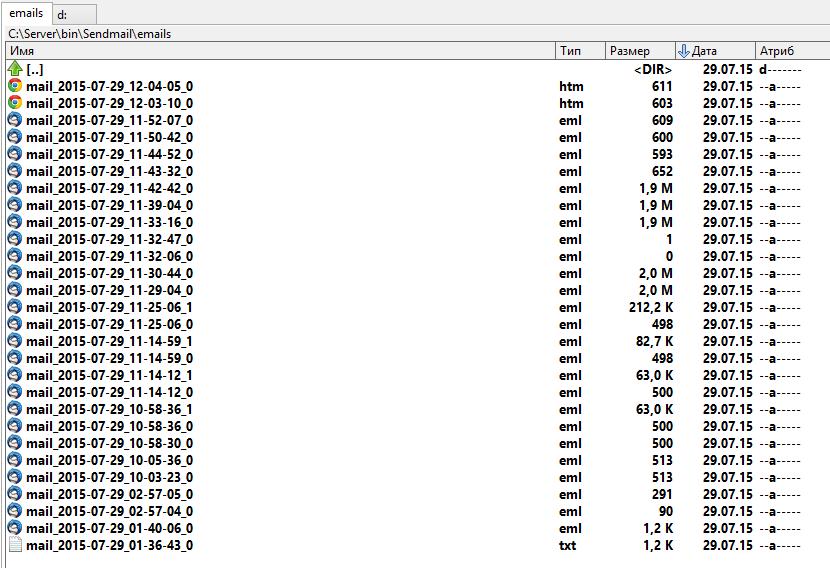
Save the file and restart the server (Screenshot 10). Great, now all sent emails will be stored in the directory C:ServerbinSendmailemails The emails will have the extension .eml and can be opened by, for example, Thunderbird. Or a regular text editor.
Next, you must add the PHP directory to the PATH on Windows. Failure to do so may cause problems with some PHP modules, including php_curl.dll, php_intl.dll, php_ldap.dll, php_pdo_pgsql.dll, and php_pgsql.dll.
Click Start, start typing Change System Environment Variables (Screenshot 11)
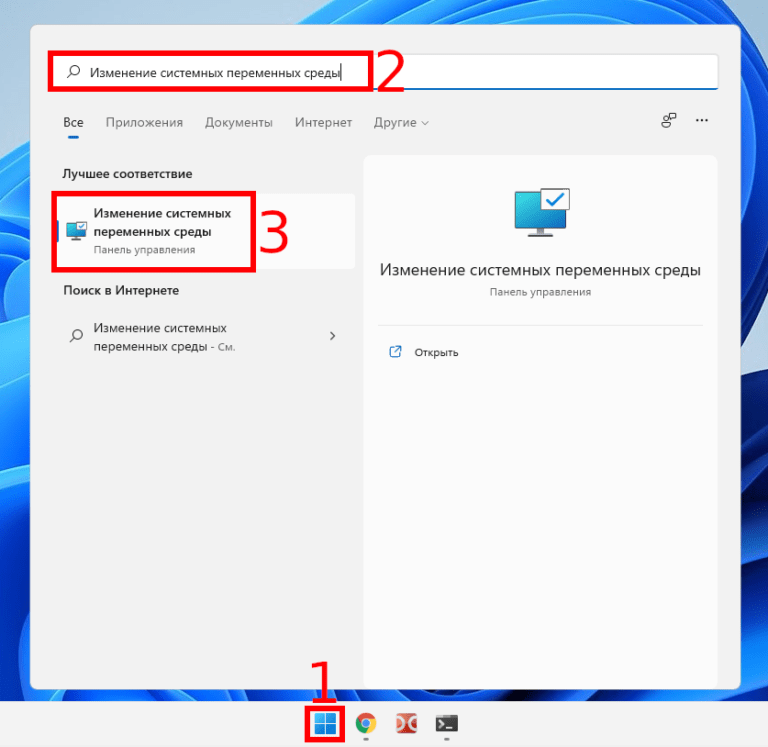
And open the corresponding settings window (Screenshot 12).
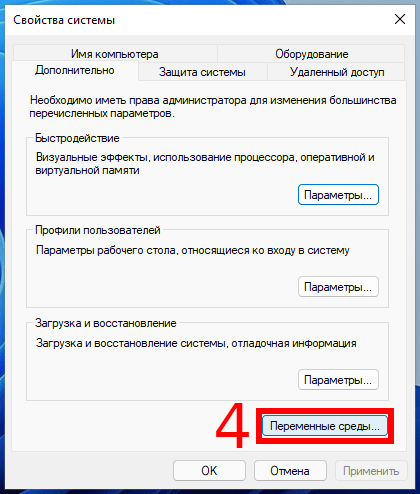
There, click on “Environment Variables”. In the System Variables window, find and click Path, then click Change, then New, and type “C:ServerbinPHP” there and move the entry up. And after that, close all windows with saving changes and restart the server.
If you don’t know what cURL is, you don’t need to. That is, feel free to skip this step. cURL is a console utility that allows you to exchange data with remote servers using a very large number of protocols. cURL can use cookies and supports authentication. If a web application requires cURL, it must be specified in the dependencies. Many popular applications do not require cURL, for example, phpMyAdmin and WordPress do not need to configure cURL. If cURL is configured incorrectly, you will receive errors:

or:

To make cURL work in Apache on Windows, you need:
Be sure to add the PHP directory to the PATH (system environment variables). How to do it is described a little above: https://hackware.ru/?p=17793#12.
The extension=curl line must be uncommented in the C:ServerbinPHPphp.ini file.
.You need to download the file https://curl.haxx.se/ca/cacert.pem, then in the C:Server folder create a new folder named certs and move the downloaded file to this new folder (C:Servercerts).
In the C:ServerbinPHPphp.ini file, find the line.
;curl.cainfo = And replace it with curl.cainfo = C:Servercertscacert.pem:
Restart the server. All significant information, that is. site files and their databases are stored in the C:Serverdata folder. There are two ways to make a backup copy in case the original data is corrupted.
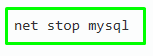
The first way is that we simply make a copy of all files (sites + databases) to a safe place. This is a simple method and will be the most convenient for most people. You need to start by stopping MySQL, because until it is stopped, some database files are open and cannot be copied correctly:
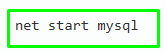
Now just copy the C:Serverdata folder to any safe place. It already contains databases (subfolder C:ServerdataDB) and all sites (subfolder C:Serverdatahtdocs). After the copy is complete, start the MySQL service again:
If you need to restore all sites, or individual sites, or just individual site files, this can be done without stopping the web server. If you need to restore the databases, you will need to stop MySQL again and return the original files to C:ServerdataDB. Please note that even if you completely return the source folder C:Serverdata, there is a full rollback of all data, i.e. all changes made after the backup will be lost!
The second backup method consists in exporting the databases (this is done while the MySQL service is running) and creating a backup of only the site folder C:Serverdatahtdocs. This method is a bit more complicated, but you can control exactly which databases you want to export. Also in this form (databases in the form of .SQL files and site files) it is convenient to transfer sites to another web server or hosting. This is usually not required, but you may want to back up the server binaries. All these files are located in the C:Serverbin folder. These are Apache, MySQL and PHP – ie. programs that are responsible for the operation of the server, but which we can download from official sites and configure again at any moment. If you want to make a backup copy of them (for example, before updating the server), then stop the services:

And copy the C:Serverbin folder to a safe place. By the way, you can copy the entire server, i.e. folder C:Server – in this case, a backup copy of both executable files and data (databases, sites) will be created at the same time. After copying is complete, restart the services:

All components that make up the web server are actively developing and new versions are released regularly. When a new version is released, you can update one component (for example, PHP) or several at once.
Download the archive with the new version of Apache. Copy the c:ServerbinApache24confhttpd.conf file to a safe location. Stop and remove Apache:

Delete the C:ServerbinApache24 folder (this will not affect your sites and databases). Extract the new archive to C:Serverbin. Copy the httpd.conf file you saved earlier to c:ServerbinApache24confhttpd.conf. Start the Apache service:

Download archive with the new version of PHP. Copy the c:ServerbinPHPphp.ini file to a safe location. Delete the C:ServerbinPHP folder. Extract the new archive to C:ServerbinPHP. Copy the php.ini file you saved earlier to c:ServerbinPHPphp.ini. Restart Apache:

Download archive with the new version of MySQL. Copy the c:Serverbinmysql-8.0my.ini file to a safe location. Stop and remove the MySQL service:
![]()
Delete the folder C:Serverbinmysql-8.0 (this will not affect your sites and databases). Extract the new archive to C:Serverbin. Rename the folder to mysql-8.0. Copy the my.ini file you saved earlier to c:Serverbinmysql-8.0my.ini. Start the MySQL service:

Download archive with the new version of phpMyAdmin. Copy the c:ServerdatahtdocsphpMyAdminconfig.inc.php file to a safe location. Delete the C:ServerbinphpMyAdmin folder (this will not affect your sites and databases). Extract the new archive to C:Serverdatahtdocs. Rename the folder to phpMyAdmin. Copy the config.inc.php file you saved earlier to c:ServerdatahtdocsphpMyAdminconfig.inc.php.
If you no longer need the server or want to reinstall it, stop the services and remove them from autostart by running the following in the command line:

Delete the server files, delete the C:Server folder. Warning, this deletes all databases and your sites.