
29.10.2026
30 min
300



User and group management is one of the foundations of Linux security. The configuration of user accounts, system groups, and administrative privileges determines who can access a server, run services, modify configurations, and access sensitive data. In the second part of the “Linux for DevOps and DevSecOps” series, we’ll explore UID and GID identifiers, system account files, user creation and deletion, group management, and the su and sudo mechanisms.

In the first part of the series, we explored the Linux file system, terminal navigation, file searching, and essential commands. Now, we’ll move on to how the system identifies users, separates their privileges, and controls access to resources.
On a typical home computer, these mechanisms may go largely unnoticed. However, a Linux server can run dozens of system services, automated processes, and user accounts simultaneously. Each should have only the permissions necessary to perform its specific tasks.
For DevOps, this is a matter of infrastructure stability and proper administration. For DevSecOps, it also involves privilege management, protecting system accounts, and minimizing the impact of a potential compromise.
In Linux, a user has more than just a username displayed in the terminal or used to log in. The system primarily identifies user accounts through numerical values known as UID (User Identifier) and GID (Group Identifier). A UID identifies a user, while a GID identifies a group. These identifiers are used to check access permissions for files, directories, and other system resources. While humans find it easier to work with usernames such as admin, deployer, or postgres, the Linux kernel relies on their corresponding numerical identifiers.
For example, a user account named deployer might have a UID of 1001 and a primary group with a GID of 1001. When the user creates a file, the file system typically records the numerical identifiers of its owner and group. This behavior has important implications. Suppose a server has a user named deployer with UID 1001 who creates several files. Later, that account is deleted, and a new user with the same username is created with UID 1002. The new deployer will not automatically become the owner of the old files because they are still associated with UID 1001.
The reverse situation is even more interesting from a security perspective. If a new user is assigned the same UID 1001, the system will recognize that user as the owner of files associated with that identifier, even if those files previously belonged to a different account. This is why it is important to consider numerical identifiers, not just usernames, when migrating data between servers, restoring backups, or deleting user accounts.
Each local Linux user account is typically described by several key attributes:
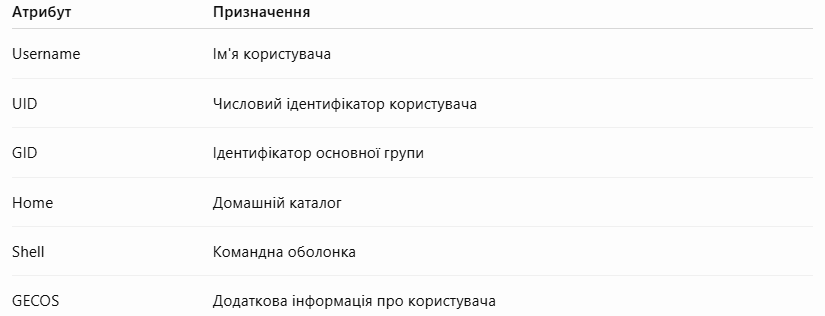
The home directory is used to store user files and personal settings. The shell determines which program is used as the command-line interface when logging in. For example, it can be /bin/bash, /bin/zsh, or a special program such as /usr/sbin/nologin, which prevents interactive login.
To find out which user a command is currently running as, use whoami:
whoami
The command displays the effective user name for the current process. This is useful when working with multiple accounts or switching between them using `sudo` and `su`.
For more detailed information, there is the `id` command:
id
Example of the result:
uid=1001(deployer) gid=1001(deployer) groups=1001(deployer),27(sudo)
Here you can see the UID, the primary group, and all supplementary groups of a user. If only the numeric identifier is needed, the -u and -g options are used:
id -u
id -g
The first command will display the UID, and the second will show the primary GID. You can also check the attributes of another account by specifying its name:
id root
id www-data
To retrieve the full user record, it is recommended to use getent:
getent passwd root
Unlike directly viewing /etc/passwd, the getent command queries configured NSS (Name Service Switch) sources. This allows it to work not only with local user accounts but also with users whose information is retrieved from LDAP or other identity management systems. This is particularly important in corporate environments, where user accounts can be centrally managed through external services.
Not all Linux user accounts belong to actual people. Many are created by the operating system or installed software to run specific services. Linux users can generally be divided into three categories: regular, system, and privileged users. These categories differ in their purpose, permissions, and typical UID ranges.
In many Linux distributions, regular users are assigned UIDs starting from 1000, while lower values are generally reserved for system accounts. However, the exact ranges depend on the distribution, system configuration, and how user accounts are created.
You can check these settings in the /etc/login.defs file:
grep -E '^(UID_MIN|UID_MAX|SYS_UID_MIN|SYS_UID_MAX)' /etc/login.defs
This allows you to see the UID ranges used by the corresponding user account management utilities. A special role is assigned to the root user, which has UID 0. Traditionally, this account is used for full system administration and can bypass many standard permission checks. However, this does not mean it operates without any restrictions: modern Linux also uses capabilities, Mandatory Access Control (MAC) policies, namespaces, and other security mechanisms. Nevertheless, gaining full control over the root account in a typical server environment often means compromising the entire system.
Another example is the system user www-data, which is commonly used by web server processes in Debian and Ubuntu. When a web server runs under a separate, unprivileged user account, potentially malicious code executed within its process should not automatically gain administrative privileges. This reflects one of the fundamental principles of security: services should operate with the minimum privileges necessary to perform their tasks.
To view local user accounts with UIDs below 1000, run:
awk -F: '$3 > 0 && $3 < 1000 {print $1, $3, $7}' /etc/passwd
Here, awk uses a colon as the field separator and then filters records by UID. This command allows you to view the names of system users, their numerical identifiers, and the shells assigned to them for login.
Many system accounts use /usr/sbin/nologin or /bin/false. These prevent standard interactive logins, although they do not completely prohibit processes from running under those user accounts through other mechanisms.
Linux also has an account called nobody. It is often used for operations that do not need to be associated with a regular user, including certain NFS configurations or process isolation scenarios. On many systems, this account is assigned UID 65534, although this value is not universal.
It is important to understand that the name nobody does not automatically make a process secure. If an application has access to sensitive resources through file permissions, group membership, or other mechanisms, that access may still be available even when the process runs without elevated privileges.
When multiple people or services work on the same server, configuring access individually for each user becomes inconvenient. This is why Linux supports groups. A group brings together users who need shared permissions to access specific resources. For example, several engineers on a development team may need access to the same directory containing configuration files or application data.
Instead of changing the owner of every file or configuring permissions separately for each user account, you can create a group called developers, add the necessary users to it, and assign that group ownership of the corresponding directory.
Linux distinguishes between primary and supplementary groups. Every user has one primary group, whose GID is specified in the user’s account record. Users can also belong to multiple supplementary groups, which provide access to additional resources.
Under normal circumstances, newly created files inherit their group ownership from the effective GID of the process. However, this behavior may vary depending on directory settings, particularly the SGID bit. As a result, files created in shared working directories do not always belong to the user’s primary group.
To check current group membership, use:
groups
For a specific user:
groups deployer
More detailed information, including numerical GIDs, will be displayed by the command:
id deployer
And to view the record for a specific group:
getent group developers
As a result, you can obtain a string that looks like this:
developers:x:1500:deployer,maria
This means that the developers group has a GID of 1500, while deployer and maria are listed as its supplementary members. However, getent group does not necessarily display all users for whom this group is their primary group. To get a complete overview of a specific user’s group membership, it is more convenient to use id.
Groups can also grant extensive privileges. For example, users who have access to the standard Docker daemon through the docker group can effectively gain root-equivalent privileges on the host under a typical configuration. Therefore, adding users to administrative or technically privileged groups should be treated as a security-sensitive operation, rather than simply a way to resolve a permission error.

In a typical local configuration, Linux uses several system files to manage user accounts. The most important ones are /etc/passwd, /etc/shadow, /etc/group, and /etc/gshadow. These files contain information about users, their passwords, groups, and certain authentication settings. Access to these files varies depending on the sensitivity of the information they store.
The /etc/passwd file contains local user account records. Its name is historically associated with passwords, but in modern systems, password hashes are usually stored separately.
You can view the file using the standard command:
cat /etc/passwd
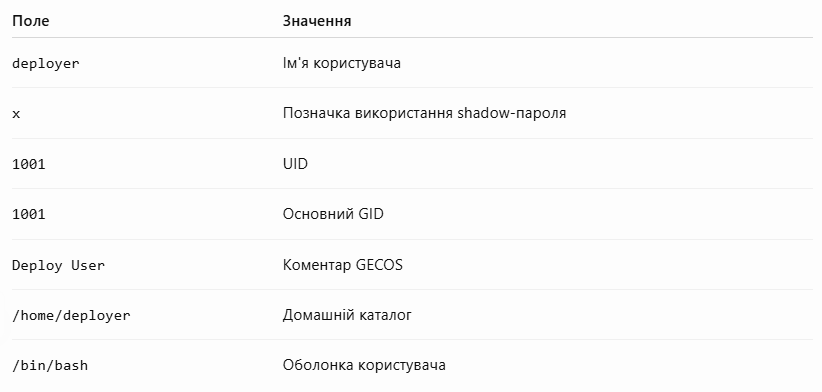
Кожен рядок описує окремий обліковий запис і складається із семи полів, розділених двокрапками.
For example:
deployer:x:1001:1001:Deploy User:/home/deployer:/bin/bash
The fields have the following meaning:
On most Linux systems, /etc/passwd is readable by regular users. This is necessary for many programs that convert numerical identifiers into usernames.
In the past, password hashes could be stored directly in this file. This approach introduced additional security risks, as any user with read access could obtain the hashes and attempt to crack the passwords offline. For this reason, password-related information was moved to a separate, protected file.
The /etc/shadow file stores local authentication data, including password hashes and password expiration settings. Unlike /etc/passwd, this file is not intended to be publicly readable. On a typical system, access is restricted to the root user and authorized system mechanisms.
To view a specific entry in a test environment, you can run:
sudo getent shadow deployer
Depending on the access permissions and NSS configuration, the command will display the corresponding record if it is available. Passwords in /etc/shadow are typically not stored in plaintext but as cryptographic hashes. Many systems use hashing schemes that also incorporate a random salt and computational cost parameters.
For example, the $6$ prefix traditionally indicates SHA-512-crypt, while $y$ is used for yescrypt. The specific algorithm depends on the Linux distribution and its configuration.
In addition to password information, these records contain password aging settings, including the date of the last password change, minimum and maximum password lifetimes, the warning period before expiration, and other parameters.
You do not need to read /etc/shadow directly to view these settings. Instead, you can use the following command:
sudo chage -l deployer
This command displays information about password expiration and the associated restrictions. Special attention should also be paid to the ! and * characters in the password field. These may indicate that a password is locked or cannot be used for authentication. However, this does not always mean that the entire user account is disabled, as login via SSH keys or other authentication mechanisms may still be possible.
The /etc/group file contains information about local groups. Its records are also separated by colons.
For example:
developers:x:1500:deployer,maria
The first element specifies the group name, the second describes the group password field, the third contains the GID, and the fourth lists additional members.
To view the entire file, you can run:
cat /etc/group
The /etc/gshadow file is used to store protected group information, including group passwords, group administrators, and membership lists. In routine system administration, direct interaction with this file is rarely necessary.
It is important to avoid editing these system files with a regular text editor unless absolutely necessary. Specialized utilities are available for modifying user accounts. These tools account for the structure of the data and help prevent conflicts caused by simultaneous editing.
If manual editing is still required, the following utilities are available:
sudo vipw
sudo vipw -s
sudo vigr
sudo vigr -s
These commands are designed to work with /etc/passwd, /etc/shadow, /etc/group, and /etc/gshadow.
After making changes, you can verify the consistency of local entries:
sudo pwck
sudo grpck
However, even these utilities are no substitute for backups and careful planning of changes, especially on production servers.
When a new engineer joins a team or an application requires a dedicated system account, an administrator must consider not only how to create the user but also how to properly configure their environment and privileges. One of the main tools for this is useradd. It allows administrators to create local user accounts with specific attributes, including a home directory, shell, groups, UID, and other settings.
For example, to create a regular user named deployer, you can run:
sudo useradd -m -s /bin/bash deployer
The `-m` parameter creates a home directory, while `-s /bin/bash` assigns Bash as the shell. Typically, a corresponding entry is also created for the new user in the system files, along with a primary group of the same name (depending on the distribution’s configuration).
You can verify the result using the following commands:
id deployer
getent passwd deployer
ls -ld /home/deployer
If the user requires additional information in the GECOS field, it can be specified during creation using the -c parameter:
sudo useradd -m -s /bin/bash -c "Deployment Engineer" deployer2
For automated services, system accounts without interactive login are often created. For example:
sudo useradd -r -s /usr/sbin/nologin -c "Monitoring Service" monitor-svc
The `-r` flag indicates that a system user is being created, while `/usr/sbin/nologin` prevents standard interactive login via this shell.
This approach allows the service to run as a separate, unprivileged user rather than as `root`. This reduces risks in the event of an application vulnerability, as the process should not possess privileges it does not require.
The `passwd` command is used to set a password:
sudo passwd deployer
The system will prompt you to enter a new password and confirm it. The characters entered are typically not displayed on the screen; this is standard terminal behavior.
If necessary, you can require a password change upon the next login:
sudo passwd -e deployer
This is useful when an administrator creates a new user account and assigns it to an employee. In such cases, the temporary password should not remain in use permanently.
The chpasswd utility can be used to automate password management for multiple user accounts. However, passing passwords directly through the command line or storing them in plaintext within scripts is insecure. For corporate infrastructure, centralized management of secrets, user accounts, and access permissions is a more appropriate approach.
When creating a home directory, useradd -m typically copies default files from /etc/skel into it. This is a special template directory used to define the initial environment for new user accounts.
You can check its contents using the following command:
ls -la /etc/skel
This directory may contain .bashrc, .profile, .bash_logout, and other configuration files. These files control certain aspects of shell behavior, environment variables, and personal settings.
For example, if an organization wants all new users to have the same Git configuration, an administrator can add the appropriate template to /etc/skel. It will then be applied to new home directories created using that template.
However, changes made to /etc/skel do not automatically update the home directories of existing users.
In addition, the behavior of new user accounts may be influenced by /etc/default/useradd, /etc/login.defs, global shell settings, and authentication policies.
For DevOps engineers, it is important to consider these factors when automating server deployments to ensure that identical user creation procedures do not lead to unexpected differences between systems.
When a user creates a file or directory, the system must determine who can read, modify, or access that object. The resulting permissions depend on the permissions requested by the program, the current umask, and sometimes ACLs and other file system properties. For now, we will cover only the basic principle, as file permissions will be discussed in greater detail in the third part of this series.
The umask command displays the permission mask that restricts the permissions assigned when new files and directories are created.
umask
A typical result for many systems:
0022
For a regular file created by a program with requested permissions of 666, a umask of 022 results in permissions of 644. This means the owner can read and modify the file, while the group and other users have read-only access.
For a directory created with requested permissions of 777, the same umask typically results in 755. The owner can list the directory contents, create and delete entries, and access files within it, subject to the applicable permissions. Other users have more limited access.
Importantly, umask works as a bitwise exclusion mask rather than through ordinary arithmetic subtraction. It also cannot grant permissions that the program did not originally request.
To see how this works, you can create a test file and directory:
umask 022
touch test.txt
mkdir testdir
ls -ld test.txt testdir
If you need to restrict access to new files, you can set a stricter mask:
umask 077
Under typical conditions, newly created regular files will have permissions of 600, while directories will have permissions of 700. This can be useful when working with personal configuration files, keys, or other sensitive data that should not be accessible to unauthorized users.
However, changing umask in the current shell generally affects only that shell and its child processes. For permanent settings, you need to consider shell configuration, PAM, systemd, and other process initialization mechanisms.
After a user account has been created, its settings may need to be modified. For example, an employee may need access to a new project, a different shell, a renamed account, or an account expiration date. The usermod utility is used for these operations. It is one of the main commands for managing local user accounts in Linux.
Suppose you need to change the shell of the deployer user to Zsh:
sudo usermod -s /bin/zsh deployer
Of course, before doing this, you must ensure that the relevant shell is installed and available on the system.
You can view the list of allowed shells via:
cat /etc/shells
A user can also change their shell using `chsh`, provided the system configuration allows it.
To rename an account, the `-l` option is used:
sudo usermod -l deploy-admin deployer
It changes the username, but does not necessarily rename the home directory. If the home files also need to be moved, a separate operation is used:
sudo usermod -d /home/deploy-admin -m deploy-admin
These changes are best performed when the user has no active sessions or running processes that depend on the old paths. You should also check service configurations, scheduled tasks, and other components where the old username may have been explicitly specified. Another important scenario is temporarily disabling access.
To lock password-based authentication, you can run:
sudo passwd -l deploy-admin
Check status:
sudo passwd -S deploy-admin
And to restore the option of password authentication, provided the password is still valid:
sudo passwd -u deploy-admin
However, there is an important detail that often leads to security mistakes. Locking a password does not always mean completely disabling a user account. If a user authenticates using an SSH key or another permitted authentication method, they may still be able to access the system.
Therefore, when an employee leaves an organization or when responding to an account compromise, it is essential to review all available access methods. These may include SSH keys, active sessions, certificates, tokens, centralized authentication, or access through automated systems.
For a local user account, you can set an account expiration date:
sudo usermod --expiredate 1 deploy-admin
This approach marks the user account as expired in systems that enforce this setting. However, to completely revoke access in a corporate environment, it is also necessary to review external authentication systems, SSH keys, and active processes.
When a user account is no longer needed, it can be deleted using userdel. However, in Linux, deleting a user account and removing all files owned by that user are not the same operation.
For example:
sudo userdel deploy-admin
Typically, this command removes local account records but does not clear all of its files from the file system.
If you also need to remove the home directory and the local mailbox, the -r option is used:
sudo userdel -r deploy-admin
Before performing these operations, you should check whether any important data remains in the user’s home directory, whether other services depend on the user’s files, and whether any active processes are still running under that account.
A particular issue arises with files stored outside the home directory. For example, a user may have created files in /srv, /opt, or shared application directories. After the account is deleted, these files may remain associated with a numerical UID that no longer corresponds to any locally recognized user.
To find such files, you can use the -nouser option with the find command:
sudo find /srv -nouser -ls
Similarly, -nogroup allows you to find files for which the system cannot determine a group.
sudo find /srv -nogroup -ls
These checks are useful after deleting user accounts, but they should be performed with consideration for external user directories and the characteristics of the file system.
Another security risk is associated with UID reuse. If a new user is assigned the UID of a previously deleted account, they may potentially gain access to files left behind by that account, unless other security mechanisms restrict such access.
Therefore, properly removing a user involves more than simply running userdel. It also requires checking the user’s files, privileges, active sessions, and system dependencies.
Linux provides a dedicated set of utilities for managing local groups: groupadd, groupmod, and groupdel.
The simplest operation is creating a new group. For example, if several engineers need shared access to a project, you can create a group called developers:
sudo groupadd developers
If necessary, the administrator can manually assign a GID:
sudo groupadd -g 5000 infrastructure
Generally, it is better to let the system automatically select available identifiers, unless there is a specific reason to use a fixed GID.
To change a group name, use `groupmod -n`:
sudo groupmod -n backend developers
In this case, the `developers` group will be renamed to `backend`, while its numerical GID will remain unchanged.
To remove an unnecessary group, the following is used:
sudo groupdel backend
However, a standard utility might not allow the deletion of a group that serves as the primary group for an existing user. Additionally, before deletion, you must check for files, directories, and services that depend on its GID.
To add an existing user to a supplementary group, the `usermod -aG` command is typically used.
For example:
sudo usermod -aG infrastructure deployer
Here, the -G option specifies the list of supplementary groups, while -a appends the user to their existing group memberships. This distinction is extremely important. If you run usermod -G without -a, the user’s existing list of supplementary groups will be replaced with the new one. As a result, the user may lose access to previously available resources, including administrative privileges.
To add a user to multiple groups at once, separate the group names with commas:
sudo usermod -aG infrastructure,developers deployer
You can check the result using the following commands:
id deployer
groups deployer
It should be noted that changes to membership do not necessarily affect already running processes immediately. Typically, a user must log in again for the new groups to take effect in their session.
To launch a shell with a different active group, you can use:
newgrp infrastructure
However, this does not fully refresh the entire existing session. Therefore, after changing user privileges, it is more reliable to verify them in a new login session.
Let’s consider a typical scenario. A server has a directory called /srv/project that stores application files. Several developers need access to this directory, while other users do not require access to these files. To achieve this, you can create a group called project-team, assign it as the directory’s group owner, and configure the appropriate group permissions.
sudo groupadd project-team
sudo mkdir -p /srv/project
sudo chgrp project-team /srv/project
sudo chmod 2770 /srv/project
The value 2770 means that the owner and the group have full standard permissions for the directory, while other users have no access; the SGID bit ensures that the group is inherited by new objects created within it.
Next, the required users can be added to the group:
sudo usermod -aG project-team deployer
sudo usermod -aG project-team maria
After their sessions have been refreshed, users will be able to work with the shared directory according to the configured permissions.
However, the SGID bit alone does not guarantee that every new file will be writable by all group members. This also depends on umask, the permissions assigned when files are created, and any applicable ACLs. Therefore, default ACLs may need to be configured to enable proper collaboration in shared directories. We will explore these mechanisms in greater detail in the third part of the series, which focuses on file permissions.

When working with a server on a daily basis, you often encounter tasks that a regular user cannot perform without additional privileges. These include installing packages, managing system services, and editing configuration files in /etc. In Linux, su and sudo are commonly used for such operations. Both tools allow you to run commands as another user, but they work in different ways.
The su (substitute user) command allows you to launch a shell or execute a command as another user account.
For example:
su - deployer
In a typical configuration, the system will prompt for the target user’s password and then launch their login shell.
To switch to the root user:
su -
Using the hyphen (-) creates a login environment for the target user. This means that the relevant environment variables, home directory, and working environment are adjusted, and the appropriate shell configuration files are loaded.
In contrast, using su without the hyphen may preserve parts of the current environment, although the exact behavior depends on the implementation and system configuration.
The su command is useful when you need to work as another user for an extended period, such as when checking their environment or troubleshooting account-related issues. In Ubuntu, direct password-based login as root is typically disabled by default, so administrators more commonly use sudo.
The sudo command allows you to execute individual commands as root or another user, according to the configured access control policy.
For example, to update the package list in Ubuntu or Debian, use:
sudo apt update
Such a command executes only the specified operation with the necessary privileges, without requiring you to work constantly within an administrative shell.
To execute a command on behalf of another user, the -u parameter is used:
sudo -u www-data id
This may be necessary to check the environment of a system service or what identifiers a process receives at startup.
To view your own sudo permissions, you can do:
sudo -l
The result will depend on the current policy and will show the commands that are permitted to be run.
If necessary, you can open an administrative shell:
sudo -i
However, you should avoid remaining in such a shell unnecessarily. Even a simple command mistake can have much more serious consequences, as subsequent operations will be executed with elevated privileges.
For DevSecOps, the main advantage of sudo is the ability to delegate only specific actions. For example, a user can be allowed to restart a particular service without being granted full administrative access.
Additionally, sudo can log executed commands and other session information, depending on its configuration. This is useful for auditing, although standard logging does not provide a complete record of every action performed within a launched shell or application.
The rules governing the use of sudo are traditionally defined in the /etc/sudoers file and additional files included from /etc/sudoers.d/.
These rules allow administrators to specify which users and groups are permitted to execute particular commands, which user accounts those commands can run as, and whether authentication is required. However, editing this file with a regular text editor is risky. A syntax error could prevent sudo from working properly.
For safer editing, the visudo utility is available:
sudo visudo
In a typical Ubuntu configuration, one might encounter a rule:
%sudo ALL=(ALL:ALL) ALL
The `%` symbol denotes a group, so the rule applies to members of the `sudo` group. It allows them to execute commands on behalf of other users and groups, subject to a defined policy.
Specific, narrow rules can be created for individual services. For instance, if a particular user only needs to restart Nginx, permission can be granted specifically for that command.
It is crucial that such rules account for the full path to the executable, any potential arguments, and the behavior of the program itself. If a command allows for the execution of arbitrary subprocesses or the modification of system files, a rule that appears restricted may, in practice, grant much broader privileges.
Particular caution should be exercised when using `NOPASSWD`, which allows specified commands to be run without re-entering a password. While this mechanism can be useful for automation, misconfigured rules create additional opportunities for abuse.
For managing distinct policies, it is more convenient to use files located in `/etc/sudoers.d/`. For example, the configuration for a specific service account can be edited via:
sudo visudo -f /etc/sudoers.d/deployer
After making changes, it is advisable to check the syntax of the entire configuration:
sudo visudo -c
In a production environment, it is also essential to ensure that access to policy files is restricted and that configuration changes do not introduce unintended privilege escalation paths.
One of the most common administrative mistakes is granting users excessive privileges simply to resolve an access issue quickly. For example, if an engineer cannot interact with the Docker daemon, adding them to the docker group may resolve the error. However, in a standard rootful Docker configuration, this access allows highly privileged operations, including creating containers that can access host resources.
A similar problem occurs when a dedicated user account is created for an automated task but is allowed to execute arbitrary commands as root through sudo. From a technical perspective, this may seem convenient, especially for CI/CD pipelines. However, if the service or its secrets are compromised, an attacker could potentially exploit those privileges to gain further access to the system.
This is why following the principle of least privilege is essential in Linux. Users, processes, and services should receive only the permissions necessary to perform their specific tasks. For administrators, this means regularly reviewing group memberships, restricting access to service accounts, monitoring sudo configurations, and promptly revoking unnecessary privileges.
Additional security checks should include identifying inactive user accounts, unknown SSH keys, unmanaged service accounts, and permissions on sensitive directories. Special attention should also be given to automation. Deployment scripts, CI/CD systems, and monitoring agents often operate without continuous human supervision. If they are granted excessive privileges, the consequences of a mistake or compromise can be significantly more severe.
To reinforce what we have learned, let’s consider a typical scenario on a test server running Ubuntu or Debian. Suppose we need to create a dedicated user for deploying an application and set up a shared group for managing its files. The following commands modify local user accounts and system directories, so they should only be executed on your own test machine or in a virtual environment.
First, let’s create a group:
sudo groupadd project-team
Now, let’s create a new user, `lab-deployer`, with a home directory and the Bash shell:
sudo useradd -m -s /bin/bash lab-deployer
Next, let’s add it to the created group:
sudo usermod -aG project-team lab-deployer
Let’s check the obtained identifiers:
id lab-deployer
getent group project-team
As a result, `lab-deployer` should appear among the additional group members.
Now, let’s create a directory for the training application:
sudo mkdir -p /srv/lab-project
sudo chgrp project-team /srv/lab-project
sudo chmod 2770 /srv/lab-project
This allows you to configure group access to the directory and helps ensure that new files and directories created within it inherit the project-team group.
For more predictable collaboration in a shared directory, you also need to consider the permissions assigned to newly created files and the umask value.
Now, let’s check whether the user can create a file in the directory:
sudo -u lab-deployer touch /srv/lab-project/test.txt
If the settings are correct, the command will complete without an error.
Let’s check the owner, group, and permissions:
ls -ld /srv/lab-project
ls -l /srv/lab-project/test.txt
In this example, you can see how the system links user accounts, groups, and file permissions. These same principles are applied when managing access to projects, application directories, and shared work resources.
Once the tutorial is complete, we will delete the test files and the user account:
sudo rm -f /srv/lab-project/test.txt
sudo rmdir /srv/lab-project
sudo userdel -r lab-deployer
sudo groupdel project-team
These commands are intended for a newly created training environment. Before executing them, ensure that the directory contains no important data and that the user and group are not being used by other processes.

🔎 Viewing Users and Their Information
whoami— display the current effective user.
id— view a user’s UID, GID, and group memberships.
groups— check which groups a user belongs to.
getent passwd— retrieve user account records.
getent group— view group information.
👤 Managing User Accounts
useradd— create a new user.
usermod— modify user account settings.
userdel— delete a user account.
passwd— set, change, or lock a password.
chage— manage password expiration settings.
chsh— change a user’s login shell.
👥 Managing Groups
groupadd— create a new group.
groupmod— change a group’s name or GID.
groupdel— delete a group.
newgrp— launch a shell with a different active group.
🔐 Access Permissions and Privileges
umask— view or modify the permission mask for newly created files.
su— switch to another user.
sudo— execute a command with authorized privileges.
visudo— safely edit and validatesudorules.
⚙️ Editing System Account Records
vipw— safely edit user records in/etc/passwd.
vigr— safely edit group records in/etc/group.
Most user account management commands require administrative privileges. Before modifying system users, groups, or configurations, it is important to understand the consequences and verify that the affected accounts are not being used by running services.
Users and groups in Linux are more than just a way to organize accounts. They form the foundation of access control between people, services, and processes running on the system.
In the second part of this series, we explored UID and GID, the purpose of system users, and the structure of /etc/passwd, /etc/shadow, and other account-related files. We also covered creating, modifying, and deleting users, managing groups, configuring default permissions, and working with administrative privileges through su and sudo.
For DevOps engineers, this knowledge is essential for configuring servers, deploying applications, and automating infrastructure. For DevSecOps specialists, it provides the foundation for access control and reducing security risks associated with excessive privileges.
In the third part of the “Linux for DevOps and DevSecOps” series, we will take a closer look at file and directory permissions, the chmod and chown commands, SUID, SGID, and Sticky Bit, as well as Access Control Lists (ACLs). We will explore how to configure permissions correctly and avoid mistakes that could compromise the security of a Linux server.