
10.02.2025
11 min
917

This article takes a detailed look at modern approaches to bypassing SSL Pinning in Android apps. We explain that SSL Pinning provides an additional layer of security by verifying the server certificate, and that root privileges and specialized software are required to analyze such protected traffic.

SSL Pinning is a technology widely used in applications to protect confidential data transmitted between a client and a server. An application is any software, regardless of platform – mobile or desktop. Due to the dominance of mobile applications in the market, Android is considered as an example.
Modern network traffic is almost entirely transmitted via the secure TLS protocol, which provides encryption and trust verification between the device and the server. The mechanism is based on checking the server certificate – if it meets the security requirements, the client device establishes a secure connection and transmits encrypted data.
The main question is why the device trusts a particular server certificate and whether a manually created certificate will be accepted.
The answer lies in trust certificates that are pre-built into the operating system and issued by authoritative certification authorities (Certificate Authority, CA). A self-created SSL certificate is not considered trustworthy because its absence from the list of trusted CAs makes it impossible to automatically verify its legitimacy.
The next logical question is: is it possible to create your own CA certificate to bypass SSL pinning? This article is the answer to this question. Therefore, let’s consider the following questions:
Why do you need to do this?
How does it even work?
Unlinking SSL with Frida
Implementing your CA
The article discusses mobile application API security testing and open data parsing in ethical research. Many online services, including online stores, news portals, and banking institutions, use separate APIs for mobile applications, which may differ significantly from the API for the web version.
This API simplifies work because:
Data can be submitted in a structured format (JSON).
There may be no CAPTCHA.
Requests may have a lower rate-limit or other features that should be studied or tested for vulnerabilities.
However, this does not mean that working with the application will be easier. It can use various protection mechanisms, such as:
Integrity Check – checks the integrity of the application to detect modifications.
Proof of Work – additional computational tasks to slow down attacks.
Root Checking – detects root access and blocks work on rooted devices.
Native Cryptography – uses encrypted native libraries that need to be decompiled or reverse engineered.

There is an SSL library OpenSSL, and for Android a modified version of it is used – BoringSSL, which is a fork of OpenSSL and optimized for the specifics of the mobile platform. It is this library that performs all the logic of verifying certificates. It can be found in the process memory as the file libssl.so.
To check this, you must first determine the PID (process ID) of any process that uses the Internet (except for the browser, since it has specific features of working with the network, which is discussed in the “Advanced” section). Then run the command:
cat /proc/<pid>/maps | grep ssl
7f61cbbb8000-7f61cbbcb000 r--p 00000000 00:21 186853  /usr/lib64/libssl.so.3.2.2
7f61cbbcb000-7f61cbc5d000 r-xp 00013000 00:21 186853  /usr/lib64/libssl.so.3.2.2
7f61cbc5d000-7f61cbc80000 r--p 000a5000 00:21 186853  /usr/lib64/libssl.so.3.2.2
7f61cbc80000-7f61cbc8b000 r--p 000c8000 00:21 186853  /usr/lib64/libssl.so.3.2.2
7f61cbc8b000-7f61cbc8f000 rw-p 000d3000 00:21 186853  /usr/lib64/libssl.so.3.2.2
This means that the library libssl.so was loaded from /usr/lib64/libssl.so.3.2.2.
/apex/com.android.conscrypt/lib/libssl.so
This library plays a key role in implementing SSL and certificate validation in Android applications.
However, applications do not access its functions directly. Instead, high-level libraries are used to work with SSL, which are already integrated into the programming environment and simplify interaction with security mechanisms.
java.net.ssl
This library provides a convenient API for working with TLS connections, and all low-level calls to libssl.so are performed in the background. Logically, the library should have a function that determines whether an SSL certificate is trusted or not.
Is it possible to change this function so that it always accepts any certificates? Yes, it is possible! This is one method that has both its advantages and disadvantages.
Pros:
No need to mess with your own CA certificate.
You can quickly unpin one application and see its traffic.
Cons:
Does not work with WebView and Flutter.
Therefore, if you decide to take this method, go to the paragraph “Unbinding SSL using Frida”, otherwise go to “Implementing your CA”.
Frida is a powerful reverse engineering tool that allows you to change the behavior of applications in real time. It is widely used for analyzing and modifying applications because it allows you to make changes to the code without having to recompile it.
With Frida, you can use JavaScript to adjust the logic of the application, which is ideal for disabling SSL Pinning and analyzing encrypted traffic.
The OpenSSL library has functions that are responsible for certificate validation, such as:
SSL_CTX_set_verify та SSL_set_verify.
Let’s focus on SSL_set_verify, as it is responsible for verifying the server certificate. Its signature looks like this:
void SSL_set_verify(SSL *ssl, int mode, SSL_verify_cb verify_callback);
The second argument (mode) specifies the certificate verification mode. For example, the value SSL_VERIFY_PEER means that the server certificate must be verified.
The third argument (verify_callback) is a pointer to a callback function that will be called after the certificate is verified. This function determines whether the certificate should be trusted.
However, this approach is typically used for native code or desktop applications. In the case of Android, the validation mechanism works differently.

Android uses the BoringSSL library, which is a fork of OpenSSL adapted to the needs of the mobile platform.
One of the key differences of BoringSSL is the additional function SSL_set_custom_verify, which is used in the Java library conscrypt for certificate verification. It allows developers to define their own rules for validating SSL connections, which can be useful for analyzing and modifying the operation of applications.
This function allows you to specify your own certificate verification logic, which is executed by native code. Below is an example from the conscrypt library, where SSL_set_custom_verify is called:
static void NativeCrypto_SSL_set_verify(JNIEnv* env, jclass, jlong ssl_address,
                                        CONSCRYPT_UNUSED jobject ssl_holder, jint mode) {
    CHECK_ERROR_QUEUE_ON_RETURN;
    SSL* ssl = to_SSL(env, ssl_address, true);
    JNI_TRACE("ssl=%p NativeCrypto_SSL_set_verify mode=%x", ssl, mode);
    if (ssl == nullptr) {
        return;
    }
    SSL_set_custom_verify(ssl, static_cast<int>(mode), cert_verify_callback);
}
Hook SSL_set_custom_verifySSL_set_custom_verifyNow we can intercept the SSL_set_custom_verify function using Frida and replace its logic so that certificates are always considered valid. Here is the JavaScript code:
setTimeout(() => {
    // Спершу знаходимо модуль libssl.so
    const libssl = Process.getModuleByName("libssl.so");

    // Шукаємо функцію SSL_set_custom_verify.
    // getExportByName() повертає вказівник на неї
    const SSL_set_custom_verify_ptr = libssl.getExportByName("SSL_set_custom_verify");

    // Створюємо нативну функцію для цієї адреси, щоб мати
    // можливість викликати її
    // https://frida.re/docs/javascript-api/#nativefunction
    // https://android.googlesource.com/platform/external/boringssl/+/refs/heads/master/src/include/openssl/ssl.h#2648
    const SSL_set_custom_verify = new NativeFunction(SSL_set_custom_verify_ptr, 'void', ['pointer', 'int', 'pointer']);

    // Нативний callback, який завжди повертає 0
    // Це означає, що сертифікат вважається валідним
    // https://frida.re/docs/javascript-api/#nativecallback
    const alwaysTrue = new NativeCallback(() => {
        return 0;
    }, 'int', ['pointer', 'pointer']);

    // Замінюємо оригінальну SSL_set_custom_verify на нашу функцію,
    // яка викликає наш alwaysTrue callback
    Interceptor.replace(SSL_set_custom_verify_ptr, new NativeCallback((ctx, mode, cb) => {
        console.log("[+] SSL_set_custom_verify викликано");
        SSL_set_custom_verify(ctx, 1, alwaysTrue);
    }, 'void', ['pointer', 'int', 'pointer']));
}, 0);
Finding the function. SSL_set_custom_verifyWe find it in the libssl.so module using getExportByName.
Creating a NativeFunction. We create a NativeFunction for SSL_set_custom_verify so that we can call it manually.
Native callback (alwaysTrue). This callback always returns 0, which means the certificate was successfully verified.
Intercepting and replacing the function. We use Interceptor.replace to replace the original function with our own, which calls SSL_set_custom_verify with our callback.
To run the script, run the command:
frida -U -l назва_вашого_файла.js -f назва.адроїд.пакета
A feature of WebView and Flutter is that they do not interact directly with libssl.so, but instead perform CA certificate validation on their own.
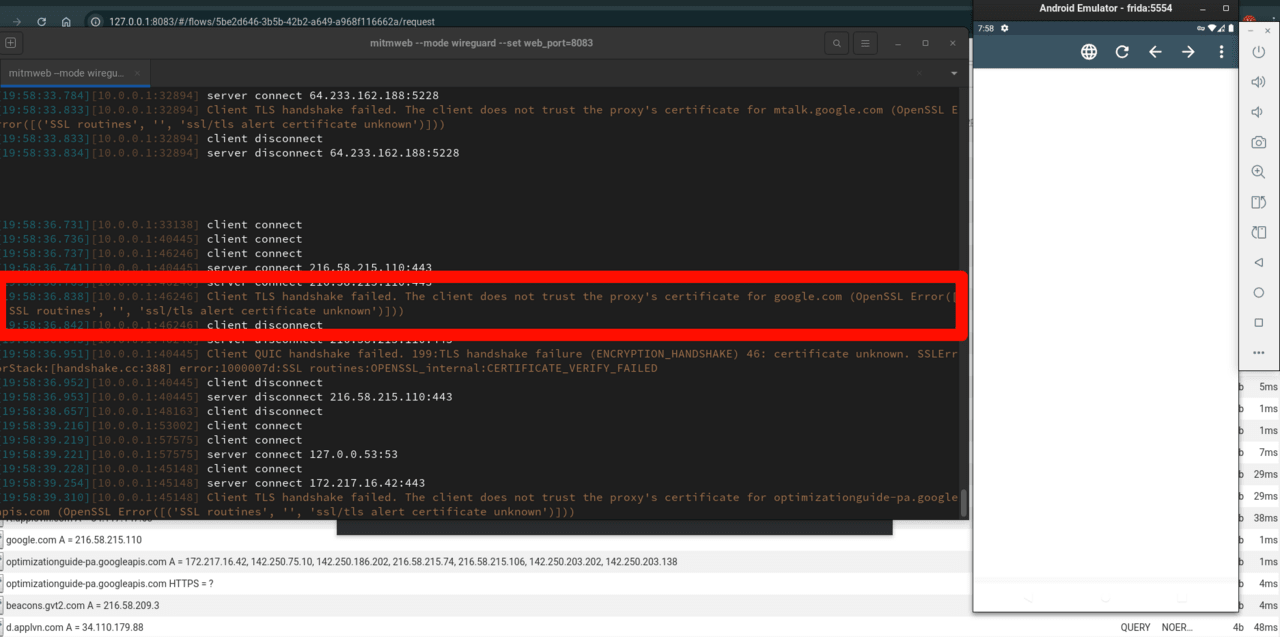
For example, while testing WebView, an application was loaded and an attempt was made to open a Google page. As shown in the screenshot, the site did not load, and an error appeared in the mitmproxy terminal indicating that the client did not trust the certificate. This confirms that WebView has its own mechanisms for validating SSL connections, which require alternative workarounds.
In Android, trust certificates are stored in the /system/etc/security/cacerts/ directory in hash.0 format. To intercept SSL traffic in WebView or Flutter, you need to add your own certificate to this directory.
The main problem is that starting with Android 10+, it is impossible to mount /system without disabling dm-verity. However, there is an alternative approach – mount tmpfs in /system/etc/security/cacerts/. This allows you to temporarily change the contents of the directory and work with your own certificates, but only until the next device reboot.
Advantages of this method:
Works for all traffic on the device, including WebView and Flutter.
No need to interfere with libraries or applications directly.
Cons:
There may be noise due to packets we don’t need, as this will affect all traffic on the device.
For this method, it is recommended to use transparent proxies in your application to view traffic. Personally, I use mitmproxy in wireguard mode.
/system/etc/security/cacertsMake sure you have a CA certificate. In our example, it is the certificate from mitmproxy:
➜ ls
mitmproxy-ca-cert.cer
➜ export CA_CERT=mitmproxy-ca-cert.cer
Android uses certificates in PEM format. Let’s convert our .cer file to .pem:
➜ openssl x509 -in $CA_CERT -out certificate.pem
➜ ls
certificate.pem  mitmproxy-ca-cert.cer
Android stores certificates in the /system/etc/security/cacerts/ directory in the format hash.0. Calculate the hash and rename the file:
➜ mv certificate.pem $(openssl x509 -inform PEM -subject_hash_old -in certificate.pem | head -1).0
➜ ls
c8750f0d.0  mitmproxy-ca-cert.cer
Use adb to copy the certificate to the device’s temporary directory:
➜ adb push c8750f0d.0 /data/local/tmp
c8750f0d.0: 1 file pushed, 0 skipped. 3.4 MB/s (1172 bytes in 0.000s)
1. Get root access on your device:
➜ adb shell
generic_x86_arm:/ $ su
generic_x86_arm:/ # whoami
root
2. Create a temporary directory for the certificates:
mkdir -m 700 /data/local/tmp/certs
3. Copy the existing certificates to a temporary directory:
cp /system/etc/security/cacerts/* /data/local/tmp/certs/
4. Create a tmpfs mount for the cacerts directory:
mount -t tmpfs tmpfs /system/etc/security/cacerts/
5. Return the original certificates to tmpfs:
mv /data/local/tmp/certs/* /system/etc/security/cacerts/
6. Copy your new certificate to cacerts:
mv /data/local/tmp/c8750f0d.0 /system/etc/security/cacerts/
7. Update permissions and SELinux context:
chown root:root /system/etc/security/cacerts/*
chmod 644 /system/etc/security/cacerts/*
chcon u:object_r:system_file:s0 /system/etc/security/cacerts/*
Important! After rebooting the device, all changes will be reset, so the procedure must be repeated again.
After adding the certificate to /system/etc/security/cacerts/, it will be recognized by the system as trusted, which will allow WebView to work correctly with intercepted traffic.
Browsers are not amenable to the standard method of disabling SSL Pinning via Frida, as they have their own implementation of the certificate verification logic.
Although WebView is based on Chromium, its implementation can be viewed in the Chromium Repository, which allows you to find potential workarounds.
Some applications may not trust the installed CA certificate, even if it is added to the system. This can be a result of Certificate Transparency, which causes the application to ignore unverified certificates. In this case, the application must be reverse-engineered to discover the verification logic and modify it.
If none of the methods work, but the application uses libssl.so, you can change the approach: disable traffic interception and instead intercept calls to the SSL_read and SSL_write functions, which will allow you to get the decrypted data directly as it is processed.
SSL Pinning is a key security mechanism widely used in modern mobile applications to protect transmitted data. The article discussed several ways to bypass this mechanism for application security testing, including:
Intercepting and modifying certificate verification functions with Frida
Adding your own CA certificate to work with WebView and Flutter
Each method has its own advantages and limitations, so choosing the best approach depends on the specific scenario.
It is important to remember the ethical aspects of security testing and use this knowledge exclusively to strengthen the security of mobile applications.