Want to make a compact musical keyboard with Arduino with minimal components? In this project, you’ll learn how to use a resistive ladder and analog input to activate multiple buttons without overloading the digital pins.

While it’s possible to simply hook up a number of momentary switches to digital inputs to key of different tones, in this project, you’ll be constructing something called a resistor ladder.
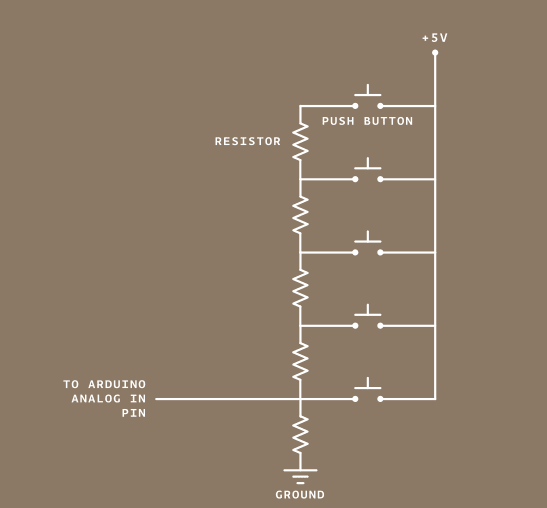
This is a way to read a number of switches using the analog input. It’s a helpful technique if you find yourself short on digital inputs. You’ll hook up a number of switches that are connected in parallel to analog in 0. Most of these will connect to power through a resistor. When you press each button, a different voltage level will pass to the input pin. If you press two buttons at the same time, you’ll get a unique input based on the relationship between the two resistors in parallel.
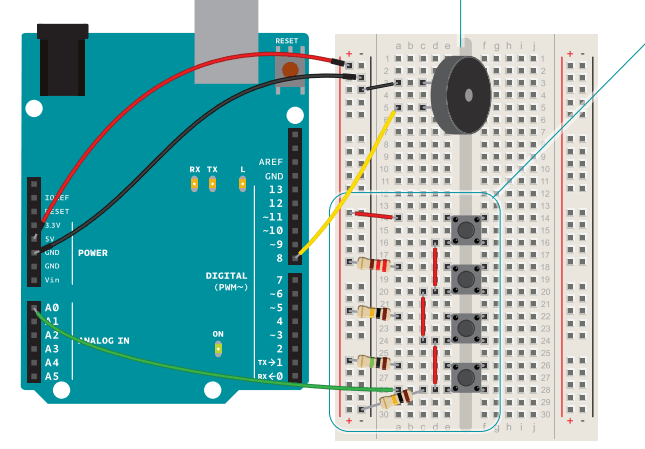
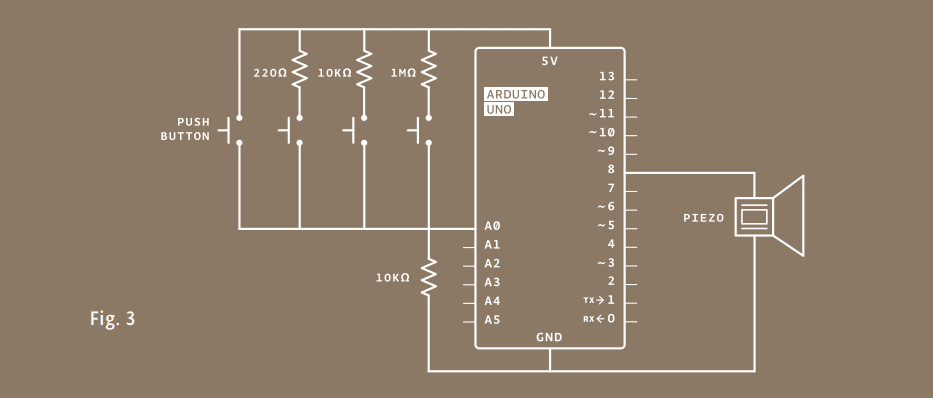
Wire up your breadboard with power and ground as in the previous projects. Connect one end of the piezo to ground. Connect the other end to pin 8 on your Arduino.
Place your switches on the breadboard as shown in the circuit. The arrangement of resistors and switches feeding into an analog input is called a resistor ladder. Connect the first one directly to power. Connect the second, third and fourth switches to power through a 220-ohm, 10-kilohm and 1-megohm resistor, respectively. Connect all the switches’ outputs together in one junction. Connect this junction to ground with a 10-kilohm resistor, and also connect it to Analog In 0. Each of these acts as a voltage divider.

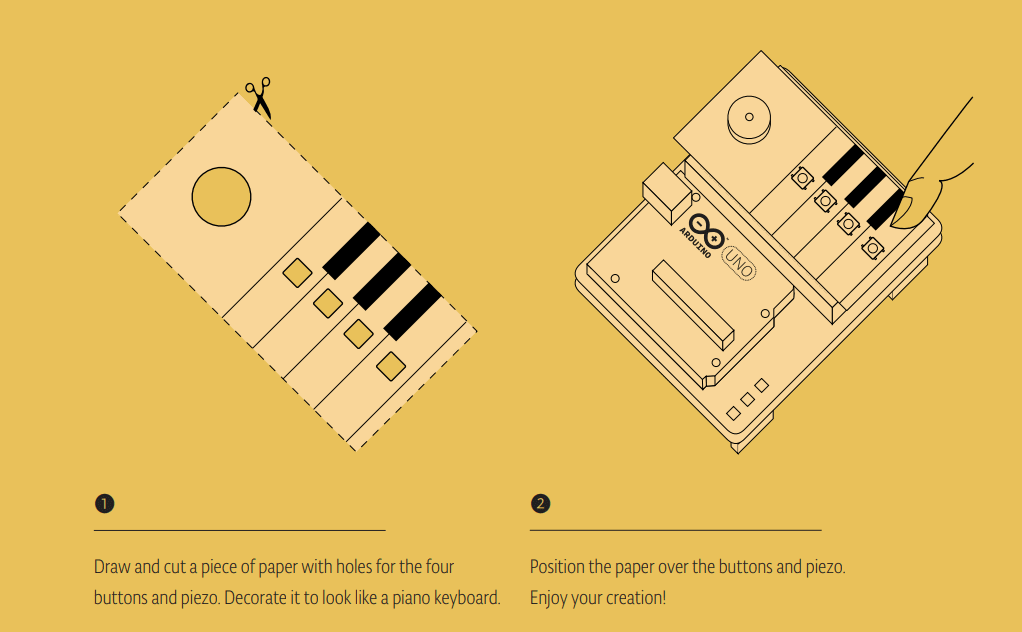
Think about an enclosure for the keyboard. While old analog synthesizers had wires poking out all over the place, your keyboard is sleek and digital. Prepare a small piece of cardboard that can be cut out to accommodate your buttons. Label the keys, so you know what notes are triggered by each key.
THE CODE
The array. In this program, you’ll need to keep a list of frequencies you want to play when you press each of your buttons. You can start out with the frequencies for middle C, D, E and F (262Hz, 294Hz, 330Hz, and 349Hz). To do this, you’ll need a new kind of variable called an array.
An array is a way to store different values that are related to each other, like the frequencies in a musical scale, using only one name. They are a convenient tool for you to quickly and efficiently access information. To declare an array, start as you would with a variable, but follow the name with a pair of square brackets: []. After the equals sign, you’ll place your elements in curly brackets.
To read or change the elements of the array, you reference the individual element using the array name and then the index of the item you want to address. The index refers to the order in which the items appear when the array is created. The first item in the array is item 0, the second is item 1, and so forth.
Create an array of frequencies. Set up an array of four notes using the frequencies listed above. Make this array a global variable by declaring it before the setup().
Begin serial communication. In your setup(), start serial communication with the computer.
Read the analog value and send it to the serial monitor. In the loop(), declare a local variable to hold the value read on pin A0. Because each switch has a different resistor value connecting it to power, each will have a different value associated with it. To see the values, add the line Serial. println(keyVal) to send to the computer.
Use an if()…else statement to determine what note to play. Using an if()…else statement, you can assign each value to a different tone. The values included in the example program are ballpark figures for these resistor sizes. As all resistors have some tolerance for error, these may not work exactly for you. Use the information from the serial monitor to adjust as necessary.
int buttons[6];
// set up an array with 6 integers
int buttons[0] = 2;
// give the first element of the array the value 2
int notes[] = {262,294,330,349};
void setup() {
 Serial.begin(9600);
}
void loop() {
 int keyVal = analogRead(A0);
 Serial.println(keyVal);
 if(keyVal == 1023){
 tone(8, notes[0]);
 }
Play the notes that correspond to the analog value
After each if() statement, call the tone() function. The program references the array to determine what frequency to play. If the value of A0 matches one of your if statements, you can tell the Arduino to play a tone. It’s possible your circuit is a little “noisy” and the values may fluctuate a little bit while pressing a switch. To accommodate for this variation, it’s a good idea to have a small range of values to check against. If you use the comparison “&&”, you can check multiple statements to see if they are true.
If you press the first button, notes[0] will play. If you press the second, notes[1] will play, and if you press the third, notes[2] will play. This is when arrays become really handy.
Stop playing the tone when nothing is pressed
Only one frequency can play on a pin at any given time, so if you’re pressing multiple keys, you’ll only hear one sound. To stop playing notes when there is no button being pressed, call the noTone() function, providing the pin number to stop playing sound on.
If your resistors are close in value to the values in the example program, you should hear some sounds from the piezo when you press the buttons. If not, check the serial monitor to make sure each of the buttons is in a range that corresponds to the notes in the if()…else statement. If you’re hearing a sound that seems to stutter, try increasing the range a little bit.
Press multiple buttons at the same time, and see what sort of values you get in the serial monitor. Use these new values to trigger even more sounds. Experiment with different frequencies to expand your musical output. You can find frequencies of musical notes on this page: arduino.cc/frequencies

If you replace the switches and resistor ladder with analog sensors, can you use the additional information they give you to create a more dynamic instrument? You could use the value to change the duration of a note or, like in the Theremin Project, create a sliding scale of sounds.
 else if(keyVal >= 990 && keyVal <= 1010){
 tone(8, notes[1]);
 }
 else if(keyVal >= 505 && keyVal <= 515){
 tone(8, notes[2]);
 }
 else if(keyVal >= 5 && keyVal <= 10){
 tone(8, notes[3]);
 }
 else{
 noTone(8);
 }
}

The tone() function is fun for generating sounds, but it does have a few limitations. It can only create square waves, not smooth sine waves or triangles. Square waves don’t look much like waves at all. As you saw in Fig. 1 in Project 6, it’s a series of on and off pulses.
As you start your band, keep some things in mind : only one tone can play at a time and tone() will interfere with analogWrite() on pins 3 and 11.
Arrays are useful for grouping similar types of information together; they are accessed by index numbers which refer to individual elements. Resistor ladders are an easy way to get more digital inputs into a system by plugging into an analog input.