25.09.2024
7 min
1179

BloodHound Community Edition is an Active Directory analysis tool that helps you quickly find vulnerabilities in your domain and see the relationships between users, groups, and permissions. This article explains how to install BHCE, collect data, import it into the system, and use handy graphs to assess the security of your environment. This article will be useful for those who want to understand BHCE in simple terms and apply it in their tests or audits.
Many cybersecurity professionals strive to master BloodHound, but often encounter difficulties at the start. Because of this, the initial motivation quickly fades, confusion and even disappointment arise.
This material explains the process of installing BloodHound CE, collecting the necessary data, analyzing the information obtained and visualizing domain relationships based on it.
Before moving on to practice, it is important to understand the point of working with BloodHound. Active Directory is a complex system where a large number of settings create room for error. In typical domain environments, CVE exploits are rarely used – most attacks on privilege escalation occur precisely due to incorrect configurations. The specialist’s task is to identify the maximum possible number of such scenarios, assess their criticality and prepare recommendations to minimize risks.
For this work to bring real benefit and financial value, it is necessary not only to find problems, but also to be able to clearly and professionally describe them in reports. A simple, structured risk representation is a must-have element of a successful Active Directory audit.
BloodHound was developed by SpecterOps as a way to visualize relationships between AD objects. Due to the scale and complexity of most AD networks, manually auditing these relationships is a nightmare. Instead, the original BloodHound used Neo4j’s graph theory to visualize this information, allowing information to be passed between objects.
There are currently three versions of BloodHound that you need to know about:
BloodHound Legacy: The original version of BloodHound, which is no longer supported. Built on Electron, it is a bit complicated to configure.
BloodHound Community Edition: Released in August 2023, actively supported. Uses docker compose to manage a set of containers, extremely easy to deploy. Smooth web app interface.
BloodHound Enterprise: Paid version of BloodHound for attack path management. The main difference is that this version is used for risk management and verification.
There are a few different components that we need to know about. First, the BloodHound application itself is nothing more than a front-end for data visualization, presentation, and analysis. We need to collect data about the environment using a collector so that it can be fed into the application for analysis.
We need to collect data from the AD environment to feed it into BloodHound for analysis. There are two main collectors you need to know about:
SharpHound: This is an officially supported collector tool for BloodHound, written in C#. It must be run from a Windows computer that is joined to a domain to collect information.
BloodHound.py: A community-developed python script used to collect AD data. Can be run from a Linux-based machine such as a Raspberry Pi.
It is important to understand that at the time of writing, bloodhound.py does not support BloodHound-CE. You should use the bloodhound-ce branch of the bloodhound.python collector if you decide to use it. Do not mix legacy collectors with Community Edition collectors – this will cause a crash during input (which is very annoying!).
BloodHound is a web application used to interpret data received from the collector. This is a GUI application that we interact with to interpret the data to identify risks and escalation paths. The frontend is only as good as the data received from the collector.
Inside the frontend GUI is File Ingest. With its help, the data received from the collector is placed in a Neo4j database. After analysis, this data will be available to the GUI application for analysis.
One of the most interesting things about BloodHound-CE is the available HTTP API for querying the data. This will help us automate and quickly extract data to prove its value during pentesting.
We have already talked about the original version of BloodHound and why it is important, but it is very important to understand. The older collectors DO NOT WORK with the Community Edition of BloodHound. Anyone can use the old version and it will still work fine, but it won’t be up to date with the latest threats. As we prove the value of the game to customers, we need to use items that can assess the risks that are most applicable to them.
Great, now that we know everything about each piece of the puzzle, we can get started installing BloodHound-CE and collecting data for our analysis.
Community Edition uses docker compose through a set of containers. This greatly simplifies the launch and management of the infrastructure for BloodHound, as all containers are in a docker network.
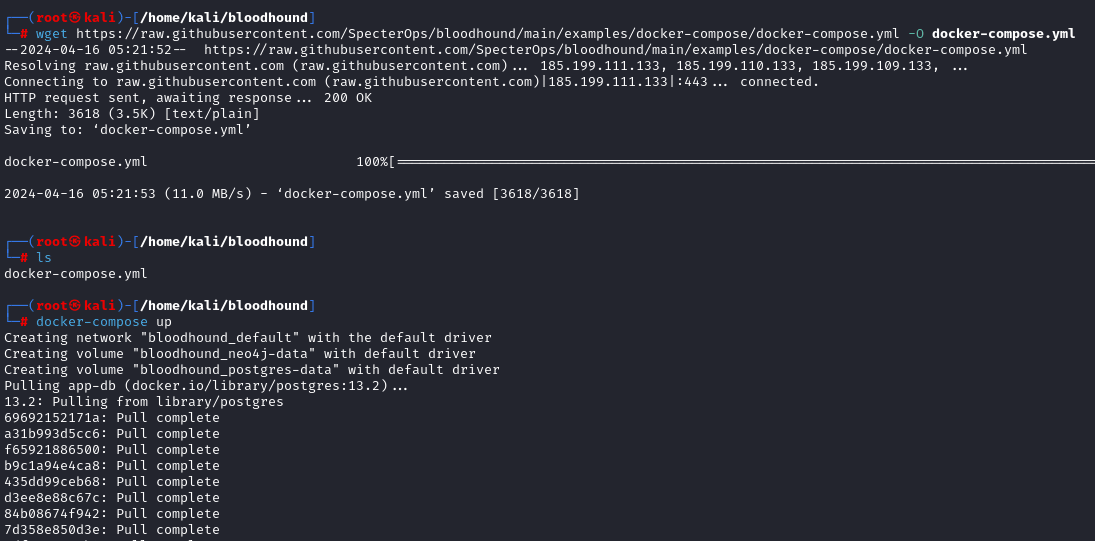
We just need to download the docker-compose.yml file and give the docker command to compile the containers.
wget https://raw.githubusercontent.com/SpecterOps/bloodhound/main/examples/docker-compose/docker-compose.yml -O docker-compose.yml
docker-compose up

Please note that the logs will list the initial password that you need to use to log in.
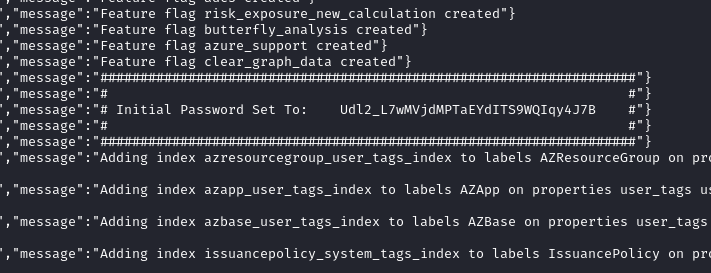
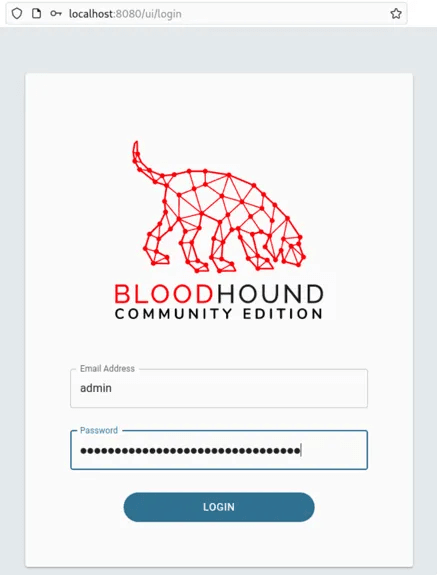
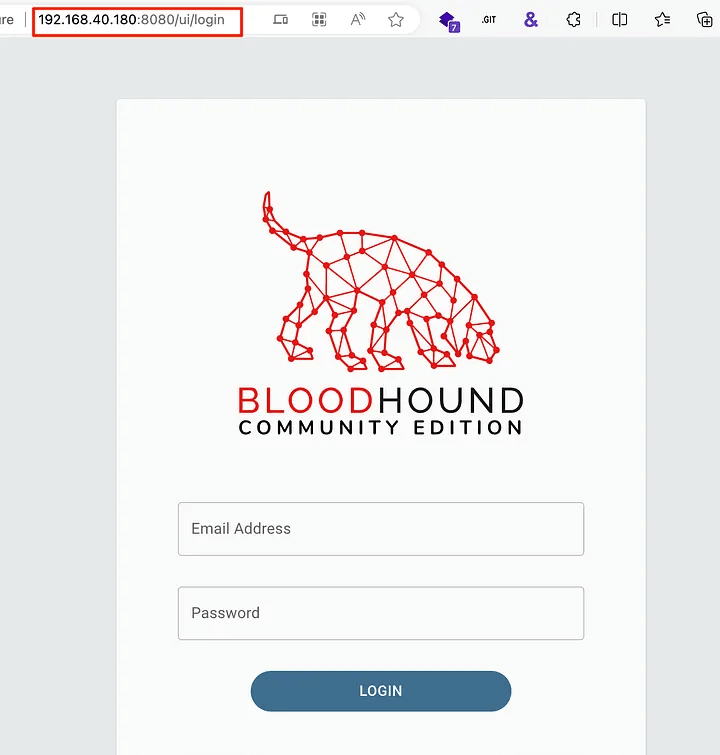
Copy this password and go to http://localhost:8080, to log in to the GUI. The user will be admin.
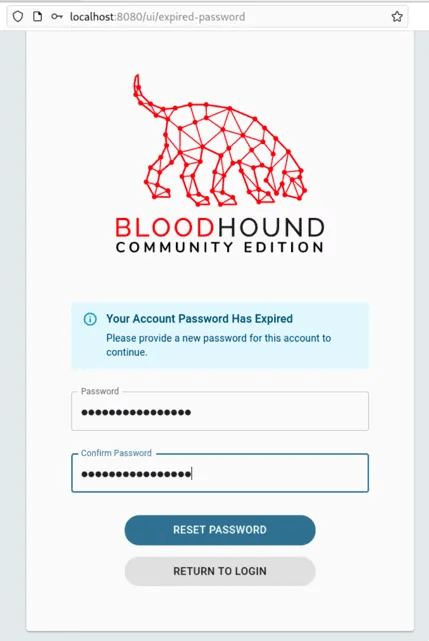
When you log in, you will be prompted to change your password.
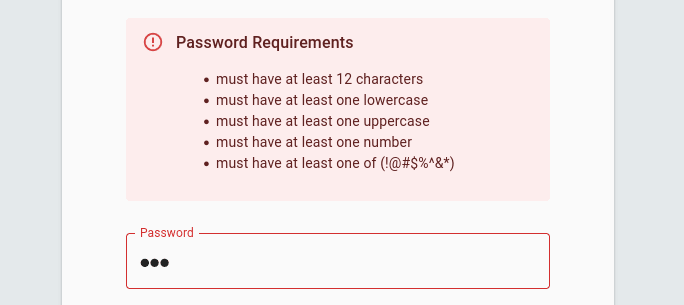
And they won’t let you use an easy password.
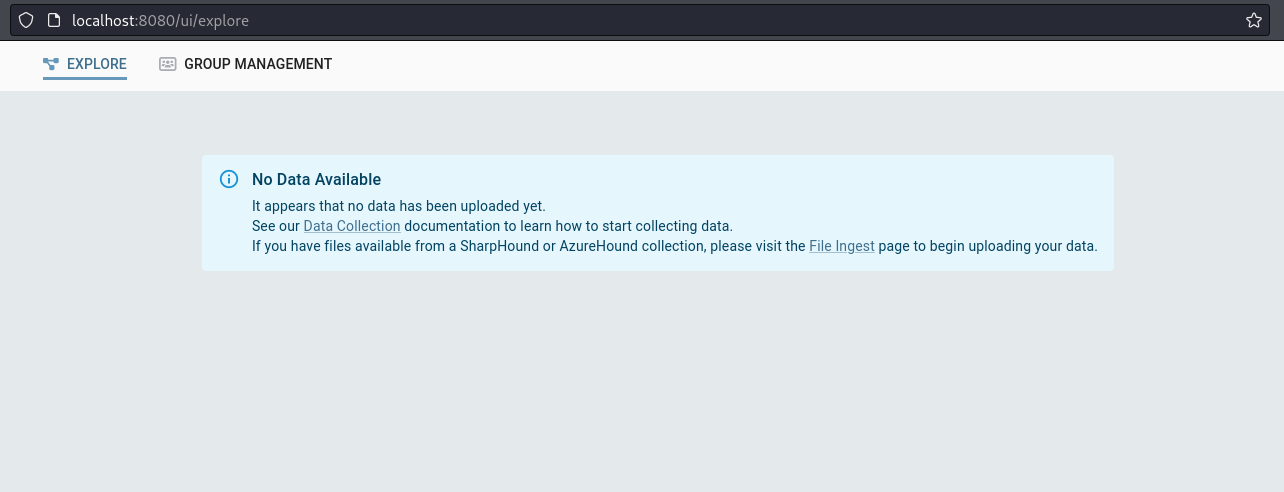
Okay, we’re in. But wait, there’s no data here! How do we start the analysis? First, we need to load the collectors.
We have several ways to do this. We can use the SharpHound.exe C#, PowerShell, or Python collectors to collect this information.
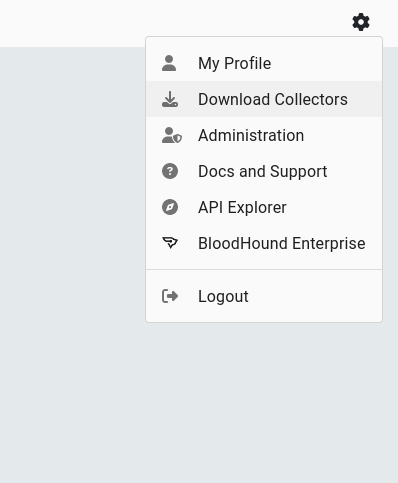
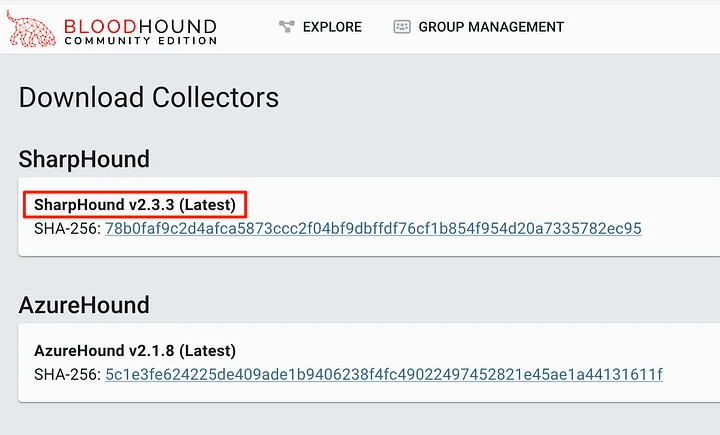
To get a copy of the supported collectors, we can download them directly from the BHCE GUI. Click on the gear and then “Download Collectors”. This will open a page where we can download the collector.
Once unpacked, we can run this collection tool on a remote host. Choose the method that is most convenient for you to perform this operation, whether it is a beacon for sequential execution or an interactive RDP session.
Using SharpHound.exe is very simple – we can just run it without any additional flags and it will happily collect standard information about the current domain with the current user.
.\SharpHound.exe
To collect all available information, we can specify the -c All flag. This will allow us to retrieve information such as ADCS, RDP, and DCOM information. However, in large environments, collecting all information can overload the machine – keep this in mind!
Personally, I like to collect everything, then encrypt the ZIP with a password and give the files a prefix. Although this data is available to all users on the domain, in the wrong hands it can become confidential information.
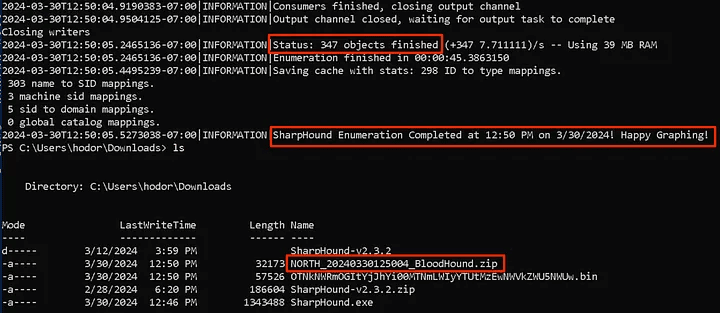
.\SharpHound.exe -c All --zippassword 'p@ssw0rd' --outputprefix 'NORTH'

Once complete, we will see that the zip file has been created and with our intended prefix. Note the number of objects, this may be useful in a report for the client.
To collect data from other domains in the same forest, we need to add a few additional flags. For example, using the –domain flag, we need to point to the desired domain. Next, we will switch to the sevenkingdoms.local domain, running as the user [email protected]. This machine must be able to resolve the domain in DNS to work.
.\SharpHound.exe -c All --domain sevenkingdoms.local --zippassword 'p@ssw0rd' --outputprefix 'SEVENKINGDOMS'
If we are in a forest, but we do not have access to an account trusted in a separate domain, we can always run SharpHound.exe using the runas.exe command.
runas /netonly /user:[email protected] cmd
.\SharpHound.exe -c All --domain essos.local --zippassword 'p@ssw0rd' --outputprefix 'ESSOS'
Alternatively, you can specify the –ldapusername and –ldapppassword flags to connect to a different domain. This does not require the runas.exe command to run.
.\SharpHound.exe -c All --domain essos.local --ldapusername khal.drogo --ldappassword horse --zippassword 'p@ssw0rd' --outputprefix 'ESSOS'

Have you ever encountered a situation where the SharpHound.exe file is flagged as malicious by detection tools? In some scenarios, we can bypass this control by loading an executable C# file into memory and then executing the entry point (ATT&CK ID T1620).
$sh = [System.Reflection.Assembly]::Load([byte[]]([IO.FIle]::ReadAllBytes("C:\Temp\SharpHound.exe")));
$cmd = "-c All --zippassword 'p@ssw0rd' --outputprefix REFLECTED"
[Sharphound.Program]::Main($cmd.Split())

Note that you may need to add the –outputdirectory switch to ensure that the save is in the correct location.
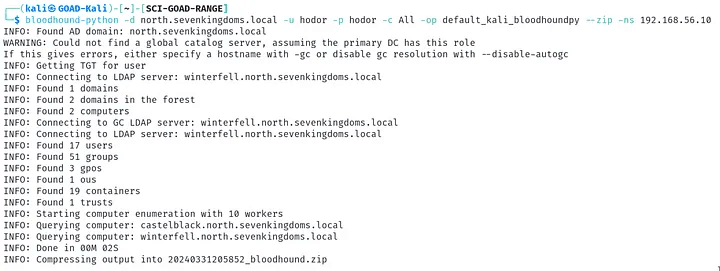
Next, we can use the bloodhound.py tool to collect this information. As mentioned earlier, the current bloodhound.py package in the Kali repositories is for Legacy BloodHound only. You need to download the bloodhound-ce branch from GitHub .
sudo apt install bloodhound.py
bloodhound-python -d north.sevenkingdoms.local -u hodor -p hodor -c All -op default_kali_bloodhoundpy --zip -ns 192.168.56.10
Since we are interested in the data to support BHCE, let’s focus on installing this branch and using it. In particular, we can clone this branch directly from GitHub.
git clone -b bloodhound-ce https://github.com/dirkjanm/BloodHound.py.git
If we don’t want to install a dependency, we can always create a container to run. There is already a Dockerfile in the repository that we can use to build.
cd BloodHound.py
docker build -t bloodhound .
docker run -v ${PWD}:/bloodhound-data -it bloodhound
a0140a0d356a:/bloodhound-data# bloodhound-python -d north.sevenkingdoms.local -u hodor -p hodor -c All -op ce_branch_bloodhoundpy --zip -ns 192.168.56.10
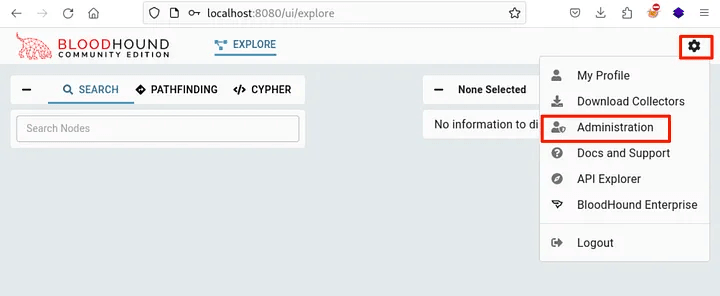
Now that we have collected the data, we need to be able to use it. To do this, we need to load it into the GUI, where it will be entered into the Neo4j database. To do this, we need to click on the cog button, and then on the Administration button.
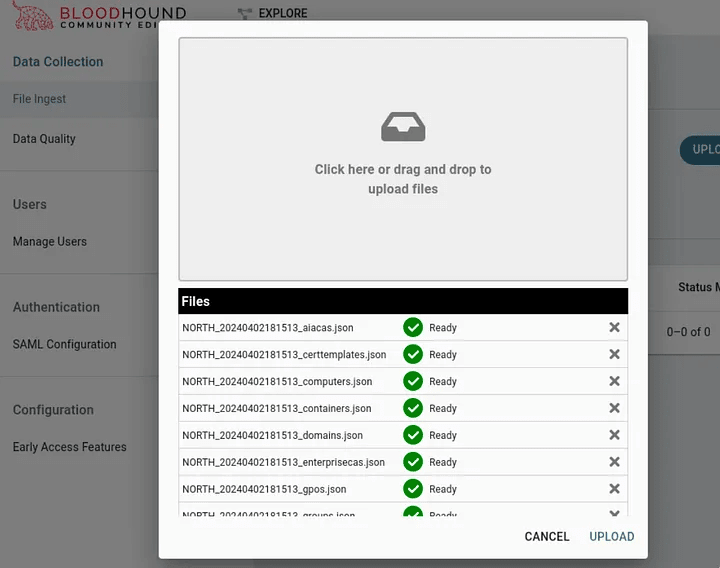
At this point we can click the UPLOAD FILE(S) button to upload our data. Note that we cannot upload a zip file, but we can select multiple JSON files at once.

In the pop-up window, we can drag and drop the files to be accepted. Remember, we cannot upload a zip archive, but we can upload all the JSON files extracted from the zip archive.
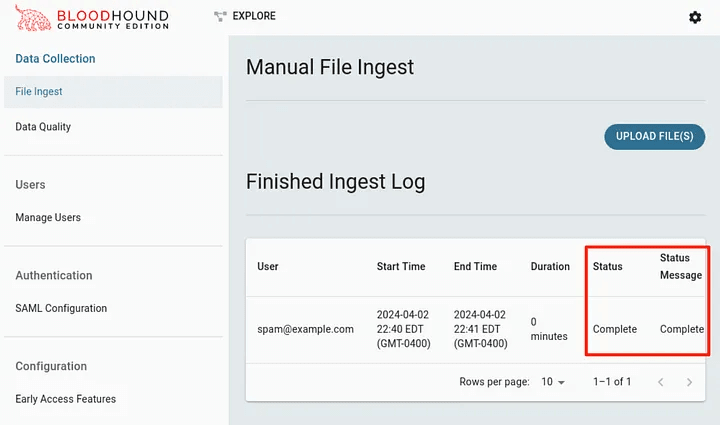
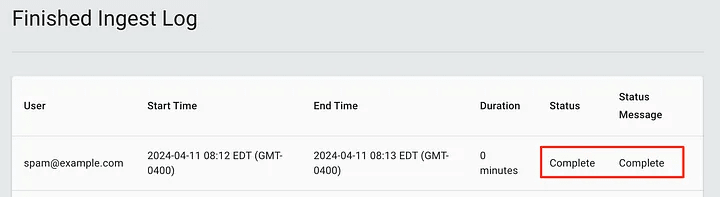
After double-clicking the download button, we will be returned to the download page. We can see that the status indicates that the download is complete! We can continue downloading additional data for other domains in the forest.
One of the most frustrating things about BHCE is the lack of feedback when loading outdated information. This scenario is what I think makes many hackers who are learning to use the tool frustrated and quit.
In this case, if we were to collect information from the Legacy Bloodhound collector and import it into BHCE, there is a chance that the files would pass the initial upload check, be marked as complete, but would not actually be accepted.
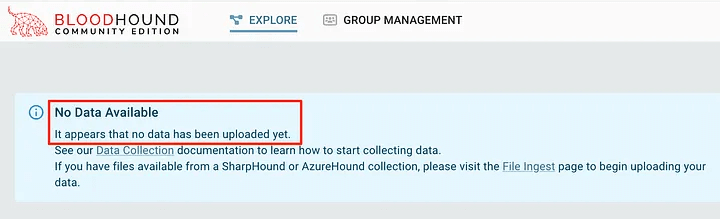
Back on the Explore page, we see that the data still hasn’t been retrieved. It’s easy to get frustrated here – after all, we downloaded the data, right?
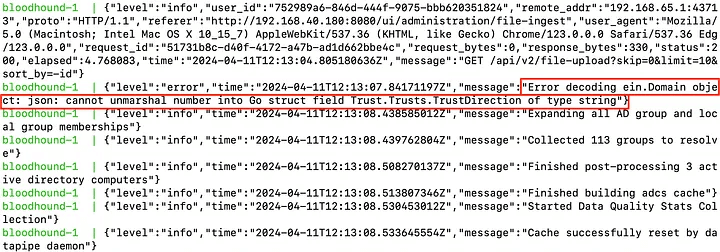
To find this out, we had to look in the docker compose logs to see the error. It shows that an unmarshalling error occurred (the process of converting serialized data, often in a specific format such as JSON, XML, or binary, back into the original object or loaded data).
This happened with data collected using the Kali bloodhound-python repository.
To avoid such problems, it is advisable to use the latest versions of collectors compatible with BHCE. It would also be useful if the BHCE GUI was updated in such a way that it clearly shows marshaling errors or at least gives a clear signal that the Ingest process failed.
You can use the official documentation to get data via the API. Although most users usually import data via the GUI, BHCE fully supports working via the API.
If you have come this far, we can start exploring the collected data! This will allow us to find and understand the relationships between objects in the forest and how they can be used. First, we can use the built-in queries to explore the data. To do this, you need to click on the CYPHER button, then on the folder icon to open the queries.
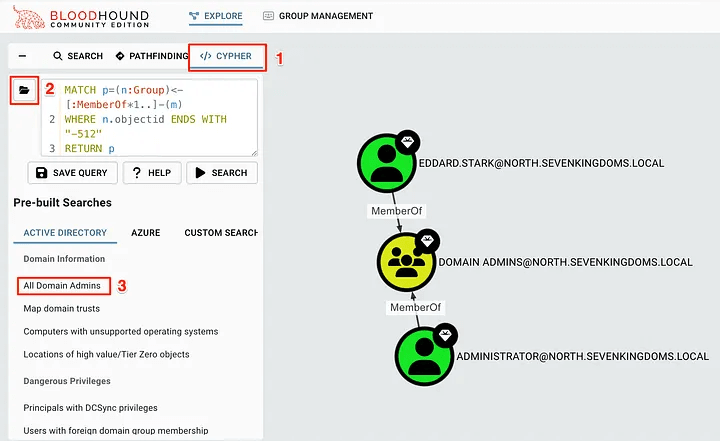
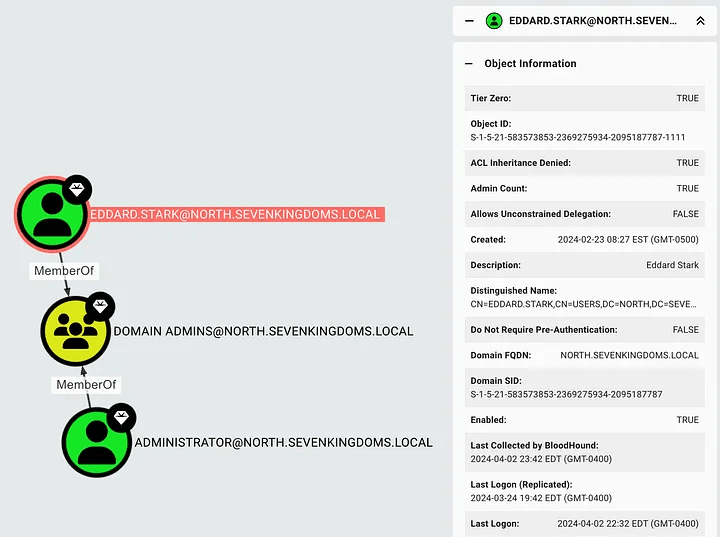
By clicking on one of the search queries, for example “All Domain Admins”, you will add the Cypher query to the search bar and search the database for matches. The results will now be on the screen! To get detailed information about an object, we can click on it to view its properties. This will help you find additional information about the account or domain.
To find specific paths from one object to another, you can use the PATHFINDING button. In this case, we can ask how the user samwell.tarly can access the domain administrators to determine how this user can use this path.
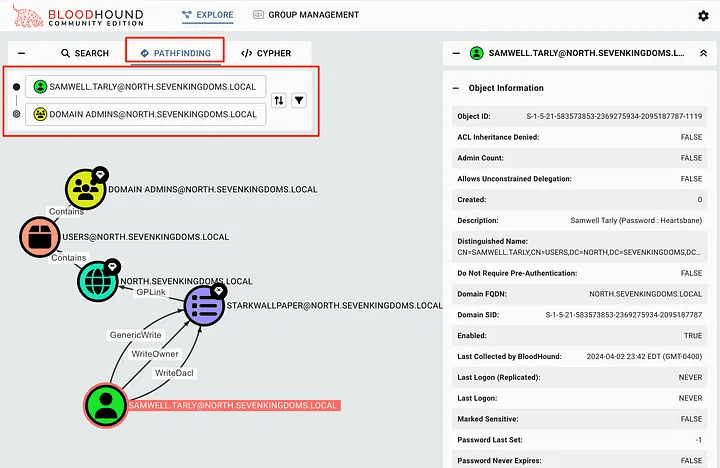
In this scenario, we see that the user samwell.tarly has the GenericWrite, WriteOwner, and WriteDaclGPO permissions for STARKWALLPAPER. If we don’t know how this can be used, we can right-click on the Edge itself to open the properties in the right pane. This contains information about Edge, including how to abuse this permission on machines running Windows or Linux.
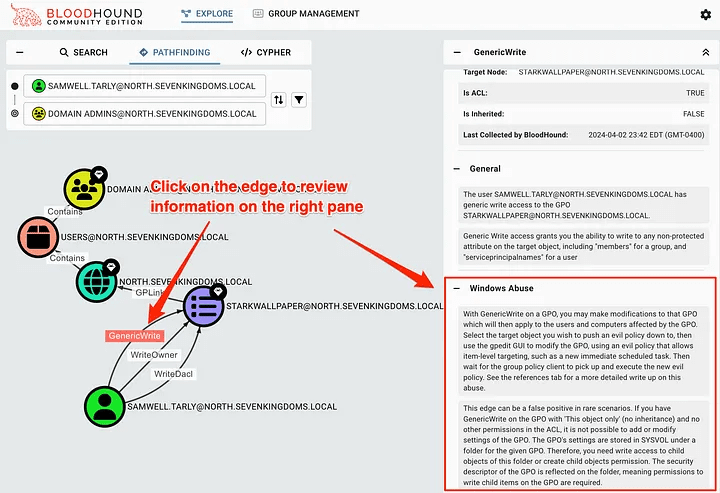
How cool is that? It tells us what and how we can use to prove influence. These properties also include some great links that are always worth reading to learn more about a specific abuse scenario.
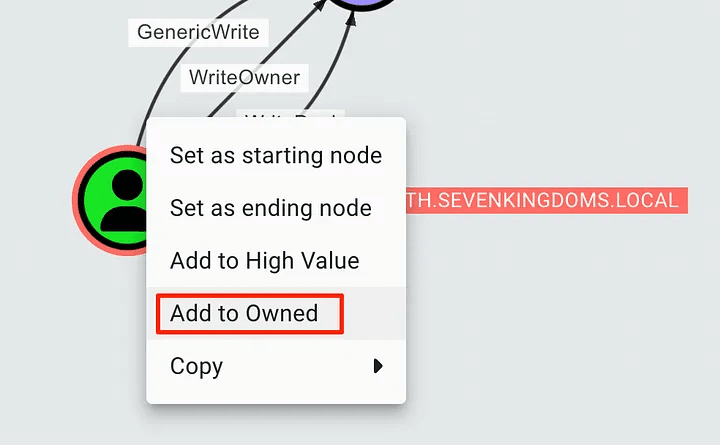
To mark an object as Owned, we can right-click in the GUI. This will add a skull icon to the object, allowing us to perform additional queries based on the owned objects. This will help us keep track of how we can maneuver in an access-gaining environment.
To view the objects marked as Owned, we can click on the “GROUP MANAGEMENT” button at the top of the page. You will notice that the page will initially be blank and we will have to click on a few buttons to get the information we need.
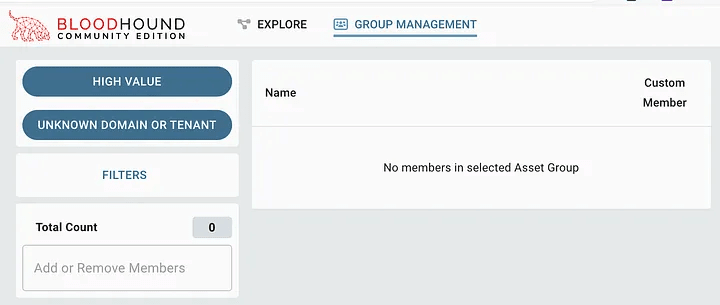
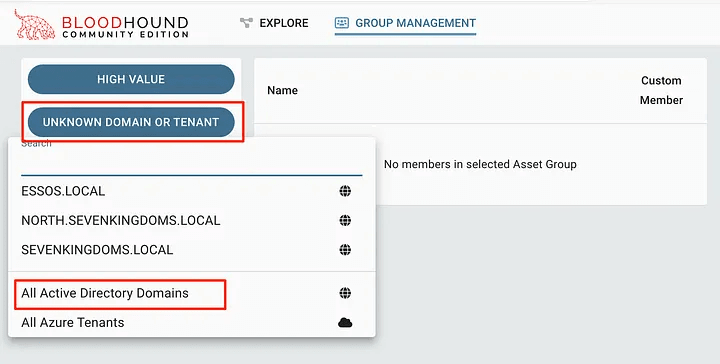
Start by clicking the second button to select the entity to search. In most cases, selecting “All Active Directory Domains” is sufficient.
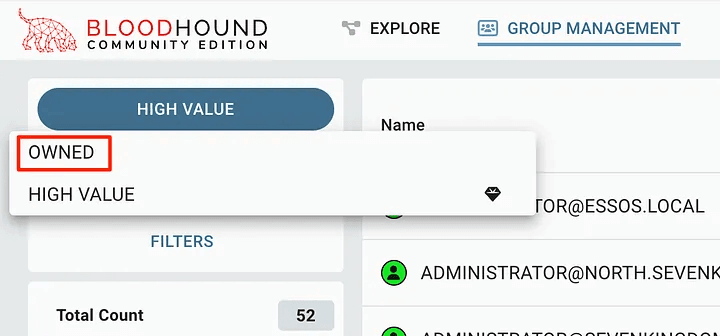
After that, we can click on the top menu and select “OWNED”.
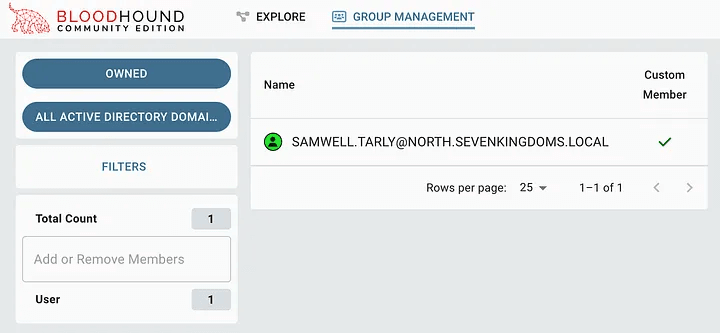
At this point, we will be able to see the account that we marked as captured. This can be useful for tracking objects as they are accessed, as well as for reporting to the client.
While the built-in search queries can help you quickly find objects of interest, there are times when you need to find something that isn’t covered by these queries. To solve this problem, we can create our own queries that are sent to the Neo4j database. This way, we can make sure that the search works exactly as we intended, and then save it to the user’s search.
The standard BHCE query set is noticeably missing several important search operations that allow us to effectively associate individual domain objects with the most valuable or risky targets. BHCE and Legacy handle this differently, and require special queries in Cypher. Here’s how to get a list of all objects belonging to BHCE:
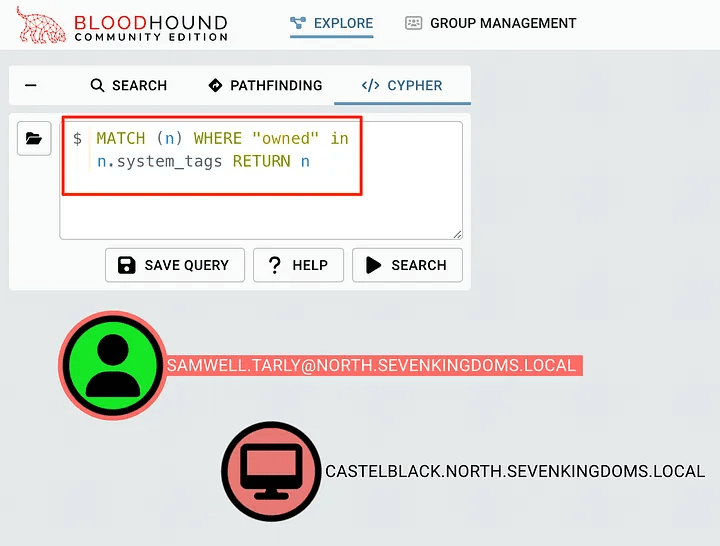
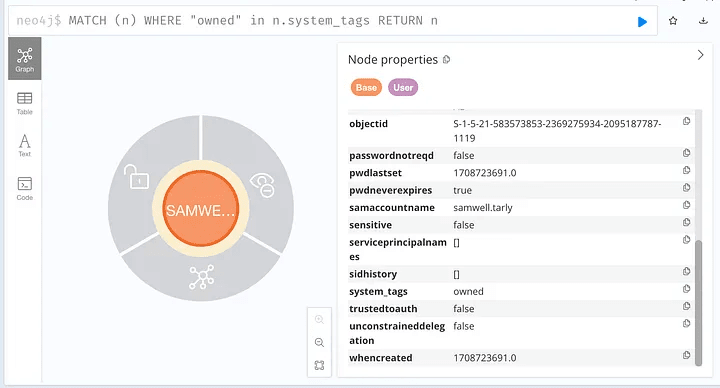
MATCH (n) WHERE "owned" in n.system_tags RETURN n
You can place it in the Cypher query bar, click the search button, and see all the objects captured. Note that in the image below, the User and Computer objects are captured, but have no path to each other from this search.
Here are some useful queries that have proven to be effective in identifying misconfigurations in a domain environment:
Find all unconstrained delegations from non-DCs
MATCH (c1:Computer)-[:MemberOf*1..]->(g:Group) WHERE g.objectid ENDS WITH '-516' WITH COLLECT(c1.name) AS domainControllers MATCH (c2 {unconstraineddelegation:true}) WHERE NOT c2.name IN domainControllers RETURN c2
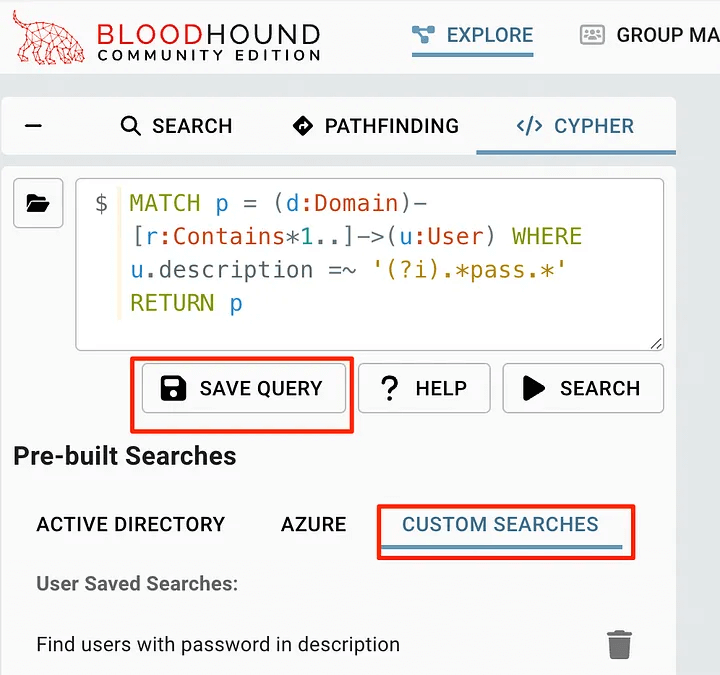
Find users who have the word “pass”.
MATCH p = (d:Domain)-[r:Contains*1..]->(u:User) WHERE u.description =~ '(?i).*pass.*' RETURN p
List of all captured objects
MATCH (n) WHERE "owned" in n.system_tags RETURN n
Знайдіть усі шляхи від володіння до об’єктів рівня 0
MATCH p = allShortestPaths((o)-[*1..]->(h)) WHERE 'owned' in o.system_tags AND 'admin_tier_0' in h.system_tags RETURN p
If you want to learn more, the BloodHound documentation has some fantastic resources on how to create and understand deep Cypher queries: Searching with Cypher – BloodHound (bloodhoundenterprise.io)
When we want to save the search results for future use, we can save it using the Save Query button. This will cause the “User Queries” category to appear in the same folder icon for future use.
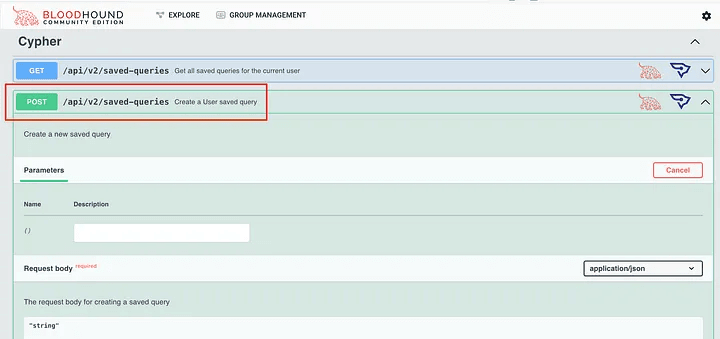
However, there is currently no way to load user requests from disk like in BloodHound Legacy. This has been discussed several times in the BloodHound Slack, suggesting using the API instead.
However, we can use the API documentation to try to figure out what we need to do. It is useful to note that there are a few different things we can use to read and post new user requests to the system.
If we need direct access to the Neo4j web console, we can access it by going to http://localhost:7474. For most scenarios, this is not necessary unless we need direct access to the database. This is a web interface to the Neo4j database that will allow us to perform raw queries against the cipher and view the data. We will log in using the default credentialsneo4j:bloodhoundcommunityedition
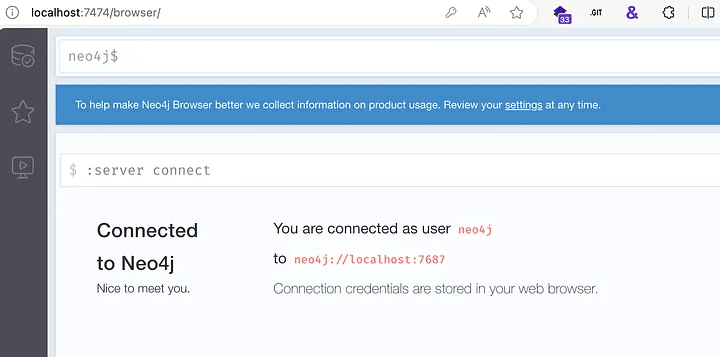
We can put raw queries into the prompt and see the results, as well as all the properties for each returned object.
This will help us create and debug user queries for BHCE. Again, access to the Neo4j web console is not typically needed in most scenarios, but it is useful to have as a fallback option just in case.
In most consulting environments, we need to clean BloodHound data to maintain data separation between clients. In the latest BloodHound 5.8.0 release, this can be done in the GUI.
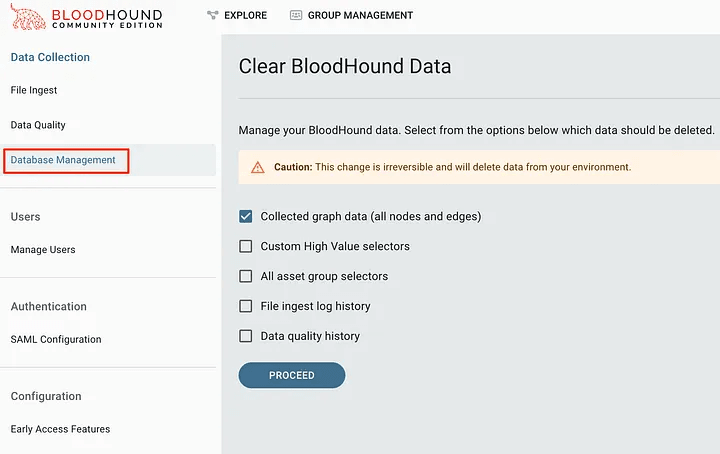
Before version 5.8.0 we had to remove what BloodHound was using to clean it up. We’re leaving these instructions here in case anyone needs to know how to do this, it’s also covered in issue #107 for BHCE.
First, let’s list the volumes used by docker:
docker volume ls
In this data, we see two volumes associated with BloodHound.
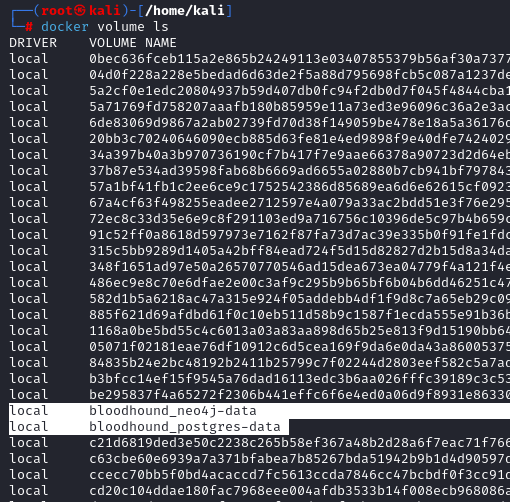
Identifying the Neo4j volume used by BloodHound To remove this data and get a fresh copy of the BloodHound data, we need to delete this volume. Note that bloodhound_postgres-data is used for login to the GUI and web application. It is usually not necessary to delete it unless you want to reset everything. Let’s delete this reset data. We use the command below to tell docker to delete this volume.
To simplify the task, we can do this all in one command.
docker volume rm $(docker volume ls -q | grep neo4j-data)
If you want to remove everything and get a fresh copy of all containers, volumes, and configurations, follow these instructions. It is assumed that the docker-compose.yml file is in the working directory.
First, we need to demolish the containers and remove the volumes with the following command:
docker-compose down -v
After that, we can get a fresh copy of the containers using the pull command.
docker-compose pull
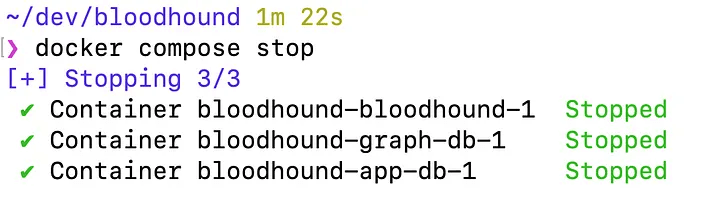
Stopping a container is very easy: we can simply ask docker to stop them.
docker compose stop
In many environments, we will want to share our BHCE instance with others so that they can all connect to the same instance. By default, BHCE is only exposed to localhost. To achieve this, we need to modify the docker-compose.yml file to expose it to others.
By modifying the following line in the bloodhound service, we can tell Docker Compose to expose the GUI to interfaces other than localhost. This is very convenient if we plan to use a single server for multiple pentesters to use at the same time.
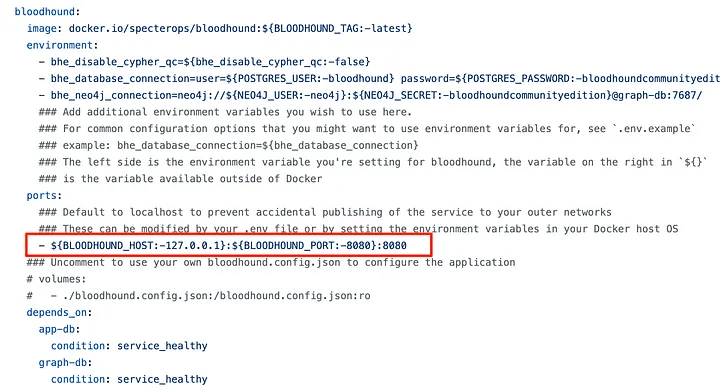
If we want to open it to all interfaces, change the BLOODHOUND_HOST parameter to 0.0.0.0. Note that if you have a white IP, your server will be accessible on the Internet! It is usually better to bind it only to the VPN interface, for example, the WireGuard interface, to restrict access.
For those looking to speed up their workflows and improve the quality of their results, it’s always important to find tools that actually save time. The logical question is: how can we leverage these approaches to get things done much faster and more efficiently?
The AD-Miner toolkit uses data in Neo4j to search for a variety of known risks and escalation paths, and then presents these results in an HTML file with an overall score.
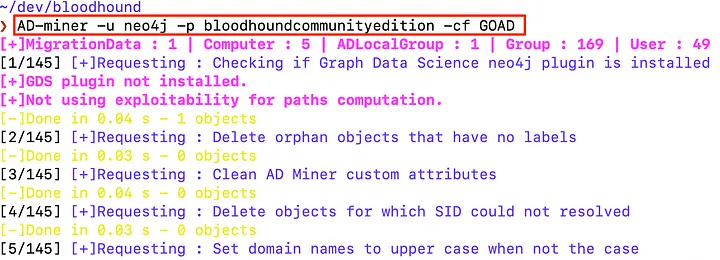
We can get it running by first installing the AD-Miner tool using pipx, and then providing the credentials to connect to the Neo4j database – these credentials are stored in the docker-compose.yml file. By default, this is neo4j:bloodhoundcommunityedition. Note that this is the password for the Neo4j database, not the BHCE GUI!
Installing using pipx:
pipx install 'git+https://github.com/Mazars-Tech/AD_Miner.git'
Generate an AD-Miner report using default BHCE credentials
AD-miner -u neo4j -p bloodhoundcommunityedition -cf GOAD
This can take a long time depending on the size of the environment – I had to wait more than 2 hours on some domains! After the process is complete, the files will be in the render_GOAD folder, using the label specified in the -cf switch. We can find this HTML file in the created folder.
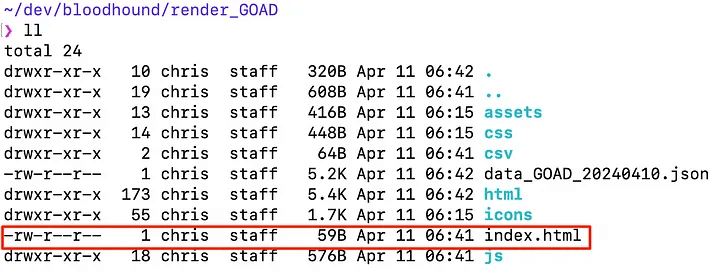
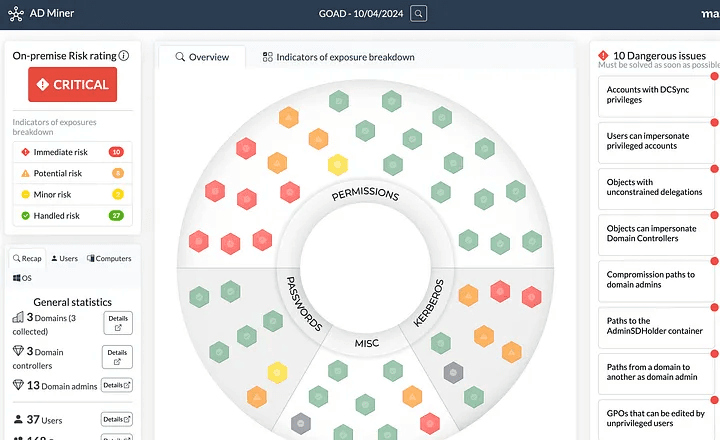
How great! Now we have an interactive dashboard that allows us to draw our attention to the most important configuration errors. AD-Miner is a fantastic tool for additional analysis and data enrichment.
BloodHound Community Edition is a powerful and at the same time user-friendly tool that greatly simplifies Active Directory analysis in complex corporate networks. The use of modern collectors, correct data entry and the ability to work with graph relationships allows you to quickly find incorrect configurations and potential attack paths. Combined with tools like AD-Miner, BHCE turns into a full-fledged suite for deep domain auditing, helping specialists objectively assess risks and form clear recommendations for improving infrastructure security.