The article covers practical examples, common startup errors, and tips on how to check if your container is working correctly. You’ll learn when you really need host-networking in Docker, and when it’s better to stick to regular bridge mode.
How to use Docker Compose with host network configuration
This tutorial will walk you through using Docker Compose with host network configuration on a LabEx cloud virtual machine. Docker Compose is a tool that helps you manage multiple containers – think of containers as lightweight, isolated environments that run applications such as a web server. Normally, Docker isolates the container’s network from the host machine (the virtual machine you’re running on), but the host network option allows the container to directly use the host network.
This is useful when your application needs to act as if it were running directly on the host, such as accessing host ports without any additional configuration. Eventually, you’ll configure Docker Compose, build, deploy, and test a simple web service using host network. Docker comes pre-installed on your LabEx environment, but we’ll also provide Docker Compose for you.
Docker Compose Setup
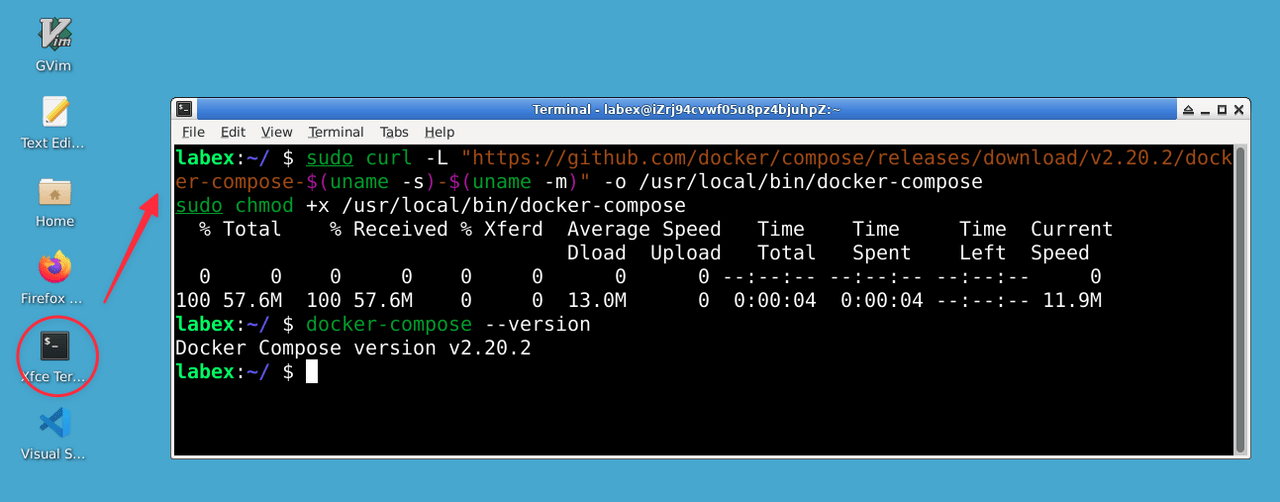
Before we dive into the setup, let’s make sure that Docker Compose is available on your LabEx Cloud VM. While Docker is pre-installed, Docker Compose — a separate tool for managing multi-container setups — may not be there. We’ll quickly install it using the terminal.
Open a terminal on your LabEx VM. A prompt should appear asking for /home/labex/project — this is your default working directory. Run these commands one by one:
sudo curl -L "https://github.com/docker/compose/releases/download/v2.20.2/docker-compose-$(uname -s)-$(uname -m)" -o /usr/local/bin/docker-compose
sudo chmod +x /usr/local/bin/docker-compose
Here’s what they do:
-
curl Downloads the Docker Compose binary from the official release on GitHub. The URL uses $(uname -s)-$(uname -m) to match your VM’s system (e.g. Linux-x86_64). Version 2.20.2 is stable and widely compatible.
-
-o /usr/local/bin/docker-compose Saves it to /usr/local/bin, the standard location for executable tools. sudo ensures that you have write permission there.
-
chmod +x: Makes the file executable so you can run it as a command. Again, sudo grants the necessary permissions.
To make sure this worked, run:
docker-compose --version
You should see output similar to Docker Compose version v2.20.2. If you get a “command not found” message, retry the commands carefully – check for typos or internet issues (the virtual machine needs internet access to boot). This step ensures that you are ready to use docker-compose in the next steps.
Creating a Docker Compose file using Host Network
Now that Docker Compose is ready, let’s create the docker-compose.yml file, your plan for launching a web service with a host network. We’ll use nano, a simple and beginner-friendly terminal text editor.
To create and edit the file, follow these steps:
In the terminal, make sure you are in the project directory:
cd /home/labex/project
Create and open the file using nano:
nano docker-compose.yml
Type or paste the following content into nano:
version: "3"
services:
  web:
    image: nginx:latest
    network_mode: host
Here’s what each part means:
-
version: “3”: Sets the Docker Compose file format. Version 3 is a common standard, as is the template selection.
-
services: Lists the containers (or “services”) to run, such as workers for your project.
-
webNames your service—name it whatever you want, but “web” is fine for a web server.
-
image: nginx:latest: Specifies the software—Nginx, a popular web server, with latest pulling the latest version from Docker Hub (a container image library).
-
network_mode: hostKey parameter. Docker typically provides containers with their own private network, isolating them from the host. hostmode allows the container to use the virtual machine’s network directly, so Nginx can access the host’s ports (e.g. 80) without any additional steps.
To save a file in nano format:
-
Press Ctrl + X to exit
-
Press Y to confirm saving changes
-
Press Enter to confirm file name
The file is now saved in the format /home/labex/project and you are ready for the next step.
Deploying a Docker Compose application
Once you have the docker-compose.yml files, let’s deploy the Nginx container by telling Docker to start it based on your plan. To do this, switch to the terminal.
In the terminal at /home/labex/project, run the command:
docker-compose up -d
Breakdown into parts:
-
docker-composeA tool that reads docker-compose.yml and manages your services.
-
up: Starts the web service (Nginx) defined in the file.
-
-d: Runs it in the background (“detached”), so your terminal remains free.
Docker Compose will download the nginx:latest image from Docker Hub if it is not already on the virtual machine (you may see a download message) and then start the container. Check if it is working with:
docker ps
This lists the active containers. Look for nginx:latest under “IMAGE” and “Up” under “STATUS” (e.g. “Up 5 seconds”). You won’t see port mappings (e.g. 0.0.0.0:80->80/tcp) because network_mode: host uses the host ports directly. If nothing is displayed, make sure you are logged in to /home/labex/project (pwd to verify) and rerun docker-compose up -d.
Testing the Nginx service on the host network
Now that the container is up and running with the host network, let’s check if Nginx is serving web pages on the host port 80 — the standard web port.
In the terminal at /home/labex/project, run the command:
curl localhost:80
This lists the active containers. Look for nginx:latest under “IMAGE” and “Up” under “STATUS” (e.g. “Up 5 seconds”). You won’t see port mappings (e.g. 0.0.0.0:80->80/tcp) because network_mode: host uses the host ports directly. If nothing is displayed, make sure you are logged in to /home/labex/project (pwd to verify) and rerun docker-compose up -d.
Testing the Nginx service on the host network
Now that the container is up and running with the host network, let’s check if Nginx is serving web pages on host port 80, the standard web port.
In a terminal at /home/labex/project, run the command:
curl localhost:80
What is happening:
-
curl: Gets data from a web address, like a terminal-based browser.
-
localhost:80: Connects to the virtual machine itself (localhost) on port 80. With network_mode: hostNginx container uses the host network, so its port 80 is the host port 80.
You should see HTML code starting with <!DOCTYPE html>—the default Nginx welcome page. Normally, Docker isolates container networks by requiring port mappings (e.g., host port 80 to container port 80). Host mode bypasses this, allowing Nginx to bind directly to port 80 of the virtual machine.
If you get a “Connection refused” message, check step 3—run docker ps to confirm that the container is “Powered.” Restart with docker-compose up -d if necessary, or check Docker with sudo service docker status . There is no browser here, so curl is not your testing tool.
Log research and cleanup
Let’s check the container logs to see what’s going on inside—a key troubleshooting skill—and then clean it up by deleting it.
Check logs
Run:
docker-compose logs web
-
docker-compose logs: Shows the results of your services.
-
web: Target audience of the web service from docker-compose.yml.
Look for lines like “nginx starting” or “listening on 0.0.0.0:80.” If you used curl, you might see a “GET /” message logged. Errors (like “port 80 failed”) will also be displayed here — useful if Nginx is stalling.
Cleaning
Do:
docker-compose down
-
docker-compose downStops and removes the container, freeing port 80 and cleaning up.
Check using:
docker ps
The absence of the nginx line means it is no longer there. If it remains, restart docker-compose down. It remains in the docker-compose.yml so you can restart it later with docker-compose up -d. This completes the lifecycle: setup, deployment, testing, and removal.
Troubleshooting and best practices
Here’s how to deal with the issues and use Docker Compose wisely.
Troubleshooting tips
-
Container not starting: If docker ps is empty, check docker-compose logs web for errors such as “port in use”. Free port 80 with sudo lsof -i :80 and sudo kill <PID>, then docker-compose up -d.
-
No curl response: Verify that the container is started (docker ps) and Docker is running (sudo service docker status). Restart with docker-compose up -d or sudo service docker restart.
-
File problems: If docker-compose up file is not found, check that you are in /home/labex/project (pwd) and that docker-compose.yml exists (ls).
Best practices
-
Restrict host network: This is simple, but skips isolation, putting security at risk if other services are running. Use this for labs, not production unless absolutely necessary.
-
Pre-check ports: First test sudo netstat -tuln | grep :80—clear port 80.
-
Save files: Save docker-compose.yml to /home/labex/project for reuse.
-
Watch logs: Check logs regularly to catch problems early.
These habits make your Docker work reliably and teach you essential skills.
Summary
You’ve installed Docker Compose, created a docker-compose.yml file with host networking, deployed an Nginx container, tested it, checked the logs, and cleaned it up. Host networking allows containers to use the host network directly, bypassing Docker isolation—a powerful trick. These steps provide a foundation for managing and troubleshooting Docker Compose applications, preparing you for larger projects.