
Before starting to use Tor, it is necessary to understand the subtleties and differences of this or that product. After all, Tor Browser and Tor are not the same thing. Both terms will be used throughout this article, so it’s important to be clear about the difference between the two. And she is. And now we will start with terms to save time and immediately everything became clear. Tor Browser is a set of several components, the main ones providing it:

The Tor network is a large and complex system that allows you to access the Internet through an encrypted connection and with IP address replacement. There is enough material on the Internet about the Tor network itself, and I will not consider the issue of its operation in this article. When I use the word “Tor” I mean a service (program) for a computer. This program has no GUI – it runs in the background and is always connected to the same Tor network I talked about in the previous paragraph. This program allows you to connect to it via the SOCKS protocol and therefore use the Tor network in this way.
So, if you want to hide your IP or bypass regional blocks when browsing websites, Tor Browser is all you need. If you need more – the use of the Tor network by programs other than a web browser, setting up a hidden service, and so on, then you need to use the Tor service. In this article, I will show different tricks for using both Tor Browser and Tor service.
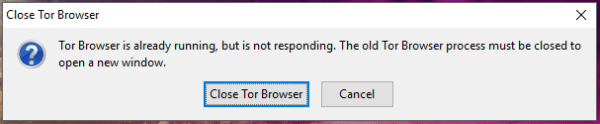
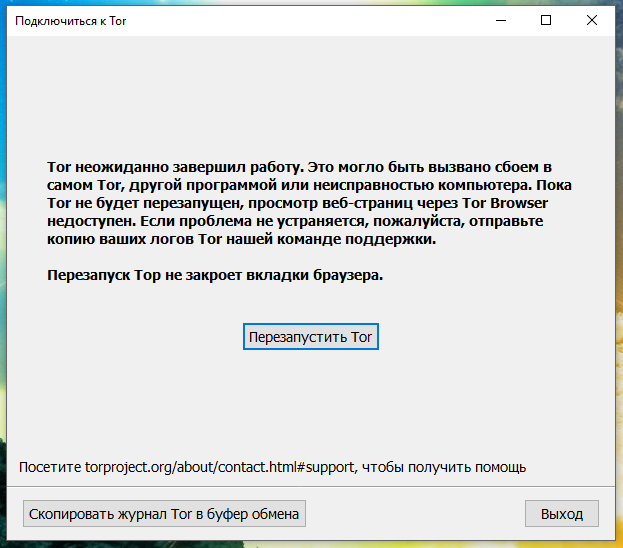
Problem: You may need to connect to different sites with different IP addresses or to the same site with different IPs at the same time. If you try to launch two instances of Tor Browser, you will encounter an error:
This message says that Tor Browser is already running and needs to close the old Tor Browser process before opening a new window. If you try to run from different folders, the following error will occur:
When Tor Browser starts, it starts the Tor service in the background. This service starts listening on port 9150. The web browser then connects to this port and begins exchanging data with the Tor network. When you try to launch Tor Browser a second time, a check is made to see if the Tor service is already running, since applications cannot listen on the same port at the same time, and for this reason it is not possible to run two instances of Tor Browser at the same time. The way out of this situation: change the ports in the second (and all subsequent) instances of Tor Browser to other, unoccupied ones. At the same time, you need to remember that you need to change the port of both the Tor service and the settings of the web browser, which connects by default to port 9150. But that’s not all. The Tor service runs in the background and when we close the web browser window, this service needs to be stopped – so that we can successfully launch the Tor Browser next time. The control port (ControlPort) is used to send commands (for example, change the IP address or stop the service). That is, the Tor Browser starts the Tor service so that it listens on port 9150, through which data is exchanged with the Tor network, and port 9151, through which the web browser gives commands to the Tor service.
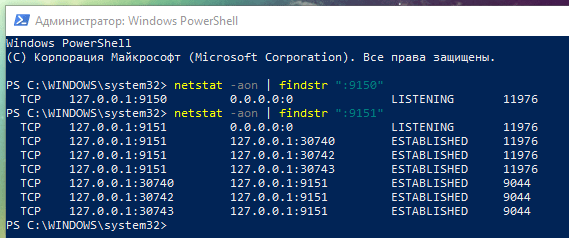
To verify this, execute two commands with the Tor Browser running:
netstat-aon | findstr “:9150”
netstat-aon | findstr “:9151”
You will see that both ports are indeed in use. If we change port 9150 but don’t change the control port, the second instance of Tor Browser still won’t start! So we need to change the two port settings for the Tor service and for the web browser.
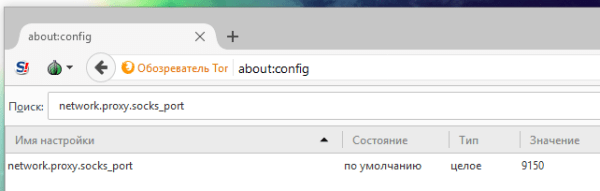
Download Tor Browser. Install it as many times as you need Tor Browser instances. You can’t just make copies of the same installed folder because the shortcuts will be the same and even though you’ll be opening different folders, the shortcuts will all point to the same executable file. You can not change anything in the first Tor Browser – it will use the default settings. We will make changes starting from the second. Any unoccupied ports can be used, for example, I will use ports 9160 and 9161 in the second Tor Browser, 9170 and 9171 in the third, etc. Start Tor Browser. In the address bar of the browser, enter about:config and click the “I accept the risks!” button:
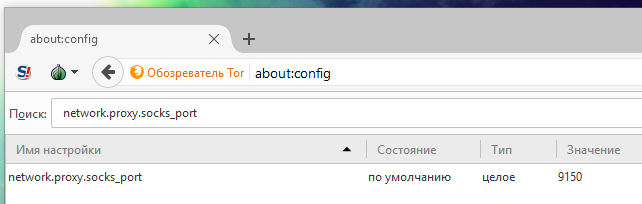
Search for network.proxy.socks_port – use the search to speed up the process and replace with, for example, 9160
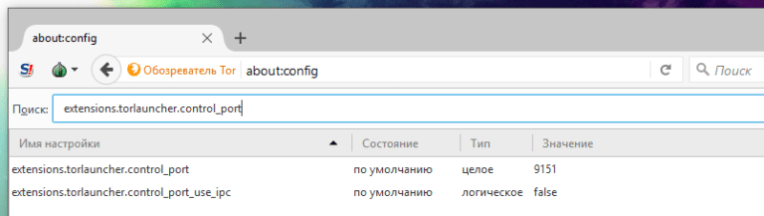
Now find the extensions.torlauncher.control_port setting and change the new control port, for example 9161
Close Tor Browser. This completes the setup – in the old instructions you may find additional steps, including editing the torrc-defaults file – this is not necessary! The modern Tor Browser automatically starts the Tor service with the correct ports. Repeat the above steps for each subsequent instance of the browser.
You may not know about the Expert Bundle – it’s a standalone Tor without a browser. If you know about a separate Tor service, but you want to, for example, use the Tor settings provided by Tor Browser, there are two options: fast or proper.
The more correct way is to run Tor with the Expert Bundle with the necessary settings. You won’t need to keep a browser window open all the time to use network bridges and other features. Next, I’ll show you how to configure Tor to work with the Expert Bundle with more features. In my examples, the Tor folder is located in C: Tor and the configuration file is called torrc (ie C: Tor torrc).
Some ISPs block Tor. They can use different approaches, such as blocking all Tor network IP connections or analyzing the traffic and, if it is determined to belong to the Tor network, block it. To bypass such blocking, you can use a repeater. A bridge is one of the types of repeaters. Since not all IP addresses of the bridges are known, there is a chance to bypass Tor blocking. Bridges built directly into Tor Browser are currently blocked in Russia. You need to get a working bridge. This can be done in five ways:
will connect using Snowflake;
send a message to the Tor Telegram bot;
send an email to the address [email protected];
request a bridge using the Tor Browser – Moat tool.
on a computer
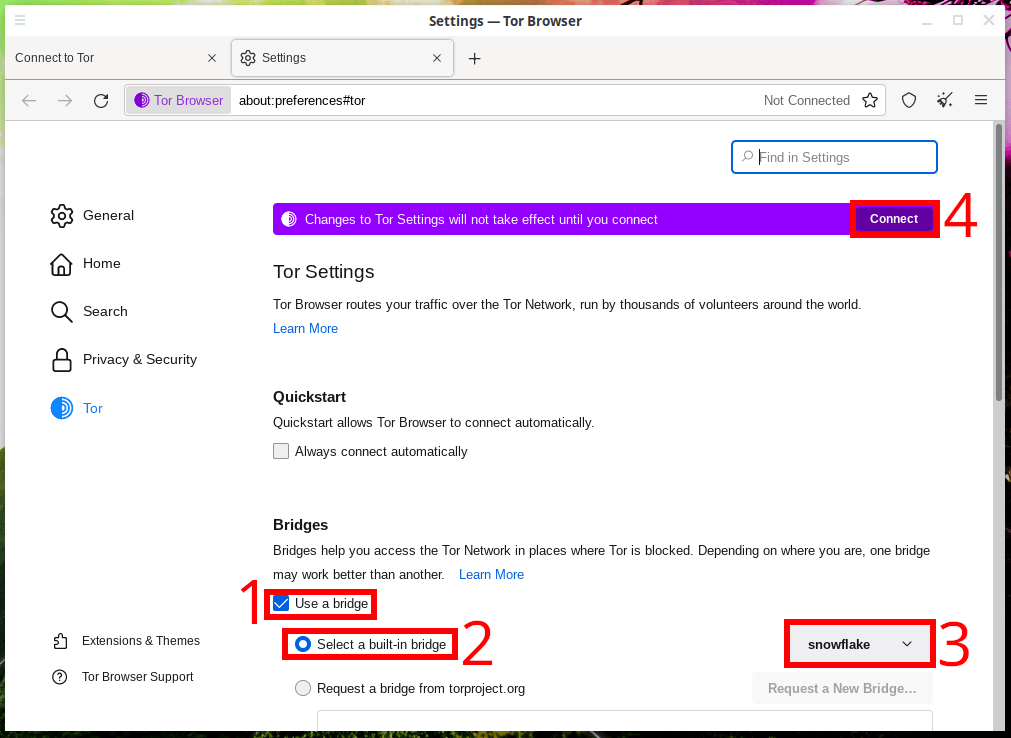
To use Snowflake, select “Tor Network Settings” when you launch the Tor browser for the first time.
In the “Bridges” section, check the box “Use a bridge” and select the option “Choose a built-in bridge”.
Select “Snowflake” from the drop-down menu.
Once you’ve selected this option, return to the top of the page and click “Connect” to save your new settings.
on Android
To use Snowflake, click the settings icon when you first launch Tor Browser.
On the first screen, you will learn about the status of the Tor network.
Click on the Bridge Configuration menu item.
Click on the “Use bridge” option and select “Snowflake”.
2. How to get a bridge from the Tor Project website
Go to the BridgeDB page
Solve the captcha.
Copy all lines completely. Below is how to manually add bridges to Tor Browser.
3. How to get a bridge using the Telegram bot
Connect with @GetBridgesBot on Telegram.
Type /bridges
Copy the entire line in its entirety. Below is how to manually add the Tor Browser bridge.

4. How to get a bridge by email (only for owners of Gmail and Riseup accounts)
Send an email to [email protected] from a Gmail or Riseup email account.
Leave the subject field blank. In the body of the message, write “get transport obfs4”.
Copy all lines completely. Below is how to manually add bridges to Tor Browser.
If these bridges do not work, please contact [email protected] for new bridges. The resulting bridges must be manually added to the Tor Browser.
5. How to get a bridge using Tor Browser – Moat tool
Users can request bridges through the “request a bridge from torproject.org” mechanism built into the Tor Browser. Just follow these three steps:

Tor Browser on a computer
When starting Tor Browser, select “Tor Network Settings”.
Go to the “Bridges” section. Check the box “Use Bridge”.
Select “Specify your bridge”. Enter the resulting bridges (one per line).
Click “Connect” to save your changes.
If Tor Browser is already running:
In the menu with three bars (≡), select the “Options” item.
In the left column, select “Tor”. Select “Specify your bridge”.
Enter the received bridges (one bridge per line).
Click “Connect” to save your changes.
Tor Browser for Android users
On the Tor Browser start screen, click the settings icon. You will see the status of the Tor network.
Click Bridge Configuration.
On the next screen, you can choose between using the built-in bridge or configuring an existing bridge. Enable the Use Bridge option and select Specify Bridge.
Add received bridges.
Install packages.
In Debian derivatives (Kali Linux, Linux Mint, Ubuntu) this is done with the command:
sudo apt install tor obfs4proxy
In Arch Linux derivatives (BlackArch, Manjaro) this is done with the command:
sudo pacman -S tor obfs4proxy
In the /etc/tor/torrc file, this is done with the command:
sudo gedit /etc/tor/torrc
Add the following lines, and in the rule that starts with Bridge, enter the details of your bridge.
Start the tor service:
sudo systemctl restart tor
Let’s look at the Tor log:
sudo journalctl -b –no-pager /usr/bin/tor
Pay attention to the lines in which the bridge is mentioned. If you do not have root rights and cannot edit the /etc/tor/torrc file, this is not an obstacle to connecting to the Tor network through the bridge.
Create a settings file anywhere you have write permissions:
gedit settings.txt
And copy the following lines into it (replace the bridge parameters with yours):
ClientTransportPlugin obfs4 exec /usr/bin/obfs4proxy
Bridge obfs4 77.116.217.120:59126 5A1C6F3FEB89849001EDBFF45C17025E9C6324A3 cert=NyiABUP2ym213/zjXUVcBqe/HaGHnz6no30X
UseBridges 1
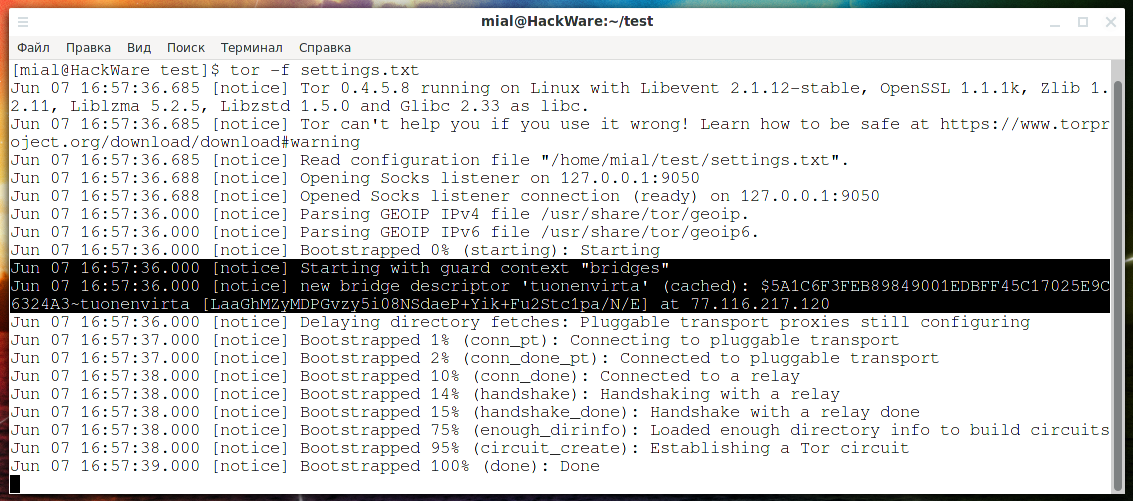
Run like this:
tor -f settings.txt
As you can see in the following lines, the connection to the Tor network is made using a bridge:
Jun 07 16:57:36.000 [notice] Starting with guard context “bridges”
Jun 07 16:57:36.000 [notice] new bridge descriptor ‘tuonenvirta’ (cached): $5A1C6F3FEB89849001EDBFF45C17025E9C6324A3~tuonenvirta [LaaGhMZyMDPGvzy5i08NSdaeP+Yik+Fu2Stc1pa/N/E] at 77.116.217.120
After obtaining the bridge list, add the following to the C:Tortorrc file:
ClientTransportPlugin obfs2,obfs3,obfs4,scramblesuit exec C:TorPluggableTransportsobfs4proxy.exe
Bridge LINE
UseBridges 1
Instead of ROW, insert one of those long strings we got in the previous step:
Let’s check:
C:Tortor.exe -f “C:Tortorrc”
The line Bootstrapped 100%: Done indicates that the connection was successful.

Note that obfs4proxy.exe does not unload after stopping Tor and even after closing the console. You need to stop this process manually.

To find the PID:
netstat-aon | findstr “:9050”
To add to autoboot with settings:
C:Tortor.exe –service install -options -f “C:Tortorrc”
You can connect to Tor through a proxy. The following types of proxies are supported:
If you are connecting via an HTTP proxy, use the HTTPSProxy directive:
HTTPSProxy Proxy_IP:8888
As Proxy_IP, enter the IP address of the proxy server, and replace port 8888 with the desired one. If you need to enter a username and password on the proxy, do it like this:
HTTPSProxyAuthenticator USER:PASS
Instead of USER, enter the user name, instead of PASS, enter the password. When connecting through a SOCKS5 proxy, add to the configuration file:
Socks5Proxy Proxy_IP:8888
As Proxy_IP, enter the IP address of the SOCKS5 proxy server, and replace 8888 with the desired port. If you need to log in, you can enter the username and password as follows (replace USER and PASS with valid data):
Socks5ProxyUsername USER
Socks5ProxyPassword PASS
When connecting through a SOCKS4 proxy, add to the configuration file:
Socks4Proxy Proxy_IP:8888
As Proxy_IP, enter the IP address of the SOCKS5 proxy server, and replace 8888 with the desired port. SOCKS4 does not support authentication.
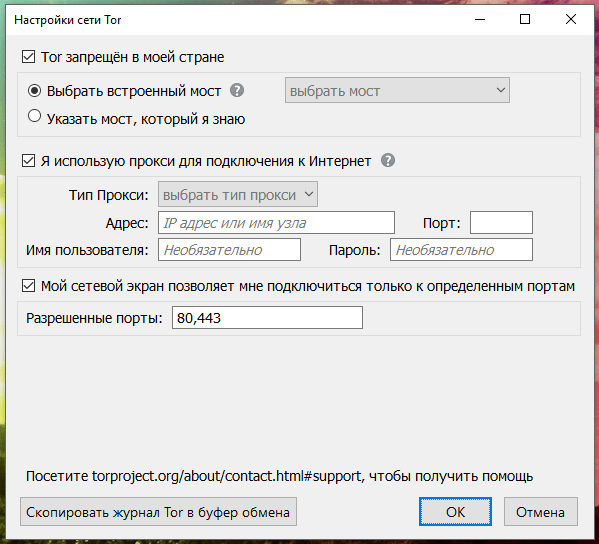
For example, a corporate network only allows web browsing, meaning you can only connect to ports 80 (HTTP websites) and 443 (HTTPS websites). You can configure Tor to connect only to specific ports on a remote Tor network node. Configuring Tor when the firewall only allows connections to ports 80 and 443:
ReachableAddresses *:80,*:443
ReachableAddresses reject *:*
ReachableAddresses reject *:*
Let’s go back to Tor Browser again. For obvious reasons, saving logins and passwords is disabled in it by default. However, if you only use this browser to bypass site blocks or change IP, such settings are unnecessary. If you want sites to save the passwords you enter, go to Settings, then Privacy, uncheck “Always work in private browsing mode.” Restart your browser. Go to Settings, then Security and put a check mark next to “Remember logins for sites”.


