
12.05.2023
6 min
2678

You can connect to the network using a wired, Wi-Fi, or cellular connection. We need a little more information to set up pricing and feature options. A valid service address is required. Please provide a mailing address. By entering your account information and clicking the Show My Preferences button, you are giving CenturyLink consent to access your account information, including the services you subscribe to, to respond to your inquiry and to inform you about CenturyLink products and services. You may deny us permission without taking any further action, and your denial will not affect your current services. Under federal law, it is your right and our responsibility to protect your account information. Tails can work with different Wi-Fi adapters, so when you turn it on, just try to use the existing Wi-Fi card. If the built-in Wi-Fi card did not work, the following wireless adapters are recommended on the Tails developer website (that is, they will definitely work in Tails): Edimax N150, Panda Wireless Ultra, Panda Wireless PAU05.
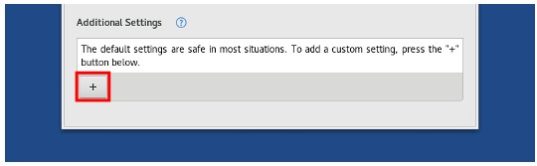
It is also recommended to try to disable MAC address spoofing. This is done in the Tails welcome screen, where you need to press + (plus) to display additional settings. Remember that the MAC address of the Wi-Fi card can uniquely identify your computer on the local network. Therefore, it is not recommended to turn off MAC address spoofing unnecessarily. The MAC is not transmitted to the Internet, it is visible only to other local network nodes, as well as in the wireless space – to everyone within the reach of the Wi-Fi network. The MAC can be written by the router to the log.
Many public Internet connections (usually available through a wireless network connection) require their users to register and log in to access the Internet. This includes both free and paid services that you can find in Internet cafes, libraries, airports, hotels, universities and so on. Usually, in these situations, the so-called Intercepting Portal blocks the request to the website and redirects the web browser to the login page. This cannot work when using Tor, so a browser with unrestricted network access is required. Tails includes Unsafe Browser for this, and it can be launched via Applications → Internet → Unsafe Web Browser.
Unsafe Browse has a red theme unlike Tor Browser. Unsafe Browser is not anonymous. Use it only to log in to the Interceptor Portal or to browse web pages on your local network. If you download files using Unsafe Browser, it is impossible to access them from anywhere except Unsafe Browser itself. Safety recommendation:
Do not run this browser at the same time as the anonymous Tor Browser. It is possible to confuse browsers with each other, which can have disastrous consequences.
Attention, in the latest versions of Tails, the insecure browser is not available, if you did not enable it at system boot.
What additional programs can I install in Tails?
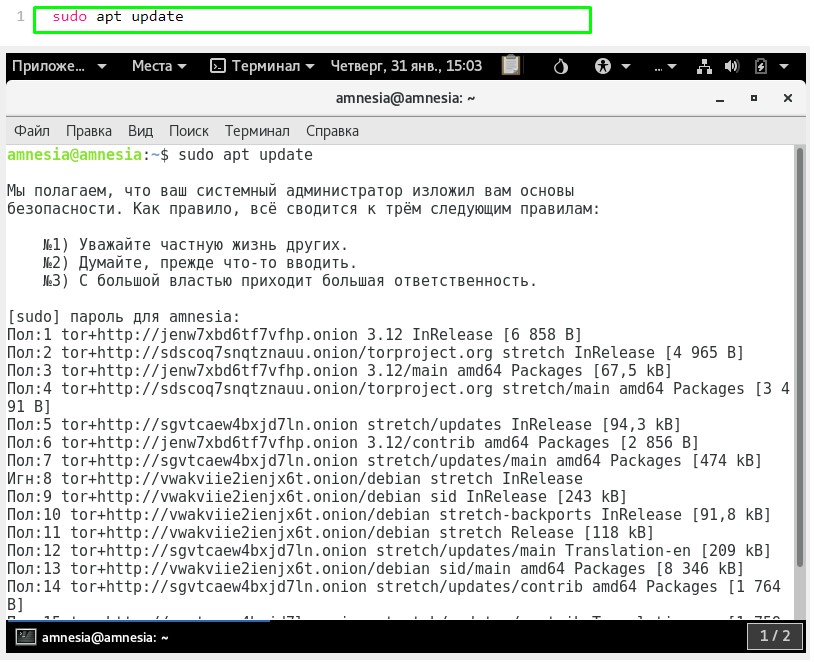
Tails includes a limited set of apps, but you can install more apps. These programs are distributed in packages available in the Debian repositories – much like Google Play or the App Store. To find out which packages are available in Debian:
Set an admin password when you start Tails.
Select Applications → System Tools → Synaptic Package Manager.
Wait for Synaptic to finish downloading new package information from the Debian servers.
Browse packages by selecting them from the left sidebar.
Search by package names and descriptions using the Search button.
Search the Internet for alternatives to other programs. For example: “debian alternatives for photoshop”.
Ask a friend who knows Linux.
Search on Debian.
The security of the packages included in Tails is thoroughly tested. Installing additional packages can break Tails’ built-in security, so be careful what you install. If you are not sure:
Packages that use the network must be configured to work through Tor. Otherwise, they will be blocked from accessing the network.
Some programs can, for example, change the firewall or break Tails’ built-in security. But other software, such as games or office tools, probably won’t cause problems.
Software not officially included with Tails may not have been tested for security. The authors of Tails cannot provide support or documentation for it.
Only programs packaged for Debian can be installed and are under public control.
To install a package using Synaptic:
When starting Tails, set an administrator password.
Select Applications → System Tools → Synaptic Package Manager.
Click Search and search for the package file name.
Right-click the package name in the search results and select Mark for Installation.
Synaptic calculates additional changes to make your package work. Click Mark to confirm these changes.
Click Apply to download, install, and configure the package.
If you feel confident on the command line, you can use the apt command instead.
To do this, you need to enable the Additional Software persistent storage feature. After the package is installed using Synaptic or apt, a notification will appear asking you:

Install Only Once —means to install the program only once, for the current session.
Install Every Time — install the app every time you start Tails (when persistent storage is enabled).
If you select Install Every Time, the package will be saved to permanent storage and automatically reinstalled every time you start Tails. When connected to the Internet, the package will also be updated automatically.
If you choose Install Only Once, the package will also be saved to persistent storage, but will not be automatically installed again when you start Tails. This package can sometimes be reinstalled faster because you won’t need to download it again.
Additional setting
Some packages require additional configuration to work. To save these configurations for other Tails sessions, you can use the Dotfiles persistent storage feature.
To see which packages are automatically installed every time you start Tails, choose Applications → System Tools → Additional Software.
Click on the button to remove the package from the list.
The same list is also available from the persistent storage configuration window by clicking the button.
When you have installed the package, if you choose:
Install Only Once you can remove it restart Tails.
Install Every Time you can remove it
Using Additional Software:
Select Applications → System Tools → Additional Software.
Click on to the right of the package name.
Set an admin password when you start Tails.
Select Applications → System Tools → Synaptic Package Manager.
Click Search and search by package name.
Right-click the package name in the search results and select Mark for Removal.
Click Apply to remove the package.
From the command line using apt.
After removing a package, a message will appear asking you if you want to remove this package from the list of additional software.
After you’ve installed a lot of packages that you no longer use, you can clear up free space in your personal storage:
Set an admin password when you start Tails.
Select Applications → System Tools → Root Terminal to open Root Terminal.
Run the following command:
The packages available on Debian are under public control. Configuring additional APT repositories may break Tails’ internal security and may result in the installation of software that has not been approved by Debian. Be extra careful with what you install. This step is usually not necessary to install additional programs, and may only be necessary in very rare circumstances. Sometimes you may need additional APT repositories. For example, to install packages from the non-free section of the Debian repository.
Set an admin password when you start Tails.
Create an apt-sources.list.d folder in your persistent volume:
![]()
![]()

File names must end with .list and can only contain the following characters: letters, numbers, underscore, dash, and period.

Restart Tails for the changes to take effect
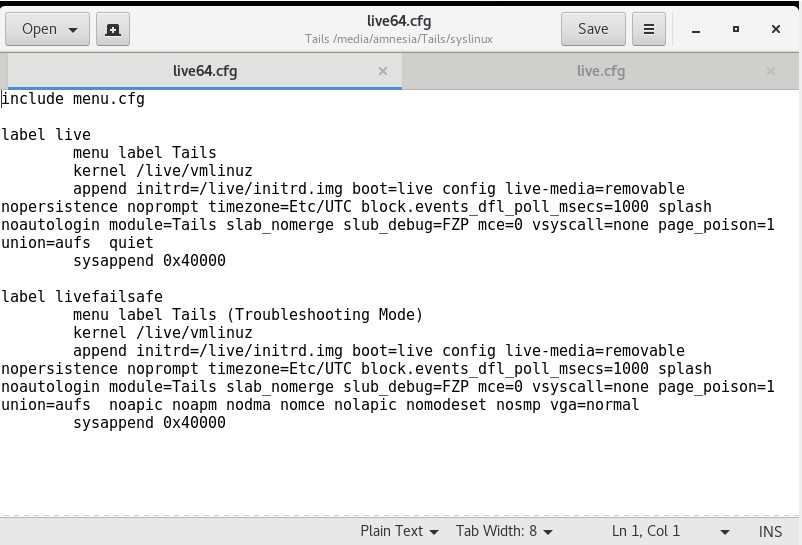
This instruction is only for those who really understand why he needs it. If you know why you need it, then you should also understand the disadvantages/consequences/differences from a normal Tails installation. We’ll use the built-in Tails tools, we’ll just tweak them a bit. By the way, you can install Tails in VirtualBox in the same way. Boot from DVD/USB and set Admin Password at login, then open terminal. Enter the command in the terminal to open the file:
![]()
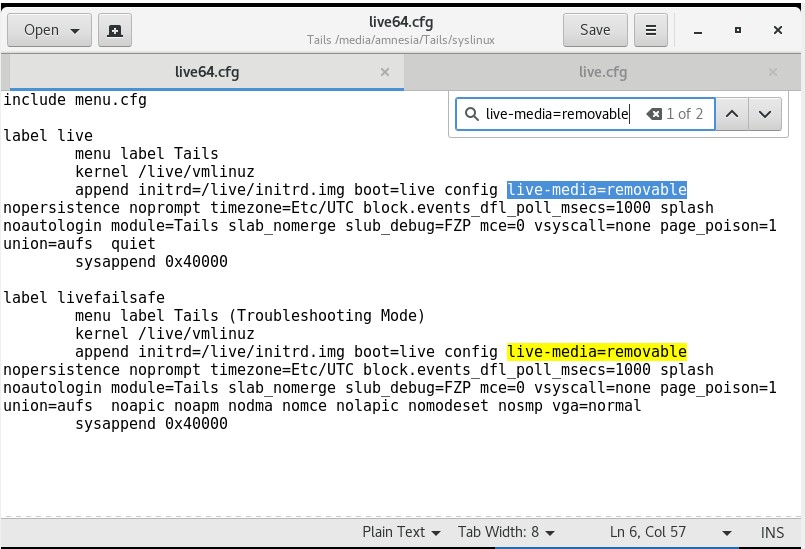
Find the line in it:
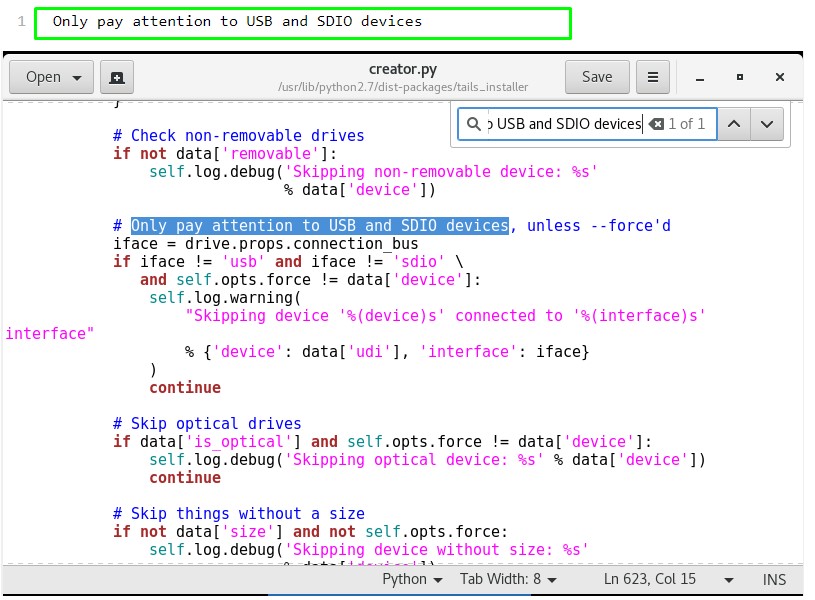
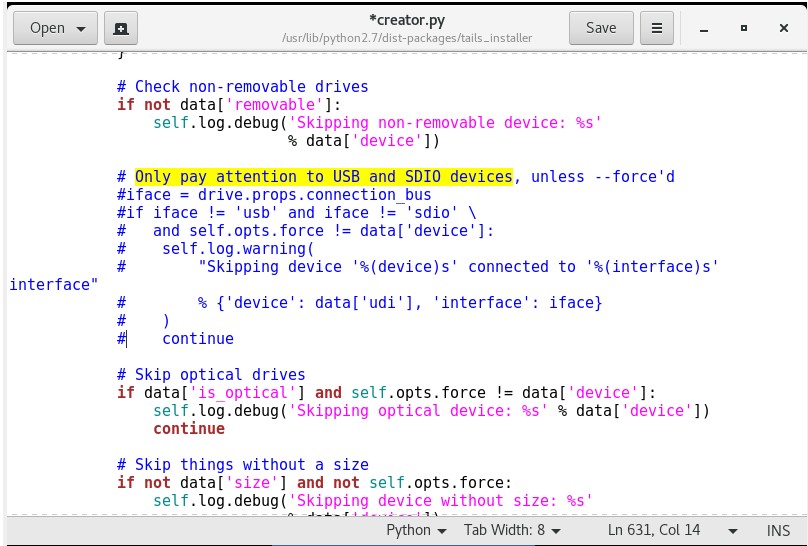
And comment out the next 8 lines by putting a # in front of each line (the change in font color means you did everything right). This should be done up to and including:
![]()
Вийде:
Save and close the file. Now open the file:
![]()
Find the line there:
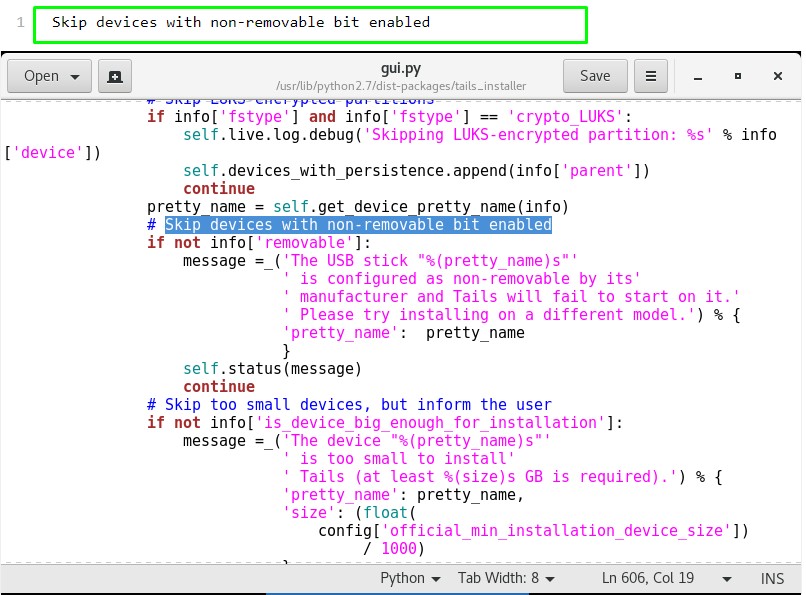
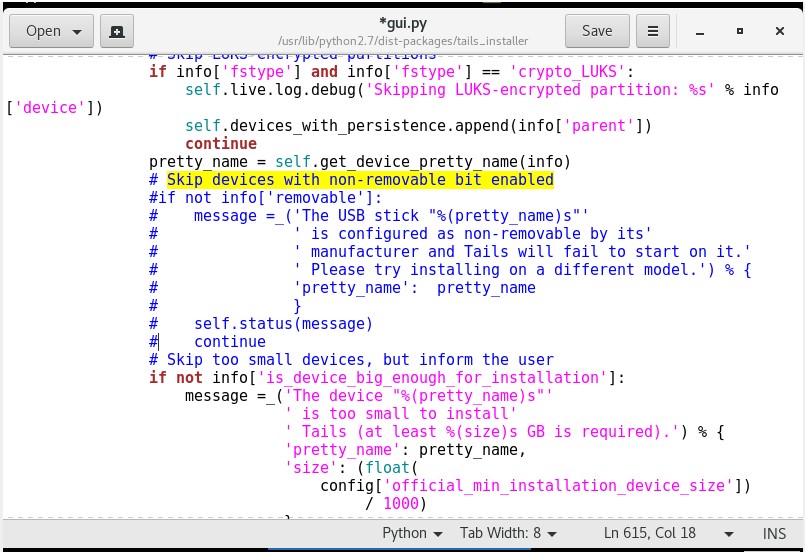
And comment out the next nine lines, up to and including:
![]()
It should look something like this:
Save and close the file. Now run the command in the terminal:
![]()
Select the drive and click Install:
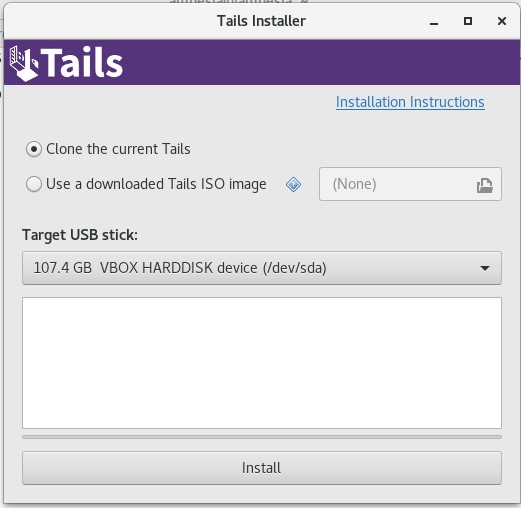
Without rebooting, mount the “Tails” partition from the newly created device/disk using Applications → Utilities → Disks:
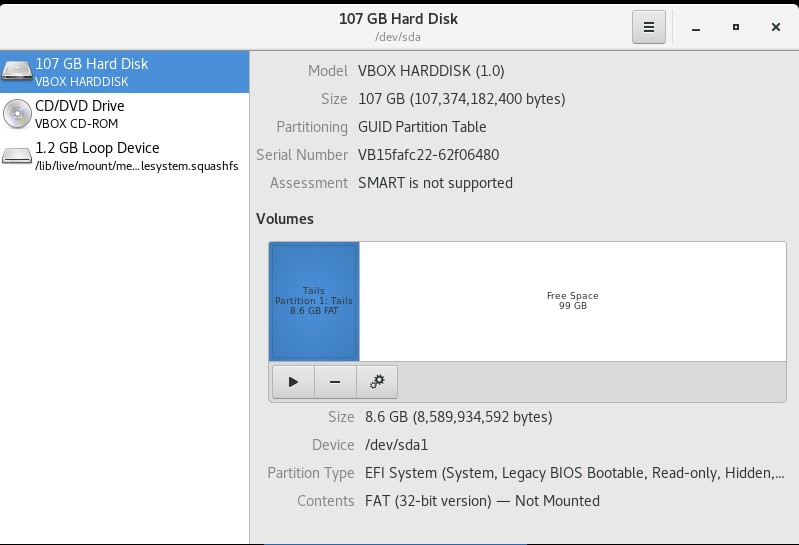
I’m interested in the disk on which Tails is installed, not the empty space. To mount it, click on the appropriate button (similar to the Play button). In the terminal, do:
![]()
Two files will be opened in gedit:
In each of them, find all occurrences of the string:
![]()
But delete this line:
Save and close these files. Then, in the terminal, run:
![]()
The file will be open in gedit. Similarly, find all occurrences of the string in it
![]()
But delete this line. Finally execute the command:
![]()
As always, gedit will open the file. Find all occurrences of the string in it
![]()
But delete this line. Reboot, select boot from disk (HDD) and enable admin password. Now open a terminal and execute there:
![]()
Find in this file:
AFTER this line, insert the line:
![]()
Important: it MUST be placed in column 1! A change in color means you did everything right:
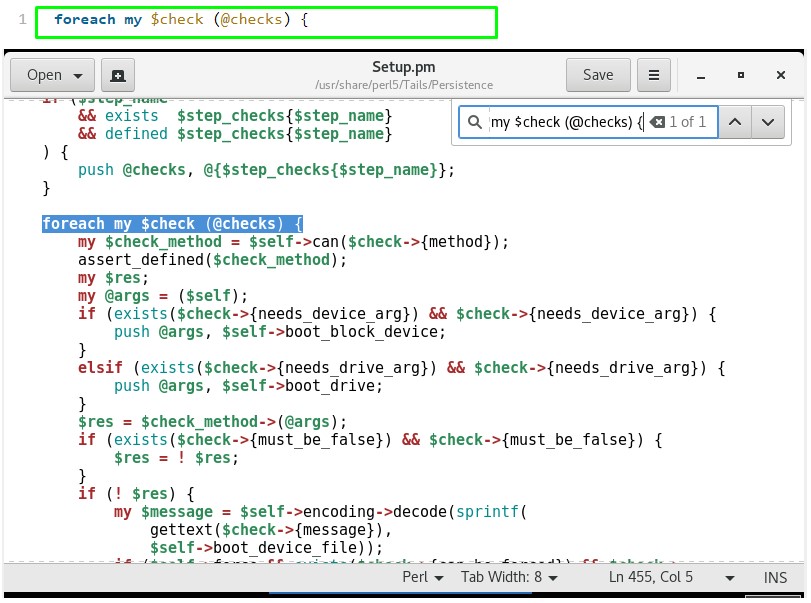
Find the line below:
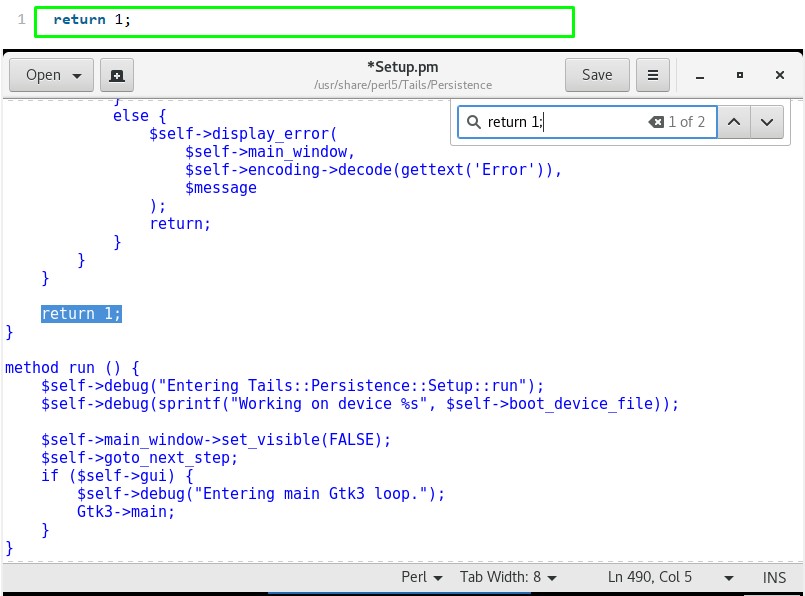
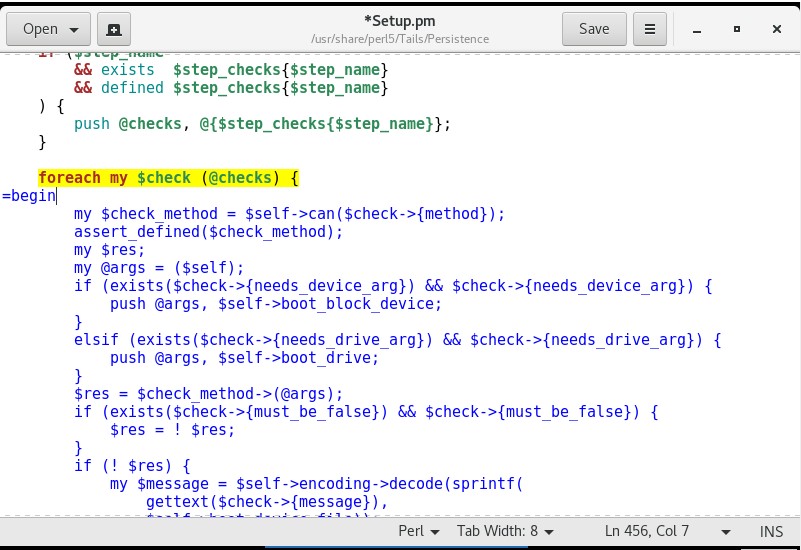
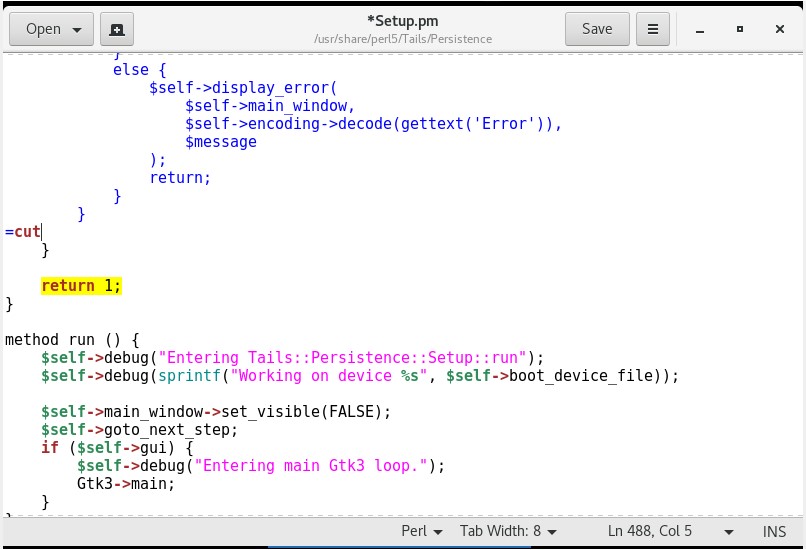
BEFORE (above the curly brace “}” which is in the same column as the first “r” of the line “return 1;”) insert the line
![]()
Important: it must be placed in column 1:
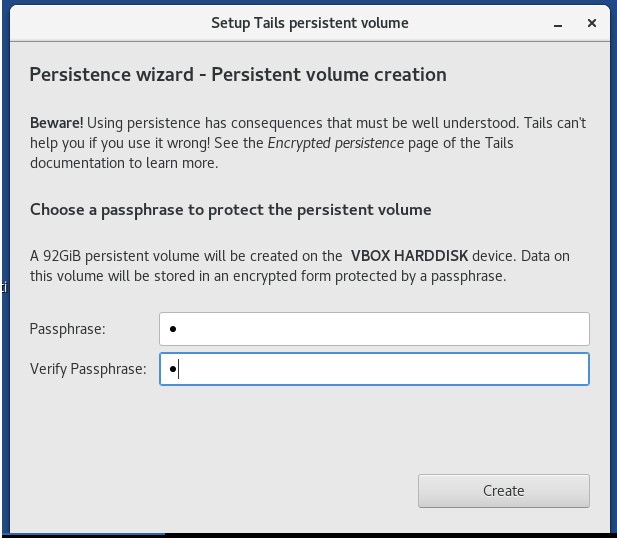
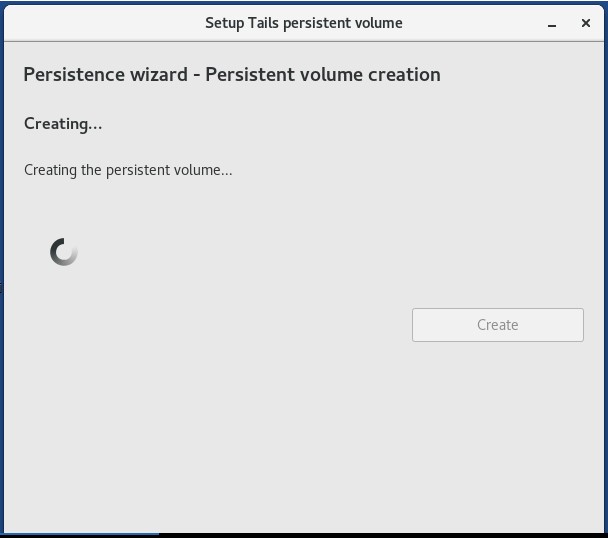
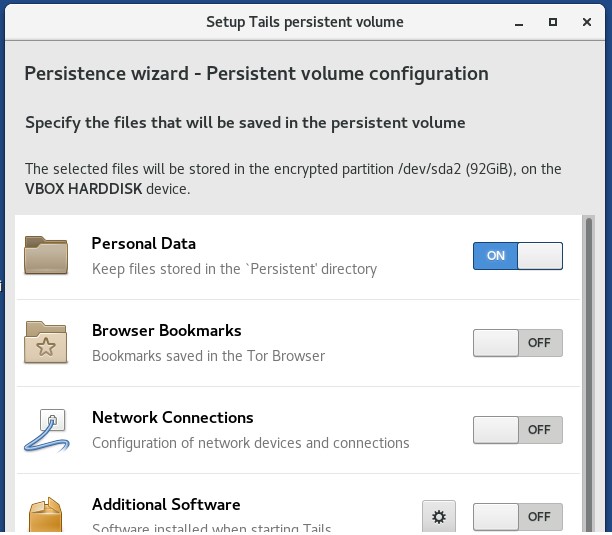
As you normally do, launch Applications → Tails → Configure persistent volume. Set a password and create permanent storage:
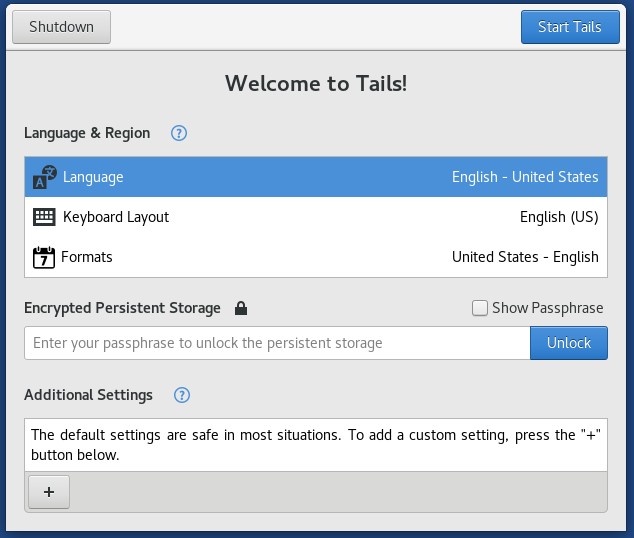
After rebooting, a new field will appear in the welcome window where you can enter a password to activate persistent storage. As usual, you can configure persistent storage through the menu (remember that /usr/local/share/perl/*/Tails/Persistence/Setup.pm must be patched as shown below):
You can save two files (or at least /usr/local/share/perl/*/Tails/Persistence/Setup.pm) and replace them with a script after every reboot (take care of owners and access rights!) to make your hdd-tails behave exactly like USB-tails. I recommend making a copy of the Setup.pm file:
![]()
I also recommend creating a file in which we will collect several useful actions. We create a file:
![]()
Copy into it:

After rebooting, run the file like this:
![]()
As a result, the patched version of the Setup.pm file will be restored to the system, as well as the VirtualBox Guest Add-ons processes will be launched – the screen will become larger, the clipboard will work, and more. To update the system installed in this way, use the following instructions.
VeraCrypt is not available in the default Tails repositories. But it can still be installed manually. There is a portable version for VeraCrypt, so you can save it to the Persistent folder and it will be available to you every time you restart Tails. By the way, Tails has a program for unlocking VeraCrypt drives and containers, but that program can’t create containers, and frankly, I don’t know how much you can trust it. Therefore, we will install a full-fledged original VeraCrypt from the author. So, I’ll show you how to install a portable version of VeraCrypt in Tails in the Persistent section. So you must have persistent storage enabled. You will be able to run VeraCrypt from it, as well as create VeraCrypt containers on this same persistent storage. Therefore, the program and encrypted containers with your files will be saved and will not disappear after reboots.
You can install VeraCrypt manually, links to official sites and instructions are provided in this article. But installing VeraCrypt even in regular Linux can cause confusion among users, so a script was written (it’s in the same article) to help download and install the latest version. But Tails is too specific a system and even that script won’t be able to help you. Therefore, another script was written to install VeraCrypt in Tails.
specifies the latest VeraCrypt release
downloads the installation files for the latest VeraCrypt release
runs the installation files
after extraction, places the VeraCrypt executables in the Persistent folder and gives them names that say
this is done for VeraCrypt with a graphical and console interface
So, create a file with the following command:
![]()
Now copy the script into this file:
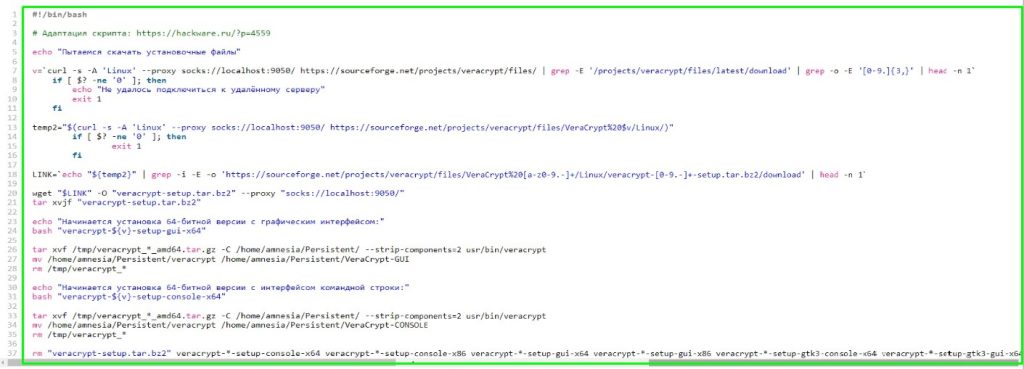
Now run the script with the following command:
![]()
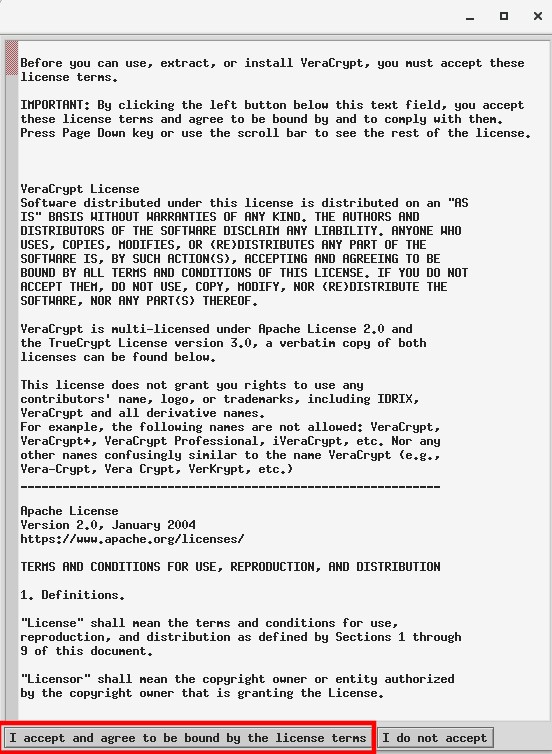
The graphical version installer will be launched first. It is important to choose file extraction and not installation. Select «Extract .tar Package File»:

Accept the license terms:
Click OK twice and:

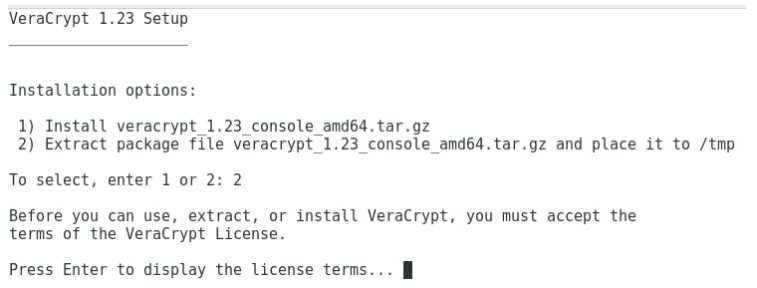
It will immediately switch to installing the console version.
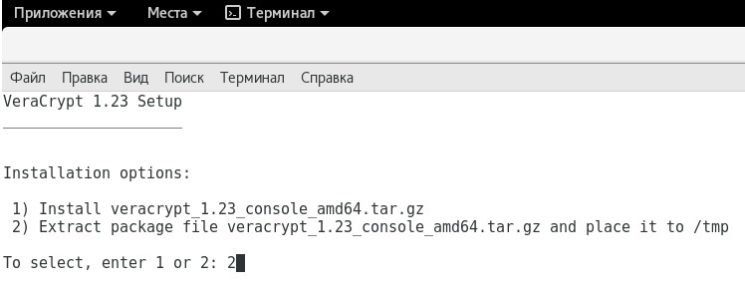
Select:
![]()
Press Enter to display the license:
Press Spacebar to scroll through the license. At the end, write “yes”:
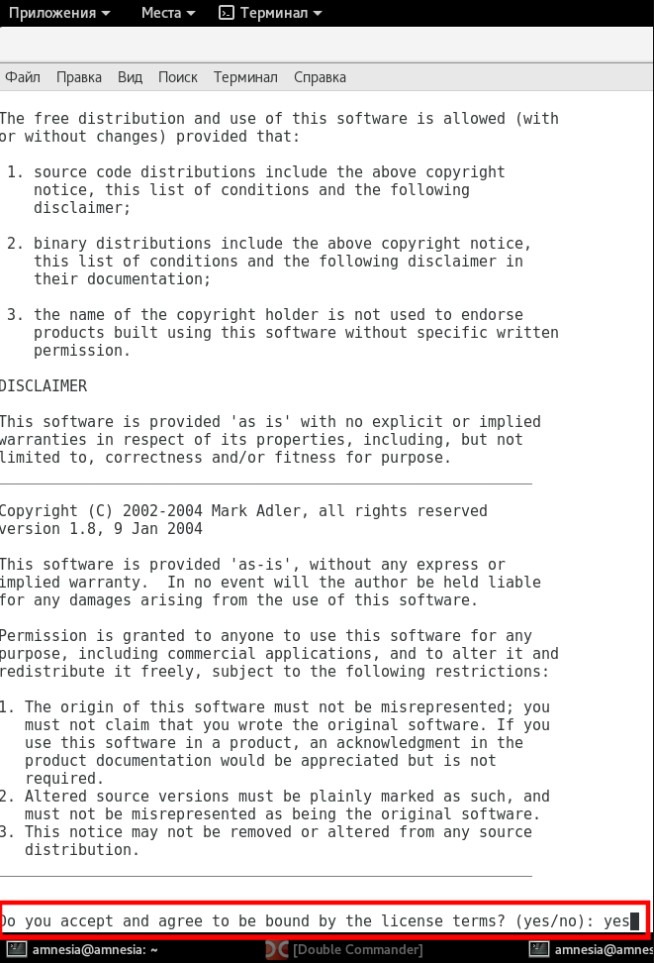
Then press Enter to exit. As a result, two files will be created in the /home/amnesia/Persistent/ folder:
VeraCrypt-GUI — graphic version
VeraCrypt-CONSOLE — console version
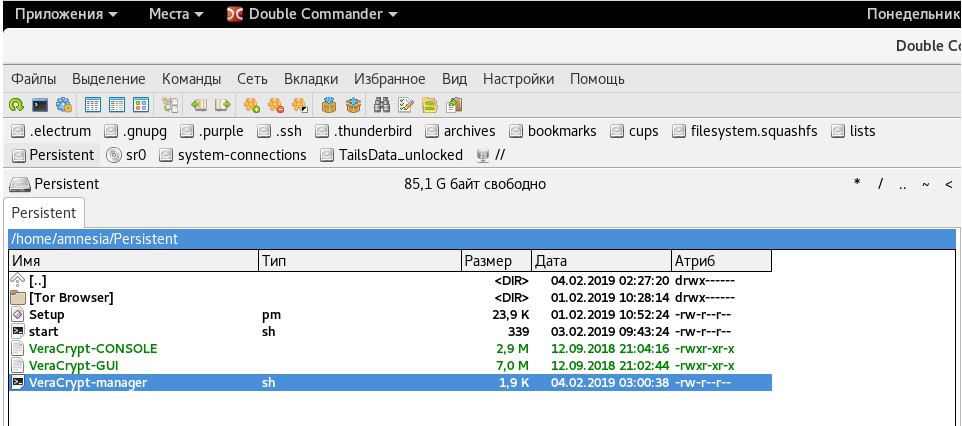
You can run them by double-clicking or from the console with commands:

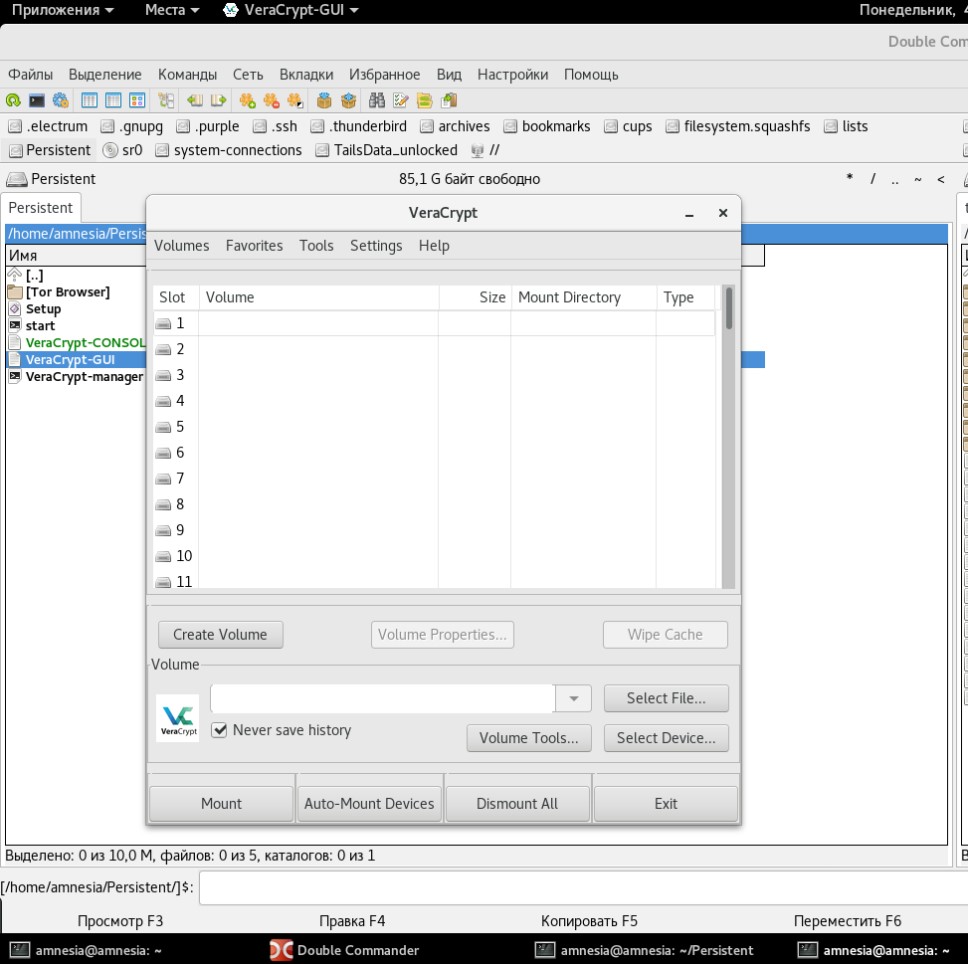
You don’t need root to create containers, but you may need root to mount containers, in which case run the program as root like this:

By default, Tails is a Live system, then all the changes made are saved to the virtual file system (in fact, kept in RAM), but after rebooting the computer they are lost. If you need to make changes that should remain permanently, then for this:

This method only works for Tails installed on USB and only until the next reboot. That is, on the next reboot, the disk will be mounted read-only again, but the changes made while the disk was mounted for writing will be preserved. At the same time, access is only to the downloader files and its settings.
Tails is a Debian-based distribution, so there are commands to update packages:

But due to the fact that this is a Live system, all the changes made will be lost after a reboot. Due to the features of the permanent storage (only what is provided by the developers is stored), even if it is activated, updated programs will not be written there — that is, after the system is rebooted, the packages will be in their original state.
If you plugged in a writable drive and then updated the programs, then, in theory, the changes you made should be saved. But it should be remembered that the consequences can be unpredictable: due to disk space limitations, or due to the lack of necessary packages in the repository (since it is a Live system repository), anything can happen in the system after such an update: including it may turn out to be completely inoperable.
When you use your computer, all the data you access is temporarily stored in the random access memory (RAM): texts, saved files, as well as passwords and encrypted keys. The more recent the activity, the more likely the data will still be in RAM. After turning off the computer, the data in the RAM quickly disappears, but it can remain in the RAM after turning off for several minutes. An attacker with access to the computer can recover important data from your session before it is completely gone. This can be achieved using a technique called a cold boot attack. To prevent this attack, data in RAM is overwritten with random information when Tails is disabled. This erases all traces of your session on this computer.
Moreover, the attacker has physical access to the computer while Tails is running, and can also recover data from RAM. To avoid this, learn different methods of quickly disabling Tails (about it in the next paragraph). As far as we know, cold boot attacks are not very common data recovery, but it is good to be prepared for them. If a cold boot attack does not occur immediately after shutdown, the RAM itself is emptied within minutes and all data is lost.
Click on the system menu located in the upper right corner of the screen and select:
to turn off the computer
to restart the computer.
Physically remove the USB drive or DVD from which Tails is running.
This method rarely breaks the file system of your persistent storage. Use this method only in extreme circumstances.
If you are unable to enable persistence after using this method, you should be able to recover most of the information by performing a persistent storage file system check. When turned off, the information in the RAM is erased to protect against cold boot.
The term “local area network” refers to a set of computers and devices that can be reached directly from your computer without going online. For example, your home router, your network printer, or your company’s intranet are most likely on your local area network, also known as a LAN (Local Area Network). From a technical point of view, this applies to IP addresses in the ranges:
10.0.0.0-10.255.255.255 (10/8)
172.16.0.0-172.31.255.255 (172.16/12)
192.168.0.0-192.168.255.255 (192.168/16)
Accessing resources on a local network can be useful in the context of Tails, for example to share documents with someone on the same local network without accessing the Internet. But a program that can connect both to resources on the Internet (through Tor) and to resources on a local network (without Tor) can violate your anonymity. For example, if a website you visit anonymously with Tor Browser may also connect to other web pages on your local network, this information may reveal your location. This is why the Tor Browser cannot access the Tails LAN. This page describes some of the security measures built into Tails to protect against such attacks, and explains how to access some types of resources on a local network. Warning: LAN connections are not anonymous and do not go through Tor.
Unable to access web pages on local network with Tor Browser. This prevents websites on the Internet from determining your location from the content of other web pages that may be related to your local network. Use an insecure browser to access web pages on your local network.
If you download files using an insecure browser, you will not be able to access them outside of the insecure browser itself. You can use the curl command to download files from web pages on your local network. For example, to download a document available on the local network at http://192.168.1.40/document.pdf, run the following command:
![]()
Open the Nautilus file manager – this can be done by opening any folder. Click the Other Locations button in the sidebar. Enter the FTP server address in the “Connect to server” text box. Example:
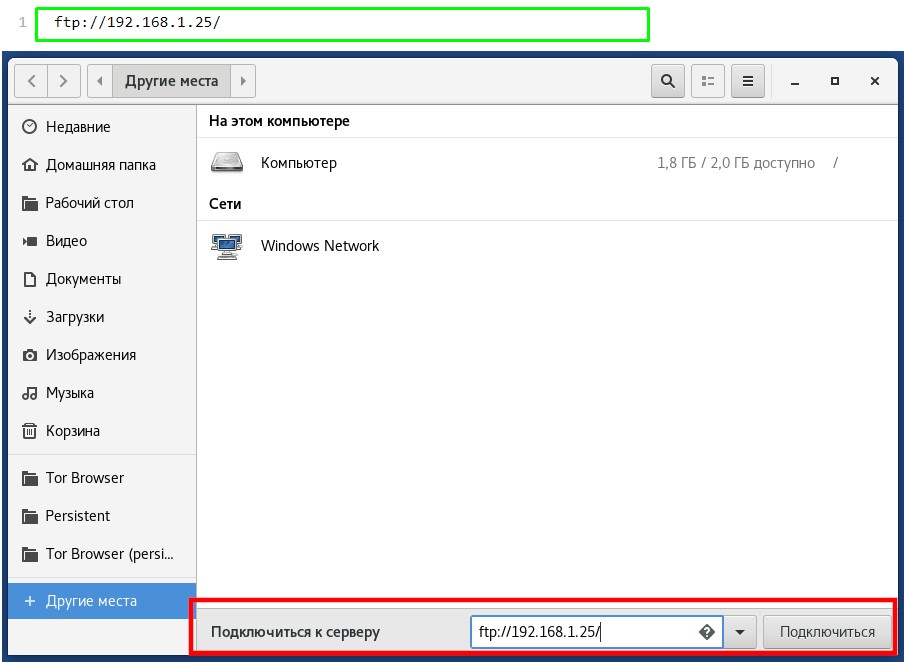
Click Connect.
Why Use Secure Removal?
When you delete a file, operating systems don’t actually delete the contents of the file. This does not happen even after emptying the recycle bin or explicitly deleting the file, for example from the command line. Instead, they simply remove the file entry from the file system directory because it requires less work and is therefore faster. The contents of the file – the actual data – remain on the medium. The data will remain there until the operating system uses the space for new data.
Likewise, reformatting, repartitioning, or overwriting a system image doesn’t always guarantee that every area of the drive will be written to, although all of these will make the drive appear empty to most software, or, if the image is overwritten, empty except for the files represented in the image . After all, even when a medium is overwritten, the physical properties of the medium may allow the recovery of the previous contents. In most cases, however, this recovery is not possible by simply reading data from the device in the usual way, but requires the use of laboratory methods such as disassembling the device and directly accessing/reading from its components.
The methods below will not work properly on USB drives and solid state drives.
Existing hard disk-based methods for securely deleting individual files are ineffective.
Overwriting the entire drive twice is usually, but not always, sufficient to guarantee a clean drive.
Note: Unfortunately, Tails does not currently allow you to perform this task using graphical tools.
Files can be safely deleted in Tails thanks to the file browser extension.
Open the file browser by opening any folder from the Places menu or by clicking the Home icon on the desktop.
Navigate to the folder containing the files you want to delete.
Use the mouse to select the files you want to delete.
Right-click on the files and select Wipe.
In the Russian version, this item is called Erase:
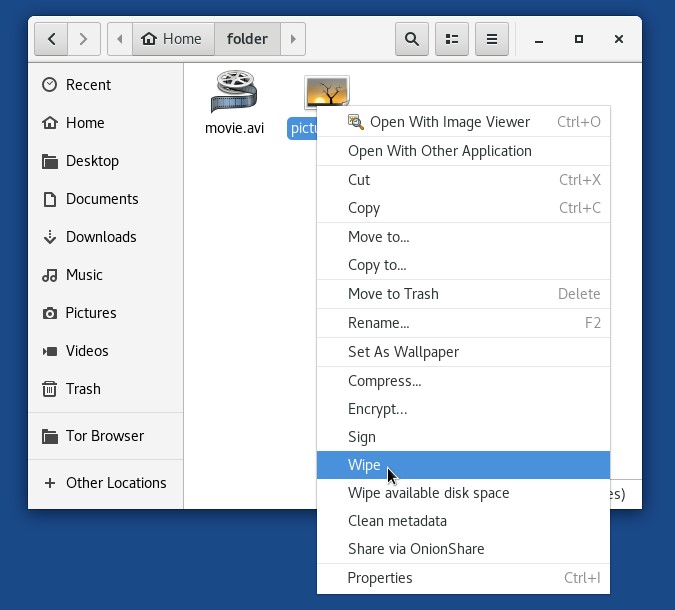
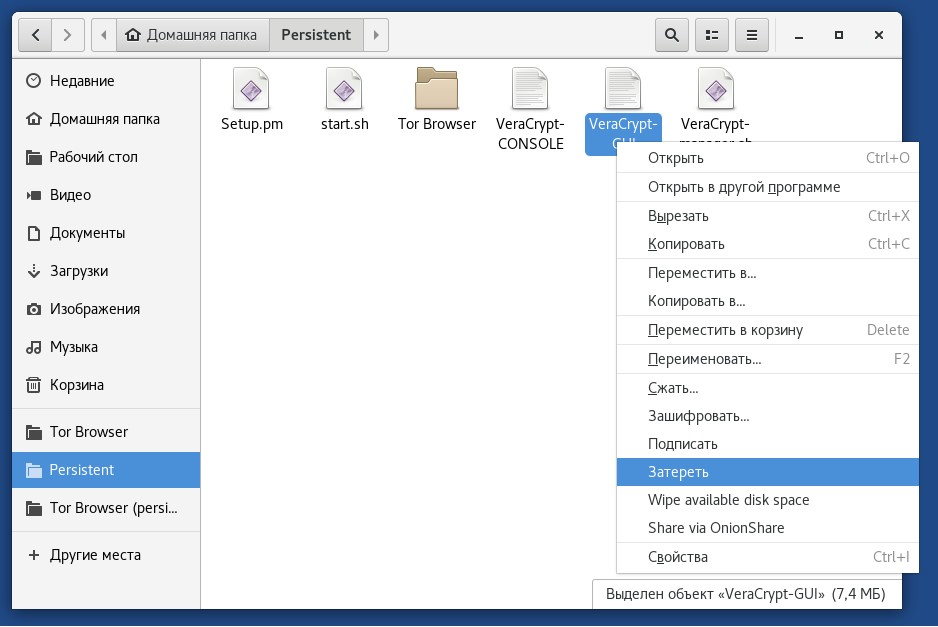
Confirm it.
The uninstallation will begin. This can take anywhere from a few seconds to a few minutes, depending on the size of the files. Bear with me…
Note: Safely deleting files does not delete potential backup copies of the file (for example, LibreOffice creates backups that allow you to recover if LibreOffice becomes unresponsive).
Before you start safely cleaning free disk space, be sure to empty the recycle bin.
Open the file browser by opening any folder from the Places menu or by clicking the Home icon on the desktop.
Click the drive you want to empty the Recycle Bin in the left pane to navigate to the root of that drive.
In the title bar, select → Show hidden files to show hidden files.
Delete the folder.Trash-1000 or similar.
Note: Apply this technique to the Persistent folder to empty the Persistent Volume Recycle Bin.
To clear the contents of all files that were previously hidden but not securely deleted from the drive, you can also safely clear all free disk space. Warning: This method does not work properly on SSDs or USB drives. The drive or folder may or may not contain other files. These files are not deleted during the operation.
Open the file browser by opening any folder from the Places menu or by clicking the Home icon on the desktop.
Click the drive you want to clean in the left pane to navigate to the root of that drive.
Right-click an empty space in the right pane and select Wipe available diskspace.
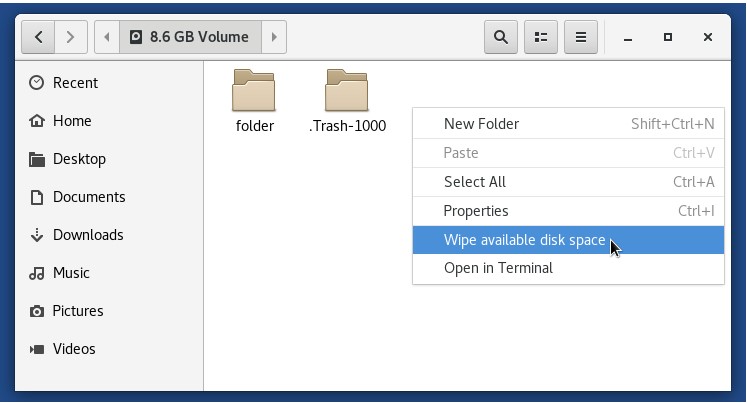
Confirm.
Cleaning will begin. This can take anywhere from a few minutes to a few hours depending on the amount of available disk space. Bear with me…
Note that a file with a name similar to tmp.7JwHAyBvA9 is created in the folder. It is made as large as possible to use all available disk space and then safely removed.
This paragraph shows how to remove Tails from a USB drive so that it can be used for something else. The contents of the USB stick will be lost during this operation, but an attacker using data recovery techniques will still be able to tell that Tails was installed on the USB stick if you don’t clean up all free disk space afterwards. Note: The instructions below do not work on Windows XP. The Windows XP version of Diskpart does not have a list of removable drives.
Note: You can overwrite any hard drive on your computer. If at any stage you do not know the disk number, stop the operation.
Make sure the USB drive you want to reset is turned off.
Click the Start button and select All Programs → Accessories → Command Prompt to open the Command Prompt.
Execute the command.
![]()
Run the command to start Diskpart:
![]()
To get information about each disk on your computer. Example:

Plug in the USB drive you want to reset. Run the command again:
![]()
A new disk corresponding to this flash drive will appear in the list. Example:

Make sure it is the same size as the USB drive you want to reset. Write down the disk number assigned to the Diskpart flash drive.
To select a USB drive, run the following command:
![]()
Replace the number with the number of the USB drive you want to reset.
Run the command:
![]()
To remove the partition table from a USB drive.
Run the command:
![]()
To create a new partition table on a USB drive.
Run the command:
![]()
To create a new primary partition on the USB drive.
This paragraph shows how to remove Tails from a USB drive in Linux so it can be used for something else. The contents of the USB drive will be lost during this operation, but an attacker will still be able to tell that Tails was installed on the USB drive using data recovery methods, unless you clean up all free disk space in a safe manner afterwards.
Note: You can overwrite any hard drive on your computer. If you are not sure which device to choose, stop.
Make sure the USB drive you want to reset is turned off.
Choose Applications → Utilities → Disks to launch GNOME Disks. A list of all storage devices on your computer is displayed in the left pane of the window.
Plug in the USB drive you want to reset. The new device will appear in the list of storage devices. This new device matches the USB drive you connected. Click on it.
In the right pane of the window, make sure that the device matches the USB drive you want to reset, its brand, storage size, etc.
To reset the USB drive, click the button in the title bar and select Format Disk….
In the Format Disk dialog box:
If you want to safely delete all data, select Overwrite existing data with zeroes from the Erase list.
In the Partitioning drop-down list, select Compatible with all systems and devices (MBR/DOS).
Then click the Format… button.
In the confirmation dialog, click the Format button to confirm.
To ensure that all changes are saved to the USB drive, click the button in the title bar.
Resetting the USB flash drive in Tails itself
If Tails is the only Linux system, you can reset the Tails USB drive directly from the USB drive while Tails is running.
When starting Tails, add a download option
![]()
In the Boot Loader menu. For detailed instructions, see Documentation on using the bootloader menu.
If Tails starts as usual, follow the instructions to reset the USB drive using GNOME disks. If the system does not start, it means that the computer does not have enough RAM for this mode of operation. Try performing a reset from another computer or find another Linux system, such as another Tails USB flash drive.
What is a MAC address?
Every network interface—wired or Wi-Fi—has a MAC address, which is a serial number assigned to each interface at the factory by its manufacturer. MAC addresses are used in a local network to identify each network interface during data transmission. While an IP address identifies where you are on the Internet, a MAC address identifies which device you are using on a local network. MAC addresses are only useful on a local network and are not sent over the Internet. Such a unique identifier used on a local network may compromise your privacy. Here are two examples:
If your laptop connects to several Wi-Fi networks, all these local networks use the same MAC address of your Wi-Fi interface. Someone watching these networks can recognize your MAC address and track your geographic location.
Other clients on the local network can see that someone is using Tails, they can associate the Tails user with a MAC address.
Tails can temporarily change the MAC address of your network interfaces to random values during a work session. This is called “MAC address spoofing”. MAC address spoofing in Tails hides the serial number of your network interface, to an outside observer it looks like this: a new device is connected to the network that he has never seen (and will never see again).
MAC address spoofing is enabled by default in Tails, as it is usually only beneficial. But in some situations, it can also lead to connectivity issues or make your network activity suspicious. This documentation explains whether or not to use MAC spoofing based on your situation.
By default, MAC address spoofing is enabled for all network interfaces. This is usually useful even if you don’t intend to hide your geographic location. Here are some examples:
Using your computer on public networks without registration, such as free Wi-Fi services in restaurants, where you do not need to register your identity. In this case, changing the MAC address hides the fact that the computer was connected to this network.
Using your computer on networks that you use often, such as with friends, at work, at university, and so on. You already have a close relationship with this location, but changing the MAC address hides the fact that your computer is connected to this network at a certain time. It also hides the fact that you are using Tails on this network.
In some situations, changing the MAC address is not beneficial, but it can also be problematic. In such cases, you can disable MAC address spoofing. Note that even if MAC spoofing is disabled, your online anonymity is preserved:
An attacker on a local network can only see encrypted connections to the Tor network.
Your MAC address is not sent over the Internet to the websites you visit.
However, disabling MAC address spoofing allows the local network to track your geographic location again. If this is problematic, consider using a different network device or moving to a different network.
Using a public computer, for example, in an Internet cafe or library. This computer is regularly used on this local network, and its MAC address is not associated with your identity. In this case, changing the MAC address may prevent connection. Network administrators may even find it suspicious that an unknown MAC address is being used on that network.
On some network interfaces, MAC address replacement is not possible due to hardware or Linux limitations. Tails temporarily disables such network interfaces. You can disable MAC address spoofing to be able to use them.
Some networks only allow connections from a list of authorized MAC addresses. In this case, changing the MAC address makes it impossible to connect to such networks. If you have been granted access to such a network in the past, MAC spoofing may prevent you from connecting.
Using your own computer at home. Your identity and the MAC address of your computer are already associated with this local network, so changing the MAC address is probably useless. But if access to your local network is restricted based on MAC addresses, it may not be possible to connect to a spoofed MAC address.
Disable MAC address spoofing. You can disable MAC address spoofing in Tails Greeter:
When the Tails Greeter appears, press the button ![]() .
.
When the Additional Settings dialog box appears, click MAC Address Spoofing.
Select the Don’t spoof MAC addresses option.
Other means of surveillance may reveal your geographic location: video surveillance, cell phone, credit card transactions, social contacts, etc.
When using Wi-Fi, anyone within range of your Wi-Fi interface can see your MAC address, even if they are not connected to the same Wi-Fi access point.
When using a mobile phone connection such as 3G or GSM, your SIM card identifier (IMSI) and phone serial number (IMEI) are always communicated to the mobile operator.
Some portals may send your MAC address over the Internet to their authentication servers. This should not affect your decision to replace the MAC address. If you decide to use a fake MAC address, as long as it does not change, your Internet provider will recognize your computer and allow you to connect.
When starting Tails, you can specify startup options to affect the basic functionality of the distribution. There are 2 ways to specify launch parameters:
The Boot Loader menu is the first screen that appears when you start Tails. Troubleshooting Mode disables some features of the Linux kernel and may work better on some computers. You can try this option if you think you are experiencing hardware compatibility errors when running Tails.
To add a boot option, press Tab when the Boot Loader menu appears. A list of download options is displayed at the bottom.

Press Space and enter the download option you want to add.
If you need to add more than one download option, enter them one by one and separate them with a space.
Then press Enter to launch Tails.
Tails Greeter appears after the bootloader menu, but before the GNOME desktop:
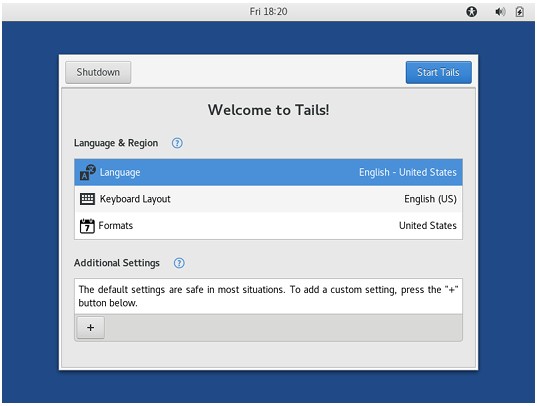
You can activate assistive technologies, such as a screen reader or large text, from the universal access menu (which looks like a human) in the top bar. To start Tails without options, click the Start Tails button.
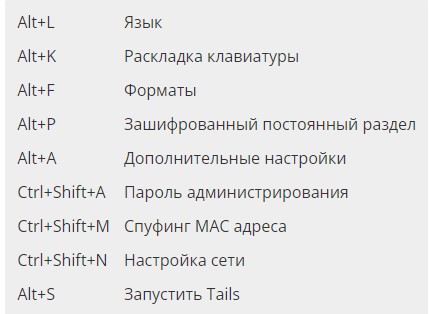
You can customize Tails according to your language and location with Tails Greeter. Tails Greeter language and region section.
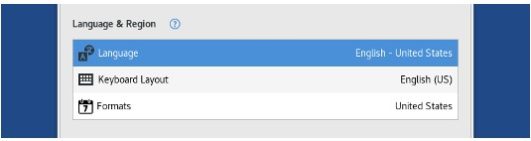
The Language option allows you to change the main language of the interface.
Text that has not yet been translated will appear in English.
The Keyboard Layout option allows you to change the keyboard layout. For example, to switch to the AZERTY keyboard, which is common in France.
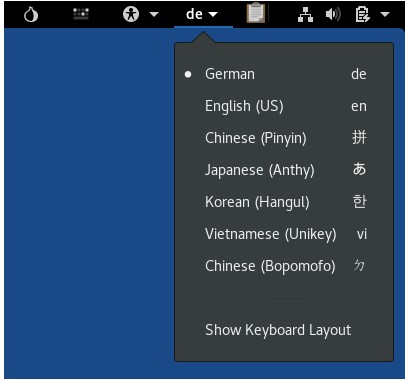
You’ll still be able to switch between different keyboard layouts on your desktop after starting Tails. Menu in the upper right corner of the desktop to switch between different keyboard layouts:
The Formats option allows you to change the date and time format, the first day of the week, the units of measurement, and the default paper size according to the standards used in the country.
For example, the United States and the United Kingdom, two English-speaking countries, have different standards:

With this option, you can also display the calendar in a language other than the main one. For example, to display an American calendar with weeks starting on Sunday, when the primary language is Russian.
If encrypted persistence storage is detected on the USB drive, the Encrypted persistence storage section will appear in the Tails Greeter section:

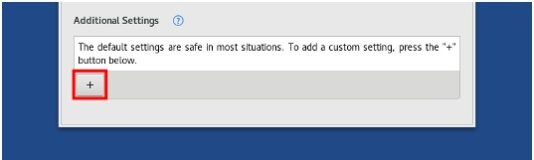
Tails is carefully configured to be as secure as possible by default. But depending on your situation, you can change one of the following Tails Greeter settings. Additional Tails Greeter settings
Installing an administrator to be able to perform administrative tasks, such as installing additional software or accessing the computer’s internal hard drives.
See our admin password documentation.
Disable MAC address spoofing to prevent problems with network interfaces.
Change the network configuration to: Connect directly to the Tor network (default).
Configure a Tor bridge or local proxy:
If you want to use Tor Bridges because your internet connection is being censored or you want to hide the fact that you are using Tor.
If you need to use a local proxy to access the Internet.
After starting Tails and connecting to the network, the assistant will guide you through setting up Tor.
Turn off all networks if you want to work completely offline with added security.
Wi-Fi, WWAN, and WiMAX devices are enabled when Tails starts. But all other kinds of wireless devices like Bluetooth, GPS and FM devices are disabled by default. If you want to use such a device, you need to turn it on first.
This technique uses the command line.
When starting Tails, set an administrator password.
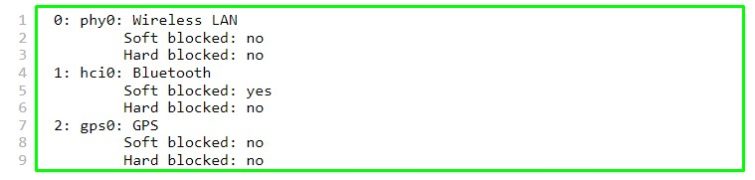
To find out the index of the wireless device you want to enable, open a terminal with root privileges and run the following command:
![]()
For example, the command might return the following:

The device index is the number that appears at the beginning of the three lines describing each device. In this example, the Bluetooth device index is 1 and the GPS device index is 2. You may have other values.
To enable the wireless device, run the following command in a root terminal, replacing [index] with the index found in step 2:
![]()
An example of a command to unlock a GPS device (you may have a different number):
![]()
To verify that the wireless device is enabled, run the following command again in a root terminal:
![]()
This output should be very similar to the output in step 2, but the device enabled in step 3 should no longer be software locked. For example, the command might return the following:
Tor status icon
The current status of Tor is displayed as a bulb icon in the notification area:

You are connected to Tor.
You are not connected to Tor.
If you are not connected to Tor, all internet connections are blocked by default.
Onion Circuits displays information about current Tor circuits and connections. To open Onion Circuits, click the Tor status icon and select Open Onion Circuits.
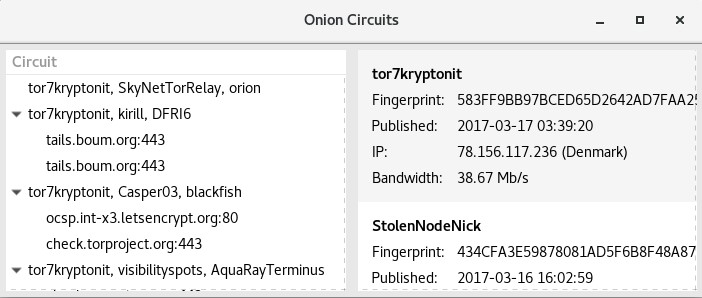
Chains installed by Tor are listed in the left panel.
The first relay or guard. If you have configured a Tor bridge, your bridge will be the first relay.
Second relay or middle node.
Output node.
When connecting to the target server, for example when visiting a website, this connection appears in the list under the scheme in use. In the example above, the connection to check.torproject.org goes through the Unnamed relay, the betGamers Tor Relay, and the source node hessel0. If you click on a chain, technical information about the site will appear in the right panel.
Tails does not leave traces on the computer you use unless you explicitly ask for it. It is important to understand some of the implications. Booting the computer from the media containing Tails does not change anything about the operating system actually installed on the hard disk: as a live system, Tails does not need to use your hard disk for the entire session. If the hard drive is missing or damaged, it will not prevent your computer from running Tails. So, to get back to your normal operating system, simply remove the DVD or USB drive containing the Tails files. You must save anything you want to save for future access to a separate device (another USB drive, another DVD, or any other device of your choice) or use the persistent storage feature.
Accessing your computer’s internal drives has security implications:
You can leave traces of your Tails activity on hard drives.
If Tails is compromised, malware can install itself on your regular operating system.
If Tails is compromised, it can access personal data on your drives and use it to de-anonymize you.
When starting Tails, set an administrator password.
Open the Nautilus file manager.
Click on the hard drive option in the left pane.
If the normal operating system is in hibernation mode, accessing it can cause file system corruption. Access to the drive is only possible if your system has been shut down properly. If you have a GNU/Linux system installed on your drives, you can only access files owned by the first user (uid=1000) on that system. In all cases, there may be problems with permissions. To avoid permission restrictions, you can run Nautilus with administrator rights.
All Tails applications are configured to work over Tor. If you try to access the network, if this application is not configured to connect through Tor, it will be denied access to the Internet. You need to configure network usage by other programs individually for each program. As a setting you need to choose the SOCKS (or SOCKS5) protocol, as the hostname localhost, and as the port 9050. Similarly with the command line utilities, you will not be able to download the file with curl or wget unless you are using Tor. They have a –proxy option for this, so to download the program files you need to use something like this:
![]()
And:
![]()
Instead of https://hackware.ru, specify a different hostname or download file. By the way, such usual programs as ping will not work either – network access will be closed. The Destination Port Unreachable error will occur:

Since the Tor network is already configured, just add the –tor flag to your sqlmap startup command. To verify that everything is working as it should, you can run the command with the –check-tor flag. Example:
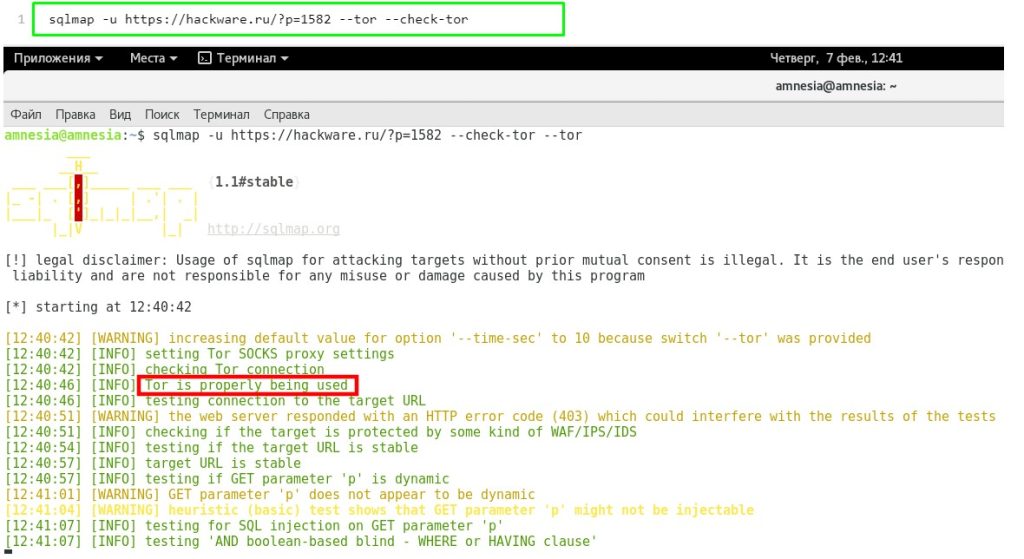
Part of the conclusion:

The line “Tor is properly being used” tells us that sqlmap is sending its requests to the target site through the Tor network and that they are reaching it.
Using WPScan in Tails
The WordPress site scanner WPScan has a –proxy option, after which it is enough to specify the Tor network data. Example command:
![]()
Using Nmap in Tails
The raw requests that Nmap uses for its scans are unrouted through the Tor network. Simply put, it is not possible to use Nmap in Tails in the normal way. However, it is possible with the support of the ProxyChains program. How to do this is described in the article “Anonymous scans with Nmap, sqlmap and WPScan via Tor”.
The history of commands that you have entered and executed before is very convenient, because by pressing ↑ (cursor up arrow) you can reduce the time of execution of the same type of operation. Also, if you make a mistake, you can go back to the previous command and correct it – no need to type a long command again.
A list of recent commands is stored in the .bash_history file located in the user’s home folder. In normal Linux distributions this file is saved after reboot and for example the next day you can open the console and find the command you typed yesterday and execute it again without having to type a lot of characters and remember the options. It doesn’t work in Tails – after a reboot, the .bash_history file is reset and only the current session’s commands are available in it.
Next, we’ll show you how to make the .bash_history file persist after a reboot, i.e. to keep the command history. But you need to assess how much this might affect security: for example, if attackers were able to get hold of your system and pick up a password from persistent storage, they would be able to see what commands you typed. If you don’t want it, don’t enable saving commands – leave the default settings.
Enable persistent storage
Enable support for Dotfiles in the persistent storage settings
Create a .bash_history file in /lib/live/mount/persistence/TailsData_unlocked/dotfiles/. You can simply copy this file from your home folder. You can do this in the file manager or directly in the command line:
![]()
Commands entered in the current session will not be saved. This feature will start working after restarting the computer and will only be active when the permanent storage is connected.
To generate keys, run the command:
![]()
Once Tails is restarted, these keys will be permanently lost. To save GnuPG keys and settings after restarting the computer, you must:
activate persistent storage
in persistent storage settings enable GnuPG feature
Remember that personal storage settings made, including GnuPG activation, will take effect the next time you boot your computer and activate persistent storage. If you generate keys immediately after turning on GnuPG, they will be lost – you need to restart the computer. To list the available public keys in your key ring:

To list the secret keys in your key ring:
![]()
To show Alexey Miloserdov’s public key:
![]()
To export Alexey Miloserdov’s public key to the public.key file:
![]()
This command will create a file named public.key with the ascii representation of the public key of user Alexey Miloserdov. To output the public key of user Alexey Miloserdov to the terminal:
![]()
To save the public key of user Alexey Miloserdov to a file named private.key:
![]()
This command will create a file named private.key with the ascii representation of the private key of user Alexey Miloserdov.
Introduction to LUKS
Note: The easiest way to keep documents encrypted in Tails is to use encrypted persistent storage. You can create other encrypted volumes using LUKS for encryption, such as another USB flash drive or external hard drive. LUKS is the Linux disk encryption standard.
GNOME Disks allows you to create encrypted volumes.
The GNOME desktop allows you to open encrypted volumes.
You can also open VeraCrypt encrypted volumes in Tails. VeraCrypt is a disk encryption tool for Windows, macOS, and Linux. See the VeraCrypt documentation below. We recommend that you use:
VeraCrypt for sharing encrypted files across different operating systems.
LUKS file encryption for Tails and Linux.
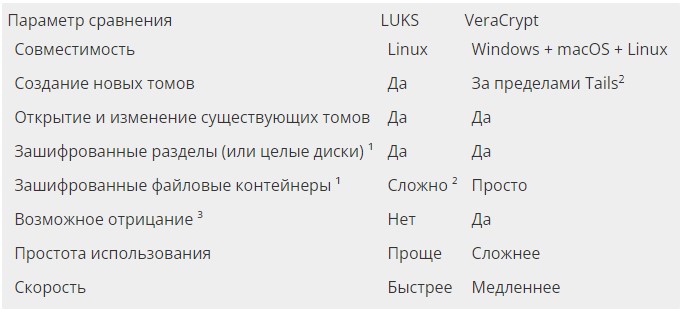
See the difference between file containers and partitions.
You can install VeraCrypt in Tails and fully work with VeraCrypt volumes, including creating them. See How to Install and Use VeraCrypt in Tails documentation.
Possible objection: In some cases (for example, with hidden VeraCrypt volumes), an attacker cannot technically prove the existence of an encrypted volume.
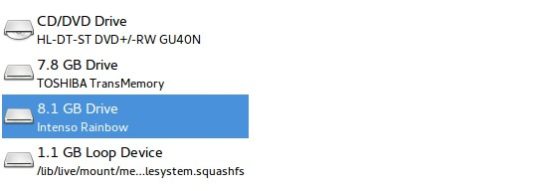
To open GNOME Disks, choose Applications → Utilities → Disks.
Specify an external storage device.
Disks lists all current storage devices on the left side of the screen.
Connect the external device you want to use.
The new device will appear in the list of storage devices. Click on it:
Make sure that the device description on the right side of the screen matches your device: its brand, size, etc.
Press the button
in the title bar and select Format Disk… to delete all existing partitions on the device.
In the Format Disk dialog box:
If you want to securely erase all data, select Overwrite existing data with zeroes from the Erase drop-down list. Select Compatible with all systems and devices (MBR/DOS) from the Partitioning drop-down list. Then click Format.
In the confirmation dialog, make sure it is the correct device. Click Format to confirm.
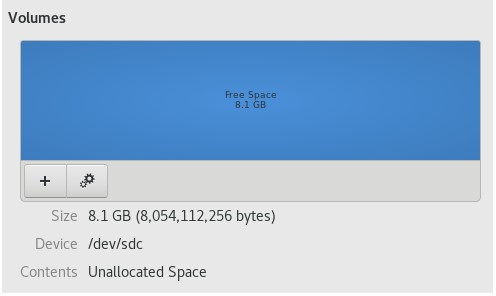
The partition diagram inside the screen now shows an empty device. Free space 8.1 GB:
Click on the button
, to create a new partition on the device.
In the Create Partition dialog box:
Partition Size: You can create a partition on the whole device or just a part of it. In this example, we are creating a 4.0 GB partition on an 8.1 GB device.
Type: Select Encrypted, compatible with Linux systems (LUKS + Ext4) from the list.
Name: You can set a name for the section. This name is invisible until the partition is open, but can help you identify it when you use it.
Passphrase: Enter the passphrase for the encrypted partition and repeat it to confirm.
Then click Create.
Note: If you get an error while creating a new partition, try shutting down your device, restarting GNOME Disks, and repeating all the steps from the beginning.
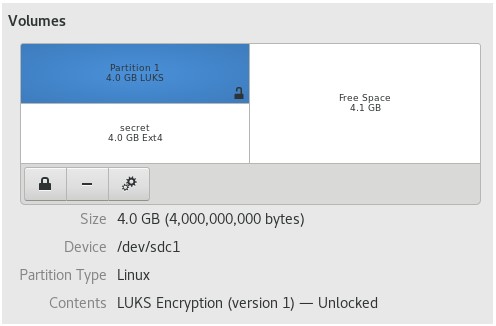
Creating a partition takes from a few seconds to a few minutes. After that, the new encrypted partition will appear among the volumes on the device:
If you want to create another partition in the device’s free space, click the free space, and then click the button again
You can open a new section in the sidebar of the file browser with the name you gave it. After opening a section with the file browser, you can also access it from the Places menu.
When you connect a device that contains an encrypted partition, Tails does not open the partition automatically, but you can do so from the file browser.
Select Places → Computer to open the file browser.
Click on the encrypted partition you want to open in the sidebar.
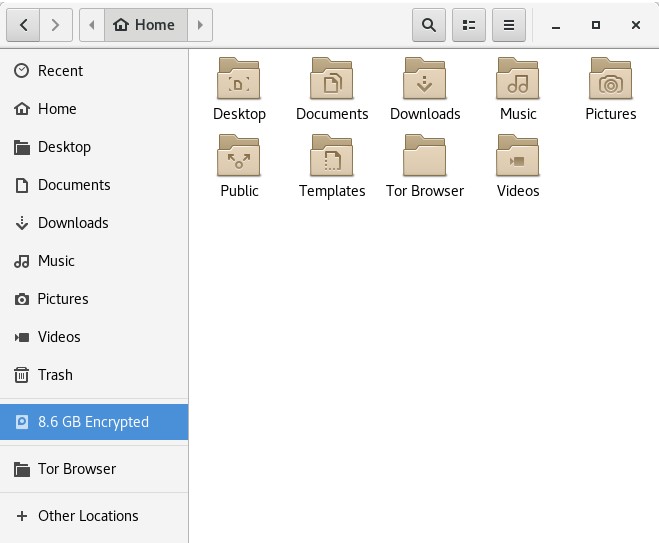
Enter the partition’s passphrase in the password line and click Unlock.
After opening a section with the file browser, you can also access it from the Places menu.
To close a section after use, click the button next to the section in the sidebar of the file browser.
Such encrypted volumes are not hidden. An attacker in possession of the device may know that it has an encrypted volume. Please note that you can be forced to give out his password or trick him into knowing it.
You can open such encrypted volumes of other operating systems. But this could compromise the security of Tails. For example, image thumbnails may be created and saved by another operating system. Or the contents of the files may be indexed by another operating system.
To open GNOME Disks, select Applications → Utilities → Disks.
Connect the external storage device that contains the encrypted partition for which you want to change the passphrase.
The device will appear in the list of storage devices. Click on it:
Make sure that the device description on the right side of the screen matches your device: its brand, size, etc.
Click on the section with
in the lower right corner.
Press the button
and select Change Passphrase….
Introduction to VeraCrypt
VeraCrypt is a disk encryption tool that works on Windows, macOS, and Linux. In addition, see:
How to reliably encrypt files, disks, flash drives (instructions with VeraCrypt)
How to install VeraCrypt on Linux
How to install and use VeraCrypt in Tails
You can also create and open encrypted LUKS volumes in Tails. LUKS is the Linux disk encryption standard. See our LUKS documentation. We recommend that you use:
VeraCrypt for sharing encrypted files across different operating systems.
LUKS file encryption for Tails and Linux.

See the difference between file containers and partitions.
You can install VeraCrypt in Tails and fully work with VeraCrypt volumes, including creating them. See How to Install and Use VeraCrypt in Tails documentation.
Possible objection: In some cases (for example, with hidden VeraCrypt volumes), an attacker cannot technically prove the existence of an encrypted volume.
With VeraCrypt, you can store your files encrypted in two different types of volumes:
FILE CONTAINERS

A file container is one large file in which you can store multiple encrypted files, a bit like a ZIP file.
SECTIONS OR DISCS

Usually, disks (flash drives and hard disks) have one partition for the entire disk. Thus, you can encrypt an entire flash drive, for example. But disks can be divided into several partitions.
To open a VeraCrypt volume, you may need the following options, depending on the options you selected when you created the volume:
Passphrase
Keyfiles: Instead of or in addition to a passphrase, VeraCrypt can be unlocked using a specific file or set of files.
PIM: A number that is required if it was specified when creating the VeraCrypt volume. Note: Due to current limitations in Debian, using PIM in Tails does not work. This will be possible in Tails 4.0 (late 2019).
Hidden volume: If you want to unlock a hidden volume in a VeraCrypt volume.
System volume: If you want to unlock an encrypted Windows system partition.
Using a file container

Unlocking a file container without key files
Select Applications → Utilities → Unlock VeraCrypt Volumes.
Click the Add button and select the container file you want to unlock.
Enter the options to unlock the volume. For more information, see in the Unlock Options section above. Click Unlock.
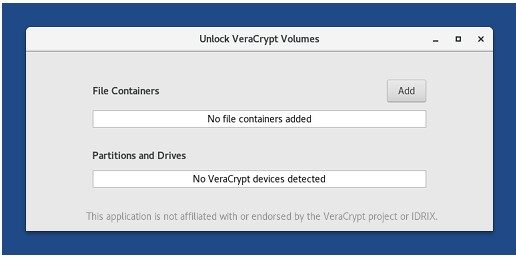
Unlock VeraCrypt Volumes will unlock your volume.
If you failed to unlock the volume (for example, if you entered the wrong password), click Unlock to try unlocking again.
Click Open to open the volume in the file browser.
Select Applications → Utilities → Disks to launch Disk Utility.
Select Disks → Attach Disk Image… in the top navigation bar.
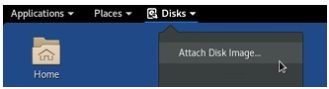
In the Select Disk Image to Attach dialog box:
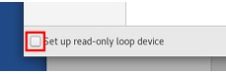
Uncheck Set up read-only loop device in the lower left corner if you want to change the contents of the file container.
Select All Files from the file filter in the lower right corner.

Navigate to the folder that contains the file container you want to open.
Select the file container and click Attach.
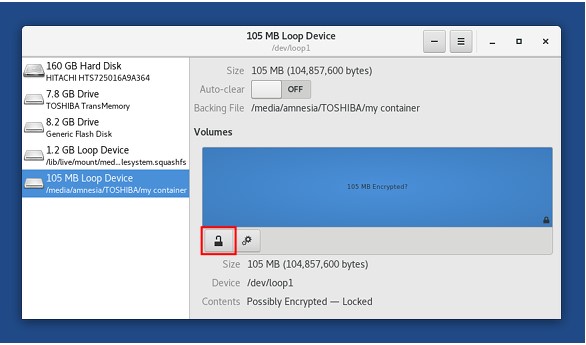
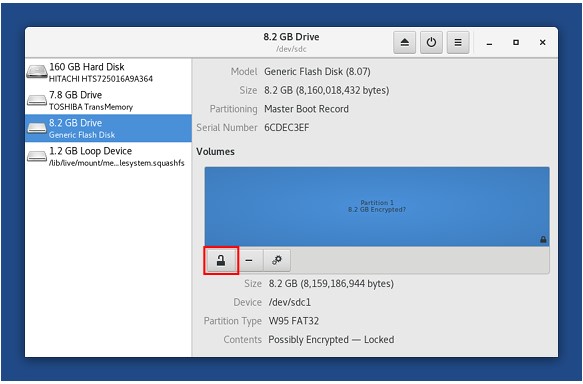
In the left pane, select the new Loop Device that corresponds to your file container.
The right panel should say Encrypted? (Encrypted?).
Press the button
in the right panel.
Enter the options to unlock the volume. For more information, see in the “Unlock options” section. ClickUnlock
Select the file system that appears under the unlocked volume. It’s probably FAT or NTFS.
Press the button
, to connect to the volume.
Click the /media/amnesia/ link in the right pane to open the volume in the file browser.
You can:
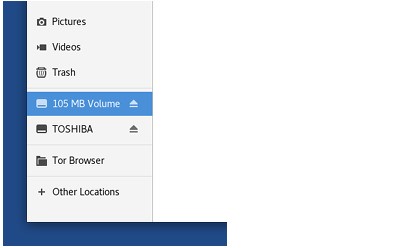
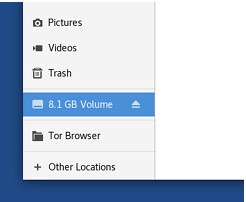
Click the button on the sidebar of the file browser
on the volume label that corresponds to your file container.
In Unlock VeraCrypt Volumes, click the button
in the line that corresponds to your file container.

If your partition or drive is on an internal hard drive, set an administrator password when you start Tails. Otherwise, plug in the USB drive or hard drive you want to unlock.
Select Applications → Utilities → Unlock VeraCrypt Volumes.
In the partition list, click Unlock in the line that corresponds to your flash drive or hard drive.
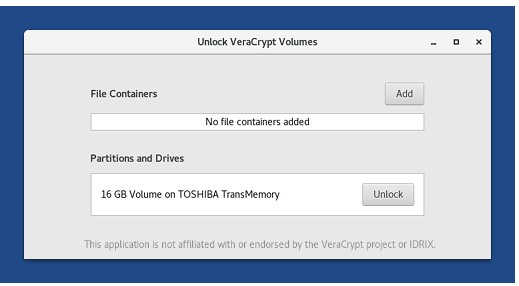
Enter settings to unlock volume. For more information, see in the Unlock Options section. Click Unlock.
Click Open to open the volume in the file browser.
If your partition or drive is on an internal hard drive, set an administrator password when you start Tails. Otherwise, plug in the USB drive or hard drive you want to unlock.
Select Applications → Utilities → Disks to launch Disk Utility.
In the left pane, select the drive that corresponds to your USB drive or hard drive.
In the right pane, select the section that corresponds to your VeraCrypt. Should it say Encrypted? (Encrypted?).
Click on the button
Enter the options to unlock the volume. For more information, see in the Unlock Options section. Click Unlock.
Select the file system that appears under the unlocked volume. It is probably FAT or NTFS.
Press the button
Click the /media/amnesia/ link in the right pane to open the volume in the file browser.
You can choose:
Click the button on the sidebar of the file browser ![]() on the label that corresponds to your section.
on the label that corresponds to your section.
In the Unlock VeraCrypt Volumes program, click on the button ![]() in the line that corresponds to the USB drive or hard drive.
in the line that corresponds to the USB drive or hard drive.