


13.05.2023
16 min
2997

Sooner or later, most fantastic stories come true in real life. In the world of information security, this happened as soon as Edward Snowden published information about PRISM – a means of surveillance of network users developed by the NSA. In this article I will describe the most effective way to protect your data from prying eyes. First of all, we should get acquainted with the main character of this article. Without this OS, you could not try to open the door to the world of anonymity. Tails is used over 20,000 times a day, with journalists and human rights activists using Tails to denounce wrongdoing by governments and corporations. Tails is a Linux-based operating system whose main goal is user anonymity. This OS is aimed at preserving your privacy and anonymity will help you use the Internet anonymously and bypass censorship – all connections are forced to go through the TOR network.

Also, leave no trace on the computer you are using and use the latest cryptographic tools to encrypt your files, email, instant messaging and hide all files and directories on electronic media. Tails is designed to boot from removable media – USB flash drive or CD. During its operation, it accesses the Internet only through the Tor network, and does not interact with other computer storages (hard and SSD drives) unless you explicitly specify it. Additionally, this operating system has several related applications installed: for anonymous instant messaging, for anonymous file distribution, Tor browser, email client, Bitcoin client, as well as common applications for working with documents and graphics.
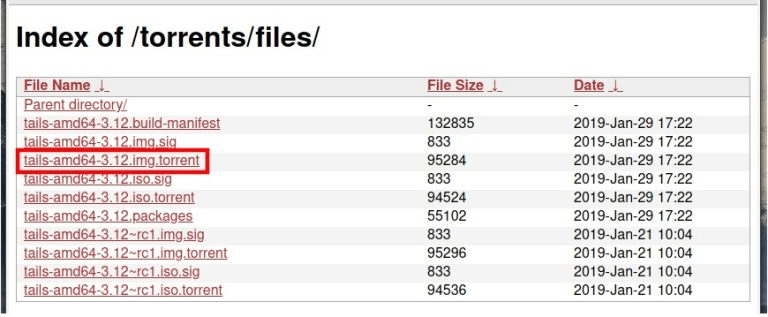
Tails torrent download page: https://tails.boum.org/torrents/files/
As you can see, there are about a dozen files. Files containing ~rc1 in the name are pre-release versions – if there is a stable version, it is better to download it. Files with the .sig extension are needed to verify the integrity and authenticity of the uploaded image. Torrents of the images themselves have extensions .img.torrent and .iso.torrent. If you will record Tails on a USB flash drive, you need to download the file .img.torrent, and if you want to write the operating system to the optical disk, then you need the file .iso.torrent.
Now developers make USB images that are easy enough to write to a USB flash drive. USB image files have the file extension .img, for example tails-amd64-3.12.img. And files with .iso in the name, for example tails-amd64-3.12.iso, are intended for burning to a CD. Make sure you have downloaded the correct file with the .img extension. Now you don’t need any two flash drives, you don’t need any Tails middleware, from all operating systems you can install Tails on a flash drive using Etcher. Details about the program and download link can be found in the article “Etcher: burning OS images to flash drives and USB disks”.
This program runs on all major operating systems, including Windows 7 (64-bit) and later, as well as Linux. For Windows you can download both an installation file and a portable one. For Linux, the program is distributed in convenient packages with the .AppImage extension. For example, after unpacking the downloaded archive, the program will have approximately the following name: balena-etcher-electron-1.4.9-x86_64.AppImage. The convenience of AppImage is that the package contains everything you need to run the program. That is, to run the program just double-click on it – no installation of dependencies and so on. Installation is elementary, and in any operating system it is identical:
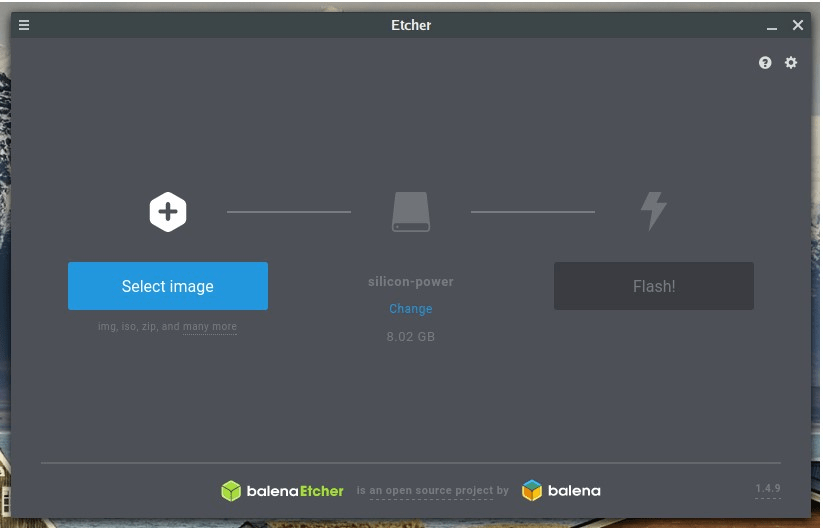
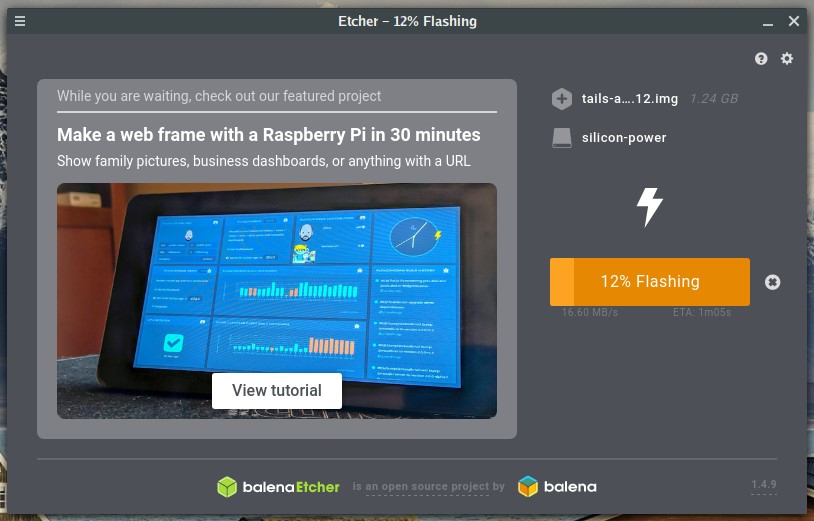
1. Launch Etcher:
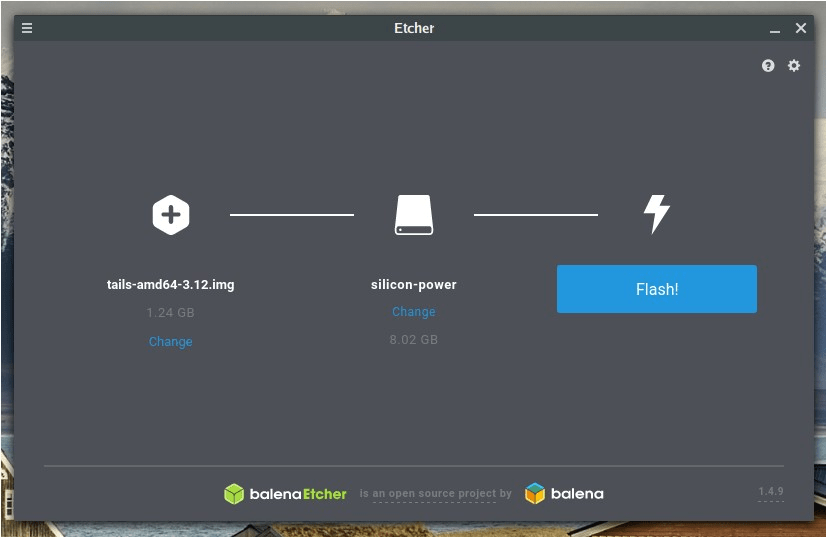
2. Image for recording to a USB flash drive:
If the USB flash drive is already connected to the computer and there is only one, the USB flash drive for recording is selected automatically. If this does not happen, select it manually.
3. Press the Flash button!
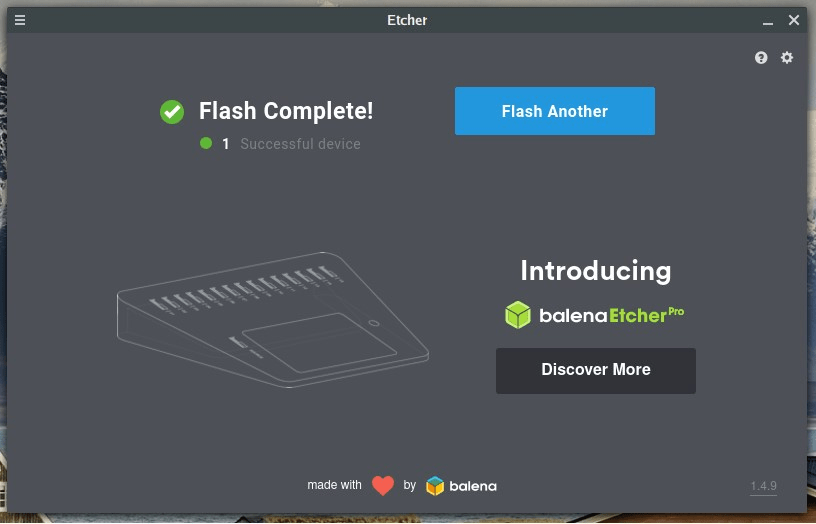
4. Wait for the end of the process:
After recording, verification will be made that the data is recorded without errors. Etcher can be closed – Tails is ready to use. That’s how easy it became.
Developers in addition to the image for USB flash drives, as before, create .ISO images that are needed to run from an optical disk. These images should be used to run Tails in VirtualBox. When creating a new virtual machine as Select Linux as the Type and Other Linux (64 bit) as the Version. The virtual machine needs at least 2048 MB of RAM, you do not need to create a new virtual disk – booting and all work will be done from the .ISO image.
At first start, specify the .ISO from Tails. You cannot mount a persistent repository while running in a virtual machine, but you can install Tails to a USB flash drive from within a virtual machine. Note: advanced users can install Tails in VirtualBox and can create a persistent repository. Step-by-step instructions on how to do this are in the sixth part of this guide.
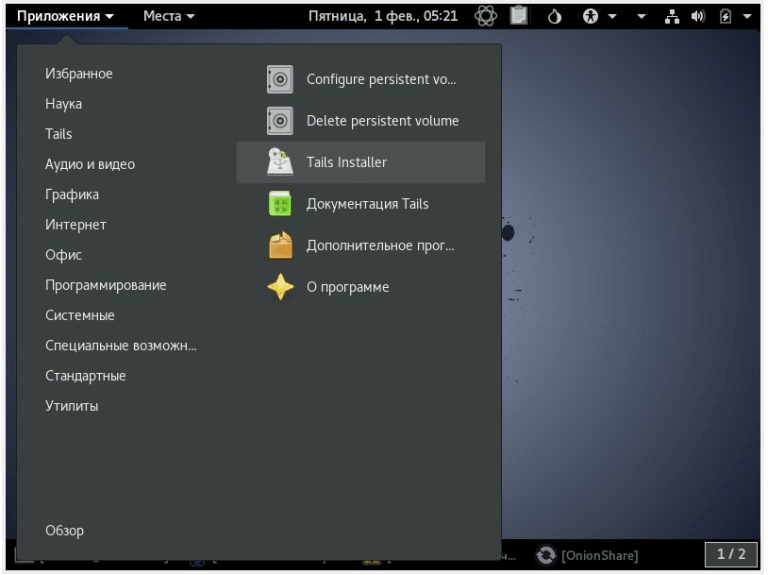
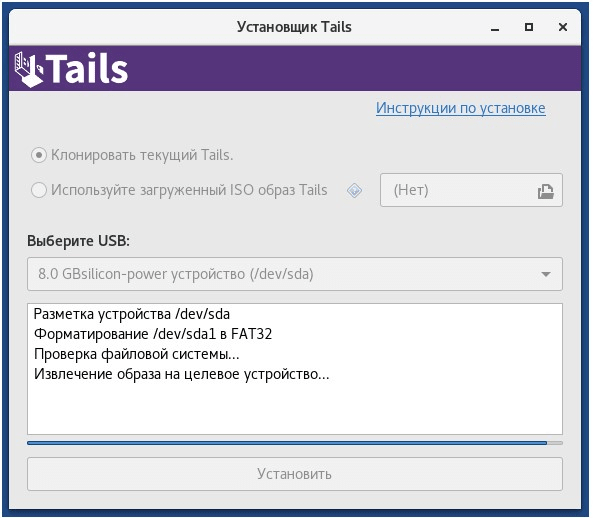
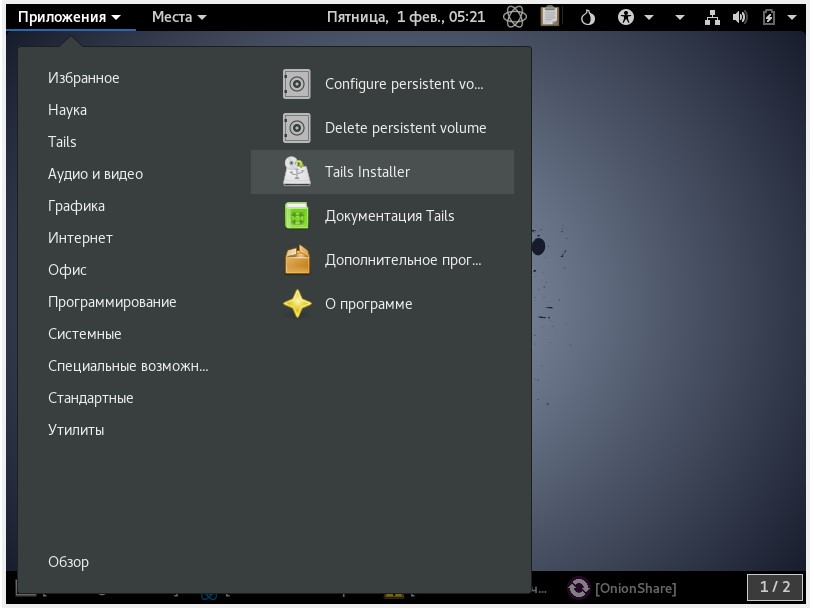
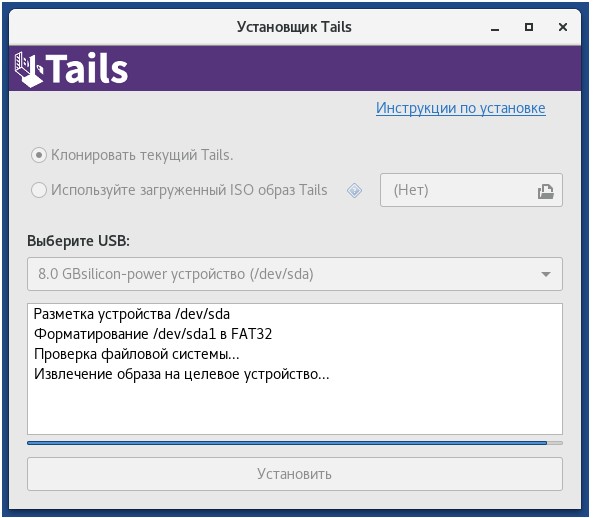
You can still install Tails as previously recommended: from within Tails itself. You can boot from the Tails optical disc or from a virtual machine, then select Tails → Tails Installer:
Specify the flash drive on which the installation will be performed. There are options:
They differ only in where the settings will be copied from: from the currently running system or from the disk you specify. It is easier to choose “Clone current Tails“. Wait for the end of the process – it takes time. Sometimes it may seem that everything is frozen – just wait, it took me about 10-15 minutes to record this way.
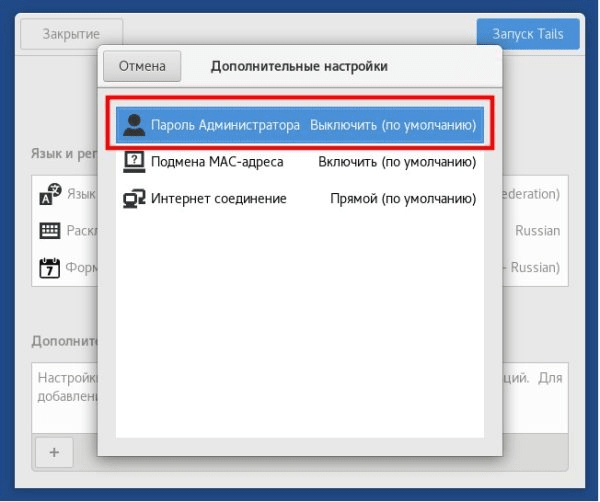
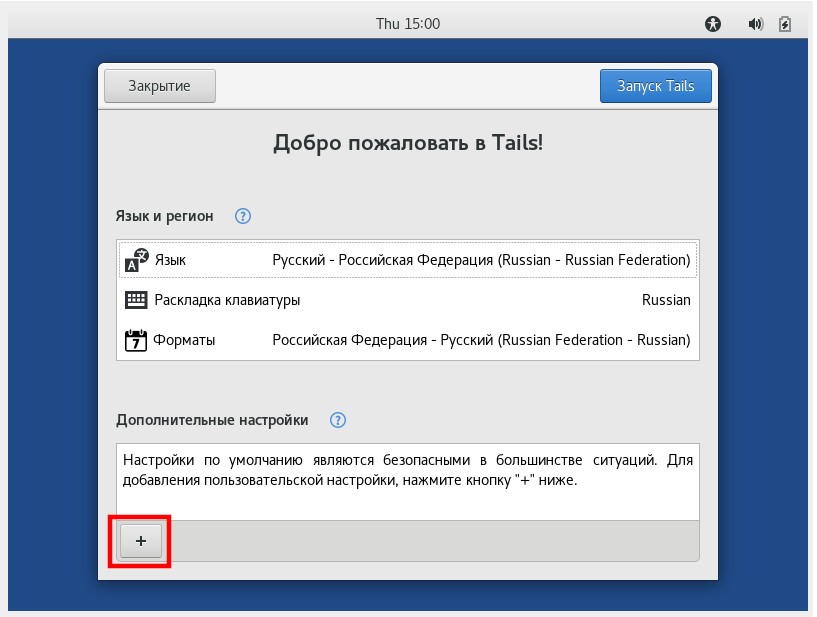
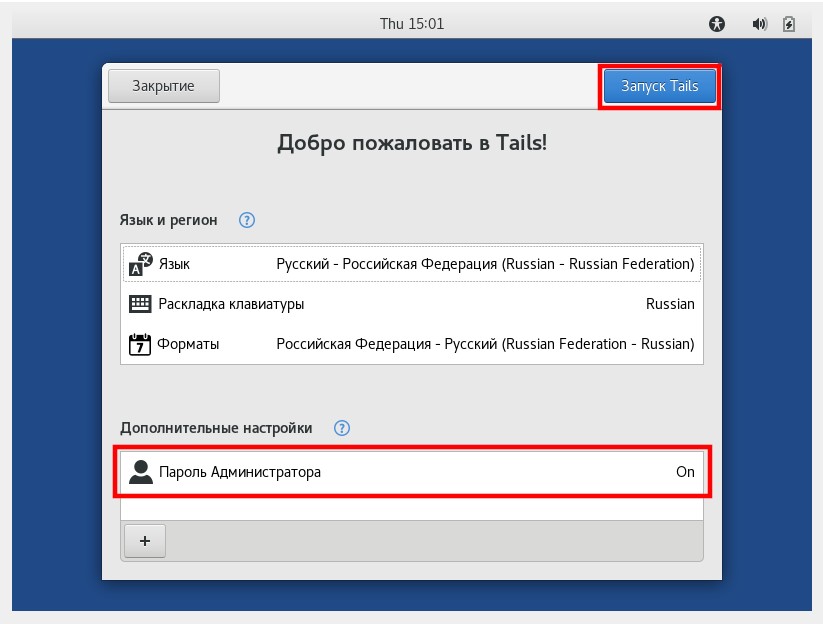
If you just enable Tails with the default settings, you will not be able to use sudo, i.e. you will not be able to execute commands as root. This may be necessary, for example, to install new programs, as well as to create a partition on Tails to store data, settings, installed programs. That is, almost everything discussed below requires administrative rights in the system, so let’s consider how to activate the administrative password in Tails. When enabling Tails at the language selection stage, press + (plus):
2.Click on Administration Password:
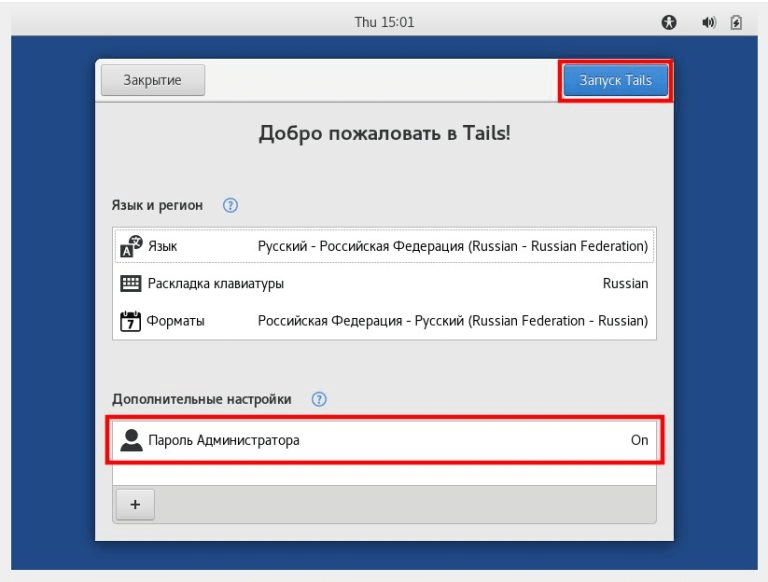
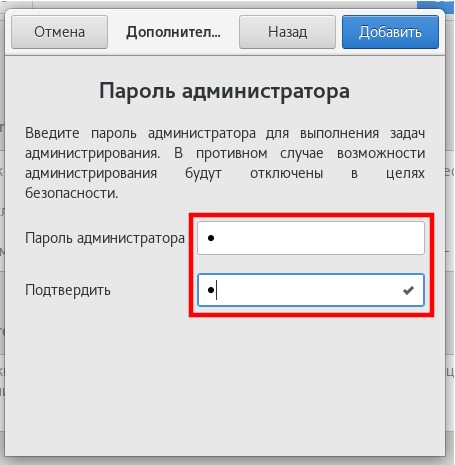
3. Think of a password and enter it twice:
4. When everything is ready, information that the administrator password is enabled will appear in the Additional Settings field. Now you just need to click the Start Tails button:


