12.05.2023
6 min
2679

Those who care about anonymity and security at work are thinking about which operating system to choose for their dirty work. Once I was ready to get into a very dangerous adventure, and as an experienced person, I began to think about how to turn everything correctly. The work was focused exclusively on network work, and it was important to me that, in the worst case scenario, nothing would be found on me and they would not be able to prove my involvement. And then my eyes fell on Tails OS. Among the advantages – work from a USB flash drive, when restarting does not save any information inside the system. All files, installed programs, browser cookies, everything will be erased. And besides, the work of all applications, including the browser, is focused on Tor. It seemed like an ideal option. A simple instruction is described on the official website, if we do not talk about encryption with PGP keys, then even a child can install it. The instructions for burning the image differ depending on which system you burn it from and how you use it, it can work from USB, DVD, and also as a virtual machine.

In the process of work, I found out that OS Tails has a rather “capricious” character, and will not be suitable for every device. The program may not work on both an old laptop and a powerful gaming laptop. But if you have a wild desire to work with her, and encourage her with patience, she will live up to any expectations. In fact, the point of the article is not to install Tails, there are many similar articles on the network. I want to talk about the problems I encountered in the process of starting and using the system. In this article, we will consider them using an example.
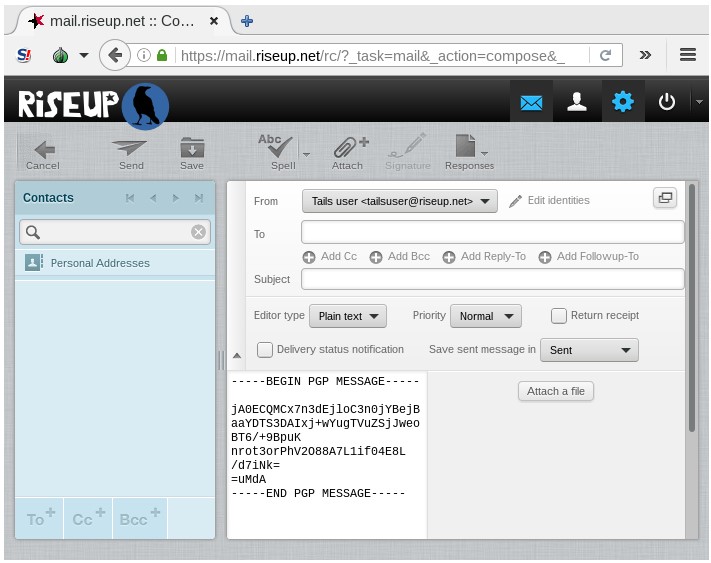
Tails includes an applet called the OpenPGP Applet for manipulating text using OpenPGP. Caution: Writing sensitive text in a web browser is dangerous because JavaScript attacks can access it from within the browser. You’re better off writing your text in a separate application, encrypting it using the OpenPGP applet, and pasting the encrypted text into a browser, for example before sending it via email.
Note: When using the OpenPGP applet to encrypt e-mail, non-ASCII characters (such as non-Latin or accented characters) may not be displayed correctly to e-mail recipients. If you intend to encrypt email frequently, we recommend setting up Thunderbird instead. The OpenPGP applet is in the message area:

Encrypt text with a passphrase
Encrypt and sign text with the public key
Decipher and check the text
Note that the applet does not manage your keys, Seahorse does.
With the OpenPGP applet, you can encrypt text with a password using OpenPGP keyphrase encryption.
Note: This method requires you to share your passphrase with the people who will be decrypting the text. OpenPGP also allows you to use public-key cryptography to send confidential messages without a common passphrase.
1. Write the text in a text editor. Don’t write this in a web browser! Click the OpenPGP Applet and select Open Text Editor to open gedit.
2. Select the text to be encrypted with the mouse. To copy it to the clipboard, right-click the selected text and choose Copy from the context menu. The OpenPGP applet now shows lines of text, indicating that the clipboard contains plain text:
3. Click on the OpenPGP Applet and select Encrypt Clipboard with Passphrase data (Clipboard does not contain valid input data), try copying the text again starting from step
4. In the Passphrase dialog box, enter a passphrase of your choice. Repeat the same phrase in the second dialog box.
5. The OpenPGP applet now shows a lock, meaning the clipboard contains encrypted text:
6. To paste the encrypted text into another application, right-click the application you want to paste it into and select Paste from the context menu. For example, you can paste it into a web browser and send it via email.
You can also decrypt passphrase-encrypted text using the OpenPGP applet.
With the OpenPGP applet, you can encrypt or sign text using an OpenPGP public encryption key.
This method requires the use of public key cryptography. If you’ve never used OpenPGP keys before, you’ll likely want to encrypt your text with an OpenPGP passphrase. See the relevant documentation.
1. Write the text in a text editor. Don’t write it in a web browser! Click the OpenPGP Applet and select Open Text Editor to open gedit.
2. Select the text to be encrypted or signed with the mouse. To copy it to the clipboard, right-click the selected text and select (Copy) from the context menu. The OpenPGP applet now shows lines of text, which means that the clipboard contains plaintext:

3. Click on the OpenPGP applet and select Sign/Encrypt Clipboard with Public Keys from the menu. If you receive the error message “Clipboard does not contain valid input data”, try copying the text again starting with a step
4. If you want to encrypt the text, select one or more public keys for the recipients of the encrypted text in the Choose keys dialog box. To select a public key, double-click the appropriate row in the Select recipients list.
5. If you want to sign the text, select the secret key you want to sign the text with in the Sign message as list.
6. If you want to hide the recipients of the encrypted text, select the Hide recipients check box. Otherwise, anyone who sees the encrypted text can know who the recipient is.
7. Click OK. If you receive a Do you trust these keys warning, respond accordingly.
8. If you selected one or more public keys for text encryption, the OpenPGP applet now shows a lock, meaning that the clipboard contains encrypted text: If you selected only a private key for text signing, OpenPGP now shows print, which means that the clipboard contains a signed text:
9. To paste encrypted or signed text into another application, right-click the application you want to paste it into.
Paste from the context menu. For example, you can paste it into a web browser and send it via email.
To save GnuPG keys and configuration across work sessions, you can enable the GnuPG save feature. For information on how to generate your own GnuPG key pair, see the relevant documentation section. You can also decrypt or verify text that is encrypted or signed using public key cryptography using the OpenPGP Applet.
With the OpenPGP applet, you can decrypt text encrypted with OpenPGP or verify text signed with OpenPGP.
1. Select with the mouse the encrypted text that you want to decrypt or the signed text that you want to verify. Include the lines “—–BEGIN PGP MESSAGE—–” and “—–END PGP MESSAGE—–“. To copy it to the clipboard, right-click the selected text and select from the Copy item in the context menu.
2. If the selected text is encrypted, the OpenPGP applet now shows a lock, i.e. the clipboard contains the encrypted text: If the selected text is only signed but not encrypted, the OpenPGP applet now shows print, i.e. the clipboard contains the signed text:
3. Click the OpenPGP Applet and select Decrypt/Verify Clipboard from the menu.
If the selected text is only signed and the signature is valid, the GnuPG results window described in step 6 is displayed directly. If the text is signed and the signature is invalid, a GnuPG error message appears, mentioning BAD signature from….If text is encrypted using a passphrase, the Enter passphrase dialog box will appear. Enter the passphrase used to encrypt the text and click OK.
1. If the passphrase for the corresponding private key is not yet cached in memory, a dialog box will appear with the following message: You need a passphrase to unlock the secret key for user. (You need the passphrase to unlock the secret key for the user). Enter the passphrase for this secret key and click OK.
2. If your keyset does not have a secret key for which the text is encrypted, a GnuPG error message appears stating decryption failed: secret key not available.
3. If the passphrase specified in step 4 is incorrect, a GnuPG error message appears stating decryption failed: bad key.
4. If the passphrase provided in step 4 is correct, or if the text signature is correct, or both, the GnuPG Output window appears. The decrypted text appears in the Output of GnuPG text box. Other messages provided by GnuPG (Other messages from GnuPG), the message Good signature from… (Good signature from…) confirms the correctness of the text signature.
To save GnuPG keys and configuration across work sessions, you can enable persistent storage with GnuPG support.
Tails includes an automatic flash drive update mechanism to a new version. In some cases, it is not possible to update automatically and you may need to update manually. This page describes both methods. Note: Tails updates always fix important security issues, so it’s important to update as soon as possible.
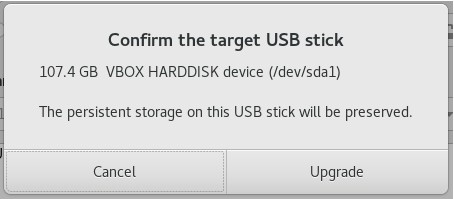
Permanent storage on the USB stick will be saved.
Note: If you’re using Tails from a DVD, you’ll need to burn a new DVD.
Automatic upgrade with Tails Upgrader
After starting Tails and connecting to Tor, Tails Upgrader automatically checks for available updates and then offers to upgrade the USB drive. Updates are checked and downloaded via Tor.
You only need one Tails USB drive. The upgrade is done this summer from running Tails. After the update, you can restart and use the new version.
The update is much smaller to download than a full USB image.
The update mechanism includes cryptographic verification of the update. You no longer need to verify the USB image yourself.
A USB drive with Tails installed.
Internet connection.
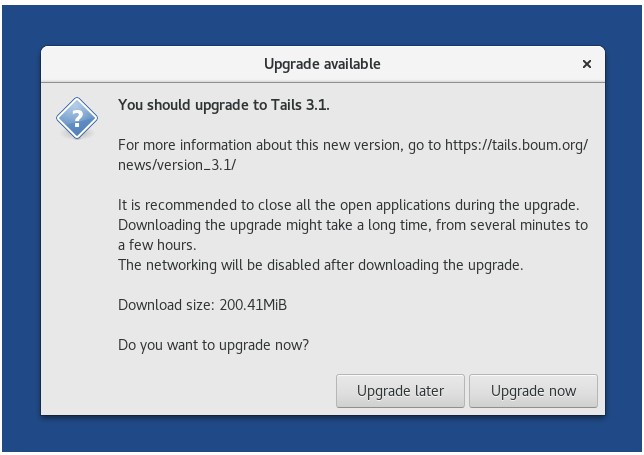
After connecting to Tor, if there is an update, a dialog will appear asking you to update the USB drive.
We recommend that you close all other applications during the update.
Downloading the update can take a long time, from a few minutes to several hours.
The network will be disabled after the update is downloaded.
If you decide to upgrade, click “Upgrade now” and follow the wizard to upgrade.
Note: If you missed an update, each update will be installed one at a time. For example, if you have Tails 1.3 and the current version is 1.3.2, it will update to 1.3.1, and after restarting Tails, it will update to 1.3.2. If you can’t upgrade at startup (for example, if you don’t have a network connection), you can start Tails Upgrader later by opening a terminal and running the following command:
![]()
We recommend reading the release notes for the latest version. They document all the changes in this new version:
new opportunities
problems that have been solved
known issues that have already been identified
They may also contain special upgrade instructions.
We recommend reading the release notes for the latest version. They document all the changes in this new version:
new opportunities
problems that have been solved
known issues that have already been identified
They may also contain special upgrade instructions.
It is not always possible to perform an automatic update as described above. For example, when:
Automatic update for this version is not available on our site.
Automatic update is not possible for technical reasons (insufficient memory, insufficient free space on the USB drive, etc.).
You want to upgrade from another Tails USB stick that already has the new version installed, for example, while offline.
Automatic update failed and you need to repair your Tails USB drive.
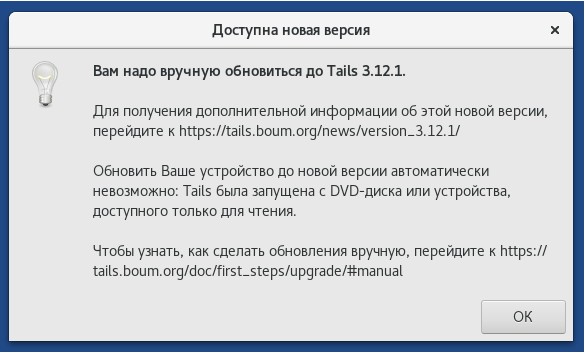
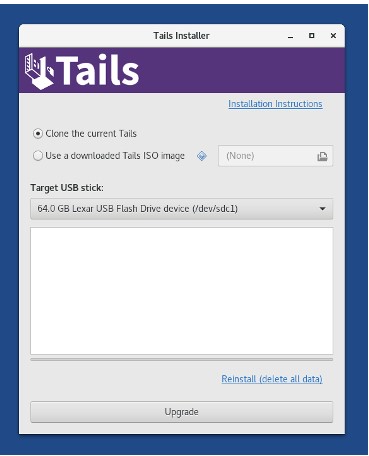
After connecting to Tor, a dialog box informs you that you need to update the USB drive with the Tails Installer to a newer version of Tails. To do this, follow the manual update instructions. To check your version of Tails, select Applications → Tails → About Tails.
Download from another Tails (not the one you want to update!).
Plug in the Tails USB drive you want to update.
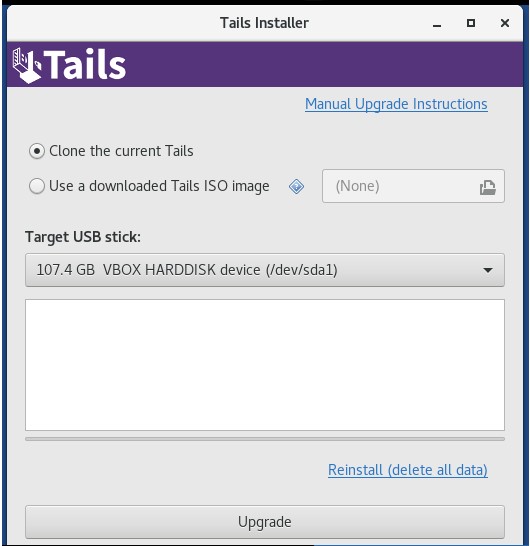
Select Applications → Tails → Tails Installer to launch Tails Installer.
Select the USB drive in the Target USB drop-down menu.
Click the Upgrade button to start the upgrade. Note: The permanent storage of the Tails USB flash drive will be saved.
Read the warning message in the confirmation dialog. Click Yes to confirm. The update takes a few minutes. Note: the progress bar usually freezes for a while while the disk data is being synchronized.
After the installation is complete, close Tails Installer.
Tails update is complete. Now you can shut down the system and reboot from the Tails USB flash drive.
If you installed Tails on an internal HDD or VirtualBox as described here, the automatic update will not work. The update can be done manually, but requires additional steps.
1. Download Tails from new version DVD/ISO/USB and set admin password.
2. Mount the “Tails” partition of the hard disk Using Applications → Utilities → Disks.
3. Run the commands in the terminal:

4. Unmount the “Tails” partition of the hard disk using Applications → Utilities → Disks.
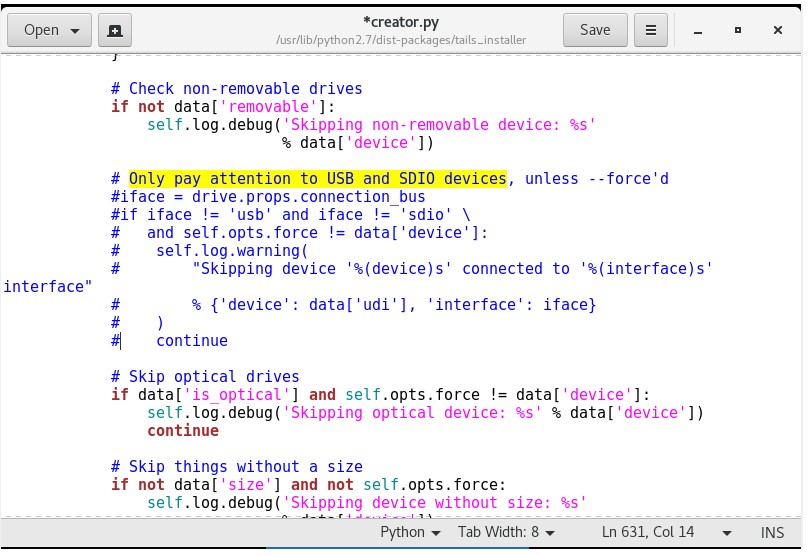
5. Open the file /usr/lib/python3/dist-packages/tails_installer/creator.py:
![]()
Find the line in it:
![]()
And comment out the next 8 lines, putting a # in front of each line (a change in font color means you did everything right). This should be done up to and including:
![]()
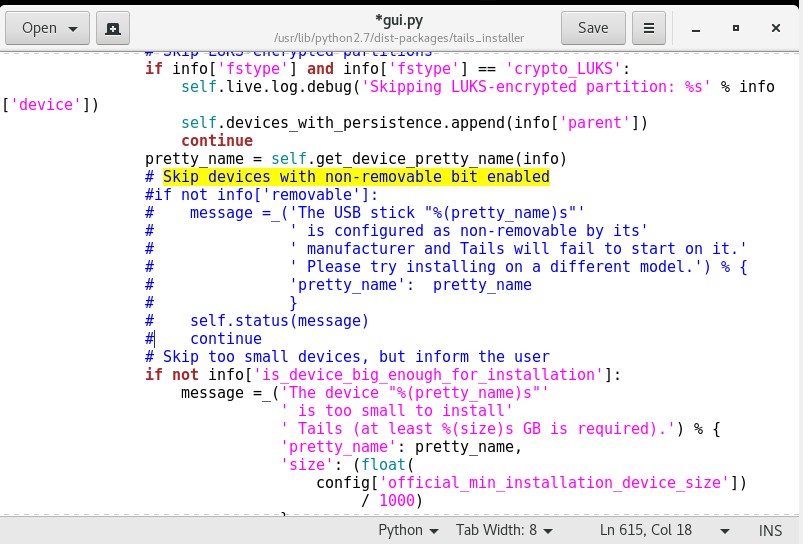
Save and close the file. Now open the file /usr/lib/python3/dist-packages/tails_installer/gui.py:
![]()
Find the line:
![]()
And comment out the next nine lines, up to and including:
![]()
It should look something like this:
Save and close the file.
6. Execute in the terminal:
![]()
This is the same as running the Tails Installers “clone update” but running from root because running from amnesia ends up giving an error.
7. Select your HDD and click the Upgrade button:
Make sure HDD is selected and click the Upgrade button:
8. When the installation is successful, mount the “Tails” partition of your hard drive using Applications → Utilities → Disks.
9. Then execute the commands:

10. Unmount the “Tails” partition of your HDD using Applications → Utilities → Disks.
11. Turn off the computer and boot from the hard drive to check the results.
In Tor Browser, you can store files in one folder – in /home/amnesia/Tor Browser/. It is offered by default if you save any file or web page.

After a reboot, this folder is cleared.
If you want the file to persist after a reboot, move it to the /home/amnesia/Persistent/ folder.
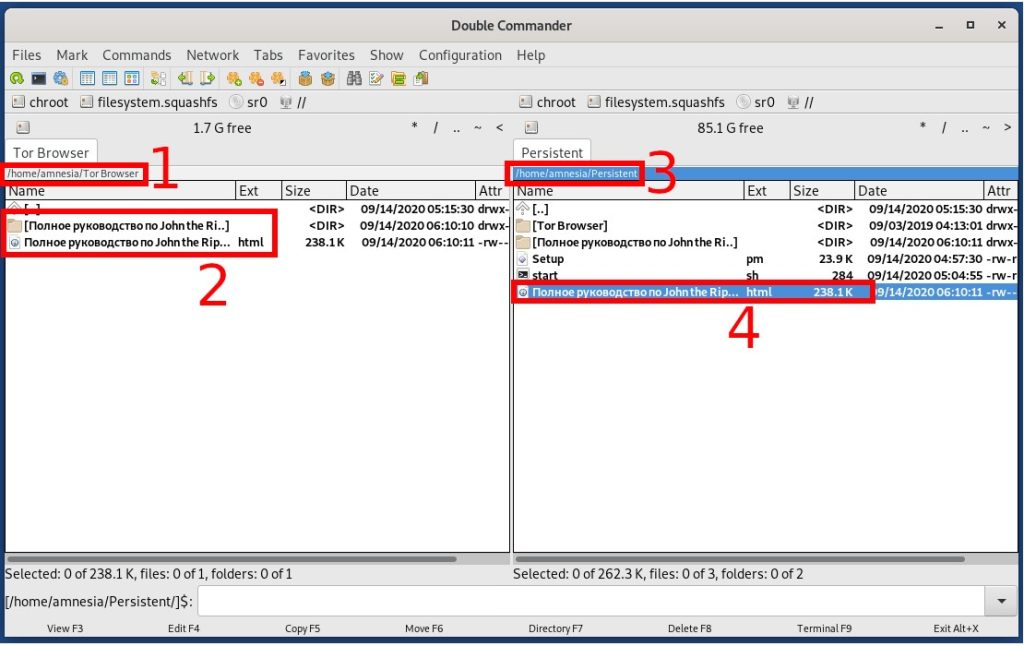
But you cannot open files saved in the /home/amnesia/Persistent/ folder in the Tor browser. That is, files saved in the /home/amnesia/Tor Browser/ folder will be deleted, and files saved in permanent storage cannot be opened. There are two ways out of this situation.
1. Save downloaded web page files to permanent storage:
![]()
After rebooting, return the files to /home/amnesia/Tor Browser/
![]()
Instead of copying and pasting files, you can use a symbolic link. To do this, create a folder in the permanent storage where you will save the files:
![]()
OR, if you’ve already saved web pages, move them to permanent storage:
![]()
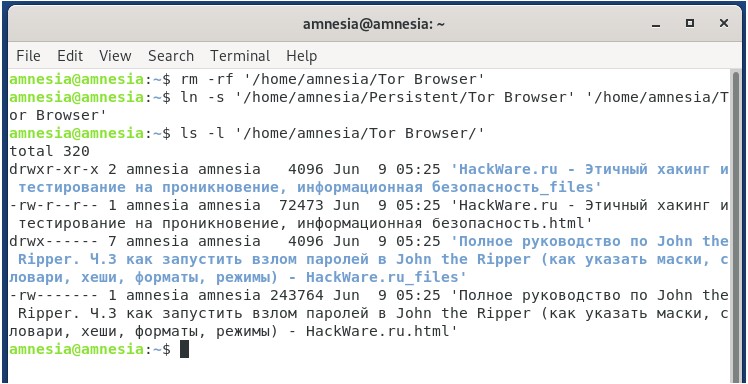
Then delete the ‘/home/amnesia/Tor Browser’ folder if it exists:
![]()
Create a symbolic link:
![]()
As a result, all files stored in the web browser will be immediately stored in permanent storage.
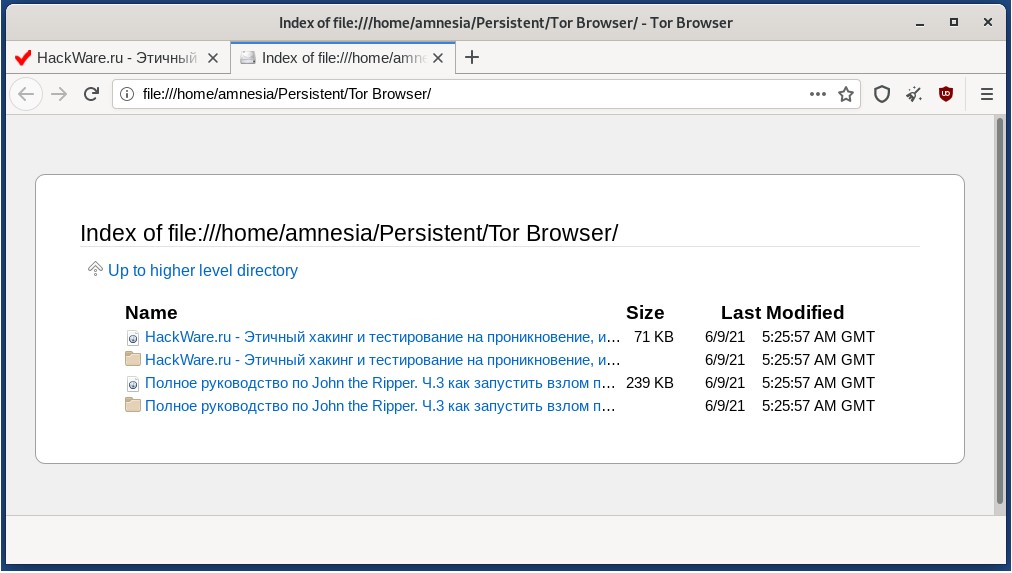
After the reboot, to restore access from the Tor browser to saved web pages, do the following:

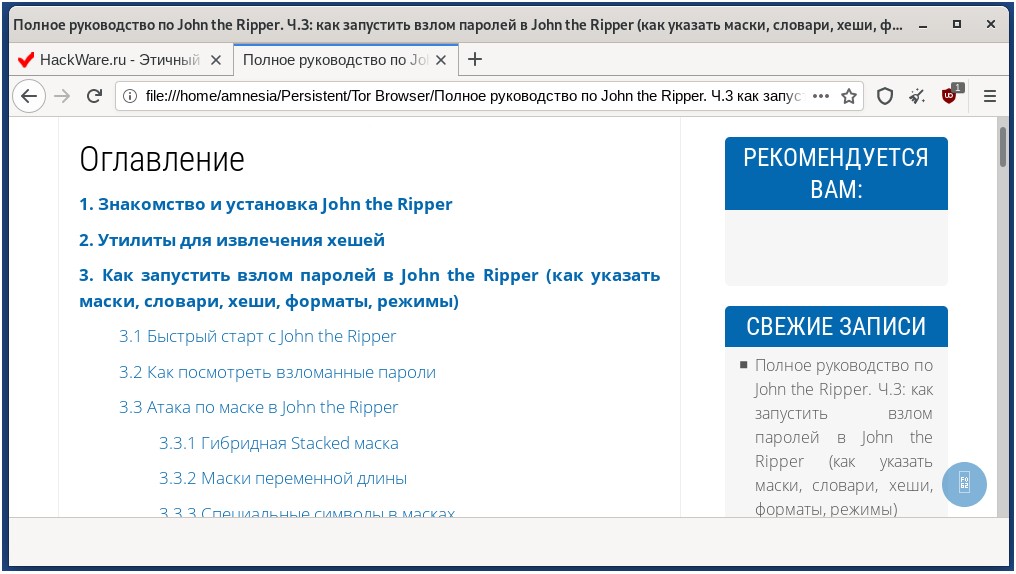
You will not be able to open files using the Tor web browser menu: Open menu → Open File. You need to enter “/home/amnesia/Tor Browser” in the address bar of the web browser, after that you will see a list of files available to open:
2. The second way to open files in persistent storage is to install a web browser that does not have restrictions on opening files, for example, installing Chromium:

Start the Chromium web browser:
![]()
In it, you can open web pages from your permanent storage.
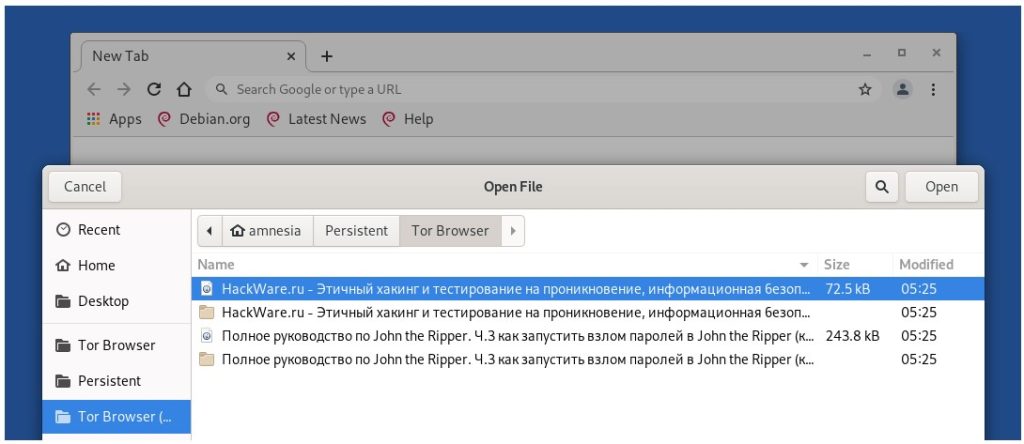
To download the files, you need to copy them to the /home/amnesia/Tor Browser/ folder, as the Tor Browser can only access this directory.
After copying the files to /home/amnesia/Tor Browser/, click the “Attach File” button on the site, navigate to the /home/amnesia/Tor Browser/ folder (should open by default), select the file you want to send and send it.
The unsafe browser does not use Tor. The websites you visit can see your real IP address. This is why we recommend you:
Use an insecure browser only to log in to Captive Portals (access points that require authentication in a web browser) or to view trusted web pages on your local network.
Close the unsafe browser after entering the authorization portal to avoid it by mistake.
An attacker could use a security vulnerability in another application in Tails to launch an invisible, malicious browser and reveal your IP address, even if you are not using that malicious browser. For example, an attacker could exploit a vulnerability in Thunderbird’s security system by sending you a phishing email that could launch an invisible, dangerous browser and reveal your IP address to them. Such an attack is unlikely, but could be carried out by a powerful attacker, such as a government or a hacking firm.
Enable a secure browser only if you need to enter the authorization portal.
Always update to the latest version of Tails to patch known vulnerabilities as soon as possible.
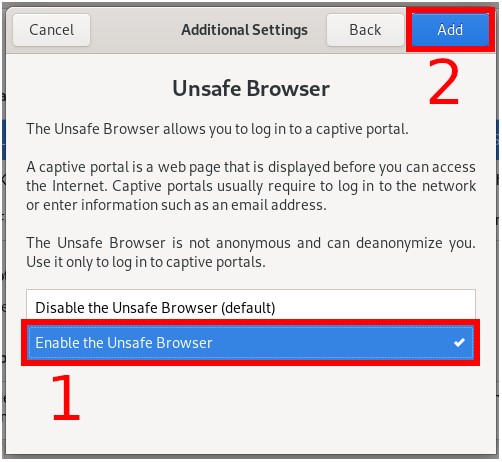
We have plans to address the root cause of this problem, but it requires major engineering work. If you download files using Unsafe Browser, it is impossible to access them from anywhere except Unsafe Browser itself. So, if you need to enable Insecure Browser, on the Tails welcome screen, click the plus (+) button.
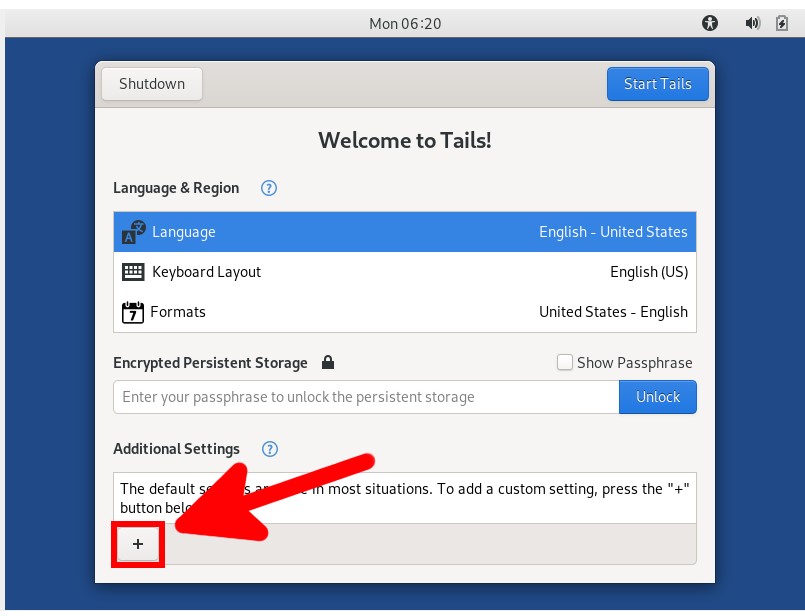
There, select Unsafe Browser.
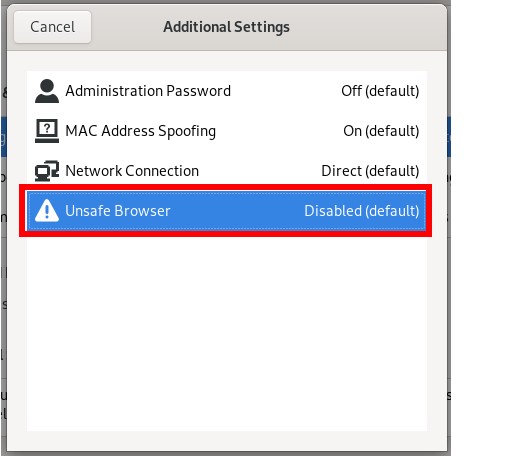
Select “Enable the Unsafe Browser” and click the “Add” button
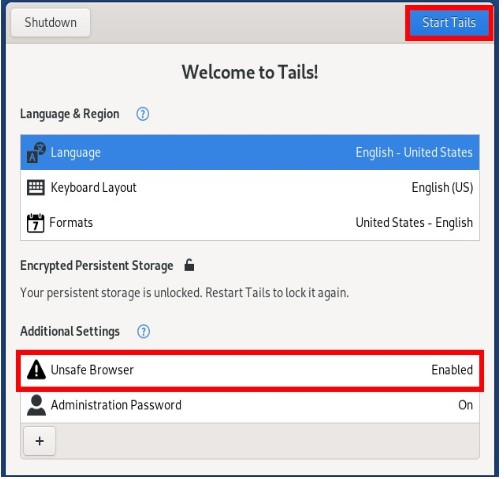
Make sure that Unsafe Browser is enabled and click the Start Tails button.
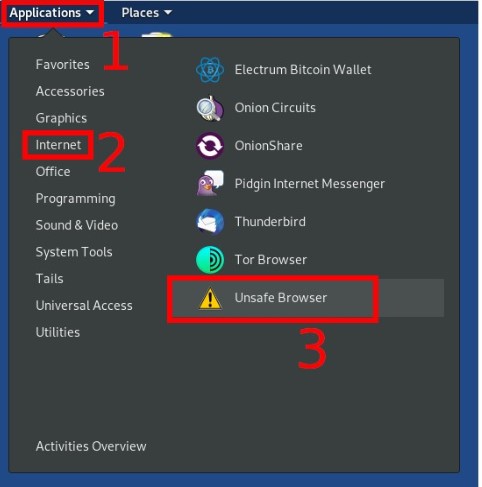
In the menu, go to the “Internet” section and select “Unsafe Browser”.
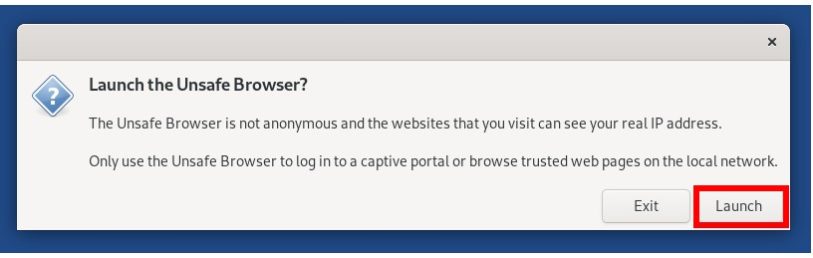
A warning is shown again that this browser is revealing your real IP address, click the “Launch” button.
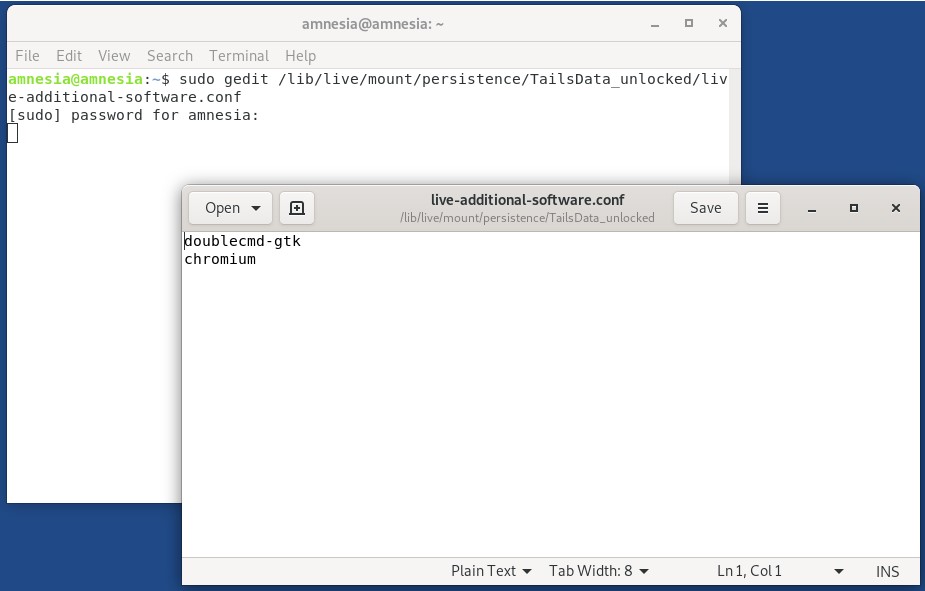
At first glance, it looks like the files in persistent storage are located in the /home/amnesia/Persistent/ directory, but this is not the case. In fact, the files from the persistent storage are located in the /lib/live/mount/persistence/TailsData_unlocked/ directory.
The list of additional software that is automatically installed each time Tails is started is stored in the /lib/live/mount/persistence/TailsData_unlocked/live-additional-software.conf file. This is a plain text file with package names in a “one package per line” format. You can add package names there for automatic installation.
In the BIOS, find and disable the Security Boot and Fast Boot options. Choose a USB flash drive or Tails disk as the download source.
To get to the BIOS or the boot menu, try pressing the ESC or Delete buttons many times when starting the computer. If that doesn’t work, google for information on how to get into the BIOS for your laptop model or motherboard (if you have a desktop computer).
If you use an ISO image to download, then try an IMG image instead, which you install on a USB flash drive. The fact is that the ISO image cannot be loaded on computers with UEFI, and the IMG image supports both BIOS and UEFI at the same time.
Tails
Tails (Troubleshooting Mode)
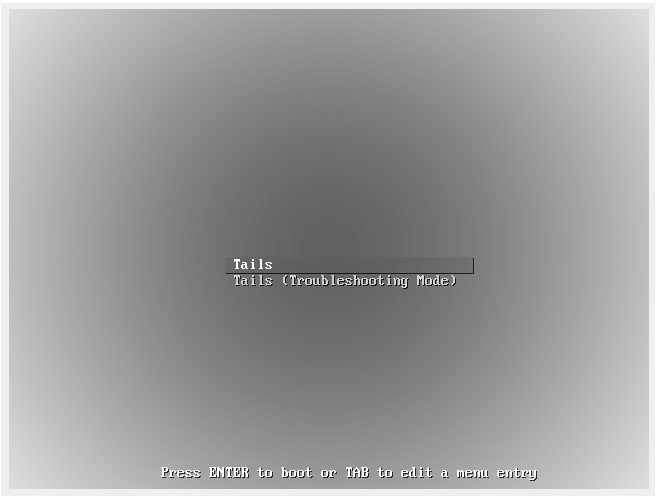
If you choose Tails (Troubleshooting Mode), system boot information will be displayed as well as debugging information.
Due to the variety of debug information, it can be more difficult to navigate the output of normal boot information. Therefore, you can choose the normal mode, but slightly edit the download options so that the image does not cover the information we need. To do this, when the Tails menu appears, press the TAB key. As a result, the download options will be displayed:

Edit them (use the arrow keys to move through the line and the ← (Backspace) key to delete. Delete the words quiet and also splash so it looks like this:

When done, press ENTER to continue the download with the edited options. As a result, messages about loading the system will be displayed. Remember (or take a photo) the last of them – they can help solve your problem.
If during boot the system initially gets stuck on the phrase for a long time:
![]()
And then the download is interrupted with an error:
![]()
There can be several reasons for such a problem.
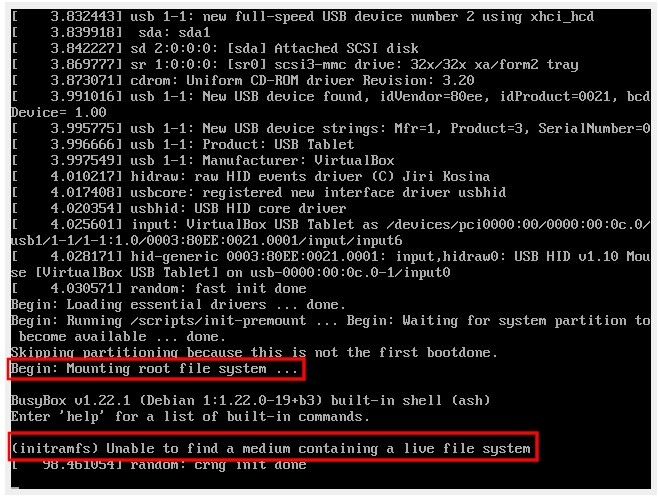
One of the typical reasons for this is that the USB flash drive declares itself as a fixed disk instead of removable (removable) media. To check (and fix) this, restart the computer, at the initial stage, when the Tails menu appears, press the TAB key. In the download options, find and delete the line “live-media=removable”, and we get:
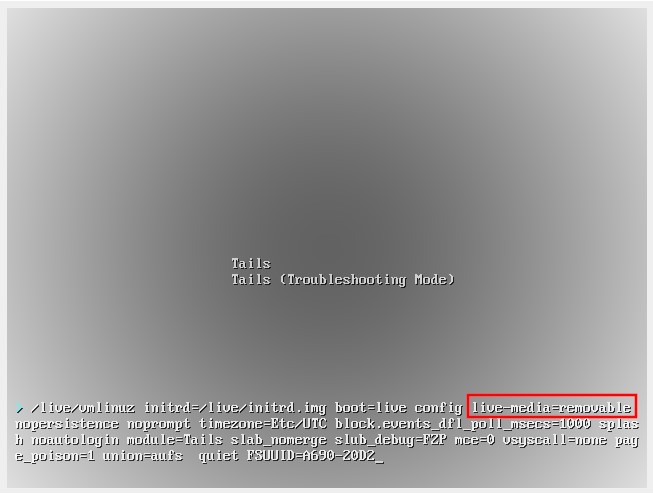
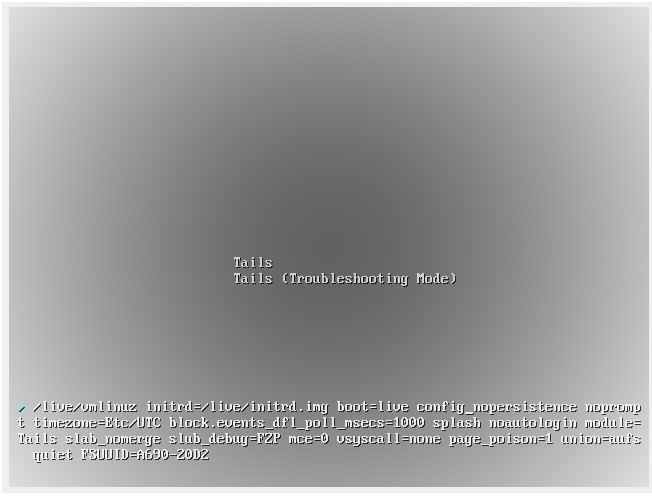
Press ENTER to continue downloading. If the download happens, that’s really the problem with it. Changed boot settings only take effect until the next reboot. That is, these changes will have to be made every time, which is inconvenient. To reverse these changes, you need to edit the bootloader files. To do this, set an Administrator Password during boot. After the download is complete, open a terminal and execute there:

You will be asked for the admin password you set earlier, it will not be displayed on the screen, after entering it press ENTER. Run the command:
![]()
Then execute the command:
![]()
Two files will be opened in gedit. In each of them, find and delete the line:
![]()
Save and close the files. Now execute the command:
![]()
Two files will be opened in gedit. In each of them, find and delete the line:
![]()
Save and close the files. When done, reboot:
![]()
If the described method did not help, try to write Tails to another flash drive or start the flash drive on another computer.
Nothing may happen when you try to run the persistent volume setup program. That is, you click on the Configure persistent volume menu and nothing happens, including no error messages. The fact is that the Configure persistent volume program may simply not show anything in the event of an error. If the error is foreseen in the program (for example, you are trying to create a permanent storage not on a flash drive), but you have chosen any Tails language other than English (for example, Russian), then the program will again not output anything, because it will already have an internal error, because it does not know how to work with lines in Russian … Therefore, if when you click on Configure persistent volume, start by rebooting and do not change the system language – leave English. Another option is to run Configure persistent volume from the command line. To do this, open the console, write there and press ENTER:
![]()
Errors that prevent the program from starting should be displayed. By the way, in order for Configure persistent volume to learn to work properly with non-English languages, open the file /usr/bin/tails-persistence-setup:
![]()
And after the very first line add:
![]()
Save and close the file.
Tails is installed on your hard drive or in a virtual machine
permanent storage is unlocked
you install additional software
you select the “install this software every time you turn on Tails” setting
Error text on the screen:

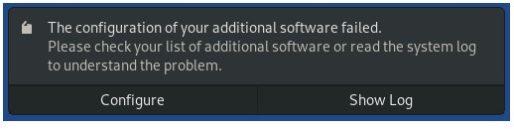
Error text in the log:
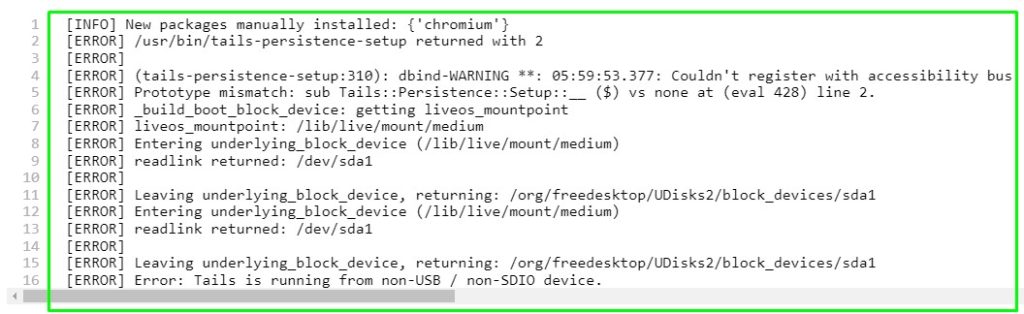
The key here is the line «Error: Tails is running from non-USB / non-SDIO device».
The system checked that it is not running on a USB stick or an optical disc and could not add additional software to the automatically installed list. Instead of trying to figure out which file you need to edit to fix the error, you can choose an easy way – just add the required packages to the file where the list of programs for automatic installation is stored. This is the /lib/live/mount/persistence/TailsData_unlocked/live-additional-software.conf file.