

31.08.2026
4 min
135



A detailed guide to installing GrapheneOS on Google Pixel 10 via Windows 11 using the official Web Installer: OEM unlocking, Fastboot Mode, flashing, bootloader locking, Verified Boot, and Sandboxed Google Play.
An illustrated guide for beginners. The phone screens are shown schematically: their exact appearance and language depend on the OS version. The Web Installer screenshots are authentic. Do not rely solely on the position of interface elements: verify their names and read all warnings.
GrapheneOS can be installed on supported Google Pixel smartphones without using the command line, manually downloading system images, or entering Fastboot commands. The project provides an official Web Installer that works directly in a compatible browser via WebUSB.
The complete list of Google Pixel models that support GrapheneOS is provided below. This guide demonstrates the installation process using a standard Google Pixel 10 connected to a Windows 11 computer. The procedure is virtually identical for other supported models, while the Web Installer automatically detects the connected smartphone and downloads the correct system image.
Warning: Unlocking and subsequently relocking the bootloader completely erases all data from the smartphone. Before proceeding, back up your photos, documents, two-factor authentication codes, recovery codes, contacts, and any other important information.
Official Web Installer: https://grapheneos.org/install/web
Official list of supported devices: https://grapheneos.org/faq#supported-devices
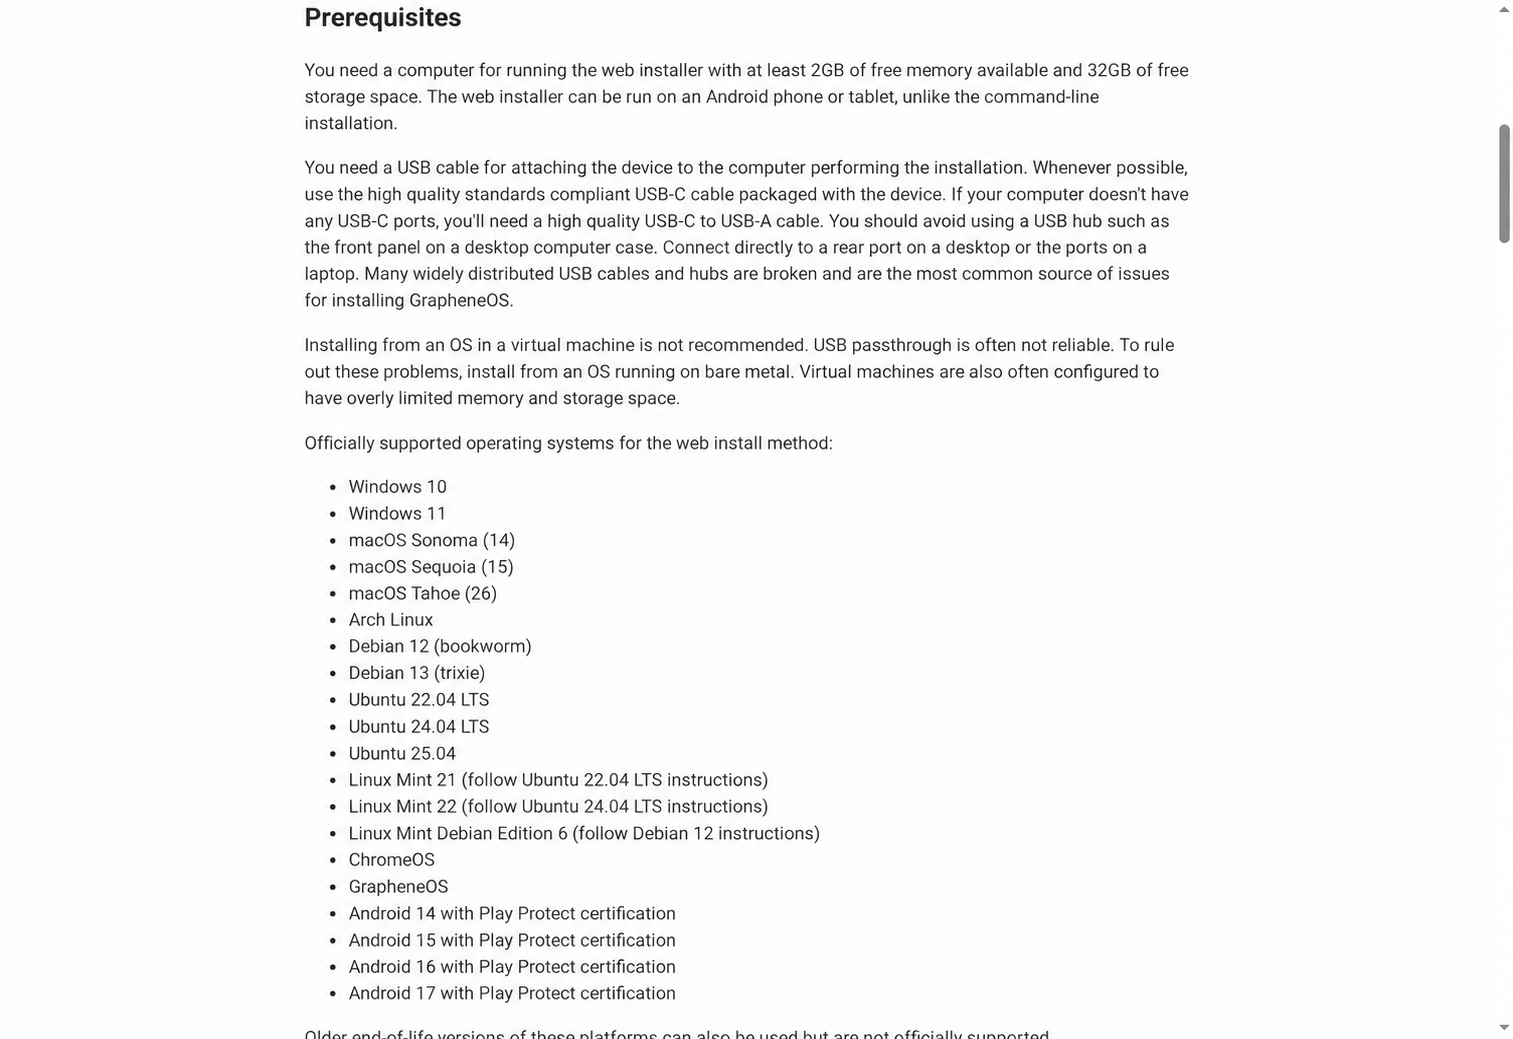
The Web Installer requires a computer with at least 2 GB of available RAM and 32 GB of free storage space. Windows 11 is officially supported. Installing the system from a virtual machine is not recommended because USB passthrough to the virtual environment may be interrupted when the smartphone automatically reboots.
On Windows 11, use the latest version of Google Chrome, Microsoft Edge, Chromium, or Brave. If you choose Brave, disable Brave Shields for the installer page before starting. Do not open the Web Installer in Incognito or InPrivate mode, as private browsing may limit the storage capacity required to unpack the system image.
You will also need:
A Pixel 10 without a carrier-locked bootloader;
A high-quality USB-C cable, preferably the one supplied with the smartphone;
A stable internet connection;
A charged smartphone, preferably with at least 60% battery;
A backup of all important data;
Approximately 30–40 minutes of free time.
Connect the smartphone directly to a USB port on the laptop or a rear USB port on a desktop computer. Avoid using a USB hub, docking station, or front-panel port on a desktop computer whenever a direct connection is available. A faulty or poor-quality cable is one of the most common causes of interrupted installations.
As of September 2026, official stable builds are available for the following devices:
Pixel 10a, Pixel 10, Pixel 10 Pro, Pixel 10 Pro XL, and Pixel 10 Pro Fold;
Pixel 9, Pixel 9 Pro, Pixel 9 Pro XL, Pixel 9 Pro Fold, and Pixel 9a;
Pixel 8, Pixel 8 Pro, and Pixel 8a;
Pixel 7, Pixel 7 Pro, and Pixel 7a;
Pixel 6, Pixel 6 Pro, and Pixel 6a;
Pixel Fold and Pixel Tablet.
For a new purchase, the developers recommend the Pixel 8 and newer models. These devices receive at least seven years of guaranteed support from their release date and feature hardware-based Memory Tagging Extension. GrapheneOS uses this technology to make exploiting memory-related vulnerabilities in the system and compatible applications more difficult.
Before purchasing a device, make sure it is not a carrier model with a locked bootloader. This restriction is especially common on smartphones purchased from US mobile carriers. If the OEM unlocking option is unavailable because of a carrier restriction, GrapheneOS cannot be installed using the standard method.
Before flashing, install all available updates for the stock Google operating system by navigating to Settings → System → Software updates. This ensures that the smartphone has the latest component firmware and reduces the risk of issues with the initial USB connection.
Check your backup. Google Photos synchronization alone is insufficient if files remain on the phone outside the synchronized folders. Separately back up your password manager data, two-factor authentication recovery codes, locally stored chats, electronic signature keys, application files, and eSIM data. Once the bootloader is unlocked, erased data cannot be recovered.
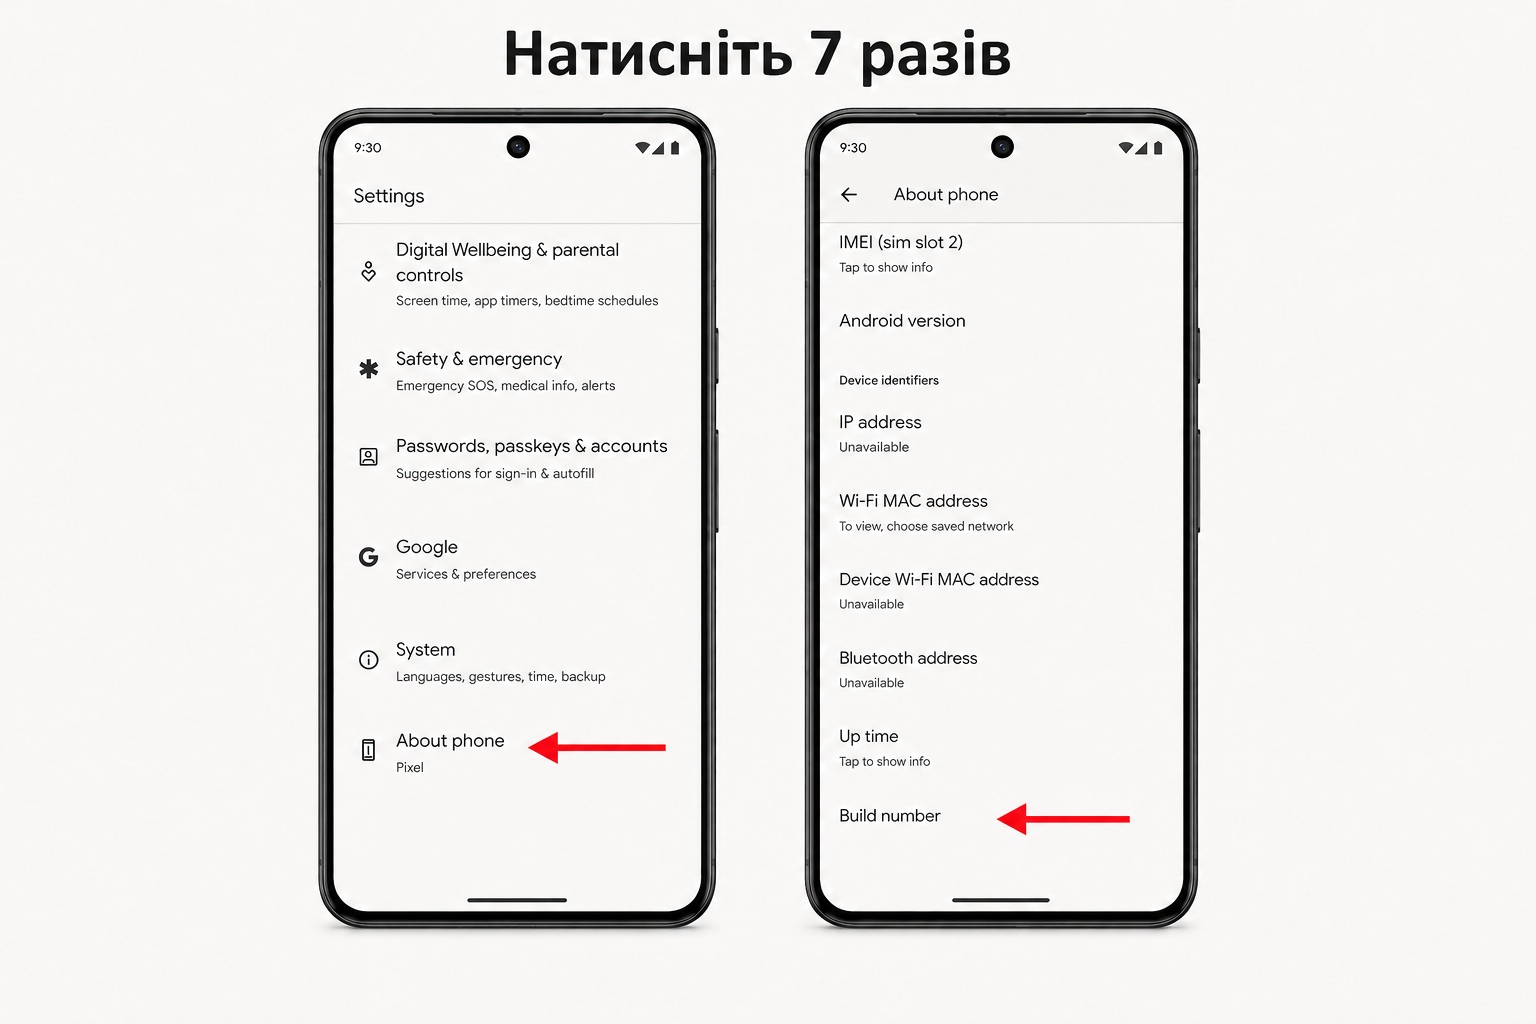
On the Pixel 10, open Settings → About phone. Scroll down to Build number and tap it seven times. Android will ask you to enter your screen-lock PIN or password and then notify you that Developer Options have been enabled.
Return to Settings → System → Developer options. Find the OEM unlocking toggle, enable it, and confirm the warning.
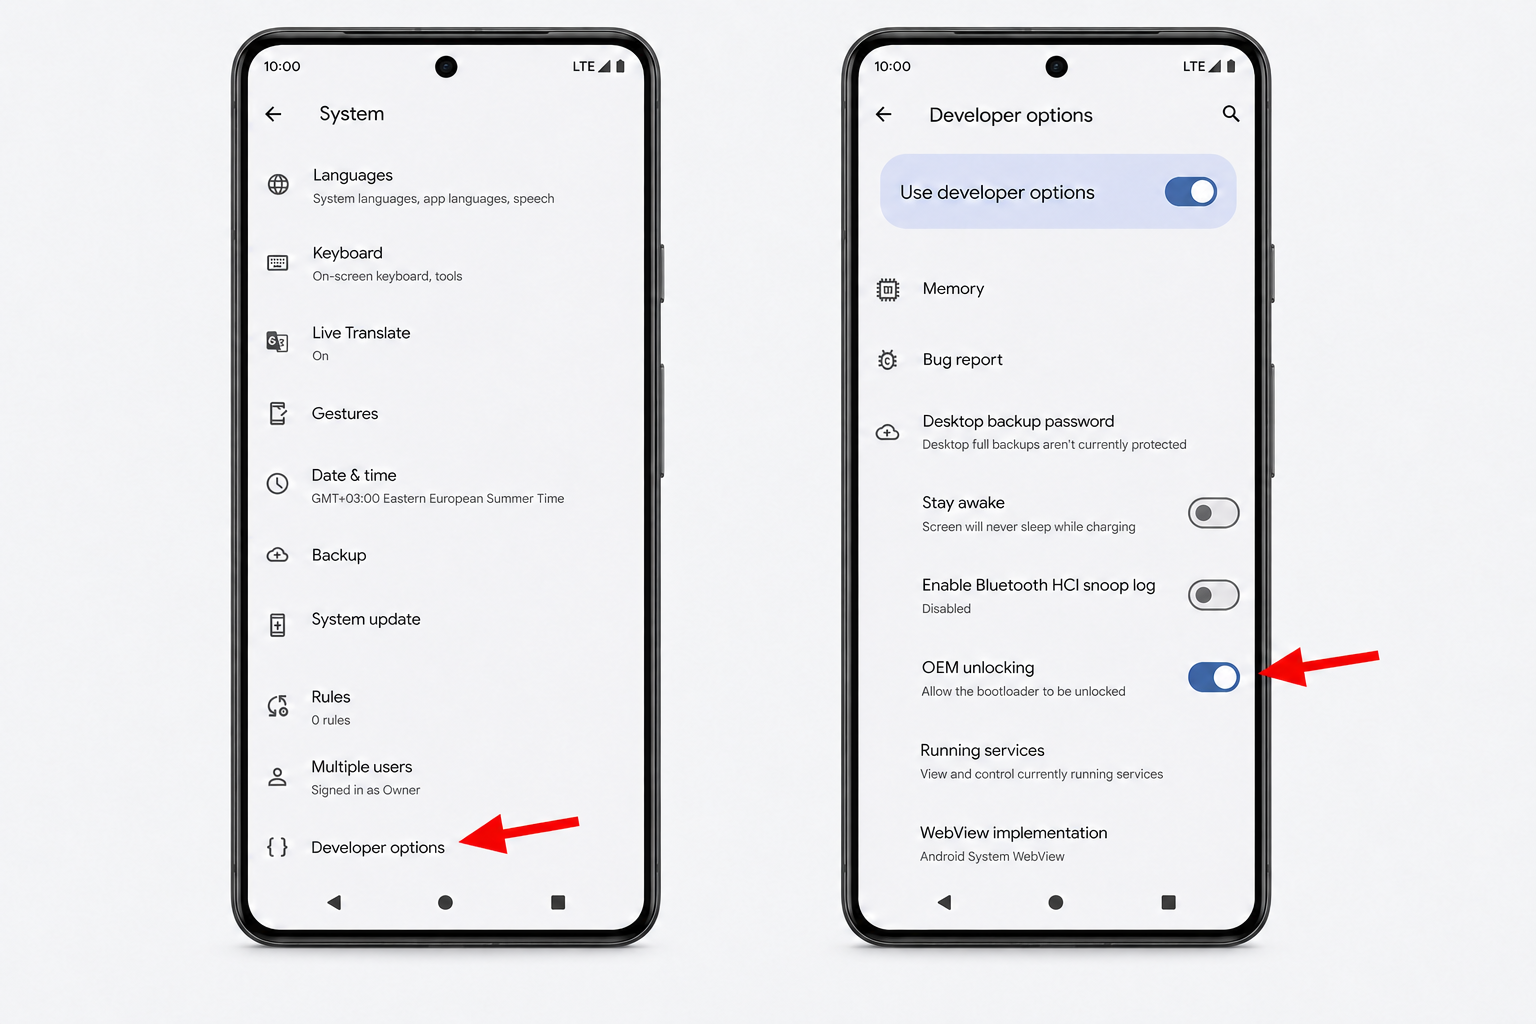
If the toggle is disabled, make sure the phone is connected to the internet, has the correct date and time, and has received all available updates. The system must verify whether the carrier variant prevents bootloader unlocking. Simply waiting 5–10 minutes may sometimes help, but it will not bypass a genuine carrier restriction.
A note for Pixel 6a owners: the factory system version on this model has a known issue with OEM unlocking. You must update the device to at least the June 2022 release and then perform a factory reset. This warning does not apply to the Pixel 10.
On your Windows 11 computer, open the latest version of Chrome or Edge and go to the official Web Installer page.
The current version of the page does not have a separate Get started button. This is important because outdated third-party guides and videos may mention one. On the official page, simply scroll through the sections and complete each action in sequence.
Do not close the tab or open the installer in multiple windows simultaneously. Other software attempting to use Fastboot may also take control of the smartphone’s connection.
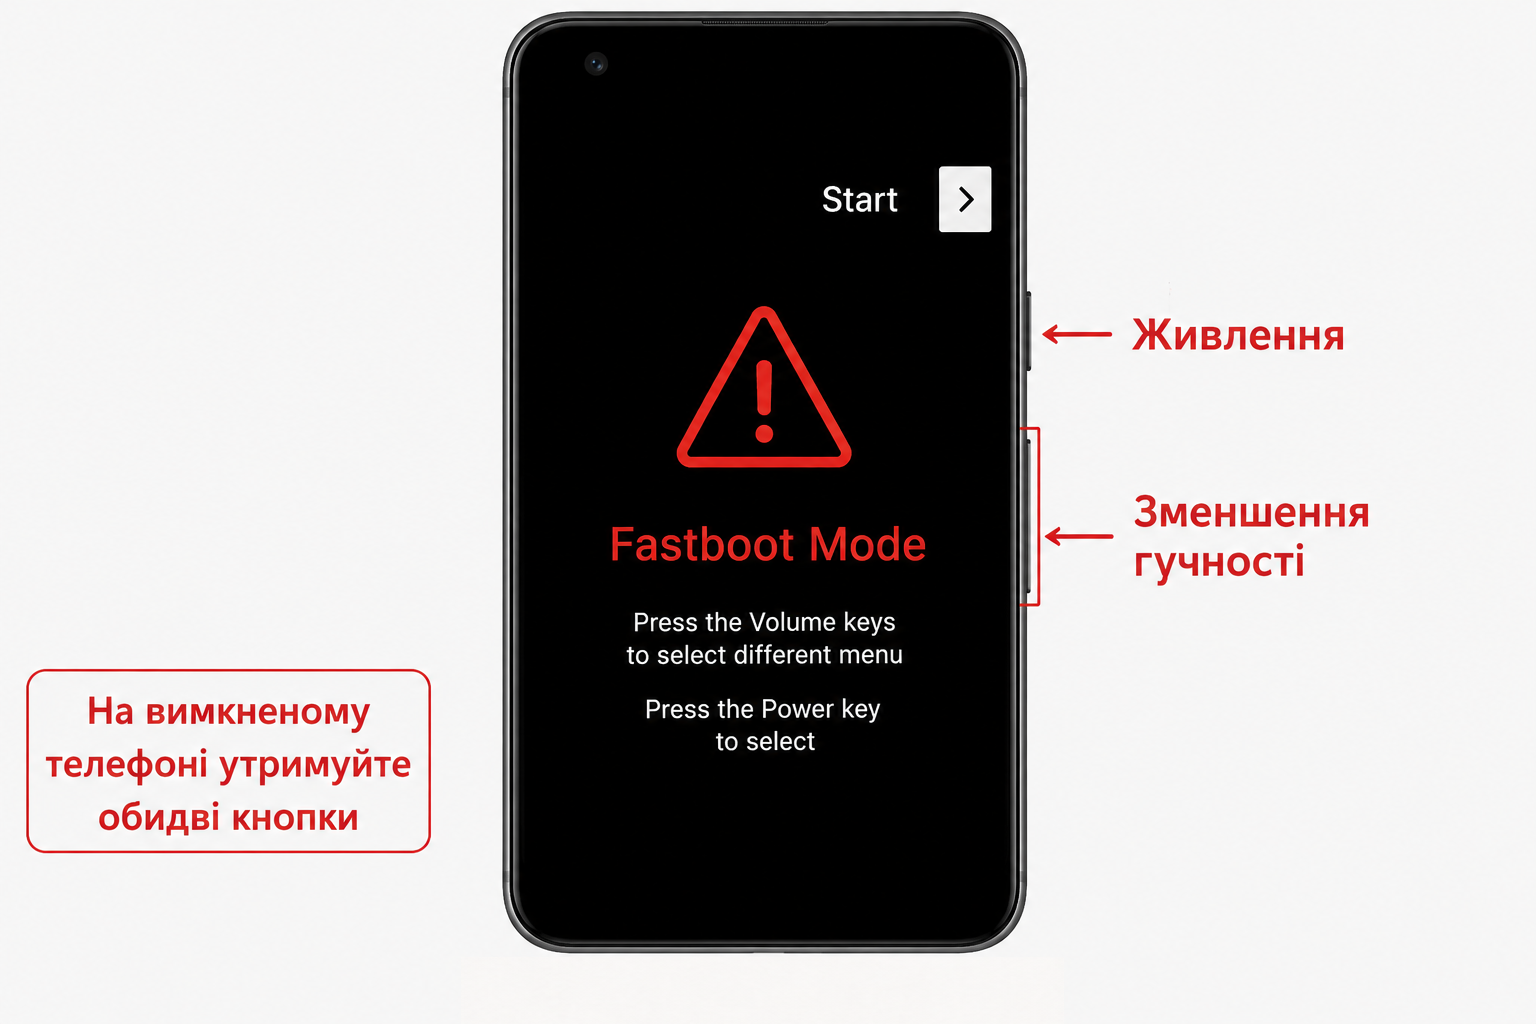
Turn off the Pixel 10. Once it has completely powered down, press and hold the Volume Down and Power buttons simultaneously. Keep holding them until the bootloader screen appears with a red warning triangle and the words Fastboot Mode.
Alternatively, restart the phone and hold the Volume Down button while it boots. The important thing is to ensure that the device stops at the Fastboot Mode screen.
Connect the Pixel 10 to your computer using a high-quality USB cable. With an up-to-date version of Windows 11 and the Pixel 10, you generally do not need to install a driver manually, as the operating system includes a compatible generic Fastboot driver.
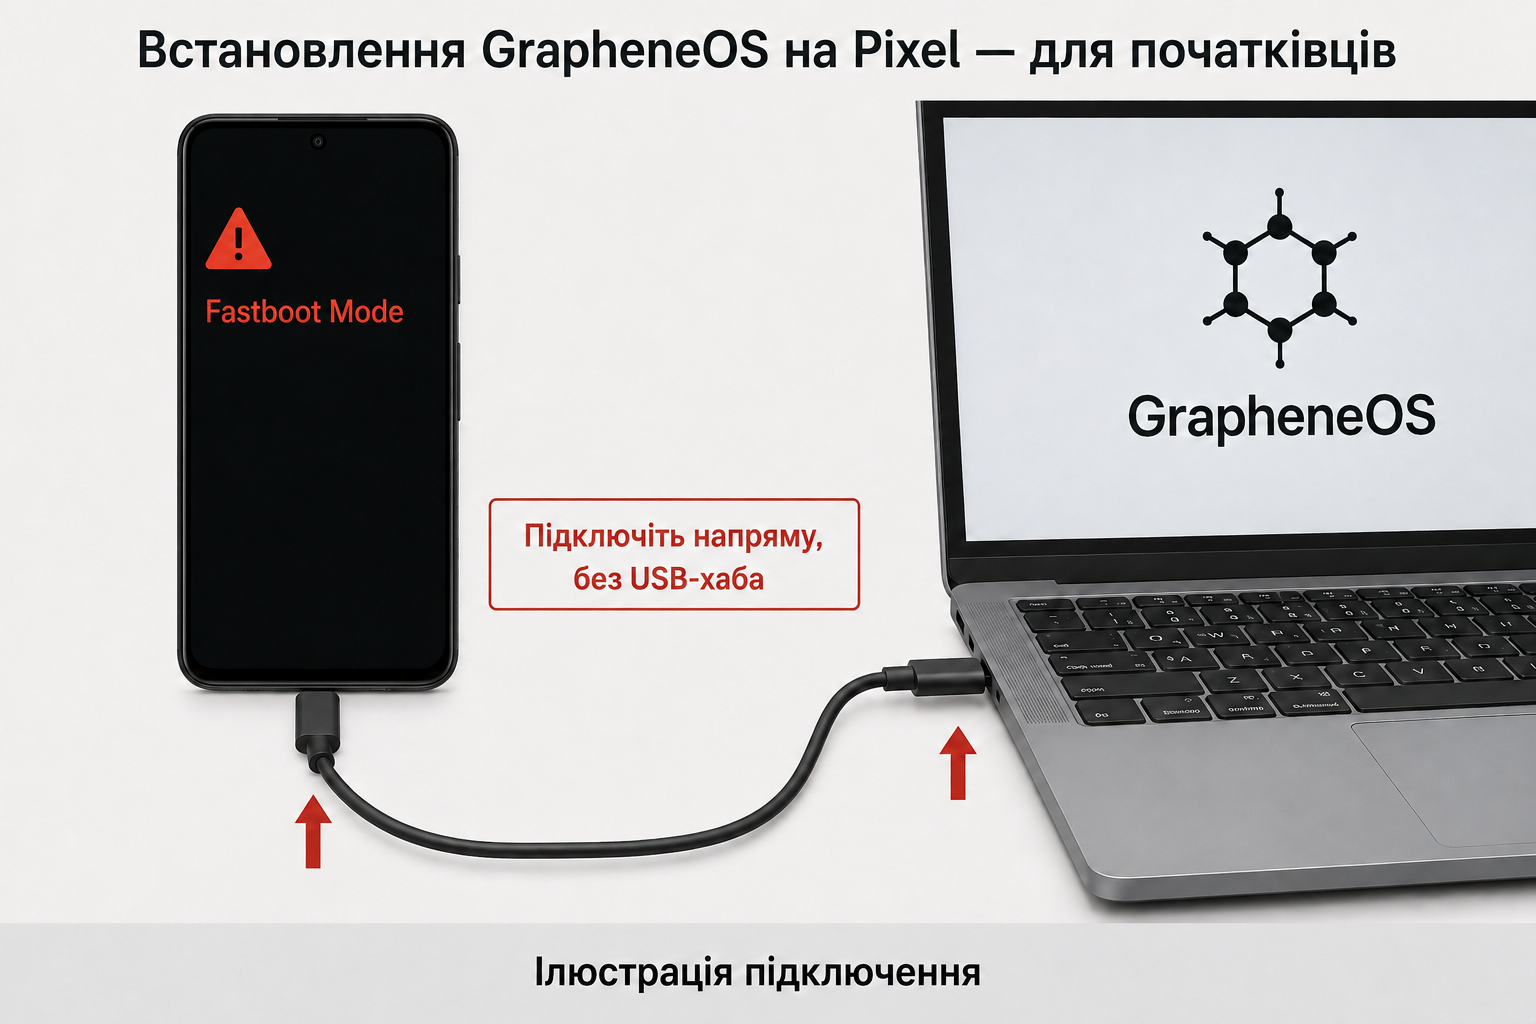
If the Web Installer does not detect the device:
Leave the smartphone on the Fastboot Mode screen.
Reconnect the cable directly to another USB port.
Do not use a USB hub or a low-quality adapter.
Open Windows Settings → Windows Update → Advanced options → Optional updates.
Check whether the Android Bootloader Interface driver is available. Because of matching USB identifiers, it may appear as LeMobile Android Device.
As a fallback option, you can download the official Google USB Driver and install it through Windows Device Manager. There is no need to use third-party driver packages.
Scroll down the official page to the Unlocking the bootloader section and click the blue Unlock bootloader button.
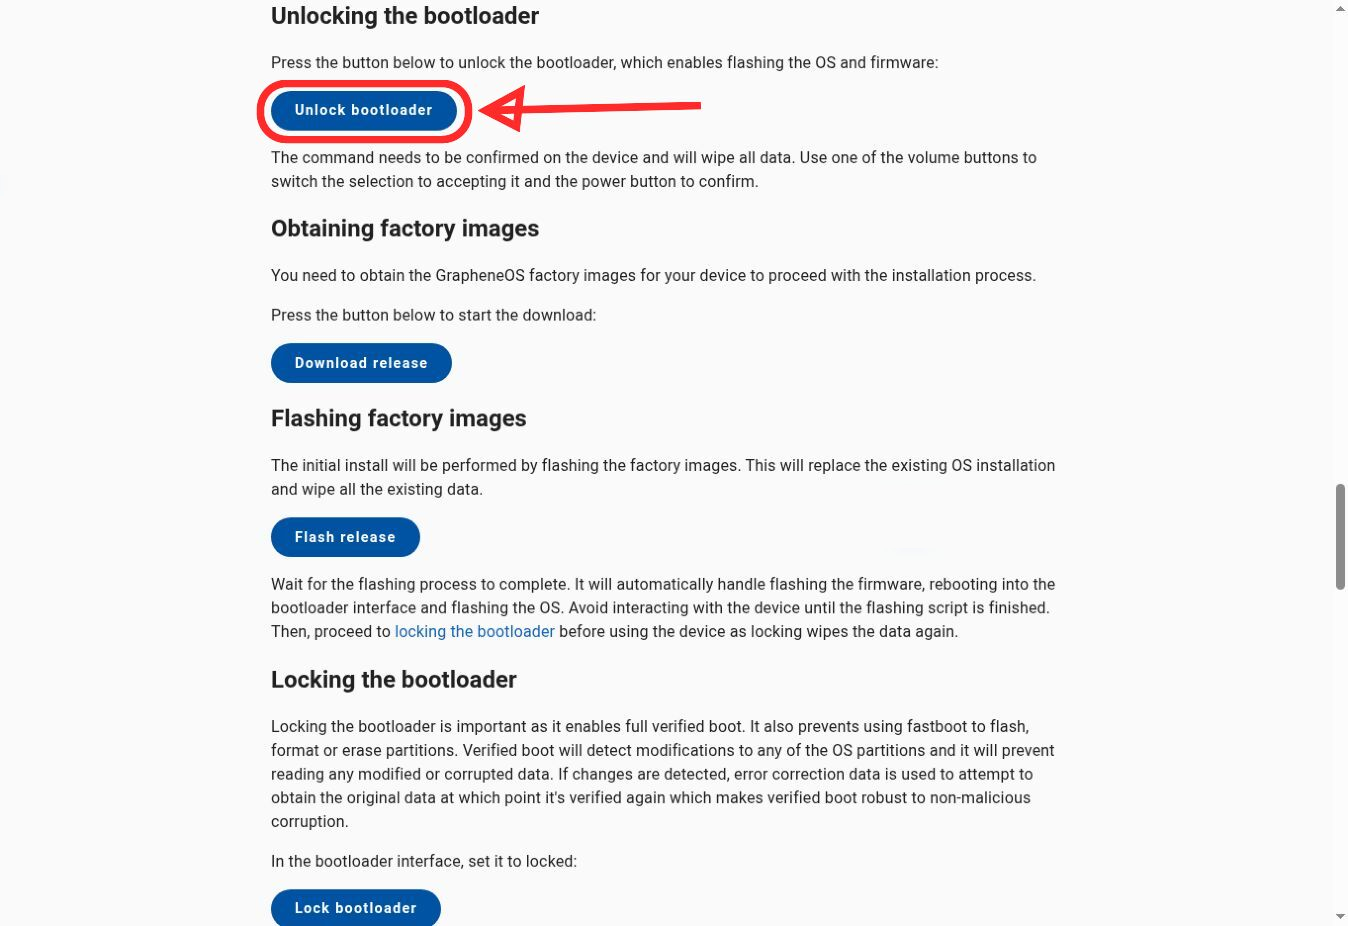
The browser may display a system window for selecting a USB device. Select the connected Pixel 10 or Android Bootloader Interface, then click the button to connect it. If the list is empty, check the cable, USB port, Fastboot Mode, and driver.
After the command is sent, an unlock confirmation will appear on the smartphone’s screen. Use the volume buttons to select Unlock the bootloader, then press the Power button to confirm.
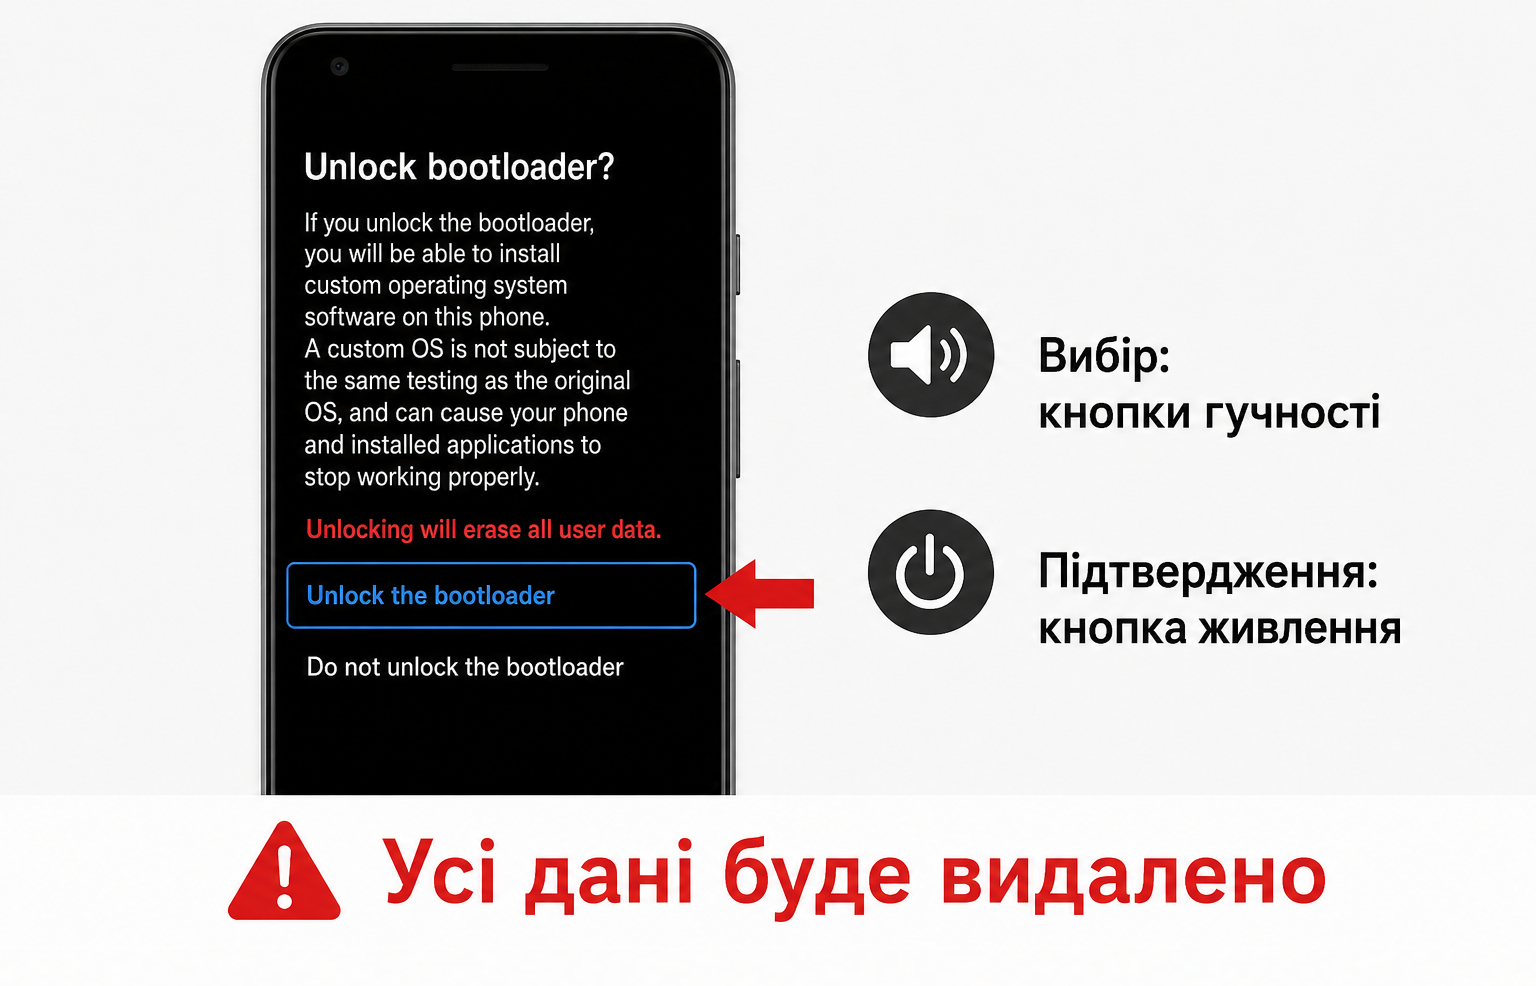
After this, the phone will completely erase all user data. You will not be able to cancel the wipe or recover the deleted data.
After unlocking the bootloader, do not set up the stock operating system again. Return the device to Fastboot Mode if it has exited it, and continue using the same Web Installer tab.
In the Obtaining factory images section, click Download release. The installer will detect the connected smartphone model and download the latest official GrapheneOS image for that device.
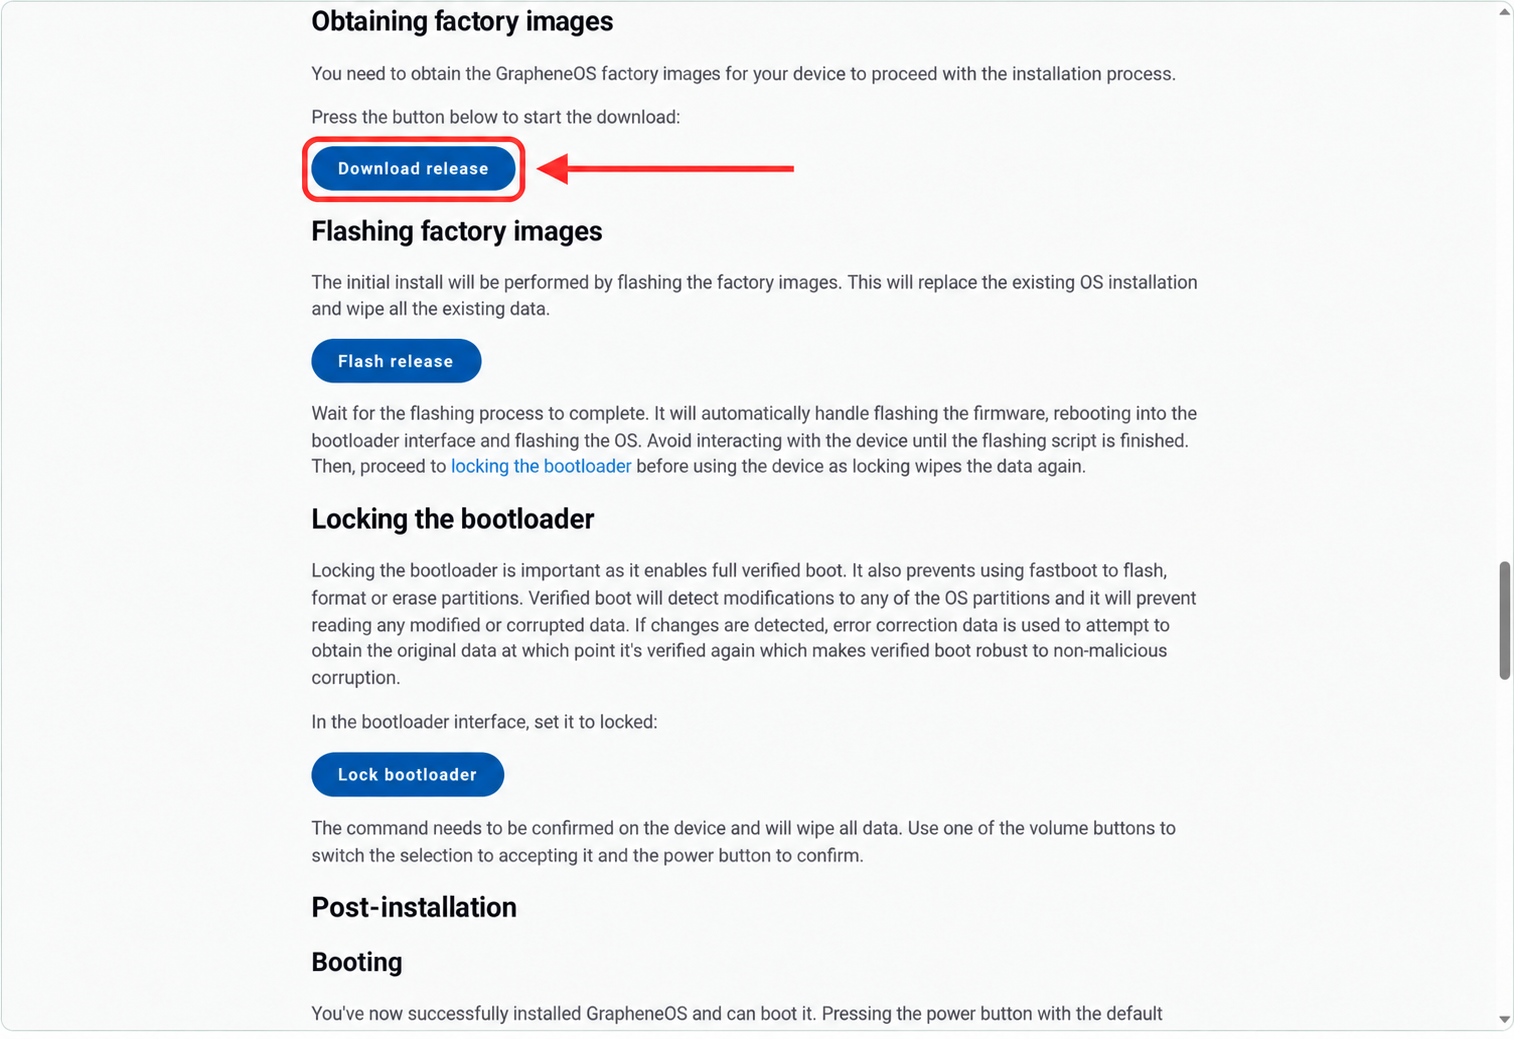
This is not a standard ZIP file download to the Downloads folder. The image is downloaded and prepared within the browser. This is why you need at least 32 GB of free storage space, an up-to-date browser, and a regular browser window rather than Incognito mode.
Wait for the download to finish. Do not refresh the page, clear the browser data, or close the tab. If the installer displays a warning about insufficient storage quota, free up space on the system drive, exit private browsing mode, or switch to a supported browser.
Once the image has been downloaded and verified, go to the Flashing factory images section and click Flash release.
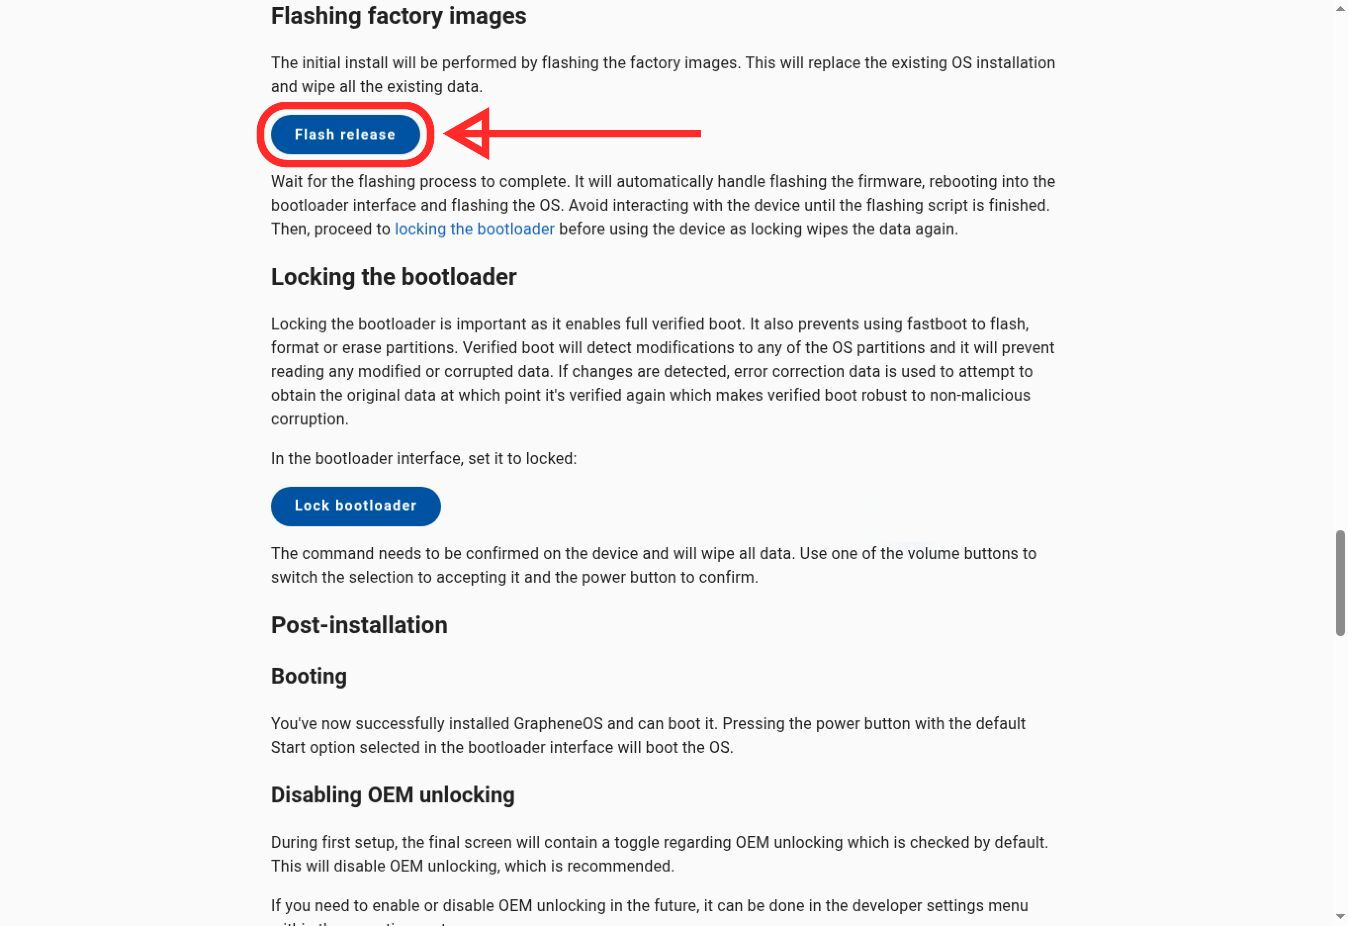
During this stage, the installer writes the firmware, reboots the device into the required modes, and installs the operating system. Do not disconnect the cable, press any buttons on the smartphone, close the browser, or allow the computer to enter sleep mode.
WebUSB may ask you to authorize the connection again after the smartphone restarts. If the installer displays a Reconnect device button, click it and select the same Pixel again in the browser’s system dialog.
Flashing usually takes several minutes, but the exact duration depends on the computer, USB port, and storage speed. Follow the Web Installer’s completion message rather than relying on a timer. Even if the phone restarts several times, do not proceed to the initial setup until the Web Installer has completed the entire process.
After the firmware has been successfully flashed, the smartphone should remain in Fastboot Mode. In the Locking the bootloader section, click Lock bootloader.
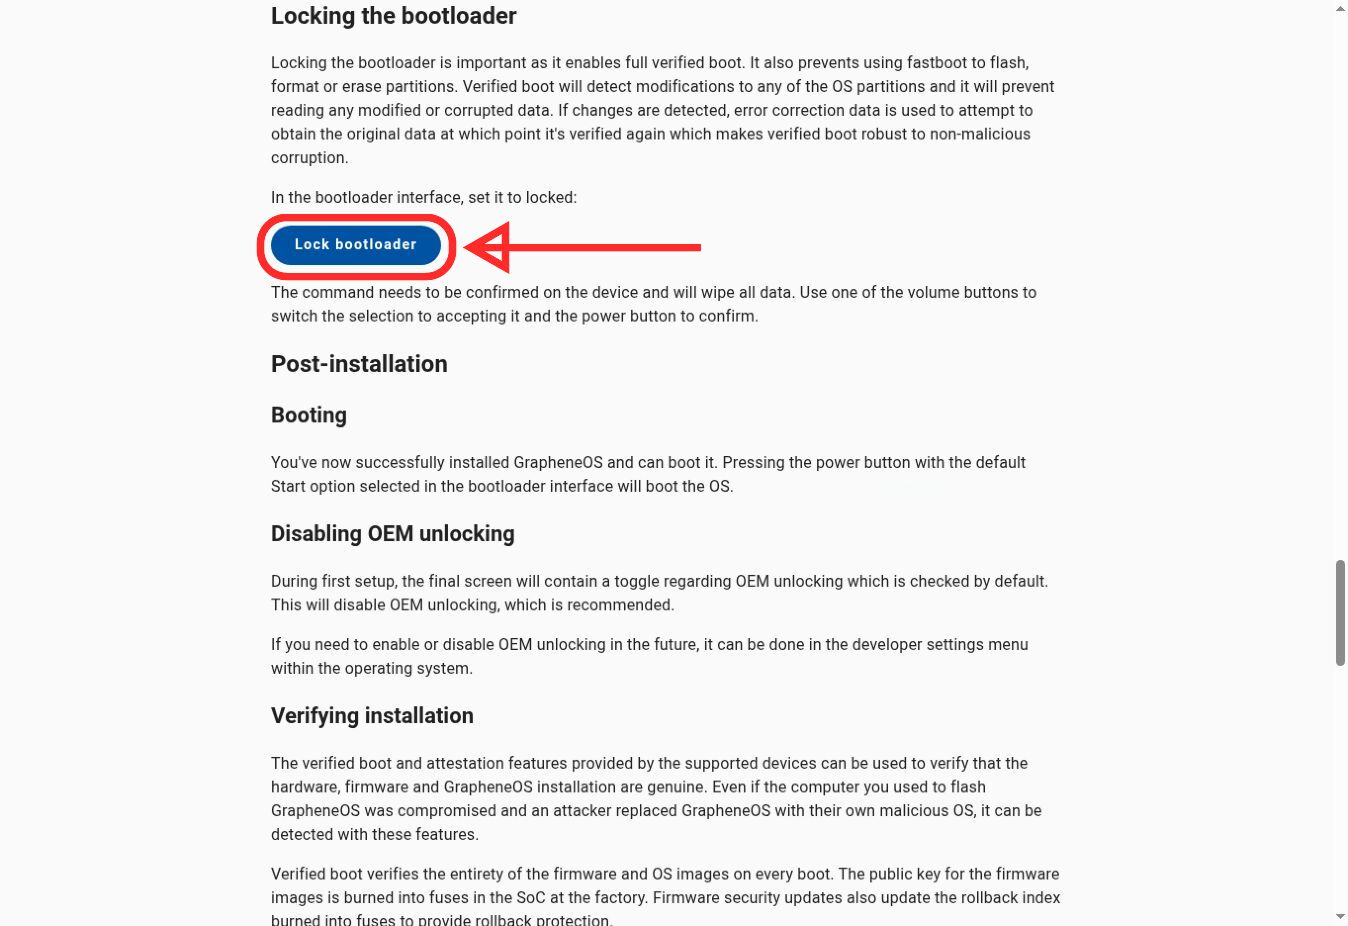
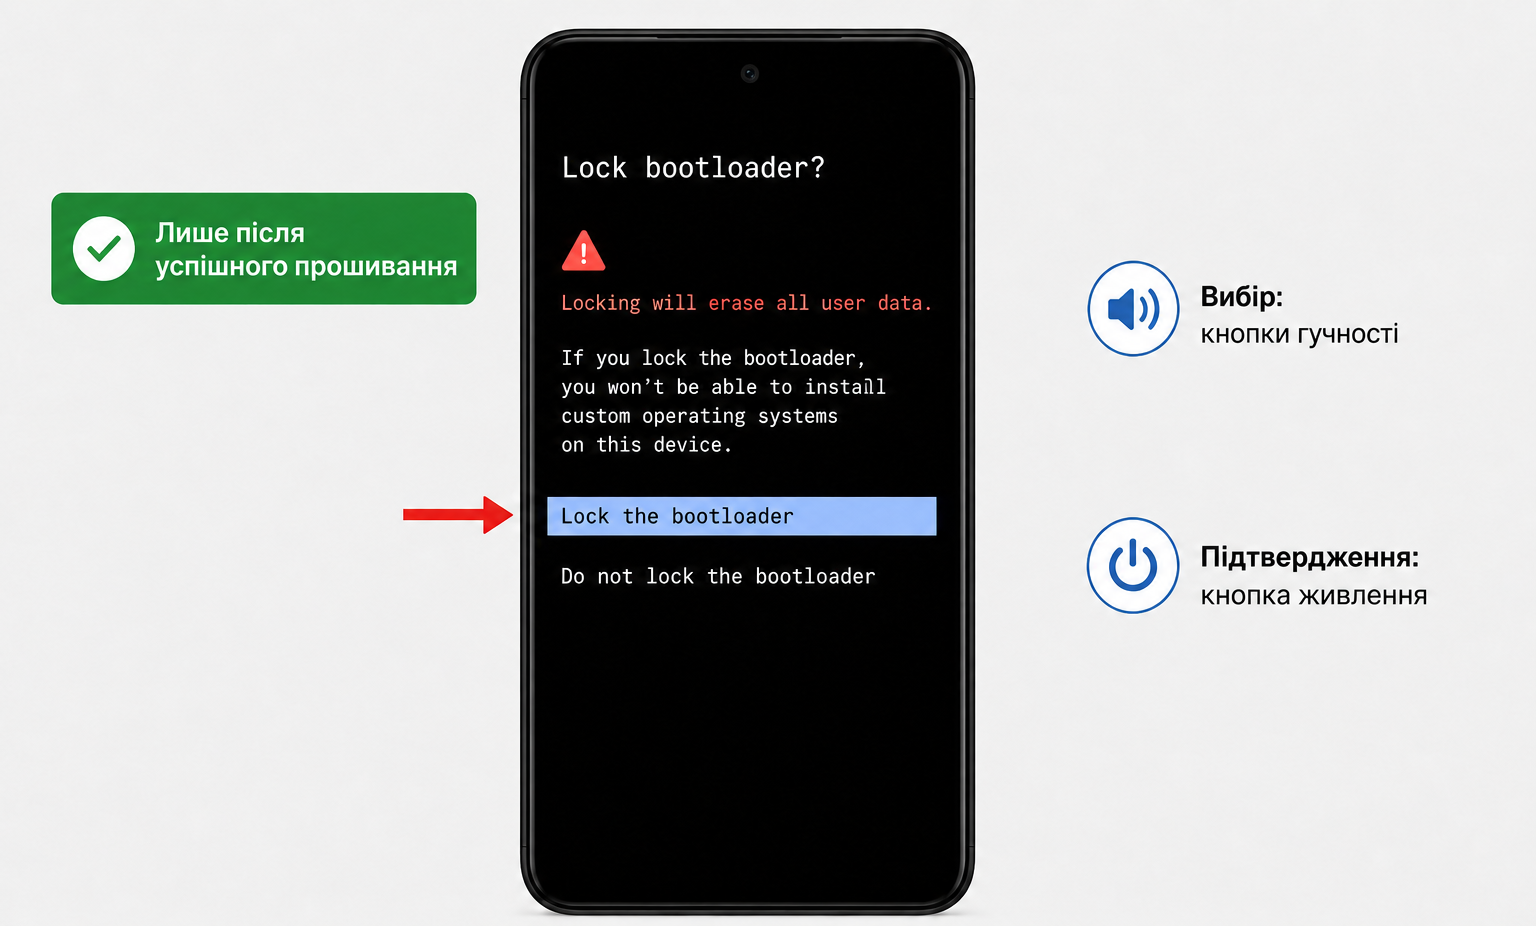
Relocking the bootloader is critically important. It not only prevents arbitrary partition flashing through Fastboot but also enables full operating system integrity verification during every boot. Do not begin using GrapheneOS with an unlocked bootloader.
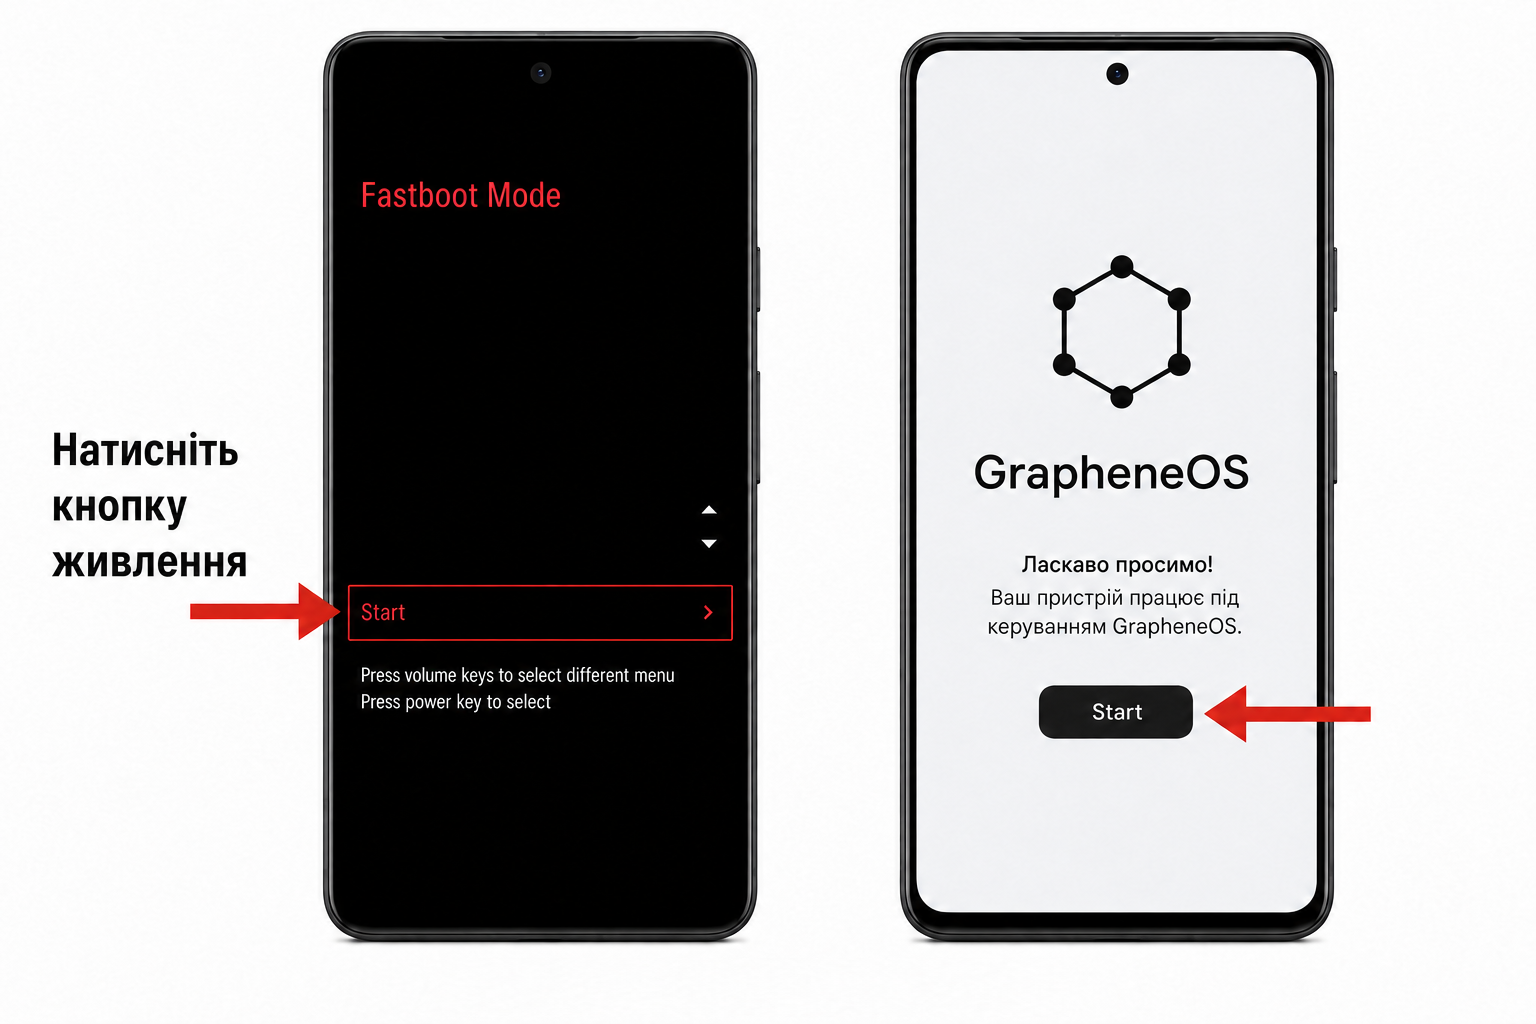
After locking the bootloader, make sure Start is selected in the Fastboot menu, then press the Power button. The Pixel 10 will boot into GrapheneOS and display the standard initial setup wizard.
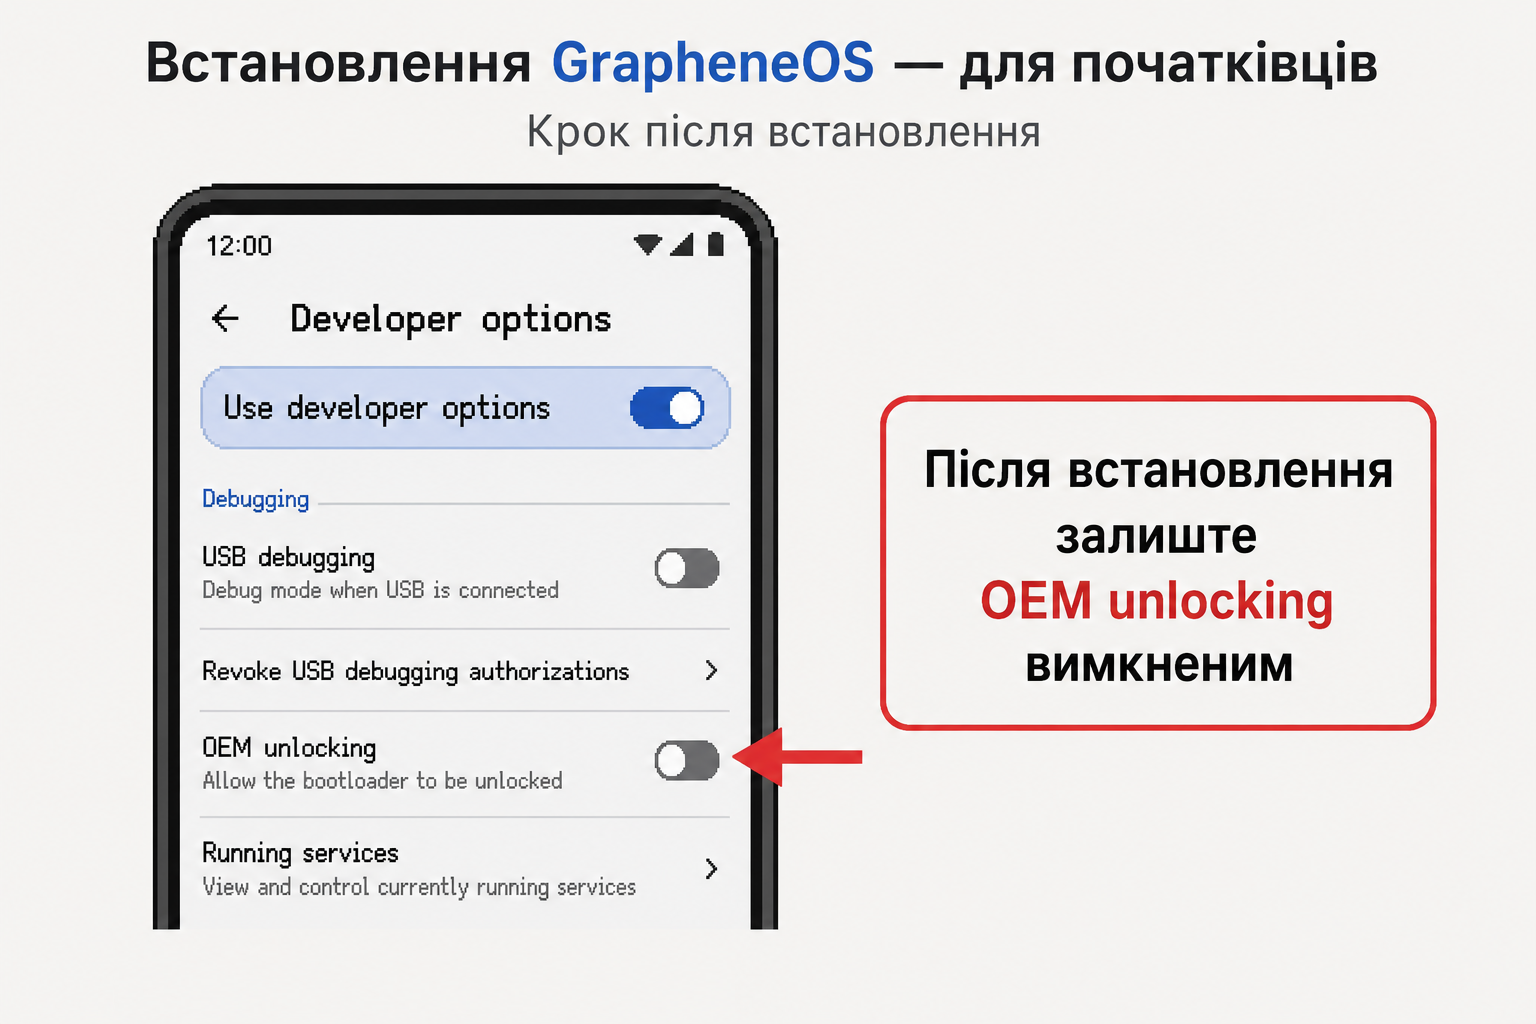
On the final screen of the initial GrapheneOS setup, there is a toggle that disables OEM unlocking. It is enabled by default, and it is recommended that you leave it that way. You can change this setting later through Developer options, but there is no need to keep OEM unlocking available during normal use.
A Google account is not required. You can skip adding one during the initial setup and, if necessary, install Sandboxed Google Play later through the built-in Apps application.
GrapheneOS uses Verified Boot to verify the firmware and system partitions every time the device starts. When the Pixel 10 boots an alternative operating system, it displays a yellow warning screen containing the SHA-256 identifier of the Verified Boot key.
For the standard Pixel 10, the official hash is as follows:
3f7415ea26f5df5b14ea6d153256071a7a1af9ce7b0970b7311cc463c7ea02c7
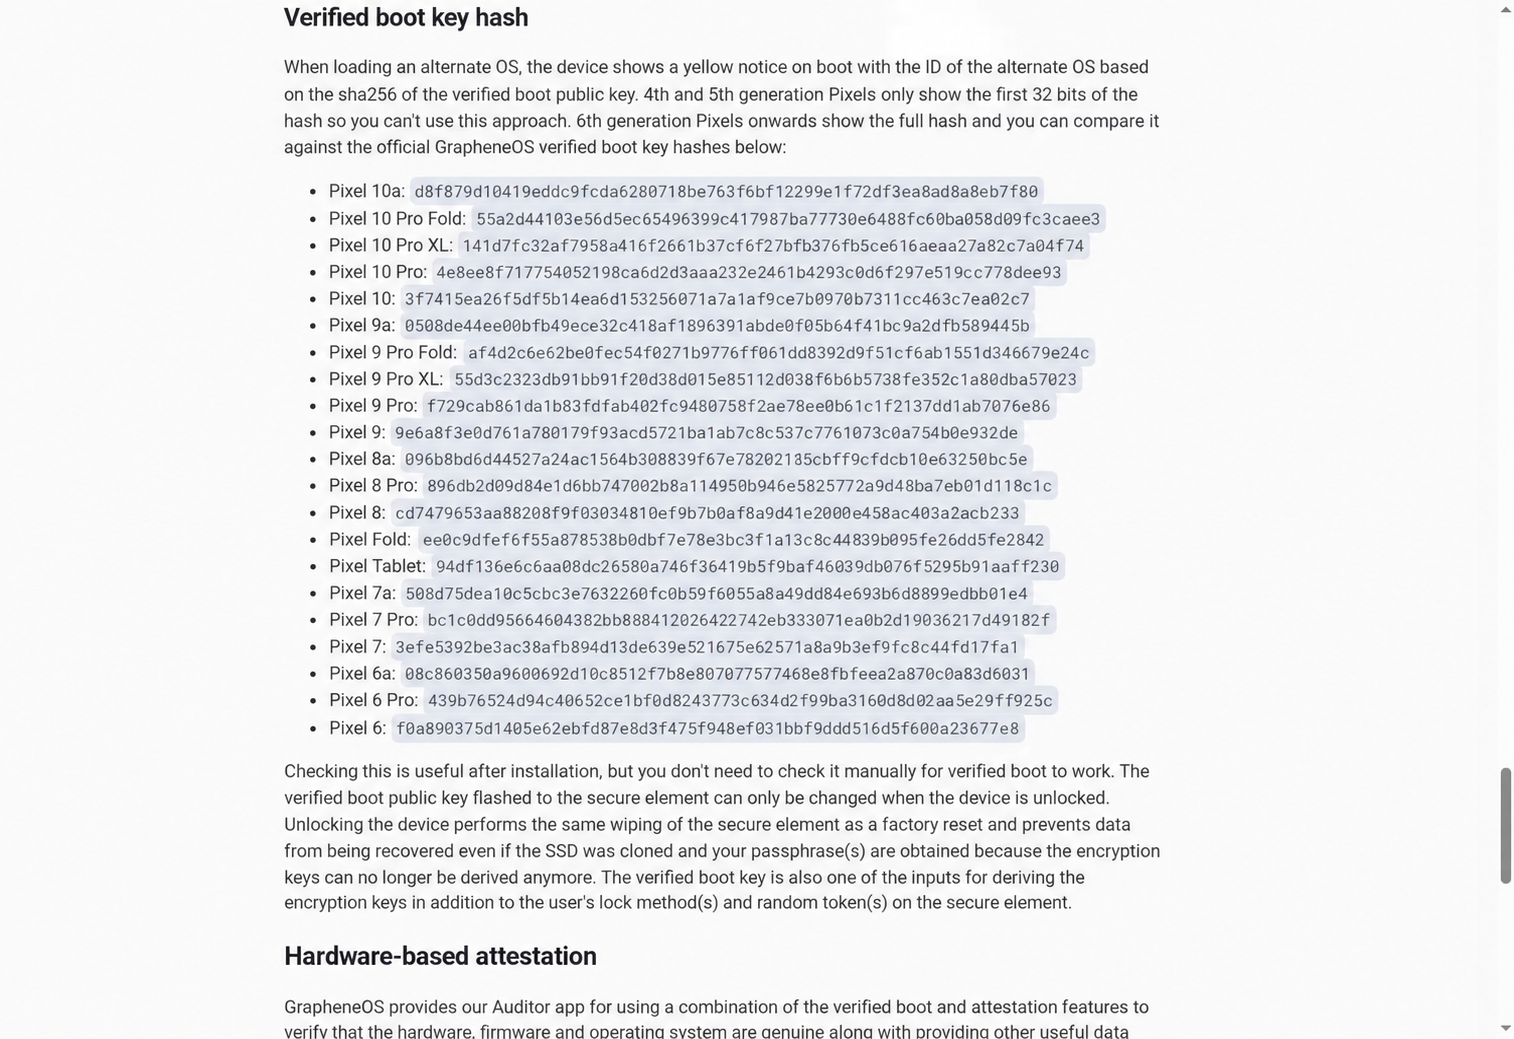
Android does not include a standard Settings → Security → Verified Boot option with a green status indicator, so there is no need to look for one based on third-party instructions. For additional verification, use the Auditor app. Local hardware attestation requires a second Android device with Auditor installed because the result is intentionally not displayed solely on the device being verified. Alternatively, you can use the remote attestation service for automated integrity checks.
Open the built-in Apps store, find the Google Play section, and install the suggested components. In GrapheneOS, they run as regular sandboxed applications without privileged system access. You can manage Google Play permissions in the same way as those of any other application.
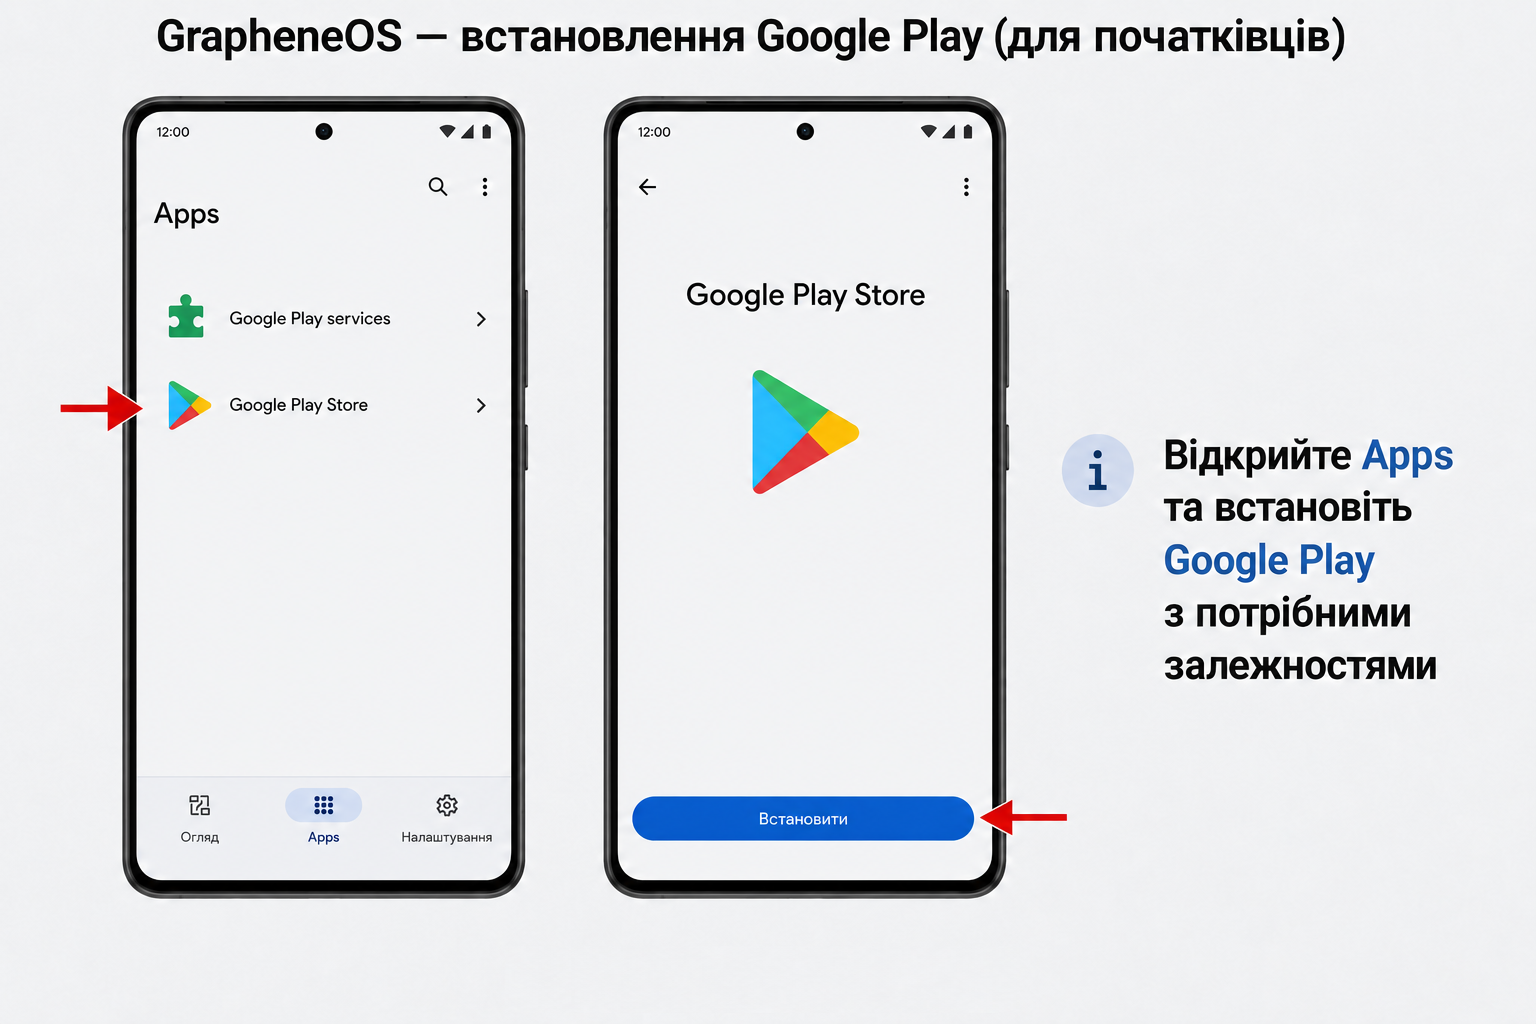
Sandboxed Google Play is required for apps that depend on Google Play services, push notifications, or Sign in with Google. However, it does not guarantee that every banking app will work. Some banks use their own integrity checks, restrict alternative operating systems, or change their requirements after updates. Compatibility must be checked separately for each specific app.
Do not panic or disconnect the cable immediately after the first delay. Start by reading the message displayed by the Web Installer. If it asks you to reconnect the device, click Reconnect device and grant the browser USB access again.
If the Pixel is not detected:
Make sure it is in Fastboot Mode;
Try a different cable or USB port;
Connect the phone without using a USB hub;
Close any applications that may be using ADB or Fastboot;
Check for optional drivers in Windows Update;
Restart a supported browser if the installation has not yet begun;
Do not switch to Firefox or Safari, as they are not supported by the Web Installer.
If the process is already writing partitions, do not restart the computer or experiment with commands from third-party forums. Record the exact error message and contact the official GrapheneOS community channels.
The official Web Installer makes installing GrapheneOS considerably easier, but the critical stages remain unchanged: creating a backup, enabling OEM unlocking, entering Fastboot Mode, unlocking the bootloader, downloading and flashing the image, and then relocking the bootloader. By following every step, using a high-quality cable, and carefully reading the official installer’s instructions, you can prepare the Pixel 10 for its first boot without using the command line.