
22.05.2023
11 min
1726

Effective pentesting requires a perfectly configured laboratory. In this article, we’ll look at how to create a pentesting lab that meets all your needs. The first step is choosing the right equipment. You will need a powerful computer with enough RAM and processing power to run the necessary software. It is also important to have a reliable Internet connection and a set of necessary network devices such as routers and switches. The next step is to choose the software. There are many tools for pentesting, including Kali Linux, Metasploit, Nmap, Wireshark, and others. These tools allow you to perform a variety of tests, from network scanning to exploiting vulnerabilities. Creating a safe and controlled environment is also important. This will allow you to experiment without risking real networks.

Using virtual machines and containers like Docker can help with this by creating an isolated environment for your tests. Practice and learning are the keys to pentesting success. Regular exercises in your own lab will allow you to improve your skills and understanding of different types of cyber threats. It is also important to keep up to date with the latest news in the field of cyber security in order to be ready for new challenges. In conclusion, creating the ideal pentesting lab is an investment in your career and skills. With the right equipment, software, and training materials, you can develop effective pentesting strategies and techniques. Do not forget about the importance of ethics and legality of your actions, because pentesting should be aimed at improving security, not at breaking it. The knowledge and skills gained through working in your own laboratory will be an invaluable asset in your professional activities. They will help you understand how attackers can attack systems and how you can protect those systems against such threats. The creation of a pentesting laboratory is a step towards a deeper understanding of cyber security and the improvement of the world of digital technologies.
In the field of cybersecurity research, isolation is a fundamental principle that ensures the integrity and security of your laboratory environment. By separating your lab from your home network, you minimize the risk of potential threats spreading beyond their intended boundaries. In this chapter, we’ll talk about the importance of isolation and explain how I’ve achieved it in my cybersecurity research lab.
To create a clear separation between my lab and home network, I used various network components and concepts, including a switch, two wireless access points (WAPs), and an ISP router.
One of the key concepts I used was the use of Virtual Local Area Networks (VLANs).
Virtual networks allow you to logically divide a physical network into several virtual networks. A VLAN skin acts as an independent broadcast domain, effectively isolating the devices within it. Using VLANs, I created two separate networks, one for my home devices and one for my lab devices.
For effective VLAN implementation, it is important to understand certain port configurations:
Access Ports: These ports are assigned to a specific VLAN and connect to devices belonging to that VLAN. Devices connected to access ports are unaware of VLAN tagging and communicate only within their assigned VLAN.
Trunk Ports: Trunk ports are responsible for carrying traffic for multiple VLANs. They are usually connected between network devices such as switches and routers. Trunk ports use VLAN tagging to distinguish between VLANs, allowing traffic to pass between them.
PVID (Port VLAN ID): The PVID is the VLAN assigned to the access port. Incoming untagged frames on an access port are associated with a VLAN specified by its PVID.
Tagged and Untagged Ports: In a VLAN configuration, ports can be either tagged or untagged. Tagged ports transmit frames with VLAN tags that indicate which VLAN the frames belong to. On the other hand, untagged ports do not include VLAN tags in the frames they transmit.
The purpose of a tagged or “trunk” port is to carry traffic for multiple VLANs, while an untagged or “access” port accepts traffic for only one VLAN. Generally speaking, trunk ports will connect switches and access ports will connect end devices.
To give you a visual idea of how I implemented VLANs and designed the network for my cybersecurity research lab, here’s a simplified network diagram:
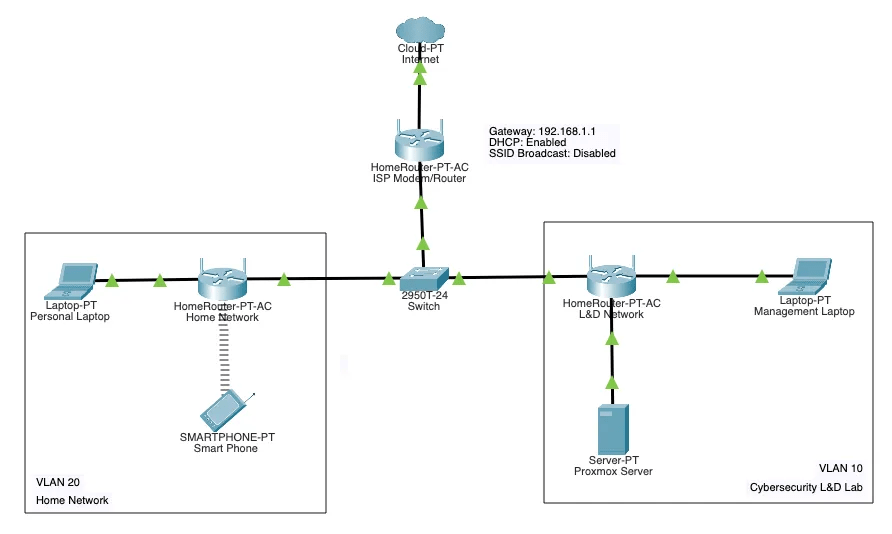
By implementing VLANs, I successfully provided the isolation I needed for my research lab.
This separation ensured that our lab remained protected from potential threats and allowed us to conduct experiments, analyze threats and study cybersecurity innovations in a controlled and secure environment.
I used two routers for my home and lab networks, disabling DHCP on both devices so they could function as wireless access points (WAPs). One router is for the home network and the other serves the lab network.
To prevent accidental wireless connections, I disabled the SSID on the ISP modem, as both VLANs have access to it. To increase the security of this network configuration, it would be advisable to enable a dedicated firewall.
When it comes to building a reliable and secure cybersecurity lab, it’s important to have the right hardware and software in place.
Equipment requirements
It is important to meet certain hardware requirements when setting up your lab to ensure optimal performance and smooth operation. Here are the recommended specifications based on your specific installation:
CPU: Intel/AMD Processor 8 Cores (Atleast 4 core CPU)
RAM: 24 GB (32 GB Recommended)
Storage: 512 GB SSD/HDD (SSD Recommended)
Meeting these hardware requirements ensures your lab runs efficiently, minimizing I/O delays and providing a responsive user experience. Importantly, upgrading to 24GB of RAM and using at least one solid-state drive for storage will greatly improve performance and usability.
Installing Proxmox: Unlocking the Power of Virtualization
To fully utilize the potential of your lab, you need to install this virtualization platform. You can check out a helpful YouTube video by Network Chuck for a step-by-step guide to installing Proxmox:
By setting up a static IP address such as 192.168.1.100, you ensure a stable connection and easy access for remote management.
Configure the IP address, subnet mask, default gateway, and DNS settings according to your specific network requirements.
Configuring storage for virtual machines and backups: Using different storage resources
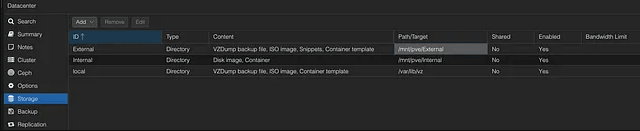
So, let me walk you through how I set up the storage components for my lab. I wanted to ensure optimal performance and data protection, so I dedicated some resources to virtual machines (VMs) and backups. Here’s what I did:
I then set aside a separate 1TB hard drive (external) to store the backups. Having dedicated backup storage ensures data redundancy and backup integrity. This way, I can easily recover critical data in case of unforeseen incidents or system failures.
As for the ISO images that are used to install the virtual machine, I decided to store them on the drive (local) where proxmox is installed.
To provide connectivity and networking capabilities for virtual machines (VMs) in the lab, you need to set up a network configuration that includes a LAN interface and a WAN interface. Let’s dive into how you configure networking for your virtual machines:
Local Area Network Interface: To create a local area network (LAN) specifically for your lab, you created a new linux bridge called vmbr1. This interface acts as a LAN interface that provides communication and data transfer between virtual machines in your lab environment. By dedicating a separate LAN interface, you can isolate your lab network from the outside network and ensure the security and integrity of your research and experiments.
WAN interface: To provide connectivity to the outside world and access to resources outside of your lab environment, you used the standard Linux bridge interface, vmbr0, as the WAN interface. This interface serves as a gateway to the external network, allowing virtual machines to connect to the Internet, access external services, and interact with resources outside your lab. By separating LAN and WAN interfaces, you maintain control over network traffic and efficiently manage communication between your lab and the external network.
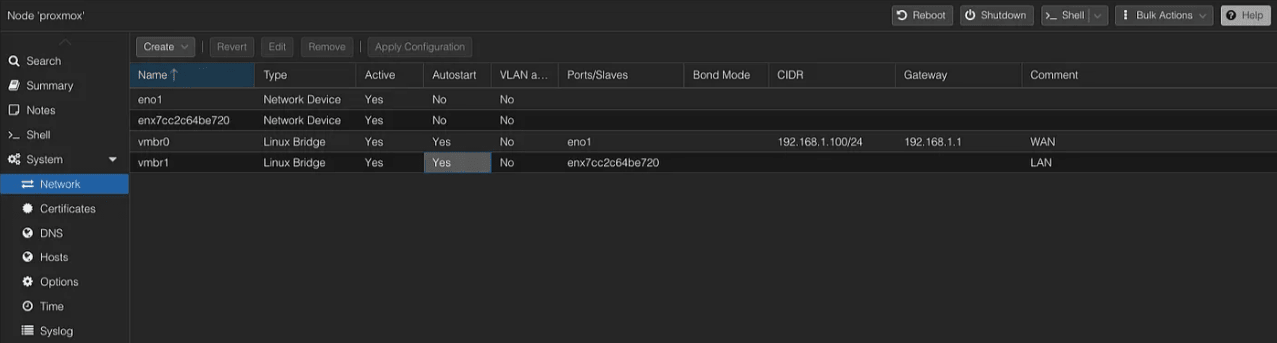
By configuring the LAN and WAN interfaces in this way, you create a network environment that supports both local communication between lab virtual machines and connectivity to a wider network. The LAN interface, vmbr1, provides secure and isolated communication within the lab, while the WAN interface, vmbr0, provides connectivity to the external network and the Internet.
To establish Active Directory (AD) integration in your lab environment, multiple computers must be connected to an AD domain controller.
Follow these steps to configure AD and connect to the relevant computers:
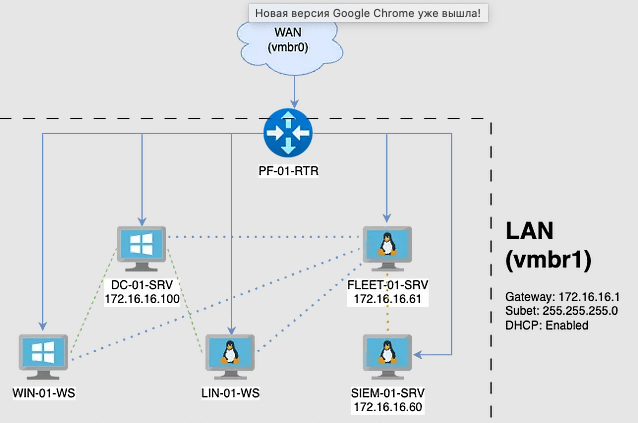
To act as a central router and firewall for your lab, you configure a Pfsense virtual machine
Set the IP address of the domain controller (172.16.16.100) as the primary DNS server on the pfSense router.
Use 8.8.8.8 as an additional DNS server to provide external DNS resolution.
Watch this YouTube video by digital for a step-by-step guide to setting up pfSense on proxmox
Configure the Windows Server virtual machine as a domain controller and configure it as a DNS server.
Watch this YouTube video from MSFT WebCast for a step-by-step guide to setting up Active Directory
You have configured Windows and Linux virtual machines as user workstations in your lab.
To join Windows and Linux computers to an AD domain, follow the instructions in this YouTube video from Professor Andrew and Nerd on the Street.
Install ELK stack on Ubuntu server and install Fleet Server on another Ubuntu server.
Follow the installation instructions in this YouTube video from Ipsec.
Two Ubuntu servers are set up in your lab. The first Ubuntu server is designed to host Fleet Server, which manages and organizes the elastic agents.
Fleet Server provides centralized management, monitoring and control of elastic agents across the entire laboratory network. Another Ubuntu server hosts the ELK stack, which stands for Elasticsearch, Logstash, and Kibana. The ELK stack is used for security information gathering and event management (SIEM), providing advanced log analysis, threat detection, and visualization capabilities.
Configure elastic agents on each host (Windows and Linux computers) to interact with Fleet Server.
Create separate agent policies for Windows and Linux computers. I added windows integration to windows agent policy and audit integration to linux agent policy.
It is important to properly configure the interfaces for each virtual machine. Ensure that all virtual machines except Pfsense are connected to the vmbr1 interface, which is the LAN interface for your lab network.
This ensures seamless communication and data transfer between virtual machines in a lab environment.
For Pfsense, it must be configured to have vmbr0 and vmbr1 interfaces. The vmbr0 interface acts as a WAN interface, connecting Pfsense to the external network and providing Internet access to the lab network. The vmbr1 interface, on the other hand, connects Pfsense to the local network, allowing it to manage the internal lab network and enforce firewall rules and security policies.