
Composite file (structured storage) – the file contains a certain semblance of a file system. The master file itself is a normal file, having all the properties of a file (ie copied, deleted, renamed, etc.). Inside there are directories called repositories, there are files called streams. Note that .doc (MSWord), .xls (MSExcel), etc. files are component files. Working with this type of files is provided by the IStorage and IStream interfaces. In such files, you can conveniently store any information and organize it into groups. Data in such storage is accessed selectively without loading the entire file into memory. A common practice of hiding viruses is introduction into component files: archives, databases, etc. building To detect viruses hidden in this way, the component file must be unpacked, which can significantly slow down the scan. For each type of composite file, you can choose whether to check all files or only new ones.

To select, follow the link located next to the name of the object. It changes its value when you click on it with the left mouse button. If the mode is set to scan only new and changed files, the links to choose to scan all or only new files will not be available. When checking large compressed files, pre-unpacking them can take a long time. This time can be reduced by enabling background decompression of compiled files larger than a specified size. If a malicious object is detected while working with such a file, Kaspersky Internet Security will notify you about it. You can limit the maximum size of the compressed file. Component files larger than the specified size will not be scanned.
Clicking on the button will take you to an article on this topic, File Upload Vulnerabilities.

Many files are a combination of multiple files. For example, .docx and .odt office document files. You can replace the extension of such files with .zip, open with any archiver and verify that they are actually just containers containing many files. For example, if you inserted a picture into a Word document, then in order to extract this picture, it is not necessary to open the file in an office editor – you can change the extension, unpack the archive and take your picture back from it. Almost all firmware (for routers, IP cameras, phones) are containers. ISO images and file system images are also containers. Archives, as you can guess, also contain several files at once.
From a practical point of view, from the point of view of finding files, there are two ways to combine files:
An example of such file association is file systems without encryption and without compression. For example, EXT4, NTFS — in which files are placed in their original form. Accordingly, images of such file systems also belong to this group. This includes some firmware, for example, for routers and IP cameras. It is clear that in such large files (images) you can find saved files. Moreover, saved files can be extracted and saved as an independent file that will be identical to the original.
Examples of this way of combining files are file systems with encryption or compression (for example, Squashfs), archives with compression. To search for individual files by their signatures, it is necessary to perform the reverse action, that is, if the file was compressed, it must be unzipped. If it is a compressed file system, it must be mounted. From a practical point of view, this means that it is useless to search for files by signatures in archives until these archives are unpacked (BUT: some raw data analysis programs support working with archives!). It is useless to search for files by signatures in the Squashfs file system before mounting it. At the same time, you can use the search for EXT4 and NTFS signatures, and you don’t need to mount them!
Mounting, for example, an NTFS image will give us the following: we will be able to access the files of this file system in the way that the developers intended, that is, we will see a list of files and be able to access any of them without having to search for files by signatures. But at the same time, we will not be able to get or even learn about already deleted files. Without mounting the NTFS image, we will be able to work with files stored directly, that is, on the one hand, we will have to search for files by signatures, but on the other hand, we will get access even to remote files. Deleted files are available as a result of the fact that usually deleting on HDD is that the information about the file is simply removed from the file system log, but the file itself remains where it was (unless it is accidentally overwritten by another file later). As for SSDs, data is usually deleted there after all. Nothing prevents you from combining these methods, and forensic tools allow you to make the search for remote data more efficient, for example, the search for deleted files is performed only on those parts of the disk that are considered empty.
Consider an example of unpacking the firmware of the Network Surveillance DVR r80x20-pq camera (I used this camera in tests, for example, in the article “Security audit of IP cameras”.
We download and unpack the archive. It is called General_IPC_XM530_R80X20 PQ_WIFIXM711.711.Nat.dss.OnvifS_V5.00.R02.20210818_all.bin, I will rename it to firmware.bin for brevity in the following commands.
Let’s check what kind of file it is:
![]()
The conclusion is as follows:

That is, it is a Zip archive. Let’s check with Detect It Easy:
![]()
We will also use the Binwalk utility, which is specially designed for firmware analysis:
![]()
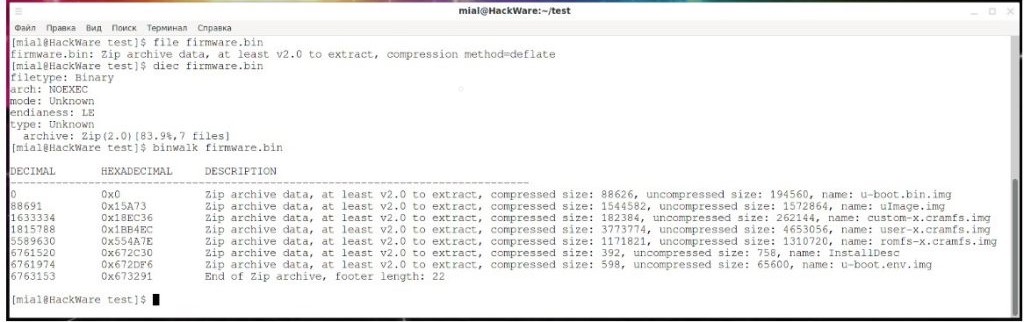
Since this is just an archive, let’s unpack it:
![]()
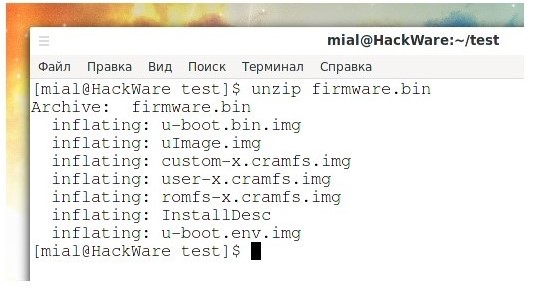
u-boot.bin.img
uImage.img
custom-x.cramfs.img
user-x.cramfs.img
romfs-x.cramfs.img
u-boot.env.img
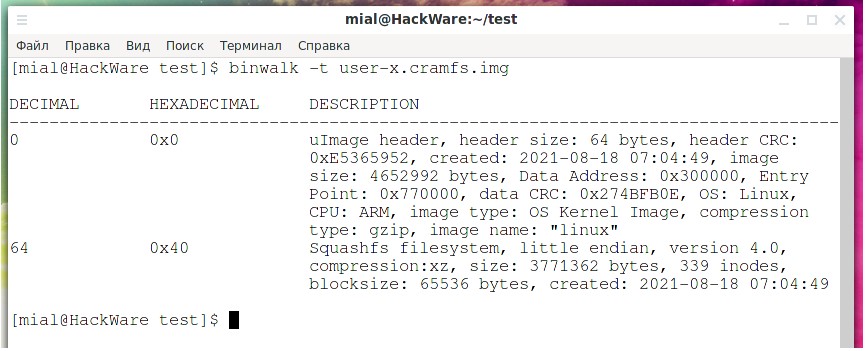
Let’s look at the user-x.cramfs.img file:
![]()
Conclusion:
![]()

U-Boot is a bootloader for PowerPC, ARM, MIPS, and several other processor-based motherboards that can be installed into bootable firmware and used to initialize and test hardware, or to download and run application code. On your Linux, you can find the uboot-tools (Arch Linux and derivatives) and u-boot-tools (Debian and derivatives) packages, which are tools and utilities for building firmwares and doing other things with them. Let’s try to mount the user-x.cramfs.img image:

We get an error:
![]()

Let’s turn to the Binwalk utility, which can find files and file systems even if they are not at the beginning:
![]()
Conclusion:

Now everything became clear – this image consists of two sections. The first 64 bytes are the uImage header. And the Squashfs file system starts with 64 bytes. We can extract the file system – how to do it at once in several ways will be shown below, but we can also simply mount it by specifying an offset:
![]()
Let’s look at the files that are placed in the user-x.cramfs.img image:
![]()

I didn’t find anything interesting in this image, let’s disassemble it:
![]()
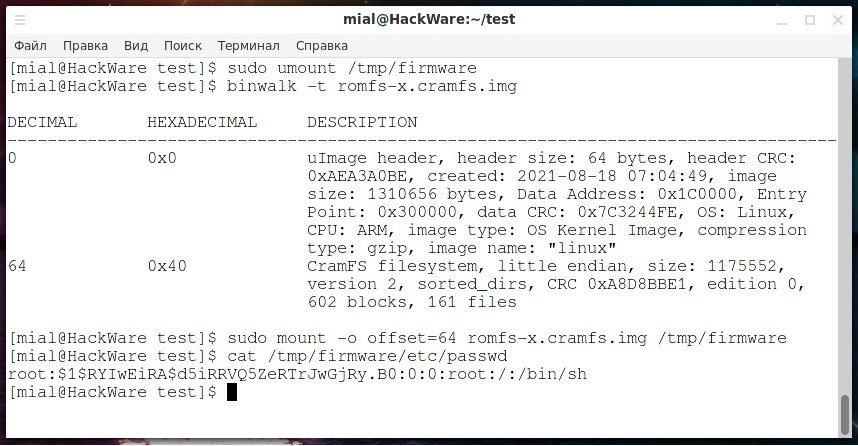
Let’s see where the file system starts in romfs-x.cramfs.img:
![]()
Mount:
![]()
Here you can find the hash of the default user root:
![]()
Likewise, scanning with Binwalk and mounting file system partitions can search for files of interest.
As shown above, with the help of the offset option, you can specify an offset and mount a file system that is part of the image and is not located at its very beginning:
![]()
If the image contains multiple file systems, you may also need to specify the file system size limit option:
![]()
Example:
![]()
For example, let’s take the ZyXEL Keenetic Lite II firmware: https://help.keenetic.com/hc/article_attachments/115009890565/Keenetic-II-V2.06(AAFG.0)C3.zip. Let’s find the sections in the firmware:
![]()
Conclusion:

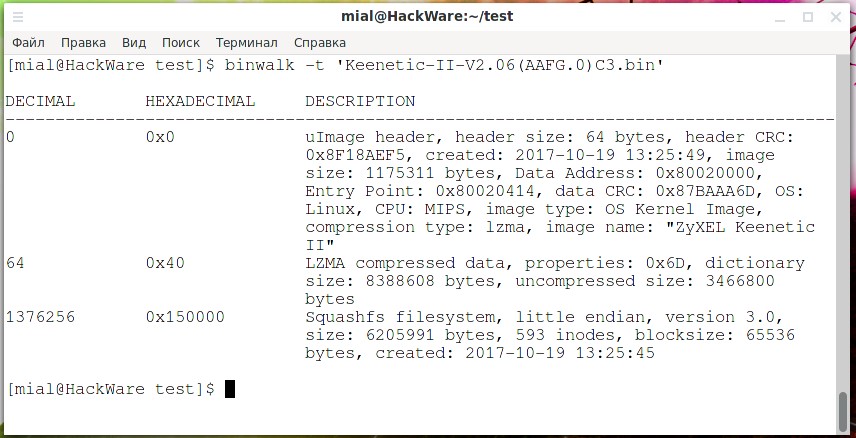
from 0 to 64 bytes – uImage header.
64 starts LZMA compressed data
The Squashfs file system starts at 1376256, its size is 6205991 bytes, it follows from the line “size: 6205991 bytes”.
To extract each of these partitions, you can use the view command:
![]()
For example, from the Keenetic-II-V2.06(AAFG.0)C3.bin file, I want to get the first 64 bytes, then the command is:
![]()
Now I want to get the second partition starting with 64 bytes. This section ends at byte 1376256, but the count option of the dd command specifies how many bytes to read (not the data fetch limit), so the count value is calculated using the formula:
![]()
In our case, it is 1376256 – 64 = 1376192, we get the command:
![]()
The LZMA file can be decompressed with, for example, 7z:
![]()
In principle, the command extracted the data, although it reported an error:
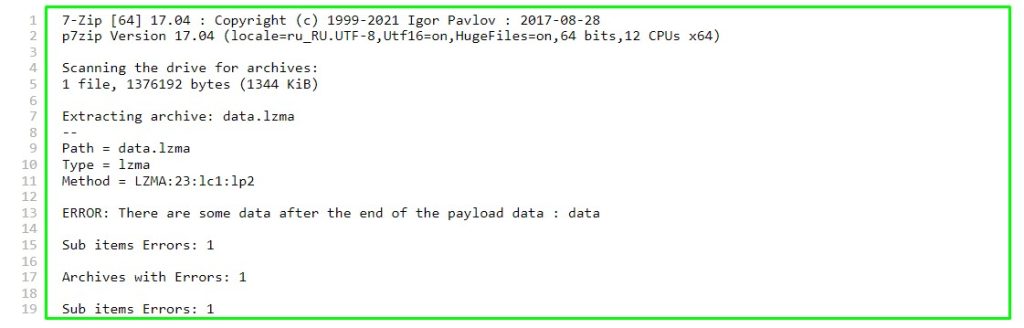
The essence of the error is that data was detected after the end of the payload. You can say that this is normal (inevitable) in this case, since we did not know the exact size of the block and specified as its end the byte where the other section begins. Another section starts with the byte (in hexadecimal) 0x150000, so it can be assumed that for padding (padding, alignment) between sections, zeros are simply “stuffed”. You can verify this by opening the data.lzma file in a hex editor, such as Bless:

Yes, there are zeroes at the end of this file – if the exact size is unknown, it’s better to write more than to lose data. The third block starts with 1376256 bytes and has a size of 6205991, the line “size: 6205991 bytes” tells us about this. The command for its removal is as follows:
![]()
But the firmware manufacturers still outsmarted me by using Squashfs version 3.0 from 2006 and I could not open it for technical reasons:

Binwalk has the following extraction options:

You can read a more detailed description in the program card https://kali.tools/?p=6771. It seems convenient to extract the data automatically, but in practice the result will not be exactly what you expect. Since even in manual mode we don’t always know exactly the boundaries of the partitions, the same applies to the specified options, which do not work well with partitions for which a specific size is not specified.
dd has improved versions of dc3dd and dcfldd. Optionally, you can use to extract file system partitions from the disk image.
File, Binwalk, and Detect It Easy programs use signatures to search for data. These signatures are determined by their databases (so-called magic files). If you need to search on your own signatures, i.e. a string of binary data, then you can use Binwalk with the following options:

For example, searching for the hex bytes 53EF in the file /mnt/disk_d/fs.ext4:
![]()
The sigfind program from the Sleuth package also allows you to search by signatures, while the program allows you to specify an offset from the beginning of a block (NOT a file). The program has several signatures for searching file systems, for example:
![]()
The following example searches for the byte sequence 53EF (reverse byte write order) at an offset of 56 from any block (if no offset is specified, only blocks where the given byte sequence has an offset of 0 will be output):
![]()