
02.04.2023
7 min
1727

The situation when urgent access to a home computer or an internal corporate network is needed is familiar to everyone. Unfortunately, the quality and security of public networks often leave much to be desired. It is better not to transmit important information over such networks. In addition, external software is often required to organize access. For system administration, there is a way to use public networks and at the same time create a secure connection to the necessary nodes without using the same VPN. We are talking about SSH tunneling. An SSH tunnel is a tunnel created using an SSH connection and used to encrypt the tunneled data. It is used to secure data transmission on the Internet. The peculiarity is that unencrypted traffic of any protocol is encrypted at one end of the SSH connection and decrypted at the other. As part of SSH tunneling, the connection between the client and the server is established, it is encrypted and thus allows you to protect the confidentiality and integrity of the data. The following trick requires two Linux computers. Unfortunately, even Cygwin can’t handle this trick.

Moreover, both Linux should have a graphical user interface. Among other things, what happens when you connect to a remote host via SSH is the creation of an encrypted tunnel between the local and remote systems. Typically, this tunnel is used so that commands typed on a local machine can be safely transmitted to a remote machine, and the result sent back, also securely. In addition to this basic function, the SSH protocol allows most types of traffic to be routed through an encrypted tunnel, creating a sort of VPN (virtual private network) between local and remote systems. Perhaps the most frequently used of these functions is the ability to broadcast traffic from X Window systems. On a system with a running X server (these are machines that have a graphical user interface), it is possible to run an X client program (a graphical application) on a remote system and see the results of its operation on the local system. It’s easy to do. For example, I want to connect to the remote host ADDRESS and I want to run the COMMAND program on it. At the same time, I will be able to see the graphic output of this program on a local computer.
This is done like this:
![]()
A real example:
![]()
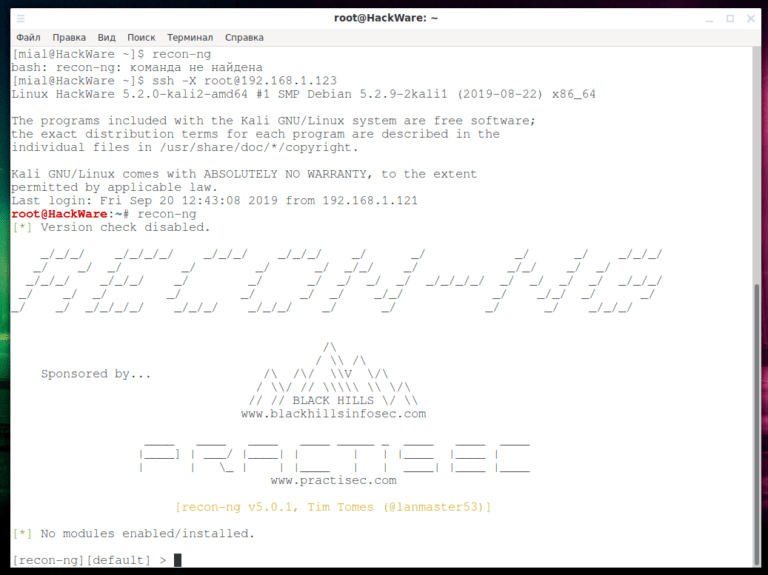
That is, SSH is started with the -X switch. And then the program just starts. I’m on Arch Linux. I successfully login to the remote computer via SSH. After that I ran the recon-ng program. This program isn’t even on Arch Linux, but it’s definitely on the Kali Linux I connected to. I can see the result of this program on the screen as if the program was running locally. But, again, I want you to understand this, there is no running recon-ng program on the local computer. If I want to save the output of recon-ng (or any other program opened in this way), it will appear that it is running in the environment of the remote computer, seeing its file system, etc. This is convenient when you want to configure a remote computer using a graphical interface. On some systems, this “focus” requires using the “-Y” option instead of “-X”.
When you need to edit a file hosted on a remote host, it would be great to be able to edit it locally as if it were a local file. Of course, one could mount NFS over an ssh tunnel to achieve this, but that would be too redundant for a one-time use. Hence the question: is there a way to edit the file via ssh on another computer? This is when vim (short for Vi IMproved) can help. vim can be thought of as “vi on steroids”, with extensible features that greatly improve the default vi editor environment. The extensibility of vim is achieved through the use of “plugins”. One such plugin is netrw, which enables reading and writing of files over the network. netrw supports various application layer protocols including ftp, http, scp, rsync and rcp.
Diff is a command-line utility that compares the contents of two files (or directories) and shows in a row how they differ. It’s very easy to use diff when both files are on localhost. But what if (one or both) input files are hosted on a remote host? You can use SSH to compare these files over the network. Here’s how to apply the diff command to remote SSH files. The diff utility can accept a single operand in the form of stdin (standard input) (represented as “-“), and you can use this feature to achieve the goal of applying diff over SSH as follows: ssh USER@REMOTE_HOST “cat remote_file.txt” | diff – local_file.txt The above command will prompt for the SSH password for the remote host. After correctly entering the password, the command will read the contents of the remote file via SSH and then pipe it to the diff utility for comparison with the local file. Another method for comparing the contents of an SSH file is to explicitly use input redirection. To use this second method you must first enable wireless ssh login to the remote host(s). With that in mind, you can do the following:
![]()
A real example of a command:
![]()
Note the double slash “/” for the root directory on the remote host. The above vim command will open a file hosted on the remote host for editing. Behind the scenes, vim uses scp to retrieve the requested file from the remote host, places the /tmp file, and finally opens it for editing. When you try to save changes to a file, the changes will first be applied to a local copy of /tmp, which will then be downloaded via scp to the remote host. Since the netrw plugin handles the network transfer behind the scenes, you can edit any remote file transparently using the traditional vi interface. Note, this trick doesn’t work in Cygwin – only current Linux.
To compare (diff) a local file and a remote file:
![]()
To compare (diff) two remote files:
![]()
Note that the latter commands will fail if remote hosts require you to enter an SSH password for access. Also note that the above input redirection is not supported by the sh shell. Use the bash shell or something compatible.
By its nature, VNC is not a secure protocol. A well-known VNC security risk is that the connection to the VNC server makes the network over an unencrypted channel. That is, anyone can download an installed VNC session. To protect against VNC sniffing, you should try additional out-of-band encryption mechanisms under or over the VNC connection. One such mechanism is setting up a VNC session through an SSH tunnel. To create an SSH tunnel to a remote host running a VNC server, the remote host must also have SSH running. Therefore, first install the OpenSSH server on the remote host (how to do this is described in the first part). The next step is to create an SSH tunnel from the local host to the remote host. To do this, run the following command. Here, 5900 is the port number that the remote VNC server is listening on.
![]()
After entering the SSH password and successfully logging in, an SSH tunnel will be established between 127.0.0.1:5900 and remote_host:5900. You can now go ahead and run the VNC client on your localhost. In your VNC client, connect to 127.0.0.1:5900 instead of the remote VNC server. VNC traffic will then be routed through an SSH tunnel between you and the remote VNC server and therefore protected from packet interception.
![]()
X11 forwarding is a mechanism that allows the GUI of X11 applications running on a remote Linux server to be displayed on the local client machine. Behind the scenes, the X11 output of the running application is authorized to be sent to the localhost over the X11 connection between the client and the remote server. SSH has options for securely tunneling such X11 connections so that the X11 forwarding session is encrypted and encapsulated. X11 forwarding does not require the remote server host to have a full X11 system installed. However, you need at least xauth installed on the server host. xauth is a utility that maintains the Xauthority configuration used by the server and client to authenticate X11 sessions. To set up xauth, do the following on the remote server:
For Debian, Linux Mint, Ubuntu, Kali Linux and their derivatives:
![]()
On Arch Linux and derivatives:
![]()
Then enable X11 redirection in sshd by adding the following directive to the /etc/ssh/sshd_config file:
![]()
Restart the sshd service for the changes to take effect. The above setting will enable X11 forwarding on the entire server host system. If you instead want to enable X11 forwarding on a per-user basis, you can use a per-user-specific ssh configuration file (eg $HOME/.ssh/config). So you can only use X11 forwarding when you ssh into a specific account. Unlike a remote server host, a local client machine needs an X11 system installed to display a running X11 application. If so, then you can open an ssh connection from the local machine to the remote server as follows:
![]()
Once logged in, you can run any X11 application on the remote server and its output will be displayed on the local client machine.
If you ran a command in SSH, then after disconnecting from SSH, this command will be stopped immediately.
Even if you moved it to the background with &:
![]()
There are various options to make the command not only continue to work after disconnecting from SSH, but also to connect to this command again to view its output, the results of the work.
In the section “SSH (part 5): Copying files using scp and sftp” we have already discussed the methods by which you can copy data from a remote server. It also shows how to integrate access to SSH files through popular file managers. Despite the simplicity of the described methods, they have a drawback – it works only in applications that support the SFTP protocol. There is a more universal option that is very simple. This method requires the installation of two additional packages:
sshfs — allows you to mount a remote file system using SFTP. In simple language, the remote server’s files will be like a part of your file system. Therefore, any programs will be able to work with them.
fuse – FUSE (Filesystem in Userspace), that is, the file system in user space. It is an interface to the file system, which allows you to mount the file system with the rights of a regular user.
Installing the necessary packages in Debian, Linux Mint, Ubuntu, Kali Linux and their derivatives:
![]()
Installing the necessary packages also in Arch Linux, BlackArch and their derivatives (this is very important):
![]()
After installing the packages, create a folder where the remote file system will be mounted – this should be a folder that you have non-elevated access to, for example:
![]()
To mount, you need to run a command like this:
![]()
If you want to specify a port, use the -p option at the end of the command. For example, I need to mount the /root directory of host 185.117.153.79, where I want to perform root login; at the same time, on the local system, I want to mount to the Downloads/ssh folder; on the remote system, SSH is running on port 2222, then my command would be:
![]()
The files in the /root folder of host 185.117.153.79 will now be available in Downloads/ssh on the local computer. Note that the sshfs command does not require sudo. For automation, you can configure SSH login by key (without password), and save the mount command from sshfs in a file/script for quick connection.