
02.04.2023
7 min
1727

The SSH protocol (Secure Shell) is used for secure remote management of the operating system. To provide SSH access to the user, an SSH client and an SSH server are required. Each operating system has its own set of programs that provide connections. Yes, for Linux it is lsh (server and client), openssh (server and client). For Mac OS, Nifty Telnet SSH is most commonly used. And in the Windows OS, the PuTTY application <https://www.putty.org/” https://www.putty. org is most often used to implement a connection via the SSH protocol. To connect to a remote system using SSH, we will use ssh command.When we start an SSH client and tell it to connect to a server, the server and the client use cryptographic magic to establish a secure connection that cannot be hacked or tampered with.You can connect from any operating system and even from a mobile phone .

SSH is one of the most secure protocols for remote PC access. Modern encryption algorithms and a wide selection of protocol configuration tools make it the most popular option for remote computer administration and secure data transfer. Anything you could do if you were sitting at your computer with a command line open, you can do with SSH. This is why SSH is loved: concise and clear interface, ease of operation and complete security with proper configuration. The main thing is to carefully read the article and understand the settings. After all, we have collected all possible SSH connections, configuration files and command line options in one place.
You need to install the ssh package (contains SSH client and server). On Debian and derivatives, there is a separate package with the ssh-client client – just install it or the ssh package.
There are SSH clients for Windows, such as PuTTY. But this is only a client, without additional features – for example, with PuTTY it will not be possible to create keys for logging in to SSH without a password. That’s why I prefer and recommend Cygwin. This program contains a full-featured version of SSH, including the ability to generate keys and perform other typical SSH operations without any problems. At its core, Cygwin implements many of the capabilities of the Linux command line.
There are a number of free programs for connecting to SSH – search the app store for “ssh client”. They differ in capabilities: support for working with keys, the ability to switch to landscape mode, convenient access to special keys, etc. – just choose any of them that you like more. In this screenshot, I’ve connected to my desktop via SSH from my phone and launched the Wi-Fi network monitoring program. That is, I can control the Linux system and observe the results of the applications from the phone.
The SSH client on Linux is a command-line utility, so you need to open a console to enter commands. And Windows users need to enter commands to connect to the SSH server in Cygwin. Everything in square brackets is optional.
![]()
![]()
As the ADDRESS, you need to specify the IP to which you want to connect or the name of the host. Since the user is not specified, the SSH client will substitute the username in the current session as the username.
A typical connection command looks like this:
![]()
As USER, you must specify the user name on the remote system to which the connection is being made. During the connection process, this user will need to confirm their identity with a password or key. If the command is not specified, a normal interactive shell will be opened to the remote system. If the command is specified, then if the connection is successful, it will be executed, and the interactive shell will not be opened, ssh will finish its work after executing the command.
You can also specify a URI in the following format:
![]()
Please note that after “:” you can specify a port for a command of the type:
![]()
When connecting for the first time, SSH will display information with a request:

The first line informs us that the program cannot establish a connection with this host, but do not rush to be upset. The second line shows us the unique fingerprint of the remote host and asks if we want to connect to it? Type: yes
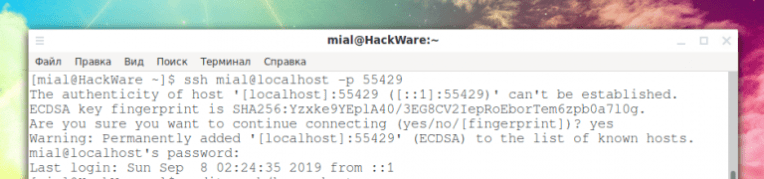
Then a message appears that the host has been added to the list of known hosts:
![]()
The message will not be displayed the next time you connect. This procedure – warning about connecting to new hosts – is a reliable protection against spoofing (substitution) of IP addresses when connecting: if you connect to the same host, then this message should no longer appear. If this message appears again, it means that you are connecting to some other host! To end the session (shut down), type exit or press Ctrl+D.
I have a VPS that has an IP address of 185.117.153.79, to connect to it I execute the command:
![]()
But keeping the IP address in mind all the time is inconvenient, especially if there are several servers. It would be more convenient to connect to the host by a name that is easy to remember. This is the IP address of the SuIP server, so I’ll choose suip as a short name, and just the letter s as an even shorter nickname. In order for the operating system to start recognizing these names, you need to configure the hosts file. On Windows, this file is located at the path C:WindowsSystem32driversetchosts, and on the Linux operating system, it is the /etc/hosts file.
So, you need to add records of the type:
![]()
For our example, we add the following line:
![]()
![]()
![]()
A VPN, that is, a virtual private network, consists of hosts connected to it, which can be scattered around the world, but thanks to the VPN, they are combined into one local network, within which each node can communicate with another by a local IP address. Moreover, the connections are securely encrypted and third parties will not be able to find out what traffic is transmitted inside the VPN. Let’s say I want to SSH into a computer that’s on a VPN that I’m also connected to. In this case, I can connect by specifying the IP of the computer that interests me in the VPN network.
Example:
![]()
In addition to opening a shell session on a remote system, ssh also allows you to execute individual commands on the remote system:
![]()
For example, to execute the tree command on a remote host with the IP address 192.168.1.36 and display the results on the local system, you need to do the following:
![]()
Using this technique, you can do interesting things like run the ls command on a remote system and redirect the output to a file on the local system:
![]()
Notice the single quotes in the above command. This is done because we don’t want the track discovery to be done on the local machine; since we need this execution on a remote system. Also, if we want standard output to redirect a file on a remote machine, we can enclose the redirect operator and the filename inside single quotes:
![]()
An equally interesting version of command execution will be given a little below:
![]()
The cat command urgently reads and displays the contents of the .ssh/id_rsa.pub file located on the local machine. | (pipe) passes what should appear in standard output to another command. Instead of the command that should process the lines passed to it, a connection to the remote system (ssh [email protected]) takes place. The remote system receives lines for which the command cat >> .ssh/authorized_keys is provided. That is, the contents of standard output are written to the .ssh/authorized_keys file located on the remote machine.
The SSH client has a lot of command line options, but they are mostly for traffic redirection and advanced SSH use cases. In this part, we will consider only some of the most frequently requested options.
Command line options
File with user-specific settings~/.ssh/config
A file with system-wide settings/etc/ssh/ssh_config
All configuration values change only when they are first installed. Therefore, the host specific settings should be at the beginning and the default values at the end. The SSH client configuration file supports many directives, but their configuration is required for advanced use of SSH and for most cases no configuration is required. It is necessary to note the special directives Host and Match, which divide the file into blocks. The Host directive sets the hostname to which all subsequent settings apply until another Host or Match directive is encountered. Specifying ‘*’ as the host allows you to set global defaults that apply to all hosts. A pattern can have the opposite meaning if it is preceded by an exclamation mark (‘!’). If the negation entry matches, then the Host clause is ignored unless there is a match with other patterns. Hence, negation matches are useful for providing exceptions to wildcard matches.
The following is a small piece of configuration that sets the connection port to 55455 for host 10.6.0.1, uses 2222 as the connection port for host 192.0.100.8, and connects to port 22 for all other hosts:
![]()
These configuration files contain keyword-argument pairs, one pair per line. Arguments can optionally be enclosed in double quotes (“”) to pass arguments containing spaces. Keywords are case-insensitive, but arguments are case-sensitive. Many directives are commented out, but they point to a default value that is used anyway. If If you are satisfied with the default value, then you do not need to change anything. If you want a different value, you need to uncomment the line with the corresponding directive (remove the # symbol) and make the changes. Configuration parameters can be separated by spaces or optional spaces and one ‘=’ ; the latter format is useful to avoid the need to enclose whitespace values in quotes when specifying configuration parameters using the ssh, scp, and sftp -o options. Since each parameter uses the first value received, more host-specific declarations must be placed at the beginning of the file, and in end common default values.
An example of connecting to a remote SSH server with a concise name instead of an IP address has already been considered above. This is a system-wide setting of name-to-IP address conversion, as a result, suip and s names can now be used with any program, whether in a web browser or with utilities such as ping:

But the ssh client has its own functionality to set a convenient hostname that is easy to remember. Moreover, they allow you to immediately specify the port, which is impossible to do with the previous method. For example, the IP address of my SSH server is 185.117.153.79, its port is 54321 and I want to add the ability to connect to it with the name Host, then I just need to add the following to the ~/.ssh/config file:
![]()
As you can see, the HostName directive is used — it sets the real host name, including the IP address. The Port directive sets the port to use for this host.
As a result, you can now connect using the usual command:
![]()
Or use its full equivalent:
![]()
The full list of directives can be found using the command:
![]()
For information about command line options, run:
![]()
By default, the private key for connecting to SSH is taken from the file ~/.ssh/id_rsa. If you need to connect to the SSH server with a different key, then use the -i option, after which specify the path to the desired file with the private key:
![]()