29.04.2025
21 min
1178

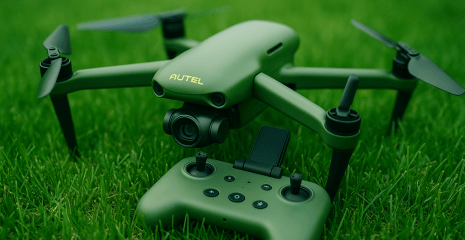
This section is dedicated to the proprietary Autel Sky application, which is an integral part of working with EVO Lite series drones. In it, you will learn how to activate the device after the first power-on, get acquainted with the control interface and learn how to use all the functions of the drone’s camera. A simple and clear explanation of each stage will allow you to quickly set up the equipment and avoid typical beginner mistakes. The section will be useful for both beginners and experienced users who want to improve their drone control skills through the application.
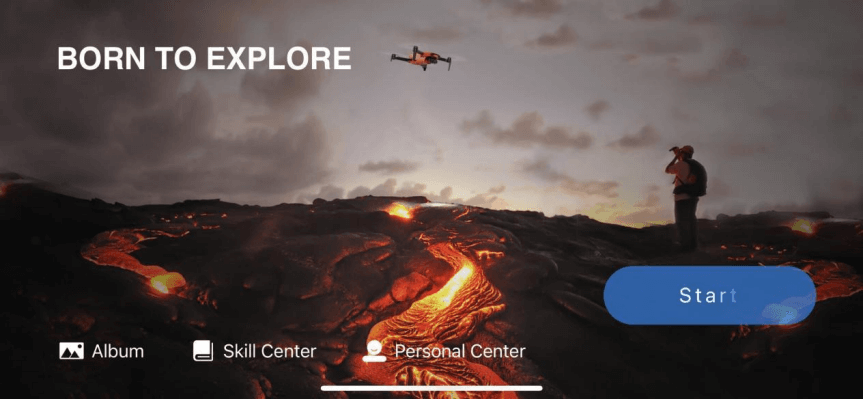
Autel Sky app combines flight control, video recording, editing and content sharing functions. Its interface is simple, aesthetically pleasing and easy to use. With step-by-step flight training and a new powerful video editor, users can easily immerse themselves in the world of aerial photography.
When launching the EVO Lite series quadcopter for the first time, you must complete the following activation steps:
Spread the quadcopter’s beams, remove the protective cover from the stabilizer, and turn on the drone.
Turn on the remote controller, connect it to your mobile phone, and open the Autel Sky app.
After the remote controller is successfully connected to the quadcopter, the app will automatically open the activation page. Click “Next” to enter the terms of use of the device.
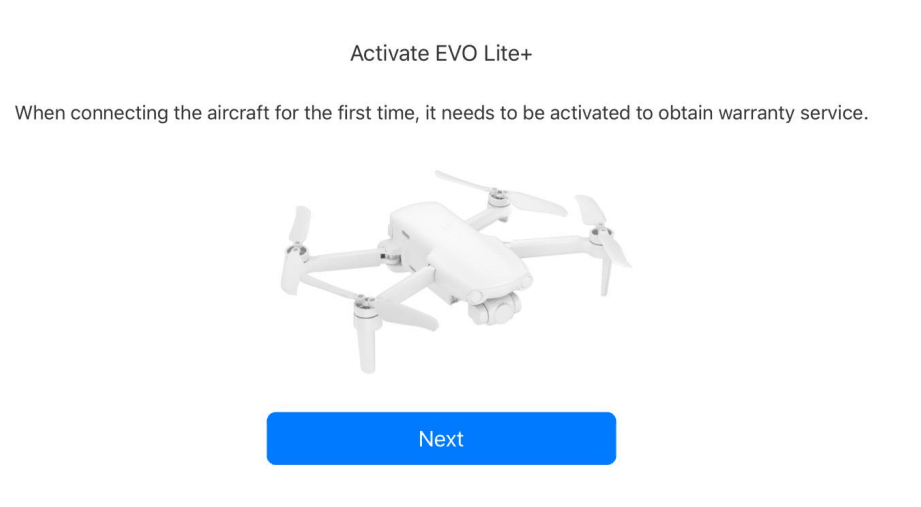
Check the box next to “I have read and agree to the above terms and conditions,” then click the “Activate” button. If the activation was successful, the application will display the message “Activation completed successfully.”

You can only purchase Autel Robotics Care after successfully activating your device.
The remote controller is pre-paired with the drone by default. If you have replaced the remote controller or the drone, please refer to Section 3.4 to learn how to re-pair.
Home page
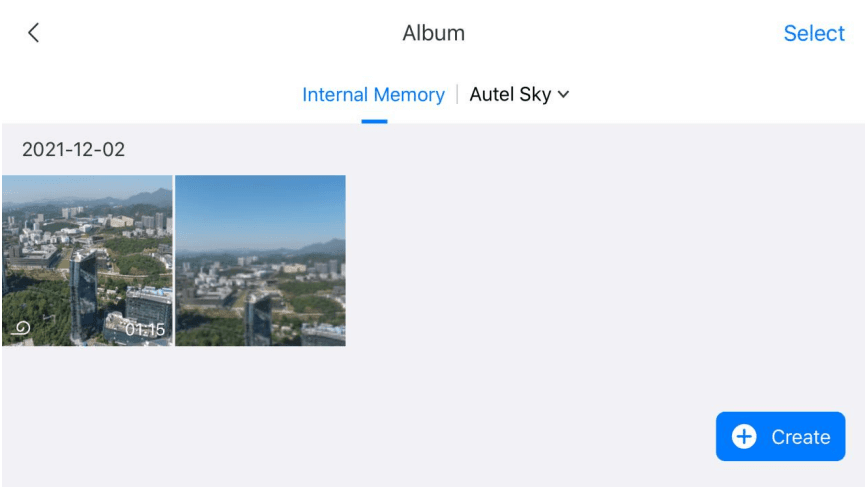
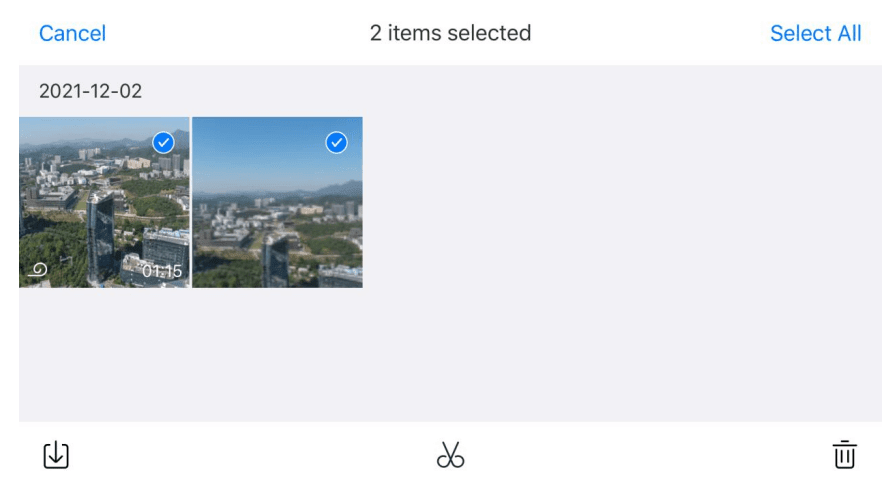
The user can view and edit photos and videos directly in the album. The album supports SD card, internal storage of the drone and the memory of the Autel Sky application itself. All photos and videos can be downloaded to the local album for further work. To create a video or edit a clip, click the “Create” button – there are templates and manual trimming tools available.
Note: If the drone is not connected or there is no SD card, the SD card item is not displayed. In this case, the built-in storage of the device is automatically used.
Click on the “Skills Center” item to select your drone model and view related video instructions and control tips.
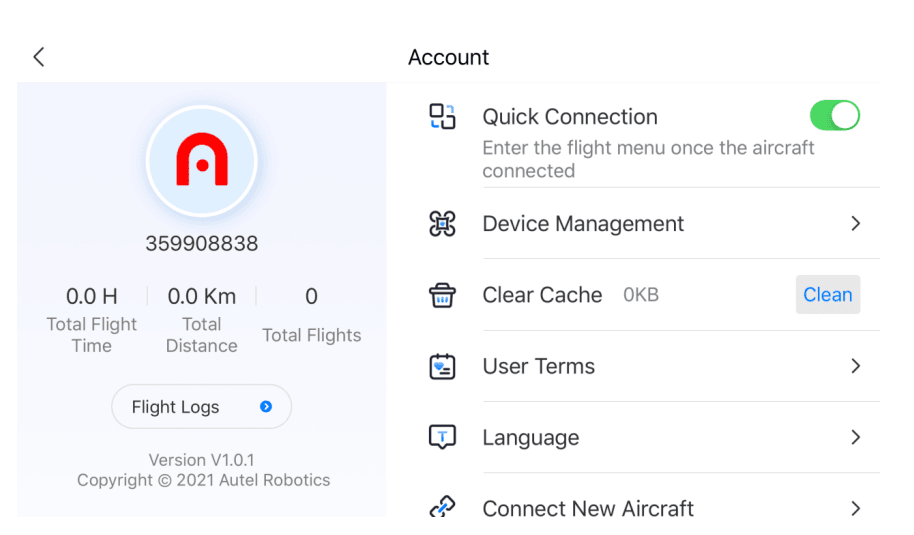
In this section, you can view your personal profile, flight log, terms of use, Autel Care subscription status, and other device information. Additional settings are also available here:
quick connection;
drone control;
cache clearing;
interface language selection;
connecting new drones;
activating the Autel Robotics Care service;
step-by-step guide for beginners.
Important: The user can swipe up on the image transfer interface to hide all service information and leave only the camera video stream screen.
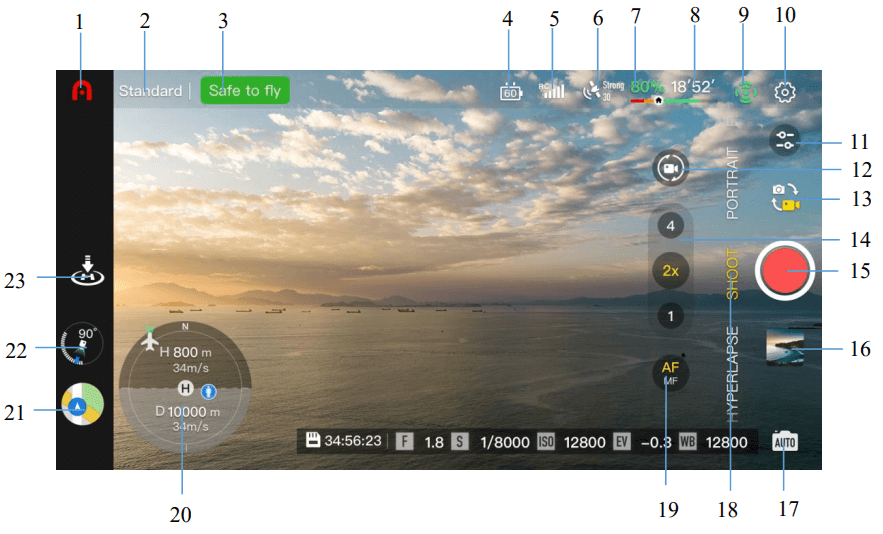
Home. Tap to return to the app’s home screen.
Flight Mode. Shows the drone’s currently selected flight mode (e.g. Standard, Sports, Cinema, etc.).
Device Status. Shows the drone’s general status and warnings. In case of malfunctions, tap to view detailed information.
Remote Controller Battery Level. Shows the percentage of remaining battery power of the remote controller.
Image Transmission Signal Strength. Shows the level of communication between the drone and the remote controller, which affects the video quality.
GNSS Status. Shows the GNSS signal strength (GPS/GLONASS, etc.) and the number of satellites found.
Drone Battery Level. The current percentage of battery power of the quadcopter.
Flight Time Remaining. The estimated time remaining until the battery is completely discharged based on the current power consumption.
Obstacle Avoidance. Status of obstacle avoidance sensors (on or off).
Camera settings. Access basic photo and video shooting settings.
Lens rotation. Activates camera rotation (EVO Lite only). Works in video, short clip, hyperlapse and night shooting modes. Rotation is adjustable to 360° or 720° (horizontal), 360° (vertical) only.
Photo/video switch. Change shooting mode between photo and video.
Zoom. Adjust image zoom.
Capture button. Start or stop video, take a photo.
Album. Quick access to saved photos and videos.
Pro/auto mode switch. In pro mode, you can manually change shutter speed, aperture, ISO, white balance. In auto, everything is adjusted automatically. (Aperture adjustment is only available for EVO Lite+.)
Capture mode. Select photo format (single, burst, timer), video (frame rate, HDR), quick effects (Rocket, Orbit, etc.), night shooting, panoramas, hyperlapse, etc.
AF/MF switch. Manual (MF) or automatic (AF) focus.
Orientation indicator. Shows the drone’s location, nose direction, operator position, home point, and flight speed/distance (vertical and horizontal)
System settings. Accesses security configuration, control, shooting, image transmission, and device information:
Safety: activate beginner mode, set home point, altitude/range limits, calibrate compass and IMU, battery settings, find drone, advanced sensor and backlight settings.
Control: select units of measurement, joystick mode, flight speed, button actions, calibrate remote control, set stabilizer and tilt angle.
Shooting: select photo/video formats, codec, storage location, additional shooting functions (graph, histogram, anti-glare, etc.).
Image transmission: HD, smooth, 2.7K modes.
Device info: serial number, software versions and other technical data.
21. Map Single tap — turns on the minimap. Double tap — switches the camera view to the full-screen map.
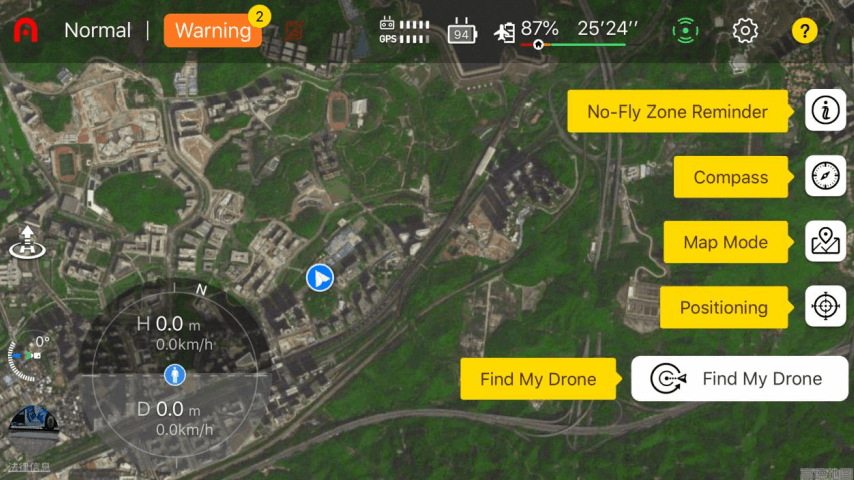
Switch between minimap, full-screen map, and image broadcast interface. Also available:
BZ: View flight restriction zones (altitude, prohibitions).
Compass: Current drone position.
Map mode: Normal, satellite or hybrid view.
Positioning: Quickly determine the coordinates of the drone, remote control or home point.
Find my drone: Launch light and sound signals to find the device.
22. Stabilizer. Shows the current camera tilt angle.
23. Takeoff/Landing. Press and hold the corresponding button to automatically take off or land. There are two options: landing at the home point or at the location where the drone is currently located.
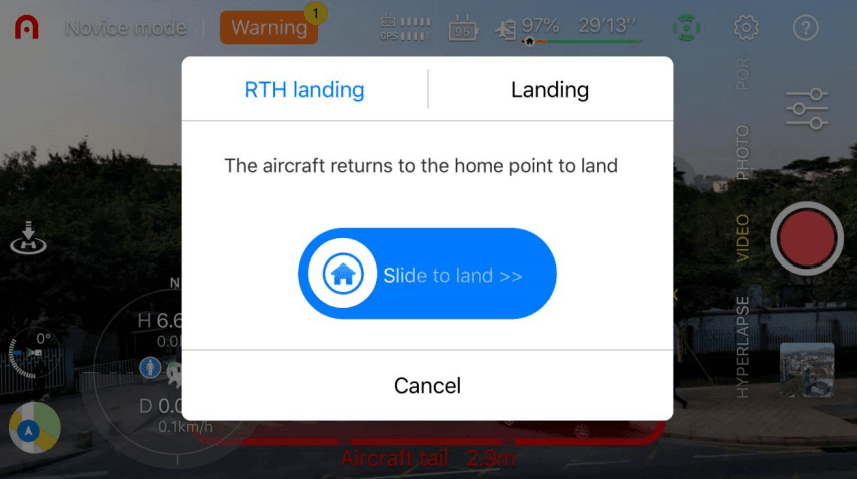
Note: If the flight altitude is lower than the set return altitude (default 30m), the drone will first climb to the set altitude and then fly to the return point. Make sure there are no obstacles above the drone.
Photos and videos can be downloaded from the EVO Lite drone directly to your smartphone at speeds of up to 20MB/s via the Autel Sky app.
Algorithm of actions:
Turn on the quadcopter and place it on a flat surface.
Connect your smartphone to the remote controller, open Autel Sky and connect to the drone.
After successful connection, open the album, select the photos or videos you want, and click the upload icon (⬇) for quick transfer.
Important: Use fast transmission in places without obstacles and external sources of interference – avoid routers, Bluetooth headsets, etc. In countries where 5.8 GHz / 5.2 GHz frequencies are allowed, the transmission speed will be maximum. If only 2.4 GHz is allowed, the speed will be lower.
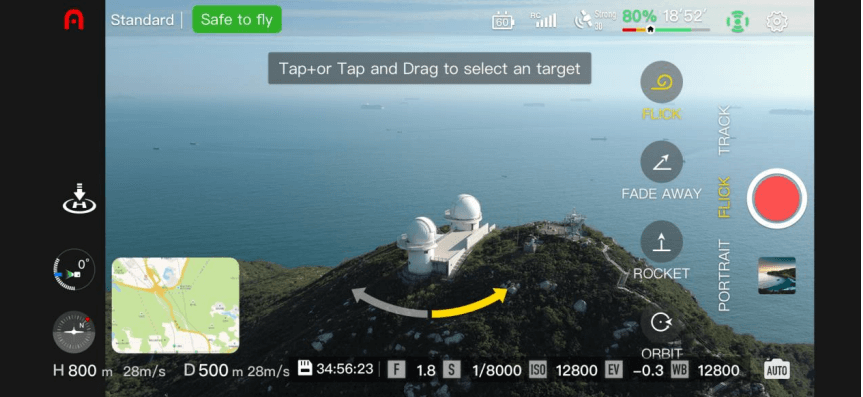
This mode allows you to quickly shoot a short, effective video in one of 4 automatic scenarios:
Fade Away – the drone flies backwards and upwards, keeping the subject in the frame.
Rocket – a vertical take-off over the subject with the camera looking down.
Orbit – the drone flies around the target in a circle at a fixed distance.
Flick – an arc with a cinematic zoom-out effect.
After shooting, the video is automatically processed, ready for quick editing and publishing.
Make sure the battery is fully charged. The launch must be from a height of more than 2.5 m.
Select the “Short Video” mode in the application, choose one of the options, watch the animation with a description. Before starting, make sure that the space for automatic flight is safe.
After selecting the mode, press “+” on the object on the screen or simply touch it with your finger. Then press the shooting button, and the drone will automatically fly, record a video and return to the starting point.
When finished, press “Album” to view the video. The application allows you to edit and publish the video on social platforms.
If you press the shooting button or pause the video (⏸) via the remote control during shooting, the drone will stop and hover at the current location. All frames before this action will be saved in the album.
With built-in artificial intelligence and high-precision sensors, the Autel Lite series drone supports advanced shooting functions, including short video mode and portrait shooting. However, it is important to consider a number of limitations before use, which affect flight safety and image quality.
When recording short videos with one touch, the following conditions should be observed:
use the feature only in an open area without obstacles;
keep the drone no further than 30 meters from the remote control and within line of sight;
avoid flying with weak GPS signals;
comply with privacy laws;
do not use the feature if the object: blends into the background or moves too fast; is in the air or beyond 50 meters; periodically disappears from view; is in very dark or excessively bright lighting conditions.
Special attention deserves the portrait mode, where artificial intelligence recognizes the subject and highlights it in the frame. Depending on the situation, the user can choose:
close-up — for one person;
medium-length — for a small group;
long-distance — for large scenes.
These modes open up new possibilities for creating dynamic and engaging video content from a drone.
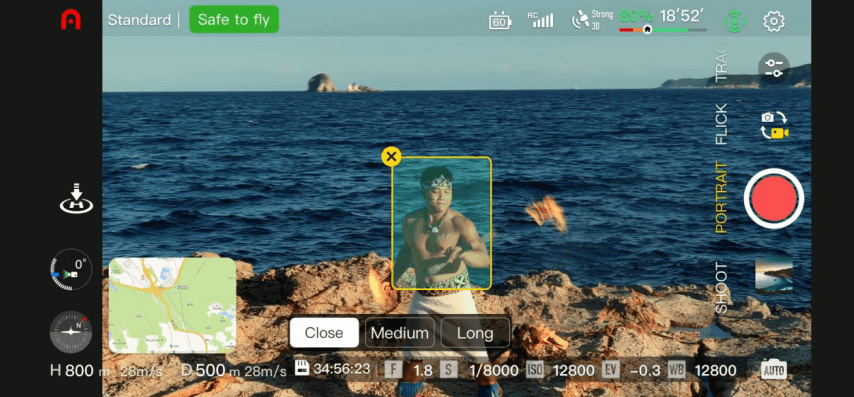
Recommended number of people in the frame:
Close-up: 1–3 people
Medium-range: 3–5 people
Long-range: 5–10 people
Make sure the drone is charged. Turn it on and fly it at least 2.5m high.
Open the camera interface in the Autel Sky app and select Portrait mode.
Select the subject and scene, and the drone will automatically determine the optimal distance for shooting.
Select a photo or video. The drone will hover in place when finished.
Before shooting, make sure that the GPS signal is stable and the obstacle avoidance system is activated.
If the drone moves more than 30 m away, a flight confirmation will appear – click “Confirm” to continue the flight.
During automatic flight, you can interrupt it manually by using the joysticks of the remote control to change the position.
Designed for shooting in the dark or in low light. Thanks to the Autel Moonlight algorithm, EVO Lite quadcopters provide:
clear photos and videos even in the dark
minimum image noise
high ISO
stable quality when shooting in ultra-low light conditions
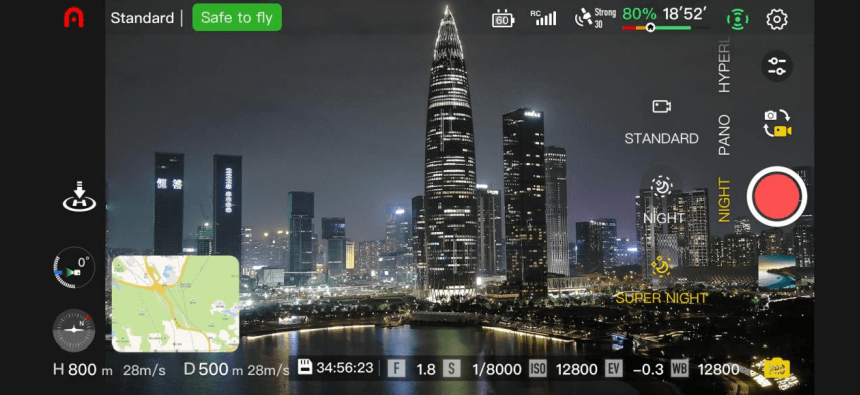
When shooting at night, the user can choose one of three modes, depending on the lighting conditions:
Standard mode – the result corresponds to the quality of a regular video recording.
Night mode – the system automatically adjusts the ISO, up to a maximum of 16,000.
Super Night mode – improved automatic processing, the ISO value can reach: 64,000 for EVO Lite, 48,000 for EVO Lite+
Important: Manual adjustment of professional shooting parameters (exposure, shutter speed, ISO, etc.) is available only in Super Night mode.
Autel Sky App for EVO Lite Series Drones is not just a flight tool, but a complete ecosystem that combines intuitive control, flexible shooting modes and convenient content editing. Starting from device activation and basic settings, the user enters a well-thought-out interface that simplifies the first steps and opens up advanced capabilities even for beginners.
Particularly impressive are such functions as fast file transfer, automatic short videos, portrait shooting with intelligent distance selection, as well as super night mode, which provides professional quality even in the most difficult lighting conditions. Thanks to thoughtful warnings, status indicators, flight map and adaptive settings, the user gets full control over the drone in any situation.