01.05.2025
7 min
1089

“Drone User Guide” is a basic section that will be useful for both beginners and those who want to streamline their knowledge of working with unmanned aerial vehicles. In this material, the reader will learn where to start getting acquainted with the drone, how to properly configure it, what the symbols in the documentation mean, and how to install the Autel Sky proprietary software on a mobile device. Carefully laid out explanations cover all the key stages of preparing for the flight, starting with deciphering technical information and ending with setting up the control system. This guide helps to avoid typical mistakes even at the stage of familiarization with the device, better understand the principles of operation of a modern quadcopter, ensure its stable and safe operation, and also fully realize the functional capabilities of the device.
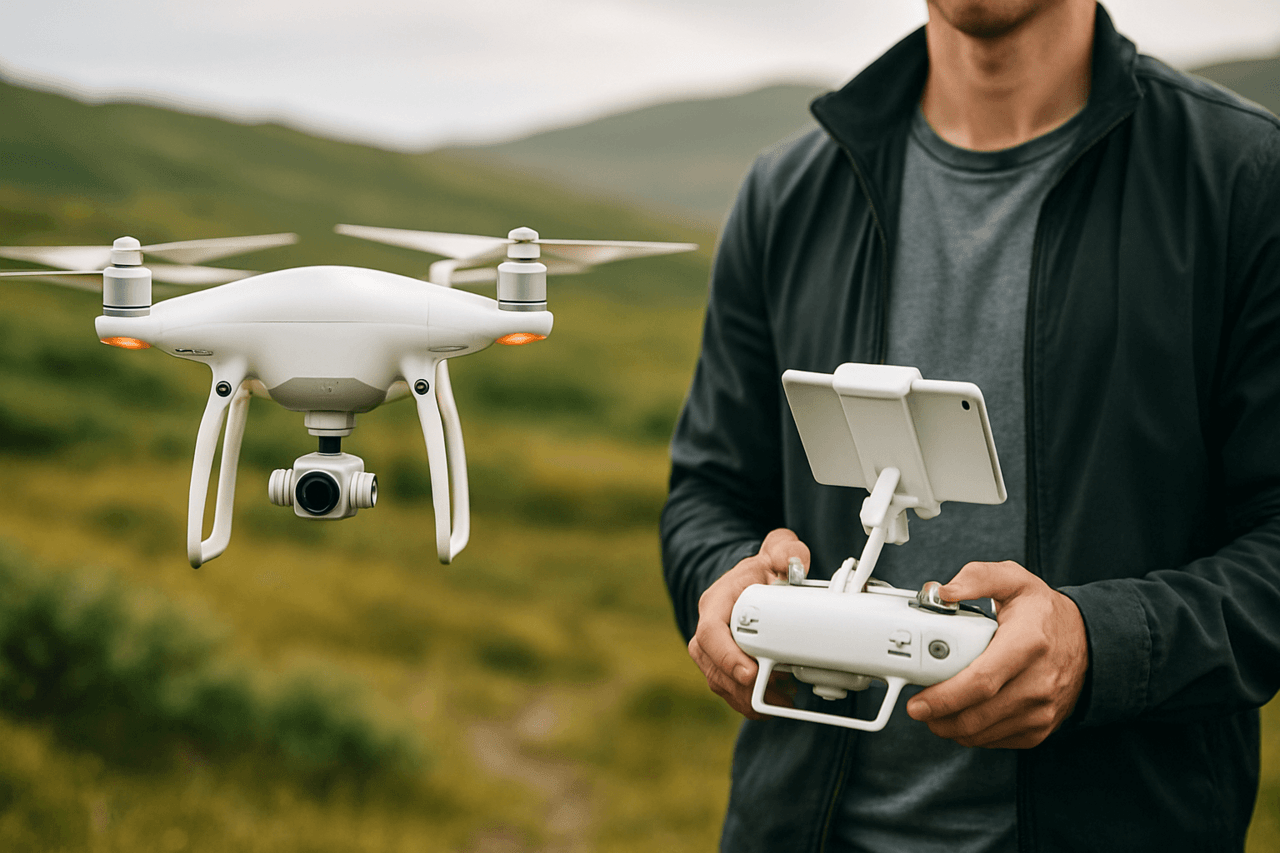
The Autel Sky app provides real-time video streaming and allows you to conveniently control the drone’s flight and camera from your smartphone. It is compatible with Android 6.0, iOS 13.0 and above.
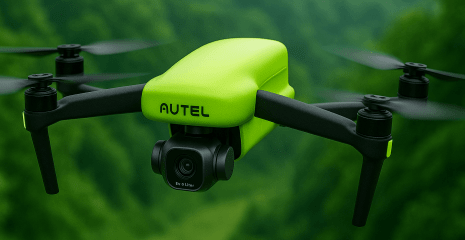
If you decide to use this handsome drone, then you cannot do without the Autel Sky app — it is it that gives you full control over the flight and shooting.
There are two easy ways to download the app:
Method 1. Open the App Store or Google Play, search for Autel Sky, then click “Install”.
Method 2. Go to the official app download page on the Autel Robotics website and scan the QR code to start downloading immediately: www.autelrobotics.com/download/App_download.html
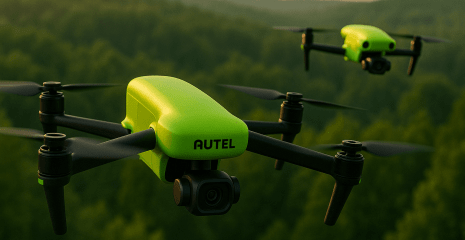
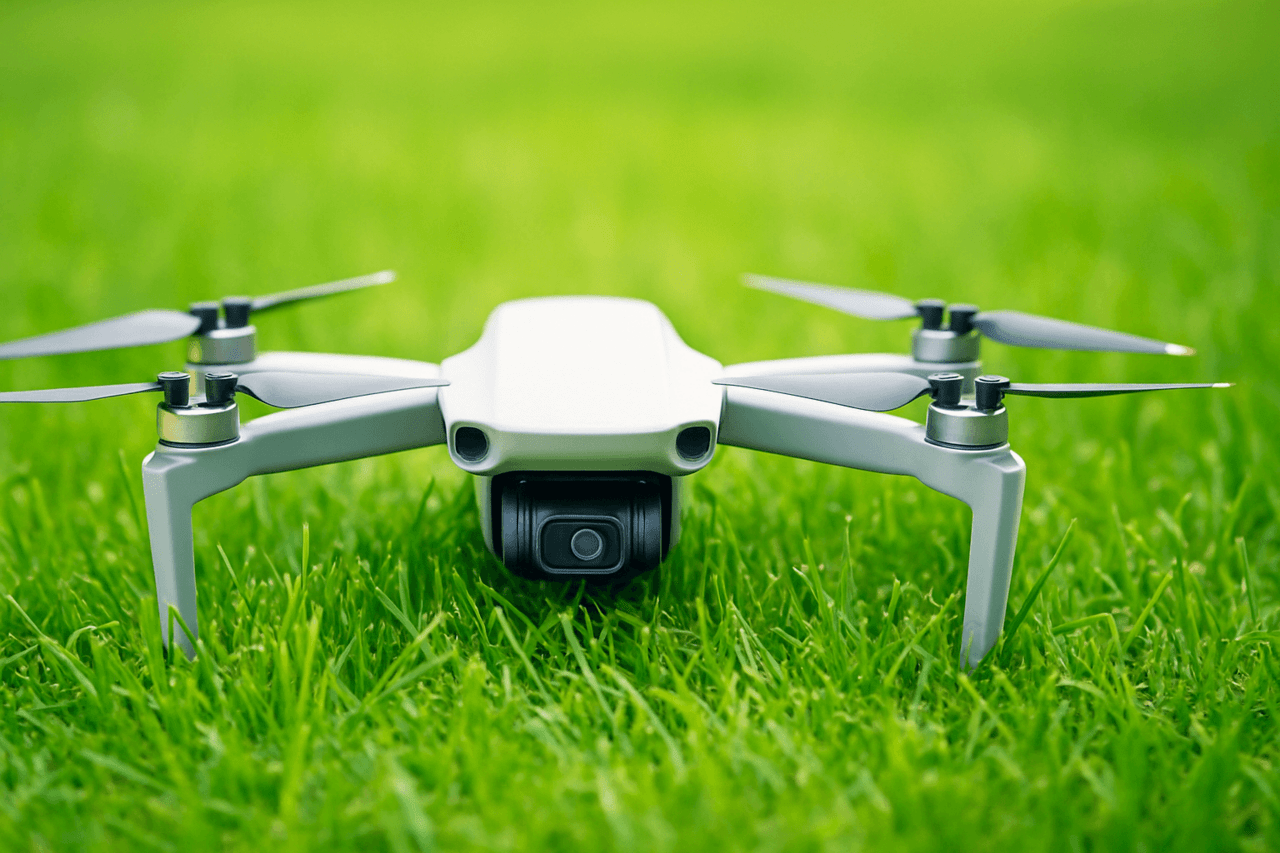
The EVO Lite series of wireless drones features four main propellers and a foldable fuselage design. These drones feature high flight stability both indoors and outdoors, support intelligent route control and an advanced set of intelligent functions. The maximum flight speed is 68 km/h and the autonomy is up to 40 minutes.
The series includes the EVO Lite and EVO Lite+ models:
The EVO Lite features a 1/1.28-inch CMOS sensor and 4-axis stabilization, allowing you to shoot 4K video and photos up to 50MP.
The EVO Lite+ features a 1-inch CMOS sensor and 3-axis stabilization, allowing you to record 6K video and photos up to 20MP.
The new Autel Sky app provides access to a wide range of intelligent shooting modes:
one-touch short video;
panoramic shooting;
slow-motion video.
Additionally, users can instantly edit videos in the app using ready-made templates, and quickly transfer or publish content directly from their mobile device.
The EVO Lite series uses the next-generation image transmission technology — Autel SkyLink. It supports simultaneous reception and transmission of signals at 2.4 GHz, 5.2 GHz and 5.8 GHz frequencies. Under ideal conditions (no obstacles and interference), the signal can be transmitted up to 12 km, with an image resolution of up to 2.7K.
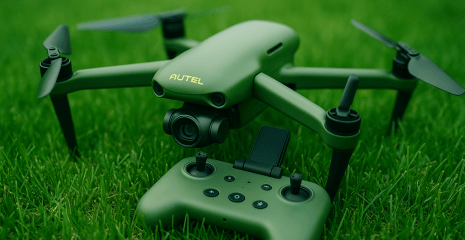
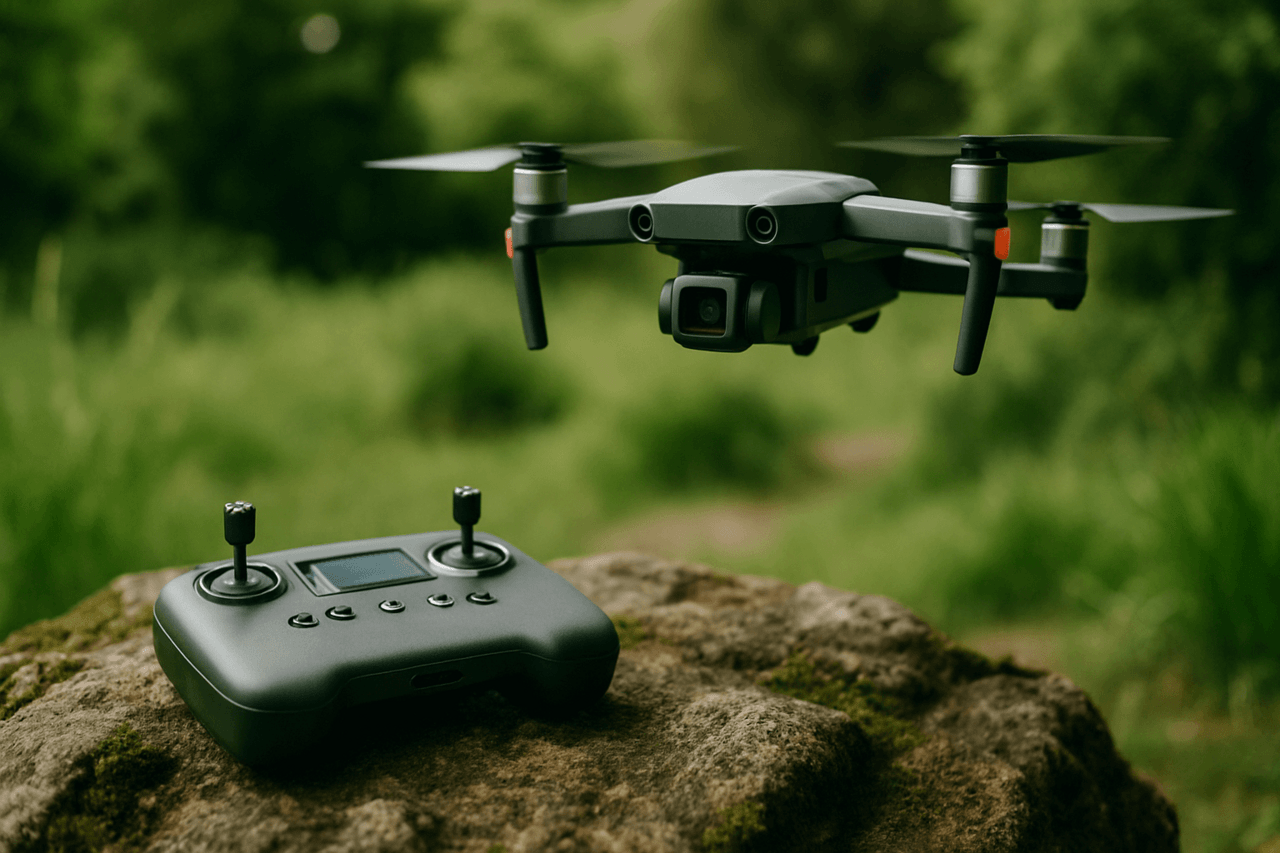
The remote control has a smartphone holder and allows you to display high-definition images in real time via the Autel Sky app.
Note: Maximum flight speed is measured at sea level and in complete absence of wind.
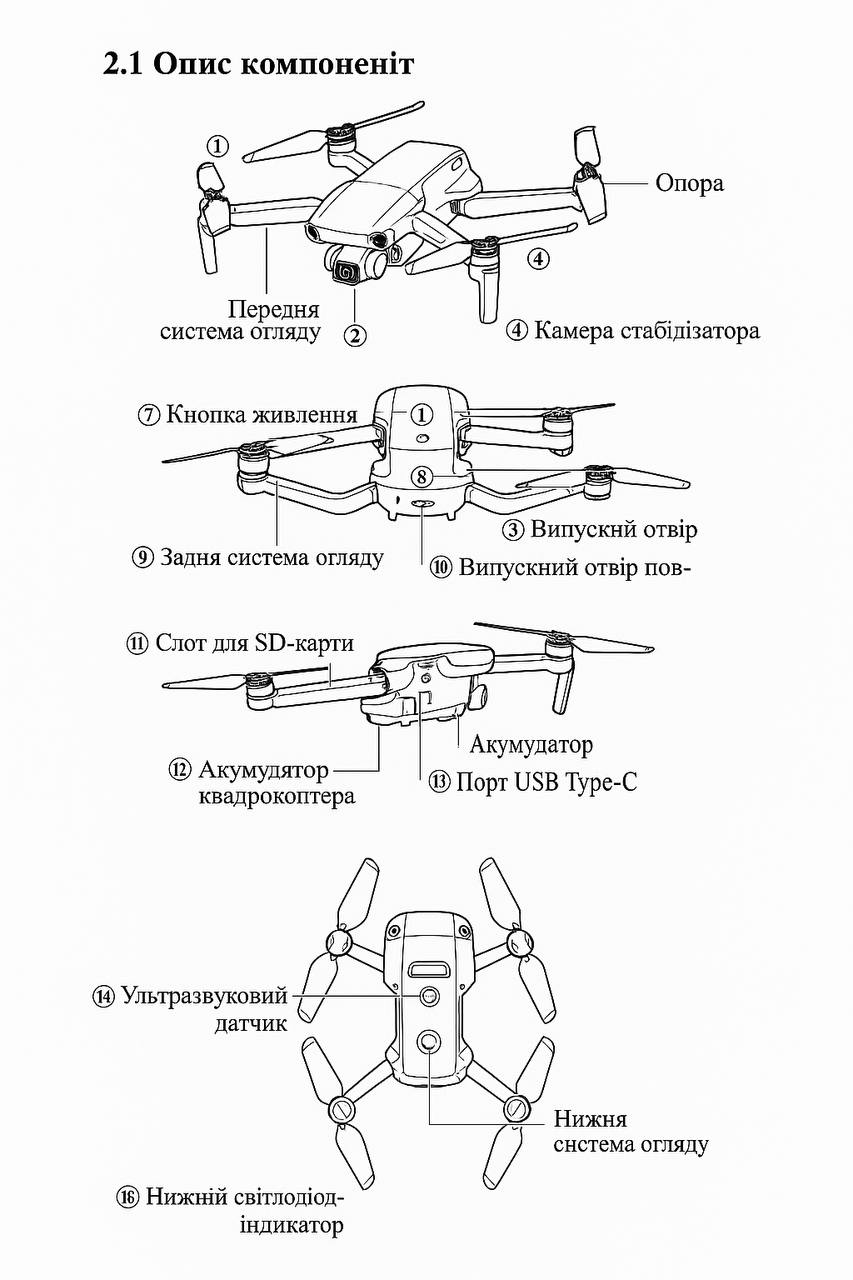
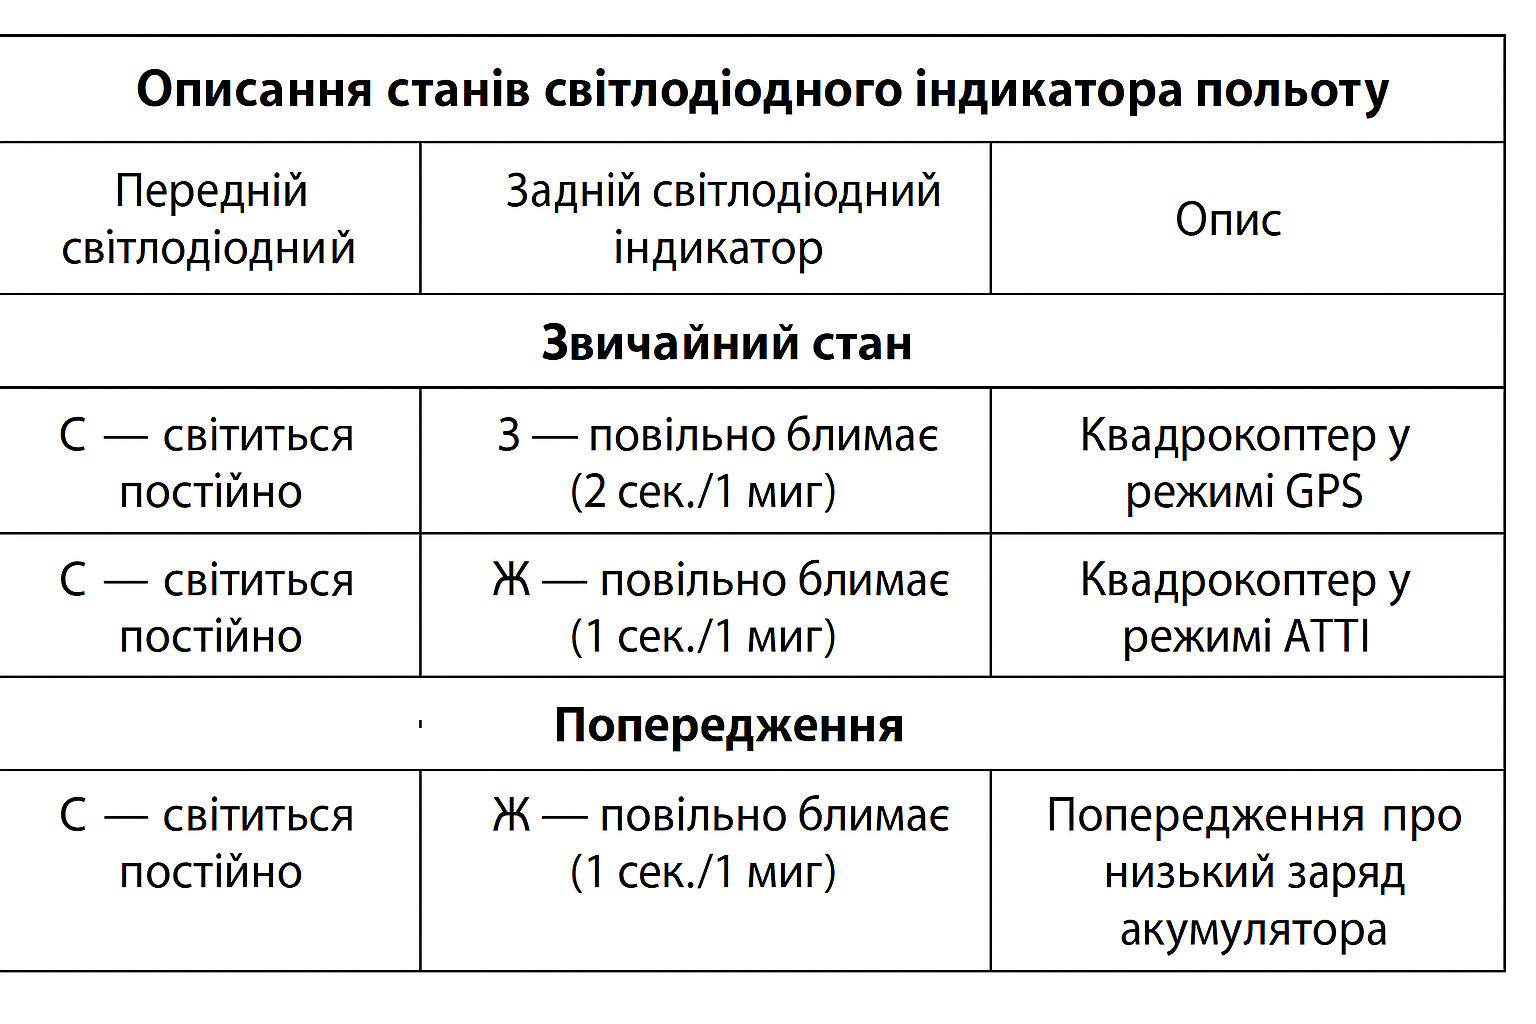
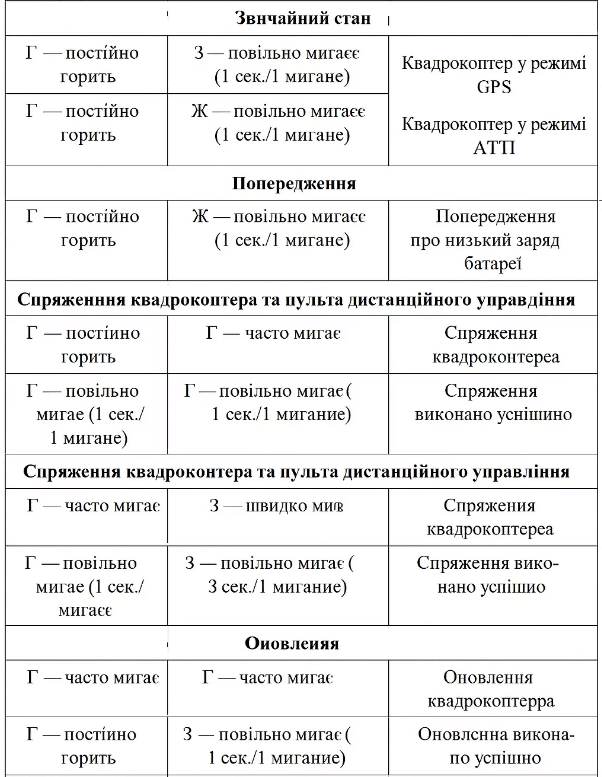
At the end of each beam of the quadcopter is an LED indicator.
The front indicator is constantly lit red, which helps to navigate the direction of the quadcopter’s movement (determine the “nose” of the device).
The rear indicator shows the current flight status, changing color or glow mode depending on the situation (for example, connection with the remote control, takeoff, return, etc.).
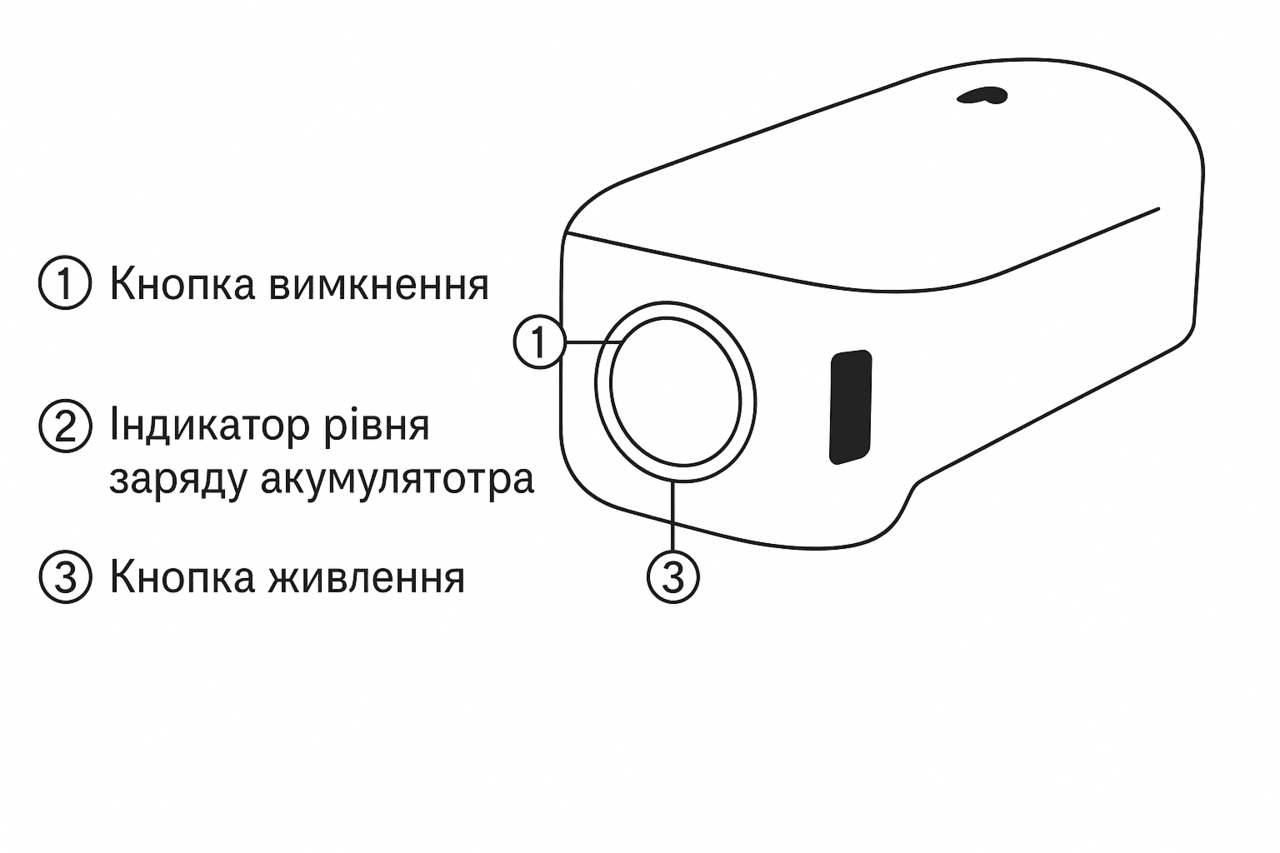
The EVO Lite battery has a capacity of 6175 mAh, a nominal voltage of 11.13 V and is equipped with a charging and discharging control system. For safe charging, you should use the branded adapter and cable included in the official delivery package.
Use only the original batteries and chargers supplied with Autel Robotics products. Do not modify these components or replace them with devices from other manufacturers.
Battery electrolyte is a corrosive substance that can cause serious injury. If it accidentally comes into contact with skin or eyes, immediately flush the affected area with clean water and consult a doctor.
The drone is equipped with four LED indicators: 1, 2, 3, and 4 to display the battery level. Their location can be seen in the diagram below.

When the battery is off, press and hold the power button for 1 second to check the battery level as shown below.
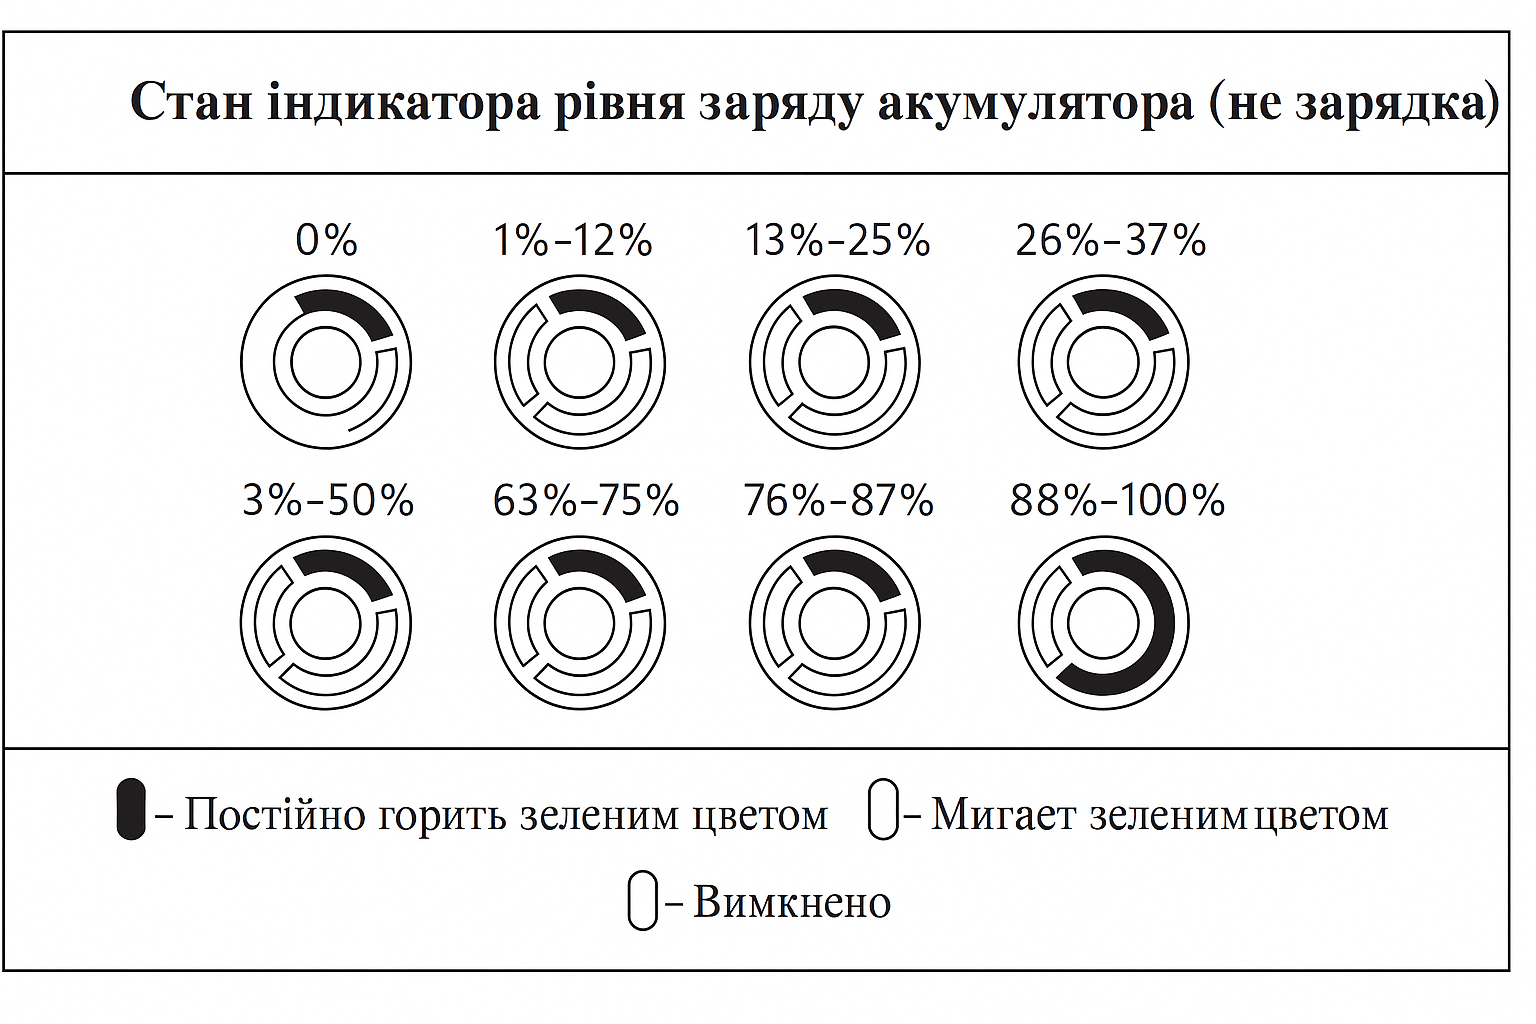
Before installing the battery, turn on the battery. To do this, press and hold the power button for 3 seconds. After that, the charge indicators will light up, showing the current charge level.
To turn off the battery, press and hold the power button for 3 seconds. If the battery is installed in the quadcopter, the indicators 1 and 4 will flash five times to indicate that it is turned off. When all the LEDs are off, the battery can be safely removed from the device.
Before installation, make sure the battery power is turned off.
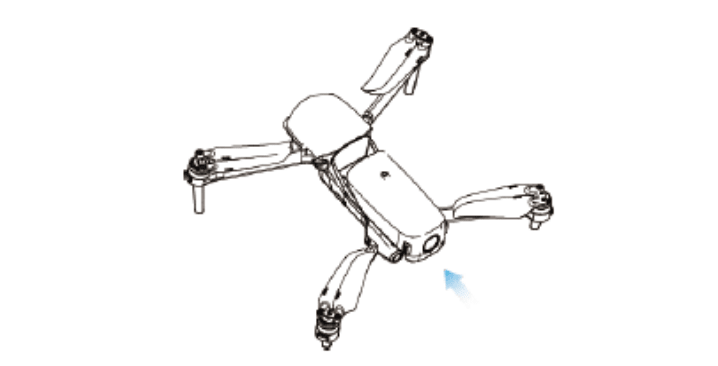
Insert the battery into the battery slot on the bottom of the quadcopter and push it in until it clicks into place.
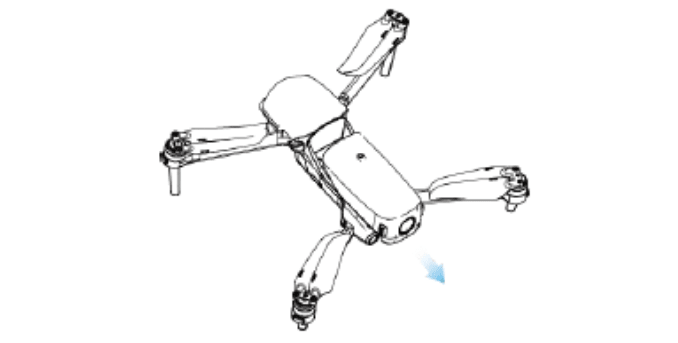
Before removing the battery, turn off the power switch.
Press the latches on both sides of the battery and slowly pull out the battery.
To charge the quadcopter battery and remote controller, use the charger and cable included in the standard kit. The battery must be fully charged before each flight.
Connect the adapter to an AC power source.
Press and hold the release button on both ends of the battery, then connect one end of the charging cable to the corresponding connector on the quadcopter battery.
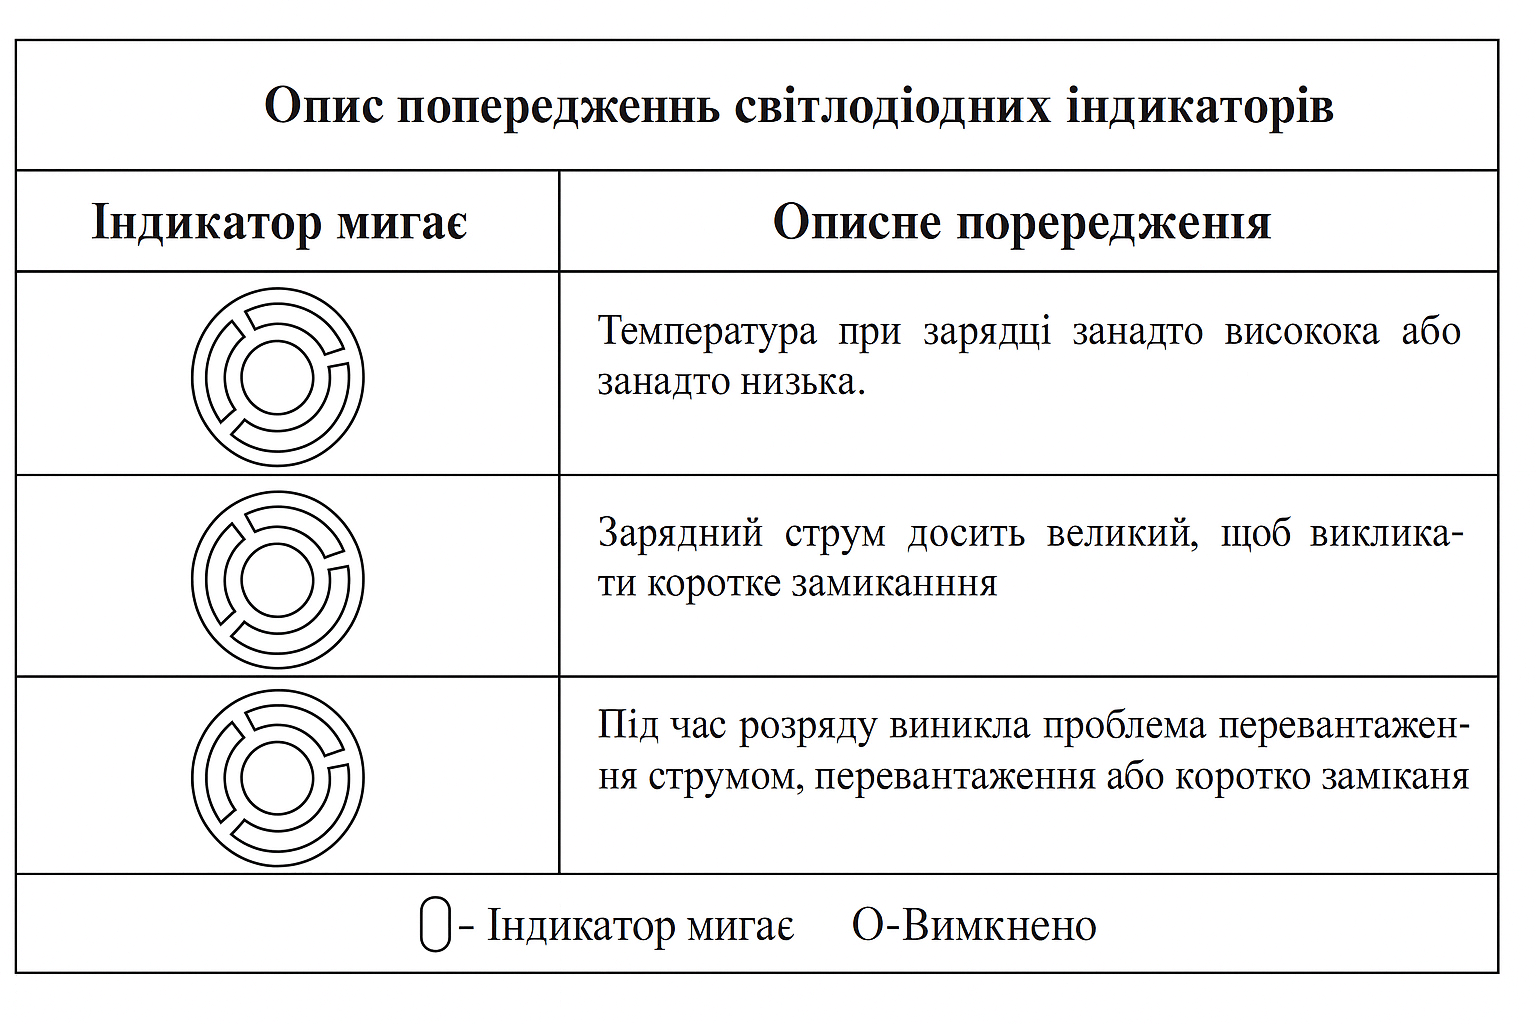
The quadcopter battery charge indicator will flash in a circle while charging.
When all the charge indicators turn off, the smart battery is fully charged. Unplug the charger to complete the charging process.

The following features are designed to protect the battery and extend its service life:
Self-discharge during storage: If the battery is stored at high temperatures or unused for 6 days and the charge level remains high, the self-discharge function is activated. The battery automatically discharges to a safe level – this process takes 2-3 days. During this period, a slight heating of the battery is considered normal.
Deep discharge protection: When the battery is critically low, the battery automatically enters sleep mode to prevent damage. In this state, pressing the power button does not respond. To “wake up” the battery, connect it to the charger.
Temperature protection during charging: Charging stops if the temperature is below 5°C or above 45°C.
Over-current protection: When the charging current is too high, the charging process stops to prevent damage to the battery.
Over-charge protection: When the battery is fully charged, the battery automatically stops receiving current.
Balance protection: Each battery cell maintains a voltage balance to prevent overcharging or overdischarging.
Storage protection: When the battery is not in use, it automatically turns off the power supply and completes the self-discharge period. This function does not work during flight.
Short circuit protection: When a short circuit is detected, the power supply will be turned off immediately.
Low power mode: If no operations are performed for 30 minutes, the battery will automatically turn off.
Communication: During flight, the drone constantly synchronizes with the battery, transmitting real-time voltage, capacity, current and temperature data.
Power saving mode: When the battery level drops below 8%, the battery enters power saving mode. To resume operation, it must be connected to a charger.
Always turn off the power of the quadcopter before installing or removing the battery.
Use only original batteries and chargers certified by Autel Robotics for the EVO Lite series drones. Using unauthorized components may cause fire, explosion, liquid leakage, or other hazards. Autel Robotics is not responsible for the consequences of using third-party devices.
Fully charge the battery before each flight. If the drone warns of low battery during flight, land as soon as possible, stop the flight, and replace or charge the battery.
Do not disassemble, puncture, bend, crush, or deform the battery. This may cause fire, explosion, or liquid leakage.
If the battery is swollen, damaged, smokes, or leaks, stop using it immediately and immerse the battery in a container of salt water.
Operate the battery at temperatures between -10°C and 40°C. Exceeding the range may cause fire or permanent damage.
At temperatures below 10°C, insert the battery into the quadcopter to preheat. Flight is only permitted after warming up to 20°C and above.
In cold weather (0–5°C), use a fully charged battery — and turn on the quadcopter first to warm it up.
Do not use the battery in conditions of strong static or electromagnetic fields.
Do not expose the battery to open fire, do not put it in a microwave oven or pressure cooker.
If the drone falls into water — remove the battery immediately after removing the device, dry it in an open area, and then contact the service center.
A full charging cycle takes up to 90 minutes, depending on the remaining charge.
Do not use a damaged charger.
If charging does not occur, disconnect the device from the power source.
Charging is allowed only after the battery has cooled to room temperature.
Do not turn on the quadcopter during charging – it is not supported when the drone is turned on.
The operating temperature for charging is from 5°C to 45°C. Optimal is 22–28°C.
Simultaneous charging of multiple batteries through separate chargers is allowed.
Charge the battery at least once every three months to maintain its working condition.
Autel Robotics is not responsible for the use of unofficial chargers.
Do not allow the battery to come into contact with water or heat sources. Store in a dry, ventilated place at a temperature of 22–28°C.
Keep the battery out of reach of children and animals.
Do not leave the battery in direct sunlight or near metal, sharp or chemically active objects.
Storage temperature for a period of more than 1 day is from -10°C to 30°C.
If the battery is not used for a long time, the service life is reduced. Damaged batteries are prohibited for transportation. If transportation is necessary, the battery should be discharged to 20–30%.
Fully discharge the battery before disposal.
The battery contains hazardous chemicals and should not be disposed of in the general waste stream. Please check the recycling regulations in your country.
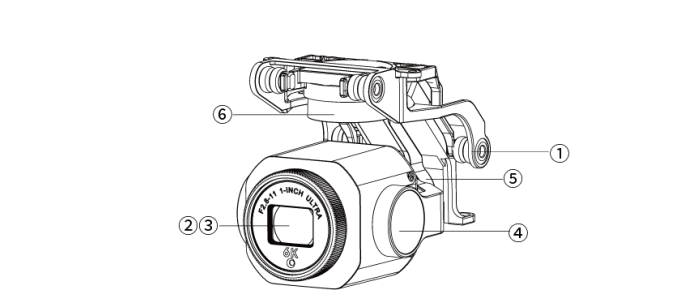
The EVO Lite series quadcopter stabilizer is a 4-axis mechanism with a 4K camera and a 1/1.28″ CMOS sensor. The camera is capable of rotating ±400° around its own axis.
Stabilizer tilt control is carried out using:
the wheel on the remote control;
or via the Autel Sky app within the range of -90º to +30º.
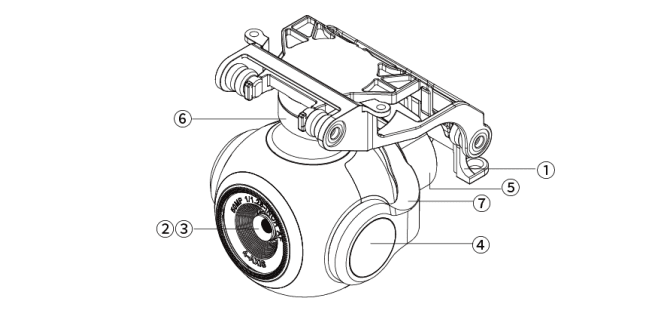
Shock absorber
Camera
UV filter
Transverse axis motor
Longitudinal axis motor
Vertical axis motor
Rotation axis motor
EVO Lite+ Series Quadcopter Stabilizer The EVO Lite+ Series quadcopter is equipped with 3-axis stabilization and a built-in 1-inch CMOS sensor on the camera for recording video in high resolution 6K. from -90 º to 30 º.
Shock absorber
Camera
UV filter
Transverse axis motor
Longitudinal axis motor
Vertical axis motor
Stabilization mode. The longitudinal axis of the stabilizer is kept horizontal, and the transverse axis is fixed at an angle set by the user. This mode is designed to obtain stable images and videos.
FPV mode. The longitudinal axis follows the tilt of the quadcopter, and the transverse axis remains at an angle set by the user. This mode is used for shooting from the first person (First Person View).
The camera stabilizer of the EVO Lite series quadcopter is fixed with one protective cover, which protects it from accidental rotation or damage during storage.
For stable operation of the stabilizer, the temperature should be from -10°C to 50°C.
Be sure to remove the protective cover of the stabilizer before turning it on. Otherwise, damage to the camera or its wiring may occur.
After turning on the power of the quadcopter, the stabilizer automatically performs self-diagnosis and calibration. Make sure that there are no obstacles around that may restrict its movement.
The stabilizer contains precision components. Any impact or damage may disrupt their operation and reduce the stabilization efficiency.
Avoid getting sand, stones or foreign objects in it to prevent it from interfering with the movement of the stabilizer.
Do not attach any objects to the stabilizer to avoid disrupting its balance and damaging the motor.
Make sure there are no stickers or foreign objects on the stabilizer, and the quadcopter itself is placed on a flat, open surface.
Impacts or excessive external force may cause the stabilizer to malfunction, especially if it falls on the ground or grass.
Flying in fog or clouds may cause moisture to condense on the stabilizer, which will cause temporary malfunctions. After drying, the performance will be restored.

The EVO Lite quadcopter camera is equipped with a 1/1.28-inch sensor, supports 50 megapixels, has an aperture of F1.9 and a focal length of 0.5 m. Video recording in 4K format at 60 frames / s is available.
The EVO Lite+ camera has a 1-inch sensor, supports photo shooting from a distance of 20 m and video recording in 6K, with an adjustable aperture of F2.8–F11. The focal length is also from 0.5 m.
Both cameras support shooting modes:
single shot;
burst;
exposure bracketing (AEB);
timer;
HDR image;
night mode;
panorama.
Photos can be saved in DNG or JPG formats, videos in MOV or MP4. The footage is stored on a Micro SD card. The image can also be streamed to the Autel Sky app in real time with a resolution of up to 2.7K and a frame rate of 30fps.
For stable operation of the lens, adhere to the recommended temperature and humidity conditions.
Clean the lens regularly with special cleaning agents to avoid deterioration of image quality.
Do not cover the camera – overheating
may cause damage to the lens or even burns.
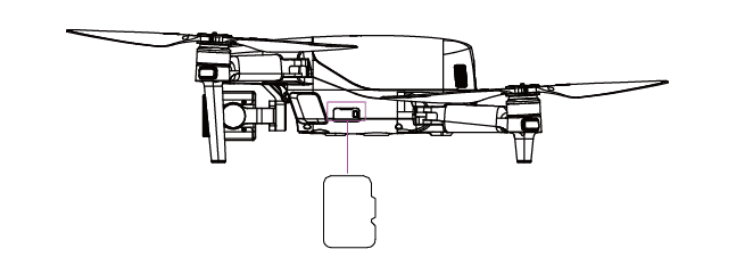
The EVO Lite series quadcopter has a Micro SD card slot, which allows you to expand the memory capacity.
Before turning on the drone, you must insert a Micro SD card into the appropriate slot, as shown in the illustration. The device supports cards up to 256 GB. For high-quality video recording, it is recommended to use Class 10 or UHS-3 cards.
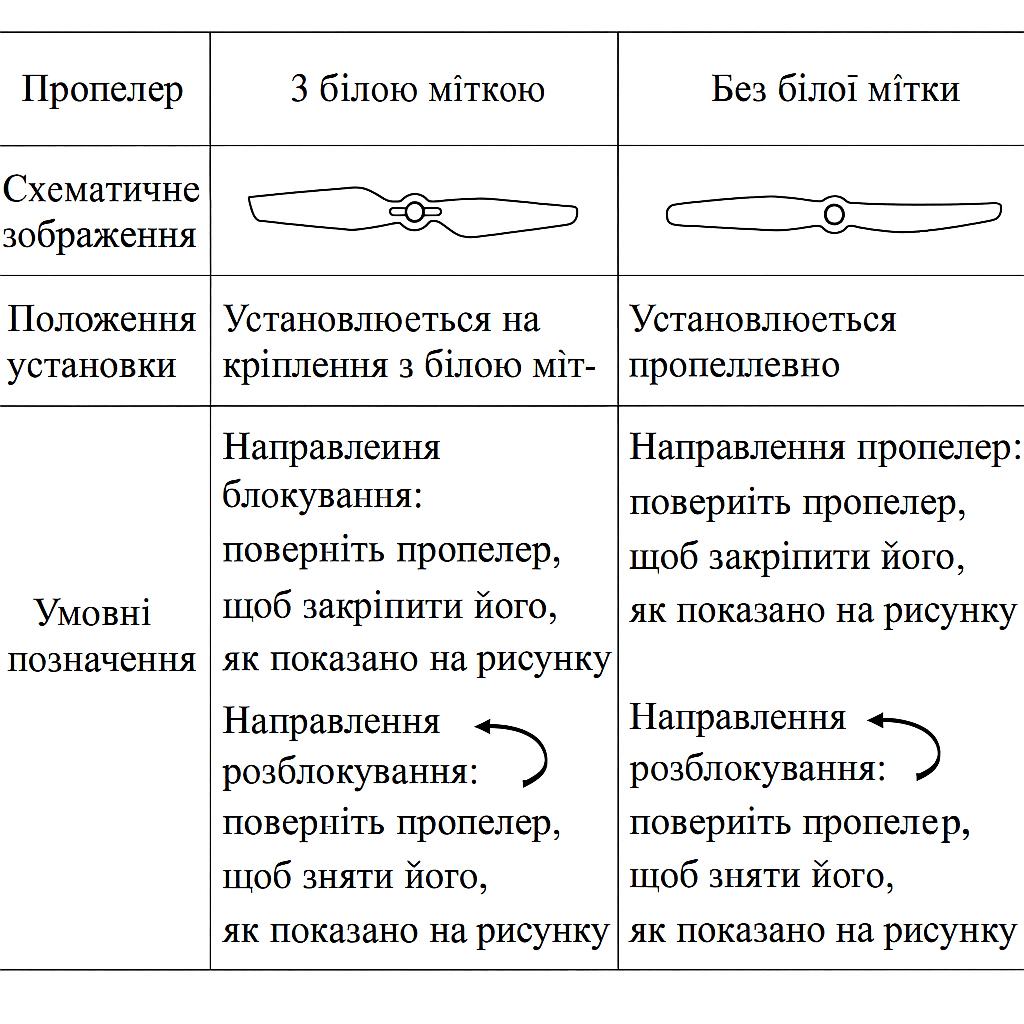
Turn off the quadcopter.
Press down on the propeller with force and rotate it in the unlock direction until it comes off.
Before flying, make sure each propeller is securely fastened.
Do not use damaged propellers for flight.
It is strictly forbidden to touch the rotating propeller or motor.
The propellers must be removed before testing the motor.
Use the original Lite series propellers supplied by Autel Robotics. Do not use propellers from other models.
When replacing blades, use a pair from the same package. It is not allowed to combine blades from different sets.
Do not modify the motor design without official permission.
Do not block the ventilation holes of the motor or the drone body.
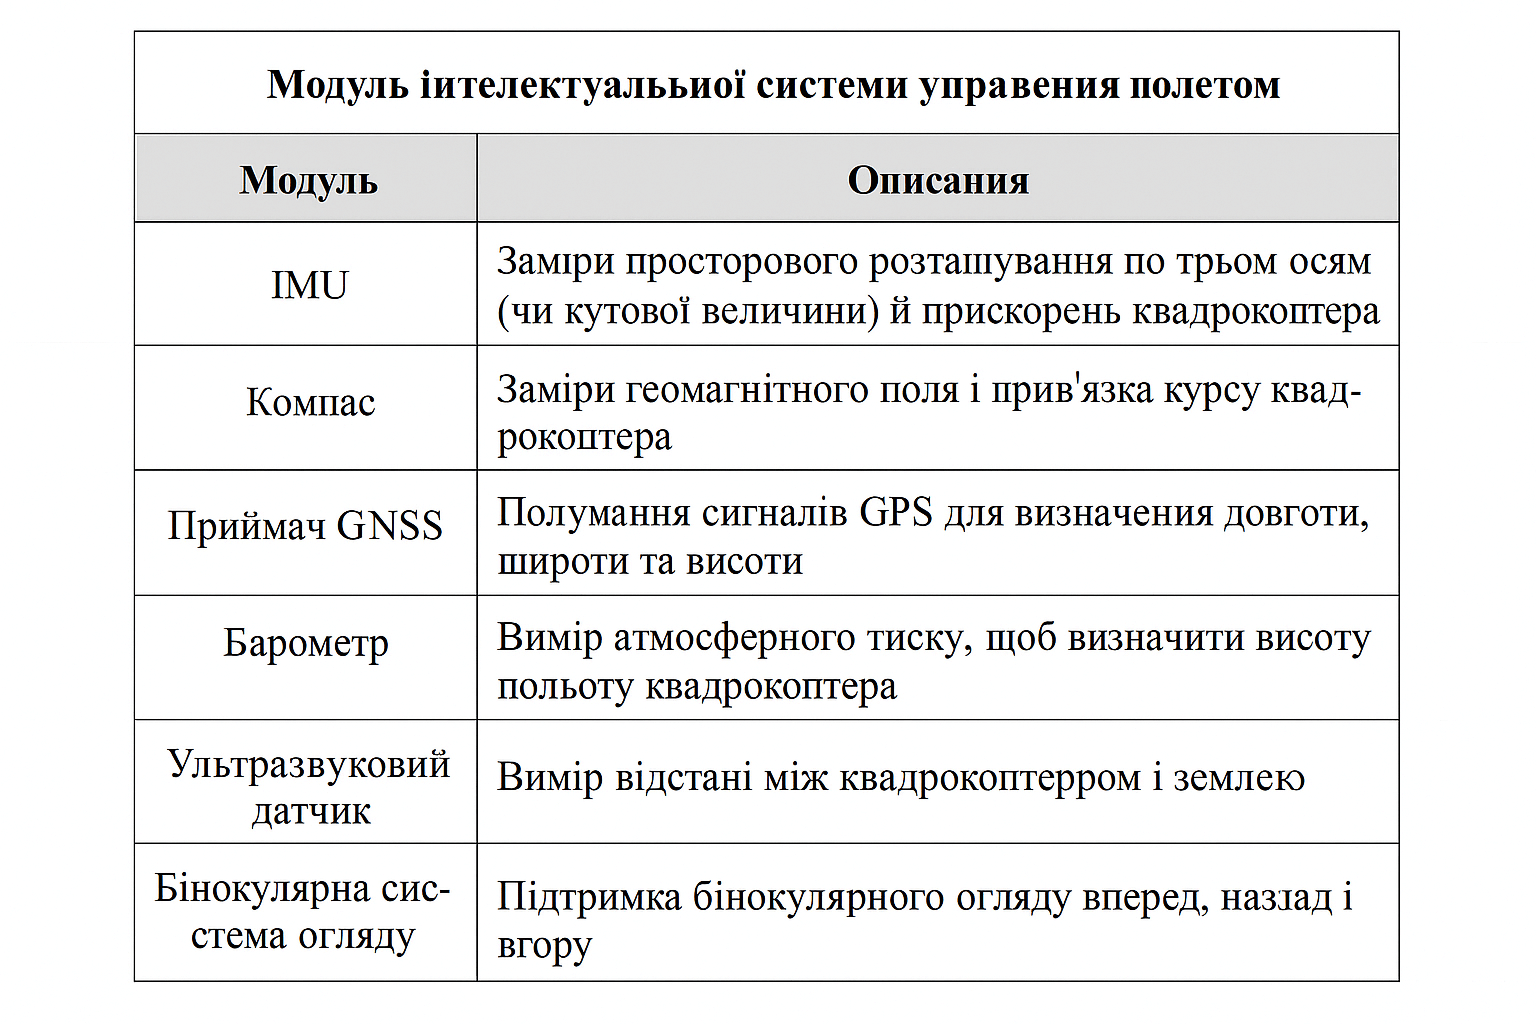
2.6 Інтелектуальна система керування польотом
The EVO Lite series quadcopters are equipped with a built-in intelligent flight control system that provides stable, precise, and convenient control.
This system supports a wide range of features, including:
course change;
uninterrupted operation;
positioning system;
and other smart algorithms.
A detailed description of the functions of each module will be presented in the following table.
The EVO Lite series quadcopter supports standard, custom, and smooth modes, which can be switched in the app.
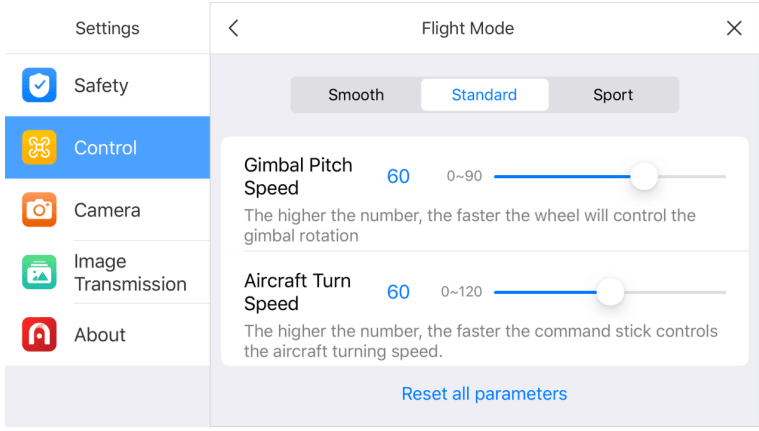
Use the GPS module and the bottom view system for precise hovering, stable flight, and short video recording. When the GPS signal is strong, precise positioning via satellites is activated. When the signal is weak, the system uses visual positioning, provided that the light level is sufficient. In such conditions, the maximum flight angle is 25° and the maximum speed is 10 m/s.
Also uses the GPS module and the bottom view system for precise hovering. After adjusting the control sensitivity, the maximum flight speed increases to 18 m/s, the climb speed to 5 m/s, and the descent speed to 4 m/s.
In this mode, the flight speed is limited to:
maximum horizontal speed — 5 m/s
ascent speed — 3 m/s
descent speed — 2 m/s
This provides better stability when shooting video.
If the GPS signal is weak, the compass is damaged, or the visual positioning system is not working, the quadcopter will automatically switch to ATTI mode. In this mode, it will not be able to hover accurately, will drift in a horizontal plane, and automatic flight functions (such as return) will be unavailable. In case of switching to ATTI, you should immediately land the drone in a safe place. It is not recommended to fly with poor GPS, low light, or in confined spaces – this may lead to an accident.
Important:
In user mode, the speed is much higher, so the braking distance should be at least 30 m in calm conditions.
The descent speed also increases – expect a braking distance of at least 10 m.
The sensitivity of the direction control increases – even a small movement of the joystick causes a strong reaction of the drone. Fly only in open spaces.
In standard or smooth mode, when the stabilizer tilts to around -90° or 0°, the flight speed is limited for stable shooting. In strong winds, the limitation is lifted, which may cause stabilizer vibration.
The feature is only activated when the GPS signal is strong. To enable manual return:
hold the return button (🔁) on the remote;
or tap the back icon (🔁) in the Autel Sky app.
The drone will return and land at the preset point.
Importantly:
The default return height is 30m. If the drone is below this height, it will first rise and then return.
If the drone is already within 10m of the return point, it will land immediately.
If the forward vision system is enabled, the drone will avoid obstacles. If not, it will not.
To exit the return manually, press the pause button (⏸) or the corresponding button on Autel Sky.
This feature allows the drone to automatically return or land if something goes wrong.
Activated in the following cases:
If the connection is lost for 3 seconds, the drone will attempt to return.
If GPS is available, it will return.
If not, it will automatically land.
After the connection is restored, you can press pause (⏸) to control the drone again.
The drone is constantly calculating how much charge is needed to return.
A. At 25% charge, a warning appears, automatic return is activated.B. At 15% charge, a critical warning appears, the drone lands immediately.
If the battery is 25% and the drone is closer than 50m to the home point, it will not return.
If there is no GPS signal, the return will not be performed, the drone will enter ATTI mode.
During an emergency landing, you can press pause (⏸) to manually change the home point.
Above the return point, the drone scans the surface:
if it is even, the drone lands;
if it is uneven, it hangs, waiting for a command.
When enabled, the camera detects terrain near the takeoff point. If a match is confirmed, the drone will land as close to it as possible.
Importantly:
The take-off point is automatically recorded as the return point.
The precision landing function does not work if the point data was updated during the flight.
Choose an open and well-lit area for take-off.
When landing, make sure that the terrain has not changed.
The compass is calibrated at the factory, so it usually does not need to be recalibrated.
However, it is necessary if:
a compass error occurs;
the drone is flying in the wrong direction;
the flight location is far from the previous calibration.
WARNING: The compass is very sensitive to electromagnetic interference, which can affect its accuracy. If the problem persists after calibration, change the flight location.
Choose an open area outdoors.
Do not calibrate near magnets, metal structures, or fixtures.
Avoid power lines.
Do not carry metal objects (keys, magnetic jewelry).
Stay away from mobile phones and other devices.
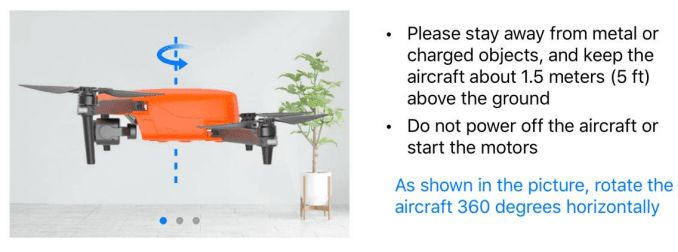
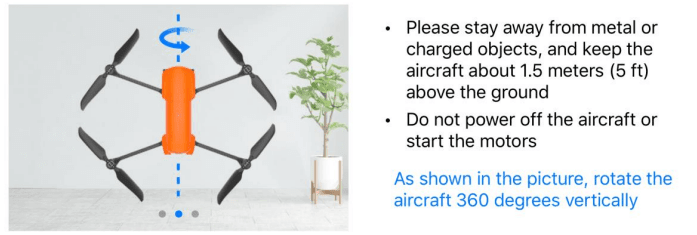
Unfold the quadcopter.
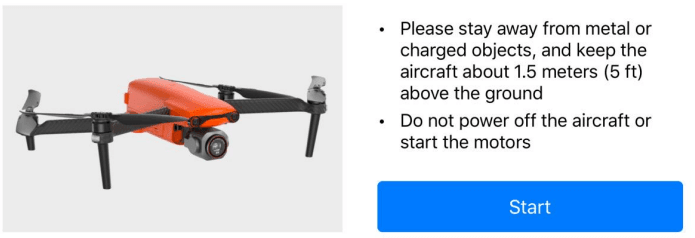
Log in to the Autel Sky app → Settings → Security → Compass Calibration → click “Start”.
Keep the quadcopter horizontal, then turn it until the quadcopter’s rear LED indicator turns solid green.
Hold the quadcopter vertically with the nose down, then turn it until the quadcopter’s rear LED indicator is solid green.
Hold the quadcopter sideways and then rotate it until the quadcopter’s rear LED indicator turns solid green.
If the compass calibration fails, the rear indicator of the quadcopter will usually turn red and a corresponding message will appear in the app. In this case, repeat the calibration procedure described above.
Do not place the drone near metal or electrical objects, and keep the quadcopter approximately 1.5 meters above the ground during calibration.
The computer vision system uses image processing to measure the distance between the quadcopter and potential obstacles. When such an obstacle is detected, the system automatically stops the quadcopter.
At the bottom of the device are ultrasonic sensors (one transmits a signal, the other receives), which help:
determine the height above the ground;
and work in conjunction with the visual system to calculate the drone’s exact location.
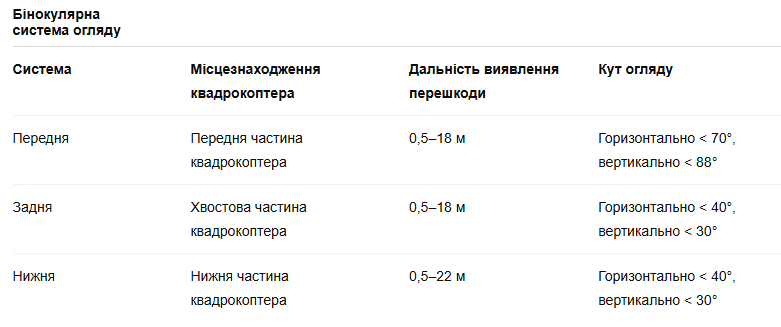
Below is the coverage angle for each binocular viewing system.
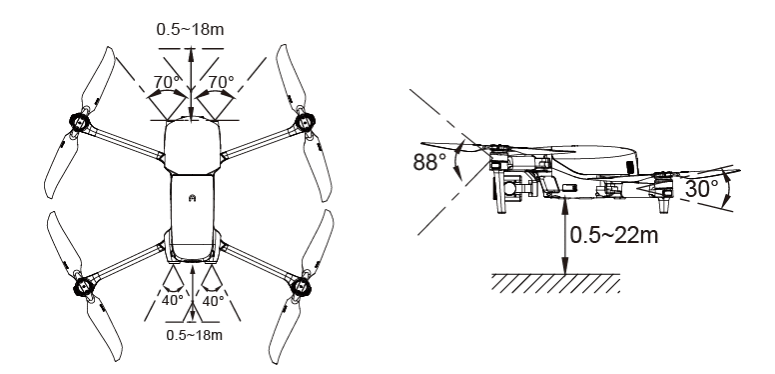
The visual positioning system has dead zones outside the coverage area. For safety reasons, you must carefully monitor the environment and the app’s messages during flight.
Do not use the quadcopter in difficult conditions (insufficient lighting, small objects (e.g. branches, fishing lines, nets), moving objects, transparent (e.g. windows) or reflective surfaces (e.g. mirrors)).
When filming cars or other vehicles, choose a field or closed road for driving. Never use the quadcopter on highways.
Make sure the quadcopter is in GPS or visual positioning mode.
The quadcopter should only take off when the flight LED indicator is slowly flashing green or flashing red twice.
If the GPS signal is weak or does not meet the requirements for visual positioning, extreme caution should be exercised.
The performance of the visual system and ultrasonic system is affected by the brightness and texture of the surface under the quadcopter. Avoid flying over the following surfaces: – a solid surface (e.g., pure black or white); – a surface with high or retroreflective properties (e.g., ice); – a water or transparent surface; – a surface with frequent changes in lighting; – a surface that is too dark or bright; – a moving surface (e.g., a busy road); – a sound-absorbing surface (e.g., a thick carpet); – a surface with a blurred texture (e.g., electric poles, pipes, etc.); – a surface with frequent repeating elements (e.g., tiles); – the presence of small obstacles (e.g., a tree branch, power line, etc.).
Avoid flying in the rain, in foggy weather, or in conditions where visibility is less than 100 m.
Before flying, check the visual system to make sure that the binocular camera lens and sensors are not dirty or covered:– Remove film, stickers, and other coatings;– Remove water droplets, fingerprints, dirt, etc. Use a lint-free cloth, not alcohol or organic solvents;– If there are scuffs, cracks, scratches, wear, etc., contact a service center.
To avoid malfunctions in the ultrasonic system, do not use ultrasonic devices at a frequency of 40 kHz, such as rangefinders, flaw detectors, washers, or welding machines.
With a powerful camera, smart stabilization, intelligent control system and the Autel Sky application, these drones are ideal for both amateur and professional filming.
However, to fully realize the capabilities of the device, you should carefully follow the safety instructions, monitor the battery status, calibrate the compass and carefully prepare for the flight. This will not only extend the service life of the drone, but also ensure stable operation even in difficult conditions.
Fly smart, shoot beautifully – and always have control in your hands.