25.04.2023
8 min
1641

Open intelligence (OSINT) is the process of collecting and analyzing information from open sources. In today’s data-driven information age, the importance of OSINT only increases. This method allows you to find key information that can be useful for different purposes. The first step in OSINT is information gathering. There are many sources from which data can be obtained: websites, social media, public records, and many others. The Internet provides a lot of tools that facilitate the extraction of the necessary information. After collecting information, the next step is to analyze it. It is important to separate the useful information from the irrelevant information and to identify the connections between different pieces of data. The last, but no less important stage is the verification of the received information. In order to be sure of the reliability of the data, it is necessary to use various sources and methods of verification. Open intelligence is a powerful tool in the hands of professionals. With its help, you can get an in-depth analysis of the situation, understand trends and make informed decisions.
Ever since we started publishing on image geolocation, I’ve always wanted to uncover techniques and techniques that would make the process more systematic and organized. In our professional life, we often come across classic methods of image geolocation, but sometimes they are difficult for a simple presentation. That’s why I thought about creating a simpler technique that would be universal for solving problems of varying complexity. The gap analysis approach is very productive for organizing investigations (although I prefer in-depth analysis of complex issues), but it is difficult to express simply and succinctly. Therefore, I decided to generalize the approach to geolocation, dividing it into three stages: extraction, analysis and verification.
Extract – Study the image carefully to extract all possible details, no matter how small or obscure. On some images this will be easy, on images with less detail it may take longer. Therefore, it is a very painstaking and important work on the image.
Research – Reviewing all the data you extracted from the source photo and researching it by any means necessary. For example, a license plate, a road sign, a geological feature, etc. Some data points will be more useful than others, but you can’t always know from the beginning which one will be the most important.
Validation – Examining all the data points you’ve extracted will give you a rough idea of where the location might be, but now you need to test whether your hypothesis is correct. If you are right, well done! If you get stuck, going back to steps 1 and 2 may help. Therefore, you need to be very careful!
Hopefully this is a simpler approach to geolocation problems. Obviously, the more complex the problem, the more time and effort is required to obtain and research the information, but it must scale for research of any scale.
The only thing a methodology cannot do is replace skills and practice. The famous photographer Henri Cartier-Bresson said that the first 10,000 photos you take will be your worst. The same is probably true of image geolocation puzzles; the more you practice, the more you improve your skills. The good news is that it probably won’t take 10,000 practice images to become competent.
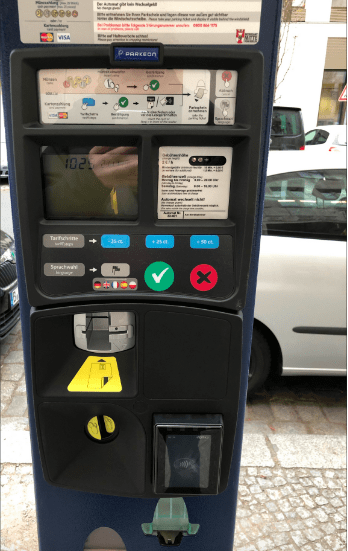
It’s time to put theory into practice. Last Tuesday, Mark asked us to locate this parking meter. It is too general to quickly find a result using reverse image search or Google Lens, so we need a more methodical approach.
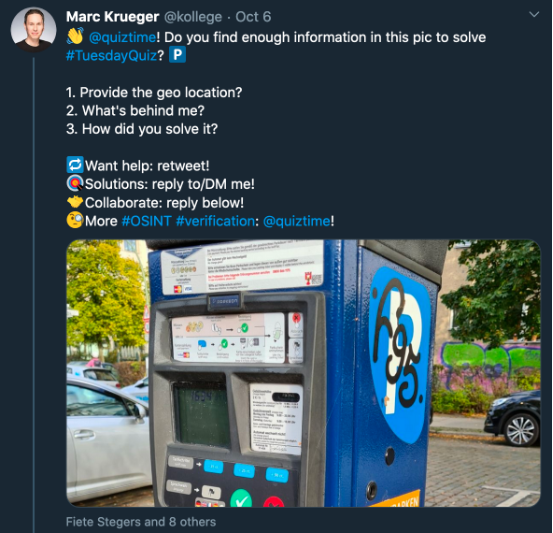
Let’s see how much information we can get from the photo. I made it my goal to find at least 20 pieces of information before researching them:
Parkeon parking meter, German language.
The second language on the parking meter is English. This place is likely to receive foreign visitors.
Parking cars on the street, but the cars are parked at right angles, not parallel.
The address of “Handyparken” is 100022.
There are several parking apps available here, including Pay By Phone, EasyPark and ParkNow.
Red and white logo on the parking meter.
Contact number: 0800 866 1175 at the parking meter.
Silver cars with blue lettering on the side (taxi?)
Cyclist (or bike lane?)
A 30 km/h speed limit and a pedestrian sign are most likely next to a residential street.
Paved streets
Graffiti is clearly visible on the building on the right.
The building on the left has 4-5 floors.
It has a flat roof.
It has rectangular windows, most of which have 3 panes. On the upper floor – 4 pieces.
Sidewalk with hedge and trees nearby.
10.04. Time: 16:34.
“F95” graffiti tag.
Mark edited out some of the parking meter details, so these are probably location clues. It might help if we can find some unedited pictures of the counters in the same area.
A tall green lamp post at the intersection.
It was challenging to extract 20 specific pieces of information, but setting that limit forces you to extract tiny details that you might otherwise miss.
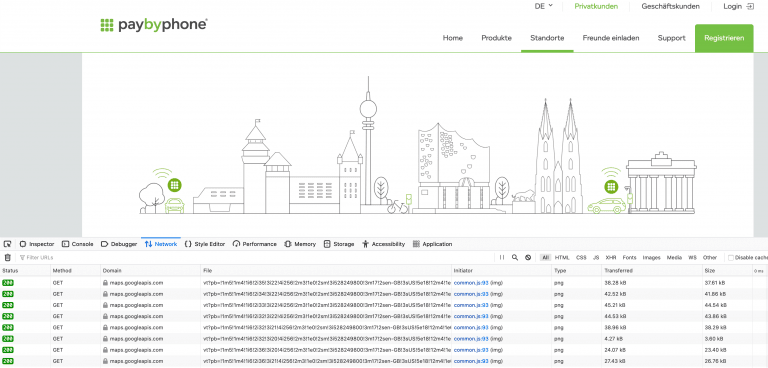
We now have 20 pieces of information to work with. Some of them will be useful and some won’t, but we can’t yet know which ones. Like many who have attempted this quiz, I thought I would be able to find the Handyparken reference number (item 2) on one of the program’s websites. Unfortunately, it was not easy. Even digging into the source code and network queries, it’s not easy to determine which geographic location “100022” corresponds to. I thought about installing the parking apps, but as I’m based in the UK, it was quite difficult to access German versions of the apps, even with a German VPN. This line of research didn’t lead to anything, so I had to try something else.
Some of the data we extracted is very visible. They may be useful for checking later, but probably won’t help you find a specific area. We can use information about the cobblestone streets (7) and the lamppost (19) to verify the location is correct, but examining the cobblestone streets and lampposts won’t even give us the correct town, let alone the correct street.
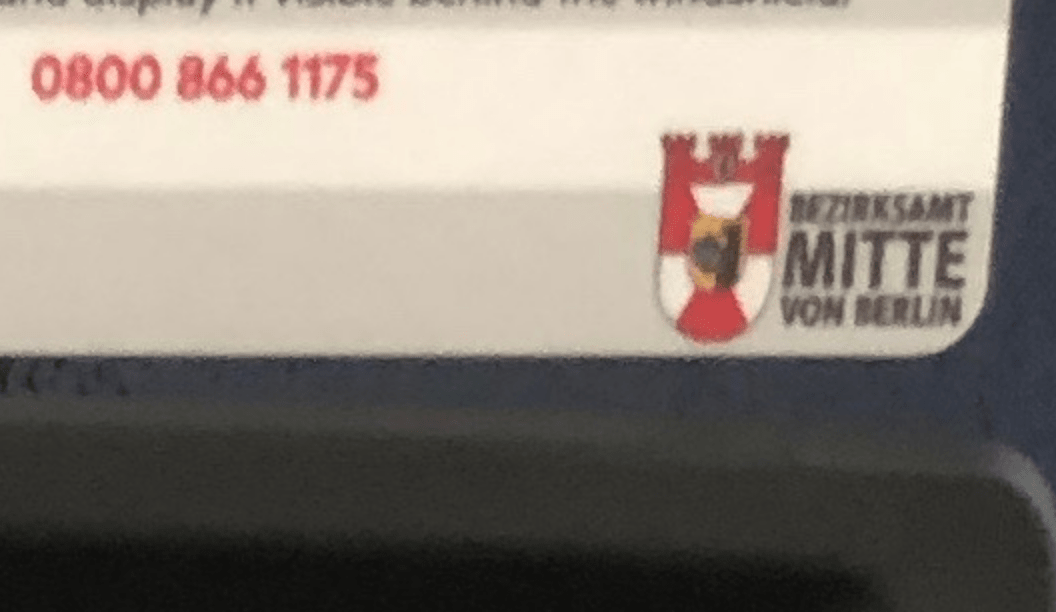
As a general rule, the more unique and specific a data point is, the more likely it is to be related to a specific location. The reference to Handyparken is very specific, but further research has been difficult. The next most specific detail to look out for is the customer service phone number on the parking meter: 0800 866 1175. I ran the number and there were no obvious matches. However, there was a Google Image match. I was a bit surprised by this because if you look at the original page that the image was posted on, the phone number is not actually mentioned. I can only assume that Google used some kind of OCR to read the phone number in the image in question, or that it is referenced elsewhere on the forum.
We can see that the new painting has a parking meter that is almost identical to the one in Mark’s painting. The coat of arms is the same on both meters, so now we know Mark must be in Berlin-Mitte.
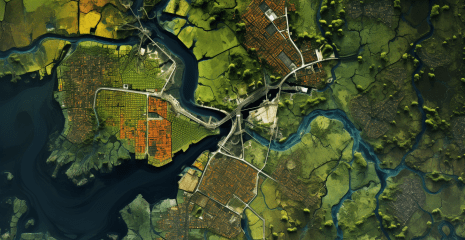
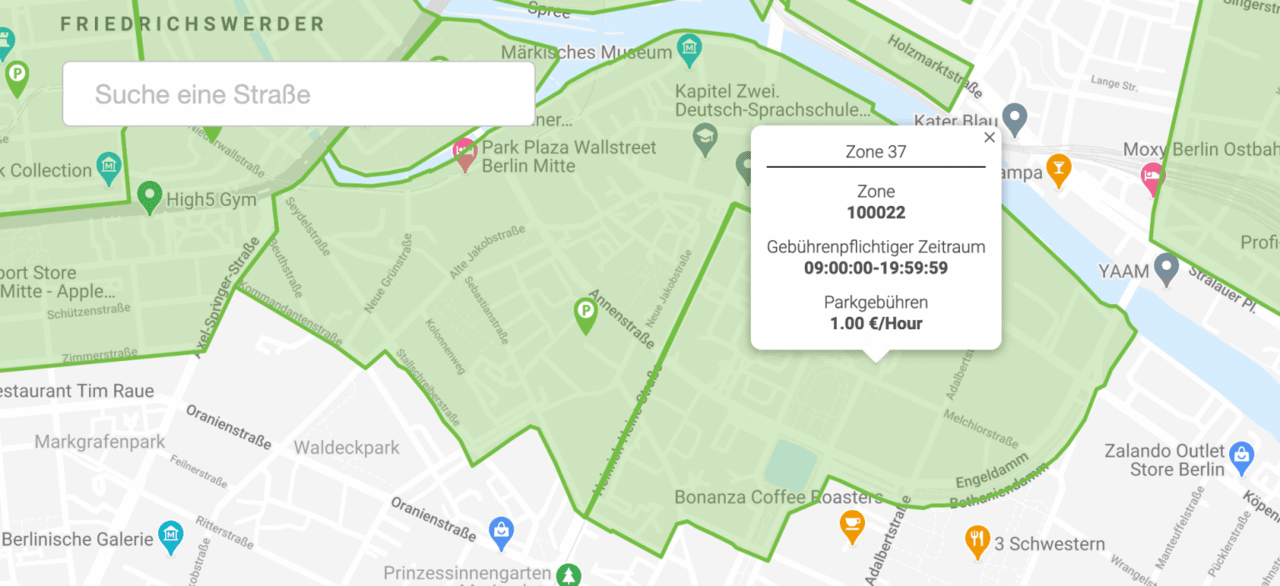
So what do we explore next? We have narrowed down the search to a certain region of Berlin, but now we need to try to find a specific street in that region. Since we now know we’re looking at Berlin, I decided to look at the phone card bill and specifically look at Berlin. On the map you can see that each district in Berlin has its own parking guide. They seem to follow the sequence 1000xx, so it only takes a few clicks to find that area 100022 refers to a small area between Spree and Heinrich-Heine Strasse. Mark must be in there somewhere.
Next, we can Google Maps to find that area and zoom in to try to find Mark’s location. But it will still take quite a lot of time and it will not be very methodical. There are other units of information that we have extracted and can use to be a little more precise.
One of the units of information was a building that we can try to identify (a 4-5 story building with a flat roof and rectangular windows). But since we’re looking for a parking meter, why not see where people park their cars? So we’ll start looking for places that have cars that are parked at right angles to each other. Most parking lots in this location have parallel parking spaces. Therefore, we understand that this place is not suitable for us.
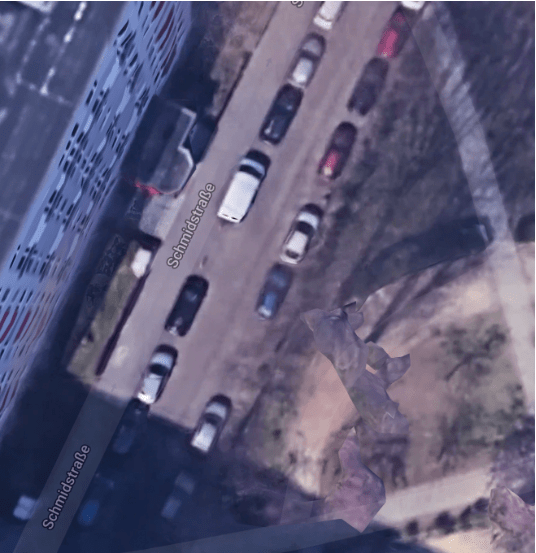
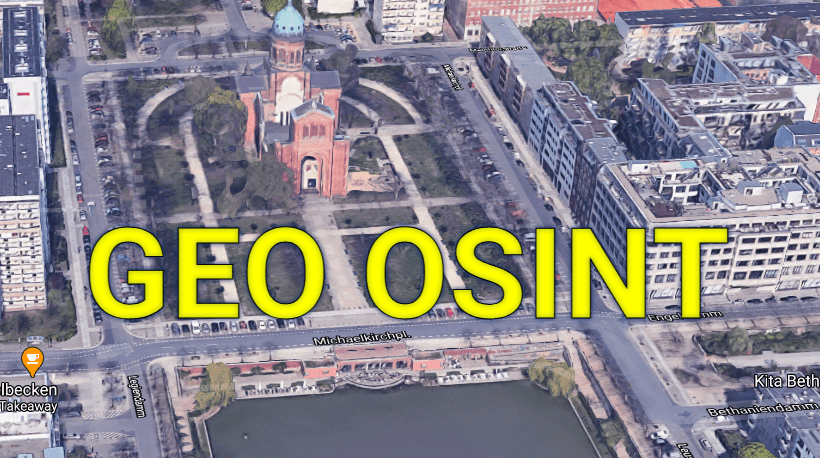
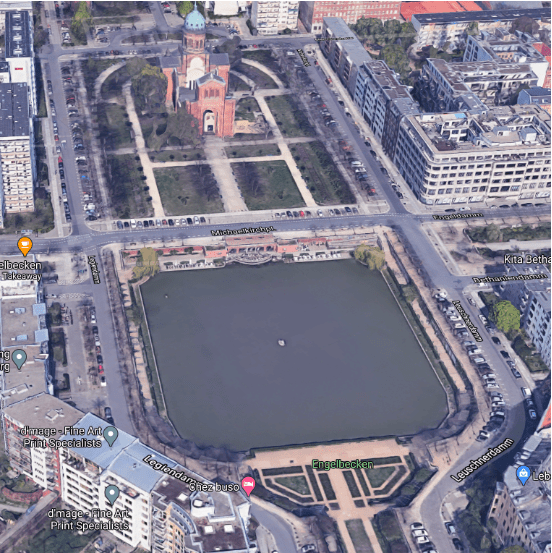
However, in the area around Michaelkirchplatz there are many cars parked at right angles to each other, just as the information unit states.
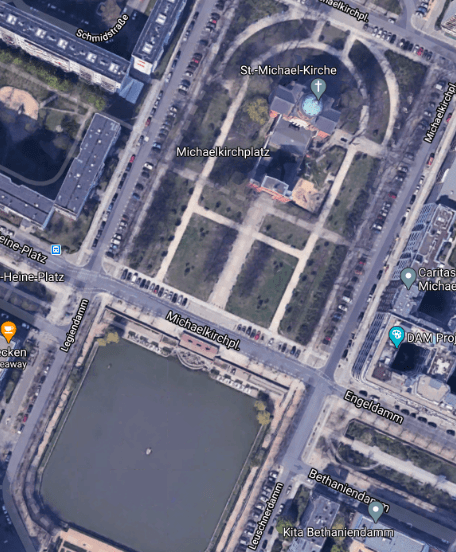
Since it looks promising, we can find a house that matches the unit of information. Enable 3D mode in Google Maps to try to get the best view.
The house on the corner of LeusChendamm and Engeldamm looks like it could match the unit of information. The building has 5 floors and a flat roof. It remains to make sure of this.
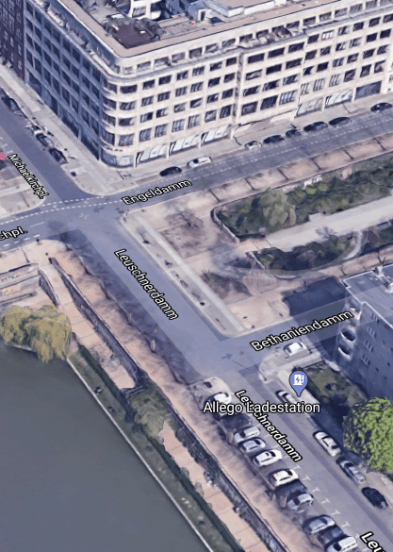
So far all the research we have done has led to this place and Mark was probably somewhere in LeusChendamm. But before we draw that conclusion, we need to check and make sure everything is correct.
If we are correct in the location, then we must compare the units of information that we first extracted and found to match the location of our study. Since this is an urban street layout, Google Street View is a good tool to start checking. The street coverage in Germany is not very good, but the big city centers have pretty good coverage, even though most of the images are now more than ten years old.
And I also remembered that many people in Germany decided to wash their houses on the street. So we will have to use Mapillary. Mapillary isn’t as perfect as Google, but it fills the gaps for places like Germany where the street view is very limited.
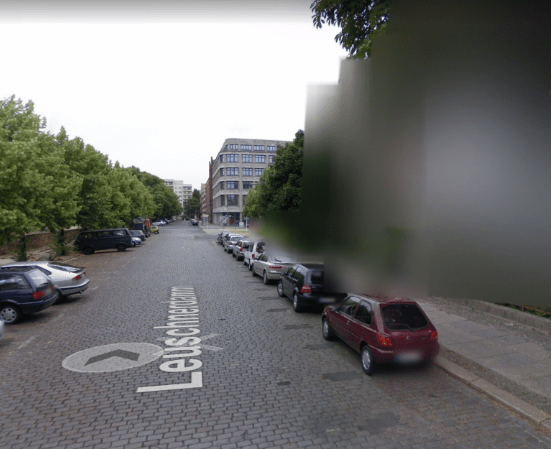
The street image from the Mapillary service looks pretty good! It seems obvious that this is the correct location, and even though Mapillary doesn’t offer a 360 panorama, we can already verify that this is the location we need. The street is paved, there is an appropriate speed limit sign of 30 km/h and a pedestrian sign and a tall green lamp post at the intersection. There is also a sidewalk with a hedge and trees nearby. More importantly, we see a 5-story building with a flat roof and the same distinctive graffiti that can be seen on the building across from where Mark was standing.
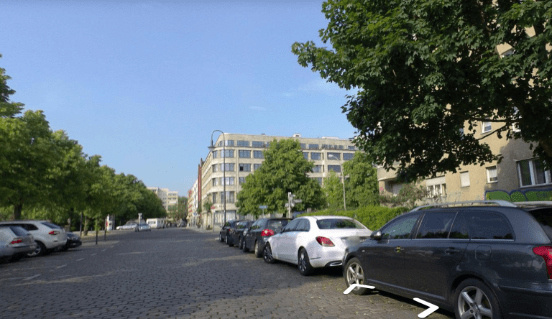
So the answer to the original question above from Mark on twitter, the parking meter was in front of Engelbecken Park and Gardens.
The investigation was successfully completed!