08.05.2023
11 min
1767

In the first article, we talked about how an External Violator can act during a pentest, what methods he can use to collect and use information for further penetration. As mentioned earlier, penetration testing typically uses several methods. The previous article discussed the actions of an External Violator, that is, a user who does not have any access rights to the organization’s resources (at least legal ones) and is outside the controlled territory. But during the pentest, models of violators who have access to the territory of the organization and to corporate resources are also always considered. These are the Guest and Internal intruder models. The Guest model assumes that the pentester is given access to the organization’s office and the ability to connect to the corporate network, that is, an Ethernet socket. In the case of an Internal Violator, the pentester is given not only a network socket, but also a domain user account with a typical set of access rights.

Let’s start with the consideration of the model of the Guest violator, since here the pentester, by definition, has fewer opportunities, as compared to the Internal violator. We will immediately stipulate that “under the terms of the training” the provided network port should not be disabled, although the “malicious” pentester will then definitely write in his report recommendations on forcibly disabling ports that are not in use on the switch. However, an Inside Intruder can also use these traffic manipulation techniques and may be even more successful because more network segments are likely to be available to it. He is still a legal user.
First of all, the pentester needs to study the network of the organization being studied. For this, you can use such tools from Kali Linux as Nmap and Masscan. This is what the Nmap network scan report looks like:
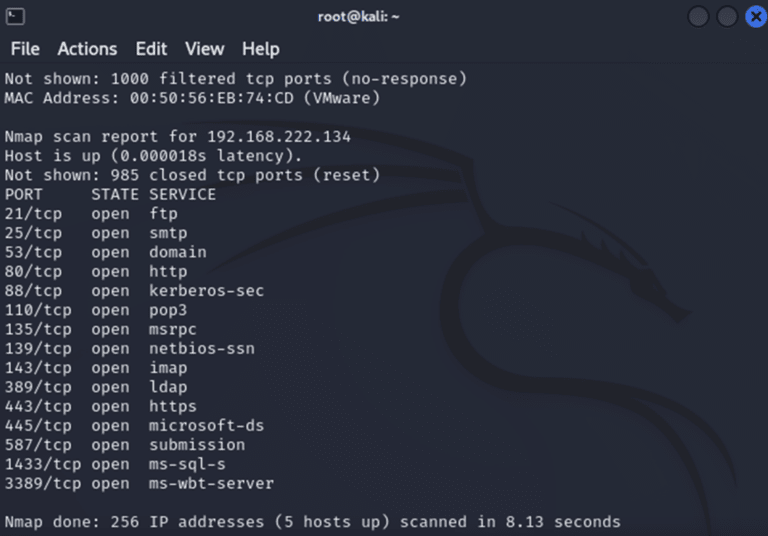
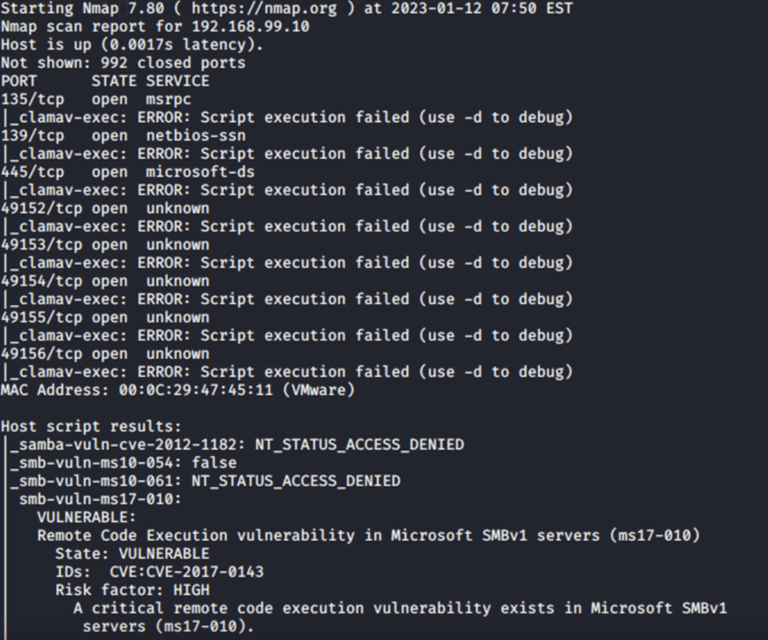
Then you can try to knock on the open ports and find out what is behind them. However, the same Nmap can be used as a vulnerability scanner. Of course, he is far from the cumbersome Nessus/MaxPatrol, but he is quite capable of detecting such “wonderful” vulnerabilities as EternalBlue. To do this, you can use one of the scripts for Nmap. Let’s scan the subnet:
![]()
After several unsuccessful attempts to tap open ports, the scanner detected MS17-010 – “good old” EternalBlue.
Many examples of exploitation of this vulnerability can be found on the web, for example with Metasploit, so we will not consider this vector further and move on to the topic of traffic analysis.
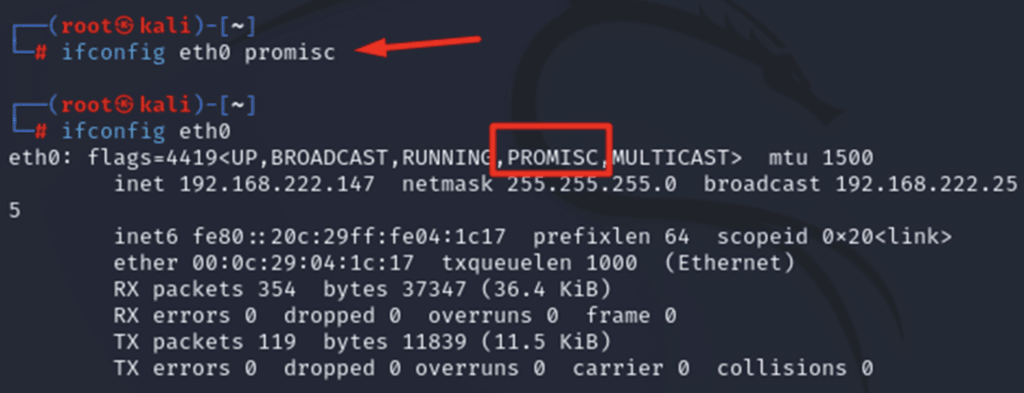
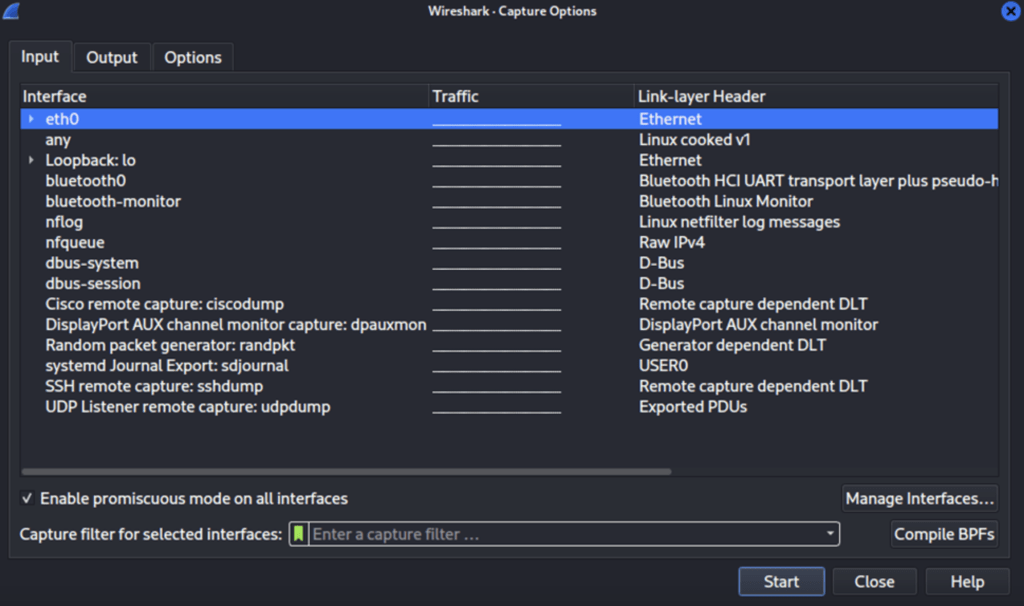
So, how our toolkit will always perform Kali Linux. To begin with, you can try to listen to what kind of traffic is going through the network. For this, we will use the classic Wireshark tool. Of course, first we need to put the network interface in mixed mode using simple commands:
I will not go into detail about working with Wireshark, since there are enough articles on this topic, including on Habra. Let’s briefly see what the interface of this sniffer is. When loading the program, we are prompted to choose which system interface to listen to.
Then press Start. In the input line, you can specify the traffic for which protocol to display. The main field displays intercepted packets in real time. At the bottom, for the selected package, its contents are displayed at all levels of the hierarchical model, starting with the channel one.
We are interested in HTTP traffic, so the corresponding package is selected below and we can see its contents.
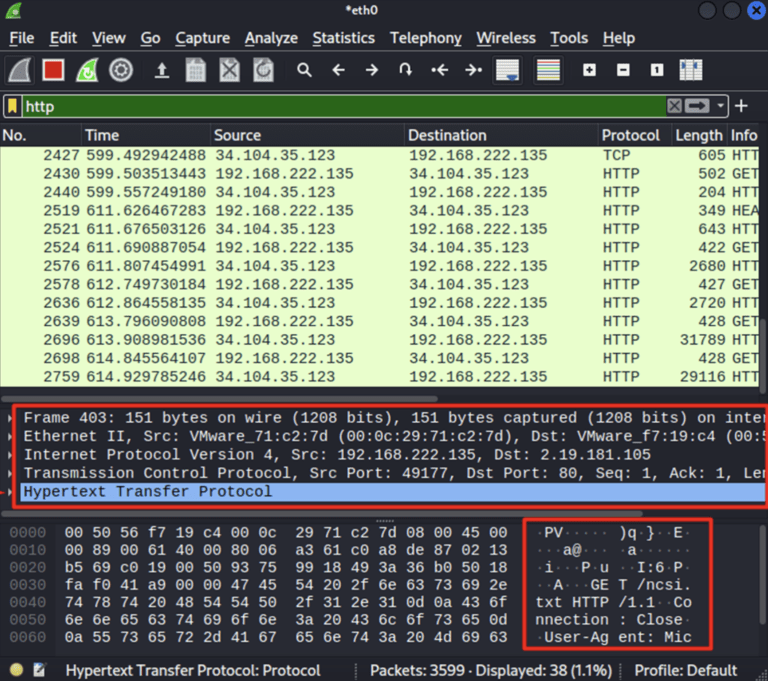
But let’s go back to the pentest. In the old days, when unencrypted traffic traveled through the Internet, a lot of interesting things could be learned with the help of a sniffer. But now on the global network it is increasingly difficult to find a site that does not use SSL encryption. Of course, such resources still exist, but, most likely, they are either resources of defunct organizations whose DNS name lease has not yet expired, or flat business card sites where there is nothing to encrypt. Local web resources within the organization’s network are another matter
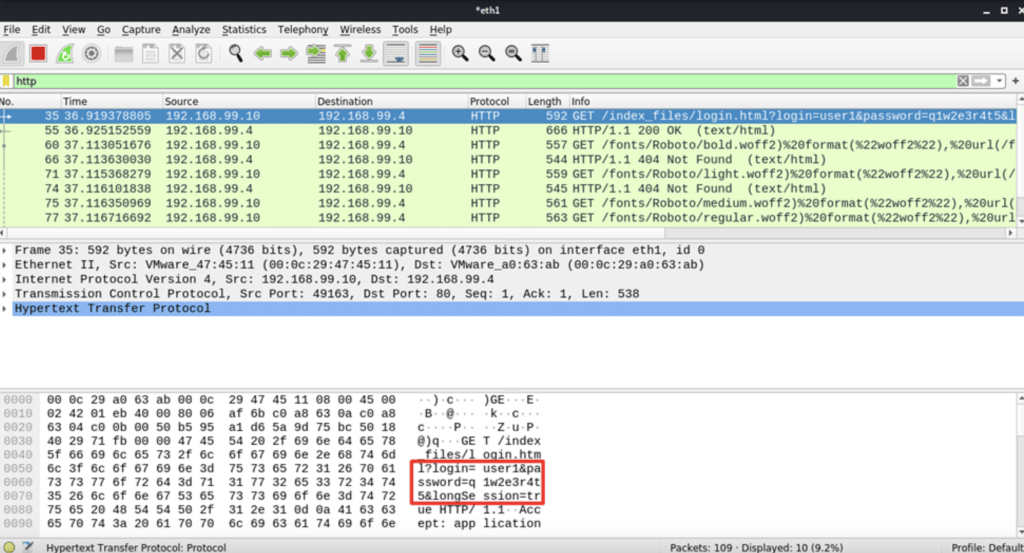
A poorly written website will not last long on the Internet. It will definitely be broken, not for the sake of money, but for the sake of interest, gaining practice, hooliganism, etc. Actually, we considered some methods of searching for vulnerabilities in the web in the previous article. But within the network of organizations, crooked resources can live for years and even decades. For example, a student long ago wrote a timekeeping system in PHP. The system works properly, users enter the web interface, write off their labor costs, and managers build the download reports they need. Why change something if everything works like that? That’s fine, but firstly, this web portal uses HTTP and user credentials go over the network in the open, and secondly, the code itself and the libraries used contain many vulnerabilities that can easily be found with the same Nikto scanner discussed in the previous article.
If the credentials are sent over HTTP in the clear, we can intercept them using Wireshark.
It may look something like this:
It may seem a bit strange from the outside, but in many organizations for internal needs, a large amount of various useless, very necessary self-written software, which no one particularly supports and which contains many vulnerabilities, can be used. At the same time, no one needs to improve these applications, because “that’s how it works” and, besides, it’s additional labor costs for administrators and programmers, and the organization doesn’t really want to spend money on it.
Let’s assume that all sysadmins and security guards (if there are any) are aware and use traffic encryption, or simply that nothing really useful could be found in HTTP traffic. Then you can try to resort to the help of various utilities to implement a “man in the middle” (Man In The Middle, MiTM) attack. This attack assumes that the attacker stands in the middle between the participants of the information exchange and intercepts and modifies the passing traffic.
Different techniques can be used when implementing this type of attack. And the choice of equipment can be determined not only by the presence/absence of protection means, but also by the recklessness of the pentester, the terms of the contract between the customer and the organization conducting the testing. So, our main goal is to force the traffic between the recipient and the receiver to go through a node that we control.
To do this, you must first prepare this very node, namely, configure traffic redirection and routing. You can use the following command to forward packets:

It is also necessary to review the netfilter rules so that they do not interfere with the passage of traffic. It will not be very good if after the start of the attack, users simply lose connection.
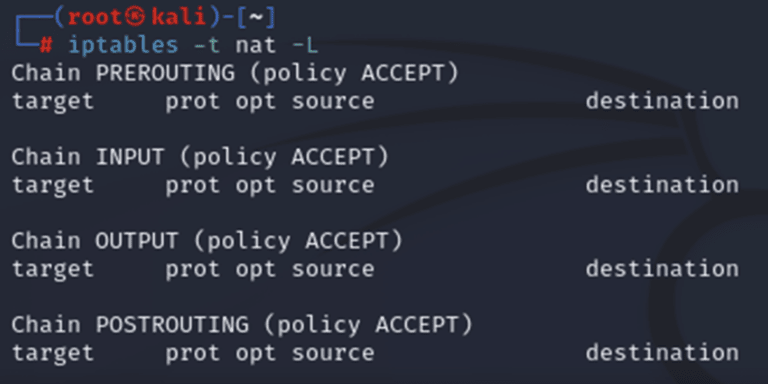
Well, let’s check the routing settings using the following command:

We need packets that arrived on one interface to be able to be sent on from another interface unchanged. We will interfere with their content a little later. Now that we’ve tested the ability of traffic to flow through our node in a test environment, let’s talk about ways to redirect real user traffic through that node during a pentest.
In the simplest case, we can simply connect to a network cable, that is, stand in the gap between the user’s network and, for example, a floor switch. It looks somewhat strange, but with physical access to network equipment, this is quite possible, not only in theory.
For the practical implementation of such connections, you can use microcomputers such as Raspberry Pi. At the same time, a USB-Ethernet adapter is used as the second network interface. Of course, on a large volume of traffic, the device will begin to choke, but if the connecting segment contains less than a dozen nodes, then the microcomputer should cope.
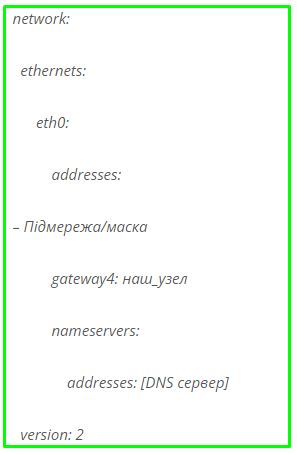
Dynamic Host Configuration Protocol, DHCP is an application protocol that enables network devices to automatically obtain an IP address and other parameters necessary to operate on a TCP/IP network. These “other options” include the default gateway. If we can push our DHCP settings to the users, in which our node is specified as the Default Gateway, then the traffic will go through it, which is what we need. Next, we need to raise the DHCP service. Of course, if there is an opportunity, you can simply use the same Raspberry or a small router with OpenWRT firmware, which will distribute addresses with the settings we need.
But if Kali Linux is used as a fake DHCP server, then it is necessary to install isc-dhcp-server by executing:

Next, you need to make changes to the DHCP configuration file, which should be located in /etc/netplan/.
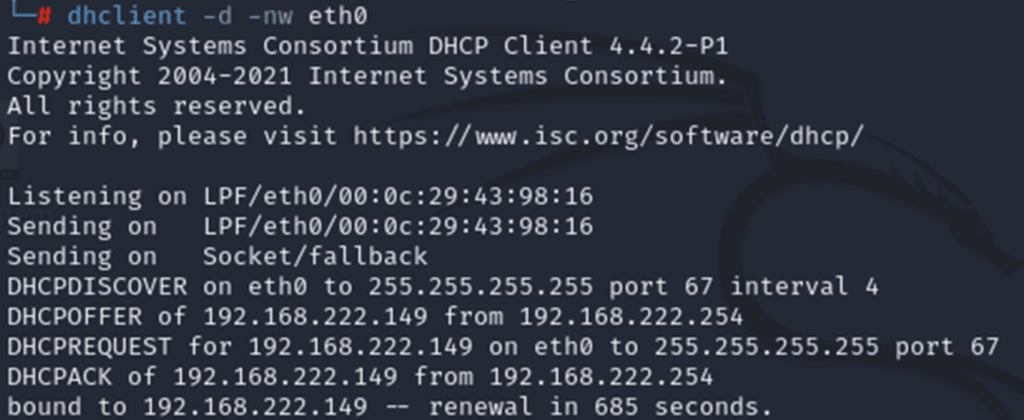
Anyway, we’ve created our fake DHCP server, but if we just activate it in a custom segment, it’s unlikely that our addresses and settings will get many users, since the legitimate servers are still up and running. Therefore, before starting your DHCP server, you need to disable legal DHCP. The easiest way to do this is by using an attack on exhaustion of IP addresses (DHCP Starvation). To do this, you must first find out which legal DHCP servers are currently present in the network. There are several ways to find out the IP addresses of these servers, but perhaps the most reliable is the use of the dhclient utility.
As you can see in the screenshot, we run the utility for the eth0 interface. First, there is a gj request throughout the network who can provide an IP address (DHCPDICOVER). There is only one DHCP server on my stand, so only the .254 node responded to the DHCPOFFER step. But if there were several servers (and in large networks there are usually at least two), then here we would get a complete list of potential targets. At the DHCPREQUEST step, the client requests a specific address .149. DHCPACK – the server issued the address .149. So our goal is 192.169.222.254.
Next, we will need the Yersinia utility. If your Kali distribution does not have it installed, do the following:
![]()
To start in the graphical interface, use the command:
![]()
In the window that opens, select DHCP -> Launch attack. Next, check sending DHCPDICOVER and press OK.
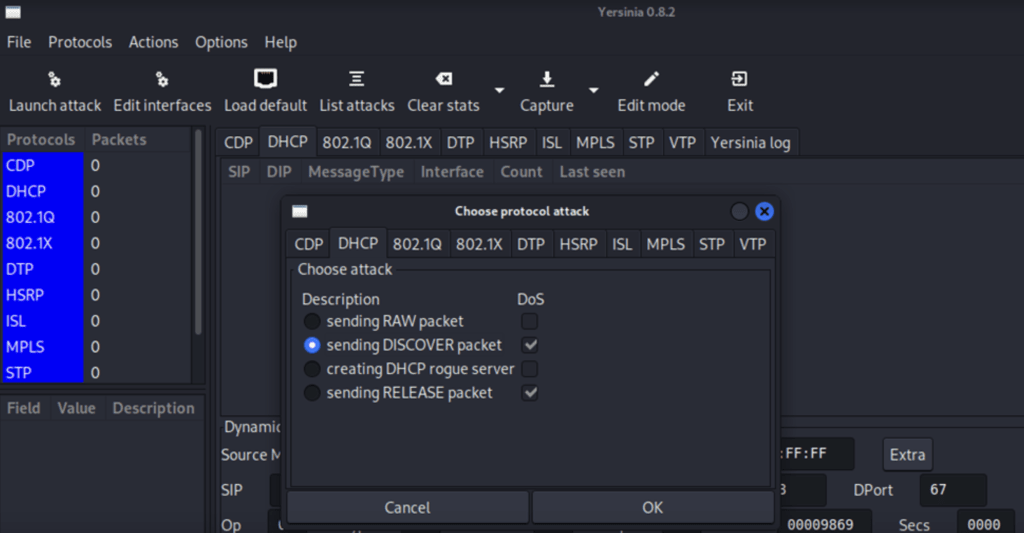
The attack began. The utility will send DHCPDISCOVER packets from different MAC addresses, and the server will dutifully issue IP addresses to each new “client” until they run out. After a few minutes, press List Attacks -> Stop. Now you can activate our fake DHCP server and issue your addresses.
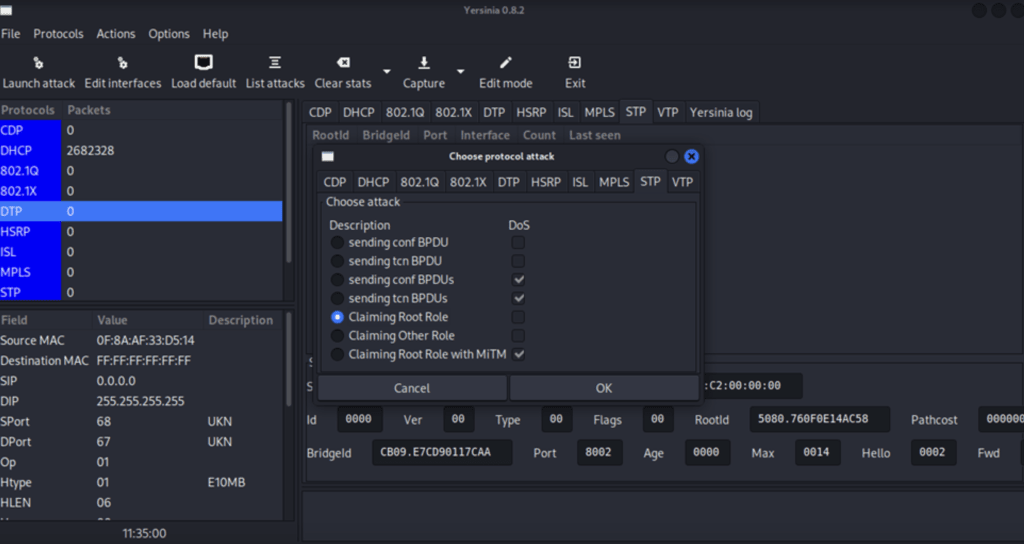
You can not close the Yersinia utility, we will still need it. To understand the implementation of the manipulations described below, familiarity with the basics of the Spanning Tree Protocol (STP) is necessary. The main task of STP is to eliminate loops in the topology of an arbitrary Ethernet network in which there are one or more switches connected by redundant connections. STP solves this task by automatically blocking connections that are currently redundant for the full connectivity of the switches. As illustrations of the work of STP, I will use pictures from the manuals of a vendor who has already left Russia.
For STP operation, it is necessary to select the root switch (root). The selection is based on the priorities of each of the switches, and if the priorities are the same, the MAC addresses are compared. The smallest wins. All other switches (except root) select a single port directed to root. All other “redundant” (or spare) ports are blocked. After enabling the switches in the network, by default, each switch considers itself to be root. Then each switch starts sending configuration Hello BPDU (Bridge Protocol Data Unit) frames once every 2 seconds on all ports.
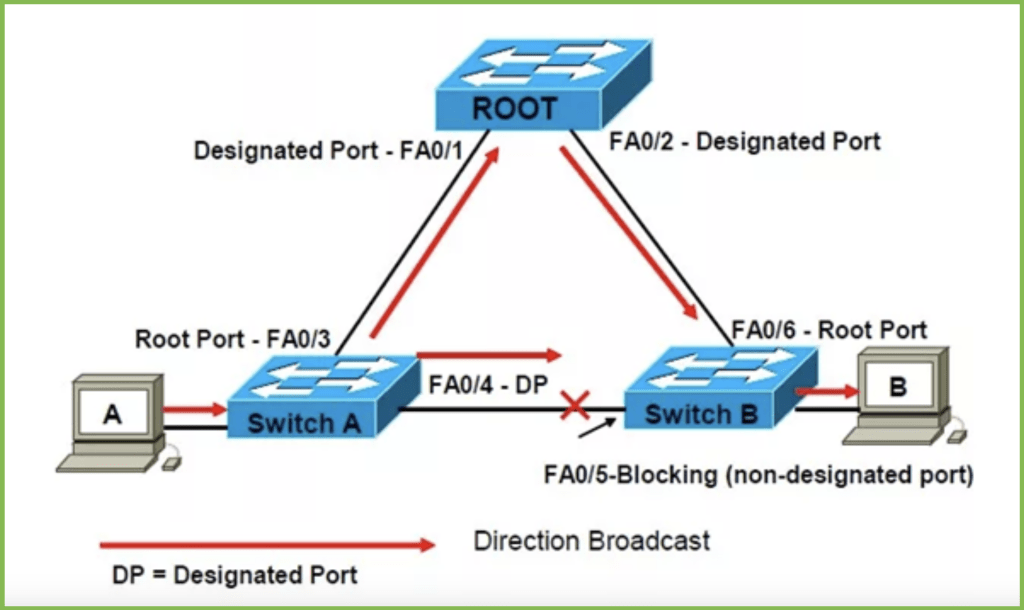
This is where our attacker comes into play. We can: First, use Wireshark to find out the MAC address of the current root switch. Then, with the help of special utilities, send a BPDU frame with a value smaller than the real root and thus become the root. As a result, all traffic will go through our node.
As an example of an attack, we will again use the Yersinia utility. In the program interface, select STP -> Launch attack. Then Claiming Root Role. Press OK.
And we will finish our “hit parade” of MiTM attacks with another classic attack – ARP Spoofing, also known as ARP poisoning. ARP (Address Resolution Protocol) is a protocol in computer networks designed to determine the MAC address from the IP address of another computer. The essence of the attack is as follows: the attacker sends false ARP packets to convince the victim computer that the eavesdropping computer is the final destination. Next, packets from the victim’s computer are intercepted and forwarded to the real recipient, the sender’s MAC address is changed in them so that the corresponding packets also go through the eavesdropping computer. The eavesdropping computer becomes a “gateway” for the victim’s traffic, and attackers gain the ability to eavesdrop on the traffic in a man-in-the-middle attack.

The arpspoof utility will help us implement this attack. If the pentester node is C, node A is the victim machine, and B is the gateway or target server with which we are interested in exchanging information, then the command call will look like this:
![]()

In addition to the considered methods of implementing MiTM, there are also many other methods, for example, introducing false routes into dynamic routing protocols, poisoning DNS, modifying the hosts file, etc. For wireless networks, it is also possible to use a spoofed access point and then redirect all traffic to the attacker’s node.
Now that we know how to redirect traffic through our node, let’s talk a little bit about how it can be used. Let’s start with the already mentioned HTTPS. To implement the attack, we will need the Sslsplit utility included in Kali Linux.
Next, we need to generate a self-signed certificate. First, let’s update the necessary libraries:
![]()
And we will generate our certificate:

SSLsplit will now be able to sign generated certificates of requested domains.
Next, we will use Sslsplit to start listening to SSL traffic:
![]()
There are previously generated certificates, a connection log file and a directory in which the logs of all connections will be stored. Next, after “ssl” we indicate that SSL traffic is being intercepted, and the certificate will be replaced. Next, the interface and port on which traffic is listened to, the interface and port to which the connection will be made are specified. Here, setting up the attacker’s node is generally optional, you can, of course, simply receive copies of the traffic, but during installation in the gap, we are guaranteed to see all passing traffic.
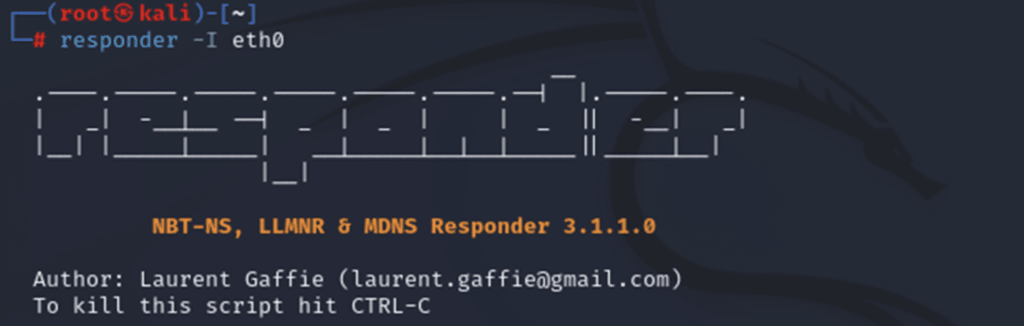
We will use the Responder utility, which is also part of Kali Linux.
The utility will then display its options and their statuses. We will be interested in LLMNR, NBT-NS and MDNS. They must be enabled.

The results of the utility are displayed on the screen, as well as the intercepted hashes, for example:
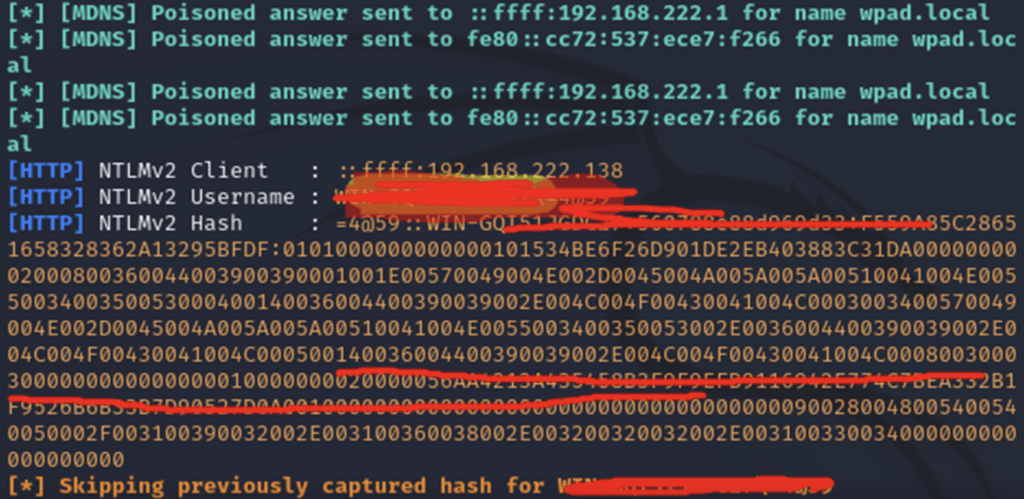
We have already considered hashes in the previous article, so we will not dwell on this topic now. But here it is important to understand that if our pentester works according to the Guest model and he managed to intercept and decrypt the credentials of the domain user, then he turns into an Internal Violator.
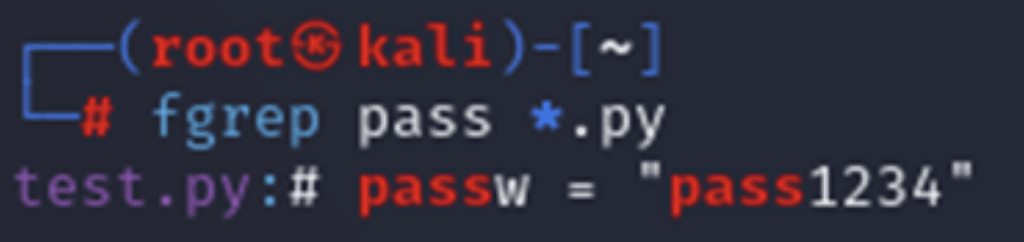
Everything described in the article before this was to one degree or another devoted to scanning network resources or viewing and intercepting traffic. However, this is not the only direction of development of attacks that can be used by the Insider. If you have rights in the domain, you can try to access the found network folders, which usually have a lot of interesting things. For example, archived credentials may appear in the source code of scripts and applications. So, in the following example, we use the fgrep utility to search for occurrences of pass characters in Python scripts.
And found a commented assignment to the passw variable of some value. Apparently the line was in a comment and the password was most likely not hard-coded, but it would still be good for a pentester to take a close look at the code in the test.py file, both for possible useful credentials and to learn the general logic. Similarly, you can use fgrep to search for interesting words in various documents, source codes, and event logs.