
08.01.2026
10 min
657

Bash truly becomes convenient when you start working with data in a thoughtful way. This article brings together two essential topics that are hard to move forward without: how to pass values to scripts and how to store multiple pieces of data at the same time.
The text is aimed at those who already know the basics of Bash and want a better understanding of how scripts receive information and what they do with it. There are no complex explanations or overloaded terminology here. Just clear logic, practical examples, and a real sense of how things work in practice.
This material will be useful for anyone using Bash for automation, system administration, or small custom tools. It helps you write scripts that are easy to read, modify, and extend without turning into a mess.

In the second part of the beginner series, we look at how to pass arguments to Bash scripts. We also get familiar with special Bash variables and see how they work in real-world scenarios.

Up to this point, you have already learned how to use variables to make Bash scripts flexible and reusable. This allows them to work with different kinds of data and respond differently to user input. In this lesson, you will learn how to pass variables to a Bash script directly from the command line.
The following script, count_lines.sh, outputs the total number of lines in the file specified by the user.
#!/bin/bash echo -n "Please enter a filename: " read filename nlines=$(wc -l < $filename) echo "There are $nlines lines in $filename"
For example, the user can specify the /etc/passwd file, and the script will output the number of lines in that file.

This script works fine, but there is a much better approach.
Instead of prompting the user for a filename, things can be made simpler. The user can just pass the file name as an argument when running the script, like this:
./count_lines.sh /etc/passwd
The first Bash argument, also known as a positional parameter, is available inside the script through the $1 variable.
So in the count_lines.sh script, the variable holding the file name can be replaced with $1 like this:
#!/bin/bash

nlines=$(wc -l < $1)
echo "There are $nlines lines in $1"
Notice that the read command and the first echo have been removed, as they are no longer needed:
You can now run the script and pass any file as an argument.
./count_lines.sh    /etc/group
There are 73 lines in /etc/group
You can pass more than one argument to a Bash script. In general, the syntax for passing multiple arguments to any Bash script looks like this:
script.sh arg1 arg2 arg3 …
The second argument is available through the $2 variable, the third argument through $3, and so on. The $0 variable contains the name of the Bash script, in case you were wondering.
Now the count_lines.sh Bash script can be modified to count the number of lines in multiple files at once.
#!/bin/bash

n1=$(wc -l < $1)
n2=$(wc -l < $2)
n3=$(wc -l < $3)

echo "There are $n1 lines in $1"
echo "There are $n2 lines in $2"
echo "There are $n3 lines in $3"

As you can see, the script outputs the number of lines for each of the three files. And of course, the order of the arguments matters.
There are a huge number of commands in Linux. Some of them can be quite complex, with long syntax or a large number of options. Fortunately, Bash arguments make it possible to turn a complicated command into a simple and convenient task.
As an example, take a look at the following Bash script, find.sh:
#!/bin/bash

find / -iname $1 2> /dev/null
This is a very simple script that can still be genuinely useful. Just pass any file name as an argument, and it will show you exactly where that file is located.

You can see how much easier this is than typing the full find command. It clearly shows how arguments can turn a long and complicated Linux command into a simple Bash script.
If you are wondering about 2> /dev/null, it means that error messages, for example when a file cannot be accessed, will not be displayed on the screen. To understand this better, it is worth reading about stderr redirection in Linux and about /dev/null.
Bash has many built-in special variables that are very handy and available for immediate use.
The table below lists the most common built-in Bash special variables:

To see these special variables in action, take a look at the following Bash script, variables.sh:
#!/bin/bash

echo "Name of the script: $0"
echo "Total number of arguments: $#"
echo "Values of all the arguments: $@"
You can now pass any arguments you like and run the script:

If you want some hands-on practice, download the PDF and practice passing arguments to Bash scripts with simple exercises. Solutions are included as well.
Too many variables and starting to feel messy? Use an array in your Bash script.

So far, in your Bash scripts, you have been using a limited number of variables. Usually, these were just a few variables to store one or two file names or user names.
But what if you need a lot more variables? For example, what if you want to write a Bash script that reads a hundred different values from a user? Are you really going to create 100 separate variables?
Luckily, you do not have to. Arrays offer a much more convenient solution.
Let’s imagine you want to create a Bash script called timestamp.sh that updates the timestamp of five different files.
To start with, let’s look at the naive approach and use five separate variables:
#!/bin/bash

file1="f1.txt"
file2="f2.txt"
file3="f3.txt"
file4="f4.txt"
file5="f5.txt"

touch $file1
touch $file2
touch $file3
touch $file4
touch $file5
Now, instead of using five variables to store the names of five files, you can create a single array that holds all of them. Here is the general syntax of an array in Bash:
array_name=(value1 value2 value3 … )
You can then create an array called files that stores all five file names used in the timestamp.sh script, like this:
files=("f1.txt" "f2.txt" "f3.txt" "f4.txt" "f5.txt")
As you can see, this is much cleaner and more efficient, since five variables are replaced by just one array.
The first element of an array has index 0, so to access the n-th element, you use the index n minus 1. For example, to print the value of the second element in the files array, you can use the following echo command:
echo ${files[1]}
And to print the value of the third element in the files array, you can use:
echo ${files[2]}
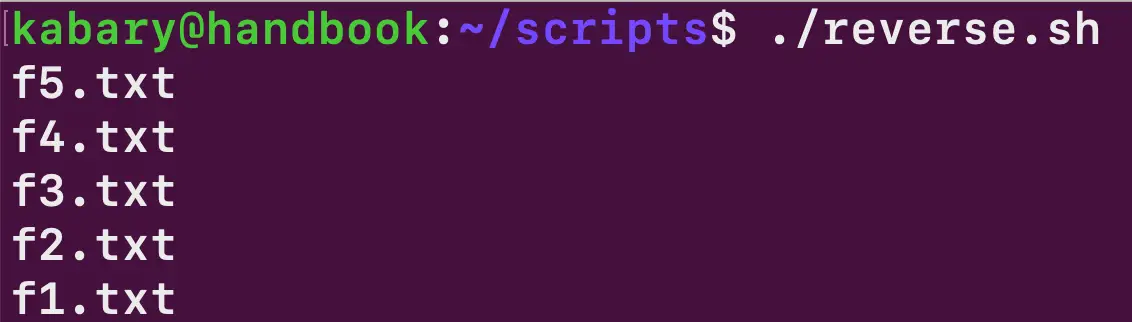
And so on. The following Bash script, reverse.sh, prints all five values from the files array in reverse order, starting with the last element of the array:
#!/bin/bash

files=("f1.txt" "f2.txt" "f3.txt" "f4.txt" "f5.txt")

echo ${files[4]}
echo ${files[3]}
echo ${files[2]}
echo ${files[1]}
echo ${files[0]}
You might be wondering why there are so many echo commands here and why a loop is not used. The reason is that Bash loops are introduced later in this series.
You can also print all array elements at once:
echo ${files[*]}

f1.txt f2.txt f3.txt f4.txt f5.txt
You can also print the total number of elements in the files array, that is, the size of the array:
echo ${#files[@]}

5
You can also change the value of any array element. For example, the value of the first element of the files array can be changed to a.txt using the following assignment:
files[0]="a.txt"
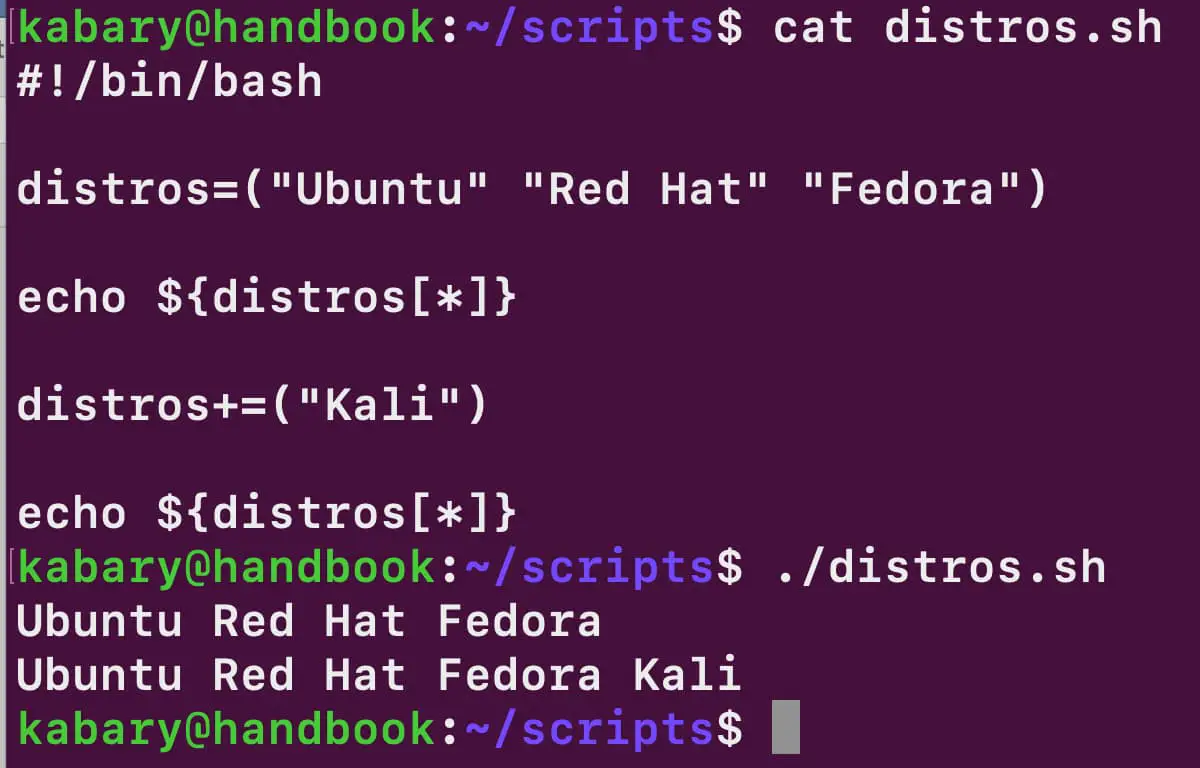
Let’s create an array that stores the names of popular Linux distributions:
distros=("Ubuntu" "Red Hat" "Fedora")
At the moment, the distros array contains three elements. To add a new element to the end of the array, you can use the += operator.
For example, this is how you can add Kali to the distros array:
distros+=("Kali")
The distros array now contains four elements, with Kali being the last element in the array.
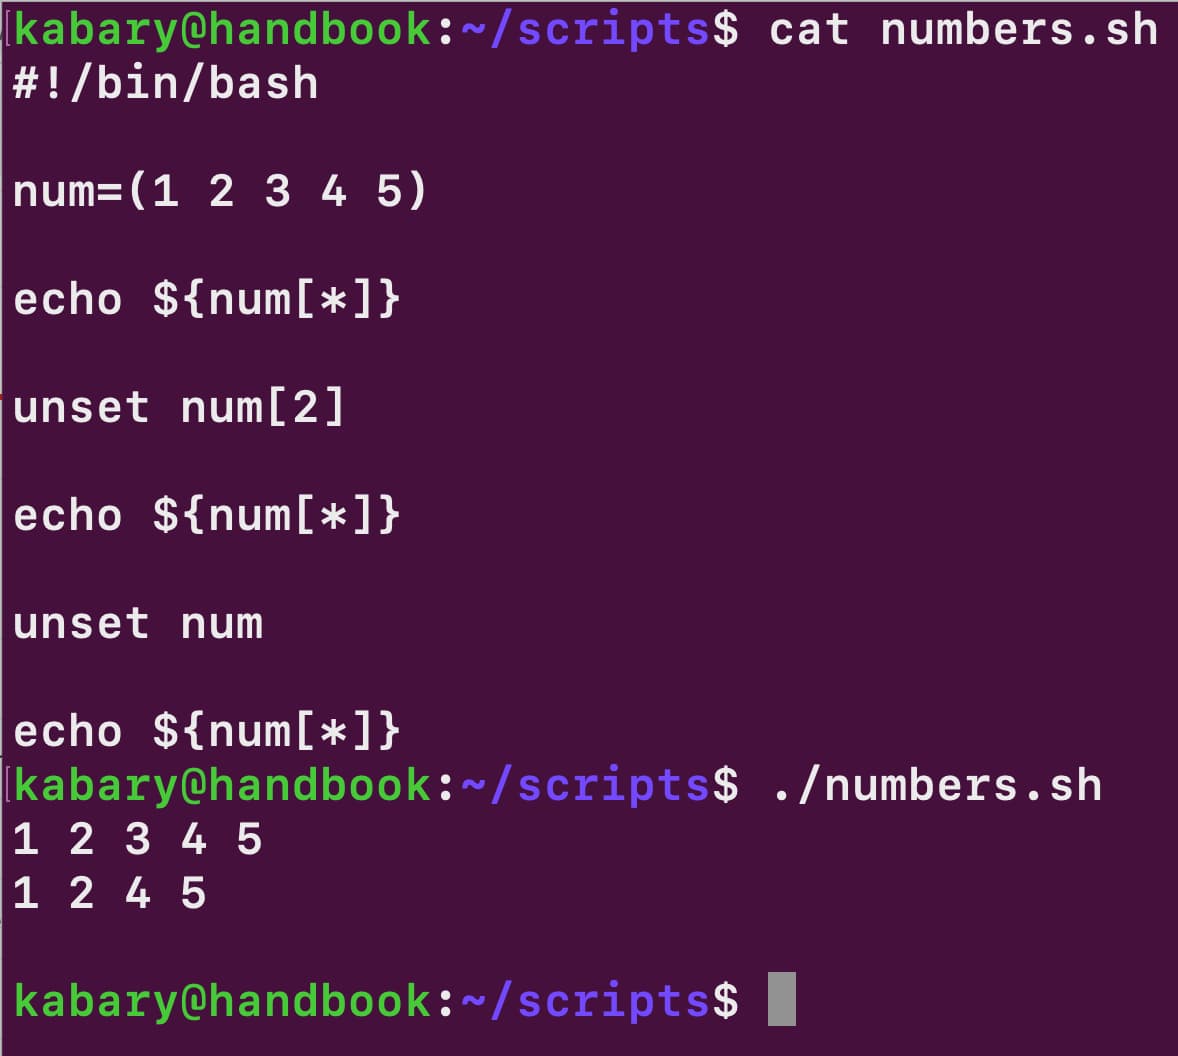
num=(1 2 3 4 5)
You can print all the values in the num array:
echo ${num[*]}

1 2 3 4 5
The third element of the num array can be removed using the built-in shell command unset:
unset num[2]
Now, if you print all the values of the num array again, you can see the result:
echo ${num[*]}
1 2 4 5
As you can see, the third element of the num array has been deleted.
In the same way, you can also delete the entire num array:
unset num
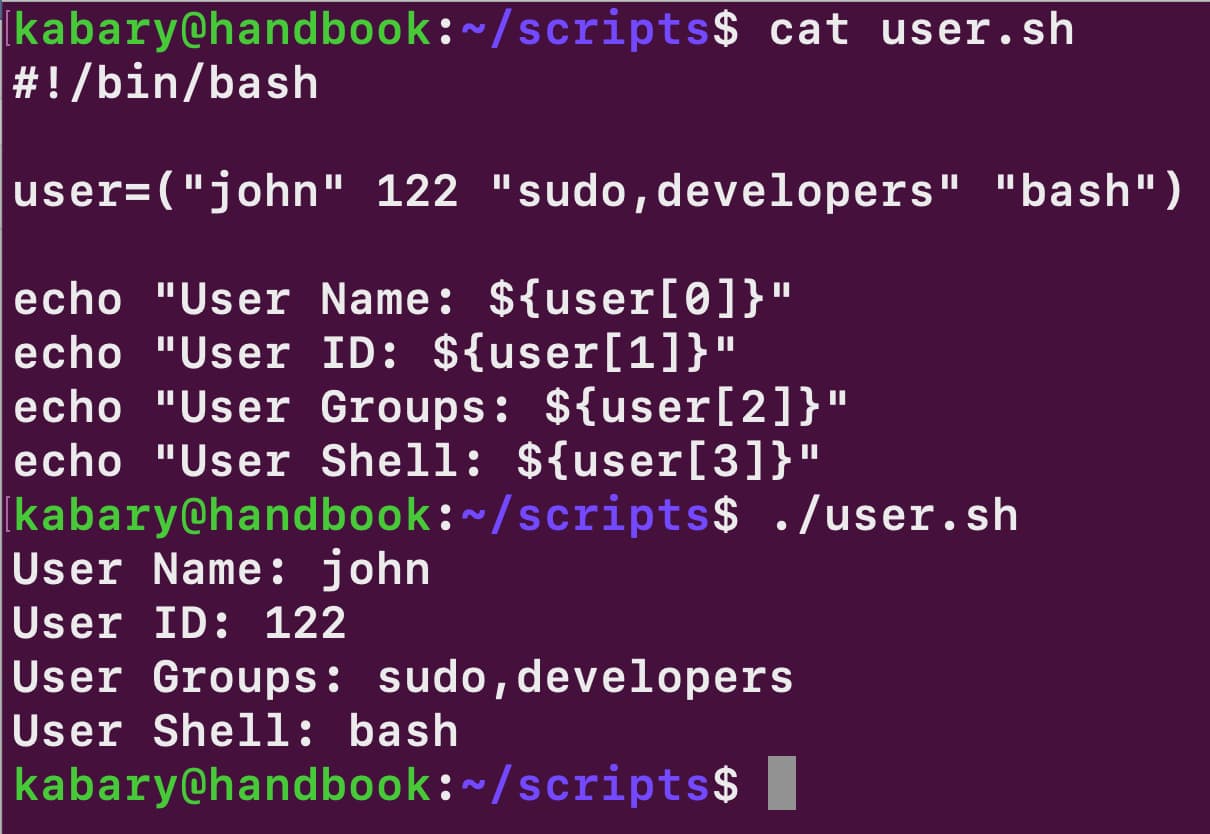
In Bash, unlike many other programming languages, you can create arrays that hold different data types at the same time. Take a look at the following Bash script, user.sh:
#!/bin/bash

user=("john" 122 "sudo,developers" "bash")

echo "User Name: ${user[0]}"
echo "User ID: ${user[1]}"
echo "User Groups: ${user[2]}"
echo "User Shell: ${user[3]}"
If you want something more advanced and closer to real-world use cases, take a look at an example of splitting strings in Bash using arrays.
And of course, you can reinforce what you have learned by practicing with exercises and checking the solutions whenever something does not work or you need a hint.